
CDM10:4 mk5 - Blender Citronic - Free user manual and instructions
Find the device manual for free CDM10:4 mk5 Citronic in PDF.


| Product Type | Blender |
| Brand | Citronic |
| Model | CDM10:4 mk5 |
| Dimensions (H x W x D) | 450 x 200 x 200 mm |
| Weight | 5.5 kg |
| Power Consumption | 1500 W |
| Voltage | 220-240 V, 50/60 Hz |
| Jug Capacity | 2.0 liters |
| Number of Speeds | Variable with pulse function |
| Material (Jug) | Stainless steel |
| Blade Material | Stainless steel, 4-blade design |
| Safety Features | Overload protection, non-slip feet, safety lock lid |
| Cleaning | Removable jug and lid are dishwasher safe; wipe base with damp cloth |
| Maintenance | Regularly check blade assembly for wear; replace if blunt |
| Spare Parts Available | Replacement jug, blade assembly, lid seal |
| Repairability | Replaceable motor brushes and blade assembly |
| Certifications | CE, RoHS |
| Warranty | 1 year limited warranty |
Frequently Asked Questions - CDM10:4 mk5 Citronic
User questions about CDM10:4 mk5 Citronic
0 question about this device. Answer the ones you know or ask your own.
Ask a new question about this device
Download the instructions for your Blender in PDF format for free! Find your manual CDM10:4 mk5 - Citronic and take your electronic device back in hand. On this page are published all the documents necessary for the use of your device. CDM10:4 mk5 by Citronic.
USER MANUAL CDM10:4 mk5 Citronic
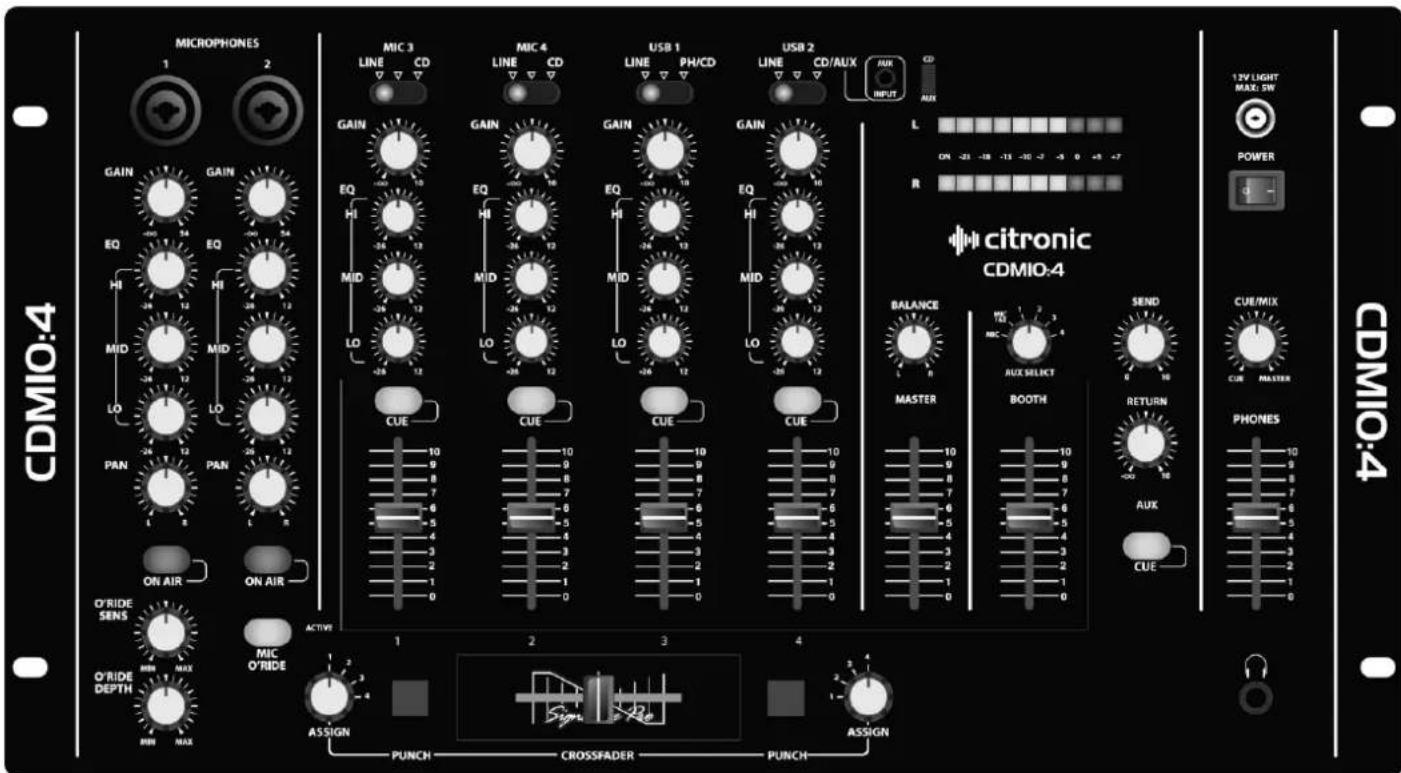
19" 4 Channel USB Mixer
Item ref: 171.135UK
User Manual
Version 1.1

Caution: Please read this manual carefully before operating Damage caused by misuse is not covered by the warranty
Introduction
Thank you for purchasing the Citronic CDM10:4 USB Rackmount DJ Mixer.
This product is intended to give long term, reliable service in normal usage.
Please read these instructions before use to avoid incorrect operation and to help outline the functions and controls.
Maintenance
No user serviceable parts inside, refer all servicing issues to qualified service personnel. Clean with a lint-free dry or damp cloth.
To replace cross-fader, disconnect mains and undo the 2 securing screws slightly, lift the cross-fader and disconnect from the in-line connector (noting the correct orientation). Connect the new cross-fader, reposition and secure with the 2 screws. Channel, Master and Booth faders may be serviced or replaced by removing the plate that they are fitted to.
Packing Contents
- IEC Mains cable
• CDM8:4 USB 19" DJ Mixer - Instruction Manual
Layout
Microphone Section
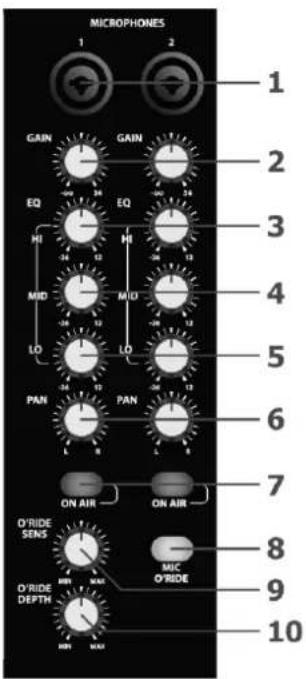
- Combo inputs
- GAIN controls
- HI controls
- MID controls
- LO controls
- PAN controls
- ON AIR button
- MIC O'RIDE button
- O'RIDE SENS control
- O'RIDE DEPTH control
Inputs for microphone on jack or XLR
Mic input sensitivity adjustment
Mic EQ high frequency adjustment
Mic EQ mid frequency adjustment
Mic EQ low frequency adjustment
Mic left/right stereo positioning
Press in to activate mic channel
Select mics to override audio playback
Adjust override sensitivity to mic input
Adjust audio playback reduction amount
Stereo Section:
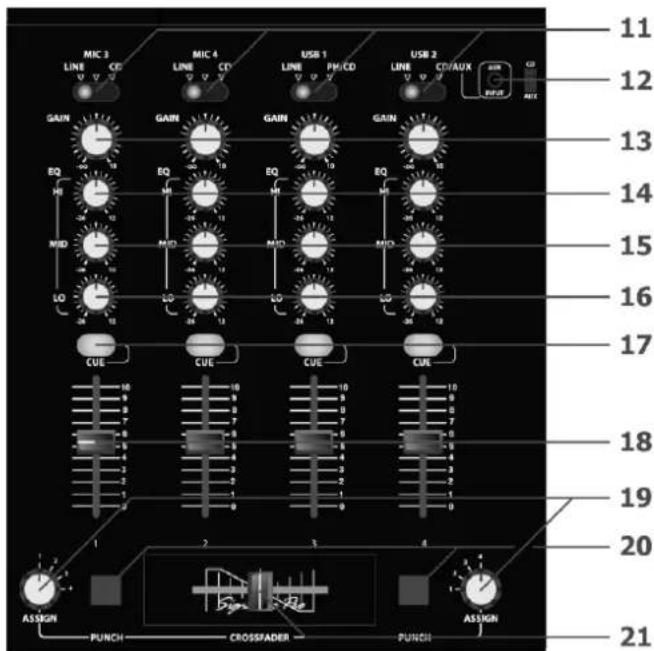
- Input selector
- AUX input
- GAIN controls
- HI controls
- MID controls
- LO controls
- CUE buttons
- Channel faders
- ASSIGN rotary
- PUNCH buttons
- CROSSFADER
Select between rear inputs
3.5mm input & select switch
input sensitivity adjustment
EQ high freq. adjustment
EQ mid freq. adjustment
EQ low freq. adjustment
Select channel to monitor
Channel level to master
Crossfader channel select
Momentary crossfade defeat
Mix between 2 channels
Master Section
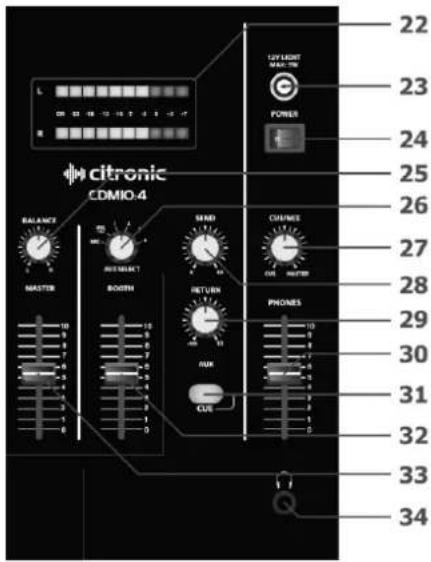
- VU meters 2 x 10-segment LED level meters
- 12V LIGHT 12Vdc output for light (BNC)
- POWER switch Main power on/off switch
- BALANCE control Balance between Left + Right output
- AUX select Select channel to SEND output
- CUE/MIX Monitor fade between cued & master
- SEND Output level to SEND output
- RETURN Loop return for send outputs
- PHONES fader Level fader for headphones output
- CUE button Select SEND to monitoring
- BOOTH fader Level control for BOOTH output
- MASTER fader Level control for MASTER outputs
- Headphones out 6.3mm stereo jack for headphones
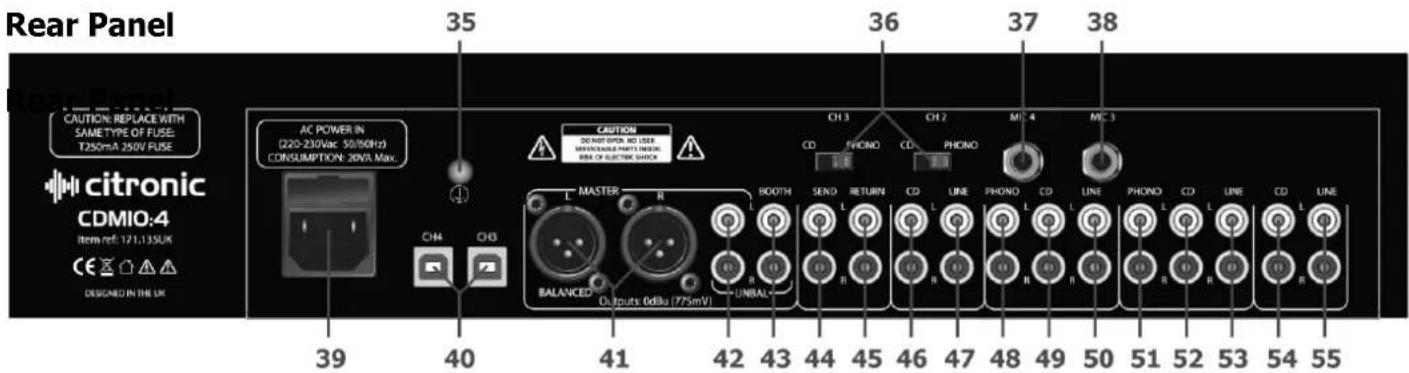
- Ground screw Grounding point for turntables
- CD/PHONO switches Switch between CD and Phono level for CH.2 & 3 PHONO inputs
- MIC 4 input 6.3mm jack microphone input for CH.4
- MIC 3 input 6.3mm jack microphone input for CH.3
- Mains inlet IEC mains connection and fuse holder
- CH.4 & CH.3 USB USB type B connectors to PC/Mac
- BALANCED outputs Balanced Left & Right XLR master outputs
- UNBAL outputs Unbalanced Left & Right RCA master outputs
- BOOTH outputs Unbalanced Left & Right RCA booth outputs
- SEND outputs Aux loop send outputs (L+R RCA)
- RETURN inputs Aux loop return inputs (L+R RCA)
- CD input CH.4 CD input for CH.4 (L+R RCA)
- LINE input CH.4 Line input for CH.4 (L+R RCA)
- PHONO input CH.3 PHONO or CD input for CH.3 (L+R RCA)
- CD input CH.3 CD input for CH.3 (L+R RCA)
- LINE input CH.3 Line input for CH.3 (L+R RCA)
- PHONO input CH.2 PHONO or CD input for CH.2 (L+R RCA)
- CD input CH.2 CD input for CH.2 (L+R RCA)
- LINE input CH.2 Line input for CH.2 (L+R RCA)
- CD input CH.1 CD input for CH.1 (L+R RCA)
- LINE input CH.1 Line input for CH.1 (L+R RCA)
Introduction
The following pages give a full description of the connectors and their purpose. You should study this carefully before you power up the mixer to ensure you get the best performance from the CDM10:4.
Cables & Connectors
Always use good quality cables and connectors. Over 75% of all problems with DJ systems are simple connector issues. Don't get caught out.
Switching on your system
Always turn on your mixer and input devices before you turn on the amplifier. The CDM10:4 has been designed not to harm your amplifiers or speakers if you turn them on first, but this may not be true of the inputs plugged into the mixer. Play Safe and always turn your amplifiers on last.
Power Supply
The power supply for the CDM 10:4 is built into the mixer and is supplied with a BS approved IEC mains plug specifically for use in the UK. If it does not match the power socket you wish to use check with your dealer before you plug it in. It is possible you could damage your mixer if it is not the correct version.
Crossfader
This is commonly the most used feature on your mixer. Even though a great deal of care has been taken in the choice of components for this function, it is the most likely thing to wear out first on your mixer. So we've made it quick and easy to replace.
Connection Guide
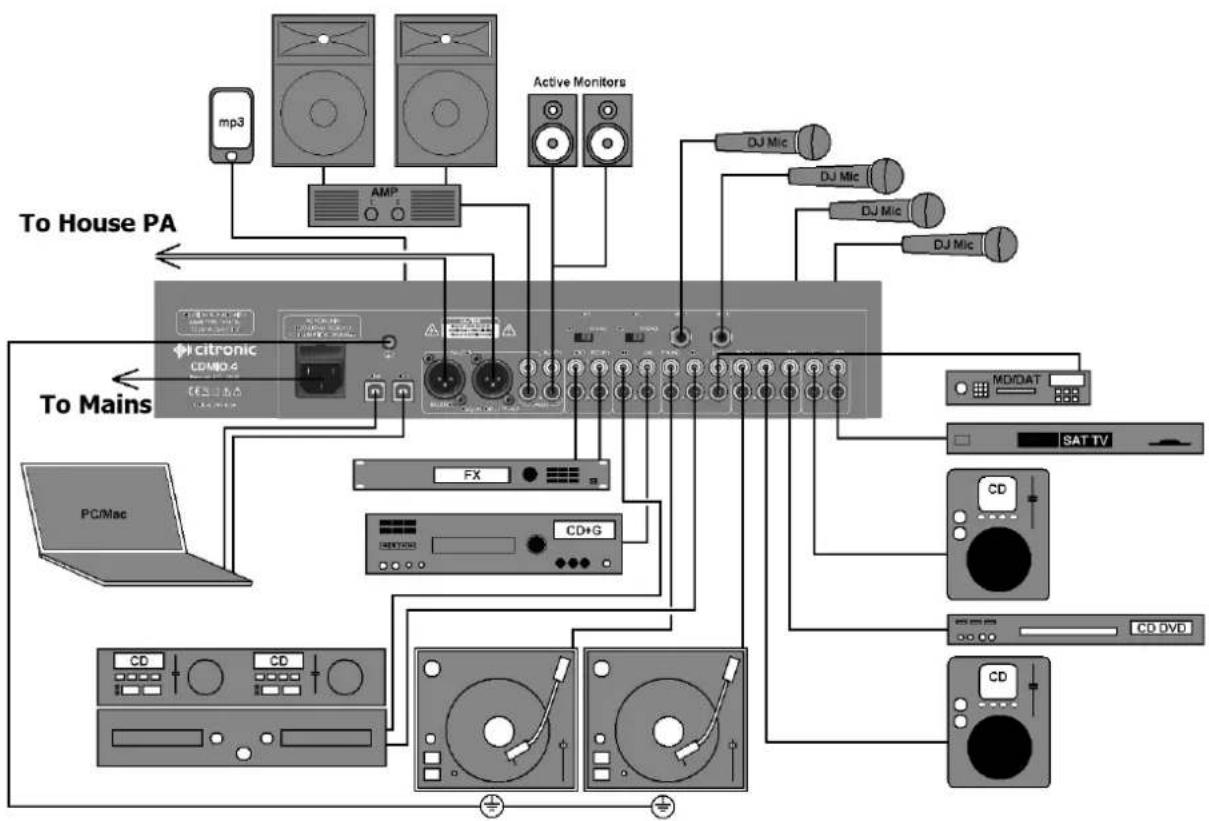
flowchart
graph TD
    A["To House PA"] --> B["CD/DVD"]
    A --> C["CD/DVD"]
    D["PC/Mac"] --> E["CD/DVD"]
    F["mpt"] --> G["AMP"]
    H["Active Monitors"] --> I["DJ Mic"]
    I --> J["DJ Mic"]
    I --> K["DJ Mic"]
    I --> L["DJ Mic"]
    M["To Mains"] --> N["CD/DVD"]
    O["To House PA"] --> P["CD/DVD"]
    Q["MP3"] --> R["AMP"]
    S["AMP"] --> T["CD/DVD"]
    U["CD/DVD"] --> V["CD/DVD"]
Operation
- Check mains for correct voltage as indicated near to the IEC mains inlet on the rear panel
- Connect to mains supply using the IEC cable provided
- Connect the Main unbalanced RCA and/or balanced XLR outputs to the main PA and ensure that the volume levels are turned down to avoid damage
- Connect the BOOTH outputs to powered booth monitors or separate PA zone
- Connect any turntables to the RCA PHONO inputs on CH.2 and CH.3
- For external audio processing or effects, assign the required channel using AUX ASSIGN and connect SEND to inputs of the processor and RETURN to outputs of the processor
- If the unit is to be rack-mounted, it is possible to unscrew the input connector section and rotate 180° for underside connection, taking care not to disconnect any internal wiring
• Earth turntables to the case grounding point on the rear panel - Connect CD players or other line level audio sources to the CD inputs
- Connect CD, CD+G, laptop, TV decoder, DVD or MP3 players to LINE inputs
- Connect DJ mics to the top panel jack/XLR combo sockets and rear jack sockets if needed
• If required, connect personal MP3 player to top panel 3.5mm input - Connect headphones to the HEADPHONE jack
- Connect rear panel USB connections to a PC or Mac for computer audio playback/recording
- With MASTER LEVEL down, switch the power on
- Ensure microphone levels are turned down
• Gradually increase MASTER LEVEL and channel levels to check input signals - Ensure that the input selectors are moved to select the relevant input being played
- Be aware that the CROSSFADER operates across assigned channels – setting to centre position allows both channels through – moving to either side favours that channel
• Gradually increase microphone channel levels to check microphone signals.
• Monitor each stereo channel via headphones selecting using the CUE switches - Whilst a channel is on CUE, adjust the GAIN so that LED meters show a full signal without showing "in the red" (overload)
- Adjust Hi, Mid and Lo EQ settings to the desired tonal effect for mics and audio sources
- When using DJ mics 1 and 2, push the ON AIR switch and if required, push MIC OVERRIDE to drop the music level whilst talking. Sensitivity and Depth of this function are adjustable.
- Playback from PC or Mac computer is available through 2 USB ports, which act as Plug & Play audio devices. Connecting these to the computer will work the same as connecting 2 external sound cards. Once automatic installation is complete, select these as playback hardware in the relevant software menu and select "USB" on the CDM10:4 channel selector for playback.
- The USB interfaces can also be selected as recording devices to record mixes from CDM10:4 (consult your software manual for further installation and setup details)
- When not being used, turn down the Vocal mic levels to avoid unwanted noise
• Turn down PA volume controls and CDM10:4 faders before switching off to avoid loud pops
Specifications
| Power supply | 230Vac, 50Hz |
| Fuse rating | T250mA (240V) / T500mA (110V) |
| Cut-out | 440 x 250mm |
| Equaliser: Bass | +12dB, -26dB @ 100Hz |
| Equaliser: Midrange | +12dB, -26dB @ 800Hz |
| Equaliser: Treble | +12dB, -26dB @ 9kHz |
| Headphone output | 112mV @ 32 Ohms |
| Input: Line | 195mV, 50k Ohms |
| Input: Mic | 1.5mV, 2k Ohms |
| Input: Phono | 4mV, 47k Ohms |
| Signal to noise ratio: Line | >87dB |
| Signal to noise ratio: Mic | 68dB |
| Signal to noise ratio: Phono | 73dB |
| Dimensions | 483 x 266 x 80mm (6U) |
| Weight | 5kg |
Troubleshooting
| No output | Check mains power is on |
| Check leads and connections | |
| Check MASTER LEVEL and mic or channel fader is turned up | |
| Check CROSSFADER by setting to centre | |
| Distorted output | Check line input isn't connected to PHONO |
| Check channel and MASTER faders are not too high | |
| Check volume control of amp, active speakers or recording equipment | |
| Microphone feedback | Eliminate "line-of-sight" between mic(s) and speakers |
| Adjust EQ and/or level controls | |
| No microphone output | Check if mic is switched off |
| Check if phantom power source is required | |
| Low microphone output | Low output – ensure mic is not switched to "pad" or "Hi Z" |
| Quiet vocals – ask singer to sing closer to mic. | |
| Low audio output | Check turntable is not connected to line input and PHONO is selected |
| Check channel and MASTER faders are not too low | |
| Check for volume control on sound source |
Brand : Citronic
Model : CDM10:4 mk5
Category : Blender