PRO-3 USB - Blender Citronic - Free user manual and instructions
Find the device manual for free PRO-3 USB Citronic in PDF.


| Product Type | Blender |
| Brand | Citronic |
| Model | PRO-3 USB |
| Dimensions (H x W x D) | 40 cm x 20 cm x 20 cm |
| Weight | 3.0 kg |
| Jug Capacity | 1.5 L |
| Material | Stainless steel blades, Tritan plastic jug |
| Power Supply | 220-240 V, 50/60 Hz |
| Power Consumption | 500 W |
| Speed Settings | Variable speed with pulse function |
| Safety Features | Overload protection, non-slip feet, safety lock lid |
| Cleaning | Detachable parts dishwasher safe; wipe base with damp cloth |
| Accessories | Measuring cup, cleaning brush |
| Warranty | 2 years |
| Repairability | Spare parts available; user-replaceable blade assembly |
Frequently Asked Questions - PRO-3 USB Citronic
User questions about PRO-3 USB Citronic
0 question about this device. Answer the ones you know or ask your own.
Ask a new question about this device
Download the instructions for your Blender in PDF format for free! Find your manual PRO-3 USB - Citronic and take your electronic device back in hand. On this page are published all the documents necessary for the use of your device. PRO-3 USB by Citronic.
USER MANUAL PRO-3 USB Citronic
Professional DJ Mixer
Ref.No:171.130
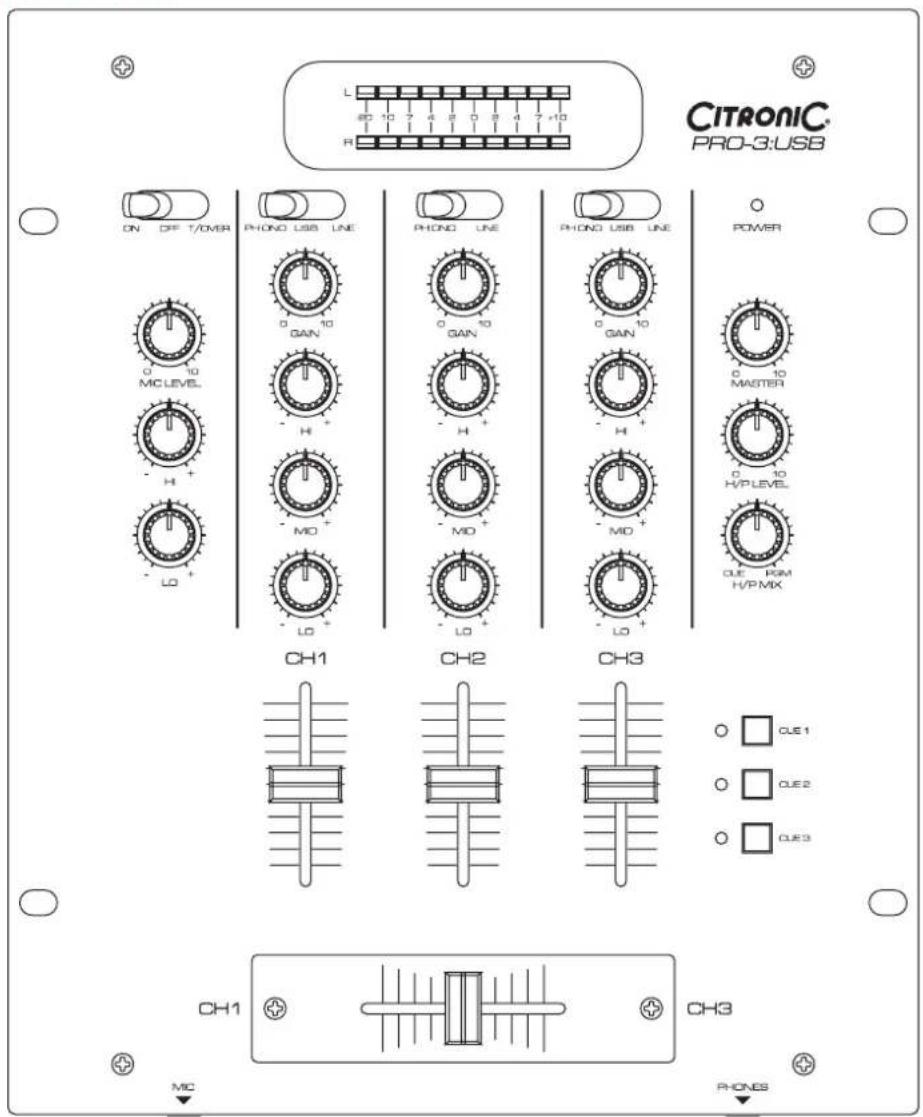
©OWNER'S MANUAL
Safety Instructions
- Read Instructions-All the safety and operating instructions should be read before this product is operated.
- Retain Instruction- The safety and operating instruction should be retained for future reference.
- Heed Warnings- All warnings on the appliance and in the operating instructions should be adhered to.
- Follow Instructions-All operating and use instruction should be followed.
- Water and Moisture- The appliance should not be used near water-for example, near a bathtub, washbowl, kitchen sink, laundry tub, in a wet basement, or near a swimming pool, and the like.
- Carts and Stands-The appliance should be used only with a cart or stand that is recommended by the manufacturer. An appliance and cart combination should be moved with care. Quick stops, excessive force, and uneven surfaces may cause the appliance and cart combination to overturn.
- Wall or Ceiling Mounting-The product should be mounted to a wall or ceiling only recommended by the manufacturer.
- Heat -The appliance should be situated away from heat sources such as radiators, heat registers, stoves, or other appliances (including amplifiers) that produce heat
- Power Sources-This product should be operated only from the type of power source indicated on the rating label. If you are not sure of the type of power supply to your home, consult your product dealer or local power company. For products intended to operate from battery power, or other sources, refer the operating instructions.
- Grounding or Polarization-This product may be equipped with a polarized alternation-current line plug (a plug having one blade wider than the other). This plug will fit into the power outlet only one way. This is a safety feature. If you are unable to insert the plug fully into the outlet, try reversing the plug. If the plug should still fail to fit, contact your electrician to replace your obsolete outlet. Do not defeat the safety purpose of the polarized plug.
- Power-Cord Protection - Power-supply cords should be routed so that they are not likely to be walked on or pinched by items placed upon or against them, paying particular attention to the cord in correspondence of plugs, convenience receptacles, and the point where they exit from the appliance.
- Cleaning-The appliance should be cleaned only as recommended by the manufacturer. Clean by wiping with a cloth slightly damp with water. Avoid getting water inside the appliance.
- For AC line powered units-Before returning repaired unit to user, use an ohm-meter to measure from both AC plug blades to all exposed metallic parts. The resistance should be more than 100,000 ohms.
- Non-use Periods -The power cord of the appliance should be unplugged from the outlet when left unused for a long period of time.
- Object and Liquid Entry-Care should be taken so that objects do not fall and liquids are not spilled into the enclosure through openings.
16..Damage Requiring Service-The appliance should be serviced by qualified service personnel when:
A. The power-supply cord or the plug has been damaged; or
B. Objects have fallen, or liquid has been spilled into the appliance; or
C. The appliance has been exposed to rain; or
D. The appliance does not appear to operate normally or exhibits a marked change in perform-ance; or
E. The appliance has been dropped, or the enclosure damaged.
- Servicing-The user should not attempt any service to the appliance beyond that described in the operating instructions. All other servicing should be referred to qualified service personnel.
- Ventilation-Slots and openings in the cabinet are provided for ventilation and to ensure reliable operation of the product and to protect it from overheating, and these openings must not be blocked or covered. The openings should never be blocked by placing the product on a bed, sofa, rug, or other similar surface. This product should not be placed in a built-in installat-ion such as a bookcase or rack unless proper ventilation is the manufacturer instructions have been adhered to.
- Attachments-do not use attachments not recommended by the product manufacturer as they may cause hazards.

- Accessories -Do not place this product on an unstable cart, stand, tripod, bracket, or table. The product may fall, causing serious injury to a child or adult, and serious damage to the Product. Use only with a cart, stand, tripod, bracket, or table recommended by the manufacturer, or sold with the product. Any mounting of the product should follow the manufacturer instructions, and should use a mounting accessory recommended by the manufacturer.
- Lightning-For added protection for this product during a lightning storm, or when it is left unattended and unused for long periods of time, unplug it from the wall outlet and disconnect the antenna or cable system. This will prevent damage to the product due to lightning and power-line surges.
- Replacement Parts-When replacement parts are required, be sure the service technician has used replacement parts specified by the manufacturer or have the same characteristics as the original part. Unauthorized substitutions may result in fire, electric shock, or other hazards.
- Safety Check-Upon completion of any service or repairs to this product, ask the service technician to perform safety checks to determine that the product is in proper operating condition.
CAUTION
RISK OF ELECTRIC SHOCK DO NOT OPEN

CAUTION: To reduce the risk of electric shock, do not remove any cover. No user-serviceable parts inside. Ref -er servicing to qualified service personnel only.

The lightning flash with arrowhead symbol within the equilateral triangle is intended to alert the use to the presence of un-insulated “dangerous voltage” within the product’s enclosure that may be of sufficient magnitude to constitute a risk of electric shock.

The exclamation point within the equilateral triangle is intended to alert the user to the presence of important operation and maintenance (servicing) instructions in the literal -ture accompanying this appliance.
CAUTION
To prevent electric shock, do not use this polarized plug with an extension cord, receptacle or other outlet unless the blades can be fully inserted to prevent blade exposure.
Main Features
* 3 band EQ w/ input gain control per channel.
* High level master output, headphone output.
* Power on/off switch.
* Master output level meter.
* Mic on/off/talkover function.
* Low sound leakage crossfader.
* USB computer connection (record & playback).
Controls and Features
Top panel
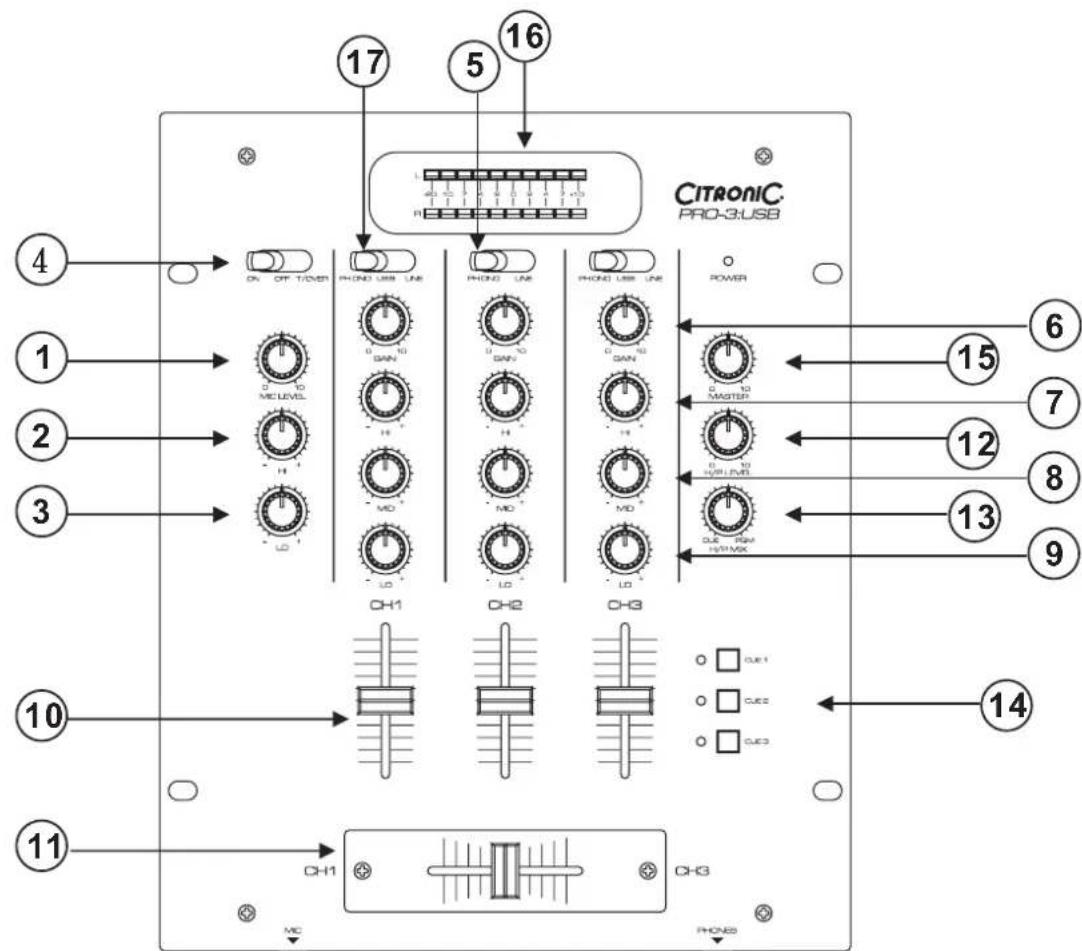
Features Functions Top Panel&
1. Microphone Volume
This knob is used to regulate the microphone output volume. Turning the knob in a clock-wise direction will increase the volume level.
2\~3. Microphone EQ section
These controls are used to adjust the microphone treble and bass levels. Each microphone input has a separate channel EQ.
Microphone Treble Control
This knob is used to adjust the treble levels of the Microphone with a maximum signal gain of 10dB or maximum signal decrease of -10dB. Turning the knob in a counter-clockwise direction will decrease the amount of treble applied to the microphone signal, turning the knob in a clockwise direction will increase the amount of treble applied to microphone signal.
Microphone Bass Control
This knob is used to adjust the bass levels of the Microphone with a maximum signal gain of 10dB or maximum signal decrease of -10dB. Turning the knob in a counter-clockwise direct-ion will decrease the amount of bass applied to the microphone signal, turning the knob in a clockwise direction will increase the amount of bass applied to microphone signal.
4. Talkover Switch
When engaged this function will decrease all signal levels, except the microphone level, by 14dB.
5. Channel Input Switch
These switches are used to select the input source assigned to each channel. Each channel may only be assigned one input source at a time.
6. Channel Gain Control
This adjustment is used to adjust an audio source signal input gain for a channel. Never use the gain control to adjust output volume. Setting the gain level properly will ensure a clean output signal. To properly set the gain level controls:
- Be sure the MASTER VOLUME CONTROL (15) is set to minimum (zero output).
- Set the CHANNEL FADER (10) to level 7.
- Begin play on an audio source connected to the channel you are adjusting.
- Turn the PFL (14) function on, for the channel you are adjusting.
- Use the GAIN CONTROL (6) to achieve an average output level of no distortion.
7\~9.CHANNEL EQUALIZER ( BASS/MID/TREBLE CONTROL)
All of the channels include a three-band signal EQ. These controls are used to increase or decrease the LOW's, MID's, and HI's of the output signal.
CHANNEL TREBLE CONTROL
This knob is used to adjust the treble levels of a channel allowing for a maximum treble gain of 9dB or maximum decrease of -15dB. Turning the knob in a counter-clockwise direction will decrease the amount of treble applied to a channel signal, turning the knob in a clockwise direction will increase the amount of treble applied to a channel signal.
CHANNEL MIDRANGE CONTROL
This knob is used to adjust the midrange levels of a channel allowing for a maximum midrange gain of 9dB or maximum decrease of -24dB. Turning the knob in a counter-clockwise direction will decrease the amount of midrange applied to a channel signal, turning the knob in a clockwise direction will increase the amount of midrange applied to a channel signal.
CHANNEL BASS CONTROL
This knob is used to adjust the low frequency levels of a channel allowing for a maximum bass gain of 9dB or maximum signal decrease of -25dB. Turning the knob in a counter-clockwise direction will decrease the amount of bass applied to a channel signal, turning the knob in a clockwise direction will increase the amount of bass applied to a channel signal.
10. Channel Fader
These faders are used to control the output signal of any source assigned to its particular channel.
11. Crossfader
This fader is used to blend the output signals of channels one and three together. When the fader is in the full left position (channel 1), the output signal of channel on will be controlled by the master volume level. The same fundamentals will apply for channel three. Sliding the fader from one position to another will vary the output signals of channels one and three respectively. When the crossfader is set in the center position, the output signals of both the channels one and channels three will be even.
12. Headphone Level Control
Sets the desired music level to the headphones. The headphone program depends on the position of the monitor pan control(13).
13. Headphone Mix (Pan) Control
Varies the mix between the cued input and master output, ideal for accurate beat mixing. Full left will give cued input, full right will give master output program.
14.PFL BUTTONS
These buttons are used to activate a channels "CUE" mode. A red LED next to the PFL button will glow when a channels cue mode is activated. Cue mode will send a channels incoming signal to the headphones. The cue level is adjusted by the CUE LEVEL ADJUS-TMENT KNOB (12). Be sure the cue level is set to minimum before putting a pair of
headphones on. Be sure the CUE MIXINGKNOB (13) is turned to the "CUE" position to hear the selected channel source.
15. Master Volume Control
This rotary knob is used to control the master output level (volume). To avoid distorted output try to maintain an average output signal level below “OVER”. Be sure this volume control is always set to zero before turning the unit on.
16. LED Monitor Display
The dual LED's indicators are used to indicate the master output level.
17. Input toggle switch
Selects which source will be active based on what you have connected to the rear panel input section(Phone/USB/Line).
Features Functions Rear Panel&
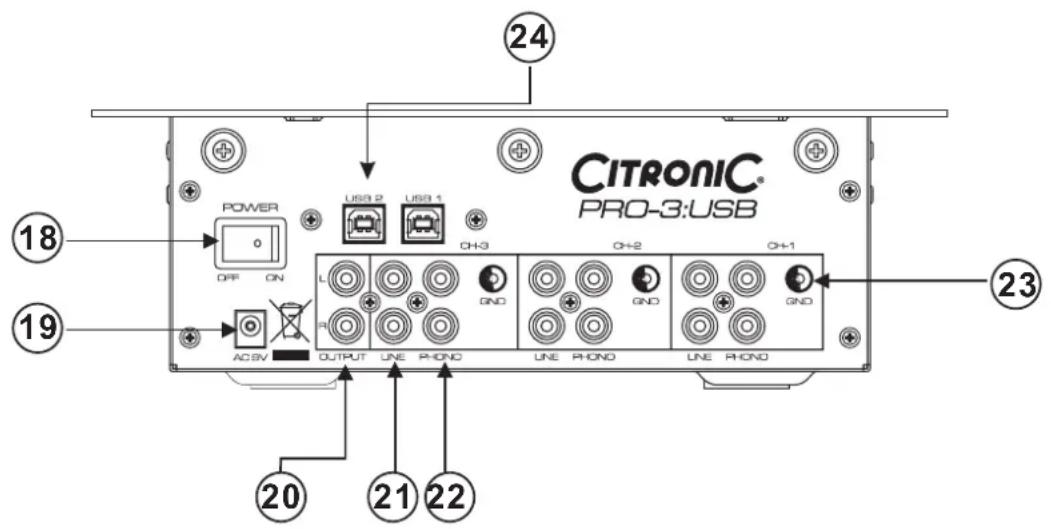
18. Main Power Switch
This is the main power ON/OFF button. The READY LED will glow led when power is ON. Before main power is applied, be sure you have made all connections to the mixer. Also be sure your amplifier(s) is(are) tuned off. Remember to avoid damaging pops, the mixer should be powered on first and turned off last.
19. AC Connection
This connector is used to supply main power to the unit via the included AC adaptor.
20.RCA Master Outputs
The Master Output includes a pair of RCA UNBALANCED JACKS. The RCA jacks send a low current unbalanced output signal.
21. Channel 3: LINE 3 RCA Input Jacks
These Jacks are used for line level inputs. Connect CD players or Tape Decks to LINE inputs. Line level musical instruments with stereo outputs such as Rhythm Machines or Samplers should also be connected to LINE inputs. Turntables should only be connected to "Phono" inputs. The red colored RCA jack represents the right channel input and the white represents the left channel input.
22.Channel 3: PHONO 3 Input Jacks
Connect turntables equipped with MM pickup cartridge to PHONO inputs (All DJ turntable use MM pick-up cartridges).
23. GND (GROUND TERMINAL)
Connect each of your turntables ground leads to either of the three ground terminal. This will reduce the humming and popping noises associated with magnetic phono cartridges.
24.USB Terminal
After hooking up your computer with the USB connections, your computer will detect them respectively as an external sound card (USB Code). You may either play music on your computer or send it via the USB connections as a signal source to the unit; alternatively, you may record the master output signal on your computer using the USB connections.
NOTE:(1)USB cable limit within 3 meter.
(2) To use the USB2.0 connection, please also refer to the operation manual of your computer and the programmers used.
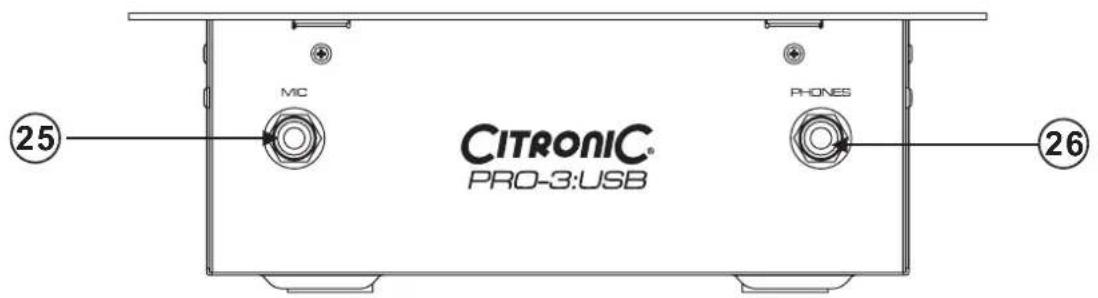
25. DJ Microphone Jack
This jack is used to a connect a microphone to the mixer. Connect you microphone via 1/4 inch (6.3mm) jack. The signal volume will be controlled by the DJ MIC KNOB (1). The bass and treble levels can also be adjusted by the built-in MICROPHONE EQ (2/3).
26. Headphone Output Jack
This jack is used to connect your headphones to the mixer allowing you to monitor the cue source. Use headphones only rated at 8 ohms to 32 ohms. Most DJ headphones are rated at 16 ohm, these are highly recommended. Always be sure the CUE LEVEL VOLUME (12) is set to minimum before you put the headphones on.
Cleaning
Due to fog residue, smoke, and dust, cleaning the mixer should be carried out periodically to Optimize light output.
-
Use normal glass cleaner and a soft cloth to wipe down the outside casing.
-
Use a cleaner specially designed for electronics to spray in and around the knobs and witch. This will reduce small particle built up that can effect the proper operation of the mixer.
-
Clean should be carried out every 30-60 days.
-
Always be sure to dry all parts completely before plugging the mixer in.
Cleaning frequency depends on the environment in which the mixer operates (i.e. Smoke, fog, residue dust, dew).
Specifications
POWER SOURCE: AC 9V 1000mA
DIMENSION: 254 (W) x 308 (D) x 82.5 (H)mm
WEIGHT: 3.4 Kgs
INPUT/OUTPUT IMPEDANCE & SENSITIVITY:
(MASTER 04USTFBJT, LOAD = 100K OHM, MAXIMUM GAIN, EQ FLAT)
LINE: 10-50K OHM /-10dBV (320mV) ±2dB
PHONO: 47K OHM /-50dBV (3.16mV) ±2dB
MIC: 2.2K OHM /-50dBV (3.16mV) ±2dB
MASTER: 1K OHM +4.5dBV (1.68V) ±2dB
PHONES (Load=32 ohm) 33ohm/1dBV (1.12V) ±2dB (CUE MIX AT CUE)
FREQUENCY RESPONSE: (EQ flat, maximum gain, level meter=0dB, load=100K OHM)
LINE: 20 - 20K Hz ±2dB
PHONO: 20 - 20K Hz +2/-3dB (RIAA)
MIC: 20 - 20K Hz +1.5/-3dB
THD + N: (1KHz MASTER = 0dBV OUTPUT, w/ 20kHz LPF)
LINE: Less than 0.02%
NOTE: 0dBV=1V rms.
MAXIMUM INPUT: (MASTER OUTPUT THD=0.5%, EQ, MASTER AT CENTER, GAIN AT MAXIMUM POSITION)
LINE: More than +4dBV
PHONO: More than -35dBV
MIC: More than -45dBV
MAXIMUM OUTPUT: (THD=1%, GAIN, MASTER AND FADER AT MAXIMUM, EQ AT CENTER POSITION)
MASTER: More than +18dBV (8.0V) at LOAD=100K OHM
PHONES: More than +4dBV (1.6V) at LOAD=32 OHM
OUTPUT NOISE: (GAIN, MASTER AND FADER AT MAXIMUM, EQ AT CENTER POSITION, W/20KHz LPF, A-WEIGHTED)
LINE: Less than -87dBV
PHONO: Less than -70dBV
MIC: Less than -60dBV
CROSSTALK: (W/20KHz LPF, A-WEIGHTED
LINE: More than 70dB AT 1K Hz between L and R.
More than 70 dB AT 1KHz between channels.
EQ:
MIC:
HI 10KHz ±10±2dB
LOW 100Hz ±10±2dB
CHANNEL:
CHANNEL EQUALIZER
BASS 70Hz 9 ± 3dB / -25 ± 3dB
MID 1KHz 9 ± 3dB / -24 ± 3dB
TREBLE 13KHz 9 ± 3dB / -15 ± 3dB
FADER MAXIMUM ATTENUATION 1KHz (W/20KHz LPF):
CHANNEL FADER: More than -80 dB
CROSSFADER: More than -75dB
CHANNEL BALANCE: Within 3dB
TALKOVER: -14dB +/- 2dB
USB SECTION:
PLAYBACK: (EQ FLAT, FADER AND MASTER MAX.)
OUTPUT: 17dBV +/- 2dB (0dBfs, 1KHz, MAXIMUM GAIN.)
THD+N: LESS THAN 0.02% (0dBfs, 1KHz; W/ 20KHz LPF, MAXIMUM GAIN)
FREQUENCY RESPONSE: 20 - 20KHz +/- 2dB (MAXIMUM GAIN)
S/N RATIO: MORE THAN 85dB (W/ 20KHz LPF, A-WEIGHTED, MAXIMUM GAIN)
CH SEPARATION: MORE THAN 70dB AT 1KHz (0dBfs, W/ 20KHz LPF, A-WEIGHTED, MAXIMUM GAIN)
RECORDING AND PLAYBACK: (LINE 1KHz,-14dBV INPUT, GAIN MAXIMUM, 600hm impedance)
OUTPUT: 2.5dBV +/-2dB THD+N LESS THAN 0.05%
For other Citronic products in the range, visit ...
www.citronic.com
- Professional DJ Mixer
- Safety Instructions
- CAUTION
- Main Features
- Controls and Features
- Top panel
- Features Functions Top Panel&
- Microphone Volume
- 2\~3. Microphone EQ section
- Microphone Treble Control
- Microphone Bass Control
- Talkover Switch
- Channel Input Switch
- Channel Gain Control
- 7\~9.CHANNEL EQUALIZER ( BASS/MID/TREBLE CONTROL)
- CHANNEL TREBLE CONTROL
- CHANNEL MIDRANGE CONTROL
- CHANNEL BASS CONTROL
- Channel Fader
- Crossfader
- Headphone Level Control
- Headphone Mix (Pan) Control
- 14.PFL BUTTONS
- Master Volume Control
- LED Monitor Display
- Input toggle switch
- Features Functions Rear Panel&
- Main Power Switch
- AC Connection
- 20.RCA Master Outputs
- Channel 3: LINE 3 RCA Input Jacks
- 22.Channel 3: PHONO 3 Input Jacks
- GND (GROUND TERMINAL)
- 24.USB Terminal
- DJ Microphone Jack
- Headphone Output Jack
- Cleaning
- Specifications
- INPUT/OUTPUT IMPEDANCE & SENSITIVITY:
- MAXIMUM INPUT: (MASTER OUTPUT THD=0.5%, EQ, MASTER AT CENTER, GAIN AT MAXIMUM POSITION)
Brand : Citronic
Model : PRO-3 USB
Category : Blender