
MT-705 - Portable DVD Player DENVER - Free user manual and instructions
Find the device manual for free MT-705 DENVER in PDF.


| Product Type | Portable DVD Player |
| Brand | Denver |
| Model | MT-705 |
| Screen Size | 7 inches |
| Display Resolution | 800 x 480 pixels |
| Disc Types Supported | DVD, DVD±R/RW, CD, CD-R/RW |
| Media Playback | DVD Video, CD Audio, MP3, JPEG, DivX |
| Inputs | USB 2.0, SD/MMC card slot |
| Outputs | AV out (composite), Headphone jack (3.5mm) |
| Power Supply | AC adapter 100-240V, 50/60Hz; DC 9V 2A |
| Battery Type | Built-in rechargeable lithium-ion |
| Battery Life | Approximately 3 hours |
| Weight | 1.2 kg |
| Dimensions (W x H x D) | 200 x 160 x 40 mm |
| Screen Swivel | Yes, 180-degree rotation |
| Parental Control | Yes, with password |
| Languages Supported | English, French, Spanish, German, Italian (on-screen menu) |
| Cleaning Instructions | Wipe with a soft, dry cloth. Do not use abrasive cleaners. |
| Safety Precautions | Do not disassemble, avoid moisture and extreme temperatures. |
| Spare Parts Availability | Contact Denver customer service for replacement parts. |
Frequently Asked Questions - MT-705 DENVER
User questions about MT-705 DENVER
0 question about this device. Answer the ones you know or ask your own.
Ask a new question about this device
Download the instructions for your Portable DVD Player in PDF format for free! Find your manual MT-705 - DENVER and take your electronic device back in hand. On this page are published all the documents necessary for the use of your device. MT-705 by DENVER.
USER MANUAL MT-705 DENVER
Please read this manual before connection and use.
SAFETY INFORMATION
TO REDUCE THE RISK OF FIRE AND ELECTRIC SHOCK, DO NOT EXPOSE THIS UNIT TO RAIN OR MOISTURE.
CAUTION : To reduce the risk of fire and electric shock, do not remove the cover (or back) of the unit. Refer servicing only to qualified service personnel.

The lightning flash with arrowhead symbol, within an equilateral triangle, is intended to alert the user to the presence of uninsulated "dangerous voltage" within product's enclosure that may be of sufficient magnitude to constitute a risk of electric shock.

The exclamation point within an equilateral triangle is intended to alert the user to the presence of important operation and servicing instructions in the literature accompanying the appliance.
WARNING: TO REDUCE THE RISK OF FIRE OR ELECTRIC SHOCK, DO NOT EXPOSE THIS APPLIANCE TO RAIN OR MOISTURE.
CAUTION: TO PREVENT ELECTRIC SHOCK, MATCH WIDE BLADE OF PLUG TO WIDE SLOT, FULLY INSERT.
IMPORTANT SAFEGUARDS
In addition to the careful attention devoted to quality standards in the manufacture of your video product, safety is a major factor in the design of every instrument. However, safety is your responsibility, too. This sheet lists important information that will help to assure your enjoyment and proper use of the video product and accessory equipment. Please read them carefully before operation and using your video product.
Installation
- Read and Follow Instructions- All the safety and operation instructions should be read before the video product is operated. Follow all operating instructions.
- Retain Instructions- The safety and operating instructions should be retained for future reference.
- Heed all Warnings-Comply with all warnings on the video product and in the operating instructions.
- Polarization- This video product is equipped with a polarized alternating - current line plug . This plug will fit into the power outlet, try reversing the plug. If the plug still fails to fit, contact your electrician to replace your obsolete outlet. To prevent electric shock, do not use this polarized plug with an extension cord, receptacle, or other outlet unless the blades can be fully inserted without blade exposure. If you need an extension cord, use a polarized cord.
- Power Sources- This video product should be operated only from the type of power source indicated on the marking label. If you are not sure of the type of power supply to your home, consult your video dealer or local power company. For video products intended to operate from battery power, or other sources, refer to the operating instructions.
- Overloading- Do not overload wall outlets or extension cords as this can result in a risk of fire or electric shock. Overloaded AC outlets, extension cords, frayed power cords, damaged or cracked wire insulation, and broken plugs are dangerous. They may result in a shock or fire hazard. Periodically examine the cord, and if its appearance indicated damage or deteriorated insulation, have it replaced by your service technician.
- Power-Cord Protection- Power-supply cords should be routed so that they are not likely to be walked on or pinched by items placed upon or against them, paying particular attention to cords at plugs, convenience receptacles, and the point where they exit from the video product.
- Ventilation- Slots and openings in the case are provided for ventilation to ensure reliable operation of the video product and to protect it from overheating. These openings must not be blocked or covered. The openings should never be blocked by placing the video product on a bed, sofa, rug, or heat register. This video product should not be placed in a built-in installation such as a book case or rack, unless proper ventilation is provided or the video product manufacturer's instructions have been followed.
- Attachments- Do not use attachments unless recommended by the video product manufacturer as they may cause hazards.
- Water and Moisture- donot use this video product near water for example, near a bath tub, wash bowl, kitchen sink or laundry tub, in a wet basement, or near a swimming pool and the like. Caution: Maintain electrical safety. Powerline operated equipment or accessories connected to this unit should bear safety certification mark on the accessory itself and should not be modified so as to defeat the safety features. This will help avoid any
danger and should not be modified so as to defeat the safety features. This will help avoid any potential hazard from electrical shock or fire. If in doubt, contact qualified service personnel.
- Accessories- Do not place this video product on an unstable cart, stand, tripod, bracket, or table. The video product may fall, causing serious injury to a child or adult as well as serious damage to the video product. Use this video product only with a cart, stand, tripod, bracket, or table recommended by the manufacturer's or sold with the video product. Any mounting of the product should follow the manufacturer's instructions and use of a mounting accessory recommended by the manufacturer.
- A video product and cart combination should be moved with care. Quick stops, excessive force, and uneven surfaces may cause the video product and cart combination to overturn.
Note to CATV system installer This reminder is provided to call the CATV system installer's attention to Section 820-40 of the NEC which provides guidelines for proper grounding and, in particular, specifies that the cable ground shall be connected to the grounding system of the building, as close to the point of cable entry as practical. - Outdoor Antenna Grounding- If an outside antenna or cable system is connected to the video product, be sure the antenna or cable system is grounded so as to provide some protection against voltage surges and built-up static charges. Section 810 of the National Electrical Code, ANSI/NFPA No.70-1984 (Section 54 of Canadian Electrical Code, Part1) provides information with respect to proper grounding of the mast and supporting structure, grounding of the lead-in wire to an antenna-discharge unit, connection to grounding electrodes, and requirements for the grounding electrode.
- Power Lines-An outside antenna system should not be located in the vicinity of overhead power lines, other electric light or power circuits, or where it can fall into such power lines or circuits. When installing an outside antenna system, extreme care should be taken to keep from touching or approaching such power lines or circuits, as contact with them might be fatal. Installing an outdoor antenna can be hazardous and should be left to a professional antenna installer.
Use
- Cleaning- Unplug this video product from the wall outlet before cleaning. Do not use liquid cleaners or aerosol cleaners. Use a damp cloth for cleaning.
- Objects that may touch dangerous voltage points or "short-out" parts could result in a fire or electric shock. Never spill liquid of any kind on the video product.
- Lightning-For added protection for this video product during a lightning storm, or when it is left unattended and unused for long periods of time, unplug it from the wall outlet and disconnect the antenna or cable system. This will prevent damage to the video product due to lightning and power line surges.
Service
- Servicing-Do not attempt to service this video product yourself, as opening or removing covers may expose you to dangerous voltage or other hazards. Refer all servicing to qualified service personnel.
- Conditions requiring service-unplug this video product from the wall outlet, refer servicing to qualified service personnel under the following conditions:
A. When the power-supply cord or plug is damaged.
B. If liquid has been spilled, or objects have fallen into the video product.
C. If the video product has been exposed to rain or water.
D. If the video does not operate normally by following the instruction manual. Adjust only those controls that are covered by operating instructions. Improper adjustment of other controls may result in damage and will often require extensive work by a qualified technician to restore the video product to its normal operation.
E. If the video product has been dropped or cabinet has been damaged.
F. When the video product exhibits a distinct change in performance—this indicates a need for service.
- Replacement Parts-When replacement parts are required, have the service technician verify that the replacements he uses have the same safety characteristics as the original parts. Use of replacements specified by the video product manufacturer can prevent fire, electric shock, or other hazards.
- Safety Check-Upon completion of any service or repairs to this video product, ask the service technician to perform safety checks recommended by the manufacturer to determine that the video product is in safe operating condition.
- Wall or Ceiling Mounting- The product should be mounted to a wall or ceiling only as recommended by the manufacturer.
- Heat-The product should be situated away from heat sources such as radiators, heat registers, stoves, or other products (including amplifiers) that products heat.
FEATURES
DVD, CD, MP3 compatible
CD-R, CD-RW capable
TV format:
PAL / NTSC color system
4:3 / 16:9 screen format select
Video:
Video input / output
S-Video output
Component Video output
Audio :
Audio input/output
Down-mix stereo output
Digital audio output (coaxial)
Dolby Digital output
DVD features:
Multi Subtitle select
Multi Language select
Multi Angle select
Other features:
On screen display menu
Digital zooming
Slow motion
Parental control
Auto screen saver
JPEG picture view
Manufactured under license from Dolby Laboratories.
Dolby and the double-D symbol are trademarks of Dolby Laboratories. Confidential Unpublished Works.
© 1992-1997 Dolby Laboratories.
All rights reserved.
This product incorporates copyright protection technology that is protected by method claims of certain U.S. patents and other Intellectual property rights owned by Macrovision Corporation and other rights owners. Use of this copyright protection technology must be authorized by Macrovision Corporation, and is intended for home and other limited viewing uses only unless otherwise authorized by Macrovision Corporation. Reverse engineering or disassembly is prohibited.

The player has built in copyright protection technology that prevents copying from a DVD disc to any media.
If a video recorder is connected to the player, the video output image will be distorted during recording.
CONTENTS
Page
SAFETY INFORMATION
FEATURES
CONTENTS
INTRODUCTION 1-5
About DVD 1-2
About MP3 2
About the player 3-4
DVD player panel 3
Right panel 4
Load the battery 4
Remote control 5
SYSTEM CONNECTION 6
System connection figure 6
GETTING STARTED 7-8
Play a disc 7
Problem disc message 8
Power management 8
ON SCREEN DISPLAY 9-10
DVD mode 9
CD mode 10
MP3 mode 10
FUNCTION BUTTONS 11-14
SETUP MENU 14-16
LANGUAGE 14-15
AUDIO SETUP 15
SCREEN SETUP 16
CUSTOM SETUP 16
TROUBLE SHOOTING 17-18
SPECIFICATIONS 19
About DVD
DVD (Digital Versatile Disc) is a digital video medium under the MPEG II format, featuring a variety of revolutionary entertainment capabilities. The MPEG II video compression technology provides capacity for an excellent picture of minimum 500 lines resolution on screen, up to 8 language soundtracks, up to 9 views from different camera angles and up to 32 language subtitles (provided by the DVD disc itself which supports these features).
Disc information
| Disc types | DVD | CD |
| Decoding Method | Digital / MPEG II | Digital |
| Capacity | Single-layer / Single side4.7GB = 2 hrSingle-layer / Double sides8.5GB = 4 hrDouble-layers / Single side9.4GB = 4.5 hrDouble-layers / Double sides17GB = 8 hr | 650MB = 74min |
| Disc size | 12cm / 8cm | 12cm / 8cm |
| Horizontal Resolution | 500 lines up | - |
| Sub-titles | 32 | - |
| Sound tracks | 8 | 1 |
| Symbol |  |  |
DVD features symbols
Each DVD disc contains various features depending on production of the disc. Below are some of the symbols representing the features:

Number of Audio Tracks

Screen Format

Number of Subtitles

Zoom

Angle Indicator

The player has built in copyright protection technology that prevents copying from a DVD disc to any media.
If a video recorder is connected to the player, the video output image will be distorted during recording.
REMARK
Some features contained in this DVD player are related to the DVD disc's software.
Some features cannot be performed if the disc does not support the feature, or requires special settings.
Check the features printed on the disc's packing or follow the instructions of the Disc's on screen menu.
Select a DVD disc
DVD Region Code
DVD discs and DVD players are manufactured under the worldwide agreed DVD Regional Code System that the player will operate only with corresponding disc of the same Regional Code.
| Region code | Region |
| 1 | Canada, USA |
| 2 | Europe (incl. Poland, Romania, The Czech republic), Japan, Middle East (incl. Saudi Arabia, Egypt, Iran, South Africa) |
| 3 | East Asia (incl. Hong Kong, Taiwan, South Korea), South-East Asia |
| 4 | Australia, Caribbean, Central & South America, Mexico, New Zealand |
| 5 | Africa, Former Soviet Union, India, North Korea, Pakistan, Turkmenistan |
| 6 | China |
Care of disc
Video disc contains high-density compressed data that needs proper handling
- Hold the disc with fingers. Hold the disc's outer edge and/or the center spindle hole. Do not touch the disc surface.
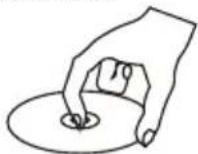

• Do not bend or press the disc. Do NOT expose the disc to direct sunlight or heating sources.

• Store discs in cabinet vertically, in dry condition. Prevent exposure to:
• Direct sunlight
* Heat or exhaust from a heating device.
• Extreme humidity.
- Clean the disc surface with a soft, dry cleaning cloth. Wipe the disc surface gently, radically, from center toward the outer edge.
• Do not apply thinner, alcohol chemical solvent, or sprays when cleaning. Such cleaning fluids will permanently damage the disc surface.
This player is compatible to the following disc types:
DVD single sided / double sided single layered / double layered
CD-DA
CD-MP3
CD-R / CD-RW*
PICTURE CD
*NOTE: Some PC application files on CD-R or CD-RW CANNOT be accepted by the unit, e.g. CD-ROM under PC Windows, etc. (CD-R / CD-RW writing format may be different, some discs are not acceptable)
About MP3
MP3 (MPEG 1, Audio Layer 3) is a digital audio format for quick downloading files that sound as good as CDs. MP3 uses entropy encoding to reduce the number of redundant sounds in an audio signal to a minimum. It takes music from a CD and reduces it by a factor of 12, with no noticeable loss of quality. On a normal CD of 74 minutes you can store over 130 songs.
Disc information
Sampling rate should be 44.1 kHz and bit rate is recommended within the range from 128 Kbps to 256 Kbps, in order to achieve the best performance. In general, higher quality settings result in larger file sizes.
MP3 Format
| Sampling rate | Bit rate | Quality |
| 44.1 kHz | 56 Kbps | 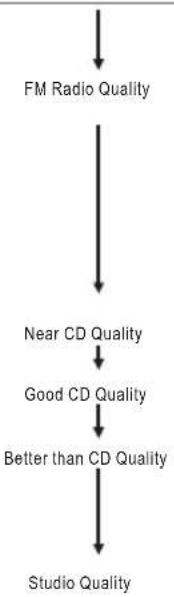 |
| 44.1 kHz | 64 Kbps | |
| 44.1 kHz | 80 Kbps | |
| 44.1 kHz | 96 Kbps | |
| 44.1 kHz | 112 Kbps | |
| 44.1 kHz | 128 Kbps | |
| 44.1 kHz | 160 Kbps | |
| 44.1 kHz | 192 Kbps | |
| 44.1 kHz | 224 Kbps | |
| 44.1 kHz | 256 Kbps |
No-play disc
The following discs are NOT acceptable by the DVD player:
- DVD disc with region code that does not match the player's region code (Check the disc's region code printed on the disc packing. Region code "ALL" will be acceptable by all players.)
• Some DVD discs that were purchased outside the application country
• PC application on CD-R/CD-RW
• CD-ROM for PC interface only
• CD-MP3 under Windows format
• MP3 CD-R/CD-RW of not proper format (see "Tips for making a good MP3 CD" below)
Tips for making a good MP3 CD
- Use good quality CD-RW disc, CD-R Gold Ultima is recommended. Up to 650 MB (74-minute CD) of MP3 files can be recorded.
- Select a high quality CD Recorder (Writer). HP CD-Write+9200 is recommended.
- Select an advance CD burning software. Easy CD Creator 4.0 or higher version is recommended.
- MP3 is data and not WAV information as such Mode 1 must be selected when compiling and burning your discs.
- Drag and drop (Direct CD) must not be used to compile the disc. The player will not recognise this format.
- Only single session recordings can be used. Multi session recordings are not recognized and will not be played
- Select Data CD Project (software user interface), file system should comply with the standard of ISO 9660 or Joliet. OR select MP3 CD Project for convenience operation (available in Easy CD Creator 5.0)
- It is advised to "finalize" the CD after burnt.
About the player
DVD player
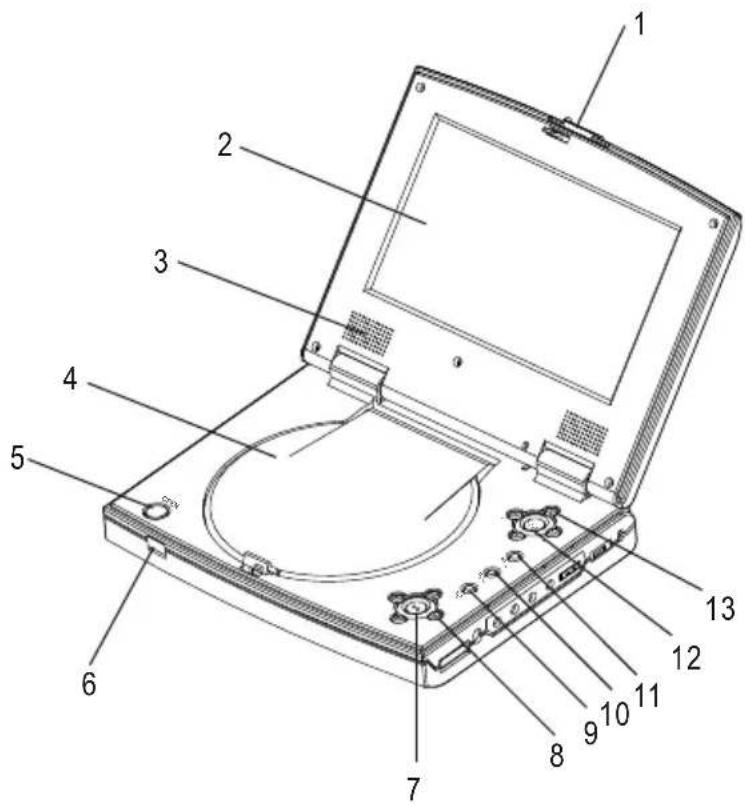
text_image
Labeled diagram of a laptop with numbered parts for identification1.Open
2. TFT LCD Screen
3.Speakers
4. Disc tray
5.Open button(disc tray)
6.Remote control Sensor
7.Play/pause button
- Previous/Next, Fast Forward/Backward
9.stop button - Menu button
- Mode button
12.Enter button
13.Directions/volume button
Up and right panel of the player
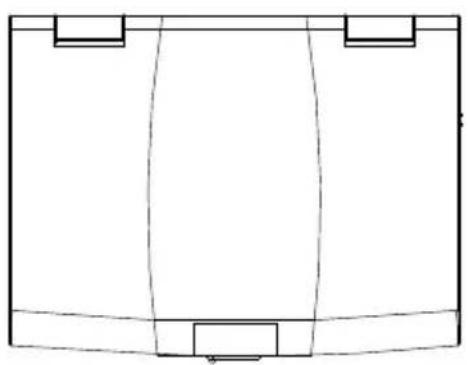
natural_image
Simple line drawing of a rectangular container with internal compartments and side supports (no text or symbols)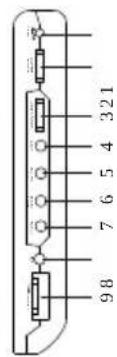
text_image
321 7 6 5 4 98- Power input
- Power ON/OFF
-
Video input/output button
4.Composit video output
5.YUV S-Video -
Audio input/output
- Coaxial digital audio
- Headphone output
8.Volume +/-
Load the battery
Note:
Put the battery under the player, aim the three grooves and push down as the diagram shows. When unloading, press push to the opposite direction.
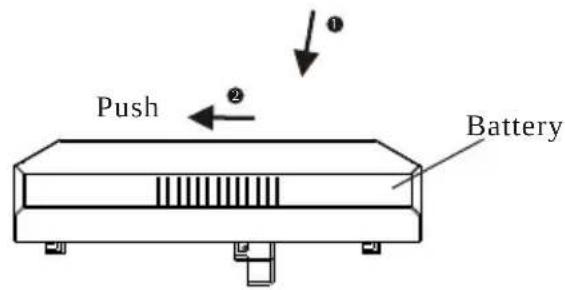
text_image
Push Battery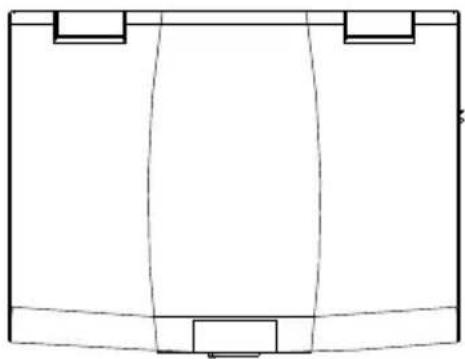
natural_image
Simple line drawing of a rectangular container with internal compartments and side supports (no text or symbols)
System connection figure
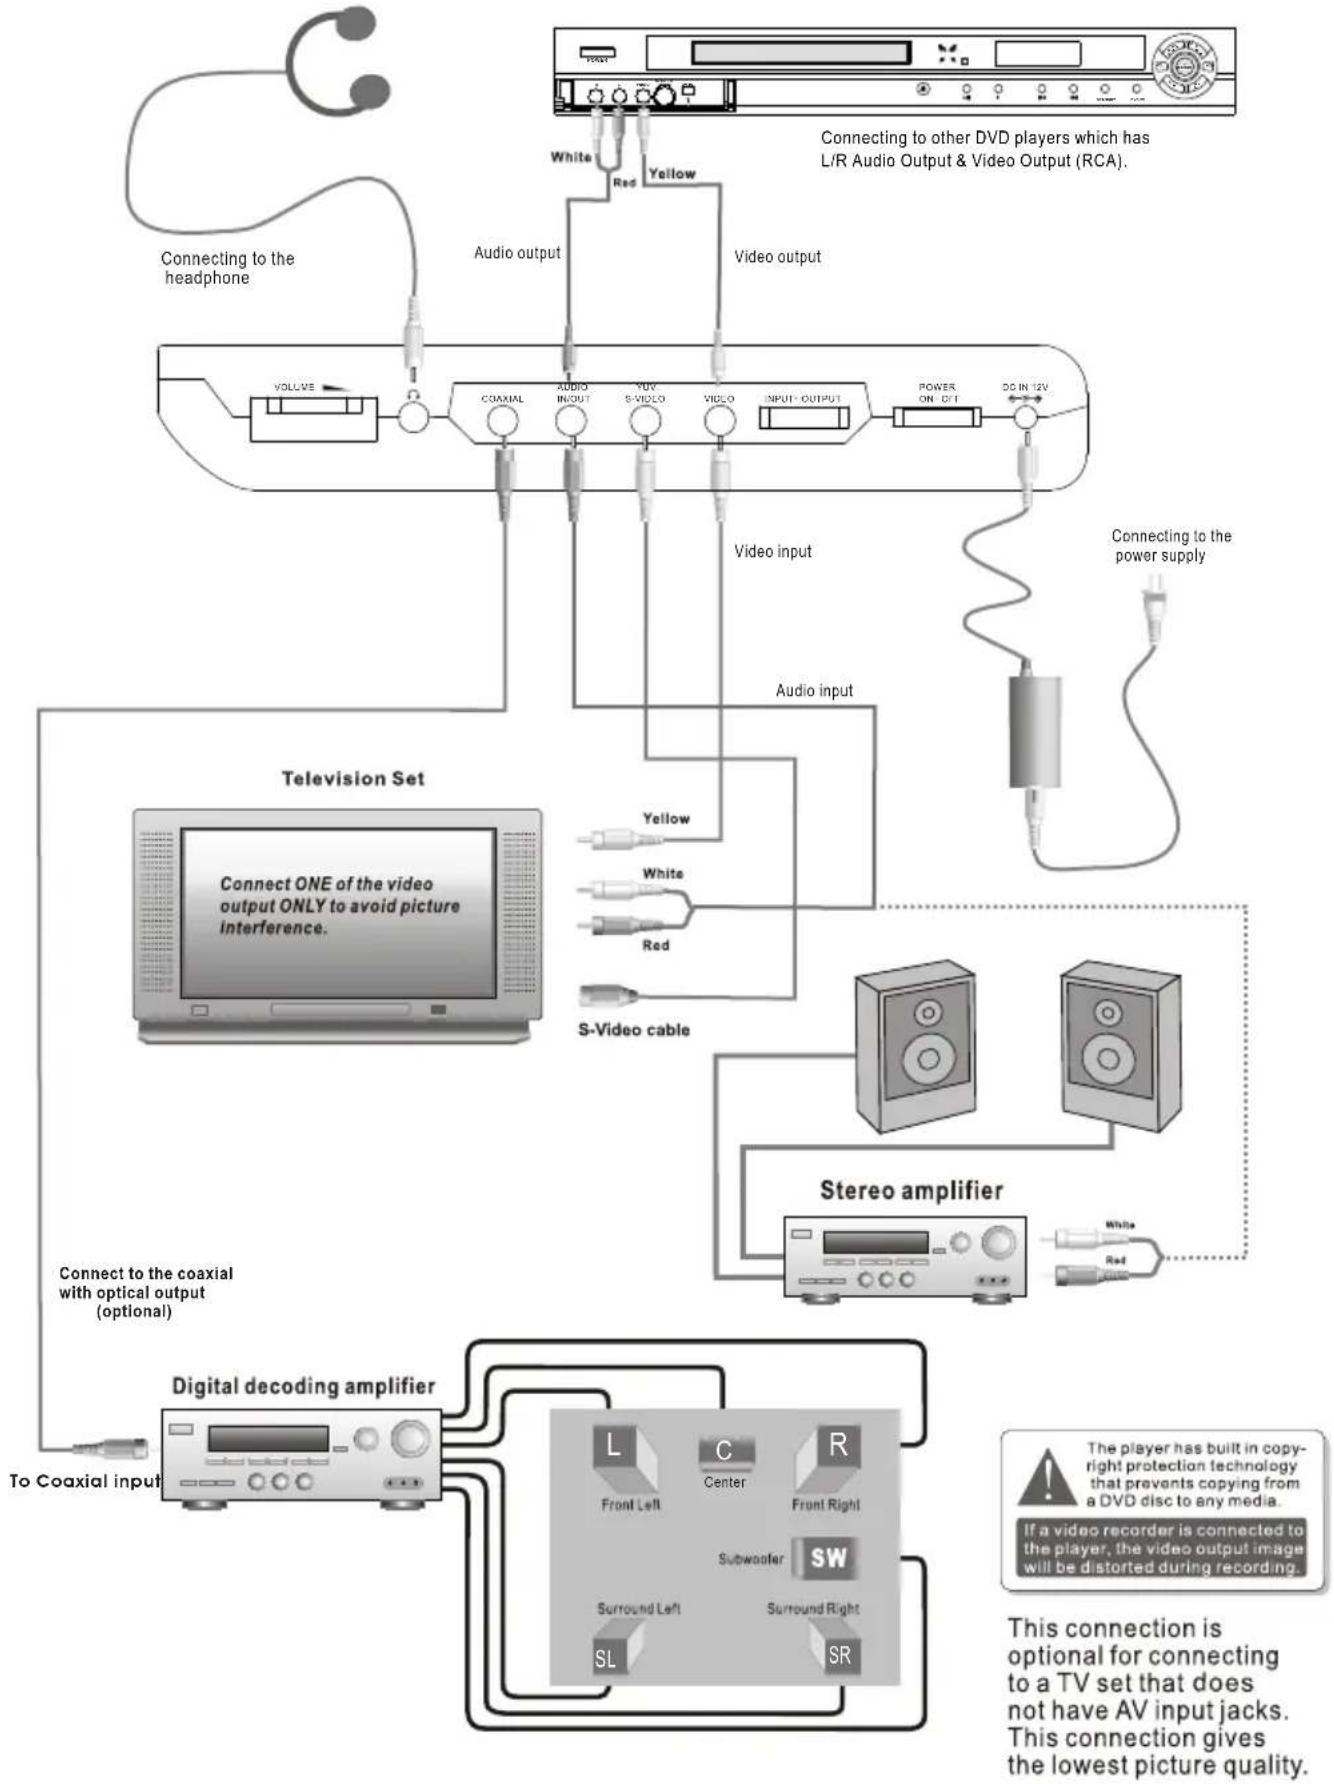
flowchart
graph TD
    A["Television Set"] --> B["Connecting to the headphone"]
    B --> C["Coaxial"]
    C --> D["Audio output"]
    D --> E["Video output"]
    E --> F["Power ON O/T"]
    F --> G["DO IN 12V"]
    G --> H["Audio input"]
    H --> I["S-Video cable"]
    I --> J["Stereo amplifier"]
    J --> K["White"]
    J --> L["Red"]
    J --> M["White"]
    J --> N["Red"]
    J --> O["White"]
    C --> P["Connect ONE of the video output ONLY to avoid picture interference."]
    P --> Q["To Coaxial input"]
    Q --> R["Digital decoding amplifier"]
    R --> S["L"]
    R --> T["C"]
    R --> U["R"]
    R --> V["Front Left"]
    R --> W["Center"]
    R --> X["Front Right"]
    R --> Y["Subwoofer"]
    R --> Z["SW"]
    R --> AA["Surround Left"]
    R --> AB["Surround Right"]
    R --> AC["SL"]
    R --> AD["SR"]
    style A fill:#f9f,stroke:#333
    style B fill:#ccf,stroke:#333
    style C fill:#cfc,stroke:#333
    style D fill:#fcc,stroke:#333
    style E fill:#cff,stroke:#333
    style F fill:#ffc,stroke:#333
    style G fill:#fcc,stroke:#333
    style H fill:#ffc,stroke:#333
    style I fill:#cfc,stroke:#333
    style J fill:#cfc,stroke:#333
    style K fill:#fcc,stroke:#333
    style L fill:#fcc,stroke:#333
    style M fill:#fcc,stroke:#333
    style N fill:#fcc,stroke:#333
    style O fill:#fcc,stroke:#333
    style P fill:#ffc,stroke:#333
    style Q fill:#fcc,stroke:#333
    style R fill:#cfc,stroke:#333
    style S fill:#cfc,stroke:#333
    style T fill:#cfc,stroke:#333
    style U fill:#cfc,stroke:#333
    style V fill:#cfc,stroke:#333
    style W fill:#cfc,stroke:#333
    style X fill:#cfc,stroke:#333
    style Y fill:#cfc,stroke:#333
    style Z fill:#cfc,stroke:#333
    style AA fill:#cfc,stroke:#333
    style AB fill:#cfc,stroke:#333
- Unpack the unit.
- Read through this owner's manual before installation and use.
- Load batteries into the remote control unit.
- Connect the system, make sure the connectors are secured.
- Connect the power plug to the AC power outlet.
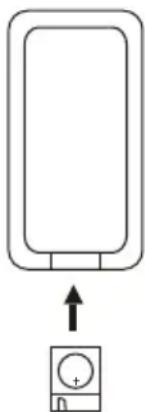
Loading batteries to the remote control
- Remove the battery compartment cover.
- Load two AAA (UM-4 or R03) batteries into the battery compartment.
- Make sure that the batteries have been inserted in the correct polarities matching to the symbols+,- marked in the battery compartment. Close the battery compartment cover.
- When replacing batteries, replace both batteries. Do not mix new and used batteries operating together, otherwise, the operation lifetime will be much shorter than normal.
- Remove the batteries if the unit will not be used for a prolonged period of time.
natural_image
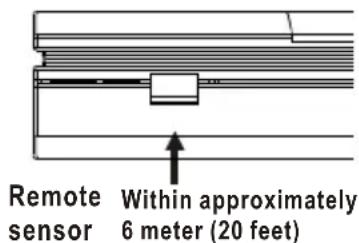
Simple line drawing of a rectangular device with an upward arrow pointing to a circular button (no text or symbols)The remote control transmits a directional infrared beam. Be sure to aim the remote control directly at the infrared sensor of the unit during operation.
If the sensor has been covered or there is a large object between the remote control and the sensor, the sensor will not respond.
The sensor may not be able to receive the remote signal when it is exposed to direct sunlight or a strong artificial light (fluorescent or strobe light). In this case, change the direction of the light or reposition the unit to avoid direct lighting.
Switch on the player
Press the main power switch on the DVD player.
Power on the TV set, and the amplifier if connected.
Set up the system
Select the corresponding setting of the TV set (AV1, AV2, S-Video, DVD etc.).
For R F modulator connection, select the corresponding turned channel until the DVD screen appears.
If amplifier has been connected, select the corresponding output mode.
Load a disc
Press OPEN button to eject the disc tray.
Load a disc, label side up, onto the disc tray.
Automatic playback
The unit will take a few seconds to load the disc's initial data, display the disc type logo on the left upper corner on screen, and then start playing back automatically.
NOTE Normally, when a MP3 disc is loaded, the player will take longer time to load.
If a DVD disc menu appears on screen
flowchart
graph TD
    A["ENTER"] --> B["VOL-VOL+"]
    B --> C["↓"]
    B --> D["↑"]
    B --> E["↓"]
    B --> F["↑"]
    style A fill:#ccc,stroke:#333
    style B fill:#ccc,stroke:#333
    style C fill:#ccc,stroke:#333
    style D fill:#ccc,stroke:#333
    style E fill:#ccc,stroke:#333
    style F fill:#ccc,stroke:#333
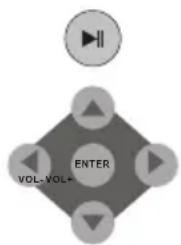
Press ▶|| button on the remote (or on the unit) to start playing.
Press the ARROW buttons to select the desired feature in the menu. And then press ENTER button to confirm a selection in the menu.
text_image
Remote sensor Within approximately 6 meter (20 feet)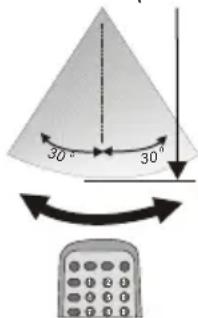
text_image
30° 30°GETTING STARTED
Problem disc messages
The following message will display on screen when there is a format problem with the loaded disc:
"WRONG REGIONAL DISC
Region code of the disc is not matching to the player's region code (region 1 to region 6).
"WRONG PASSWORD"
The rating level of the disc is higher then the rating level setting of the player.
The player will not play the disc.
"WRONG DISC"
The player is equipped with automatic disc quality detection software. When the player detects a problem disc or a damaged disc, the player may keep playing the disc at lower quality or stop playing, depending on the damaged level of the disc.
Production qualities of DVD discs vary, some discs might deviate from the industrial standard. Some incorrectly formatted discs may playback on the player. However, the playback and operational quality of those disc may be substandard.
DTS DISC
For DTS digital audio stream only No analog audio output.
This player does not have a DTS decoder bulti-in. It may result in no analog audio output if you select DTS sound output.
- Make sure you select Dolby 5.1 or 2 channel down mix instead of DTS setting .
- Connect the digital audio output (coaxial) to a digital amplifier, in order to enjoy DTS audio system.
Power management
If the player will not be in use for a long time, unplug the player for personal safety.
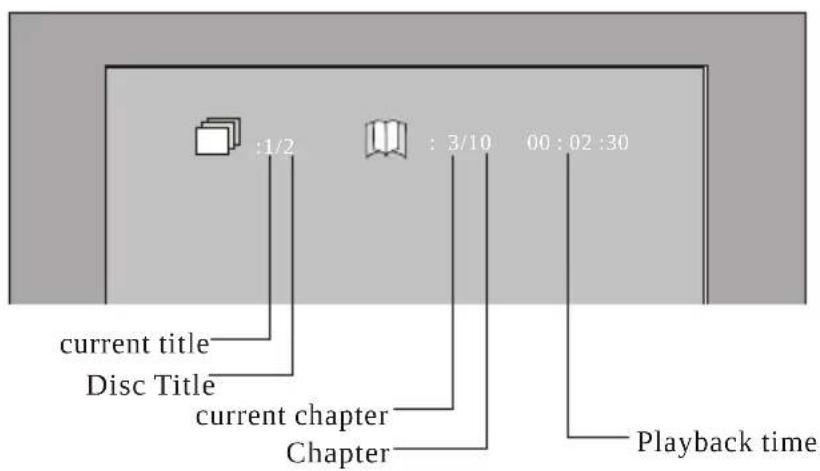
An On Screen Display (OSD) indicator will be displayed at the upper part of the TV screen when certain functions are executed, or when pressing the DISPLAY button on the remote control.
The OSD indicator is a user friendly interface designed to display the status of playback type. When a different disc is loaded (DVD, CD, MP3); the OSD indicator bar will be different.
The OSD bar will appear automatically if it is activated by pressing the DISPLAY button. Press the DISPLAY button again and a new status bar will appear. Press DISPLAY button a third time and the OSD bar will disappear. When OSD indicator bar appears, press other button, the OSD indicator bar will disappear automatically.
DVD mode - OSD
1
text_image
current title Disc Title current chapter Chapter :1/2 : 3/10 00:02:30 Playback time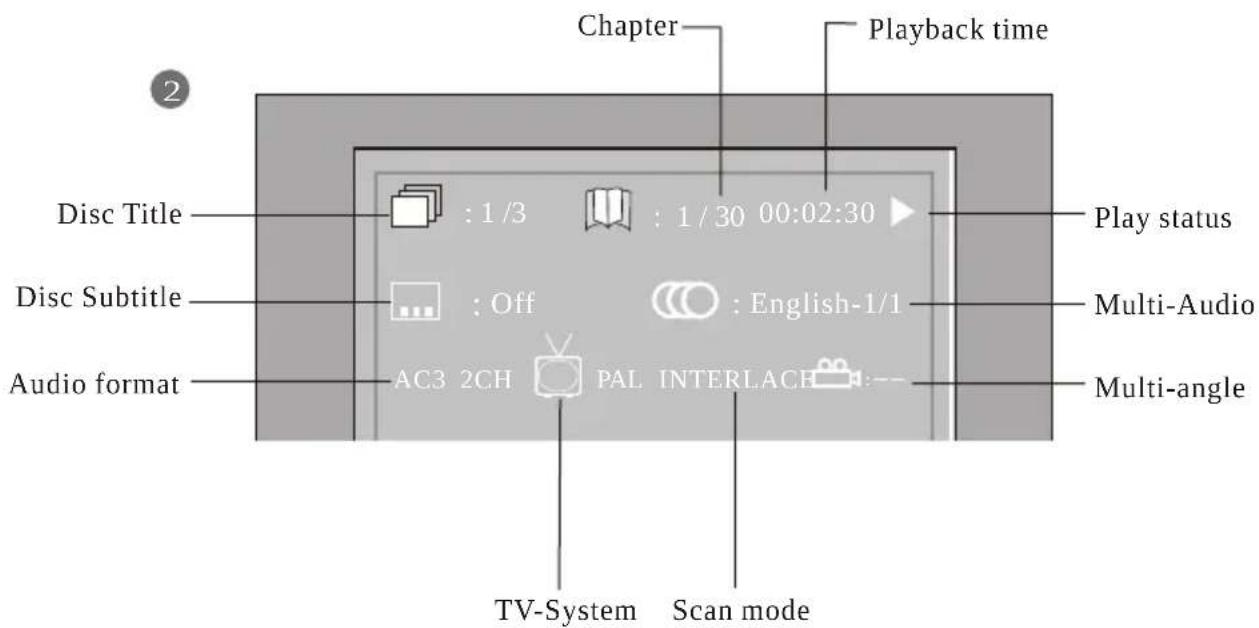
text_image
Chapter Playback time Disc Title : 1/3 : 1/30 00:02:30 Disc Subtitle : Off : English-1/1 Audio format AC3 2CH PAL INTERLACH :-- Play status Multi-Audio Multi-angle TV-System Scan mode©

©

(PLAY) --- Press button to start program play.
(STOP) --- Press the STOP button twice quit the program mode.
(CLEAR) --- Press CLEAR button if you want to cancel the wrong information you input before or cancel the desired track. Press CLEAR again to cancel all the tracks.
Language Setup
OSD
Menu
Audio
Subtitle
| PROGRAM | Track | |
| 1. | 02 | 01 |
| 2. | 02 | |
| 3. | 03 | |
| 4. | 04 | |
| 5. | 05 | |
Do not move any bar to select item, please make sure the mode is in stop mode.
Some DVD disc do not allow program setting. Single track disc cannot be programmed, MP3 disc cannot be programmed.
In STOP mode, press SETUP button SETUP Highlight LANGUAGE.
Press UP/DOWN button
Press ENTER button, the screen displays sub-menu.
Press UP/DOWN button to highlight the desired item in the LANGUAGE.
Menu
Press ENTER to confirm your selected item.
OSD
ENGLISH
FRENCH
GERMAN
ITALIAN
SPANISH
Various features of the player can be adjusted in the SETUP menu:
1 Press SETUP button SETUP menu appears.
2 Press the UP/DOWN button to highlight the desired menu.
Select the players OSD.
Press ENTER to confirm the selection.
Press SETUP button ^SETUP to quit.
ENGLISH
| MENU | CLEAR | RETURN | |
| ENTER | SETUP | ||
| VOL-VOL+ | |||
| MODE | PBC | PROG |
Language Setup
OSD
Menu
Audio
Subtitle
English
French
German
Italian
Spanish


©

| Video Format | MPEG 2 |
| Audio Format | MPEG 1, LAYER 1, LAYER 2, LAYER 3 |
| Signal Output | Color System: PAL / NTSCAudio System: DOLBY DIGITAL down mix stereoDOLBY DIGITAL digital outputAudio DAC 18bit/48KHzVideo Output: 1Vpp(at 75ohm)Audio Output (Stereo): 2 Vpp |
| Frequency Response | CD: 20Hz-20KHz (EIAT)DVD: 20Hz-22KHz (48K) |
| S/N ratio | >90 dB |
| THD | <0.05% |
| Output Terminals | Video(composite) outputx1S-Video output x1Component Video outputDown Mix Stereo output(Left and Right)x1Digital Audio(coaxial) outputx1 |
| Power input | AC 100-240V/DC 12V 2.0A20W (Max.) |
| Dimension | Body size: 206x155x35mmPacking size: 375x85x238mmNet weight: 0.9kg |
| Accessories | Video/Audio Cord 1Audio Cord 3S-Video Cord 1Adaptor 1Battery 1Remote Control 1User Manual 1Earphone (for option)Earphone commutator (for option)Car Cigarette Adaptor (for option) |