
MT-725TWIN - Portable DVD Player DENVER - Free user manual and instructions
Find the device manual for free MT-725TWIN DENVER in PDF.


| Product Type | Portable DVD Player |
| Brand | Denver |
| Model | MT-725TWIN |
| Dimensions | 220 x 150 x 34.5 mm |
| Weight | 665 g |
| Display | 7" Color TFT LCD |
| Power Supply | AC/DC adapter 12V/1.2A |
| Battery Type | Rechargeable AA 1.2V Ni-MH (up to 1800mAh) |
| Battery Life | Approx. 2.5 hours |
| Disc Compatibility | DVD, Video CD, Audio CD, JPEG CD (8cm/12cm) |
| Audio Output | Line out (20Hz-20kHz), earphone jack |
| Video Output | 1.0Vp-p/75 ohm (AV out) |
| USB Port | USB 1.1 for media playback |
| Memory Card Slot | SD/MMC/MS |
| Remote Control | Card-type remote control included |
| Accessories Included | AC/DC adapter, AV cable, earphone, remote control, AC&DC cable |
| Working Temperature | 5°C - 45°C |
| Safety Certifications | FCC, Dolby, Macrovision |
| Cleaning | Use soft dry cloth; for LCD use eyeglass cloth |
Frequently Asked Questions - MT-725TWIN DENVER
User questions about MT-725TWIN DENVER
0 question about this device. Answer the ones you know or ask your own.
Ask a new question about this device
Download the instructions for your Portable DVD Player in PDF format for free! Find your manual MT-725TWIN - DENVER and take your electronic device back in hand. On this page are published all the documents necessary for the use of your device. MT-725TWIN by DENVER.
USER MANUAL MT-725TWIN DENVER
Operating Instructions
7 TWINS PORTABLE TABLET DVD PLAYE
Content
1 PRECAUTIONS....01
2 CAUTIONS ON USING THIS PLAYER 04
3 PORTABLE DVD ACCESSORIES....06
4 SPECIFICATION....07
TYPES OF DISCS PLAYABLE ON THIS PLAYER....07
PORTABLE DVD SPECIFICATIONS....07
MONITOR ACCESSORIES AND SPECIFICATIONS....08
5 PARTS NAME AND FUNCTION.... 09
FRONT OF THE PLAYER....09
KEYPAD IN THE PLAYER....09
FRONT OF THE MONITOR.... 10
KEYPAD IN THE MONITOR....10
BACK OF THE PLAYER....
RIGHT SIDE OF THE PLAYER....
LEFT SIDE OF THE PLAYER....12
TOP OF THE PLAYER....12 13
BACK OF THE MONITOR.... 13
LEFT SIDE OF THE MONITOR..... 14
REMOTE CONTROL UNIT....
6 USING REMOTE CONTROL UNIT...... 16
PRECAUTIONS BEFORE USING REMOTE CONTROL. UNIT.... 16 RANGE.... 16
INSTALL BATTERY FOR REMOTE CONTROL UNIT.... 17
7 USING THE BATTERY....18
PRECAUTIONS BEFORE USING THE BATTERY....18
BATTERY STORAGE....18
BATTERY LIFE....18
USING THE BATTERY....18
INSTALLING AND REMOVING THE BATTERY....18
RECHARGING THE BATTERY BY USING 19 AC DC ADAPTER....
CAUTIONS WHEN CHARGING THE BATTERY....20 20
8 CONNECTING THE PLAYER TO OTHER COMPONENTS. 21
CONNECTING TO AC-DC ADAPTER....21
CONNECTING EARPHONE....21
CONNECTING TO USB STORAGE....22
CONNECTING TO MEMORY CARD.... 22
CONNECTING TO A TV SET....
CONNECTING TO AN AMPLIFIER....
CONNECTING TO AN ACTIVE SPEAKER SYSTEM.....24
CONNECTING TO AN AUDIO/VIDEO PLAYER 25
SYSTEM IF YOU WANT THE UNIT AS A MONITOR.....27
CONNECT TO A MONITOR.... 27 26
©
©
©
MACROVISION: This product incorporates copyright protection technology that is protected by U.S. patents and other intellectual property rights. Use of this copyright protection technology must be authorized by Macrovision, and is intended for home and other limited viewing uses only unless otherwise authorized by Macrovision. Reverse engineering or disassembly is prohibited.
FCC NOTICE: This device complies with part 15 of the FCC Rules. Operation is subject of the following two conditions: (1) this device may not cause harmful interference, and (2) this device must accept any interference received, including interference that may cause undesired operation.
DOLBY: Manufactured under license from Dolby Laboratories. "Dolby" and the double-D symbol are trademarks of Dolby Laboratories.
©
Cautions on Using this Player
When using with car power cable in cars
Please turn on the engine and then connect with the car power cable for using.
Cleaning the player
Normally clean the player using a soft, dry cloth. For tough dirt, apply some neutral detergent diluted in 5 to 6 parts water to a soft cloth, wring out thoroughly, wipe off the dirt, then wipe the player with a dry cloth. Note that alcohol, thinner, benzene, insecticides, etc., may cause the print or coating to peel off. Also avoid leaving rubber or plastic products in contact with the player for long periods of time, as this may damage the cabinet. When using chemically treated cloths, read the cloth's instructions carefully. Always unplug the power cord from the power outlet before cleaning the player.
To clean dirt off the liquid crystal display, wipe the display gently with a soft, dry cloth (such as an eyeglass cleaning cloth). Note that leaving water droplets on the display for long periods of time may result in discoloration or stains. For tough dirt, use a commercially available liquid crystal display cleaner.
Copyrights
Un a uthor i zed dup l icati o n, broa d cast, p u blic pe r forma n cc or rent al of disc s is pro o hibit e d by law.
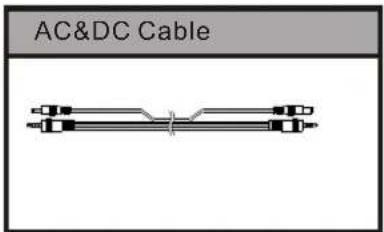
After unpacking, check that all the accessories listed below are included.
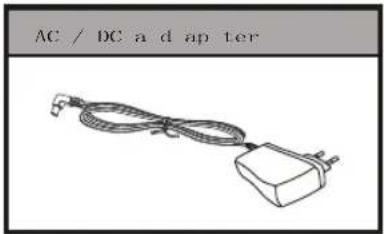
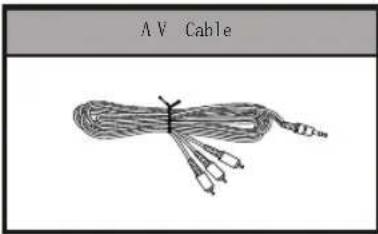
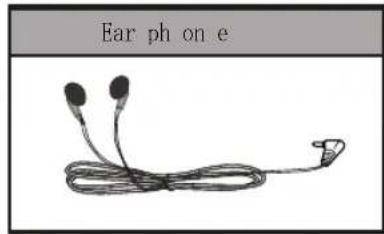

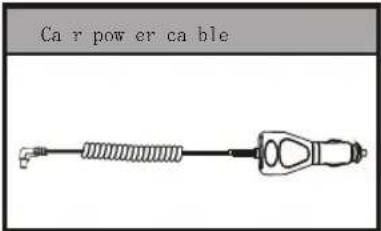
n it
The discs listed on the below can be played on this player without any adapter

DVDs 8cm/12cm;

Vedio CDs 8cm/12cm;

Audio CDs 8cm/12cm;

JPG CDs 8cm/12cm.
Noted:
- Don't using the disc that is scratched seriously
Specifications
| Disc type | DVD Video CD DAVideo CD JPEG |
| Audio output | LINE OUT (20Hz-20kHz)Ear phon e outp ut |
| Video output | Video o utpu tVid eo out put: 1 .0Vp p/75 ohm |
| LCD panel | 7′col or TFT |
| Power | AC- DC ada pter 1 2V/1 .2ARechargeable AA 1.2V battery |
| Unit size | 220mmX150mmX34.5mm |
| Weight | 665g |
| Working temperature | 5 °C~45 °C |
©
©
©
©
Portable DVD parts name and function
Left side of the player
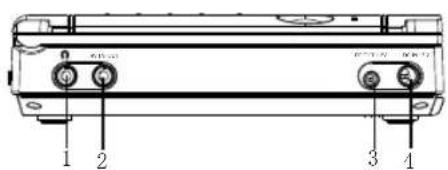
- Earphone jack, connecting to earphone
- Audio/Video input or output, input/output audio/video signal
- 12V DC output Connecting to the monitor.
- 12V DC input Connecting to the AC-DC adapter or car adapter.
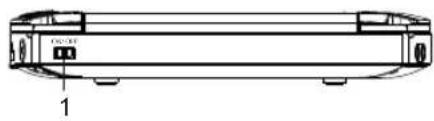
Top of the player
natural_image
Line drawing of a rectangular electronic device with ports and a labeled component (no text or symbols beyond label)- Power switch Turn ON/OFF the unit
Monitor parts name and function
Back of the monitor
Left side of the monitor
A/13
B.61127 AGN4V
1 2
3 4
1. Support
Pull out the support to the proper position in order to let the unit stand.
Top of the monitor
GIC OFF
1
1. Power switch
Turn ON/OFF the unit
Push power switch to ON to turn on the monitor when the unit is power, power indicator led light.
Push power switch to OFF to turn off the monitor, power indicator led off.
-
Earphone jack connecting to earphone
-
Audio/Video input Input audio/video signal
-
12V DC output
-
12V DC input Connecting to the DVD Player.
©
©
©
©
©
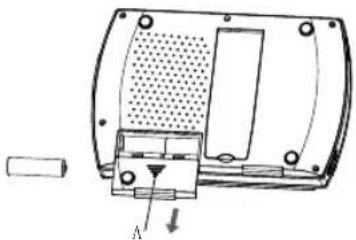
Installing and removing the battery
- Please install the battery as following:
<1> Push A of the battery cover (back of the player) according to the direction;
<2> Place the battery into the battery slot, make sure that + side of the battery is connected to the battery slot correctly;
<3> Tighten the battery cover.
Note:
■ Please use rechargeable AA 1.2V/1800mAh(up) battery only.
- Please remove the battery as follows:
<1> Turn off the player;
<2> Push A according to the direction;
<3> Take out the battery.
natural_image
Technical diagram of a mechanical component with internal structure and labeled section (no readable text or symbols)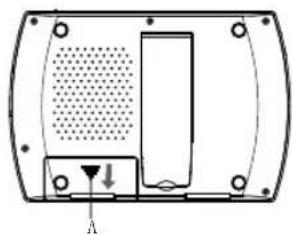
natural_image
Pure mechanical component diagram without any text, numbers, or symbols
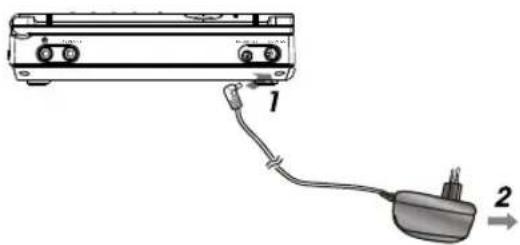
Recharging the battery by using AC-DC adapter
Please recharge the battery as follows:
1 Install the battery
2 Connect the AC-DC adapter to the player
■The charging time is around 16 hours
natural_image
Diagram of a device with two connected cables, labeled 1 and 2, showing no text or symbols beyond labelsCautions when charging the battery
■ The temperature during recharging affects the recharging efficiency.
■ Recharging is most efficient between temperatures of 10°C 30°C.
To protect the battery unit, do not recharge a fully charged battery unit repeatedly.
■ Repeated overcharging the battery may deteriorate the battery performance.
When the battery unit is hot, it may take longer than usual time for recharging or may sometimes be unable to be recharged. Wait for the battery unit to cool down before retrying recharging.
CONNECTING THE PLAYER TO OTHER COMPONENTS
Connecting to AC-DC adapter
- Please plug the AC-DC adapter to AC power socket;
- Connecting the DC output of adapter to DC in of the main unit.
Note:
■ AC-DC adapter specification: 12V/1.0A Please use the adapter that comes as standard accessory of the main unit.
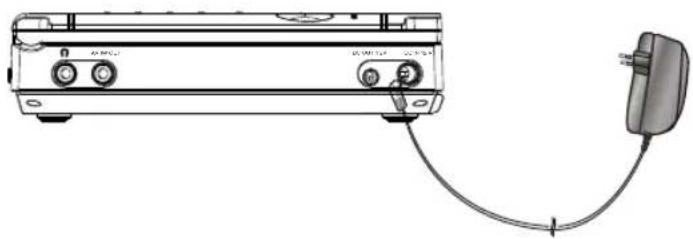
natural_image
Line drawing of a portable electronic device connected to a power outlet cable (no text or symbols visible)Connecting earphone
■ Connect the earphone plug securely to the carphone jack of the main unit.
■ To listen to the audio, using ▶ to adjust the volume to a comfortable level.
Note:
■ Please do not use DTS disc. Strong noise is produced when DTS discs are played.
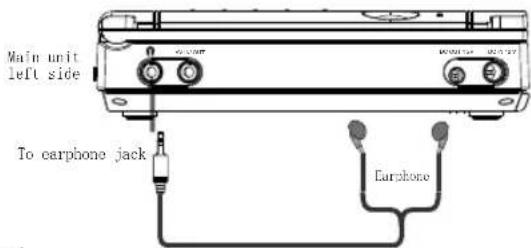
Note :
■ Insert the earphones plug securely. No sound will be heard unless the earphones are securely connected.

CONNECTING THE PLAYER TO OTHER COMPONENTS
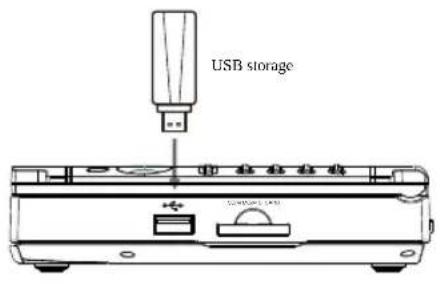
Connecting to USB storage (optional)
1 Please connect the USB storage to the USB terminal of the main unit
2 The main unit can read the contents of the USB storage automatically
Note:
■ The USB terminal of the main unit supports USB 1.1 only.
■ The main unit can read the contents of USB storage when there is no disc in the main unit.
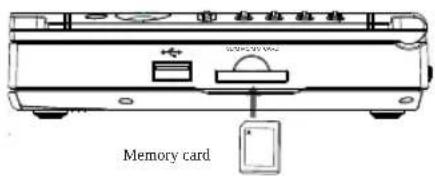
Connecting to memory card (SD/MMC/MS) (optional)
1 Please insert the memory card to the memory socket of the main unit
2 The main unit can read the contents of the memory card automatically
Note:
■ Please insert the memory card in the right direction.
The main unit can read the contents of the memory card when there is no disc in the main unit.
Main unit right side
CONNECTING THE PLAYER TO OTHER COMPONENTS
Before connecting
Turn off the power of the player and the devices to be connected.
Connecting to a TV set
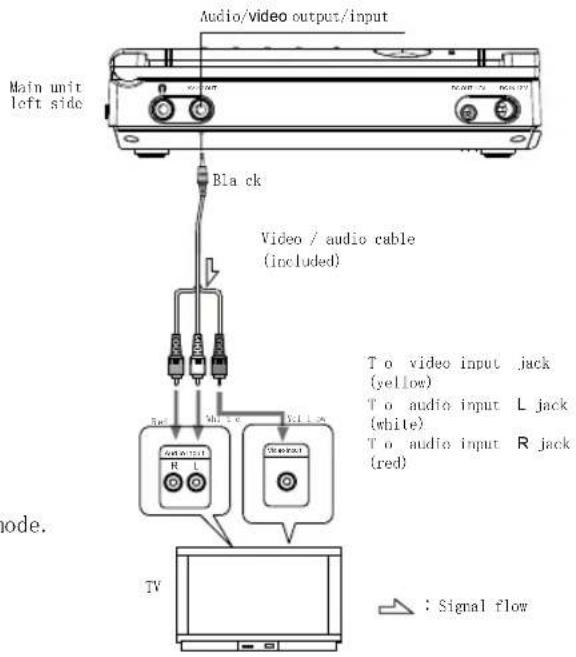
Note:
■ Please set the main unit to AV output mode.
©
©
©
©
Turning on/off the main unit
1 Turn power on
■ Push power switch to ON (main unit) to turn on the unit when the unit is powered, power indicator led light.
2 Turn power off
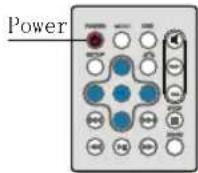
■ Press POWER (remote control unit) or push power switch to OFF (main unit) to turn off the unit, power indicator led off.
BASIC OPERATIONS
Placing discs
Playing discs
- Reading disc,
- The disc will be played automatically
- Press PLAY to start to play
Removing disc
- Power on the player
- Open the TFT cover
- Placing the disc
- Close the TFT cover
1 Press STOP to stop play
2 Open the TFT cover
3 Take out the disc
4 Close the TFT cover
Note:
Please place the disc carefully
Please don't use a bad disc
Mode settings (Brightness/Contrast/Color/TFT display mode/TFT Reverse mode/AV out/in mode(optional))
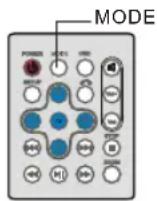
Please press MODE (remote control unit) to select a suitable mode when the main unit is in play mode.
1 Press MODE, setting brightness;
2 Press MODE, setting contrast;
3 Press MODE, setting color;
4 Press MODE, setting LCD display mode;
5 Press MODE, setting reverse mode;
6 Press MODE, setting AV output/input mode(optional)
■ The unit will stop play the disc when it is in AV input mode
■ Please do not connect signal input when the unit is in AV output mode
■ AV output mode is default mode.
Note:
Please press ↗/ (In the remote control unit) to adjust.
BASIC OPERATIONS
Stopping the playing
1 Press STOP to pause the playing, the unit can memorize the stop point
2 Press PLAY to continues play from the pausing point
3 Press STOP to stop the disc
STOP
PLAY
Note: This function is not available for all disc.
Pausing the disc
1 Press PLAY/PAUSE to pause the playing when playing
2 Press PLAY/PAUSE to continues playing
Scanning forward and backward
-
Press / (remote control unit)
1.5 seconds for fast playing in forward/backward direction: -
Change the playing speed to X2, X4, X8, X20 and normal with every push of REV/FWD on the remote control unit.
REV
FWD
PLAY/PAUSE
©
©
©
©
BASIC OPERATIONS
Playing the file storing in a USB storage(optional)
Connect on the USB storage to the USB socket of the main unit, the file stored in the storage will be read automatically.
- Power on the unit, connecting the USB storage to USB socket. (in no disc mode)
- "READ USB" will be shown in LCD and the files will be displayed in the LCD when the unit finished the reading.
[WP3_1] 1001, WP3
D1, WPI: 1 02, 1001
03, 1002
03, 1003
04, 1004
-
Operation is like playing audio files or JPEG files
-
Please remove the USB storage directly when not using the USB storage
Audio, video and JPEG file can be played on this unit
Note:
USB in this unit is USB 1.1 The unit must be in no disc mode when the file stored on the USB is played.
Playing the file storing in a memory card(optional)
Please insert the card (SD, MMC and MS) in to the socket. The file will be played automatically.
- Power on the unit, inserting the card in to the socket. (in no disc mode)
- “READ CARD” will be shown on the LCD and the files will be displayed on the LCD when the unit finished the reading.
[MP 3_1] 1 0 01. MP3
0 1 . MP3 _ 1    0 1 . 1 0 0 1
    0 2 . 1 0 0 2
    0 3 . 1 0 0 3
    0 4 . 1 0 0 4
The SD, MMC and MS can be read in this unit
Note:
The unit must be in no disc mode when the file stored on the card is played
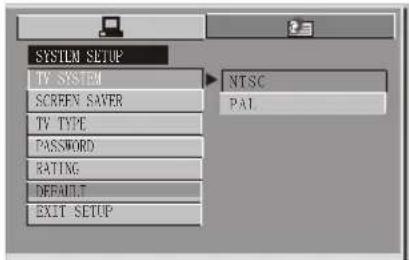
Press SETUP when the main unit is in play mode. The set up menu will be displayed in LCD.
Selecting a TV system
Please select the proper video signal system if you want to watch with a TV set.
■ NTSC: please select this item when TV set is NTSC system TV set
■ PAL: please select this item when TV set is PAL system TV set
Default:NTSC
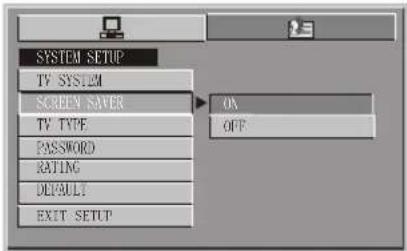
Setting screen saver
This function can protect the TFT life if the unit stays in stop for more than 1 minutes.
■ ON: screen saver enable
■ OFF: screen saver disable
■ Default: ON
Note:
■ The picture may be a grey picture if the system is not correctly set.
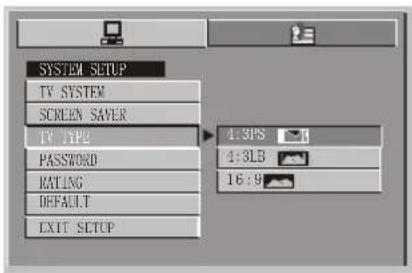
Selecting a TV scale
16:9 : Please select this item when connecting this unit to a 16:9 TV set.
4:3LB : Please select this item when connecting this unit to a normal TV set.
4:3PS : Please select this item when connecting this unit to a normal TV set.
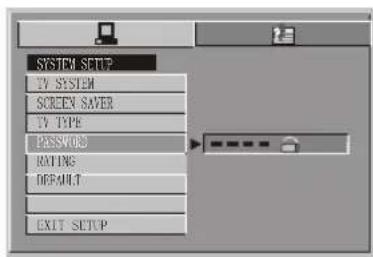
Setting parent lock
-
Default setting: 0000
-
When unlock, new parent lock can be input and select the parent lock level
Note:
■ Picture scale is depending on the disc.
MAIN UNIT SETTINGS
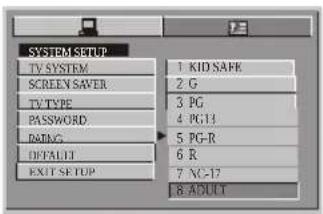
Setting parent lock level
This setting can control the unit play parent lock DVD disc.
■ Level is divided into 8 level
■ Selecting ADULT, the lock is cancel
Default: ADULT
Note:
■The parent lock level can not be set if the parent lock is locked.
Default setting
To restore the factory setting, please select this item and press OK

©
©
-PDV7030 EN--V0.1-
- Operating Instructions
- Content
- Cautions on Using this Player
- Cleaning the player
- Copyrights
- Noted:
- Portable DVD parts name and function
- Left side of the player
- Top of the player
- Monitor parts name and function
- Support
- Power switch
- Installing and removing the battery
- Note:
- Recharging the battery by using AC-DC adapter
- Cautions when charging the battery
- CONNECTING THE PLAYER TO OTHER COMPONENTS
- Connecting to AC-DC adapter
- Connecting earphone
- Connecting to USB storage (optional)
- Connecting to memory card (SD/MMC/MS) (optional)
- Before connecting
- Turning on/off the main unit
- BASIC OPERATIONS
- Stopping the playing
- Pausing the disc
- Scanning forward and backward
- Selecting a TV system
- Setting screen saver
- Selecting a TV scale
- Setting parent lock
- MAIN UNIT SETTINGS
- Setting parent lock level
- Default setting
Brand : DENVER
Model : MT-725TWIN
Category : Portable DVD Player