
CTV 1408 - TV SEG - Free user manual and instructions
Find the device manual for free CTV 1408 SEG in PDF.


User questions about CTV 1408 SEG
0 question about this device. Answer the ones you know or ask your own.
Ask a new question about this device
Download the instructions for your TV in PDF format for free! Find your manual CTV 1408 - SEG and take your electronic device back in hand. On this page are published all the documents necessary for the use of your device. CTV 1408 by SEG.
USER MANUAL CTV 1408 SEG
text_image
Connect VCR's RF OUT terminal to the RF IN jack located on the rear Coaxial Cable ANTENNA IN VCR AUDIO / VIDEO IN DVD Player SCART Cable SCART terminal Camcorder Video Cable Audio Cable VCR AV IN VIDEO or L/MONO AUDIO R AV IN on the side pane AUDIO/VIDEO IN VCR SCART Cable SCART terminalHinweise:
text_image
SETUP Language English Blue ScreenBlue Screen Pic ImprovePic Improve Color TempColor Temp AVLOff Child LockChild Lock Hotel modeHotel mode Degauss Select ADJUSTtext_image
Hotel mode Password Tuning Lock Off Max. Volume 63 New Password Channel Lock Off Clear All SELECT ADJUSTUniverselles Kennwort: 8888
Congratulations! You have purchased one of the finest Color TV's on the market!
This manual will help you use many exciting and useful features to make your TV viewing more enjoyable than ever before.
Before operating your TV set, please read all these safety and operating instructions completely and then retain for future reference.
Customer's Record
You will find the model number and chassis number on the back of your TV set.
Record these numbers in the spaces provided below.
Refer to them whenever you call upon your dealer regarding this product.
Model Number: ____ Chassis Number: ____
Safety Precautions
WARNING: TO REDUCE THE RISK OF FIRE OR ELECTRIC SHOCK, DO NOT EXPOSE THIS APPLIANCE TO RAIN OR MOISTURE.
CAUTION

RISK OF ELECTRIC SHOCK DO NOT OPEN

CAUTION: TO REDUCE THE RISK OF ELECTRIC SHOCK, DO NOT REMOVE COVER (OR BACK). NO USER SERVICEABLE PARTS INSIDE. REFER SERVICING TO QUALIFIED SERVICE PERSONNEL.

The lightning symbol in the triangle tells you that the voltage inside this product may be strong enough to cause an electric shock. DO NOT TRY TO SERVICE OR CHANGE THIS PRODUCT YOURSELF.

The exclamation point in the triangle tells you that important operating and maintenance instructions follow this symbol.
CAUTIONS:
TO PREVENT ELECTRIC SHOCK, DO NOT USE THIS POLARIZED PLUG WITH AN EXTENSION CORD RECEPTACLE OR OTHER OUTLET UNLESS THE PRONGS CAN BE FULLY INSERTED INTO THE OUTLET TO PREVENT ANY EXPOSURE OF THE PRONGS ON THE POLARIZED PLUG.
Avoid displaying stationary images on your TV screen for extended periods of time. Stationary patterns generated by computer displays, video games, stock market reports, etc .can become permanently engrained on the picture tube. This damage is not protected by your warranty as it is the result of misuse. Should you wish to use your Television to display still images, it is always advisable to reduce brightness and contrast settings. Never leave a video game or computer display unattended.
NOTE TO CABLE INSTALLER:
The cable ground shall be connected to the grounding system of the building, as close to the point of cable entry as practical.
Important Safety instructions
CAUTION
PLEASE READ THESE INSTRUCTIONS, KEEP THESE INSTRUCTIONS AND HEED ALL WARNINGS. FOLLOW ALL INSTRUCTIONS.
Electrical energy can perform many useful functions. This TV set has been engineered and manufactured to assure your personal safety. However improper use can result in potential electrical shock or fire hazards. In order not to defeat the safe guards incorporated in this TV set, observe the following basic rules for antenna/TV installation, use and servicing. All operating and use instructions should be followed.
Do not remove the cabinet cover. This may expose you to dangerous voltages. Refer all servicing to qualified service personnel.
Mains plug is used as disconnect device and it shall remain readily operable.
©
©
©
INTRODUCTION
Remote Control Keys
STANDBY
ON-SCREEN DISPLAY
MUTE
DIRECT SELECT
DIGIT SELECT
TV/AV SELECT
SETUP MENU
SLEEP TIMER
RECALL
CHANNEL AUTO SCAN
MENU SELECT
VOLUME UP
CHANNEL UP
VOLUME DOWN
CHANNEL DOWN
PICTURE MODE SELECT
*SOUND MODE SELECT
*ZOOM SWITCH
*TELETEXT FUNCTIONS (OPTIONAL)
FASTMENU SELECT IN TV MODE
*TELETEXT FUNCTIONS (OPTIONAL)
Notes:
1: When in operation, please point your remote control directly to the infrared sensor.
2: Do not expose the remote control to impacts, water or disassemble it.
3: The function buttons which marked with * may not be available due to the chassis functions.
INSTALLATION
Please read the safety instructions in this manual completely before installation.
Install your TV in an area where direct sunlight will not fall upon the screen.
Soft, indirect light is best for television viewing.
Allow enough space (at least 4 in.) between the TV and any walls or enclosures for proper ventilation.
Optimum television viewing distance is 3-5 times the screen's size.
Auto-Degaussing
Color television can be easily affected by magnetism, which shows as color distortion on the screen. If your TV is affected by nearby magnetic components or appliances, turn it off for a few minutes. The built-in auto-degaussing circuit will eliminate the magnetic interference.
To Connect the Antenna
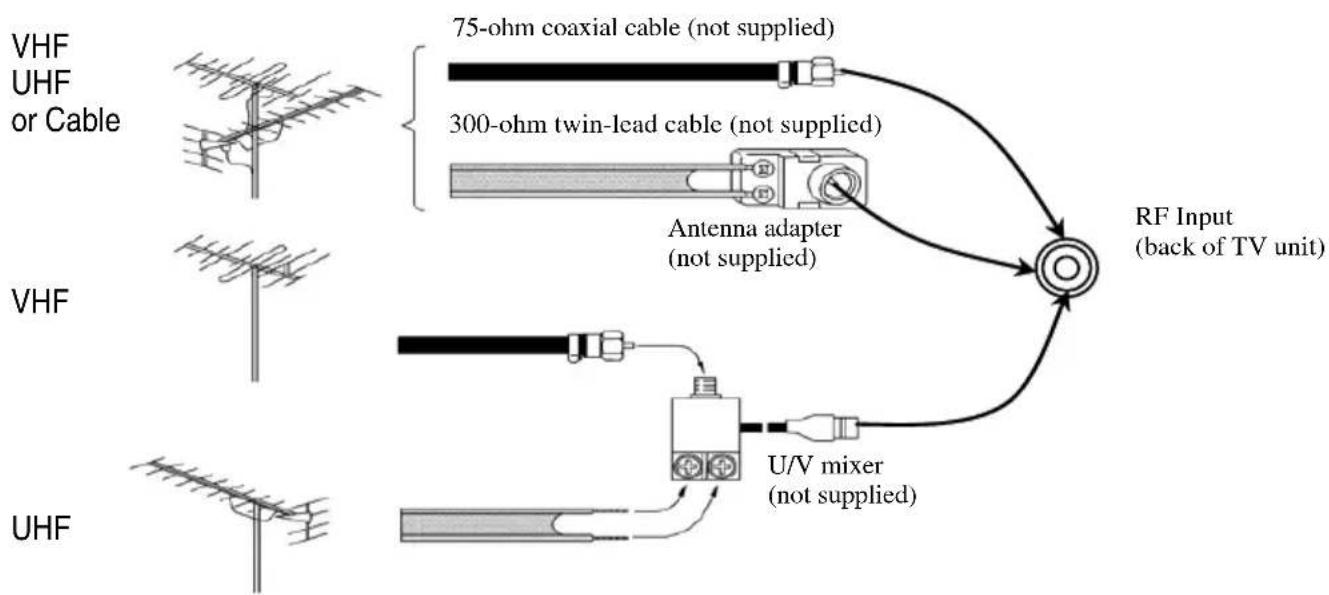
flowchart
graph TD
    A["VHF"] --> B["75-ohm coaxial cable (not supplied)"]
    C["UHF or Cable"] --> D["300-ohm twin-lead cable (not supplied)"]
    E["VHF"] --> F["Antenna adapter (not supplied)"]
    G["UHF"] --> H["U/V mixer (not supplied)"]
    I["RF Input (back of TV unit)"] --> J["Central RF Input"]
Notes:
- It is recommended that a 75 ohm coaxial cable be used in order to eliminate interference and noise which may occur due to nearby radio transmissions.
- The antenna cable should not be tied together with other wiring.
- Set up a lightning rod and check it regularly when an outdoor antenna is used.
Installing the Remote Control Batteries
- Remove the battery compartment lid.
- Insert two AAA batteries (included). Make sure the positive (+) and negative (-) polarities are correctly aligned.
- Reattach the battery lid.
Notes:
- Alkaline batteries are recommended for longer life.
- Always replace both batteries at the same time.
- Do not expose batteries to fire or break them open.
- To avoid battery leakage, remove batteries from the remote control when it is not being used for a long period of time.
INSTALLATION (continued)
To Connect External Equipment
The followings are diagrams showing basic instructions for attaching external equipment, like a VCR or DVD player, to your TV set. Please refer to operation manuals of external audio/video equipment that will be connected to your set for additional instructions.
PLEASE TURN OFF ALL POWER BEFORE CONNECTING DEVICES TOGETHER.
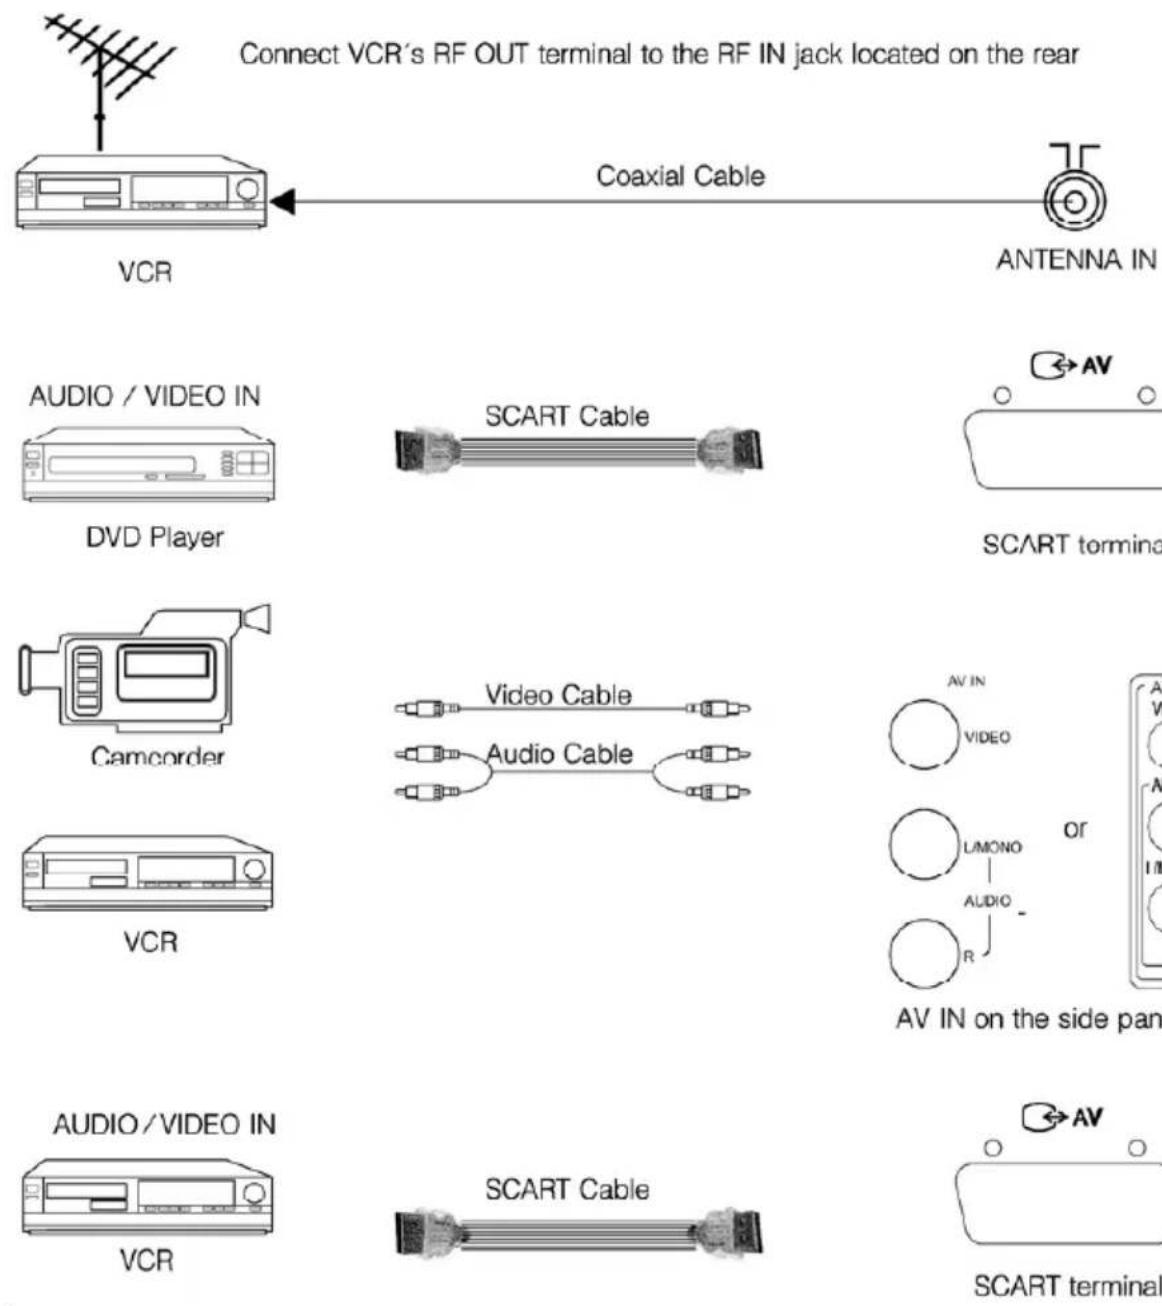
text_image
Connect VCR's RF OUT terminal to the RF IN jack located on the rear Coaxial Cable ANTENNA IN VCR AUDIO / VIDEO IN DVD Player SCART Cable SCART termina Camcorder Video Cable Audio Cable VCR AV IN VIDEO or LMONO AUDIO R AV IN on the side pan AUDIO/VIDEO IN VCR SCART Cable SCART terminalNotes:
- Do turn off the power supply of the TV set and the external equipment before connection.
- The side terminals may be easier to use with a camcorder. The connections are identical.
GENERAL OPERATION
1、POWER[On/Off]
Plug in the supply socket, and press the MAIN POWER SWITCH key on the TV. You may press any of the STANDBY, Program Number (0-9) and CH-/+ keys on the remote control to turn on the TV.
To switch back to the Standby mode, press STANDBY key. You can also power off the TV directly by pressing the MAIN POWER SWITCH key. Part of circuit on the TV remains active in the STANDBY mode. To cut off the power off completely, please press the MAIN POWER SWITCH.
Auto off without signal received
When there is no signal received (for example, the program of a certain channel is over), the TV will switch to the Standby mode if no key is pressed within 5 minutes. If you have set "Off Time" and the remaining time is less than 5 minutes, Off Time will be carried out prior to AUTO OFF. At the last 5 minutes, it will hint per-min; and at the last 1 minute, it will hint per-sec on the screen.
2、Num Keys
a. To select channels;
c. Press the number button to change AV mode to TV mode.
d. Input the page of sub code in txt mode.
e. Input the channel frequency in tune menu.
f. Input the password of the Hotel mode.
b. Press any number button to reset TV when it is standby, and the TV will turn to the right channel as the number.
3、[CH+/-]&[VOL+/-]
Press CH[+/-] to switch channels; Press the VOL-or VOL+ button to decrease or increase the volume.
Adjustable range: 0-63
During normal play, press the MUTE button and the sound is eliminated. The TV will display a picture 🖼️ on the screen. To cancel MUTE, you may press the MUTE button again or the VOL+ button.
4、TV/AV Selection
In the TV mode, press the TV/AV button to enter the AV mode. In the AV mode, the TV receives AV signals from external equipment. To resume broadcast viewing, press the TV/AV button, CH-/CH+ buttons or Num keys. To receive signals from external equipment, please select the relevant AV mode. In the hotel mode, if "AV lock" is ON, there will be "locked" displayed on the screen when switch to AV mode.
Pressing the CH-/CH+ buttons can select another lower-numbered or upper-numbered channel.
Direct selection:
To select a one-digit channel number
Press the DIGIT button to choose "-" firstly, then press one of 0-9 buttons.
To select a two-digit channel number
Press the DIGIT button to choose "--" firstly, then enter a first-digit and second-digit. If only one digit is entered, the channel will automatically shift to the digit related channel in three seconds.
To select a three-digit channel number
Press the DIGIT button to choose "--" firstly, then enter a first-digit,second-digit and third-digit. If only one or two digits are entered, the channel will automatically shift to the digit (digits) related channel in three seconds.
Note: If you enter a number over 235, the channel will remain the current one.
6、MUTE
Press the MUTE button to switch MUTE ON/OFF modes. The "MUTE ON" mode will display 📂 on the screen. When there is no signal received in TV mode, the TV will be in MUTE ON mode. and there will be no sound output.
7、PICTURE MODE
There are 4 picture modes to select. Press this button to switch user→soft→nature→rich.
And the user mode can be regulated in the PICTURE MENU.
8·DISPLAY
The displayed parts include the Signal Source, Color Sys, Sound Sys and so on.
9·MENU
Press the MENU key and the main menu will display on the screen. To stop searching, you can press the MENU key.
10·RECALL
Press the RECALL button and the TV will directly skip back to the former program channel.
11·SLEEP
This button is used to set fast off time, the adjustale range is 0,5,10,15,...120,0 minutes,press this button repeatedly,and you can select what time you want to set.
12 SCAN
Press the SCAN button to scan programs from the current channel. To stop scanning and start the corresponding operation, please press SCAN button again or any other buttons.
*13·ZOOM ( If the button does not function, it means this TV does not support this function.)
Press the zoom button, and the TV will switch between 4:3, 16:9 and zoom.
*14 °SOUND MODE ( If the button does not function, it means this TV does not support this function. )
There are 4 sound modes to select such as userînews Îmusic Îtheatre.
And the user mode can be regulated in the SOUND MENU.
MENUS OPERATION
Menus
Press the MENU button when watching TV programs, Press buttons to select and press
buttons to enter, then press the buttons to adjust.
Menu display disappears 15 seconds after last selection.
Note: In the AV mode, TUNE menu is not available.
Tune Menu
This section gives descriptions about adjustment of items in the TUNE menu. This menu will display Channel/Colour Sys/Sound Sys/Skip/Frequency/Fine Tune/Auto Search and Swap.
1. Channel
Press buttons to change the channels one by one.
TUNE
2. Colour Sys
Press buttons to choose the Colour Sys, It is very important to set the correct colour system, suggest to set it “Auto”.
Channel 9
Colour Sys Auto
Sound Sys DK
Skip Off
Frequency
Fine Tune
Auto Search
Swap
SELECT
066.75MHz
ADJUST
3. Sound Sys
Press buttons to choose the Sound Sys. It is very important to set the correct sound system, otherwise much boring noise will be heard.
4. Skip On/Off
After Auto Search, there may be some repeated program or inferior signals received. Skipping the undesired program position can dramatically quicken channel selection.
After selecting "Skip" in the TUNE menu, press the buttons to set "Skip On". When the TUNE menu has disappeared, press the CH-/CH+ buttons and you will find the channel number skipped.
5. Search
| Search | |
| VHF-H Channel 11 | 67/67.75MHz. |
| :DOWN:DOWN :UP : UP | |
In case the desired channel cannot be preset with the Auto Program function, or you would like to set the desired channels to specific channel numbers, please use the Search function.
After selecting "Frequency" in the TUNE menu, press the buttons. The TV searches another lower/upper channel. To stop search, press the MENU button. You can also select the c-channel frequency directly by using the Num buttons.
If the selected channel is not the one you want, press the buttons again until the desired channel is selected. If the TV does not stop searching when finding a channel, please use the Fine Tune function.
6. Frequency Fine-tuning
After selecting "Fine Tune" in the TUNE menu, press the buttons until you get the best sound and picture effect. Press the DISP button to check up the fine-tuned channel, and you will find that the position number turns to yellow.
7. Auto Search
| Auto Search | |
| VHF-H | Channel 11 |
| MENU: Stop | |
Before performing Auto Search, please affirm that the Sound System is correct. After selecting "Auto Search" in the TUNE menu, press the button. The TV will search automatically in sequence. After auto searching, the TV will store receivable channels and returns to POS1.
Unused position number is automatically set to Skip On. During Auto Search, press the MENU button to stop searching.
8. Swap
| Swap | |
| Channel A | 9 |
| Channel B | 7 |
| Swap |
SELECT
ADJUST
Use the SWAP function to resort program position. For example, you want to change Channel 9 to Channel 7.
a. Press the TUNE menu button to select the SWAP menu in the TV mode.
b. Press the buttons to highlight "Channel A". Press the Numeric buttons to set it to 9. Then set channel B to 7 in the way mentioned above.
c. Select the SWAP menu, and press the button. The current channel No. is changed to Channel 7 and the content of Channel 7 is exchanged with that of Channel 9.
The current channel No. is Channel 7.
Repeat the operations mentioned above to sort other searched channel position as desired.

Setup Menu
To perform the following operation, press the MENU button or the SETUP button directly to select the SETUP menu.
SETUP
| Language English | |
| Blue ScreenBlue Screen | On |
| Pic ImprovePic Improve | On |
| Color TempColor Temp | Normal |
| AVLOff | |
| Child LockChild Lock | Off |
| Hotel modeHotel mode | |
| Degauss | |
SELECT ADJUST
NOTE : If there is no AVL or DEGAUSS selection on the menu, it means this TV does not support those functions.
1. Language
Press buttons to select languages.
2. Blue Background
With this function on, the screen will display a mild blue background and mute automatically in TV mode when no signal is received.
3. Picture Improve
It is recommended to select "picture improve on" to acquire better picture effect.
4. Color temperature adjustment
You may select one of color of background as preferred among normal, Cool and Warm mode. The adjusted Color Temp mode is automatically stored and remains unchanged until next adjustment.
5. Child lock
The keyboard will be locked when Child lock is “ON”, and it will be cancelled by keeping on pressing the MENU (on the keyboard) button for 10 seconds.
If the Child Lock is ON under standby mode, you can turn on the TV by pressing the menu button on the TV set for 10 seconds. The Child Lock will remain "ON" after TV turned on.
6. Hotel mode
Hotel mode
| Password | - - - - - |
| Tuning Lock | Off |
| AV LockAV Lock | Off |
| Max. volume | 63 |
| New Password | - - - - - |
| Channel Lock | Off |
| Clear All |
SELECT ADJUST
Only after entering the correct password by pressing Numeric buttons, you can adjust the following items.
©
©
Product specifications
| TV-SYSTEM | PAL/SECAM B/G D/K I |
| RECEIVING CHANNEL | HYPER BAND CABLE TUNER |
| PROGRAM CHANNES | 236 Channels |
| CHANNEL DISPLAY | On-Screen Display(OSD) |
| RF-ANTENNA INPUT | 75 ohms |
| OPERATING VOLTAGE | 110-240V AC, 50/60HZ |
| AUDIOOUTPUT POWER(%10THD) | 3+3W |
| POWER CONSUMPTION(W) | 69W, 3W(Stand-by) |
| Net Size(mm) | 358(wide)x356(high)x334(deep) |
| Net Weight(kg) | 9kg |
This product fulfills the following EN Norms:
EN 60065_2002 + A1_2006
EN 55013:2001/+A1:2003+A2:2006
EN 55020:2002/+A1:2003+A2:2005
EN 61000-3-2:2000/+A2:2005
EN 61000-3-3:1995/+A1:2001/+A2:2005