
Sydney - Television SEG - Free user manual and instructions
Find the device manual for free Sydney SEG in PDF.


| Product Type | LED TV |
| Screen Size | 31.5 inches (80 cm) diagonal |
| Resolution | 1920 x 1080 pixels (Full HD) |
| TV System | PAL BG/DK/I, SECAM BG/DK/L/L' |
| Audio System | BG/DK/I/L/L' |
| Audio Output Power | 2 x 8W |
| Power Supply | 100-240V ~ 50/60Hz |
| Power Consumption (Normal) | 75W |
| Standby Power Consumption | <0.5W |
| Aerial Input | 75 Ohm (unbalanced) |
| Remote Control Type | Infrared (IR) |
| Remote Control Range | 5 m, angle 30° horizontal |
| Batteries (Remote) | 2 x 1.5V, size AAA |
| Inputs | 3 x HDMI, 1 x VGA, 1 x SCART, 1 x AV, 1 x YPbPr (Component), 1 x RF (T+C), 1 x RF IN (SAT), 1 x USB, 1 x Common Interface (CI) |
| Outputs | 1 x Digital Coaxial Audio, 1 x Headphone |
| VESA Mount | 200mm x 100mm; screws M5x12mm (max length) |
| Multimedia Playback | Photo, Music, Video, Text from USB |
| OSD Languages | Multiple (selectable in setup) |
| Teletext | Yes (analog and digital) |
| Electronic Program Guide (EPG) | Yes (DTV mode) |
| Parental Control | Channel block, parental guidance, password protection |
| Energy Efficiency | Class not specified, but complies with EU directives |
| Net Weight (approx) | Please refer to product label |
Frequently Asked Questions - Sydney SEG
User questions about Sydney SEG
0 question about this device. Answer the ones you know or ask your own.
Ask a new question about this device
Download the instructions for your Television in PDF format for free! Find your manual Sydney - SEG and take your electronic device back in hand. On this page are published all the documents necessary for the use of your device. Sydney by SEG.
USER MANUAL Sydney SEG
Achtung

(Waste Electrical & Electronic Equipment (WEEE))
natural_image
Simple line drawing of a computer monitor with a diagonal line on the screen (no text or symbols)Benutzerhandbuch

Fernbedienung

MINI-YPbPr -Kabel

MINI-AV-Kabel
natural_image
Line drawing of a flat-screen monitor with a vertical scroll on the right side (no text or symbols)natural_image
Top-down schematic of a device layout with no visible text, numbers, or symbolsservice@schmid-electronics.de
service@schmid-electronics.de
| Caution | 1 |
| Safety Information | 2-3 |
| Accessories | 4 |
| Technical Specification | 4 |
| Product Introduction | 5 |
| Front View | 5 |
| Rear View | 5 |
| Connections | 6 |
| Remote Control | 7-8 |
| Basic Operation | 12 |
| Auto installation setup | 9-12 |
| Basic Operation | 12 |
| OSD Menu | 13-27 |
| 1. Video menu | 13-14 |
| 2. Audio menu | 15-16 |
| 3. TV menu | 17-19 |
| 4. Setup menu | 20-22 |
| 5. Lock menu | 23-26 |
| 6. VGA menu | 27 |
| Multimedia Operation | 28-32 |
| Simple Troubleshooting | 33 |
| Waste Electrical Recycling | 34 |
| Instructions for fixing stand | 35 |
Caution
The lightening flash with arrowhead symbol, within an equilateral triangle is intended to alert the user to the presence of un-insulated “dangerous voltage” within the products enclosure that may be of sufficient magnitude to constitute a risk of electric shock to the persons.

The exclamation point within an equilateral triangle is intend to alert the user to the presence of important operating and maintenance (servicing) instructions in the literature accompanying the appliance.

Correct disposal of this Product
(Waste Electrical & Electronic Equipment (WEEE)
Your product is designed and manufactured with high quality materials and components which can be recycled and reused.
This symbol means that electrical and electronic equipment, at their end-of-life should be disposed of separately from your household waste.
Please dispose of this equipment at your local community waste collection/recycling centre.
In the USA there are separate collection systems for used electrical and electronic products. Please help us to conserve the environment we live in!

This unit complies with European safety and electrical interference directives.
Safety Information
To ensure reliable and safe operation of this equipment, please read carefully all the instructions in this user guide, especially the safety information below.
Disclaimer
The illustrations of the TV, accessories and menus shown in this User's Manual may differ from the actual product.
Electrical safety
- The TV set should only be connected to a mains supply which matches that stated on the label on the mains adaptor.
-
To prevent overload, don't share the same mains supply socket with too many other items of equipment.
-
Do not place any connecting wires where they may be stepped on or tripped over.
- Do not place heavy items on the leads, which may damage them.
- Hold the Mains plug, not the wires, when removing from a socket.
- During a thunderstorm or while leaving the TV for long periods, disconnect the aerial (if outdoor) and mains adaptor from the supply.
- Do not allow water or moisture to enter the TV or mains adaptor. Do NOT use in wet or moist areas such as Bathrooms, steamy kitchens or near swimming pools.
- To prevent overload, don't share the same mains supply socket with too many other items of equipment.
- Apparatus with Class 1 construction shall be connected to a mains socket outlet with a protective earth connection.
- Pull the plug out immediately, and seek professional help if:
- the mains plug or cable is damaged.
- liquid is spilt onto the set, or if it is accidentally exposed to water or moisture.
- anything accidentally penetrates the ventilation slots.
- the set does not work normally.
- Do NOT remove the safety covers. There are no user serviceable parts inside.
You may invalidate the warranty. Qualified personnel only are permitted to service this apparatus.
- To avoid battery leakage, remove exhausted batteries from the remote control handset, or when not using for along period.
- Do NOT break open or throw exhausted batteries on a fire.
Safety Information
Physical safety
- Do NOT block ventilation slots in the back cover. You may place the TV in a cabinet, but ensure at least 5cm (2") clearance all around the unit.
- Do NOT tap or shake the TV screen, you may damage the internal circuitry. Take good care of the remote control, do not drop it or allow it to come into contact with liquids.
• To clean the TV use a soft dry cloth. Do NOT use solvents or petrol based fluids. For stubborn stains, you may use a damp soft cloth with diluted detergent.
NOTE: No naked flames such as candles should be placed on the TV.
NOTE: When displaying the same still picture for more than 2 hours without any interruption, the picture contours of
the continuously displayed contents may remain visible on screen, i.e. a persistent image remains. The same applies,
when displaying for more than 2 hours:
- the same background/wallpaper
- logos, video games, computer games, teletext
- contents with a non-filling aspect ratio (e.g. 4:3 format)
These do not represent any malfunction and will not be covered by the manufacturer's warranty.
Accessories

natural_image
Stack of three blank rectangular sheets with no text or symbolsUser's Manual Remote control


MINI YPbPr MINI AV


Batteries
* Note: The configuration of the components may look different from the following illustration
Technical Specification
- TV System
- Screen Size
- Resolution
- Aerial input
- Audio output power
- Power Consumption
PAL BG/DK/I SECAM BG/DK L/L'
31.5 inch(diagonal)
1920x1080
75 Ω (unbalanced)
2x8W
100-240V \~ 50/60Hz 75W
Remote Control
Type infrared
Control distance 5m
Control angle 30^ (horizontal)
Batteries 2 x 1.5V, size AAA
Packaging materials are no toys. Please keep away from children. Plastic bags can cause suffocation when pulled over the head.
DVB-T TV is receivable in nearly all regions of Germany and many regions of Austria and Switzerland, nevertheless not everywhere! Also additional services such as DVB-T radio, -teletext, -EPG etc. won't get broadcasted in all regions. Please check whether DVB-T is receivable in your region. Depending on the location one can't or one can hardly receive a DVB-T signal with a regular indoor antenna. For more information: www.ueberallfernsehen.de
Product Introduction
Front View

natural_image
Line drawing of a flat-screen monitor with a vertical control panel on the right side (no text or symbols on the screen)MENU: Display/exit the OSD menu.
CH+/-: Scan through channels.
VOL+/-: Adjust the volume.
SOURCE: Display the input source menu.
POWER: Turn on/standby the TV set.
Remote Control window(keep clear) ⊙ LED indicator
(IR) Infrared Receiver: Receives IR signals from the remote control.
(Power on/Standby) LED indicator: Press POWER to turn on and off.
Indicator on(Red)
Standby mode
Indicator on(Green)
Power on mode
The effective receiving range for the signal is 5-8 metres from the front of the remote control window, and 30^ to the left or right side and 20^ above or below the control window.
Rear View

Wall Mounting
The TV is provided with mounting holes for a VESA approved wallmounting bracket 200mmx100mm (NOT SUPPLIED). Remove the Posi screws holding the base to the base bracket and lift the base away basemounting bracket). Mount the VESA bracket using 4xM5x12mm ISO metric threaded screws (not (do not remove the supplied). Do not use screws longer than 12 mm, it will occur damage to the internal parts. Fit the wall bracket securely following themanufacturers instructions.
Connections

Headphone: Connect it to your headphone or other audio equipment.
Common Interface: CI slot.
USING YOUR COMMON INTERFACE SLOT Common Interface The Common Interface (CI) slot is designed to accept the Conditional Access Module (CAM) and Smart Card in order to view the pay TV programmes and additional services. Contact your Pay Per View TV service provider to get more information about the modules and subscriptions.
NOTE: Conditional Access Module and Smart Cards are sold separately.
WARNING! SWITCH OFF YOUR TV BEFORE ANY MODULE IS INSERTED INTO THE COMMON INTERFACE SLOT, THEN ADD THE SMART CARD TO THE CAM.
USB: USB jack.

RF IN(S2): Antenna input.
SAT - single receiving installation, e.g. for Astra 19.2E or Hotbird 13.OE, with single universal LNB. In the first time installation, after selecting your desired satellite and LNB frequency, you need to choose the option DISEQC_DISABLE in Diseqc-Input.
This is also applicable for a later search. In Satellite Setup menu you need to select your desired satellite in the Diseqc input field and then select Disable.
RF IN(T+C): Connect antenna or cable 75 Ohm coaxial to receive TV signal.
Coax: Digital coaxial output.
AV: Connect to AV output on external devices.
YPbPr: Connect them to the YPbPr video output terminal of DVD.(used in component source)

AC POWER IN: Connect to power supply.
SWITCH: Turn on/off the power supply.
HDMI1/2/3: Connect it to the HDMI of DVD or other equipment.
VGA: For PC display. Connect it to the D-Sub 15 pins analog output connector of the PC.
PC-IN: Connect it to the audio output terminal of PC.
SCART: Connect them to the SCART video output terminal of DVD.
Remote Control
The remote control is using Infra-Red(IR). Point it towards the front of the LED BLU-TV. The remote control may not work correctly if it is operated out of range or out of angle.

STANDBY: Turn the TV on/standby.
AUTO: Automatically adjust the picture in PC mode.
ASPECT: Adjust screen size.
P.MODE: Select the picture mode.
S.MODE: Select the sound mode.
SLEEP: Shutdown timer.
MUTE: Press to mute the sound, press again or press VOL+ to unmute.
0-9: Choose channel directly.
: Return to the previous channel viewed.
A-B: Define Points A and B for looping playback.(in USB mode)
CH.LIST: Display the programs list.
TV MENU: System setup menu.
EXIT: Exit the OSD menu.
DISPLAY: Display ATV or DTV information.
SOURCE: Press to display the input source menu.
Cursor left/right/up/down: Cursor buttons used in menus.
OK: CONFIRM BUTTON for menu.
VOL+/-: Adjust the volume.
CH+/-: Scan through channels.
FAV: Display the favorite program list.
EPG: To show the Electronic Program Guide during no-menu state only.
SUBTITLE: To switch the dialog at the bottom of the screen.
AUDIO: To change the audio language(if available).
Remote Control
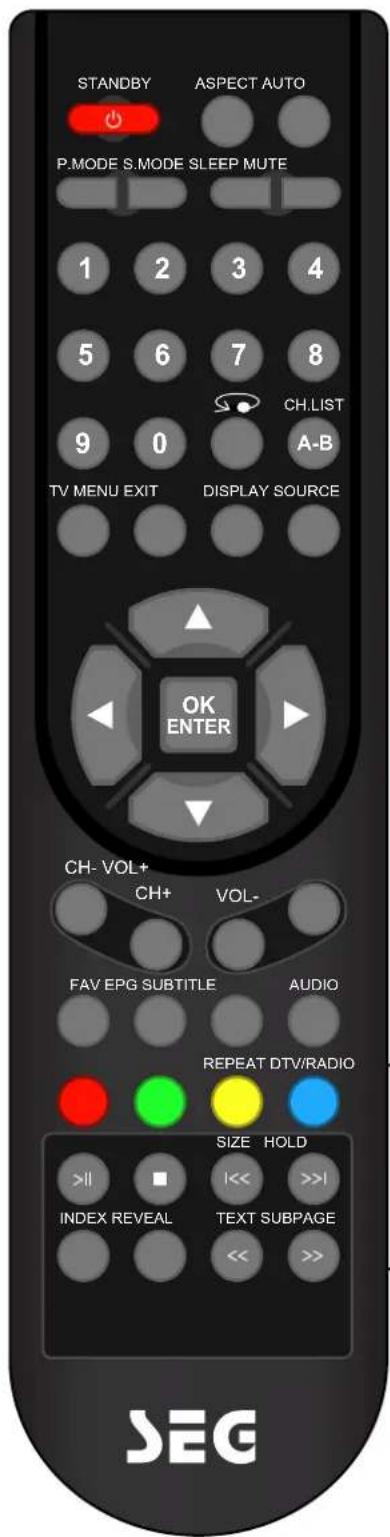
REPEAT: Repeat playing in USB mode.
DTV/RADIO
Colour buttons: short cuts-follow the coloured links in the text.
SIZE: Press to see top half of page double size, Press again to see the bottom half og page double size, Press again for normal size.
HOLD: Hold or carry on the current subpage.
INDEX: Go to index.
REVEAL: Reveal any hidden text, for example-quiz answer.
TEXT: Turn off/on the Teletext display.
SUBPAGE: For example to go directly to subpage 4: press SUBPAGE, then 0,0,0,4; press SUBPAGE again to cancel subpage mode.
|| Play/Pause
■ STOP
|<< Previous track
Next track
<< Fast reverse
Fast forward
Auto installation setup
When you initially turn on the TV you will see the first time installation menu as below:
![Initial Setup Welcome Welcome to use the Wizard for Initial Setup!! Please press [OK] to start the wizard.](/content/2026/05/806225/images/9a818df4594f3a64e0c838d022d798cf5427080146e64238a94ef62bd26c633d.jpg)
Auto installation setup
Picture Mode
- Selection the picture mode (Bright, Cinema, Sport or Home)
- Confirmation "Are you sure? Yes or No"

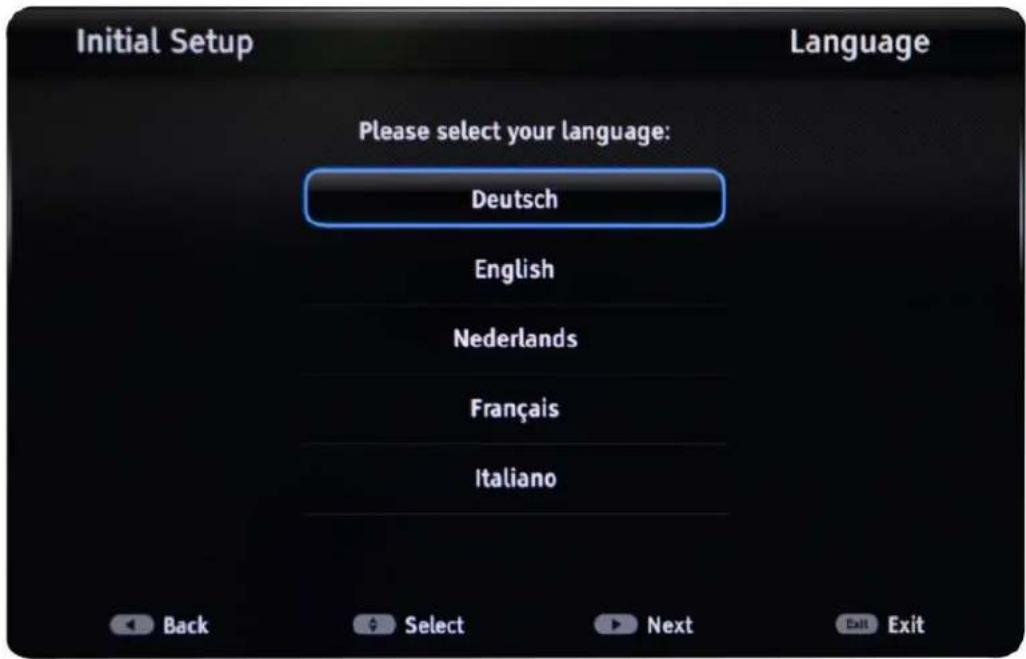
Language
- Please select your language, press ▲/▼ to select, press ENTER to confirm:
Country
Please select your country, press [▼]/ [▲] to select, press [ENTER] to confirm:

Tuner Type
Please select your tuner type, press [▼]/ [▲] to select, press [ENTER] to confirm:

| Option | Description | |
| Tuner Mode | Antenna | Set the signal type to antenna. When set to Air, TV can catch analog and DVB-T broadcasting signal. |
| Cable | Set the signal type to cable. When set to Cable, TV can catch analog and DVB-C broadcasting signal. | |
| Satellite | Set the signal type to satellite. | |
Scan
Please select your scan, press [▼]/ [▲] to select, press [ENTER] to confirm:

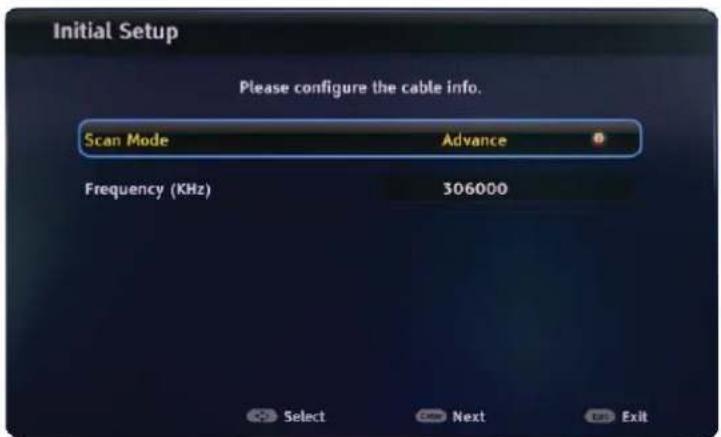
Scan
Please select your scan, press [▼]/ [▲] to select, press [ENTER] to confirm:


| Option | Description |
| Scan | Automatically search for channels. |
| Skip | Skip the scan and enter to the complete interface. |
Complete
Basic Operation
Power on/off
- Connect to the power.
- -To turn on the TV
Press POWER button on the TV or STANDBY remote control.
-To turn off the TV
Press POWER button on the TV or STANDBY remote control.
Input Source select
Press SOURCE button on the TV set or remote control to display input source menu, and use CH+/- button on the TV set or ∧/∨ button on remote control to select the input source, press OK button on the remote control to enter.
Note: Before you select the input source, make sure the connections are prepared.

OSD Menu
Video
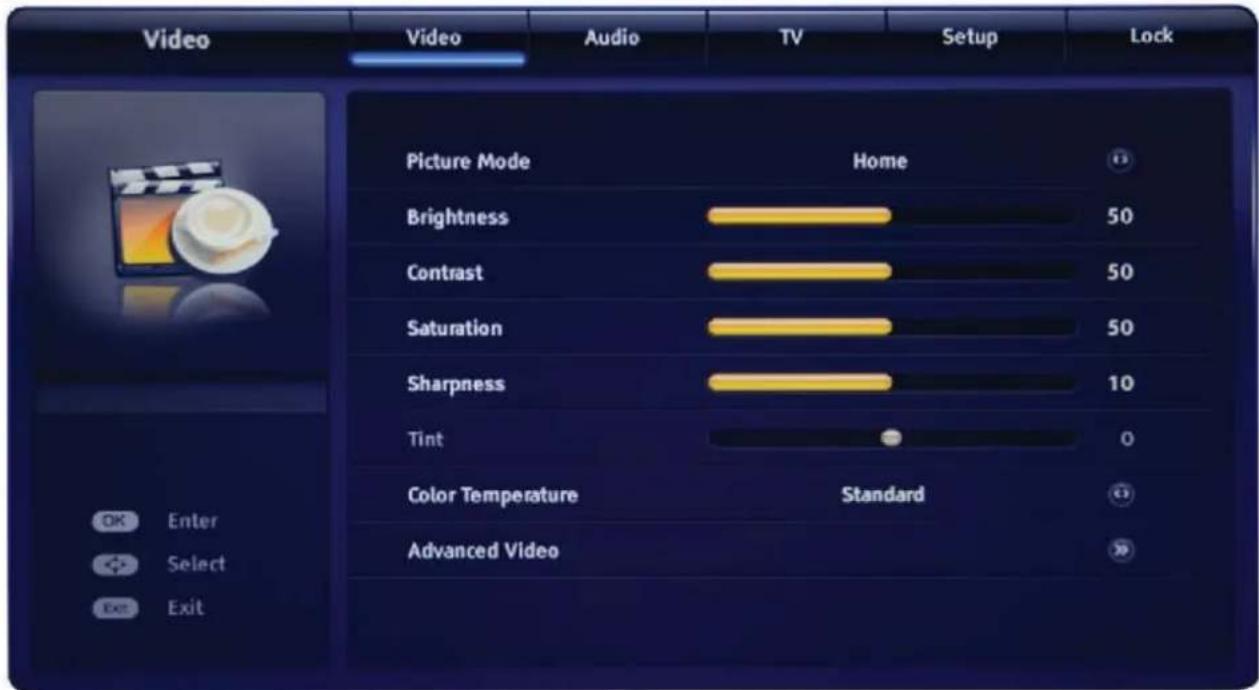
| Option | Description | |
| Picture Mode | Use the ▼ or ▲ buttons to highlight one of the following options, then press [ENTER] to enter the sub-menu and press◀ or ▶ to adjust. | |
| Standard | Select for standard picture settings. Recommended for home entertainment. | |
| Vivid | Select for enhanced picture contrast and sharpness. | |
| Bright | Select for enhanced picture brightness. | |
| Cinema | Optimal picture and sound for watching movies. | |
| Sport | Optimal picture and sound for watching sports. | |
| Home Set for home request picture contrast and sharpness. | ||
| User | Allow you to store your preferred settings. | |
| Note: Those settings can be adjusted only when the Picture Mode is set to User. | ||
| Brightness | Adjust to brighten or darken the picture. Press ◀ to darken the picture. Press ▶ to brighten the picture. | |
| Contrast | Adjust the white level of the picture. Press ◀ to decrease the contrast. Press ▶ to increase the contrast. | |
| Saturation | Adjust the color purity of the picture. Press ◀ to increase the red tones. Press ▶ to increase the green tones. | |
| Sharpness | Adjust to sharpen or soften the picture. Press ◀ to soften the picture. Press ▶ to sharpen the picture. | |
| Tint | Controls the tint ( NTSC mode only). | |
| Color Temperature | Use the ▼ or ▲ buttons to highlight one of the following options, then press [ENTER] to enter the sub-menu and press◀ or ▶ to adjust. | |
| Standard | Select to give the white color a neutral tint. | |
| Warm | Select to give the white color a reddish tint. | |
| Cool | Select to give the white color a bluish tint. | |
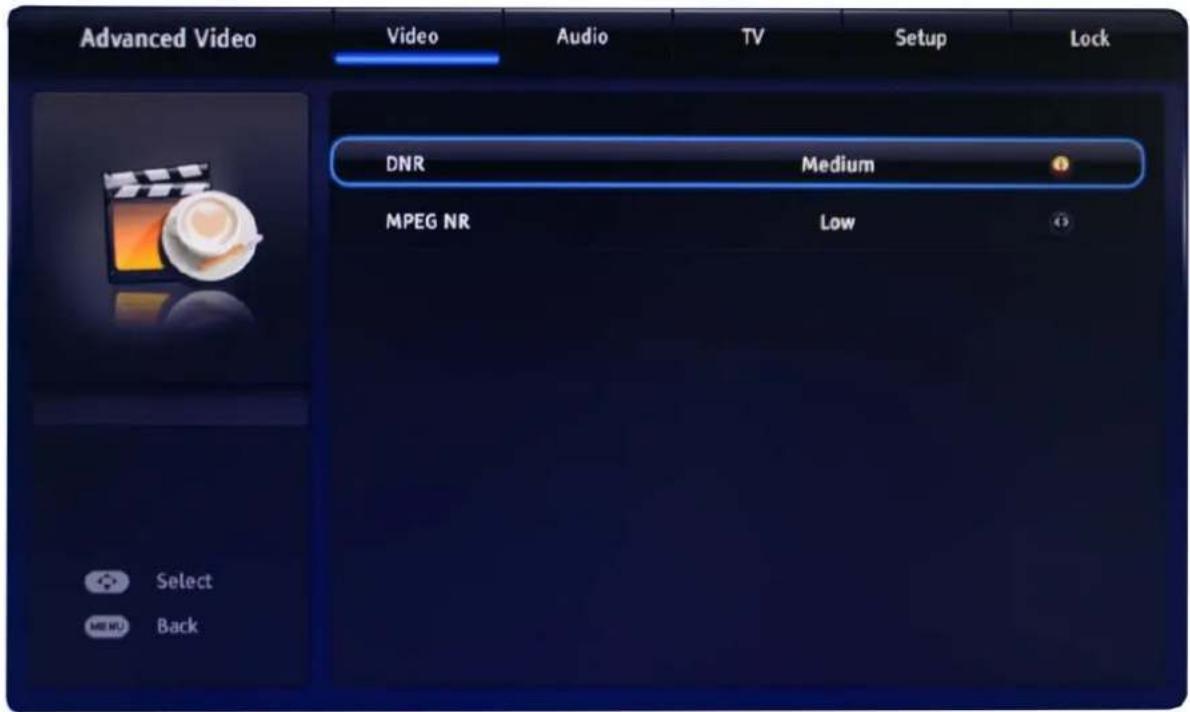
| Option | Description | |
| Advanced Video | Use the ▼ or ▲ buttons to highlight one of the following options, then press [ENTER] to enter the sub-menu and press◀ or ▶ to adjust. | |
| DNR | You can clear up analog TV signal by reducing the dot noise. | |
| This feature is not available at PC or Media source. | ||
| MPEG NR | Similar with the Noise Reduction, you can set to reduce the block noise. | |
Audio

| Option | Description | |
| Balance | Adjust the level of sound coming from the left and right speakers. Press ◀ to decrease balance. Press ▶ to increase the balance. | |
| Bass | Adjust the high frequency sounds. Press ◀ to decrease bass. Press ▶ to increase the bass. | |
| Treble | Adjust the low frequency sounds. Press ◀ to decrease treble. Press ▶ to increase the treble. | |
| Sound Surround | Off | Set the system of stereophonic sound off. |
| On | Set the system of stereophonic sound on. | |
| Equalizer | Off | Set the sound to normal type. |
| Rock | Optimal sound for listening rock music. | |
| Pop | Optimal sound for listening pop music. | |
| Live | Optimal sound for live video. | |
| Dance | Optimal sound for listening dance music. | |
| Techno | Optimal sound for listening techno music. | |
| Classic | Optimal sound for listening classic music. | |
| Soft | Optimal sound for listening soft music. | |
| Auto Volume Control | Automatically adjusts volume to be consistent across programs and channels. Press ◀ or ▶ button to select (On/Off). | |
| Sound Type | Press ◀ or ▶ buttons to select(Stereo, Dual1, Dual2, Mix). | |
| Type | Use the ▼ or ▲ buttons to highlight one of the following options, then press [ENTER] to enter the sub-menu and press ◀ or ▶ to adjust. | |
| Normal | Select to output normal type. | |
| Hearing Impaired | This mode is designed for people that have hearing impairment.If there is related information, it can be shown. | |
| Visually Impaired | This mode is designed for people that have visual impairment. | |
Visually Inpaired

TV

| Option | Description | |
| Tuner Mode | Use the ▼ or ▲ buttons to highlight one of the following options, then press [ENTER] to enter the sub-menu and press ◀ or ▶ to adjust. Cable | Set the signal type to cable. When set to Cable, TV can catch analog and DVB-C broadcasting signal. |
| Satellite | Set the signal type to satellite. | |
| Antenna | Set the signal type to antenna. When set to Air, TV can catch analog and DVB-T broadcasting signal. | |
| Channel | Channel Scan | Automatically search for channels. It will search digital channels first, then analog channels. For detail please reference page 18. |
| Note: Before execute auto channel search, please confirm your signal type . Wrong setting of Signal Type maybe cause finding no channel. Found numbers do no include encryption programs. | ||
| Analog Manual Scan | Manually search analog channels. For detail, For detail, please reference page 18. | |
| Digital Manual Scan | Manually search digital channels. For detail, please reference page 18. | |
Channel Scan

Press Menu to show "Are you sure to skip ATV SCAN?"

Press Menu to show "Are you sure to skip DTV SCAN?"
Analog Manual Scan

Input Frequency by number buttons, select Scan Down to search channel.
Digital Manual Scan

Press ◀▶ button to select correct Frequency, press OK button to search channel.
| Option | Description | |
| Favorite Network Select | Add channels to create a favorite list. | |
| Channel Skip | Manually add and skip channels in your program list. For detail, please reference page 19 . | |
| Channel Sort | Manually sort channels in your program list. For detail, please reference page 19 . | |
| Channel Edit | Manually edit channels in your program list. For detail, please reference page 19 . | |
| Analog Channel Fine Tune | Adjust the frequency of the analog channel finely. | |
| Clean Channel List | Clean the channel list what you had set. | |
| Satellite Setup | Select to set the satellite type parameter. | |
Channel Skip

Channel Sort

Channel Edit

All available TV receiver sources can be set one after the other. Switching between the single source occurs in the sub menu "TV" "via" Tuner Mode.
Setup

| Option | Description |
| OSDLanguage | Set the On-Screen-Display language. |
| ASPECT RATIO | Press◀ or ▶ buttons to select 16:9, 4:3, Zoom1, Zoom2, Auto, Point to point (only in HDMI mode available). |
| Blue Screen | Set the screen to blue or not when having no signal. |
| Time Setup | Use the▼ or ▲ buttons to highlight one of the following options, then press [ENTER] to enter the sub-menu and press◀ or ▶ to adjust.Set Time Zone/Time/Sleep Time/Auto Sleep. For detail please reverence page 21. |
| Subtitle(must be supported by channel) | Use the▼ or ▲ buttons to highlight one of the following options, then press [ENTER] to enter the sub-menu and press◀ or ▶ to adjust.For detail please reverence page 21.Digital Subtitle Lang.1st Set the first language for the digital subtitle. |
| Digital Subtitle Lang.2nd Set the second language for the digital subtitle. | |
| Subtitle Type Select the subtitle type (Normal/Hearing Impaired). | |
| Teletext(must be supported by channel) | Use the▼ or ▲ buttons to highlight one of the following options, then press [ENTER] to enter the sub-menu and press◀ or ▶ to adjust.For detail please reverence page 21.Digital Teletext Language Set the language for the digital teletext. |
| Decoding Page Language Set the language for the decoding page. |
Time Setup
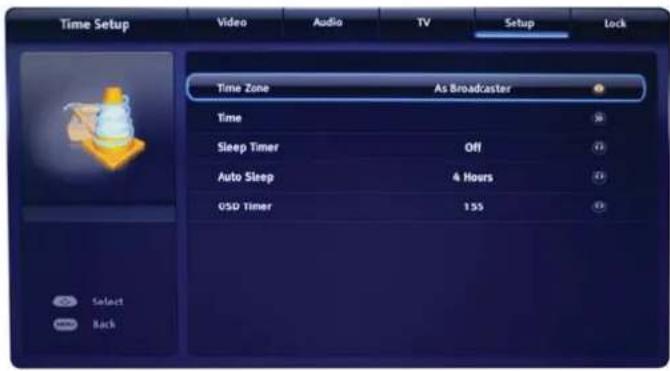
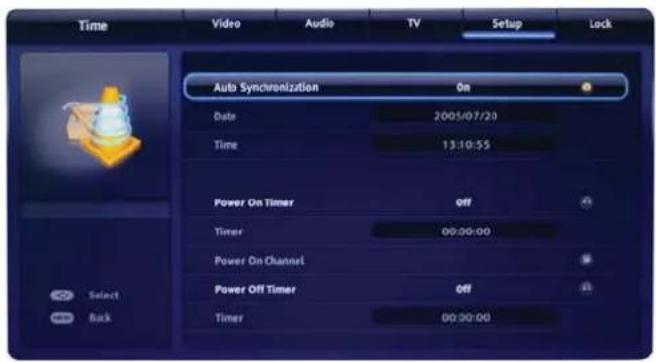
| Option | Description | |
| Time Zone | Set the time zone.Press ◀ or ▶ to select the time zone. | |
| Time | Set the current date / time .Press ◀ / ▶ / [ENTER] to adjust. | |
| Sleep Timer | Set the sleep time.Press ◀ or ▶ to select the sleep time. | |
| Auto Sleep | Off | Set the Auto Sleep off. |
| 3 or 4 or 5Hours | Set the Auto Sleep after 3 or 4 or 5 Hours | |
| OSD Timer | Sets the OSD Timer. None, 5s, 10s, 15s, 30s, 45s, 60s. | |
Subtitle

Description, see page 20
Teletext

| Option | Description | |
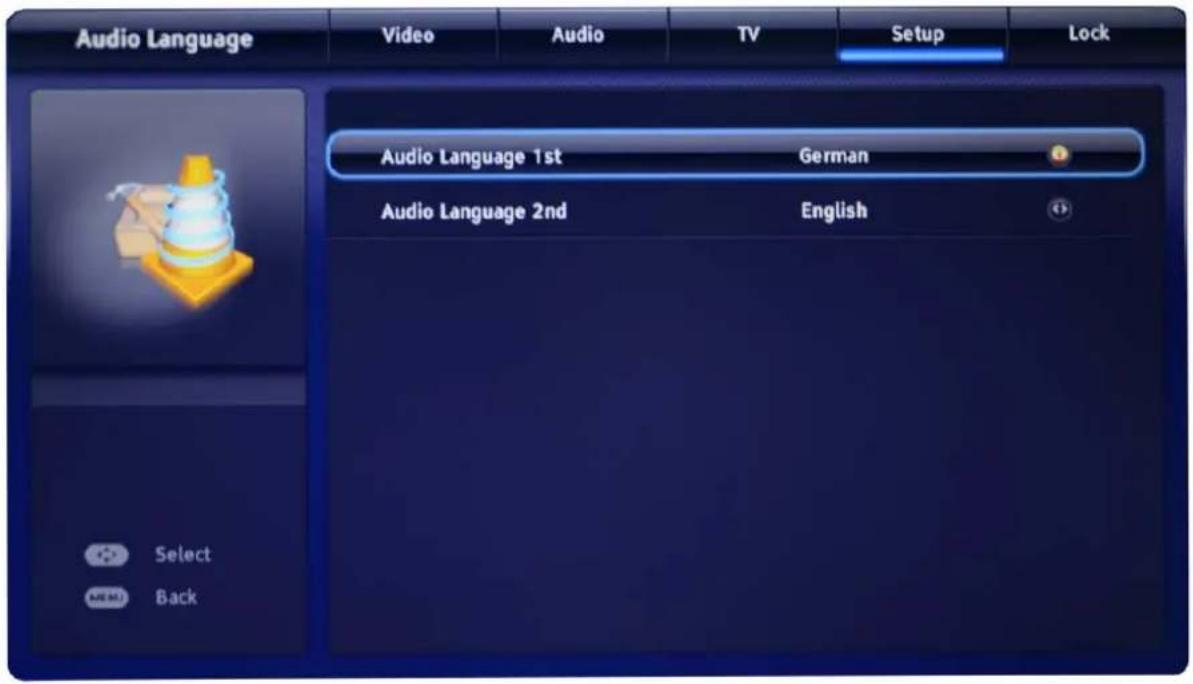
| Audio Language (must be supported by channel) | Use the ▼ or ▲ buttons to highlight one of the following options, then press [ENTER] to enter the sub-menu and press ◀ or ▶ to adjust. | |
| Audio language 1st | Set the first language for the audio. | |
| Audio language 2nd | Set the second language for the audio. | |
| First Time Installation | Set the first time installation. For detail please reverence page 9-12. | |
| Reset Default | Reset all the Settings to default . | |
Lock

Option
Description
Password
Use the ▼ or ▲ buttons to highlight one of the following options, then press [ENTER] to select it and then you will enter the password interface.

After entering the correct password, you will see the submenu as the picture below. The default password is "0000". If you forget what you set, please call the service center.

System Lock
Set the channel / program block on or off.
Channel Block
Set the channel source be locked.

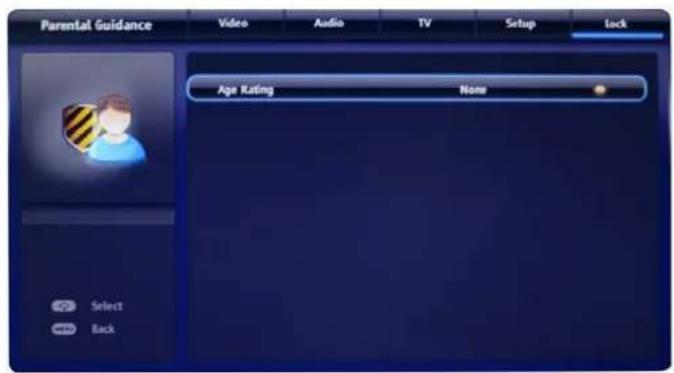
Parental Guidance
Sets the age rating. None or from 4 to 18 years old.

Change Password
Enter the 4-digital new password and confirm it.
Clear All
Set the items in the lock menu to default values.
Hotel Mode
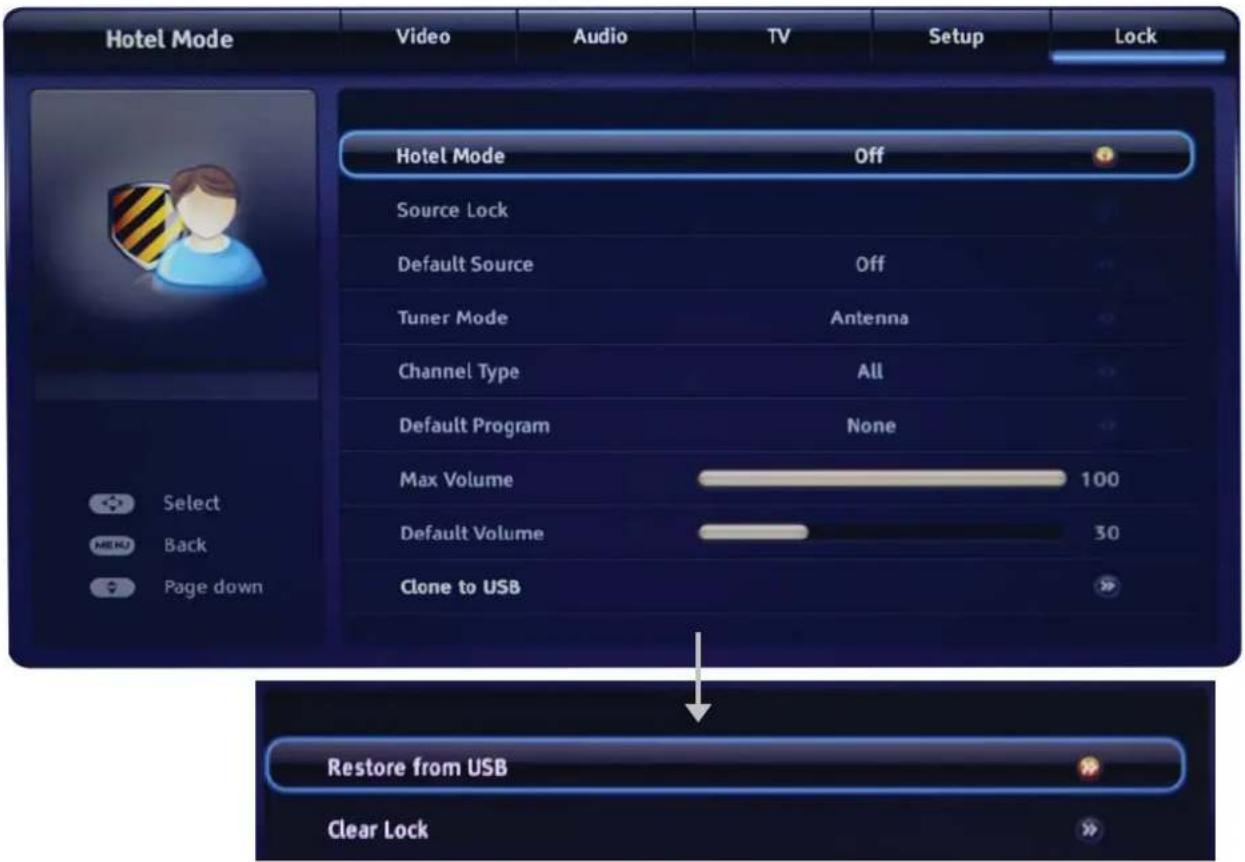
Hotel Lock Press ▲ and ▼ to select Hotel Lock and press ▶ to select the ON or OFF.
Source Lock Press ▲ and ▼ to select Source Lock and press ▶ to select the source for prohibiting any external input.
Note: The current using channels can not be locked.
Default Source If "Hotel Mode" set to on, select the default source when turn on the TV.

Hotel Mode
| Tuner Mode | Select the tuner mode. |
| Channel Type | Select the channel type. |
| Default Program | Select the default channel. |
| Max Volume | Set the max volume for the TV. |
| Default Volume | Set the default volume for the TV whenit turns on. |
| Clone to USB | Copy the settings to USB. |
| Restore from USB | Copy the date from USB to TV. |
| Clear Lock | Clear the lock setting. |
VGA

| Option | Description |
| Auto Adjust | Use the ▼ or ▲ buttons to highlight one of the following options, then press [ENTER] to enter the sub-menu and press ◀ or ▶ to adjust. |
 Select to automatically adjust the display position and phase of the picture when the TV receives an input signal from the connected PC. Note that Auto Adjust may not work well with certain input signals. In such cases, manually adjust the options below. Select to automatically adjust the display position and phase of the picture when the TV receives an input signal from the connected PC. Note that Auto Adjust may not work well with certain input signals. In such cases, manually adjust the options below. | |
| H.Position | Allows you to move the position of the picture left and right. |
| V.Position | Allows you to move the position of the picture up and down. |
| Phase | Adjust to fine tune overall sharpness. |
| Clock | Adjust the low frequency sounds. |
Media

Press SOURCE to display the input menu, and select USB.
For details,
Photo Page 29.
Music Page 30.
Video Page 31.
Text Page 32.

For this interface, you can press MENU to display the menu after select one file, no mater it is a music or video/picture/text.
Photo
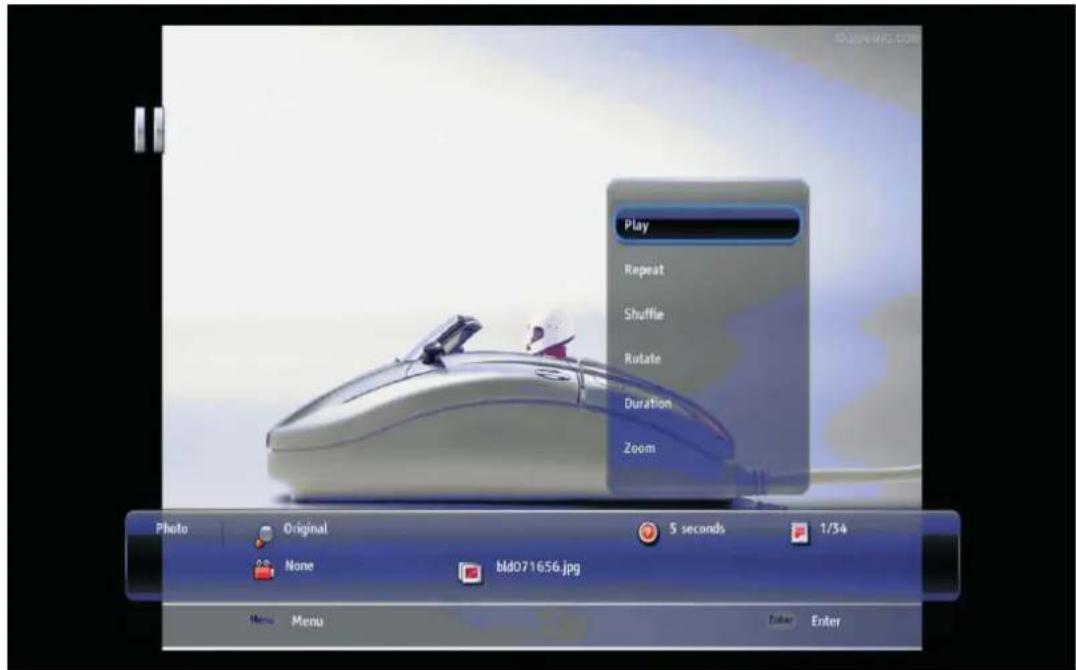
Press Green button to display the menu, then press ▲/▼ button to select the option, and press ENTER button to adjust the following functions.
Play
Press ENTER to pause or play the photo.
Repeat None/Repeat One/Repeat All Press ENTER to select the repeat mode.
Shuffle On/Off
Press ENTER to play orderly or disorderly.
Rotate
Rotate the photo clockwise/counterclockwise.
Duration
Press ENTER to display the information about the current photo.
ZOOM
Zoom out/in the movie screen.
Effect
Press ENTER to hide or show the spectrum.
Show Info
Press ENTER to display the information about the current picture.
Music

Press Green button to display the menu, then press ▲/▼ button to select the option, and press ENTER button to adjust the following functions
Pause
Press ENTER to pause or play the music.
Repeat None/Repeat One/Repeat All Press ENTER to select the repeat mode.
Shuffle On/Off
Press ENTER to play orderly or disorderly.
Show info
Press ENTER to display the information about the current music.
Hide Spectrum
Press ENTER to hide and show the spectrum.
Lyric Options
Press ENTER to set lyric property. (Only when the music is with lyrics, this item can be used.)
Audio Only
Press ENTER to hide all the content on screen, and press MENU to display again.
Video
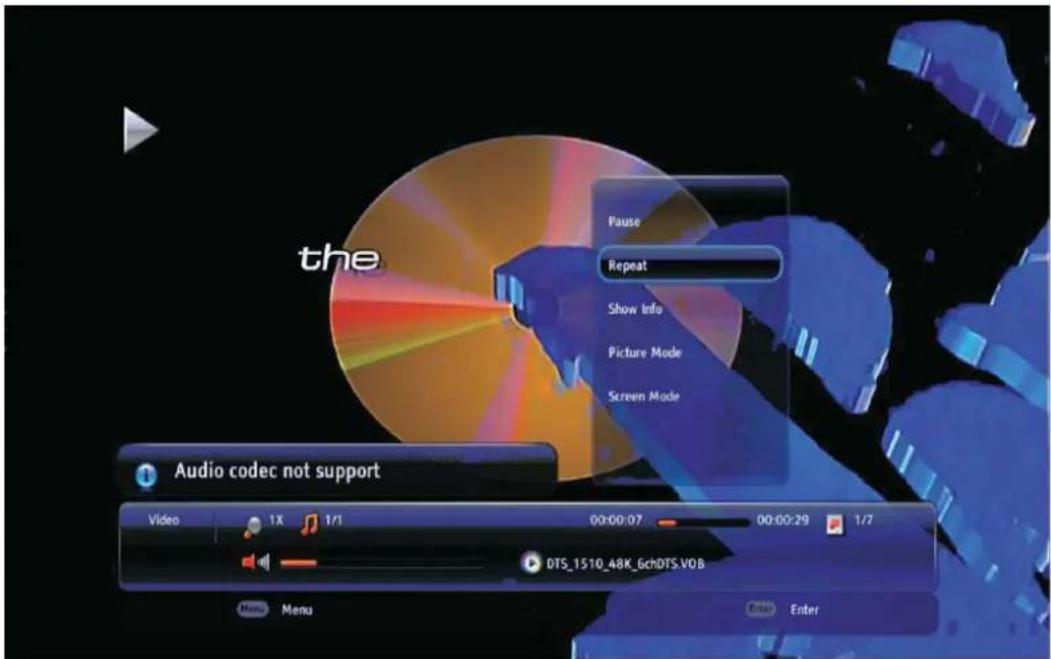
Press Green ENTER today the menu, then press ▲/▼ button to select the option, and press adjust the following functions
Pause
Press ENTER to pause or play the video.
Repeat None/Repeat One/Repeat All Press ENTER to select the repeat mode.
Show info
Press ENTER to display the information about the current video.
Picture mode
Press ENTER to select the picture mode.
Screen mode
Press ENTER to select the screen mode.
Text

Press Green button to display the menu, then press ▲/▼ button to select the option, and press ENTER button to adjust the following functions
Pause
Press ENTER to pause or play the text automatically.
Repeat None/Repeat One/Repeat All
Press ENTER to select the repeat mode.
Shuffle On/Off
Press ENTER to play orderly or disorderly.
Font
Press ENTER to enter the submenu to set the Size/Style/Color.
Show info
Press ENTER to display the information about the current video.
Background Music On
Press ENTER to turn On/Off the background music.
▼/▲ Press to view the text row by row.
◀/▶ Press to view the previous or the next page.
Simple Troubleshooting
If the display fails or performance dramatically deteriorates check the Display in accordance with the following instructions. Remember to check the peripherals to point the source of the failure.
If the display still fails to perform as expected, connect your helpline for assistance.
No power
- Check all connections to the TV.
- Press either the power button or the Standby button on the Remote control.
No picture or sound
- Ensure that the TV is plugged in and the power is on.
- Ensure that the aerial is connected.
- Try a different programme.
Poor picture quality
- Check the aerial connections.
- Check that the channel is tuned in properly.
- Adjust the picture settings: brightness, colour, sharpness, contrast, hue.
- Make sure that the TV is not located close to electrical appliances that may emit radio frequency interference.
No colour
- Adjust the colour setting.
- Check that the programme is broadcast in colour.
- Check that the cannel is tuned properly.
TV does not respond to remote control
- Check that there are no obstructions between the remote control and the unit.
- Check that the remote control is within range of the unit.
- Check that the batteries in the remote control and not weak or exhausted.
This LED BLU-TV is for household use and registered as harmless on electromagnetic waves.
Therefore, you can use it in every location as well as residential areas.
If none of the suggestions seem to work, try switching your TV off and then on again. If this doesn't work contact our technical helpine. NOTE: The TV must only be repaired by a qualified registered service person. Never attempt to remove the back cover as the TV has dangerous voltages inside that may cause fatality or fire.
Waste Electrical Recycling
TV Specifications
| TV System P | AL/BG/DK/ ISECAM BG/DK/L/L' |
| Audio System BG/DK/I/L/L' | |
| Screen size 31.5" (Diagonal) | |
| Resolution 1920 x 1080 Pixels | (RGB) |
| Aerial input 75 Ohm (unbalanced) | |
| Audio output power 2 x 8W | |
| Power requirements | 100-240V ~ 50/60Hz |
| Power consumption 75W | |
| Standby power consumption | <0.5W |
| Remote Control | |
| Type | infrared |
| Control distance | 5m |
| Control angle | 30° (horizontal) |
| Batteries | 2 x 1.5V, size AAA |
Correct disposal of Product
This sign indicates that this product may not be disposed of with your regular household waste. The recycling and separate collection of such products is your responsibility. Please drop off the above mentioned waste at a designated place for recycling waste electri-
cal and electronic equipment. If you do not know where to drop off your waste equipment for recycling, please contact your local city office or household waste collection service.
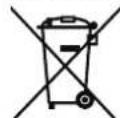
The crossed out wheeled dust bin symbol indicates that batteries and /or accumulators must be collected and disposed of separately from household waste.
Hg Cd Pb

If the battery or accumulator contains more than the specified values of lead (Pb), mercury (Hg), and/or cadmium (Cd) defined in the Battery Directive (2006/66/EC), then the chemicals Hg Cd Pb symbols for lead(Pb), mercury (Hg) and/or cadmium (Cd) will appear below the crossed out wheeled dust bin symbol.
By participating in separate collection of batteries, you will help to assure the proper disposal of products and batteries thus help to prevent potential negative consequences for the environment and human health.
For more detailed information about the collection and recycling programmes available in your country, please contact your local city office or the shop where you purchased this product.

This appliance complies with European Safety and Electrical directives.
It fullfils the following EU regulations:
EN 55013:2001+A1:2003+A2:2006
EN 55020:2007
EN 55022:2006+A1:2007
EN 55024:1998+A1:2001+A2:2003
EN 61000-3-3:2008
EN 61000-3-2:2006+A1:2009+A2:2009
EN 60065:2002+A1:2006+A11:2008+A2:2010
Manufacturer:
D-66780 Rehlingen-Siersburg (Germany)
Fon: +49(0)6835 92350-0
Fax: +49(0)6835 92350-500
Instructions for fixing stand Note: the pictures below are only for reference
The parts
needed for installing the stand (supplied)

natural_image
Top-down schematic of a device layout with labeled components (no readable text or symbols)Rear cabinet of TV

TV stand board

Screws(4xM4x14)

Screws(4xB4x12F)
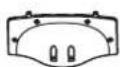
The rear board
Installation
(Put your TV on the table with its rear cabinet facing upwards.)
- Put the rear board on the stand neck, and fix the rear board with the screws supplied (4 x B4 x 12F).

- Put the rear board on the rear cabinet of TV, and fix the rear board with the screws supplied (4 x M4 x 14).

CE

Product of :




- Achtung
- Caution
- Correct disposal of this Product
- Safety Information
- Electrical safety
- Physical safety
- Accessories
- Technical Specification
- Product Introduction
- Front View
- Rear View
- Wall Mounting
- Connections
- Remote Control
- DTV/RADIO
- Auto installation setup
- Picture Mode
- Language
- Country
- Tuner Type
- Scan
- Complete
- Basic Operation
- Power on/off
- Input Source select
- OSD Menu
- Video
- Visually Inpaired
- Channel Scan
- Analog Manual Scan
- Digital Manual Scan
- Channel Skip
- Channel Sort
- Channel Edit
- Time Setup
- Subtitle
- Teletext
- Lock
- Option
- Description
- Password
- System Lock
- Channel Block
- Parental Guidance
- Change Password
- Clear All
- Hotel Mode
- VGA
- Media
- Photo
- Play
- Shuffle On/Off
- Rotate
- Duration
- ZOOM
- Effect
- Show Info
- Music
- Pause
- Hide Spectrum
- Lyric Options
- Audio Only
- Screen mode
- Text
- Font
- Background Music On
- Simple Troubleshooting
- No power
- No picture or sound
- Poor picture quality
- No colour
- TV does not respond to remote control
- Waste Electrical Recycling
- Correct disposal of Product
- Hg Cd Pb
- Manufacturer:
- Instructions for fixing stand Note: the pictures below are only for reference
- The parts
- Installation
Brand : SEG
Model : Sydney
Category : Television