
Hobart - TV SEG - Free user manual and instructions
Find the device manual for free Hobart SEG in PDF.


User questions about Hobart SEG
0 question about this device. Answer the ones you know or ask your own.
Ask a new question about this device
Download the instructions for your TV in PDF format for free! Find your manual Hobart - SEG and take your electronic device back in hand. On this page are published all the documents necessary for the use of your device. Hobart by SEG.
USER MANUAL Hobart SEG
text_image
55cm(21.5")Achtung
(Waste Electrical & Electronic Equipment (WEEE))
natural_image
Line drawing of a flat-screen monitor with a vertical panel of circular buttons on the right side (no text or symbols on the screen)9LGHR□□VLHKH□6HLWH□□□
7H[W□VLHKH]6HLWH□□□
text_image
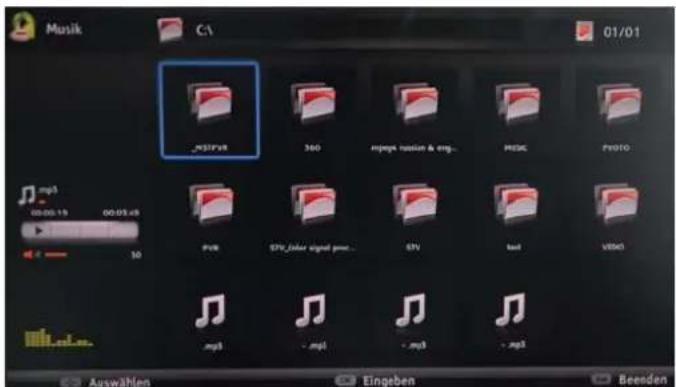
Music CA 01/01 _MSI/FVR 360 mpage musical & img... MUSIC P5010 mp5 00:00:19 00:03:48 50 PWR SPV /older signal power... SPV bad VSSG mp5 - mp5 - mp5 - mp5 Auswählen Eingeben Beenden6LH□N|QQHQ□MHGHU|HLW□LQ□GDV□DWHL□\$XVZDKOPHQ□|XU□FN□
NHKUHQ[JHDO]RE6LH0XVLNRGHU)LOPH)RWRVROHN7H[MLHGLHJUQH7DVWHXPGDV0HQHLQJXEOHQ DEVSLHOHQ'UFNHQ6LHGD]XGLH7DVWH0(18 XQG-DQVFKOLHHQGGLH7DVWHQ▲▼XPGLHJHZQVF 2SWLRQ□DXV]XZIKOHQ□'U□FNHQ□6LH□DQVFKOLH□HQG□GLH(17(5□XP□HLQH□GHU□IROJHQGHQ□2SWLRQHQ□HLQ]XVWHOOI
m = 311
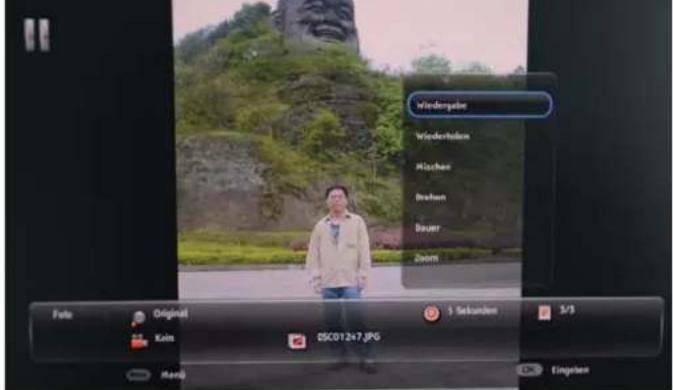
'UFNHQ6LH(17(5XPGLHDNWXHOOH'DWHLPLWMHGHF7DVWHQGUXFNXPLOLP8KU]HLJHUVLQQIXGUHKHQ
Dauer
XVZDKO UENHQ6LH[(17(5XP]GLH\$Q]HLJHGDXHUGHUHLQ]HOQH H2SWLRQ %LOGDXV]XZIKOHQ
Zoom
0LW□GLHVHU□)XQNWLRQ□N|QQHQ□6LH□GLH□%LOGDQVLFKW YHUJU□HUQ□
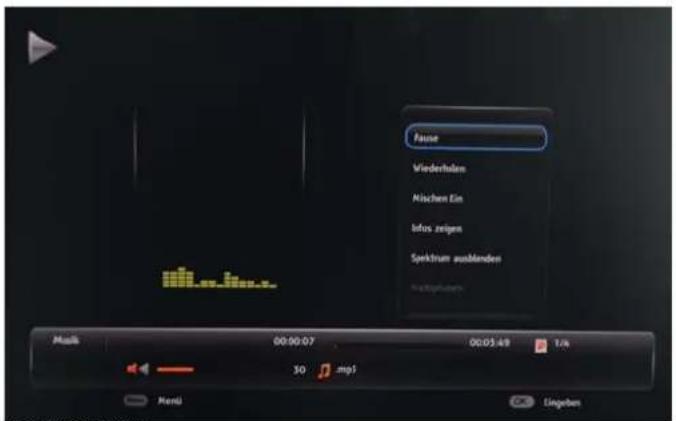
Musik
text_image
00! 00:22:00" 00! %00:00:00:00:00:00:00:00:00:00:00:00:00:00:00:00:00:00:00:00:00:00:00:00:00:00:00:00:00:00:00:00:00:00: + 1. 1. 1. 1. 1. 1. 1. 1. 1. 1. 1. 1. 1. 1. 1. 1. 1. 1. 1. 1. 1. 1. 1. 1. 1. 1 Y! 1. 1. 1. 1. 1. 1. 1. 1. 1. 1. 1. 1. 1. 1. 1. 1. 1. 1. 1. 1. 1. 1 N! N! N! N! N! N! N! N! N! N! N! N! N! N! N! N! N! N! N! N! N! N! N! N! N! N! N! N! N! N! N! N! N! N! M M M M M M M M M M M M M M M M M M M M M M M M M M M M M M M N! N! N! N! N! N! N! N! N! N! N! N! N! N! N! N! N! N! N! N! N! N! N! N! N! N! N! N! N! N! N! N! N! O! O! O! O! O! O! O! O! O! O! O! O! O! O! O! O! O! O! O! O! O! O! O! O! O! O! O! P! P! P! P! P! P! P! P! P! P! P! P! P! P! P! P! P! P! P! P! P! [O] = [O] = [O] = [O] = [O] = [O] = [O] = [O] = [O] = [O] = [O] = [O] = [O] = [O] = [O] = [O] = [O] = [O] = [O] = [O] = [O] = [O] = [O] = [O] = [O] = [O]400□6□145□7+□75
□
□
U
![]
□
□□□□□□□□□□>□□
\$1%□□□□□□□□1□
?□@□5<17□□□□□□□□□□□
山
||
[NO TEXT]
text_image
000 20000000!00000000!00000000!80000000!00000000!00000000!00000000!00000000!00000000!00000000!00000000!00000000!00000000!00000000!15:34:34:34:34:34:34:34:34:34:34:34:34:34:34:34:34:34:34:34:34:34:34:34:34:34:34:34:34:34:34:34:34:34:34: ■□□□□□□□□□□□□□□□□□□□□□□□□□□□□□□□□□□□□□□□□□□□□□□□□□□□□□□□□□□□□□□□□□□□□□□□□□□□□□□□□□□□□□□□□□□□□□□□□□□□□ ■15:34:34:34:34:34:34:34:34:34:34:34:34:34:34:34:34:34:34:34:34:34:34:34:34:34:34:34:34:34:34:34:34:15: ■15:34:34:34:34:34:34:34:34:34:34:34:34:34:34:34:34:34:34:34:34:34:15: ■15:34:34:34:34:34:34:34:34:34:36-15-15-15-15-15-15-15-15-15-15-15-15-15-15-15-15-15-15- ■15:34:34:34:34:34:34:34:34:34:34-15-15-15-15-15-15-15-15-15-15-15-15-15-15- ■15:34:34:34:34:34:34-15-15-15-15-15-15-15-15-15-15-15-15- ■15:34:34:34:34-15-15-15-15-15-15-15-15-15-15-15- ■15:34:34-15-15-15-15-15-15-15-15-15-15-15- ■15:34-15-15-15-15-15-15-15-15-15-15-15- ■15:34-15-15-15-15-15-15-15-15-15- ■15:34-15-15-15-15-15-15-15-15- ■15:34-15-15-15-15-15-15-15 ■2.7.2.2.2.2.2.2.2.2.2.2.2.2.2.2.2.2.2.2.2.2.2.2.2.2.2.2.2.2.2.2.2.2.2.2.2.2.2.2.2.2.2.2.2.2.2.2.2.2.2.2.©
Hersteller:
Schmid Electronics GmbH In Dürrfeldslach 3
The remote control is using Infra-Red(IR). Point it towards the front of the LED BLU-TV. The remote control may not work correctly if it is operated out of range or out of angle.
text_image
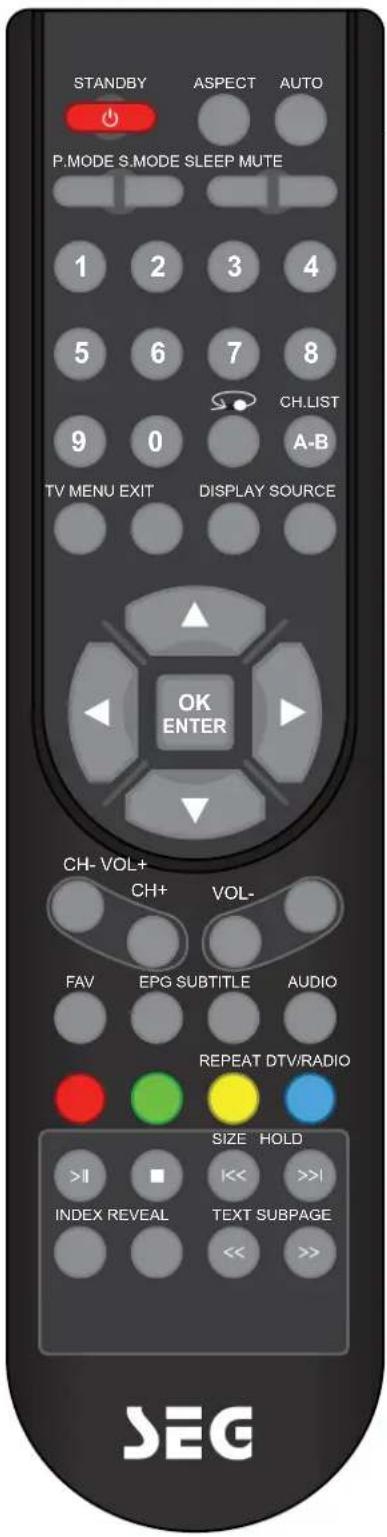
STANDBY ASPECT AUTO P.MODE S.MODE SLEEP MUTE 1 2 3 4 5 6 7 8 CH. LIST 9 0 A-B TV MENU EXIT DISPLAY SOURCE OK ENTER CH- VOL+ CH+ VOL- FAV EPG SUBTITLE AUDIO REPEAT DTV/RADIO SIZE HOLD >I INDEX REVEAL TEXT SUBPAGE << >>> << >> SEGSTANDBY: Turn the TV on/standby.
AUTO: Automatically adjust the picture in PC mode.
ASPECT: Adjust screen size.
P.MODE: Select the picture mode.
S.MODE: Select the sound mode.
SLEEP: Shutdown timer.
MUTE: Press to mute the sound, press again or press VOL+ to unmute.
0-9: Choose channel directly.
: Return to the previous channel viewed.
A-B: Define Points A and B for looping playback.(in USB mode)
CH.LIST: Display the programs list.
TV MENU: System setup menu.
EXIT: Exit the OSD menu.
DISPLAY: Display ATV or DTV information.
SOURCE: Press to display the input source menu.
Cursor left/right/up/down: Cursor buttons used in menus.
OK: CONFIRM BUTTON for menu.
VOL+/-: Adjust the volume.
CH+/-: Scan through channels.
FAV: Display the favorite program list.
EPG: To show the Electronic Program Guide during no-menu state only.
SUBTITLE: To switch the dialog at the bottom of the screen.
AUDIO: To change the audio language(if available).
Remote Control
text_image
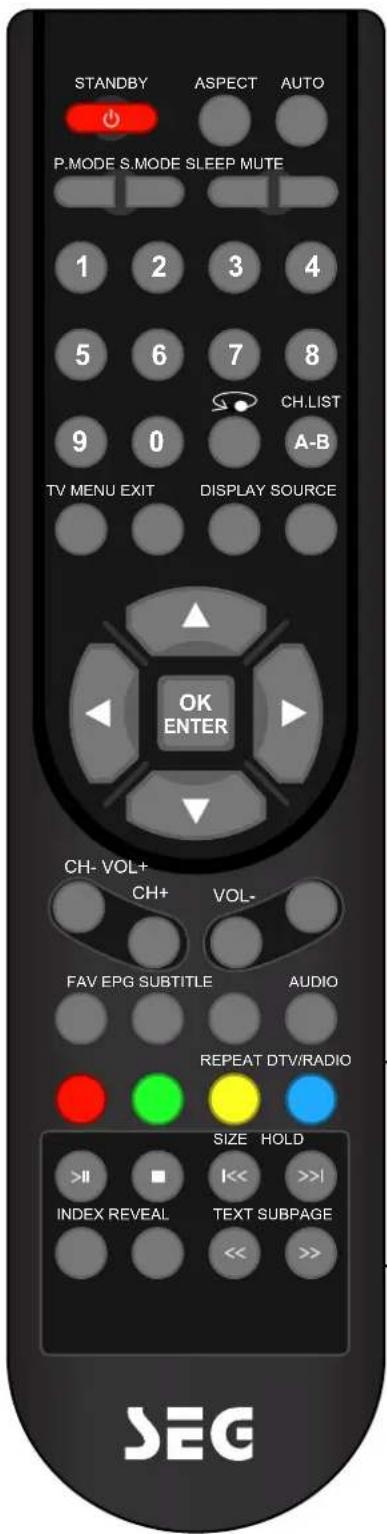
STANDBY ASPECT AUTO P.MODE S.MODE SLEEP MUTE 1 2 3 4 5 6 7 8 CH.LIST 9 0 A-B TV MENU EXIT DISPLAY SOURCE OK ENTER CH- VOL+ CH+ VOL- FAV EPG SUBTITLE AUDIO REPEAT DTV/RADIO SIZE HOLD >II ■ |<< >>| INDEX REVEAL TEXT SUBPAGE << >> SEGREPEAT: Repeat playing in USB mode.
DTV/RADIO
Colour buttons: short cuts-follow the coloured links in the text.
SIZE: Press to see top half of page double size, Press again to see the bottom half og page double size, Press again for normal size.
HOLD: Hold or carry on the current subpage.
INDEX: Go to index.
REVEAL: Reveal any hidden text, for example-quiz answer.
TEXT: Turn off/on the Teletext display.
SUBPAGE: For example to go directly to subpage 4: press SUBPAGE, then 0,0,0,4; press SUBPAGE again to cancel subpage mode.
|| Play/Pause
■ STOP
|<< Previous track
Next track
<< Fast reverse
Fast forward
Auto installation setup
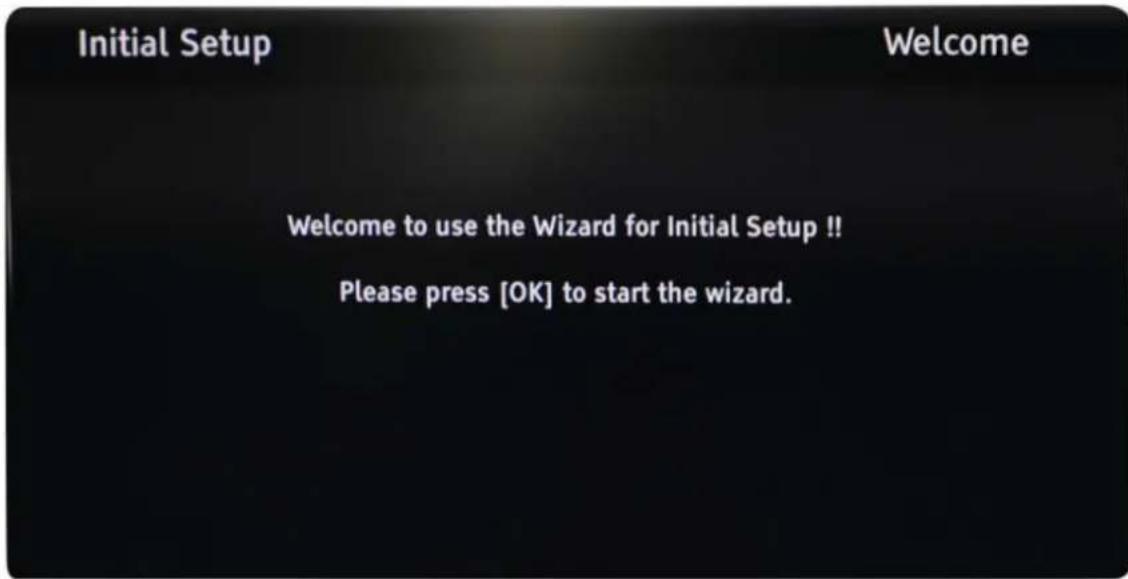
When you initially turn on the TV you will see the first time installation menu as below:
text_image
Initial Setup Welcome Welcome to use the Wizard for Initial Setup!! Please press [OK] to start the wizard.Auto installation setup
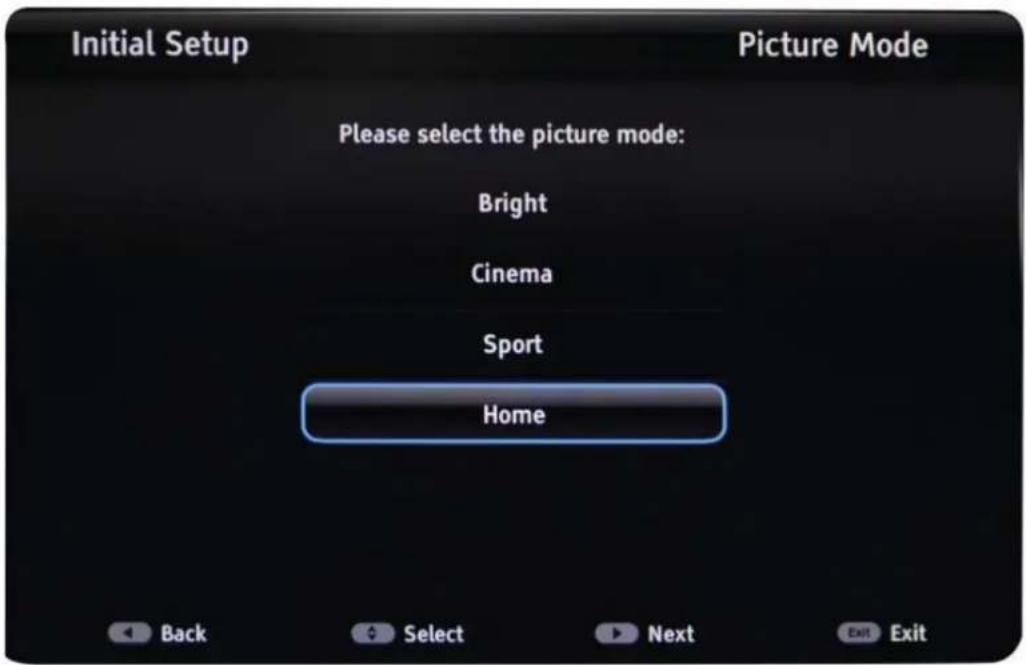
Picture Mode
- Selection the picture mode (Bright, Cinema, Sport or Home)
- Confirmation "Are you sure? Yes or No"
text_image
Initial Setup Picture Mode Please select the picture mode: Bright Cinema Sport Home Back Select Next Exit Exit☐3OHDVH☐VHOHFW☐RXU☐ODQJXDJH☐SUHVV☐☐Y☐z☐WR☐VHOHFW☐press ENTER to confirm:
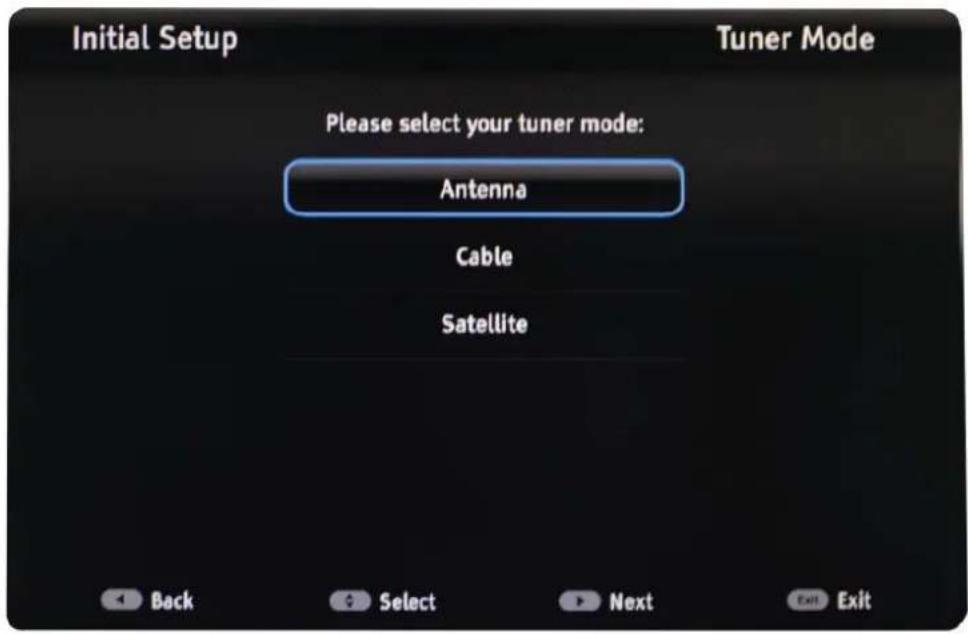
Tuner Type
Please select your tuner type, press [▼]/ [▲] to select, press [ENTER] to confirm:
text_image
Initial Setup Tuner Mode Please select your tuner mode: Antenna Cable Satellite Back Select Next Exit Exit| Option | Description | |
| Tuner Mode | Antenna | Set the signal type to antenna. When set to Air, TV can catch analog and DVB-T broadcasting signal. |
| Cable | Set the signal type to cable. When set to Cable, TV can catch analog and DVB-C broadcasting signal. | |
| Satellite | Set the signal type to satellite. | |
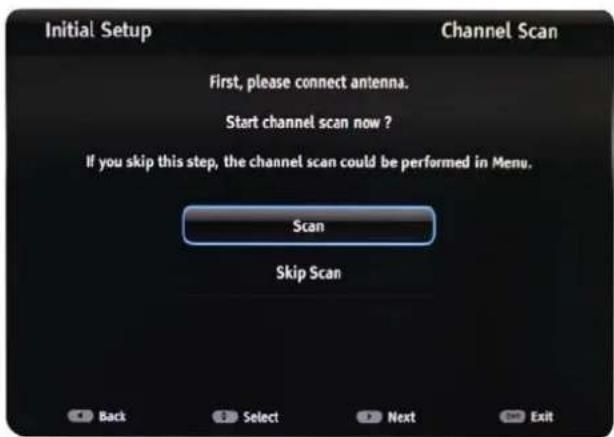
Scan
Please select your scan, press [▼]/ [▲] to select, press [ENTER] to confirm:
text_image
Initial Setup First, please connect antenna. Start channel scan now ? If you skip this step, the channel scan could be performed in Menu. Scan Skip Scan Back Select Next Exit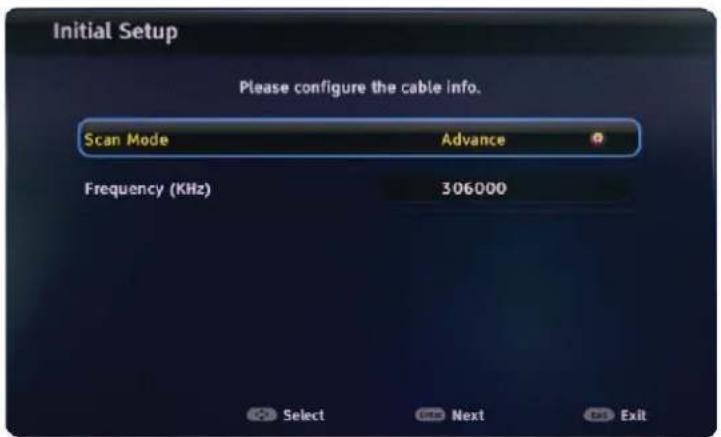
text_image
Initial Setup Please configure the cable info. Scan Mode Advance Frequency (KHz) 306000 Select Next Exit©
©
| Option | Description | |
| Tint | Controls the tint ( NTSC mode only). | |
| Color Temperature | Use the ▼ or ▲ buttons to highlight one of the following options, then press [ENTER] to enter the sub-menu and press◀ or ▶ to adjust. | |
| Standard | Select to give the white color a neutral tint. | |
| Warm | Select to give the white color a reddish tint. | |
| Cool | Select to give the white color a bluish tint. | |
text_image
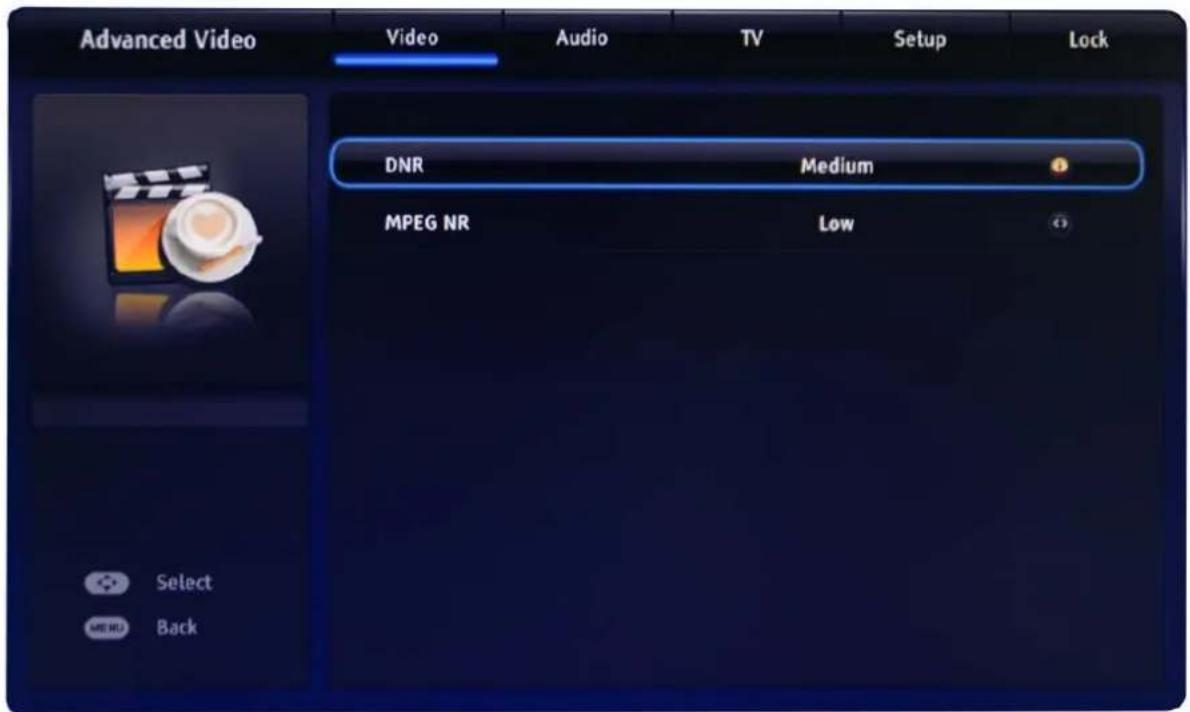
Advanced Video Video Audio TV Setup Lock DNR Medium MPEG NR Low Select Back| Option | Description | |
| Advanced Video | Use the ▼ or ▲ buttons to highlight one of the following options, then press [ENTER] to enter the sub-menu and press◀ or ▶ to adjust. | |
| DNR | You can clear up analog TV signal by reducing the dot noise. | |
| This feature is not available at PC or Media source. | ||
| MPEG NR | Similar with the Noise Reduction, you can set to reduce the block noise. | |
55 cm (21.5") LED BLU-TV Hobart
| Option | Description | |
| Sound Type | Press ◀ or ▶ buttons to select(Stereo, Dual1, Dual2, Mix). | |
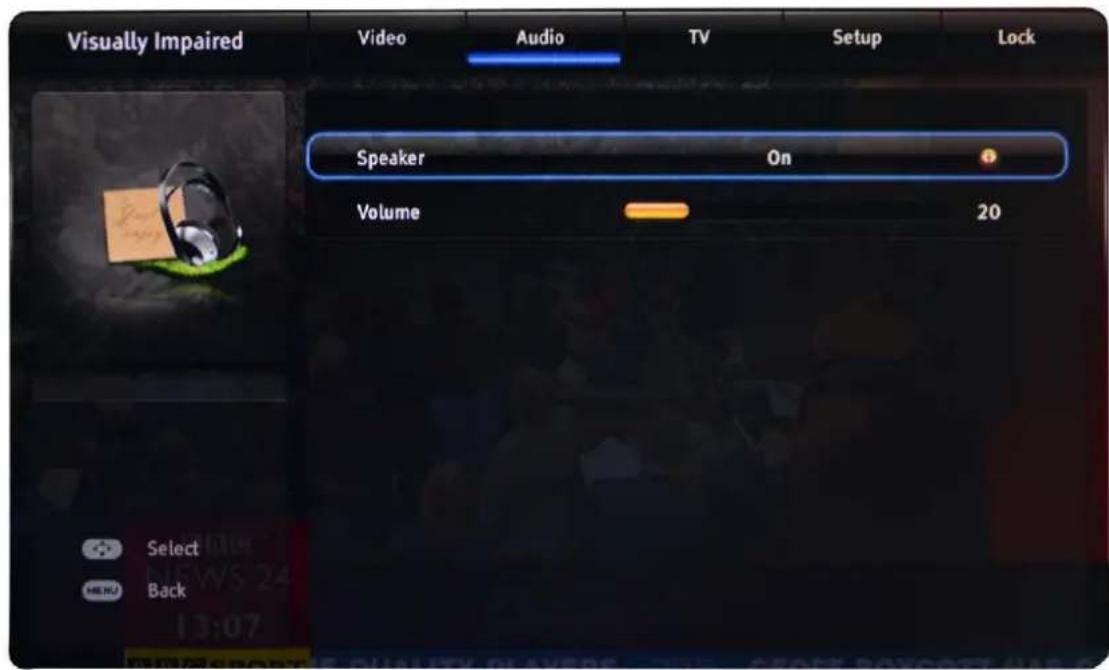
| Type | Use the ▼ or ▲ buttons to highlight one of the following options, then press [ENTER] to enter the sub-menu and press ◀ or ▶ to adjust. | |
| Normal | Select to output normal type. | |
| Hearing Impaired | This mode is designed for people that have hearing impairment.If there is related information, it can be shown. | |
| Visually Impaired | This mode is designed for people that have visual impairment. | |
Visually Inpaired
text_image
Visually Impaired Video Audio TV Setup Lock Speaker On Volume 20 Select MENU Back©
©
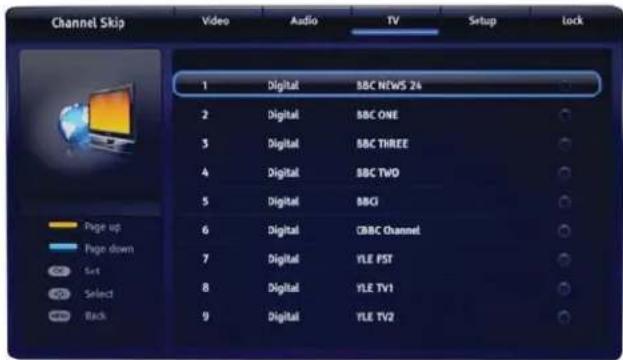
Channel Skip
text_image
Channel Skip Video Audio TV Setup Lock 1 Digital BBC NTWS 24 2 Digital BBC ONE 3 Digital BBC THREE 4 Digital BBC TWO 5 Digital BBCI 6 Digital CBBC Channel 7 Digital YLE PST 8 Digital YLE TV1 9 Digital YLE TV2Channel Sort
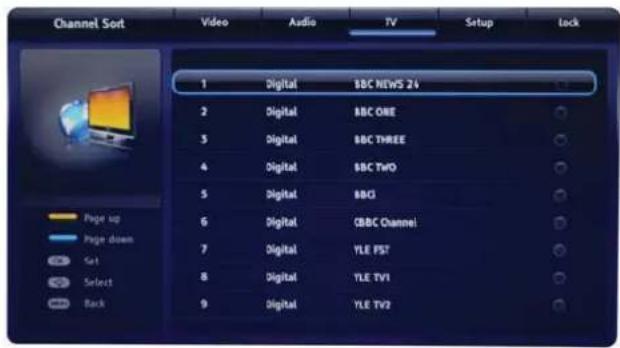
text_image
Channel Sort Video Audio TV Setup Lock 1 Digital BBC NEWS 24 2 Digital BBC ONE 3 Digital BBC THREE 4 Digital BBC TWO 5 Digital BBC1 6 Digital GBBC Channel 7 Digital YLE PST 8 Digital YLE TV1 9 Digital YLE TV2 Page up Page down Set Select BackChannel Edit
text_image
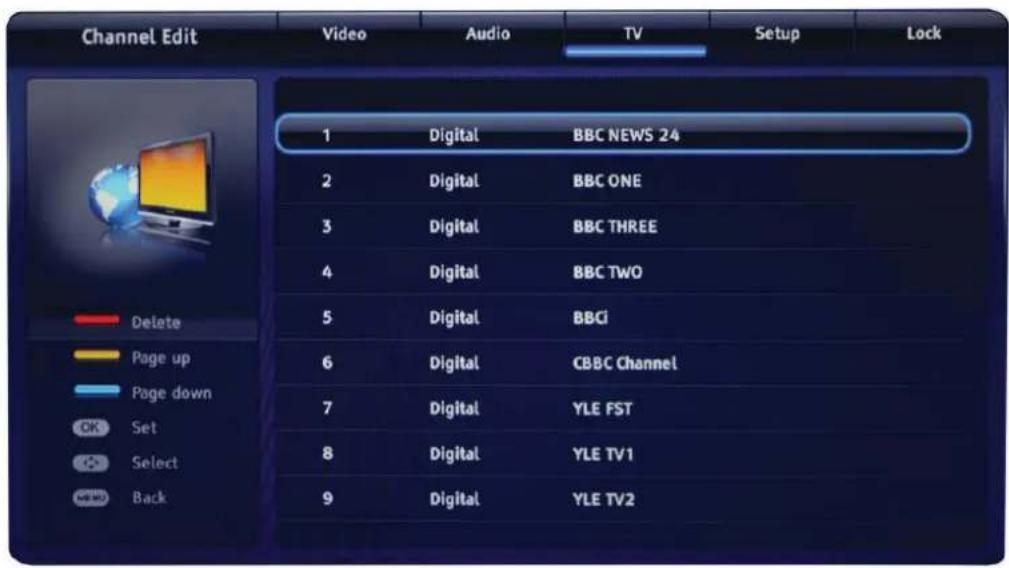
Channel Edit Video Audio TV Setup Lock 1 Digital BBC NEWS 24 2 Digital BBC ONE 3 Digital BBC THREE 4 Digital BBC TWO 5 Digital BBCi 6 Digital CBBC Channel 7 Digital YLE FST 8 Digital YLE TV1 9 Digital YLE TV2All available TV receiver sources can be set one after the other. Switching between the single source occurs in the sub menu "TV" "via" Tuner Mode.
Setup
text_image
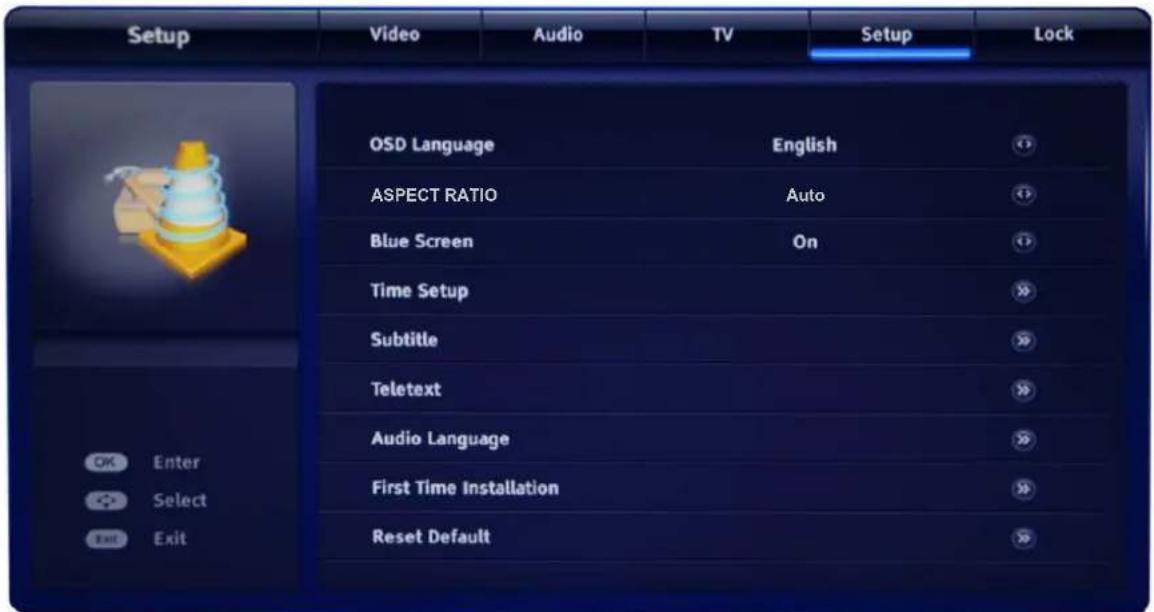
Setup Video Audio TV Setup Lock OSD Language English ASPECT RATIO Auto Blue Screen On Time Setup Subtitle Teletext Audio Language First Time Installation Reset Default| Option | Description |
| OSDLanguage | Set the On-Screen-Display language. |
| ASPECT RATIO | Press◀ or ▶ buttons to select 16:9, 4:3, Zoom1, Zoom2, Auto, Point to point (only in HDMI mode available). |
| Blue Screen | Set the screen to blue or not when having no signal. |
| Time Setup | Use the▼ or ▲ buttons to highlight one of the following options, then press [ENTER] to enter the sub-menu and press◀ or ▶ to adjust.Set Time Zone/Time/Sleep Time/Auto Sleep. For detail please reverence page 21. |
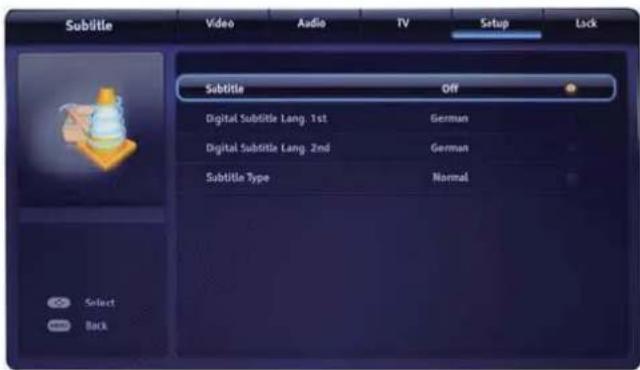
| Subtitle(must be supported by channel) | Use the▼ or ▲ buttons to highlight one of the following options, then press [ENTER] to enter the sub-menu and press◀ or ▶ to adjust.For detail please reverence page 21.Digital Subtitle Lang.1st Set the first language for the digital subtitle. |
| Digital Subtitle Lang.2nd Set the second language for the digital subtitle. | |
| Subtitle Type Select the subtitle type (Normal/Hearing Impaired). | |
| Teletext(must be supported by channel) | Use the▼ or ▲ buttons to highlight one of the following options, then press [ENTER] to enter the sub-menu and press◀ or ▶ to adjust.For detail please reverence page 21.Digital Teletext Language Set the language for the digital teletext. |
| Decoding Page Language Set the language for the decoding page. |
Time Setup
text_image
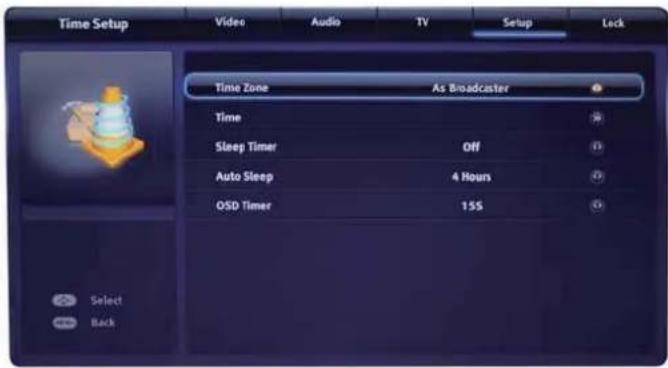
Time Setup Video Audio TV Setup Lock Time Zone As Broadcaster Time Sleep Timer Off Auto Sleep 4 Hours OSD Timer 15S Select Back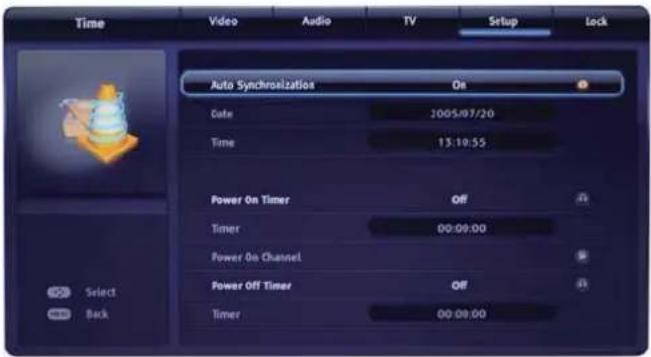
text_image
Time Video Audio TV Setup Lock Auto Synchronization On Date 2005/07/20 Time 13:10:55 Power On Timer OFF Timer 00:00:00 Power On Channel Power Off Timer OFF Timer 00:08:00 Select Back| Option | Description | |
| Time Zone | Set the time zone.Press ◀ or ▶ to select the time zone. | |
| Time | Set the current date / time .Press ◀ / ▶ / [ENTER] to adjust. | |
| Sleep Timer | Set the sleep time.Press ◀ or ▶ to select the sleep time. | |
| Auto Sleep | Off | Set the Auto Sleep off. |
| 3 or 4 or 5Hours | Set the Auto Sleep after 3 or 4 or 5 Hours. | |
| OSD Timer | Sets the OSD Timer. None, 5s, 10s, 15s, 30s, 45s, 60s. | |
Subtitle
text_image
Subtitle Video Audio TV Setup Lock Subtitle Off Digital Subtitle Lang, 1st German Digital Subtitle Lang, 2nd German Subtitle Type Normal Select BackTeletext
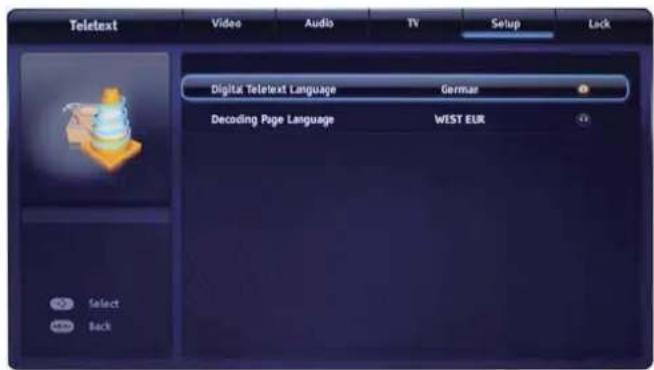
text_image
Teletext Video Audio TV Setup Lock Digital Teletext Language German Decoding Page Language WEST EUR Select BackDescription, see page 20
text_image
Audio Language Video Audio TV Setup Lock Audio Language 1st German Audio Language 2nd English Select Back| Option | Description | |
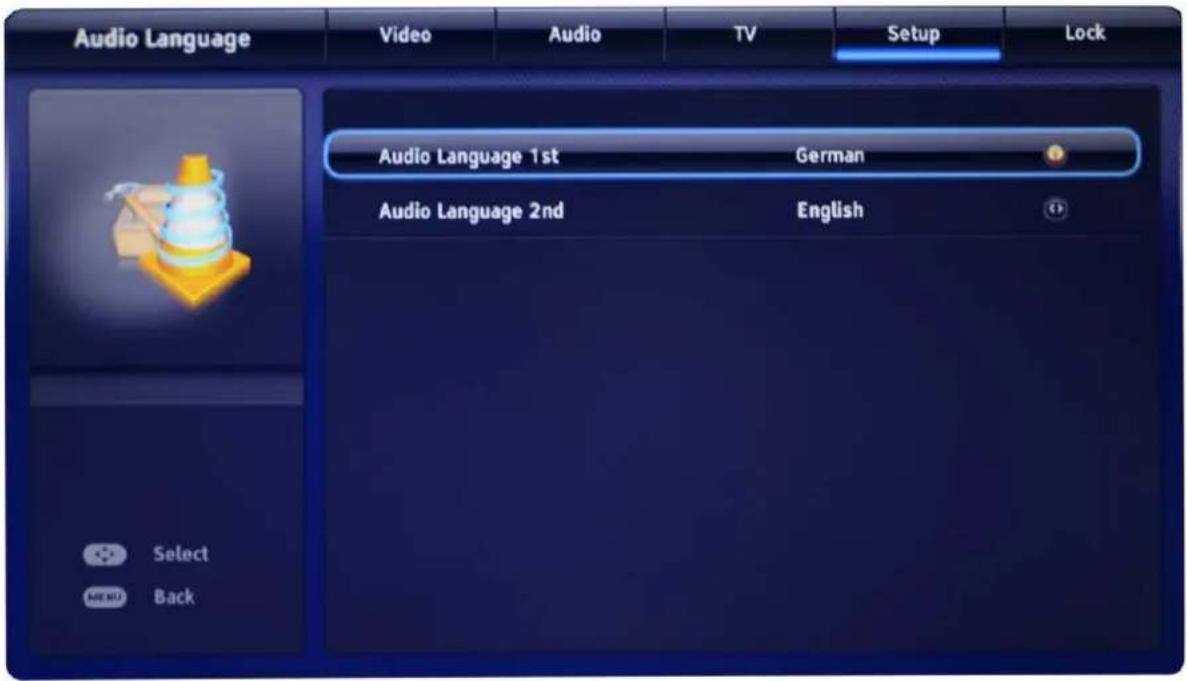
| Audio Language (must be supported by channel) | Use the ▼ or ▲ buttons to highlight one of the following options, then press [ENTER] to enter the sub-menu and press◀ or ▶ to adjust. | |
| Audio language 1st | Set the first language for the audio. | |
| Audio language 2nd | Set the second language for the audio. | |
| First Time Installation | Set the first time installation. For detail please reverence page 9-12. | |
| Reset Default | Reset all the Settings to default . | |
55 cm (21.5") LED BLU-TV Hobart
Parental Guidance
Sets the age rating. None or from 4 to 18 years old.
©
©

©
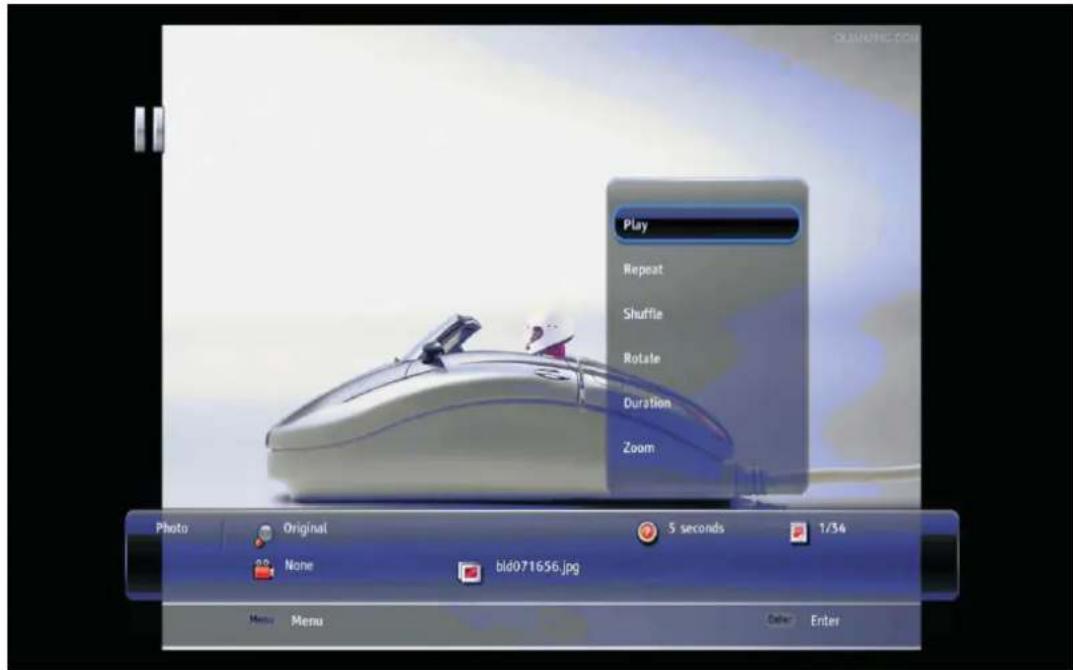
Photo
text_image
Play Repeat Shuffle Rotate Duration Zoom Photo Original 5 seconds 1/34 None bid071656.jpg Menu Menu Other EnterPress GreenEXWWRQWRGLVSODWKHPHQXWKHQSUHVYYZEXWWRQWRVHOHFWWKe option, and press ENTE DGMXVWWKHIROORZLQJIXQFWLRQV
Play
Press ENTER to pause or play the photo.
Repeat None/Repeat One/Repeat All Press ENTER to select the repeat mode.
Shuffle On/Off
Press ENTER to play orderly or disorderly.
Rotate
5RWDWHWKHSKRWRFORFNZLVHFRXQWHUFORFNZLVH
Duration
Press ENTER to display the information about the current photo.
ZOOM
=RRP□RXW□LQ□WKH□PRYLH□VFUHHQ□
Effect
Press ENTER to hide or show the spectrum.
Show Info
Press ENTER to display the information about the current picture.
©
©
Press Green□EXWWRQ□WR□GLVSOD□WKH□PHQX□WKHQ□SUHVV□Y□z□EXWWRQ□WR□VHOHFW□WKe option, and press ENT□ adjust the following functions
Background Music On
Press ENTER to turn On/Off the background music.
Simple Troubleshooting
If the display fails or performance dramatically deteriorates check the Display in accordance with the following instructions. Remember to check the peripherals to point the source of the failure.
If the display still fails to perform as expected, connect your helpline for assistance.
No power
- Check all connections to the TV.
- Press either the power button or the Standby button on the Remote control.
No picture or sound
- Ensure that the TV is plugged in and the power is on.
- Ensure that the aerial is connected.
- Try a different programme.
Poor picture quality
- Check the aerial connections.
- Check that the channel is tuned in properly.
- Adjust the picture settings: brightness, colour, sharpness, contrast, hue.
- Make sure that the TV is not located close to electrical appliances that may emit radio frequency interference.
No colour
- Adjust the colour setting.
- Check that the programme is broadcast in colour.
- Check that the cannel is tuned properly.
TV does not respond to remote control
- Check that there are no obstructions between the remote control and the unit.
- Check that the remote control is within range of the unit.
- Check that the batteries in the remote control and not weak or exhausted.
This LED BLU-TV is for household use and registered as harmless on electromagnetic waves.
Therefore, you can use it in every location as well as residential areas.
If none of the suggestions seem to work, try switching your TV off and then on again. If this doesn't work contact our technical helpine. NOTE: The TV must only be repaired by a qualified registered service person. Never attempt to remove the back cover as the TV has dangerous voltages inside that may cause fatality or fire.
Waste Electrical Recycling
TV Specifications
| TV System P | AL/BG/DK/ I SECAM BG/DK/L/L' |
| Audio System BG/DK/I/L/L' | |
| Screen size 21.5" (Diagonal) | |
| Resolution 1920 x 1080 Pixels (RGB) | |
| Aerial input 75 Ohm (unbalanced) | |
| Audio output power 2 x 3W | |
| Power requirements | 12V --- 3A |
| Power consumption 36W | |
| Standby power consumption | <0.5W |
| Remote Control | |
| Type | infrared |
| Control distance | 5m |
| Control angle | 30° (horizontal) |
| Batteries | 2 x 1.5V, size AAA |
Correct disposal of Product
This sign indicates that this product may not be disposed of with your regular household waste. The recycling and separate collection of such products is your responsibility. Please drop off the above mentioned waste at a designated place for recycling waste electri-
cal and electronic equipment. If you do not know where to drop off your waste equipment for recycling, please contact your local city office or household waste collection service.
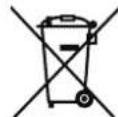
The crossed out wheeled dust bin symbol indicates that batteries and /or accumulators must be collected and disposed of separately from household waste.
Hg Cd Pb
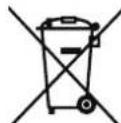
If the battery or accumulator contains more than the specified values of lead (Pb), mercury (Hg), and/or cadmium (Cd) defined in the Battery Directive (2006/66/EC), then the chemicals Hg Cd Pb symbols for lead(Pb), mercury (Hg) and/or cadmium (Cd) will appear below the crossed out wheeled dust bin symbol.
By participating in separate collection of batteries, you will help to assure the proper disposal of products and batteries thus help to prevent potential negative consequences for the environment and human health.
For more detailed information about the collection and recycling programmes available in your country, please contact your local city office or the shop where you purchased this product.

This appliance complies with European Safety and Electrical directives.
It fullfils the following EU regulations:
EN 55013:2001+A1:2003+A2:2006
EN 55020:2007
EN 55022:2006+A1:2007
EN 55024:1998+A1:2001+A2:2003
EN 61000-3-3:2008
EN 61000-3-2:2006+A1:2009+A2:2009
EN 60065:2002+A1:2006+A11:2008+A2:2010
Manufacturer:
D-66780 Rehlingen-Siersburg (Germany)
Fon: +49(0)6835 92350-0
Fax: +49(0)6835 92350-500
Instructions for fixing stand
Instructions for fixing stand
Note: the pictures below are only for reference
The parts
needed for installing the stand (supplied)
TV stand
TV board
Rear cabinet of TV
Screws(4 x ST4 x 16F)
Installation
(Put your TV on the table with its rear cabinet facing upwards.)
- Put the stand on the TV set
Rear cabinet of TV
TV stand
TV board
- Screw the stand in the positions with the screws supplied (4 x ST4 x 16F).
Screws:4xST4X16F
©