
GZCR 335BT - Car radio Ground Zero - Free user manual and instructions
Find the device manual for free GZCR 335BT Ground Zero in PDF.


| Type | Car Stereo with CD/MP3/WMA, USB, SD, Bluetooth, RDS Tuner |
| Dimensions | 178 × 165 × 50 mm (7.01 × 6.50 × 1.97 in) |
| Power Output | 4 × 40 W (max) |
| Power Supply | DC 11-16 V, < 10 A |
| Load Impedance | 4-8 Ohm |
| FM Frequency Range | 87.5-108 MHz |
| AM Frequency Range | 522-1620 kHz |
| CD Distortion (THD) | < 0.5% |
| CD Signal-to-Noise Ratio | 60 dB |
| CD Frequency Response | 20 Hz-20 kHz |
| Bluetooth Version | V2.0 EDR |
| Bluetooth Profiles | HFP, A2DP, AVRCP |
| Bluetooth Range | Up to 8 m (Class 2) |
| Display | LCD with backlight |
| Detachable Panel | Flip-down full detachable with flashing LED anti-theft |
| Media Support | CD, CD-R, CD-RW, MP3, WMA, USB, SD/MMC |
| Audio DSP | None, Classic, Rock, Pop, Flat |
| Line Output | 2V (CD 1 kHz 0 dB Vol Max) |
| Preset Stations | 30 (18 FM + 12 AM) |
| Anti-Shock | Electronic: CD 8 sec, MP3 40 sec |
| Cleaning | Use soft dry cloth; do not use alcohol |
| Safety | Do not open housing; avoid water; keep volume safe for driving |
| Warranty | Limited warranty (conditions apply) |
Frequently Asked Questions - GZCR 335BT Ground Zero
User questions about GZCR 335BT Ground Zero
0 question about this device. Answer the ones you know or ask your own.
Ask a new question about this device
Download the instructions for your Car radio in PDF format for free! Find your manual GZCR 335BT - Ground Zero and take your electronic device back in hand. On this page are published all the documents necessary for the use of your device. GZCR 335BT by Ground Zero.
USER MANUAL GZCR 335BT Ground Zero
Installation / Deinstallation....4
Bedienelemente 5
Fernbedienung....6
Bedienung....7
Radiomodus....9
natural_image
Illustration of an installation material with labeled components including a box, tools, and bolts (no text or symbols on main objects)

natural_image
Coiled black connector with multicolored wires, labeled ISO Kabel A+B and Schu (no additional text or symbols visible)
natural_image
Technical line drawing of a computer drive unit with 45-degree angle标注 (no text or symbols beyond label)AF => IN VOL. => ADJ CLOCK => 24/12hour => TA VOL => EON => PTY => REG => TEL VOL => LOC (Nur im Radio Modus) => MONO (Nur im Radio Modus) => LOUD => SUBW => BEEP => DSP => EXIT
Limited warranty - defective products must be returned in original packaging - please add a copy of the original purchasing invoice showing the purchasing date and a
detailed description of the failure. Failure caused by overload, misuse or by using the product for competition purpose are not covered by the warranty.
www.ground-zero-audio.com
We reserve the right to make needed change or improvement to the product without informing customer about this in advance.
ETR Fold down detachable front panel USB Connector, SD/MMC Slot, Front Aux in

GROUND ZERO
MOBILE ENTERTAINMENT
Thank you for selecting a Ground Zero high quality radio.
We are providing a helpful hints list which should keep you from Experiencing unnecessary shut down.
Contents
Precautions....2
A c c e s s o B i
Installation / Un- Installation....4....
Control panel 5
Remote control 6
General operations....7
Digital tuner .....operations.....9
Bluetooth function....11
CD / USB / SD Card operations....13
File / Folder search function....14
Handling discs 14
Specifications and features 15
Wiring connection....16
Troubleshooting guide 17
1 GROUND ZERO
Precautions
This unit is designed and manufactured with user's safety in mind. Any improper use or operation of this unit may result in injury to the user or damage to the product. It is highly recommended that you read this manual thoroughly and follow all instructions and precautions for the proper and safe use of this product.
Safety Precaution
- To prevent an electrical shock, do not open the housing of the unit.
• In case of malfunctioning, have the unit serviced by an approved and qualified service centre. - Do not expose the unit to water or heavy moisture, do not place it in high humidity environment or
operate when your hands are wet. Exposure to these elements and environment can cause the unit to short circuit. - For safety driving, keep the volume at a level where you can still hear traffic conditions around you.
- Do not clean the unit with alcohol, only clean with a soft and dry cloth.
- If the unit has been kept in high temperature or high humidity area, cool down the car interior before powering on the unit.
- Do not use the unit for a long time without running vehicle's engine, it may drain the battery and the vehicle may not be able to start engine.
- Before final installation into dashboard, ensure that wiring is connected correctly, then power up the unit. If all is functioning properly, complete the final installation into your car's dashboard.
- Use only the parts provided with the unit to ensure proper installation.
- Ensure that all wiring is routed in dry and cool areas. If wiring routed in hot areas or comes in touch with hot surfaces, the wiring may corrode or melt.
- When replacing fuse, be sure to use only the same rated fuse prescribed on this unit
Operation Precaution
- Do not operate the player with scratched, bended or broken discs and when a disc is not loading properly, do not force it into the disc loader.
- Never insert any other object such as coin or pin, into the disc loader, this will damage the loading mechanism or cause short circuit.
- Do not use different disc size and disc shape other than 12 cm with round shape.
- Please dispose of empty batteries in the proper manner as required by your local government agency.
- If the unit is disconnected from its power source, the unit will lose memorized data.
- Playback of discs recorded with a PC using the correct format is possible, however depending on the application software, environmental settings, CD recording device and other factors playback may not be possible.
- If source disc has poor sound quality due to scratch, dirty or improper recording, the encoded file may have poor sound quality or may not work at all.
Design and specification may vary in the operation manual from the actual product.
2 GROUND ZERO
Accessories
The unit contains below accessories
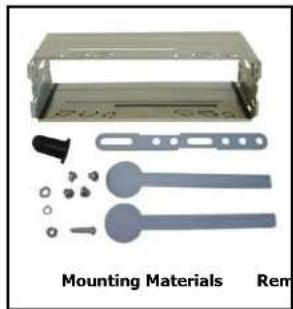
natural_image
Product photo of a mechanical assembly with mounting materials and remeining parts (no text or symbols visible)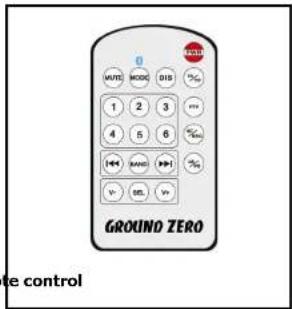
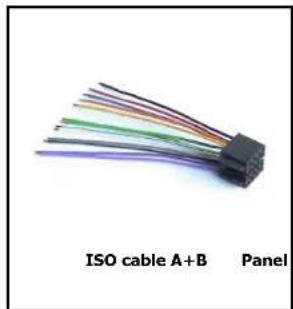
natural_image
Coiled black cable with multiple colored wires, labeled 'ISO cable A+B' and 'Panel' (no additional text or symbols)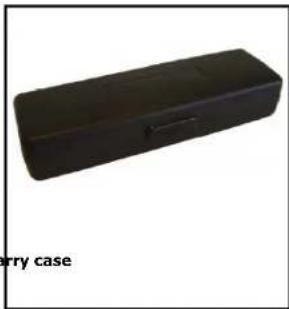
natural_image
Black rectangular electronic device case with a button, labeled 'rry case' at the bottom (no other text or symbols visible)3 GROUND ZERO
Installation
Note!
First complete the electrical connections, and then check them for correctness. Unit should be installed horizontally in an angle less than 30^
Installation
- Bend the 2 locking tabs of the Half Sleeve a little bit inside and insert the Half Sleeve into dash-board hole, and then bend mount tabs outwards to fix it.
- If necessary, place the mount strap at the rear of the unit and fix it with provided washer.
- Push the unit into the Half Sleeve until you hear a click sound.
- Place Trim Ring over the unit and installation is completed (Some vehicle may not need Trim Ring).

- Remove Trim Ring and insert Release Keys into left and right side-end holes as shown below and pull the unit out of the dash-board.
Control panel

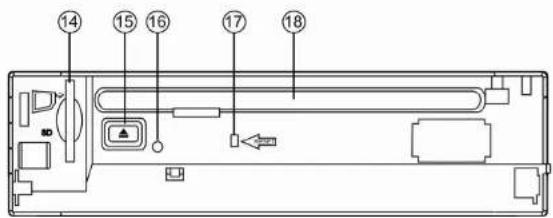
| 1 | Power / Mute button | 10 | IR Sensor |
| 2 | Volume knob | 11 | Aux in Jack |
| 3 | T-Up / Next / Fast forward button | 12 | USB jack |
| 4 | T-Dn / Previous / Fast backward button | 13 | Open button |
| 5 | Memory button | 14 | SD Slot |
| 6 | OK / PTY button | 15 | Eject button |
| 7 | Mode / -button | 16 | Light indicator |
| 8 | Select button | 17 | Reset button |
| 9 | Band / TA button | 18 | Disc slot |
Remote control

| 1 | Power button | 11 | Preset 1 / PausePreset 2 / RepeatPreset 3 / IntroPreset 4 / RandomPreset 5 / - 10Preset 6 / + 10 |
| 2 | TA/TP button | ||
| 3 | PTY button | ||
| 4 | AF/REG button | ||
| 5 | AS/PS button | ||
| 6 | Forward button | ||
| 7 | SELECT button | ||
| 8 | DIS button | 12 | BAND button |
| 9 | Mode / Bluetooth button | 13 | Backward button |
| 10 | Mute button | 14 | Volume up/down buttons |
Changing the battery
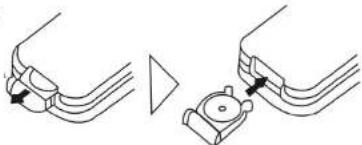
To change the battery, the battery compartment can be pulled out towards the front. Now replace the old battery with a new one of the same type (CR 2025). Please pay attention to the polarity ("+ pole" to the top) when you insert the battery. Please only touch the battery on the edge, since there might be contact problems otherwise. Now slide the battery compartment with the new battery back into the case.
Make sure that the battery compartment is positioned flush inside the case again after changing the battery.
natural_image
Diagram showing two mechanical components with arrows indicating assembly or alignment (no text or symbols)General operation
Detaching the control panel
- Turn the power off
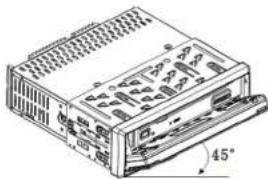
- Press the open button to release the front panel
- Push the panel to the left in 45 degrees and pull the panel towards you.
natural_image
Technical line drawing of a computer drive chassis with 45-degree angle标注 (no text or symbols beyond basic diagram)Attaching the control panel
- Insert the left side of the control panel into the main unit.
- Press the right side of the control panel until the "click" sound is heard.
Note! Do not insert DO NOT insert the control panel from the right side. It can damage the control panel. The control panel can easily be damaged by shocks. After removing it, place it in a protective case and be careful not to drop it or subject it to strong shocks. The rear connector that connects the main unit and the control panel is an extremely important part. Be careful not to damage it by pressing on it with fingernails, pens, screwdrivers, etc. Note: If the control panel is dirty, wipe off the dirt with soft, dry cloth only. And use a cotton swab soaked in isopropyl alcohol to clean the socket on the back of the control panel.
Resetting the unit
Operating the unit for the first time or after replacing the car battery, you must reset the unit. Press OPEN button on the panel to open the panel and press RESET button to restore the unit to its original factory settings.
Power on/off
Press any button (except OPEN) to turn on the unit. Press and hold PWR button on front panel or press PWR button on remote control to switch the unit off.
Note! After the unit is off, the volume level and radio current settings will be memorized, and when you turn the unit on it will resume the stored status you previously set.
Volume control
Rotate VOL knob on front panel or press VOL +/- buttons on remote control to adjust the volume level.
Turning the sound off
Press the MUTE button to turn the sound off. Press it again to turn the sound on.
Setting the sound characteristics
Short press and repeat SEL button to select the audio settings:
VOLUME => BASS => TREBLE => BALANCE => FADER => EXIT.
Rotate VOL knob on front panel or press VOL +/- button on remote control to adjust each setting.
Note!
- If the unit is turned off, all the settings of each mode will be saved.
- If cutting off battery power or resetting the unit, all the settings will return to factory default settings.
GROUND ZERO
Setting
Long press SEL button to enter into main settings menu, Rotate Vol knob on front panel or press Vol+/- buttons on remote control to choose the volume level 0-45.
Press SEL button repeatedly to choose between sub-settings: Rotate Vol knob on front panel or press Vol+/- buttons on remote control to adjust the settings.
AF => IN VOL. => ADJ CLOCK => 24/12hour => TA VOL => EON => PTY => REG => TEL VOL => LOC (In radio mode only) => MONO (In radio mode only) => LOUD => SUBW => BEEP => DSP => EXIT
| AF Set AF (Alternative Frequency) on/off. | |
| IN VOL Adjust the | initial volume level 0-45. |
| ADJ | Rotate the Vol knob clockwise or press VOL+ button on remote control to adjust minute and rotate the Vol knob anti-clockwise or press VOL- button on remote control to adjust hour. |
| 24 / 12 hour Turn the knob to choose 24 or 12 hour | |
| TA VOL Turn the knob to adjust TA volume. | |
| EON Turn the knob to adjust EON ON/OFF. | |
| PTY Set (Program Type) on /off. | |
| REG | Choose REG on/off. When REG is enabled (on), the receiver accepts regional variants of the tuned station with REG icon turned on. When REG is disabled (off), the receiver ignores regional variants. |
| TEL VOL Turn the knob to adjust TEL volume. | |
| LOC | Adjust LOC ON/OFF, when LOC is enabled, the receiver accepts regional variants. |
| MONO Turn the knob to choose MONO ON/OFF. | |
| LOUD | Set Loudness ON/OFF. Default setting is OFF. The "LOUD" function makes it possible to emphasize low and high frequencies through the push of a button in order to increase sound perception in an adjustment to the respective volume. |
| SUBW | Set SUBW ON/OFF. This function allows you to turn the RCA subwoofer output ON and OFF. |
| BEEP | Set BEEP ON/OFF. When BEEP is on, press any key will make a beep sound. Default setting is OFF. |
| DSP Choose between POP => ROCK => CLASS => FLAT => NONE. | |
Mode Setting
Press MODE button TUNER => (* CD) => (* SD) => (*USB) => AUX => TUNER (* available only if there is media device in disc, SD, USB slot)
Display
Press DIS button on remote control to see current tuning information and time. In Radio mode, display menu: Clock (clock time) => PTY => PS (program station) => Frequency => EXIT
8 GROUND ZERO
AUX jack
Intended to receive audio signals by connecting to external media player.
Digital Tuner Operations
Note: RDS (Radio Data System) service availability varies with areas. Please understand if RDS service is not available in you area, the following service is not available, either.
RDS overview
| PI | Program Identification code | Code for identifying programs |
| PS Program services name | Broadcast station name data expressed in alphanumerically characters. | |
| AF Alternative Frequency | Frequency list of broadcasting stations transmitting the same program. | |
| TP Traffic program identification | Identification data for traffic information broadcasting station. | |
| TA Traffic announcement identification | Identification data showing traffic information is being transmitted or not. | |
| EON | Enhanced other networks information | The "EON" function is an additional RDS service. If the current program doesn't offer any traffic announcements, EON automatically switches to the traffic announcements on another program. After the end of the announcement, the device switches back to the previously heard station. The readiness for traffic announcements "TA" has to be activated for this. To turn the EON function on or off, please switch to the RDS menu. |
Band selection
Press MODE button to select TUNER. Press BAND to select: FM1 => FM2 => FM3 => AM1 => AM2.
When a new frequency band is selected, the last chosen frequency / station of that frequency band will be heard.
Manual / automatic tuning
Manual tuning: To find a station, select a band first, then press and hold T-DN/T-UP buttons on remote control until MANUAL appears on the display, then press these buttons repeatedly to search a station upward or downward. Automatic tuning: To find a station, select a band first, then press and hold T-DN/T-UP buttons on front panel or short press T-UP/DN buttons on remote control, the automatic downward/upward search will start. It will play when a station is found.
GROUND ZERO
Programming preset stations
You can store up to a total of 30 radio stations in the memory (18 FM, 12 AM), manually or automatically.
To store a station:
- Select a band (if needed)
- Search a station by manual/automatic tuning
- Hold a Preset button (1-6) on remote control, where you want to store the station for at least 2 seconds. Or on front panel you can press OK button first and rotate VOL knob to choose (1-6), and finally press OK button to confirm.
To recall a station:
- Select a band (if needed)
- Press a Preset button (1-6) on remote control to recall the stored station., or on front panel, you can press T-UP/DN buttons to recall the stored station
Auto memory store
Select a band, press MEM button on front panel or AS/PS button on Remote control and hold for 2 seconds to enter auto store mode. The radio will automatically store 6 stations to the 6 preset memories of the current band. To stop auto store, press this button again.
Note: During auto station preset, the unit will search and store stations with the strong signal first, and then weaker signal stations until the memories are full.
Preset scan
Select a band, press MEM button on front panel or AS/PS button on Remote control to scan all preset stations in the memories of the current band, each preset scan for 5 seconds. To stop preset scan, press the button again.
AF (Alternative Frequencies) function
Press AF/REG button on remote control to turn on or turn off the AF function. You can also press and hold SEL button and press it repeatedly to see AF, then rotate VOL knob on front panel or press V-/+ button on remote control to set this function on/off. If the AF function is on the display will show "AF". When AF switching mode is selected, but RDS information is not received yet the "AF" will be flashing. The RDS program will be automatically searched and received. After turning on, if the RDS signal is weak or even no signal, the unit will search another frequency with this RDS program.
Press and hold AF/REG button on remote control for 2 seconds to enable or disable REG mode. You can also press and hold SEL button and press it repeatedly to see REG, then rotate VOL knob on front panel or press V-/+ button on remote control to set this function on/off. (Default is off for REG). When REG is enabled (on), the receiver accepts regional variants of the tuned station with REG icon turned on. When REG is disabled (off), the receiver ignores regional variants.
TA (Travel Announcement) / TP (Travel Program Identification)
1) Enable or disable TA mode by pressing and hold BAND button on front panel or pressing TA/TP button on remote control: (Default is OFF)
2) When TA function is activated, it will search the station with TA information automatically. If there is no TA information, it will search the station with TP information automatically, if there is no TP information either, it will return to the previous station after searching.
3) When receiving the station with TP information but without TA information, TP icon is on and TA icon keeps blinking; when receiving the station with TP and TA information, both TP and TA icons are on.
10
GROUND ZERO
4) When playing in other mode and TA information is received, it will change to the radio mode automatically. After playing over, it will return to the previous mode. Press TA button once to ignore the received TA information, press TA button twice to turn off the function.
PTY (Program Type)
Press and hold OK button on front panel or press PTY button on remote control to open PTY program type list, and turn the VOL knob on front panel or press VOL+/- buttons on remote control to select a PTY type. After selecting the program type you want, press OK button on front panel or press PTY button on remote control to search. Press them again to stop the PTY search. If PTY code is different or not available, LCD blinks with "PTY NONE".
Bluetooth Function
Features:
- Bluetooth specification V2.0 EDR compliant
- Support HFP, A2DP, AVRCP
- The Pairing Pin Code is pre-set as "0000"
- Class 2, Rang up to 8 meters wireless digital connection
- Excellent ECHO cancellation with noise elimination
- Last number redial
- Call list
- Voice Dialing
- Call Transfer
- 3 Parties Call
Operation
- Pairing According to mobile manual pairing device, when searching new device, select it (CAR RADIO), put in pass code "0000" and confirm ok, device paring finished. Operate mobile connect to Blue Tooth, after connecting Blue Tooth, the LCD will show Bluetooth icon . .
BLUETOOTH pairing code: 0000
Bluetooth icon, showed on LCD:
Slowly blink (per 5 seconds): Standby
Quickly blink (per second): Connecting
Stably show: Connected
Note!
At the 1st time when using Bluetooth, it needs to pair device.
Suggest: 1. Set "My phone's visibility as "shown to all".
- Select "Yes" in "Set as authorized".
2. Auto-connect
When power on, the last paired phone will be connected to the device via Bluetooth automatically, after searching about one minute, if the device cannot find the paired phone, it will stop searching. When in standby mode (unconnected), long press mode - to active auto-connect function and the device will search the last paired phone.
11
GROUND ZERO
3. A2DP (Advance Audio Distribution Profile)
A2DP is a function which can receive the audio frequency signal from mobile phone, amplify by car audio and play out by speaker.
Operation:
First time to Enter Bluetooth music playing program via connect mobile phone (no need to connect if the unit already connected with phone) via play music, the LCD will display A2DP, press MODE button to switch to other modes.
Note!
We cannot guarantee an unobjectionable function of the A2DP music player with all types of mobile phones. Malfunctions caused by connecting incompatible devices cannot be excluded.
4. AVRCP
When the music is playing, Press PRESET 1 / PAUSE button once to pause, press again to play. Press "track up" button to the next song, press "track down" button to the previous song.
5. BT MENU
Long press the mode - button to enter Blooetooth Menu, and rotate the VOL knob, the BT MENU changed in the following sequence:
L-DIAL (Last Number Redial) => VOICE (VOICE DIALING) => CALL LIST (Displayed only if the received calls are recorded in memory), short press mode - button again to enter your selected menu, or long press it to resume to former mode. See below for further menu descriptions.
L-DIAL: After selecting this menu (LCD shows "L-DIAL"), short press mode - button again to enter it (LCD shows "REDIAL"), then short press once again to redial the last number.
VOICE DIALING
In any mode and when a mobile phone is connected with Bluetooth to the unit, long press (over 2 seconds) the mode - button into the Bluetooth menu, then rotate the volume knob to change the bt voice, then press the mode - button to start Voice Dialing. Speak out the voice tag into the microphone. Your mobile phone will dial the number corresponding to the voice tag. Short press the mode - button to cancel the command.
Note!
This function has to be supported by your mobile phone. See your owner's manual of your mobile phone for more information on voice dialing.
CALL LIST
After selecting CALL LIST (LCD shows CALL LIST), short press mode - button to enter this menu, LCD will show the incoming calls history, rotate volume knob to display the number one by one. Press mode - button to dial the number.
ANSWER CALL
In any mode, when Bluetooth connected, if incoming a call, short press mode - button to answer the call.
REJECT CALL
In any mode, when Bluetooth connected, if incoming a call, long press mode - button to reject the call. HANG UP CALL
In any mode, when Bluetooth connected, short press mode - button during a call to hang up the call. CALL TRANSFER
In any mode, when Bluetooth connected, long press mode - button during a call to transfer the call voice to mobile phone (the device will come to the former mode), and long press it again to resume.
12
GROUND ZERO
6. PARTIES CALL
1) While in call and 2nd call comes in, short press BAND button to accept call. Press mode - key to switch from caller B to Caller A.
2) While in call and 2nd call comes in, long press BAND button to reject call.
CD / USB/ SD Card Operations
Loading/Ejecting a disc
Turn the power on. And insert the disc to disc slot with the printed side facing up. Press EJECT button to eject the disc. Inserting the SD card/USB device Insert the SD card or USB device into SD slot or USB socket. Then the playing mode will be changed into SD or USB mode automatically.
Note!
When SD card and USB device are both inserted, the playing mode will be changed into the mode of the device inserted later.
Playing/pausing
The unit will automatically play from the first sound track recorded on a disc/SD /USB device. To ensure good system performance, wait until the unit finishes reading the disc /device information before proceeding. Press 1/PAUSE button on remote control to pause playback, press it again to resume playback.
Playing the previous/next track
During playback press PREVIOUS button to play the previous track. Press NEXT button to play the next track.
Scanning forward and backward
Press and hold Fast forward/backward buttons to select fast forward/backward playing. Note: When fast backward/forward playback reaches the previous or next track, the unit will resume normal playback.
- / + 10 files
Press 5/10-, 6/10 + buttons on remote control to jump to previous/next 10 files.
Repeat playback
Press 2/REPEAT on remote control or press BAND button on the panel repeatedly to choose repeat Play, then press OK to confirm to play track repeatedly, press again to cancel. Note! After finishing playing all tracks or all folders of CD/MP3/SD, the unit restarts playing all tracks or all folders automatically.
Intro
Press 3/INT button on remote control or press BAND on the panel to choose INT Play, then press OK to confirm to activate INTRO function which will play the beginning of every track for 10 seconds.
Random
In disc mode press 4 or press BAND on the panel to choose RDM Play, then press OK to confirm to activate random playing mode, press one more time to return to normal playing.
13
GROUND ZERO
File / Folder Search Function
In MP3/WMA file CD, USB, SD mode, press MEM button on front panel or AS/PS button on remote control to enter search mode.
Below is toggle sequence of search mode:
File Number Search => File Name Search => Folder Search => Exit search mode
Note!
This function is not available for CDDA discs.
- File Number Search
Press MEM button on front panel or AS/PS button on remote control first time, it enters file number search and the last digit 0 blinks, that means the unit is ready to accept file number for search. Rotate the VOL knob on front panel or press VOL +/- buttons on remote control to input a digit, press SEL button to move the digit to next position, and now you can continue to input numbers. After completing inputs, press OK button on front panel to play.
- File Name Search
Press MEM button on front panel or AS/P5 button on remote control repeatedly until the first letter A blinks. Rotate the VOL knob on front panel or press VOL +/- buttons on remote control to input alphabet (from A to Z) or a digit (from 0 to 9) of which you want to listen to. Press SEL button to move to next position. After completing input, press OK button on front panel to play. If there is no file found, the unit will return to initial input ready mode automatically.
- Folder Search
Press MEM button on front panel or AS/PS button on remote control for 3 times, the folder name will be displayed on LCD. Rotate the VOL knob on front panel or press VOL +/- buttons on remote control to choose between folders and Sub-folders.
Handling discs
- Dirty, scratched or warped discs may cause skip ping or noise.
- Handle the disc only by the edges. Do not touch its surface to keep it clean.
- Discs should be stored in their cases after use to avoid scratches.
- Do not expose discs to direct sunlight, high humidity, high temperature or dust.
- Prolonged exposure to extreme temperature can wrap the disc (such as leaving the discs in your car during summer time).
- Do not stick or write anything on either side of disc. Sharp writing instruments, or the ink used in some felt-tip pens, may damage its surface.
- Do not touch the unlabeled side. Do not attach any seal, label or data protection sheet to either side of a disc.
Cleaning discs
Fingerprints should be carefully wiped from the surface of disc with a soft cloth. Unlike conventional records, compact discs have no grooves to collect dust and macroscopic dirt, so gently wiping them with a soft cloth should remove most dust or stains. Wipe in a straight motion from the center to the edge. Caution: Never use a thinner benzine, record cleaner or anti static spray on a compact disc. Such chemicals can damage its plastic surface.
Specifications and features
| FM Tuner | |
| Frequency range 87,5 ~ 108 | Mhz |
| Usable sensitivity 9 dBuV | |
| Stereo separation 28 dB | |
| AM (MW) Tuner | |
| Frequency range 522 ~ 1620 | Khz |
| Usable sensitivity 30 dBuV | |
| CD Player | |
| Distortion THD < 0,5% | |
| Signal to Noise Ratio 60 dB | |
| Frequency range 20 Hz ~ 20 Khz | |
| Electric | |
| Power supply DC 11 ~ 16 Volt | |
| Current consumption < 10 Ampere | |
| Load impedance 4 ~ 8 Ohm | |
| Dimensions | 178 mm x 165 mm x 50 mm / 7.01" x 6.50" x 1.97" |
| Power output 4 x 40 W Max | |
| Line output 2 | V (CD 1K 0 dB Vol Max) |
| Compatibility | |
| SD SD-HC >8 GB | |
| USB USB 2.0 >8 GB | |
| CD | CD, CD-R, CD-RW, 12 cm discs MP3, WMA, ID 3 Tag |
Panel system
| Anti- theft full detachable with flashing LED, flip down front panel, ISO mount |
| LCD Display |
| Playback |
| Decoding: MP3, WMA playback with ID3 Tag display, file and folder search |
| CD mechanism: Electronic anti- shock (Audio CD 8 seconds, MP3 40 seconds) |
| Tuner |
| AM/FM receiver with 30 (FM18, AM 12) station memory, auto / manual station store, preset scan, auto / manual tuning |
| Audio |
| DSP sound effect (None, classic, rock, pop, fiat)4 x 40 W (max) amplifier, 2 CH stereo RCA lineout |
Wiring connections

| Connector A Connector B | |
| A1 Not connected 1. Rear right speaker (+) | |
| A2 To telephone control terminal 2. Rear right speaker (-) | |
| A3 Not connected 3. Front right speaker (+) | |
| A4 To terminal always supplied with power 4. Front right speaker (-) | |
| A5 To system control terminal of the power amp or Auto- Antenna control terminal (max. 100mA 12V DC). | 5. Front left speaker (+) |
| A6 To dimmer control terminal 6. Front left speaker (-) | |
| A7 To electric terminal controlled by ignition switch (12V DC) ON/OFF | 7. Rear left speaker (+) |
| A8 To vehicle (metal) body 8. Rear left speaker (-) |
Trouble shooting
| Symptom Cause Remedy | |||
| General | Power does not turn on (No sound is produced). | Fuse is blown. | Replace with a fuse of the same rating amperage. If the fuse blows again, consult your local distributor. |
| Incorrect wiring. | Consult your local retailer. | ||
| No sound comes from the unit or its external amplifier | Wiring for amplifier output is Incorrect, or there is a short circuit among the output wiring. | Refer to the unit wiring diagram to check proper connections, make sure the wiring is done correctly. | |
| The unit is in MUTE mode. | Turn off the MUTE function. | ||
| RCA output wiring is Incorrect | Check and properly connect the RCA output with the external amplifier. | ||
| Wiring between external amplifier's REM terminal and the unit's antenna lead is incorrect, or antenna output lead of the unit is short circuit to ground. | Properly connect the REM terminal of the external amplifier and the unit's antenna output lead. | ||
| Nothing happens when buttons are pressed. Display is not accurate. | The microprocessor has malfunctioned. | Turn off the power, Then press the OPEN button and remove the front panel. Press the RESET button for about 2 seconds. | |
| Panel or main unit connectors are dirty. | Wipe the dirt off with a soft cloth moistened with cleaning alcohol. | ||
| CD | Sound skips or is noisy | Compact disc is dirty | Clean the compact disc with a soft cloth, avoid scratching the surface of the disc. |
| Compact disc is heavily scratched or warped. | Replace with a compact disc without scratches. | ||
| Sound is poor directly after power is on. | Water or moisture may have formed on the internal lens. | Let it dry for about 1 hour with the power on. | |
✿ Bedienungsanleitung in weiteren Sprachen auf www.ground-zero-audio.com verfügbar!
❖ Manual in more languages available on www.ground-zero-audio.com !
❖ Mode d'emploi en vers ces langues disponible sur le site www.ground-zero-audio.com !
- Gebruikers Handleiding in andere talen op www.ground-zero-audio.com beschikbaar !
❖ Manual en otros idiomas en www.ground-cero-audio.com disponibles!
Limited warranty - defective products must be returned in original packaging - please add a copy of the original purchasing invoice showing the purchasing date and a
detailed description of the failure. Failure caused by overload, misuse or by using the product for competition purpose are not covered by the warranty.
www.ground-zero-audio.com
We reserve the right to make needed change or improvement to the product without informing customer about this in advance.
ETR Fold down detachable front panel USB Connector, SD/MMC Slot, Front Aux in
GROUND ZERO
MOBILE ENTERTAINMENT
natural_image
Exterior view of a mechanical assembly with labeled parts (no readable text or symbols)

natural_image
Coiled black cable with multiple colored wires, labeled ISO cable A+B and Estuc (no additional text or symbols)
natural_image
Black rectangular electronic device labeled 'porta Panel' (no other text or symbols visible)3 GROUND ZERO
Instalación
Nota!
Des - Instalación
natural_image
Diagram showing two mechanical components with arrows indicating assembly or alignment (no text or symbols)Operación General
Desenganche del Panel de control
AF => IN VOL. => ADJ CLOCK => 24/12hour => TA VOL => EON => PTY => REG => TEL VOL => LOC (In radio mode only) => MONO (In radio mode only) => LOUD => SUBW => BEEP => DSP => EXIT
TA (Travel Announcement) / TP (Travel Program Identification)
BLUETOOTH pairing code: 0000
Bluetooth icon, showed on LCD:
Sugerimos: 1. fijar "My phone's visibility as "shown to all".
- Seleccionar "Yes" in "Set as authorized".
2. Auto-conexión
| Sistema antirobo desmontable con display LED, flip down front panel, ISO mount |
| LCD Display |
| Playback |
| Decoding: MP3, WMA playback with ID3 Tag display, file and folder search |
| CD mechanism: Electronic anti- shock (Audio CD 8 seconds, MP3 40 seconds) |
| Tuner |
| AM/FM receiver with 30 (FM18, AM 12) station memory, auto / manual station store, preset scan, auto / manual tuning |
| Audio |
| DSP sound effect (None, classic, rock, pop, fiat)4 x 40 W (max) amplifier, 2 CH stereo RCA lineout |
Limited warranty - defective products must be returned in original packaging - please add a copy of the original purchasing invoice showing the purchasing date and a
detailed description of the failure. Failure caused by overload, misuse or by using the product for competition purpose are not covered by the warranty.
www.ground-zero-audio.com
We reserve the right to make needed change or improvement to the product without informing customer about this in advance.

- GROUND ZERO
- MOBILE ENTERTAINMENT
- Contents
- Precautions
- Safety Precaution
- Operation Precaution
- Accessories
- Installation
- Note!
- Changing the battery
- General operation
- Detaching the control panel
- Attaching the control panel
- Resetting the unit
- Power on/off
- Volume control
- Turning the sound off
- Setting the sound characteristics
- Setting
- Mode Setting
- Display
- GROUND ZERO
- AUX jack
- Digital Tuner Operations
- Band selection
- Manual / automatic tuning
- Programming preset stations
- Auto memory store
- Preset scan
- AF (Alternative Frequencies) function
- TA (Travel Announcement) / TP (Travel Program Identification)
- PTY (Program Type)
- Bluetooth Function
- Features:
- Operation
- BLUETOOTH pairing code: 0000
- Bluetooth icon, showed on LCD:
- Auto-connect
- A2DP (Advance Audio Distribution Profile)
- AVRCP
- BT MENU
- VOICE DIALING
- CALL LIST
- ANSWER CALL
- REJECT CALL
- PARTIES CALL
- CD / USB/ SD Card Operations
- Loading/Ejecting a disc
- Playing/pausing
- Playing the previous/next track
- Scanning forward and backward
- - / + 10 files
- Repeat playback
- Intro
- Random
- File / Folder Search Function
- - File Number Search
- - File Name Search
- - Folder Search
- Handling discs
- Cleaning discs
- GROUND ZERO
- Instalación
- Nota!
- Des - Instalación
- Operación General
- Desenganche del Panel de control
- Auto-conexión
Brand : Ground Zero
Model : GZCR 335BT
Category : Car radio