
ECP31 - Coffee maker DELONGHI - Free user manual and instructions
Find the device manual for free ECP31 DELONGHI in PDF.

| Product Type | Espresso coffee maker with cappuccino maker |
| Dimensions (L x D x H) | 185 x 244 (329) x 305 mm |
| Weight | 3.8 kg |
| Power Supply | 220-240 V ~ 50/60 Hz |
| Power Consumption | 1100 W |
| Water Tank Capacity | 1.1 L |
| Pump Pressure | 15 bar |
| Power Cord Length | 1300 mm |
| Water Tank | Removable, with viewing window |
| Coffee Filters Included | 1-cup froth filter, 2-cup froth filter, ESE pod froth filter |
| Accessories Included | Filter holder, measure/pressure tamp, drip tray, cup tray, cappuccino maker |
| Functions | Espresso, cappuccino, hot milk (ECP35.31 only), hot water, steam |
| Safety Features | Auto-off, boil-dry protection (no operation without water), overheat protection |
| Cleaning and Maintenance | Removable drip tray with level indicator; descaling recommended every 200 coffees; clean cappuccino maker after each use |
| Materials | Plastic housing, stainless steel boiler |
| Certifications | CE, complies with EC directives |
Frequently Asked Questions - ECP31 DELONGHI
User questions about ECP31 DELONGHI
0 question about this device. Answer the ones you know or ask your own.
Ask a new question about this device
Download the instructions for your Coffee maker in PDF format for free! Find your manual ECP31 - DELONGHI and take your electronic device back in hand. On this page are published all the documents necessary for the use of your device. ECP31 by DELONGHI.
USER MANUAL ECP31 DELONGHI
FUNDAMENTAL SAFETY WARNINGS
- The appliance is not intended for use by persons (including children) with reduced physical, sensory or mental capabilities, or lack of experience and knowledge, unless they have been given supervision or instruction concerning use of the appliance by a person responsible for their safety.
- Children should be supervised to ensure that they do not play with the appliance.
- Cleaning and user maintenance shall not be made by children without supervision.
- Never clean by immersing the appliance in water.
• This is an household appliance only.
It is not intended to be used in: staff kitchen areas in shops, offices and other working environments; farm houses; by clients in hotels, motels and other residential type environments; bed and breakfast type environments. - If the plug or cord is damaged, it must be replaced by Customer Services only to avoid all risk.
FOR EUROPEAN MARKETS ONLY:
- This appliance can be used by children aged from 8 years and above if they have been given supervision or instruction concerning use of the appliance in a safe way and understand the hazards involved.
Cleaning and user maintenance shall not be made by children unless they are older than 8 and supervised.
- Keep the appliance and power cord away from children under eight years of age.
- Appliances can be used by persons with reduced physical, sensory or mental capabilities or lack of experience and knowledge if they are supervised or have been given instruction concerning use of the appliance in a safe way and if they understand the hazards involved.
• Children shall not play with the appliance. - Always unplug the appliance when left unattended and before assembly, taking apart or cleaning.

Surfaces marked with this symbol become hot during use (the symbol is present in certain models only).
SAFETY WARNINGS
Danger! Failure to observe the warning may result in life threatening injury by electric shock.
This is an electrical appliance and may cause electrical shocks. You should therefore follow these safety warnings:
- Never touch the appliance with damp hands or feet.
- Never touch the plug with damp hands.
- Make sure the socket used is freely accessible at all times, enabling the appliance to be unplugged when necessary.
- Unplug directly from the plug only. Never pull the cord as you could damage it.
- To disconnect the appliance completely you must unplug it from the mains socket.
- If the appliance is faulty, do not attempt to repair.
Turn it off, unplug from the mains socket and contact Customer Services. - Before cleaning the appliance, turn it off, unplug from the mains socket and allow to cool.
⚠️ Important: Failure to observe the warning could result in injury or damage to the appliance.
Keep all packaging (plastic bags, polystyrene foam) away from children.
Danger of burns! Failure to observe the warning could result in scalds or burns.
This appliance produces hot water and steam may form while it is in operation.
Avoid contact with splashes of water or hot steam.
Designated use
This appliance is designed and made to prepare coffee and heat drinks.
Any other use is considered improper and thus dangerous.
The manufacturer is not liable for damage deriving from improper use of the appliance.
Instruction for Use
Read this Instruction for Use carefully before using the appliance. Failure to follow this Instruction for Use may result in burns or damage to the appliance.
The manufacturer is not liable for damage deriving from failure to respect this Instruction for Use.
i Please note:
Keep this Instruction for Use.
If the appliance is passed to other persons, they must also be provided with this Instruction for Use.
Checking the appliance
After removing the packaging, make sure the product is complete and undamaged and that all accessories are present.
Do not use the appliance if it is visibly damaged.
Contact De'Longhi Customer Services.
DESCRIPTION
Description of the appliance
(page 3 - A )
A1. Removable water tank
A2. Cup tray
A3. Water tank compartment
A4. Guides for accessories holder (coffee filters)
A5. Lid
A6. Steam/hot water dial
A7. Cappuccino maker ( ^** varies according to model)
A8. Cappuccino maker nozzle
A9. Spout
A10. Cappuccino maker selection ring (*certain models only)
A11. ON/OFF switch
A12. Tank water level viewing window
A13. Boiler outlet
A14. Mugs or glasses tray (*certain models only)
A15. Drip tray ( ^** varies according to model)
A16. Drip tray water level indicator (*certain models only)
A17. Cup tray (*certain models only)
Description control panel
(page 3 - B )
B1. Mode selector dial
B2. OK light
B3. Power light I
Description of the accessories
(page 3 - C)
C1. Filter holder
C2. 1 coffee froth filter
C3. 2 coffee froth filter
C4. ESE pod froth filter
C5. Measure/pressure
C6. Descaler ( ^ not included, can be purchased from authorised Customer Services)
C7. Water softener filter ( ^ not included, can be purchased from authorised Customer Services)
INSTALLING THE APPLIANCE
! Important!
When you install the appliance, you should respect the following safety warnings:
• Water penetrating the coffee machine could cause damage.
Do not place the appliance near taps or sinks.
- The appliance could be damaged if the water it contains freezes.
Do not install the appliance in a room where the temperature could drop below freezing point.
- Arrange the cord in such a way that it cannot be damaged by sharp edges or contact with hot surfaces (e.g. electric hot plates).
• The appliance gives off heat.
After positioning the appliance on the worktop, leave a space of at least 3 cm between the surfaces of the appliance and the side and rear walls and at least 15 cm above the coffee machine.
Connecting the appliance

Danger!
Check that the mains power supply voltage corresponds to that indicated on the rating plate on the bottom of the appliance.
Connect the appliance to an efficiently earthed and correctly installed socket with a minimum current rating of 10A only.
If the power socket does not match the plug on the appliance, have the socket replaced with a suitable type by a qualified electrician.
FILLING THE WATER TANK
- Open the lid of the appliance (fig. 1) then extract the tank by pulling upwards (fig. 2);
- Fill the tank with fresh clean water, taking care not to exceed the MAX level (fig. 3).
Put the tank back in the appliance, pressing lightly to open the valves located on the bottom of the tank.
- More simply, the tank can also be filled without removing it, pouring the water directly from a jug.

Important:
Never operate the appliance without water in the tank or without the tank.
Check the level of water in the tank through the viewing window (A12).
SETTING UP THE APPLIANCE

Important: Everytime you switch on the appliance, make sure that the
mode selector dial (B1) is turned to I position (Stand-by).
- Turn the appliance on by pressing the ON/OFF button (fig. 4): the power light I comes on.
-
Insert the required coffee filter in the filter holder (fig. 5).
-
Attach the filter holder onto the machine without filling it with ground coffee (fig. 6).
- Place a 0.5 litre container under the boiler outlet and another 0.5 litre container under the cappuccino maker.
- Wait until the OK light comes on (fig. 8) and immediately afterwards turn the mode selector dial to the position (fig. 9) and deliver about half the tank through the filter holder.
- Then turn the steam dial to the position (fig. 10) and deliver all the water remaining in the tank through the cappuccino maker.
- Turn the steam dial back to the 0 position and the mode selector dial to the I position (STAND-BY).
- Empty the two containers and replace them under the boiler outlet and the cappuccino maker and repeat points 5-6-7.
Now the appliance is ready for use.
Auto-off
If the appliance is not used for a certain period of time (variable according to the model), it turns off automatically (the power light goes out).
Tips for a hotter coffee
To make espresso coffee at the right temperature, the coffee maker should be preheated as follows:
- Turn the appliance on by pressing the ON/OFF switch (the ON light comes on) (fig. 4) and attach the filter holder to the appliance without adding pre-ground coffee (fig. 6).
- Place a cup under the filter holder. Use the same cup as will be used to prepare the coffee in order to preheat it.
- Wait until the OK light comes on (fig. 8) and immediately afterwards turn the selector dial to the ☐/☐ position (fig. 9) and let water discharge until the OK light turns off, then interrupt by turning the dial to the I position.
- Empty the cup, wait until the OK light comes on again and then repeat the same operation.
(It is normal for a small and harmless puff of steam to be given off when removing the filter holder).
Mugs or glasses tray (models ECP35.31 and ECP33.21 only)
If you are using tall cups or glasses (for example, to make long coffee or macchiato), extract the drip tray and rest the cup directly on the mugs or glasses tray (A14 - fig. 11).
Once you have made your coffee, put the drip tray back in position.
HOW TO MAKE ESPRESSO COFFEE USING PRE-GROUND COFFEE
Important: Everytime you switch on the appliance, make sure that the mode selector dial (B1) is turned to I position (Stand-by).
- Place the ground coffee filter (C2 or C3) in the filter holder. Use the filter to make one coffee or the filter to make two coffees.
- To make just one coffee, place one level measure of pre-ground coffee (about 7 g) in the filter. (fig. 12).
To make two coffees, place two loosely filled measures (about 6+6 g) of pre-ground coffee in the filter.
Fill the filter a little at a time to prevent the pre-ground coffee from overflowing.
Important: For correct operation, before filling with pre-ground coffee, make sure there are no coffee residues left in the filter from the last time you made coffee.
- Distribute the pre-ground coffee evenly and press lightly with the presser (fig. 13). Correct pressing of the pre-ground coffee is essential to obtain a good espresso. If pressing is excessive, coffee delivery will be slow and the froth will be dark. If pressing is too light, coffee delivery will be too rapid and the froth will be skimpy and light coloured.
- Remove any excess coffee from the rim of the filter holder and attach to the appliance. Turn the handle firmly towards the right (fig. 6) to avoid water leaking out.
- Place the cup or cups under the filter holder spouts (fig. 14). You are recommended to warm the cups before making coffee by rinsing them with a little hot water.
- Make sure the OK light (fig. 8) is on (if off, wait until it comes on), then turn the mode selector dial to the ☐/☐ position. When the desired amount of coffee has been delivered, turn the dial to the I position.
- To remove the filter holder, turn the handle from right to left.
Danger of burns! To avoid splashes, never remove the filter holder while the appliance is delivering coffee.
- To turn the appliance off, press the ON/OFF button.
HOW TO PREPARE ESPRESSO COFFEE USING PODS
- Preheat the appliance as described in the section "Tips for a hotter coffee", making sure the filter holder is attached. This obtains a hotter coffee.
i Please note: Use pods conforming to the ESE standard, indicated on the pack by the following symbol. The ESE standard is a system accepted by leading pod producers and enables espresso coffee to be prepared simply and cleanly.
-
Place the pod coffee filter (C4) in the filter holder.
-
Insert the pod, centring it as far as possible on the filter (fig. 15). Always follow the instructions on the pod pack to position the pod on the filter correctly.
- Attach the filter holder to the appliance. Always turn as far as it will go (fig. 6).
- Proceed as in points 5, 6 and 7 in the previous section.
HOW TO PREPARE CAPPUCCINO COFFEE
Important: Everytime you switch on the appliance, make sure that the mode selector dial (B1) is turned to I position (Stand-by).
- Prepare the espresso coffees as described in the previous sections, using sufficiently large cups.
- Turn the selector to the position (fig. 16) and wait until the OK light comes on.
- In the meantime, fill a recipient with about 100 grams of milk for each cappuccino to be prepared. The milk must be at refrigerator temperature (not hot!). In choosing the size of the recipient, bear in mind that the milk doubles or triples in volume (fig. 17).
i Please note: You are recommended to use semi-skimmed milk at refrigerator temperature.
- ECP 35.31 only: Make sure the cappuccino maker selection ring (A10) is in the "CAPPUCCINO" position (fig. 18).
- Place the recipient containing the milk under the cappuccino maker.
- Wait until the OK light comes on. This indicates that the boiler has reached the ideal temperature for steam production.
- Open the steam by turning the steam selector to the / position for a few seconds to eliminate any water in the circuit. Close the steam.
- Immerse the cappuccino maker in the milk for about 5 mm (fig. 19) and turn the steam dial to the position. The milk now starts to increase in volume and take on a creamy appearance.
- When the milk has doubled in volume, immerse the cap-puccino maker deeply and continue heating the milk. When the required temperature (the ideal is 60^ C) is reached, interrupt steam delivery by turning the steam dial to the 0 position and the mode selector dial to the I position.
- Pour the frothed milk into the cups containing the coffee prepared previously. The cappuccino is ready. Sweeten to taste and if desired, sprinkle the froth with a little cocoa powder.
i Please note:
- To prepare more than one cappuccino, first make all the coffees then at the end prepare the frothed milk for all the cappuccinos.
• To make coffee again after the milk has been frothed, first cool the boiler, or the coffee will be burnt. To cool it, place a container under the boiler outlet, turn
the mode selector dial to the position and deliver water until the OK
light goes off. Return the selector to the 1 position and then proceed to make coffee.
You are recommended to deliver steam for a maximum of 60 seconds and never to froth milk more than three times consecutively.
MAKING MACCHIATO (HOT MILK - MODEL ECP35.31 ONLY)
To make hot milk without froth, proceed as described in the above section, making sure the ring on the cappuccino maker (A10) is positioned upwards in the "HOT MILK" position.
CLEANING THE CAPPUCCINO MAKER AFTER EVERY USE
Important! or hygiene reasons, the cappuccino maker
should always be cleaned after use.
Proceed as follows:
- Turn the steam dial to the position to deliver a little steam for a few seconds (points 2, 6 and 7 of the section "How to prepare cappuccino coffee"). This causes the cappuccino maker to discharge any milk left inside.
Turn the appliance off by turning the steam dial to the 0 position and the mode selector dial to the I position.
- Wait a few minutes for the cappuccino maker to cool down. Turn the cappuccino maker outwards and remove it by pulling it downwards (fig. 20).
Model ECP35.31
-
Remove the nozzle downwards (fig. 21).
-
Push the ring upwards and make sure the two holes shown by the arrows in fig. 22 are not blocked.
If necessary, clean with a pin.
- Replace the nozzle, move the ring downwards and put the cappuccino maker back on the nozzle, turning it and pushing it upwards until it is attached.
Models ECP33.21 and ECP31.21
-
Remove the cappuccino maker nozzle downwards (fig. 23).
-
Make sure the holes in the cappuccino maker shown in fig. 24 are not blocked.
If necessary, clean with a pin.
- Reinsert the nozzle and replace the cappuccino maker on the nozzle, turning it and pushing it upwards until it is attached.
HOT WATER
-
Press the ON/OFF button (fig. 4) to turn the appliance on. Wait for the OK light to come on.
-
Place a recipient under the cappuccino maker.
-
When the OK light comes on, turn the mode selector dial to the position and at the same time turn the steam dial to the position. Hot water comes out of the cappuccino maker.
-
To stop the flow of hot water, turn the steam dial to the 0 position and the mode selector dial to the I position.
You should not deliver hot water for more than 60 seconds.
CLEANING
Cleaning the machine
The following parts of the machine must be cleaned regularly:
- the drip tray (A15);
- the coffee filters (C2, C3 and C4);
- the boiler outlet (A13);
- the water tank (A1);
- the cappuccino maker (A7) as described in the section "Cleaning the cappuccino maker after every use".
! Important!
- Do not use solvents, abrasive detergents or alcohol to clean the coffee machine.
- Do not use metal objects to remove encrustations or coffee deposits as they could scratch metal or plastic surfaces.
Danger! Never immerse the coffee maker in water. It is an electrical appliance.
i Please note:
If the appliance is not used for more than 3/4 days, before using it again, we strongly recommend you perform a rinse cycle as described in the section "Setting up the appliance".
Cleaning the drip tray
Models ECP35.31 and 33.21: Important!
The drip tray is fitted with a level indicator (red) showing the level of water it contains.
Before the indicator protrudes from the cup tray (fig. 25), the drip tray must be emptied and cleaned, otherwise the water may overflow the edge and damage the appliance, the surface it rests on or the surrounding area.
- Remove the drip tray (fig. 26).
- Models ECP35.21 and 33.21: Remove the cup grille, empty the water and clean the tray with a cloth, then reassemble the drip tray.
Extract the mugs or glasses tray (A14), clean with water, dry and put back in the machine. - Put the drip tray back in place.
Cleaning the coffee filters
Clean the coffee filters regularly by rinsing under running water. Make sure the holes are not blocked. If necessary, clean with a pin (fig. 27).
Cleaning the boiler outlet
About every 300 coffees, the boiler outlet must be cleaned as follows:
- Make sure the appliance is not hot and that it is unplugged from the mains;
- Using a screwdriver, unscrew the screw fixing the espresso boiler outlet (fig. 28);
- Remove the boiler outlet;
- Clean the boiler with a damp cloth (fig. 28);
- Clean the outlet thoroughly in hot water using a brush. Make sure the holes are not blocked. If necessary, clean with a pin.
- Rinse under running water, rubbing all the time.
- Replace the boiler outlet, making sure the gasket is correctly positioned.
Failure to clean as described above invalidates the guarantee.
Cleaning the water tank
- Clean the water tank regularly (about once a month) and whenever you replace the water softener filter (C7, *if provided) with a damp cloth and a little mild washing up liquid.
- Remove the filter (*if present) and rinse with running water.
- Replace the filter (*if provided), fill the tank with fresh water and replace the tank.
- (Models with water softener filter only) Deliver about 100 ml of water.
DESCALING
You are recommended to descale the coffee maker about every 200 coffees.
We recommend using commercially available De'Longhi (C6*) descaler.
Proceed as follows:
- Fill the tank with the descaler solution, obtained by diluting the descaler with water following the instructions on the pack.
- Press the ON/OFF button.
- Make sure the filter holder is not attached and place a recipient under the cappuccino maker.
- Wait until the OK light comes on.
- Turn the mode selector dial to the / position and deliver about 1/4 of the solution in the tank. At intervals,
turn the steam dial to the 🏠/ 🔒 position to deliver water from the cappuccino maker. Then interrupt delivery by turning the mode selector dial to the 1 position and leave the solution to work for about 5 minutes.
- Repeat point 5 another 3 times, until the tank is empty.
- To eliminate residues of descaler solution, rinse the tank well and fill it with clean water (without descaler).
- Turn the selector to the ☐/☐ position and deliver water until the tank is empty.
- Repeat points 7 and 8.
TECHNICAL DATA
| Mains voltage: | 220-240V~50/60Hz |
| Absorbed power: | 1100W |
| Size LxDxH: | 185x244(329)x305 mm |
| Pressure: | 15 bar |
| Water tank capacity: | 1.1 l |
| Power cord length: | 1300 mm |
| Weight: | 3,8 kg |
CE The appliance complies with the following EC directives:
- Stand-by European Regulation 1275/2008 and subsequent amendments;
• Materials and accessories coming into contact with food conform to European regulation 1935/2004.
DISPOSAL
The appliance must not be disposed of with household waste, but taken to an authorised waste separation and recycling centre.
TROUBLESHOOTING
Below is a list of some of the possible malfunctions.
If the problem cannot be resolved as described, contact Customer Services.
| PROBLEM POSSIBLE CAUSE SOLUTION | ||
| No espresso coffee is delivered No | No water in the tank Fill the tank with water | |
| The holes in the filter holder are blocked Clean | Clean the filter holder spout holes | |
| The espresso boiler outlet is blocked Clean | as described in the chapter “Cleaning” | |
| Scale in the water circuit Descale as described in the “Descaling” section | ||
| The espresso coffee drips from the edges of the filter holder rather than the holes | The filter holder has been inserted incorrectly or is dirty | Attach the filter holder correctly and rotate firmly as far as it will go |
| The espresso boiler gasket has lost elasticity or is dirty | Have the espresso boiler gasket replaced by Customer Services | |
| The holes in the filter holder spouts are blocked | Clean the filter holder spout holes | |
| The espresso coffee is cold The OK light is not on when the coffee is delivered | Wait until the OK light comes on | |
| No preheating was done | ||
| The cups were not preheated Pre-heat the cups with hot water | ||
| Scale in the water circuit Descale as described in the section “Descaling” | ||
| The pump is excessively noisy The water tank is empty Fill the tank | ||
| The tank is not correctly in place and the valve on the bottom is not open | ||
| There are air bubbles in the tank connector | ||
| The coffee froth is too dark (delivered from the spout too slowly) | The pre-ground coffee is pressed down too firmly | Press the coffee down less firmly |
| There is not enough pre-ground coffee Reduce the quantity of pre-ground coffee | ||
| The espresso boiler outlet is blocked Clean | as described in the section “Cleaning the boiler outlet” | |
| The filter is blocked Clean as described in the section “Cleaning the coffee filters” | ||
| The pre-ground coffee is too fine or damp | Use only pre-ground coffee for espresso coffee makers and make sure it is not damp | |
| The wrong type of pre-ground coffee is being used | Use a different type of pre-ground coffee | |
| The coffee has an acid taste | Inadequate rinsing after descaling | After descaling, rinse the appliance as described in the section “Descaling” |
| No milk froth is formed when making cappuccino | Model ECP35.31: the ring is in the “HOT MILK” position | MODEL ECP35.31: push the ring into the “CAP-PUCCINO” position |
| Milk not cold enough Always use milk at refrigerator temperature | ||
| Cappuccino maker dirty | Clean as described in the section “Cleaning the cappuccino maker” | |
| Scale in the water circuit Descale as described in the section “Descaling” | ||
| The appliance switches off | Auto-off has been triggered | Press the ON/OFF button to turn the appliance on again |
| The appliance switches off a few seconds after switching on | The mode selector dial is not in the I position (Standby) | Turn the mode selector dial to the I position (Standby), then press the ON/OFF switch. |
ELECTRICAL REQUIREMENTS (UK ONLY)
Before using this appliance ensure that the voltage indicated on the product corresponds with the main voltage in your home, if you are in any doubt about your supply contact your local electricity company.
The flexible mains lead is supplied connected to a B.S. 1363 fused plug having a fuse of 13 amp capacity.
Should this plug not fit the socket outlets in your home, it should be cut off and replaced with a suitable plug, following the procedure outlined below.
Note: Such a plug cannot be used for any other appliance and should therefore be properly disposed of and not left where children might find it and plug it into a supply socket - with the obvious consequent danger.
N.B. We recommend the use of good quality plugs and wall sockets that can be switched off when the machine is not in use.
IMPORTANT: the wires in the mains lead fitted to this appliance are coloured in accordance with the following code:
Green and Yellow to Earth
GREEN AND YELLOW
BLUE
BROWN
EARTH
NEUTRAL
LIVE
Blue to neutral
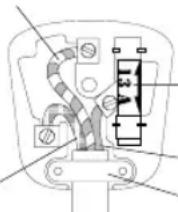
13 amp
Fuse
Brown to
live
Cord Clamp
As the colours of the wires in the mains lead of this appliance may not correspond with the coloured markings identifying the terminals in your plug, proceed as follows:
- The wire which is coloured green and yellow must be connected to the terminal in the plug which is marked with the letter E or by the earth symbol ⏚ or coloured green or green and yellow.
- The wire which is coloured blue must be connected to the terminal which is marked with the letter N or coloured black.
- The wire which is coloured brown must be connected to the terminal which is marked with the letter L or coloured red.
When wiring the plug, ensure that all strands of wire are securely retained in each terminal. Do not forget to tighten the mains lead clamp on the plug. If your electricity supply point has only two pin socket outlets, or if you are in doubt, consult a qualified electrician.
Should the mains lead ever require replacement, it is essential that this operation be carried out by a qualified electrician and should only be replaced with a flexible cord of the same size.
After replacement of a fuse in the plug, the fuse cover must be refitted. If the fuse cover is lost, the plug must not be used until a replacement cover is obtained. The colour of the correct replacement fuse cover is that of the coloured insert in the base of the fuse recess or elsewhere on the plug. Always state this colour when ordering a replacement fuse cover. Only 13amp replacement fuses which are asta approved to B.S. 1362 should be fitted.
This appliance conforms to the Norms EN 55014 regarding the suppression of radio interference.
Warning - this appliance must be earthed

- FUNDAMENTAL SAFETY WARNINGS
- FOR EUROPEAN MARKETS ONLY:
- SAFETY WARNINGS
- Designated use
- Instruction for Use
- Checking the appliance
- DESCRIPTION
- Description of the appliance
- Description control panel
- Description of the accessories
- INSTALLING THE APPLIANCE
- Connecting the appliance
- Danger!
- FILLING THE WATER TANK
- Important:
- SETTING UP THE APPLIANCE
- Auto-off
- Tips for a hotter coffee
- Mugs or glasses tray (models ECP35.31 and ECP33.21 only)
- HOW TO MAKE ESPRESSO COFFEE USING PRE-GROUND COFFEE
- HOW TO PREPARE ESPRESSO COFFEE USING PODS
- HOW TO PREPARE CAPPUCCINO COFFEE
- MAKING MACCHIATO (HOT MILK - MODEL ECP35.31 ONLY)
- CLEANING THE CAPPUCCINO MAKER AFTER EVERY USE
- Model ECP35.31
- Models ECP33.21 and ECP31.21
- HOT WATER
- CLEANING
- Cleaning the machine
- ! Important!
- Danger! Never immerse the coffee maker in water. It is an electrical appliance.
- i Please note:
- Cleaning the drip tray
- Models ECP35.31 and 33.21: Important!
- Cleaning the coffee filters
- Cleaning the boiler outlet
- Cleaning the water tank
- DESCALING
- DISPOSAL
- TROUBLESHOOTING
- ELECTRICAL REQUIREMENTS (UK ONLY)
- Warning - this appliance must be earthed
Brand : DELONGHI
Model : ECP31
Category : Coffee maker