
d-Copia 2500 - Uncategorized OLIVETTI - Free user manual and instructions
Find the device manual for free d-Copia 2500 OLIVETTI in PDF.


| Product type | Desktop copier (monochrome) |
| Model | d-Copia 2500 (25 cpm) / d-Copia 3000 (30 cpm) |
| Copying method | Electrophotography by semiconductor laser |
| Original types supported | Sheet, book, 3D objects up to 11×17" / A3 |
| Copy speed (simplex) | Up to 25 sheets/min (A4) for 25 cpm model; up to 30 sheets/min (A4) for 30 cpm model |
| First copy time | 4.7 seconds or less (A4 from cassette) |
| Warm-up time | 15 seconds or less (power on) |
| Paper capacity (standard) | Cassette 1 & 2: 500 sheets each; MP tray: 200 sheets (80 g/m²) |
| Output tray capacity | Top tray: 250 sheets; with optional finisher: 100 sheets |
| Zoom range | 25% to 400% in 1% increments (manual); preset zoom available |
| Duplex | Standard (automatic two-sided copying) |
| Resolution | 600 × 600 dpi |
| Memory | 64 MB standard |
| Dimensions (W×D×H) | 22 7/16 × 25 3/16 × 30 3/16" (570 × 640 × 767.2 mm) |
| Weight | 165 lb (75 kg) without toner/waste toner box |
| Power source | 120 V AC, 60 Hz, 11.2 A / 220-240 V AC, 50 Hz, 6.0 A |
| Power consumption (max) | 1360 W |
| Energy saving modes | Low-Power mode (1 min default), Sleep mode (9 min default) |
| Options | Document processor, paper feeder, finisher, job separator, key counter, printer kit, fax kit |
| Maintenance | Clean platen, slit glass, separator, transfer roller; replace toner and waste toner box as needed |
| Safety features | Class 1 laser product; automatic shut-off; high temperature labels; power switch isolation |
Frequently Asked Questions - d-Copia 2500 OLIVETTI
User questions about d-Copia 2500 OLIVETTI
0 question about this device. Answer the ones you know or ask your own.
Ask a new question about this device
Download the instructions for your Uncategorized in PDF format for free! Find your manual d-Copia 2500 - OLIVETTI and take your electronic device back in hand. On this page are published all the documents necessary for the use of your device. d-Copia 2500 by OLIVETTI.
USER MANUAL d-Copia 2500 OLIVETTI
PUBLICATION ISSUED BY:
Olivetti S.p.A.
Copyright © 2007, Olivetti All rights reserved
The mark affixed to the product certifies that the product satisfies the basic quality requirements.

The manufacturer reserves the right to carry out modifications to the product described in this manual at any time and without any notice.

ENERGY STAR
ENERGY STAR is a U.S. registered mark.
The ENERGY STAR program is an energy reduction plan introduced by the United States Environmental Protection Agency in response to environmental issues and for the purpose of advancing the development and utilization of more energy efficient office equipment.
Your attention is drawn to the following actions which could compromise the conformity attested to above, as well as the characteristics of the product:
- incorrect electrical power supply;
- incorrect installation, incorrect or improper use or use not in compliance with the warnings provided in the User's Manual supplied with the product;
- replacement of original components or accessories with others of a type not approved by the manufacturer, or performed by unauthorised personnel.
All rights reserved. No part of this material may be reproduced or transmitted in any form or by any means, electronic or mechanical, including photocopying, recording or by any information storage and retrieval system, without permission in writing from the Publisher.
This Operation Guide is for models d-Copia 2500 and d-Copia 3000. In this guide, d-Copia 2500 refers to the 25 cpm (copies per minute) model and d-Copia 3000 to the 30 cpm model.

Note This Operation Guide contains information that corresponds to using both the inch and metric versions of these machines.
The inch versions of these machines are shown in the screens in this guide. If you are using the metric version, use the messages provided for the inch version as reference only. In the body text, only the inch messages are given if these versions differ only in capitalization. When there is even a slight difference in the message, we have listed the information for the inch version followed, in brackets, by the corresponding information for the metric version.
Included Guides
The following guides are included with this machine. Refer to the proper guide based on your requirements.
Operation Guide (This Guide)
Describes how to load paper, basic copy operations, and troubleshooting.
Advanced Operation Guide
Explains copying features in depth, as well as default settings.
Quick Start Guide
Lists and briefly describes the copy functions of the machine.
Safety Conventions in This Guide
Please read this Operation Guide before using the machine. Keep it close to the machine for easy reference.
The sections of this guide and parts of the machine marked with symbols are safety warnings meant to protect the user, other individuals and surrounding objects, and ensure correct and safe usage of the machine. The symbols and their meanings are indicated below.

WARNING: Indicates that serious injury or even death may result from insufficient attention to or incorrect compliance with the related points.

CAUTION: Indicates that personal injury or mechanical damage may result from insufficient attention to or incorrect compliance with the related points.
Symbols
The △symbol indicates that the related section includes safety warnings. Specific points of attention are indicated inside the symbol.

.... [General warning]

..... [Warning of danger of electrical shock]

..... [Warning of high temperature]
The symbol indicates that the related section includes information on prohibited actions. Specifics of the prohibited action are indicated inside the symbol.

.... [Warning of prohibited action]

.... [Disassembly prohibited]
The ● symbol indicates that the related section includes information on actions which must be performed. Specifics of the required action are indicated inside the symbol.

.... [Alert of required action]

..... [Remove the power plug from the outlet]

[Always connect the machine to an outlet with a ground connection]
Please contact your service representative to order a replacement if the safety warnings in this Operation Guide are illegible or if the guide itself is missing. (fee required)
Contents
Legal Information and Conventions ix
1 Part Names 1-1
Body 1-2
Operation Panel 1-5
Touch Panel 1-6
2 Preparation for Usage 2-1
Loading Paper 2-2
Setting Media Type and Paper Size for the Cassettes and MP
Tray 2-7
Loading Originals 2-14
Language 2-18
3 Basic Operation 3-1
Basic Copying Procedures 3-2
Selecting Image Quality 3-4
Adjusting Density 3-5
Zoom 3-6
Duplex Mode 3-10
Split Mode 3-13
Collate Mode 3-15
Interrupt Copy 3-16
Low-Power Mode 3-17
Sleep Mode 3-17
4 Optional Equipment 4-1
Overview of Optional Equipment 4-2
Document Processor 4-3
Paper Feeder 4-3
Built-in Finisher 4-3
Document Finisher 4-6
Job Separator 4-6
Key Counter 4-7
Printer Kit 4-7
Fax Kit 4-8
5 Maintenance 5-1
Cleaning 5-2
Toner Container and Waste Toner Box Replacement 5-7
6 Troubleshooting 6-1
Solving Malfunctions 6-2
Responding to Error Messages 6-4
Clearing Paper Jams 6-8
7 Appendix 7-1
Entering Characters on Touch Panel 7-2
Paper 7-5
Specifications 7-6
Index ......Index-1
Caution/Warning Labels
Caution labels have been attached to the machine at the following locations for safety purposes. Be sufficiently careful to avoid fire or electric shock when removing a paper jam or when replacing toner.


Note Do not remove these labels.

Installation Precautions
Environment

Caution
Avoid placing the machine on or in locations which are unstable or not level. Such locations may cause the machine to fall down or fall over. This type of situation presents a danger of personal injury or damage to the machine.
Avoid locations with humidity or dust and dirt. If dust or dirt become attached to the power plug, clean the plug to avoid the danger of fire or electrical shock.
Avoid locations near radiators, heaters, or other heat sources, or locations near flammable items, to avoid the danger of fire.
To keep the machine cool and facilitate changing of parts and maintenance, allow access space as shown below. Leave adequate space, especially around the rear cover, to allow air to be properly ventilated out of the machine.


Other precautions
The service environmental conditions are as follows:
• Temperature: 50 to 90.5 °F (10 to 32.5 °C)
• Humidity: 15 to 80 %
However, adverse environmental conditions may affect the image quality. Avoid the following locations when selecting a site for the machine.
- Avoid locations near a window or with exposure to direct sunlight.
- Avoid locations with vibrations.
- Avoid locations with drastic temperature fluctuations.
- Avoid locations with direct exposure to hot or cold air.
- Avoid poorly ventilated locations.
Small amounts of ozone and other chemicals are released during copying, but the quantities do not present any health risk to humans. If, however, the machine is used over a long period of time in a poorly ventilated room or when making an extremely large number of copies, the smell may become unpleasant. To maintain the appropriate environment for copy work, it is suggested that the room be properly ventilated.
Do not install this machine beneath fluorescent lights. The original size may be detected incorrectly.
Power supply/Grounding the machine
Warning
Do not use a power supply with a voltage other than that specified. Avoid multiple connections in the same outlet. These types of situations present a danger of fire or electrical shock.

Plug the power cord securely into the outlet. If metallic objects come in contact with the prongs on the plug, it may cause a fire or electric shock.

Always connect the machine to an outlet with a ground connection to avoid the danger of fire or electrical shock in case of an electric short. If an earth connection is not possible, contact your service representative.

Other precautions
Connect the power plug to the closest outlet possible to the machine.
Handling of plastic bags
Warning
Keep the plastic bags that are used with the machine away from children. The plastic may cling to their nose and mouth causing suffocation.


Precautions for Use
Cautions when using the machine

Warning
Do not place metallic objects or containers with water (flower vases, flower pots, cups, etc.) on or near the machine. This of situation presents a danger of fire or electrical shock should they fall inside.

Do not remove any of the covers from the machine as there is a danger of electrical shock from high voltage parts inside the machine.

Do not damage, break or attempt to repair the power cord. Do not place heavy objects on the cord, pull it, bend it unnecessarily or cause any other type of damage. These types of situations present a danger of fire or electrical shock.

Never attempt to repair or disassemble the machine or its parts as there is a danger of fire, electrical shock or damage to the laser. If the laser beam escapes, there is a danger of it causing blindness.

If the machine becomes excessively hot, smoke appears from the machine, there is an odd smell, or any other abnormal situation occurs, there is a danger of fire or electrical shock. Turn the main power switch off (position) immediately, be absolutely certain to remove the power plug from the outlet and then contact your service representative.

If anything harmful (paper clips, water, other fluids, etc.) falls into the machine, turn the main power switch off (position) immediately. Next, be absolutely certain to remove the power plug from the outlet to avoid the danger of fire or electrical shock. Then contact your service representative.

Do not remove or connect the power plug with wet hands, as there is a danger of electrical shock.

Always contact your service representative for maintenance or repair of internal parts.


Caution
Do not pull the power cord when removing it from the outlet. If the power cord is pulled, the wires may become broken and there is a danger of fire or electrical shock. (Always grasp the power plug when removing the power cord from the outlet.)

Always remove the power plug from the outlet when moving the machine. If the power cord is damaged, there is a danger of fire or electrical shock.

Always hold the designated parts only when lifting or moving the machine.

For safety purposes, always remove the power plug from the outlet when performing cleaning operations.

If dust accumulates within the machine, there is a danger of fire or other trouble. It is therefore recommended that you consult with your service representative in regard to cleaning of internal parts. This is particularly effective if accomplished prior to seasons of high humidity. Consult with your service representative in regard to the cost of cleaning the internal parts of the machine.

Other precautions
If the optional fax kit is installed, when the main power switch is off ( ⏻ position), fax send/receive is disabled. To turn the power off, press the Power key on the operation panel.
Do not place heavy objects on the machine or cause other damage to the machine.
Do not open the front cover, turn off the main power switch, or pull out the power plug during copying.
When lifting or moving the machine, contact your service representative.
Do not touch electrical parts, such as connectors or printed circuit boards. They could be damaged by static electricity.
Do not attempt to perform any operations not explained in this handbook.
Caution: Use of controls or adjustments or performance of procedures other than those specified herein may result in hazardous radiation exposure.
Do not look directly at the light from the scanning lamp as it may cause your eyes to feel tired or painful.
Cautions when handling consumables
Caution
Do not attempt to incinerate the toner container or the waste toner box. Dangerous sparks may cause burns.
Keep the toner container and the waste toner box out of the reach of children.
If toner happens to spill from the toner container or the waste toner box, avoid inhalation and ingestion, as well as contact with your eyes and skin.


- If you do happen to inhale toner, move to a place with fresh air and gargle thoroughly with a large amount of water. If coughing develops, contact a physician.
- If you do happen to ingest toner, rinse your mouth out with water and drink 1 or 2 cups of water to dilute the contents of your stomach. If necessary, contact a physician.
- If you do happen to get toner in your eyes, flush them thoroughly with water. If there is any remaining tenderness, contact a physician.
- If toner does happen to get on your skin, wash with soap and water.
Do not attempt to force open or destroy the toner container or the waste toner box.

Other precautions
After use, always dispose of the toner container and the waste toner box in accordance with Federal, State and Local rules and regulations.
If the machine will not be used for an extended period of time, remove the paper from the cassette and the MP tray (multi-purpose tray), return it to its original package and reseal it.
Don't store the unit in a place exposed to:
- Direct sunlight
- High or rapidly variable temperature or humidity (limit: 104 °F or 40 °C)
Legal Information and Conventions
Please read this information before using your machine. This chapter provides information on the following topics:
Legal Information x
Regarding Tradenames x
Energy Saving Control Function xi
Automatic 2-Sided Copy Function xi
Recycled Paper xi
Energy Star (ENERGY STAR®) Program xi
About this Operation Guide xvii
Conventions in This Guide xvii
Originals and Paper Sizes xviii
Legal Information
Notice: The information in this guide is subject to change without notification. Additional pages may be inserted in future editions. The user is asked to excuse any technical inaccuracies or typographical errors in the present edition.
No responsibility is assumed if accidents occur while the user is following the instructions in this guide. No responsibility is assumed for defects in the printer's firmware (contents of its read-only memory).
This guide, any copyrightable subject matter sold or provided with or in connection with the sale of the machine, are protected by copyright. All rights are reserved. Copying or other reproduction of all or part of this guide, any copyrightable subject matter without the prior written consent of Olivetti is prohibited. Any copies made of all or part of this giude, any copyrightable subject must contain the same copyright notice as the material from which the copying is done.
Legal Restriction On Copying
- It may be prohibited to copy copyrighted material without permission of the copyright owner.
- It is prohibited under any circumstances to copy domestic or foreign currencies.
- Copying other items may be prohibited.
Regarding Tradenames
- KPDL is trademark of Kyocera Corporation.
- Windows and Windows Server are registered trademarks of Microsoft Corporation.
- Windows NT is a trademark of Microsoft Corporation.
- PCL and PJL are registered trademarks of Hewlett-Packard Company.
- Adobe, Adobe Acrobat and Adobe Reader are registered trademarks of Adobe Systems Inc.
- PowerPC is a trademark of International Business Machines Corporation.
- CompactFlash is a trademark of SanDisk Corporation.
All other brand and product names are registered trademarks or trademarks of their respective companies. The designations ^™ and ^® will not be used in this Operation Guide.
Energy Saving Control Function
The device comes equipped with a Low Power Mode where energy consumption is reduced after a certain amount of time elapses since the device was last used, as well as an Off Mode where the device automatically turns itself off after there is no activity within a set amount of time. When the copier includes printer and fax functions, the device comes equipped with a Low Power Mode where printer and fax functions remain in a waiting state but energy consumption is still reduced after a certain amount of time elapses since the device was last used, as well as a Sleep Mode where printer and fax functions remain in a waiting state but power consumption is still reduced to a minimum when there is no activity with the device within a set amount of time.
Low Power Mode
The device automatically enters Low Power Mode when 1 minute have passed since the device was last used. The amount of time of no activity that must pass before Low Power Mode is activated may be lengthened. For more information refer to Low-Power Mode on page 3-17.
Off Mode
The device automatically enters Off Mode when 9 minutes have passed since the device was last used. The amount of time of no activity that must pass before Off Mode is activated may be lengthened. For more information refer to Sleep Mode on page 3-17.
Sleep Mode (If the copier has printer and/or facsimile function)
The device automatically enters Sleep Mode when 9 minutes have passed since the device was last used. The amount of time of no activity that must pass before Sleep Mode is activated may be lengthened. For more information refer to Sleep Mode on page 3-17.
Automatic 2-Sided Copy Function
This device includes 2-sided copying as a standard function. For example, by copying two 1-sided originals onto a single sheet of paper as a 2-sided copy, it is possible to lower the amount of paper used. For more information refer to Duplex Mode on page 3-10.
Recycled Paper
This device supports the recycled paper which reduces the load on the environment. Your sales or service representative can provide information about recommended paper types.
Energy Star (ENERGY STAR®) Program
We have determined as a participating company in the International Energy Star Program that this product is compliant with the standards laid out in the International Energy Star Program.

Laser Safety (Europe)
Laser radiation could be hazardous to the human body. For this reason, laser radiation emitted inside this machine is hermetically sealed within the protective housing and external cover. In the normal operation of the product by user, no radiation can leak from the machine.
This machine is classified as Class 1 laser product under IEC 60825.
Caution: Performance of procedures other than those specified in this manual may result in hazardous radiation exposure.
These labels are attached to the laser scanner unit inside the machine and are not in a user access area.
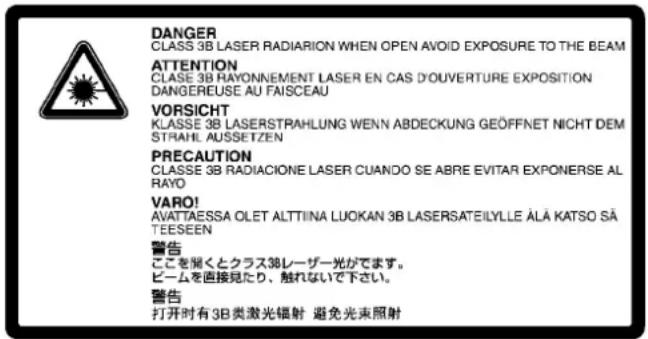
The label shown below is attached on the right side of the machine.

Safety Instructions Regarding the Disconnection of Power
Caution: The power plug is the main isolation device! Other switches on the equipment are only functional switches and are not suitable for isolating the equipment from the power source.
DECLARATION OF CONFORMITY TO 2004/108/EC, 2006/95/EEC, 93/68/EEC and 1995/5/EC
We declare under our sole responsibility that the product to which this declaration relates is in conformity with the following specifications. EN55024
EN55022 Class B
EN61000-3-2
EN61000-3-3
EN60950-1
EN60825-1
EN300 330-1
EN300 330-2
Radio Frequency Transmitter
This machine contains the transmitter module. We, the manufacturer hereby declare that this equipment is in compliance with the essential requirements and other relevant provisions of Directive 1999/5/EC.
Radio Tag Technology
In some countries the radio tag technology used in this equipment to identify the toner container may be subject to authorization and the use of this equipment may consequently be restricted.
About this Operation Guide
This Operation Guide contains the following chapters:
1 Part Names
Identifies machine parts and operation panel keys.
2 Preparation for Usage
Explains adding paper, placing original, connecting the machine, and necessary configurations before first use.
3 Basic Operation
Describes the procedures for basic copying.
4 Optional Equipment
Introduces the convenient optional equipment available for this machine.
5 Maintenance
Describes cleaning and toner replacement.
6 Troubleshooting
Explains how to handle error messages, paper jams, and other problems.
Appendix
Explains how to enter text, describes the media types that can be used with the machine and lists the machine specifications.
Conventions in This Guide
The following conventions are used depending on the nature of the description.
| Convention | Description Example | |
| Bold Indicates | operation panel keys. | Press the Start key. |
| [Regular] Indicates | ates touch panel keys. | Press [Basic]. |
| Italic Indicates | touch panel messages. | Ready to copy is displayed. |
| Note Indicates | supplemental information or operations for reference. |  Note - Note - |
| IMPORTANT Indicates | items that are required or prohibited so as to avoid problems. | IMPORTANT - |
Originals and Paper Sizes
This section explains the notation used in this guide when referring to sizes of originals or paper sizes.
As in A4 and B5, which may be used either in the horizontal or vertical direction, in order to indicate the orientation of the original/paper, horizontal orientation is indicated by an additional R character.
| Set direction Indicated size | a |
Vertical direction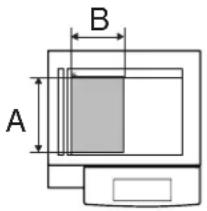  Original SizeFor original/paper, dimension A is longer than B. Original SizeFor original/paper, dimension A is longer than B. | A4, B5, A5, B6,A6, 16K |
Horizontal direction 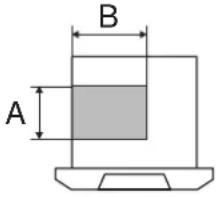 Original SizeFor original/paper, dimension A is shorter than B. Original SizeFor original/paper, dimension A is shorter than B. | A4R, B5R, A5R,B6R, A6R, 16KR |
a. The size of original/paper that can be used depends on the function and source tray. For further details, refer to the page detailing that function or source tray.
1 Part Nam
This chapter identifies machine parts and operation panel keys.
Body 1-2
Operation Panel 1-5
Touch Panel 1-6
Body

1 Original Cover (Option)
2 Platen
3 Original Size Indicator Plates
4 Left Cover 1
5 Left Cover 1 Lever
6 Left Cover 2
7 Clip Holder
8 Operation Panel
9 Cassette 1
10 Cassette 2

11 Toner Container
12 Toner Container Stopper
13 Main Charger
14 Waste Toner Box
15 Cleaning Brush
16 Green Knob (A1)
17 Paper Feed Unit (A2)
18 Paper Feed Unit Cover (A3)

19 Front Cover
20 Paper Width Guide
21 Paper Width Adjusting Tab
22 Paper Length Guide
23 Carrying Handles
24 Top Tray
25 Output Stopper
26 Paper Width Guide
27 Main Power Switch
28 MP Tray (multi-purpose tray)
Operation Panel
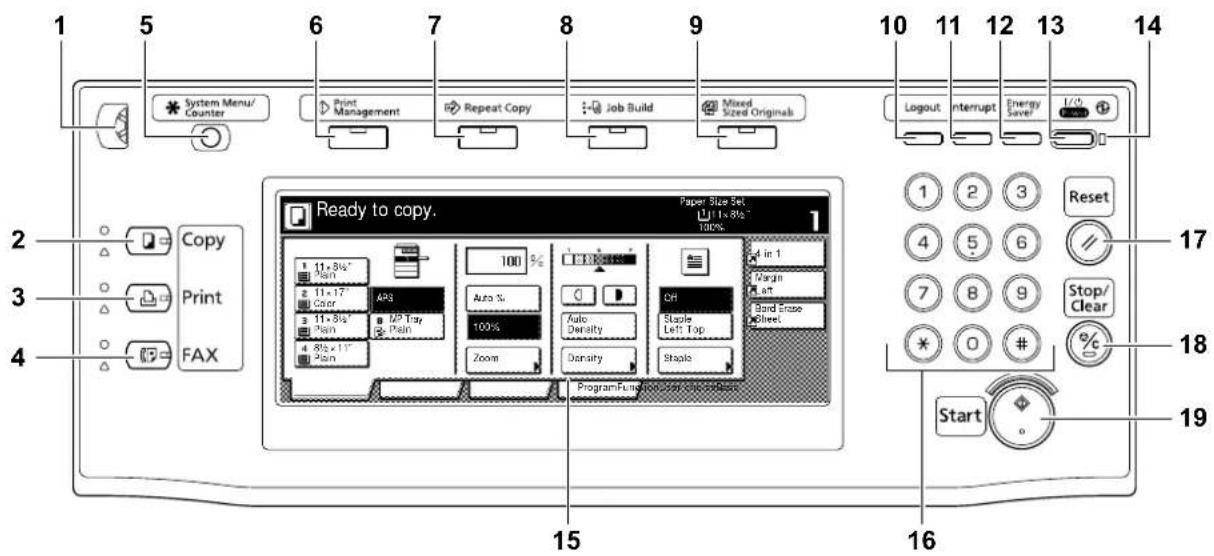
1 Brightness Adjustment Dial
2 Copy Key (Indicator/Lamp)
3 P r i n t Key (Indicator/Lamp)
4 F A X Key (Indicator/Lamp)
5 System Menu/Counter Key
6 Print Management Key/Indicator
7 Repeat Copy Key/Indicator
8 Job Build Key/Indicator
9 Mixed Sized Originals Key/Indicator
10 Logout Key
11 Interrupt Key/Indicator
12 Energy Saver Key/Indicator
13 Power Key/Indicator
14 Main Power Indicator
15 Touch Panel
16 Numeric Keys
17 Reset Key
18 Stop/Clear Key
19 Start Key/Indicator
Touch Panel
Displayed by pressing the Copy key. Screen changes when 1, 2, 3 and 4 are pressed.
1[Basic] screen
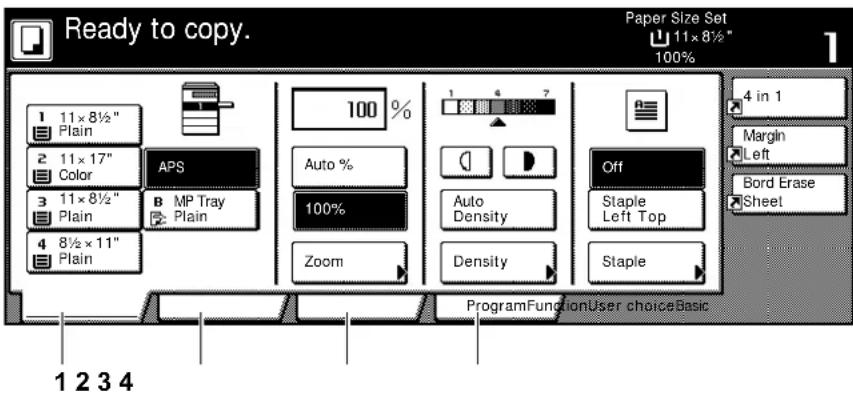
2[User choice] screen

3[Function] screen

4[Program] screen

2 Preparation for Usage
This chapter explains the preparations required before using the machine.
Loading Paper 2-2
Before Loading Paper.... 2-2
Loading Paper into Cassette 1, 2 2-2
Loading Paper in the MP Tray.... 2-4
Loading Envelopes.... 2-6
Setting Media Type and Paper Size for the Cassettes and MP Tray 2-7
Specifying Paper Size for the Cassettes 2-7
Specifying the Media Type for the Cassettes 2-8
Specifying the Paper Size for the MP Tray.... 2-9
Specifying the Media Type for the MP Tray.... 2-13
Loading Originals 2-14
Loading Originals on the Platen 2-14
Loading Originals in the Document Processor (option)...... 2-15
Language 2-18
Loading Paper
Paper can be loaded standardly in the two cassettes and the MP tray. An optional paper feeder is also available. (Refer to Chapter 4 Optional Equipment.)
Before Loading Paper
When you open a new package of paper, fan the sheets to separate them slightly prior to loading by the following steps.
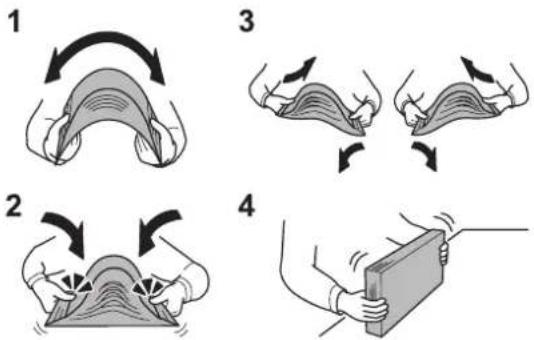
1 Bend the stack of sheets and swell in the middle.
2 Hold the stack at both ends and stretch the bottom out flat while keeping the top of the stack swelled.
3 Raise your right and left hands alternately to create a gap and let air between the sheets.
4 Finally, even out the stack on a level, flat table.
If the paper is curled or folded, straighten it before loading. Paper that is curled or folded may cause a jam.
IMPORTANT If you copy with used paper (paper already used for copying), do not use paper that is stapled or clipped together. This may damage the machine or cause poor image quality.

Note If printouts are curled or not neatly stapled, turn the stack in the cassette upside down.
Avoid exposing opened paper to high temperatures and high humidity as dampness can cause problems. Seal any remaining paper after loading in the MP tray or cassettes back in the paper storage bag.
If the machine is not going to be used for a prolonged period, protect paper from humidity by removing it from the cassettes and sealing it in the paper storage bag.

Note If you use special paper such as letterhead, paper with holes or paper with pre-prints such as logos or company name, refer to the Advanced Operation Guide.
Loading Paper into Cassette 1, 2
Up to 500 sheets of plain paper (80 g/m ^2 ) or colored paper (80 g/m ^2 ) may be loaded in each of the two standard cassettes.
The following paper sizes are supported: 11 × 17", 8 1/2 × 14", 11 × 8 1/2", 8 1/2 × 11", 5 1/2 × 8 1/2", 8 1/2 × 13" (Oficio II), 8 1/2 × 13 1/2", A3, B4, A4, A4R, B5, B5R, A5R, Folio, 8K, 16K and 16KR.
IMPORTANT When using media types other than plain paper (such as recycled or colored paper), always specify the media type setting. (Refer to Specifying the Media Type for the Cassettes on page 2-8.)
The cassettes can hold 60 to 120 g/m ^2 paper. When using 120 g/m ^2 paper, specify [Thick paper] for Specifying the Media Type for the Cassettes on page 2-8. If the media type setting is wrong, paper jams and deterioration of copy quality may occur.
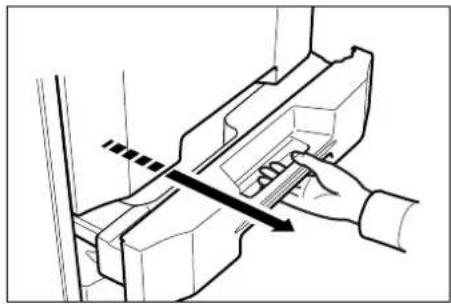
natural_image
Technical line drawing of a hand using a tool to cut or inspect a mechanical component (no text or symbols visible)1 Pull the cassette out toward you until it stops.

Note Do not pull out more than one cassette at a time.

natural_image
Technical line drawing of a mechanical device with internal components and directional arrows indicating movement (no text or symbols)2 Holding the paper width adjusting tab, move the paper width guides to fit the paper.

Note Paper sizes are marked on the cassette.

natural_image
Hand operating a mechanical component with directional arrows indicating motion (no text or symbols)3 Adjust the paper length guide to the length of the paper.
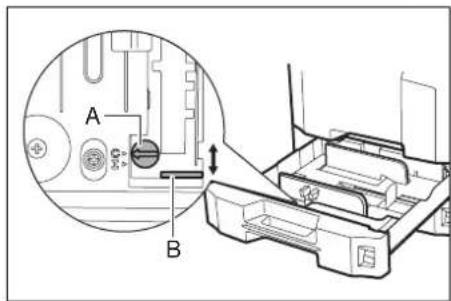

Note Paper sizes are indicated on the cassettes.
To change between inch size and metric size (A, B sizes), follow the steps below to adjust the size switch.
1 Holding the paper width adjusting tab, move the paper width guide to a position other than that of the paper.
2 Turn the size switch A 90°.
3 Move the size lever B up (C) or down (I).
C: metric size (centimeters) (A, B sizes)
I: inch size
4 Turn the size switch 90° to lock it.


natural_image
Line drawing of a hand pressing down on a document with an arrow indicating rotation (no text or symbols)
natural_image
Technical line drawing of a mechanical assembly with no visible text or symbols
4 Align the paper flush against the left side of the cassette.
IMPORTANT Before loading the paper, be sure that it is not curled or folded. Paper that is curled or folded may cause paper jams.
Ensure that the loaded paper does not exceed the level indicator (see the figure).
When loading the paper, keep the side that was closest the package seal facing up.
The paper length and width guides must be adjusted to the paper size. Loading the paper without adjusting these guides may cause skewed feeding and paper jams.
Be sure that the paper length and width guides rest securely against the paper. If there is a gap, readjust the guides to fit the paper.
5 Insert the appropriate paper size card in the slot to indicate the size of the paper inside.
6 Gently push the cassette back in.

Note If the machine is not going to be used for a prolonged period, protect paper from humidity by removing it from the cassettes and sealing it in the original package.
7 Select the media type (plain, recycled, etc.) for the cassette with the operation panel. (Refer to Specifying the Media Type for the Cassettes on page 2-8.)
Loading Paper in the MP Tray
Up to 200 sheets of plain paper (80 g/m ^4 ) may be loaded in the MP tray.
The MP tray accepts paper sizes from 11 × 17" to 5 1/2 × 8 1/2", A3 to A6R, 8K, 16K and 16KR. Be sure to use the MP tray when you print on any special paper.
IMPORTANT When using media types other than plain paper (such as recycled or colored paper), always specify the media type setting. (Refer to Specifying the Media Type for the MP Tray on page 2-13.)
The capacity of the MP tray is as follows.
- Thick paper (120 g/m²): 130 sheets
- Thick paper (160 g/m²): 100 sheets
- Thick paper (200 g/m²): 50 sheets
- Hagaki: 80 sheets
• OHP film: 25 sheets
- Envelope DL, Envelope C5, Comm. #10, Monarch, Youkei 4, Youkei 2: 20 sheets

Note When you load custom size paper, enter the paper size by referring to Specifying the Paper Size for the MP Tray on page 2-9.
When you use special paper such as transparencies or thick paper, select the media type by referring to Specifying the Media Type for the MP Tray on page 2-13.

natural_image
Line drawing of a hand inserting a device into a door panel (no text or symbols)1 Open the MP tray.

natural_image
Technical line drawing of a mechanical device with two ports and directional arrows indicating movement (no text or symbols)2 Adjust the paper width guides to the width of the paper.

natural_image
Line drawing of a hand pressing down on a device component (no text or symbols)3 Insert the paper along the paper width guides into the tray until it stops.
IMPORTANT Keep the side that was closest the package seal facing up.
Curled paper must be uncurled before use.
Straighten the top edge if it is curled.
When loading paper, always adjust the paper width guides to the width of the paper. If you butt the paper up against either side of the MP tray and then use the machine without adjusting the paper width guides to the width of the paper, the machine will malfunction.
Loading Envelopes
Up to 20 envelopes may be loaded in the MP tray.
Acceptable envelope sizes are as follows.
| Acceptable Envelope Size | |
| Monarch 3 7/8 × 7 1/2" | |
| Comm. #10 4 1/8 × 9 1/2" | |
| Envelope DL 110 × 220 mm | |
| Envelope C5 162 × 229 mm | |
| Executive 7 1/4 × 10 1/2" | |
| Comm. #9 3 7/8 × 8 7/8" | |
| Comm. #6-3/4 3 5/8 × 6 1/2" | |
| ISO B5 176 × 250 mm | |
| Envelope C4 229 × 324 mm | |
| Oufuku Hagaki 148 × 200 mm | |
| Youkei 2 162 × 114 mm | |
| Youkei 4 234 × 105 mm |
natural_image
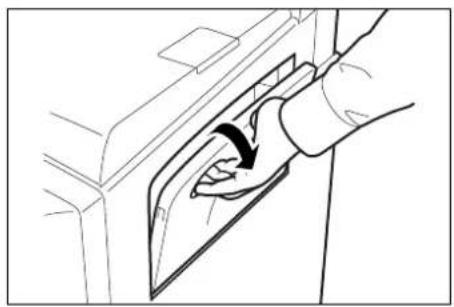
Line drawing of a hand inserting a black arrow into a device panel (no text or symbols)1 Open the MP tray.
natural_image
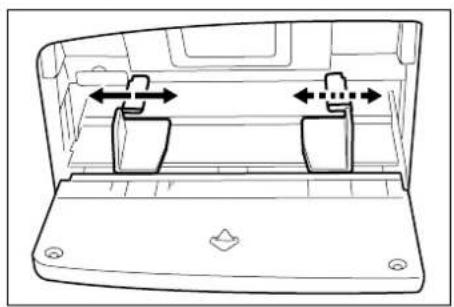
Line drawing of a device rear panel with two upright stands and directional arrows indicating movement (no text or symbols)2 Adjust the paper width guides to the width of the envelope.
flowchart
graph TD
    A["Rectangular Block"] --> B["Arrow to Circle"]
    C["Rectangular Block"] --> D["Arrow to Circle"]
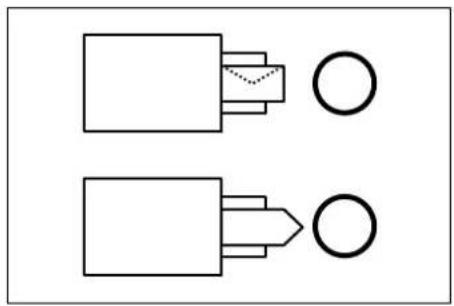
3 For landscape form envelopes, close the flap. Insert the envelope all the way along the width guides, keeping the printing side face-up and the flap closed.
For portrait form envelopes, open the flap. Insert the envelope all the way along the width guides, keeping the printing side face-up and the flap positioned opposite to the entrance.
IMPORTANT How envelopes are loaded (orientation and facing) will differ depending on the type of envelope. Be sure to load them correctly, otherwise they may be printed in the wrong direction or on the wrong face.

Note When you load envelopes in the MP tray, select the envelope type by referring to Specifying the Media Type for the MP Tray on page 2-13.
Setting Media Type and Paper Size for the Cassettes and MP Tray
The default paper size setting for cassettes 1 and 2 and for the optional paper feeder (cassettes 3 and 4) is [Auto Detection] and the default media type setting is [Plain]. To fix the type of paper to be used, specify the paper size and media type settings. Refer to Specifying Paper Size for the Cassettes below and Specifying the Media Type for the Cassettes on page 2-8.
The default paper size setting for the MP tray is [Auto Detection] and the default media type setting is [Plain]. To fix the type of paper to be used, specify the paper size and media type settings. Refer to Specifying the Paper Size for the MP Tray on page 2-9 and Specifying the Media Type for the MP Tray on page 2-13.
Specifying Paper Size for the Cassettes
To fix the type of paper to be used in cassettes 1 and 2 and in the optional paper feeder (cassettes 3 and 4), specify the paper size setting. To automatically detect the paper size, set to [Auto Detection] and select either [Centimeter] or [Inch] units.
The following paper sizes are available.
11 × 17", 8 1/2 × 14", 11 × 8 1/2", 8 1/2 × 11", 5 1/2 × 8 1/2", 8 1/2 × 13 1/2", 8 1/2 × 13" (Oficio II), A3, B4, A4, A4R, B5, B5R, A5R, Folio, 8K, 16K, 16KR

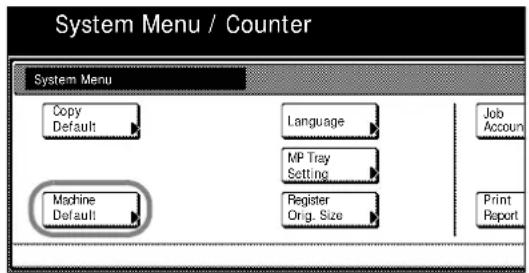

1 Press the System Menu/Counter key.
2 Press [Machine Default].
3 Use the numeric keys to enter the 4 digit management code. The default setting is 2500 for the 25 cpm model and 3000 for the 30 cpm model.
If the correct management code has been entered, the Machine Default screen will be displayed.
4 Press [▲] or [▼], select the cassette you wish to set the paper size from Paper size (Cassette 1) - Paper size (Cassette 4) and press [Change #].

Note Cassette 3 and Cassette 4 are shown when the optional paper feeder have been installed.
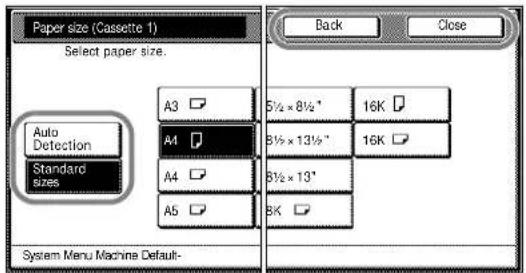
5 If [Auto Detection] is selected, choose the unit type. If [Standard sizes] is selected, choose the paper size.
Press [Close].
| Key Description | |
| [Close] Keeps the | settings and returns to the previous page. |
| [Back] Cancels settings and returns to the previous page. | |
6 Press [Close].
7 Press [End]. The display returns to the [Basic] screen.
Specifying the Media Type for the Cassettes
To use a media type other than plain paper in cassettes 1 and 2 or in the optional paper feeder (cassettes 3 and 4), specify the media type setting. The following media types are available.
Plain, Rough, Vellum, Recycled, Preprinted, Bond, Color (Colour), Prepunched, Letterhead, Thick paper, High Quality, Custom 1 - 8
IMPORTANT If the optional fax kit is installed, the available media types for printing received faxes are as shown below.
Plain, Rough, Recycled, Bond, Color (Colour), High Quality, Custom 1 - 8

1 Press the System Menu/Counter key.
2 Press [Machine Default].
3 Use the numeric keys to enter the 4 digit management code. The default setting is 2500 for the 25 cpm model and 3000 for the 30 cpm model.
If the correct management code has been entered, the Machine Default screen will be displayed.
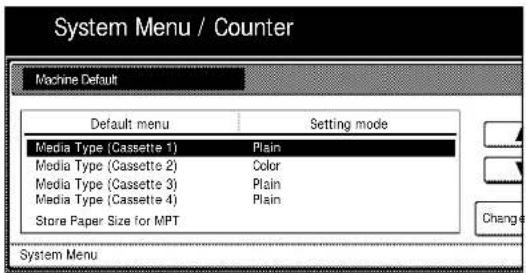
4 Press [▲] or [▼], select the cassette you wish to set the media type from Media Type (Cassette 1) - Media Type (Cassette 4) and press [Change #].

Note Cassette 3 and Cassette 4 are shown when the optional paper feeder have been installed.

5 Select the media type and press [Close].
6 Press [Close].
7 Press [End]. The display returns to the [Basic] screen.
Specifying the Paper Size for the MP Tray
To fix the type of paper to be used in the MP tray, specify the paper size setting.
The following paper sizes are available.
| Setting method | Unit Paper size | |
| Auto Detect | Inch | 11 × 17", 8 1/2 × 14", 11 × 8 1/2", 8 1/2 × 11", 5 1/2 × 8 1/2" |
| Centimeter A3, B4, A4, A4R, B5, B5R, A5R, B6R, A6R | ||
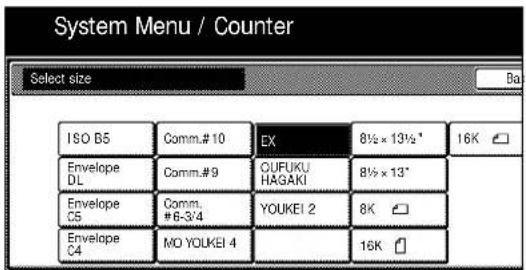
| Other Standard Sizes ISO | B5, Envelope DL, Envelope C5,Envelope C4, Comm. #10, Comm. #9,Comm. #6-3/4, Monarch, Executive,OUFUKU HAGAKI (return postcard),YOUKEI 2, YOUKEI 4, 8 1/2 × 13 1/2",8 1/2 × 13" (Oficio II), 8K, 16K, 16KR | |
| Size Entry | Inch modelsHeight: 3 7/8 - 11 5/8" (1/8" increments)Width: 5 7/8 - 17" (1/8" increments)Metric modelsHeight: 98 - 297 mm (1 mm increments)Width: 148 - 432 mm (1 mm increments) | |
| Custom Size | Pre-assigned paper size 1-4Assignable paper sizesInch modelsHeight: 3 7/8 - 11 5/8" (1/8" increments)Width: 5 7/8 - 17" (1/8" increments)Metric modelsHeight: 98 - 297 mm (1 mm increments)Width: 148 - 432 mm (1 mm increments) | |
Auto Detect
The paper size is automatically detected. Select between [Centimeter] ([Centimetre]) and [Inch] measurement units.
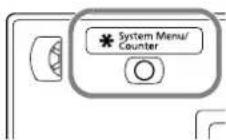
1 Press the System Menu/Counter key.


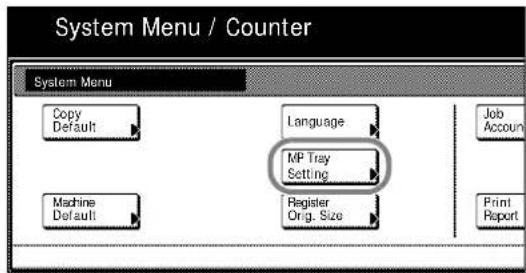
2 Press [MP Tray Setting].
3 Press [Auto Detection].
4 Select [Centimeter] ([Centimetre]) or [Inch].
5 Press [Close]. The display returns to the [Basic] screen.
Other Standard Sizes
Specify special standard sizes.
1 Press the System Menu/Counter key.
2 Press [MP Tray Setting].
3 Press [Others Standard] and press [Select size].
4 Select the paper size.
5 Press [Close].
6 Press [Close]. The display returns to the [Basic] screen.
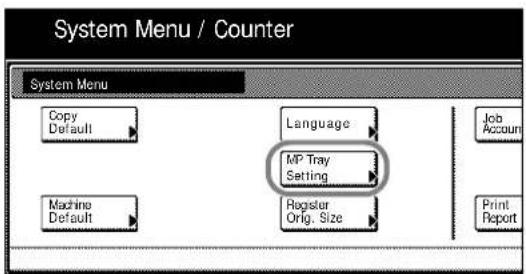

Size Entry
Specify the required paper size.
1 Press the System Menu/Counter key.
2 Press [MP Tray Setting].
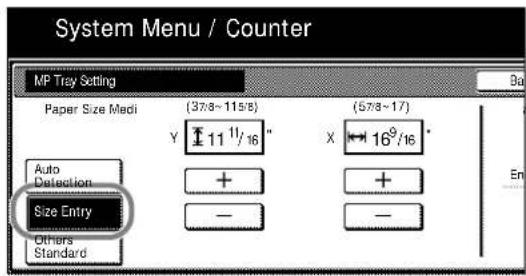
3 Press [Size Entry].
4 Press [+] and [-] to set the Y (height) and X (width) sizes. With the metric models, you may enter the size directly using the numeric keys by pressing [#-Keys].
5 Press [Close]. The display returns to the [Basic] screen.
Custom Size
Store frequently used paper sizes as custom sizes. Also, the media type can be set for each custom size.
Assignment Method
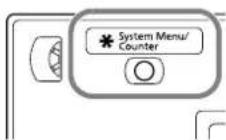
1 Press the System Menu/Counter key.
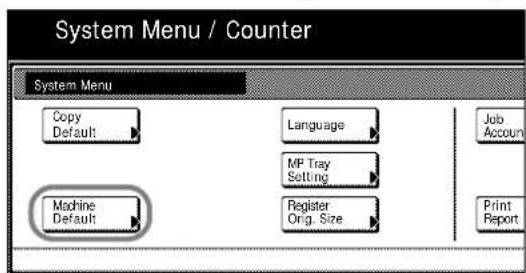
2 Press [Machine Default].
3 Use the numeric keys to enter the 4 digit management code. The default setting is 2500 for the 25 cpm model and 3000 for the 30 cpm model. If the correct management code has been entered, the Machine Default screen will be displayed.
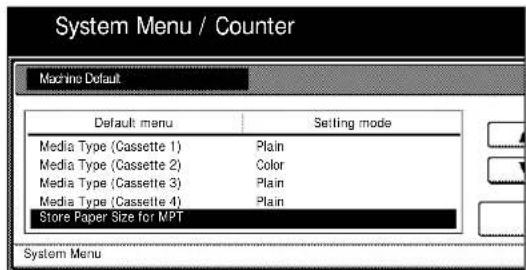
4 Press [▲] or [▼] to select Store Paper Size for MPT, and press [Change #].

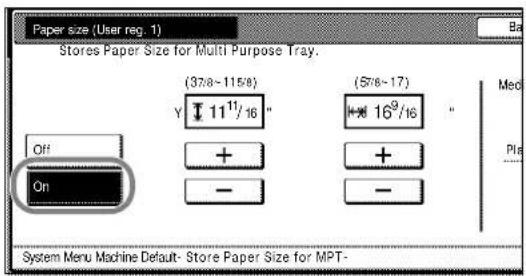

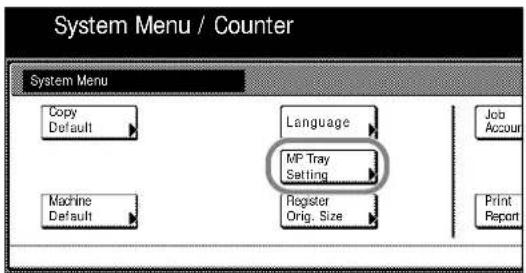


5 Press [▲] or [▼], select the number to register from Paper size (User reg. 1 - 4) and press [Change #].
6 Press [On] and press [+] or [-] to set the Y (Length) and X (Width) sizes.
With the metric models, you may enter the size directly using the numeric keys by pressing [#-Keys].
To specify a media type, press [Select Media Type]. Select the media type and press [Close].
7 Press [Close].
8 Press [Close].
9 Press [End]. The display returns to the [Basic] screen.
Setting Method
1 Press the System Menu/Counter key.
2 Press [MP Tray Setting].
3 Press [Others Standard] and press [Select size].
4 Select the paper size from Custom Size (Use regist).
5 Press [Close].
6 Press [Close]. The display returns to the [Basic] screen.
Specifying the Media Type for the MP Tray
To use a media type other than plain paper in the MP tray, specify the media type setting.
The following media types are available.
Plain, Transparency, Rough, Vellum, Labels, Recycled, Preprinted, Bond, Cardstock, Color (Colour), Prepunched, Letterhead, Thick paper, Envelope, High Quality, Custom 1 - 8
IMPORTANT If the optional fax kit is installed and you are using the MP tray to print received faxes (refer to Turning Manual Paper Feed ON/OFF (MP Tray setting) in Chapter 6 of the fax kit Operation Guide), the available media types are as shown below.
Plain, Rough, Recycled, Bond, Color (Colour), High Quality, Custom 1 - 8

Note Media type cannot be changed for MP tray paper size when a Custom size has been selected that has already set the media type.
1 Press the System Menu/Counter key.
2 Press [MP Tray Setting].
3 Press [Select Media Type].
4 Select the media type.
5 Press [Close].
6 Press [Close]. The display returns to the [Basic] screen.


Loading Originals
Follow the steps below to load originals for copying.
Loading Originals on the Platen
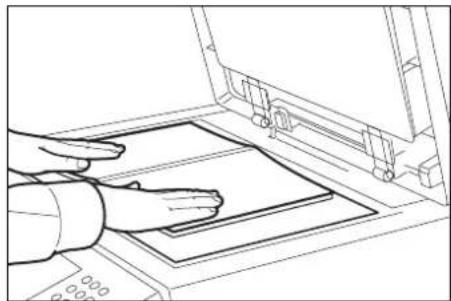
You may place books or magazines on the platen in addition to ordinary sheet originals.
1 Open the original cover.

natural_image
Line drawing of a printer with an open lid (no text or symbols)
Note Open the optional document processor instead if installed. Before opening the document processor, be sure that there are no originals left on the original table or on the original eject table. Left originals may fall off when the document processor is opened.
Keep the document processor open if the original is 40 mm or thicker.

natural_image
Line drawing of hands operating a printer with a paper sheet (no text or symbols)2 Place the original. Put the scanning side facedown and align it flush against the original size indicator plates with the back left corner as the reference point.
Original size indicator plates (Inch models)

(Metric models)
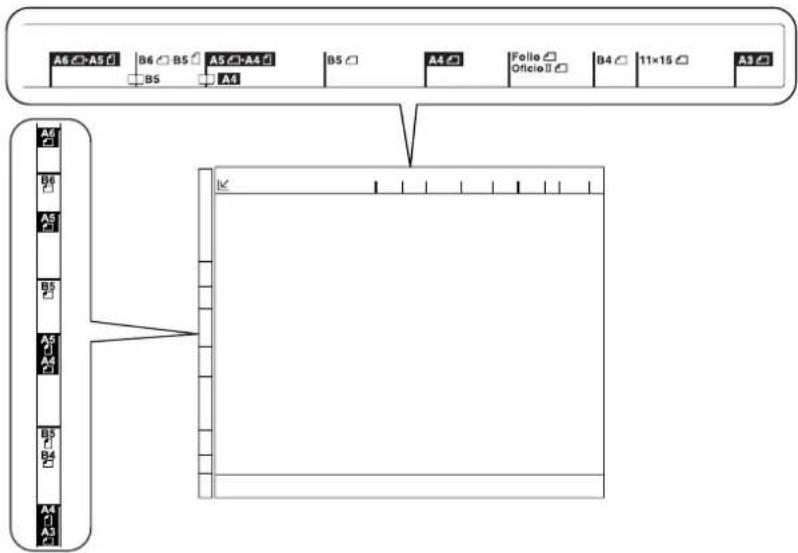
3 Close the original cover.
IMPORTANT Do not push the original cover forcefully when you close it. Excessive pressure may crack the platen glass.

Note Shadows may be produced around the edges and in the middle of open-faced originals.

CAUTION Do not leave the document processor open as there is a danger of personal injury.
Loading Originals in the Document Processor (option)
The optional document processor automatically scans each sheet of multiple originals. Both sides of two-sided originals are scanned.
Part Names of the Document Processor
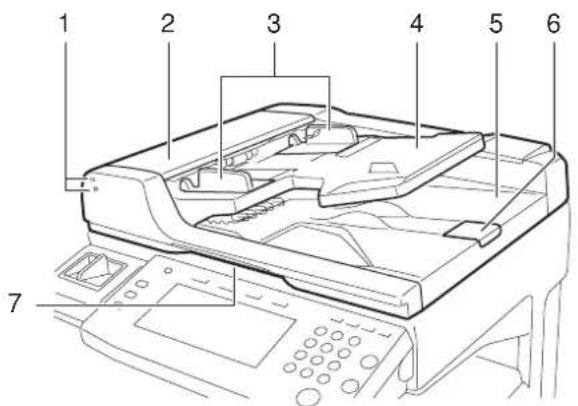
1 Original placement indicator
2 Top cover
3 Original width guides
4 Original table
5 Original eject table
6 Original stopper
7 Opening handle
Originals Supported by the Document Processor
The document processor supports the following types of originals.
| Item Specifications | |
| Weight 45 g/m2 to 1 | 60 g/m2 |
| Size | Maximum 11 × 17" to Minimum 5 1/2 × 8 1/2"Maximum A3 to Minimum A5R |
| Capacity Plain paper | (80 g/m2), Colored paper, Recycled paper: 75 sheets (Mixed sized originals: 30 sheets)Thick paper (120 g/m2): 49 sheetsThick paper (160 g/m2): 37 sheetsArt paper: 1 sheetHigh quality paper (110 g/m2): 54 sheets |
Originals Not Supported by the Document Processor
Do not use the document processor for the following types of originals.
- Soft originals such as vinyl sheets
• Transparencies such as OHP film - Carbon paper
• Originals with very slippery surfaces
• Originals with adhesive tape or glue - Wet originals
• Originals with correction fluid which is not dried - Irregularly shaped (non-rectangular) originals
• Originals with cut-out sections - Crumpled paper
- Originals with folds (Straighten the folds before loading. Failure to do so may cause the originals to jam).
- Originals bound with clips or staples (Remove the clips or staples and straighten curls, wrinkles or creases before loading. Failure to do so may cause the originals to jam).
How to Load Originals
IMPORTANT Before loading originals, be sure there are no originals left on the original eject table. Left originals may cause the new originals to jam.
1 Adjust the original width guides to the width of the originals.

natural_image
Line drawing of a printer with internal components and directional arrows indicating flow or movement (no text or symbols)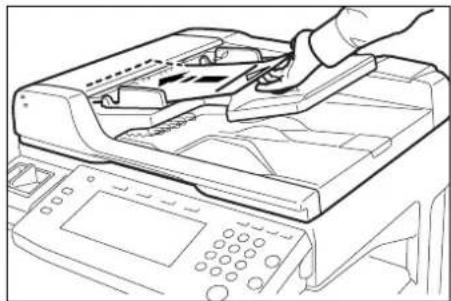
natural_image
Line drawing of a hand inserting a card into a printer (no text or symbols present)2 Place the originals. Put the side to be scanned (or the first side of two-sided originals) face-up. Slide the leading edge into the document processor as far as it will go. The original placement indicator will be lit.
IMPORTANT Confirm that the original width guides exactly fit the originals. If there is a gap, readjust the guides. The gap may cause the originals to jam.

natural_image
Line drawing of a printer or scanner device with internal components and a magnified inset showing a small object (no text or symbols)Ensure that loaded originals do not exceed the level indicator. If exceeded, originals may jam (see the figure).
Originals with punched holes or perforated lines should be placed such that the holes or perforations will be scanned last (not first).

natural_image
Technical line drawing of a mechanical component with a magnified circular detail (no text or symbols)Original placement indicator
The original placement indicator is lit depending on how originals are placed.
Indications and their status are as follows.
- Green (upper indicator) lit: Original is placed properly.
- Green (upper indicator) blinking: Original is not placed properly. Remove and place again.
- Red (lower indicator) blinking: Original is jammed. Remove the jammed original and place it properly.
Language
Select the language displayed on the touch panel.
The following languages are available.
| Model Type Language | |
| Inch models | English, French (Français), Spanish (Español), Japanese (Portuguese (Português) |
| Metric models | English, German (Deutsch), French (Français), Spanish (Español), Italian (Italiano), Russian (Русский) |


1 Press the System Menu/Counter key.
2Press [Language].
3Select the key for the language you would like to set. The touch panel display will change to that language.
3 Basic Operation
This chapter explains the following operations.
Basic Copying Procedures 3-2
Turning off the main power switch 3-3
Selecting Image Quality 3-4
Adjusting Density 3-5
Zoom 3-6
Auto Zoom 3-6
Manual Zoom.... 3-7
Preset Zoom 3-7
XY Zoom.... 3-8
Duplex Mode 3-10
One-sided to Two-sided.... 3-10
Two-sided to Two-sided.... 3-10
Book to Two-sided.... 3-10
Split Mode 3-13
Two-sided to One-sided.... 3-13
Book to One-sided.... 3-13
Collate Mode 3-15
Interrupt Copy 3-16
Low-Power Mode 3-17
Auto Low-Power Mode 3-17
Sleep Mode 3-17
Auto Sleep Mode 3-17
Basic Copying Procedures
Follow the steps as below for basic copying.

1 Open the main power switch cover and move the main power switch to on ( | position).
After warm-up is complete, the Start key's Start indicator will glow green.

natural_image
Line drawing of a hand pressing down on a flat sheet of paper into a printer holder (no text or symbols)2 Place the original.

Note Refer to Loading Originals on page 2-14 for original placement instructions.

3 Confirm that [APS] is selected. In this mode, paper that matches the size of the originals will be selected automatically. To change the paper size, press the desired paper size to select the paper source.
4 Use the numeric keys to enter the copy quantity. You can specify up to 999 copies.
natural_image
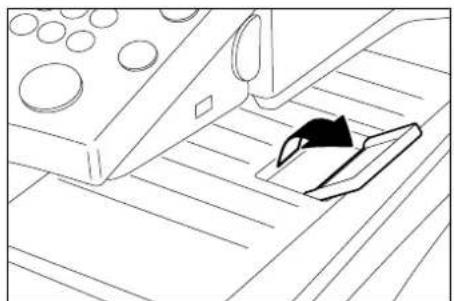
Line drawing of a mechanical component with circular holes and a triangular tool inserted into a slot (no text or symbols)
Note When copying onto 11 × 17" or A3 paper, open the output stopper.

5 Press the Start key.
natural_image
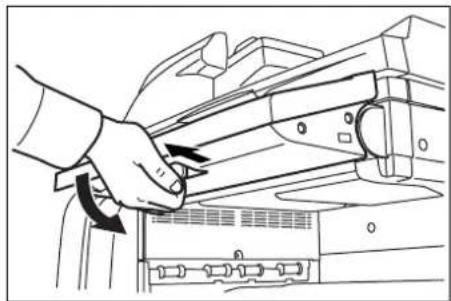
Line drawing of a hand operating a mechanical device with a scroll wheel (no text or symbols)
Note Adjust the angle of the operation panel by pulling the operation panel lower lever.

natural_image
Line drawing of a printer with a paper lid and control panel (no text or symbols)6 Remove the finished copies from the top tray.
The top tray can hold up to 250 sheets of standard paper (80 g/m ^2 ). However, the actual capacity varies depending on the type and condition of the paper.

Turning off the main power switch
Press the Power key on the operation panel, and after verifying the Power indicator has gone off, switch off the main power switch.
If the optional fax kit is installed, when the main power switch is off ( position), fax send/receive is disabled. To turn the power off, press the Power key on the operation panel.
Selecting Image Quality
Choose the image quality suited to the type of original.
| Image Quality Description | |
| Text+Photo Appropriate for mixed text and photo originals. | |
| Photo Appropriate for photo originals. | |
| Text Appropriate for document originals with large amounts of text. |

1 Place the original.
2 Press [Function].
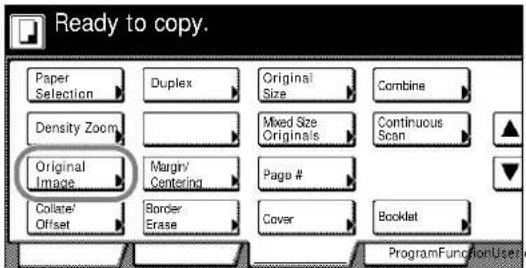
3 Press [Original Image].
4 Select the image quality.


5 Press the Start key. Copying begins.
Adjusting Density
Adjust the density automatically or manually. The default setting is [Manual]. Follow the steps as below for Manual mode.
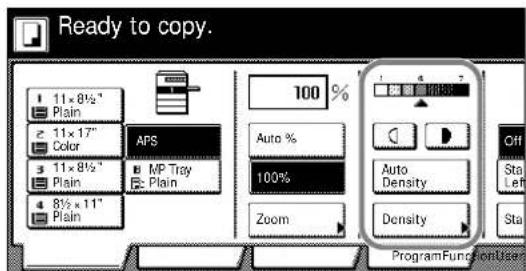
1 Place the original.
2 Press the density adjustment key (/) to adjust the density.
Press [Auto Density] to use Auto Density. The machine determines a suitable density for copying. To change the density from [Auto] to [Manual], press the density adjustment key (☐).

3 Press the Start key. Copying begins.
Note Press [Density] to display the Density screen. You can also adjust the density from this screen.
Zoom
Adjust the magnification to reduce or enlarge the original image.
The following zoom modes are available.
- Auto Zoom – Automatically reduces or enlarges the original image suited to the selected paper size.
- Manual Zoom – Reduces or enlarges the original image in 1 % increments between 25 - 400 %.
- Preset Zoom – Reduces or enlarges at preset magnifications.
- XY Zoom – Independently adjust vertical and horizontal magnifications. Set zoom size in 1 % increments between 25 - 400 %.
Auto Zoom
Automatically reduces or enlarges the original image suited to the selected paper size.
Follow the steps below to use auto zoom.
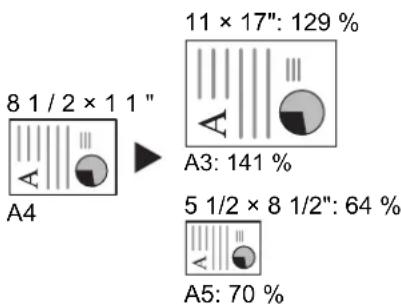


1 Place the original and select paper size.
2 Press [Auto %]. The magnification will be displayed.
3 Press the Start key. The image will be automatically reduced or enlarged for copying onto the selected paper.
25%


Manual Zoom
Reduces or enlarges the original image in 1 % increments between 25 - 400 %.
Follow the steps as below to use manual zoom.
1 Place the original and press [Zoom].
2 Press [+] and [-] to set the displayed magnification. Press [# keys] ([#-Keys]) to enter with numeric keys.
3 Press the Start key. Copying begins.
Preset Zoom
Reduces or enlarges at preset zoom levels.
| Model Type Zoom Level | |
| Inch models | 200 % (5 1/2 × 8 1/2"→11 × 17")154 % (5 1/2 × 8 1/2"→8 1/2 × 14")129 % (8 1/2 × 11"→11 × 17")121 % (8 1/2 × 14"→11 × 17")78 % (8 1/2 × 14"→8 1/2 × 11")77 % (11 × 17"→8 1/2 × 14")64 % (11 × 17"→8 1/2 × 11")50 % (11 × 17"→5 1/2 × 8 1/2") |
| Metric models | 200 % (A5→A3)141 % (A4→A3, A5→A4)127 % (Folio→A3)106 % (11 × 15"→A3)90 % (Folio→A4)75 % (11 × 15"→A4)70 % (A3→A4, A4→A5) |


| Model Type Zoom Level | |
| Metric models (Asia Pacific) | 200 % (A5→A3)141 % (A4→A3, B5→B4)122 % (A4→B4, A5→B5)115 % (B4→A3, B5→A4)86 % (A3→B4, A4→B5)81 % (B4→A4, B5→A5)70 % (A3→A4, B4→B5) |
Follow the steps as below to use preset zoom.

1 Place the original and press [Zoom].

2 Select the zoom level.

Note You can also adjust the magnification in 1 % increments as desired by pressing [+] and [-] .

3 Press the Start key. Copying begins.

XY Zoom
Select vertical and horizontal magnifications individually. Set zoom level in 1 % increments between 25 - 400 %.
Follow the steps as below to use XY zoom.
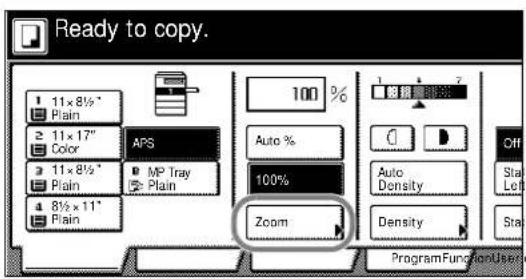
1 Place the original and press [Zoom].
2 Press [XY Zoom].

3 Press [+] and [-] to set the X and Y zoom ratios. Press [# keys] ([#-Keys]) to enter with numeric keys.

4 Under Select Original Orientation, select [Top Edge Top] or [Top Edge Left].

5 Press the Start key. Copying begins.

Original Copy

Duplex Mode
Use Duplex mode to create two-sided copies from a variety of originals, including facing pages (such as books or magazines) and two-sided originals.
One-sided to Two-sided
Produces two-sided copies from one-sided originals. The back side of the last copied page will be blank for originals with an odd number of pages.
The following binding options are available.
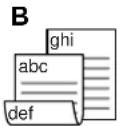
- Original Left/Right Bind to Finish Left/Right Bind: Back side is copied with same orientation as front side. ...A
- Original Left/Right Bind to Finish Top Bind: Images are copied onto the back side rotated 180^ . Pages of the copied document are in the same orientation if pages are flipped upward. ...B


Original Copy
Two-sided to Two-sided

Original Copy

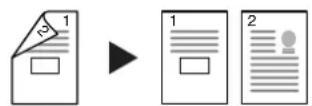
Produces two-sided copies from two-sided originals.

Note This operation requires the optional document processor.
Supported paper sizes for Two-sided to Two-sided operation are: 11 × 17" , 8 1/2 × 14" , 11 × 8 1/2" , 8 1/2 × 11" , 5 1/2 × 8 1/2" , 8 1/2 × 13" (Oficio II), 8 1/2 × 13 1/2" , A3, B4, A4, A4R, B5, B5R, A5R and Folio.
Book to Two-sided
Produces two-sided copies from originals such as books and magazines with facing pages.

Original Copy

Note Supported paper sizes for Book to Two-Sided operation are limited to: 11 × 17", 8 1/2 × 11", A3, B4, A4R, B5R, A5R, and 8K.
Follow the steps as below to use duplex copying.

1 Press [Function].

2 Press [Duplex].

3 Select the desired Duplex mode.

4 For [2 sided → 2 sided] ([2-sided → 2-sided]) or [Book → 2 sided] ([Book → 2-sided]), select the bind direction for Original.

For [1 sided → 2 sided] ([1-sided → 2-sided]) or [2 sided → 2 sided] ([2-sided → 2-sided]), select the bind direction for Finishing.

For [Book → 2 sided] ([Book → 2-sided]), set the copy page order for Finishing.
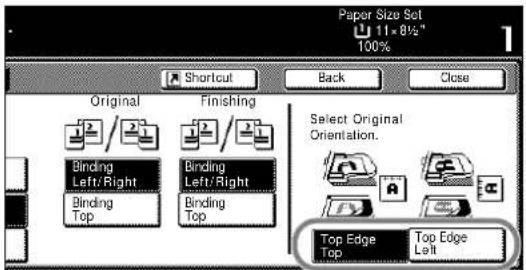

For [1 sided → 2 sided] ([1-sided → 2-sided]) or [2 sided → 2 sided] ([2-sided → 2-sided]), set [Top Edge Top] or [Top Edge Left] from Select Original Orientation.
5 Place the original and press the Start key.
If the original has been placed on the optional document processor, copying begins automatically.
If the original is placed on the platen, Scan next original(s) is displayed. Place the next original page and press the Start key.
If all original pages have been scanned, press [Scanning finished]. Copying begins.
Original Copy
Split Mode
Use Split mode to create single-sided copies from two-sided originals or originals with facing pages (such as books or magazines) as follows.
Two-sided to One-sided
Copies each side of a two-sided original onto two individual sheets.

Note This operation requires the optional document processor.
The following binding options are available.
- Binding Left/Right: The back side and front side of the original are copied with the same orientation.
- Binding Top: The back side is copied rotated 180^ from the orientation of the front side.
Book to One-sided
Copies each page of originals with facing pages (such as books or magazines) onto two individual sheets.
The following binding options are available.
- Binding Left: Originals with facing pages are copied from left to right.
- Binding Right: Originals with facing pages are copied from right to left.

Note Original sizes for split mode copy mode are limited to 11 × 17" , 812 × 11" , A3, B4, A4R, B5R and 8K. Paper sizes are limited to 11 × 812" , A4, B5 and 16K. Change the paper size to fit the original to that size.
Follow the steps as below to use Split mode.

1 Press [Function].

2 Press [Duplex].

3 Select the desired Split mode.

4 Specify the binding in the Original section.

5 When [2 sided → 1 sided] ([2-sided → 1-sided]) is selected, select [Top Edge Top] or [Top Edge Left] for Select Original Orientation.

6 Place the original and press the Start key.
If the original has been placed on the optional document processor, copying begins automatically.
If the original is placed on the platen, Scan next original(s) is displayed. Place the next original page and press the Start key.
If all original pages have been scanned, press [Scanning finished]. Copying begins.
flowchart
graph TD
    A["Document 1"] --> B["Document 2"]
    B --> C["Document 3"]
    C --> D["Output"]
    style A fill:#f9f,stroke:#333
    style D fill:#bbf,stroke:#333
Original Copy
Collate Mode
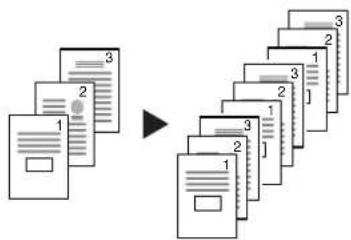
Scans multiple originals to deliver complete sets of copies as required according to page number.
Follow the steps as below to use Collate mode.

1 Press [Function].
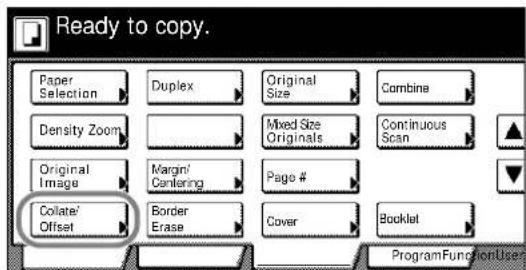
2 Press [Collate/Offset].

3 Press [Collate: On].
4 Use the numeric keys to enter the copy quantity.

5 Place the original and press the Start key.
If the original has been placed on the optional document processor, copying begins automatically.
If the original is placed on the platen, Scan next original(s) is displayed. Place the next original page and press the Start key.
If all original pages have been scanned, press [Scanning finished]. Copying begins.
Complete sets of copies will be delivered on the top tray.

flowchart
graph TD
    A["1: Document"] --> B["2: Document"]
    B --> C["3: Document"]
    C --> D["A: Leaf Image"]
    D --> E["4: Final Output"]
Interrupt Copy
Interrupt copying is useful to pause one copy job and copy other originals with different copy settings. After completing the urgent job, you can resume the interrupted jobs according to their original settings. You can also pause copy jobs that are being printed when you need to make urgent copies.
Follow the steps as below to use interrupt copying.

natural_image
Line drawing of hands operating a printer with a paper sheet (no text or symbols)
1 Press the Interrupt key.
Interrupt Mode OK will be displayed.
2 Temporarily remove and set aside the original pages of the current job.
3 Place the original for the interrupt job.
4 Specify the copy settings for the interrupt job and press the Start key.
5 After the interrupt job is completed, remove the originals and press the Interrupt key.
The previous settings will be restored. If there was a job being printed, it will be resumed.
6 Replace the interrupted original and press the Start key to restart the job.
Low-Power Mode

To activate Low-Power mode, press the Energy Saver key.
On the operation panel, only the Energy Saver, Power, and main power indicators will remain lit.
To resume copying, perform one of the following actions. The machine returns to a copy-ready condition.
- Press any key on the operation panel.
- Open the original cover or the optional document processor.
- Place originals in the optional document processor.
The machine will resume copy functionality in 10 seconds.
If you are using the optional printer function or fax function and print data or a fax arrives while the machine is in Low-Power mode, the machine automatically wakes up and starts printing.
Auto Low-Power Mode
In Auto Low-Power mode, the machine automatically switches to Low-Power mode if left idle for a preset period. The default period for Auto Low-Power mode is 1 minute.
Sleep Mode

To activate Sleep mode, press the Power key.
On the operation panel, only the Main Power indicator will remain lit. The machine will use much less power than Low-Power mode.
To resume copying, press the Power key again. The machine will resume copy functionality in 15 seconds.
If you are using the optional printer function or fax function and print data or a fax arrives while the machine is in Sleep mode, the machine automatically starts printing without illuminating the operation panel.
Auto Sleep Mode
In Auto Sleep mode, the machine automatically switches to Sleep mode if left idle for a preset period. The default period for Auto Sleep mode is 9 minutes.
4 Optional Equipment
This chapter introduces the optional equipment available for the machine.
Overview of Optional Equipment 4-2
Document Processor 4-3
Paper Feeder 4-3
Built-in Finisher 4-3
Adding Staples.... 4-4
Clearing Staple Jams.... 4-5
Document Finisher 4-6
Job Separator 4-6
Key Counter 4-7
Inserting the Key Counter...... 4-7
Printer Kit 4-7
Fax Kit 4-8
Overview of Optional Equipment
The following optional equipment is available for the machine.

flowchart
graph TD
    A["Document Finisher"] --> B["Printer Kit"]
    C["Document Processor"] --> B
    D["Key Counter"] --> B
    E["Job Separator"] --> B
    F["Paper Feeder Fax Kit"] --> B
    G["Paper Feeder Fax Kit Built-in Finisher"] --> B
Document Processor
natural_image
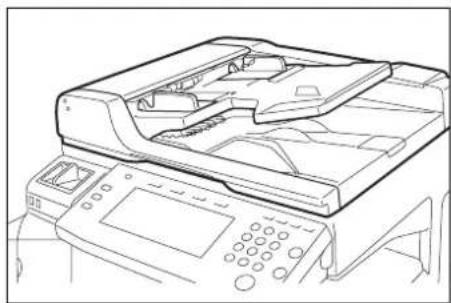
Line drawing of a printer with paper feed and control panel (no text or symbols)Automatically scans originals. Also you can perform duplex copying and split copying. For document processor operation, refer to Loading Originals in the Document Processor (option) on page 2-15.
Paper Feeder

natural_image
Technical line drawing of a mechanical housing or enclosure with internal compartments and mounting holes (no text or symbols)Two additional cassettes identical to the machine's double cassettes can be installed in the machine. Paper capacity and loading method are the same as Cassettes 1 and 2. Refer to Loading Paper into Cassette 1, 2 on page 2-2.

Note Left cover 3 is located on the left side of the paper feeder for use in clearing paper jams.
Built-in Finisher
The built-in finisher holds a large quantity of finished prints. The finisher offers a convenient means of sorting. Sorted finished prints may also be stapled.

1 Ejected paper guide extension
2 Ejected paper guide 1
3 Ejected paper guide 2
4 Finisher tray
5 Process table
6 Finisher tray extension
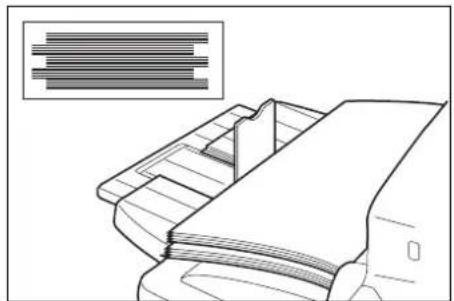
natural_image
Technical line drawing of a mechanical component with layered structure (no text or symbols)
Note Sorted copies are delivered onto the finisher tray.

natural_image
Technical line drawing of a mechanical component with an arrow indicating direction (no text or symbols)Adjust the ejected paper guide extension to the size of the paper.

The paper sizes are marked on the ejected paper guide extension. Open ejected paper guides 1 and 2 as necessary to accommodate the size of the paper.

natural_image
Line drawing of a mechanical component with a lever and base plate (no text or symbols)When stapling 11 × 17" , 8 1/2 × 14" , A3 or B4 paper, open the finisher tray extension to ensure that the paper does not fall out of the tray.
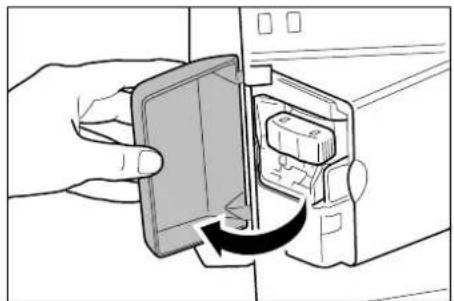
natural_image
Illustration of a hand inserting a card into a device with an arrow indicating rotation (no text or symbols present)Adding Staples
1 Open the front cover of the stapler.

natural_image
Hand inserting a small electronic component into a device (no text or symbols visible)2 Pull out the staple holder.

natural_image
Illustration of hands using a tool to adjust or install a mechanical component (no text or symbols visible)3 Remove the empty staple case from the staple holder.

natural_image
Illustration of a hand using a mechanical tool to adjust a component, with an inset showing a close-up of the component (no text or symbols present)4 Holding the staple holder in your left hand, insert a new staple case with your right hand in the direction of the arrow.
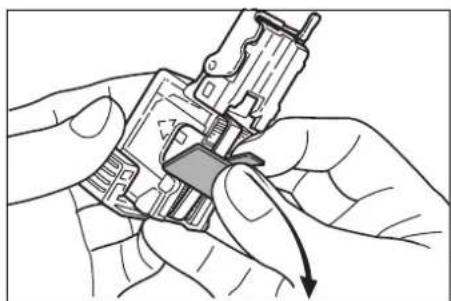
natural_image
Illustration of hands using a mechanical tool to adjust or install a component (no text or symbols visible)5 Insert the staple case as far as it will go. Pull of the paper tape wound around the staple case.
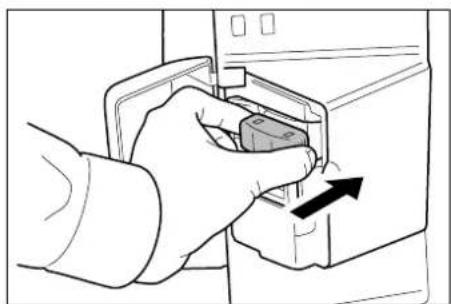
natural_image
Hand inserting a small electronic component into a device (no text or symbols visible)6 Reinsert the staple holder into the slot of the staple unit. The staple holder clicks locked when fully inserted.
Clearing Staple Jams
1 Pull out the staple holder referring to steps 1 and 2 of Adding Staples.

2 Lift the face plate up by tab A.

natural_image
Illustration of hands holding a small electronic component with a curved arrow indicating rotation (no text or symbols)3 Remove the jammed staple from the end of the cartridge (staple-loaded side).

natural_image
Illustration of hands holding a mechanical component with a curved arrow indicating rotation (no text or symbols)4 Lower the face plate back.
5 Insert the face plate back in place. The face plate clicks locked when fully inserted.
6 Lift the staple unit slightly, then lower it and insert it again into its place.
7 Close the stapler front cover.
Document Finisher

natural_image
Line drawing of a desktop computer with monitor, tower, and base (no text or symbols)The document finisher holds a large quantity of finished copies. The finisher offers a convenient means of sorting. Sorted finished copies may also be stapled. For further details, refer to the Document Finisher Operation Guide.

natural_image
Diagram of a printer's internal structure with a circular icon showing a printer symbol (no text or labels present)Job Separator
Separate paper according to output tray for easier sorting. Specify as the output tray for copy or print jobs. You can also specify the default mode output destination used for copies and received faxes.
There is a paper indicator in the front of the machine that shows whether there is paper in the job separator.
IMPORTANT Note that some media types have a tendency to curl and may jam in the paper eject unit.
If the ejected paper slips or stacks unevenly, turn the paper in the cassette over and try again.

natural_image
Illustration of a hand using a tool to press or install a sheet, with a downward arrow indicating compression (no text or symbols present)
Note To ensure that paper is delivered to the job separator, select the output destination or change the default setting. (For details, refer to Chapter 1 Selecting Output Destination and Chapter 3 Machine Default in the Advanced Operation Guide.)
When removing paper from the job separator, pull it out at an angle to avoid catching the corners of the paper.
Key Counter
natural_image
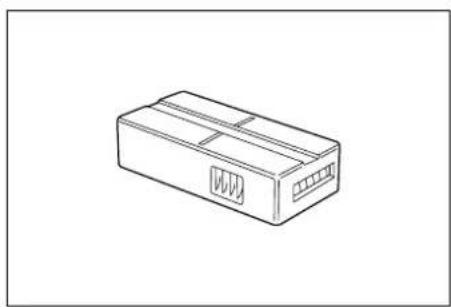
Line drawing of a rectangular electronic component with slots and ports (no text or symbols)Use the key counter to monitor machine usage. The key counter offers a convenient solution for centralized management of copy volume for different departments in a large company.

natural_image
Illustration of a hand pressing a button into a device (no text or symbols visible)Inserting the Key Counter
Insert the key counter securely into the key counter slot.

Note When the key counter function is activated, copies can only be made when a key counter is inserted into the machine. If the key counter is not inserted securely, Insert key counter will be displayed.
natural_image
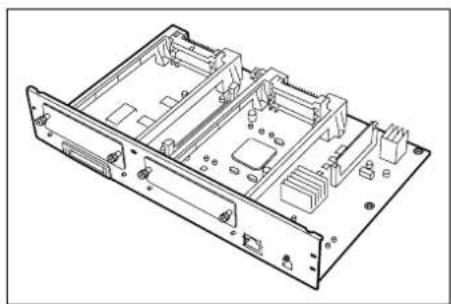
Technical line drawing of an electronic device chassis with internal components (no text or symbols)Printer Kit
Install the printer kit to use the machine as a printer as well. For further details, refer to the Printer Kit Operation Guide.
Fax Kit

natural_image
Technical line drawing of an electronic device chassis with visible components and wiring (no text or symbols)Install the fax kit to use the machine as a fax as well. For further details, refer to the Fax Kit Operation Guide.
5 Maintenance
This chapter describes cleaning and toner replacement.
Cleaning 5-2
Original Cover, Document Processor and Platen 5-2
Slit Glass 5-2
Separator.... 5-3
Transfer Roller.... 5-4
Main Charger.... 5-5
Toner Container and Waste Toner Box Replacement 5-7
Cleaning
Clean the machine regularly to ensure optimum copy quality.

CAUTION For safety, always unplug the power cord before cleaning the machine.
Original Cover, Document Processor and Platen
Wipe the rear side of the optional document processor or original cover and the platen with a soft cloth dampened with alcohol or diluted mild detergent.
IMPORTANT Do not use thinner or other organic solvents.

natural_image
Line drawing of a hand cleaning a whiteboard on a metal frame (no text or symbols)Original Cover (Document Processor)

natural_image
Line drawing of a hand cleaning or polishing a machine window with a cloth (no text or symbols)Platen
![Clean the slit glass for original fed from DP. 1.Open the document processor. 2.Clean the surface of the slit glass located on the left side and the reading guide on the document processor with the supplied dry cloth. 3.Close the document processor. 4.Press [END]. If the slit glass is dirty, black line will appear on the copy.](/content/2026/05/764886/images/6967a9112bba6810cc95a54b6b7004423a07e511aea5c7a30cb045b01cb26673.jpg)
Slit Glass
If black streaks or other soiling appears in copies when the optional document processor is used, clean the slit glass and white guide with the cleaning cloth provided. The message: Clean the slit glass for original fed from DP (Clean the slit glass for original fed) may be displayed if the slit glass requires cleaning. After cleaning, press [End].
IMPORTANT Lightly wipe the slit glass and white guide with a dry cloth. To remove adhesive material or ink, apply alcohol to a cloth and wipe lightly. Do not use water, thinner, or organic solvents.

1 Remove the cloth from the cleaning cloth compartment.
2 Open the document processor and wipe slit glass A.

3 Wipe white guide B in the document processor.
4 Press [End].
Separator
To maintain the best possible print quality, clean the machine as described below on a regular basis (once a month).

natural_image
Illustration of a hand inserting a card into a device (no text or symbols visible)1 Open the front cover.

natural_image
Technical line drawing of a computer motherboard with no visible text or symbols2 Remove cleaning brush (blue colored).
natural_image
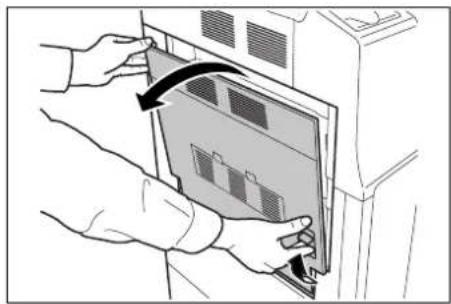
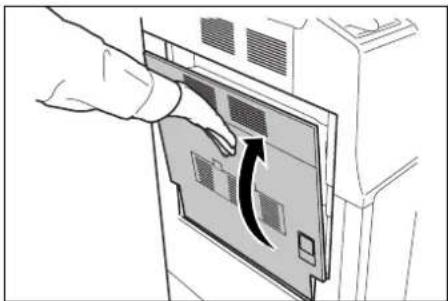
Illustration of hands inserting a device into a control panel (no text or symbols visible)3 Pull up left cover 1 lever and open left cover 1.
natural_image
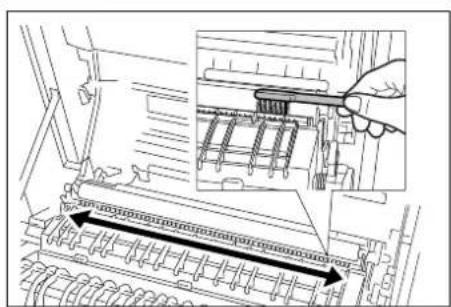
Technical diagram showing a mechanical assembly with a hand adjusting a component, no visible text or symbols4 Run the brush from side to side along the separator as shown to remove any soiling.
natural_image
Hand inserting a device into a control panel with an arrow indicating rotation (no text or symbols)5 Replace the cleaning brush and close the front cover and left cover 1.
IMPORTANT Push in the position indicated to ensure that left cover 1 is securely closed.
Transfer Roller
To maintain the best possible print quality, clean the machine as described below on a regular basis (once a month).

natural_image
Illustration of a hand inserting a file into a folder (no text or symbols visible)1 Open the front cover.

natural_image
Technical line drawing of a computer motherboard with no visible text or symbols2 Remove cleaning brush (blue colored).

natural_image
Person inserting a device into a control panel (no text or symbols visible)3 Pull up left cover 1 lever and open left cover 1.
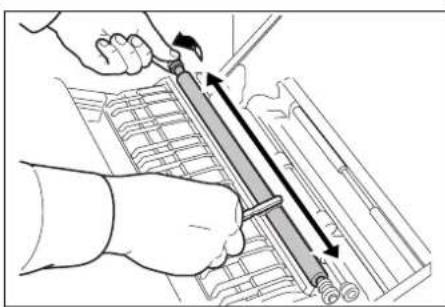
natural_image
Illustration of hands using a tool to adjust or install a mechanical component, with no visible text or symbols.4 Run the brush from side to side along the transfer roller as shown, rotating by the gear at the end, to remove any soiling.

natural_image
Hand inserting a device into a control panel with an arrow indicating rotation (no text or symbols)5Replace the cleaning brush and close the front cover and left cover 1.
IMPORTANT Push in the position indicated to ensure that left cover 1 is securely closed.
Main Charger
If black or white vertical streaks appear on copies, clean the main charger.
1 Open the front cover.

natural_image
Illustration of a hand inserting a card into a folder (no text or symbols visible)
natural_image
Mechanical assembly diagram showing a hand operating a component with arrows indicating motion (no text or symbols present)2Remove the waste toner box.
3 Clean the main charger as described in steps 6 to 11 in Toner Container and Waste Toner Box Replacement on page 5-7.

natural_image
Hand holding a mechanical component with an arrow indicating upward motion (no text or symbols visible)4 Install the waste toner box and close the front cover.
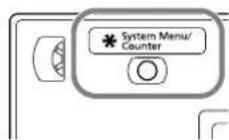
5 Press the System Menu/Counter key.

6 Press [User Adjustment].
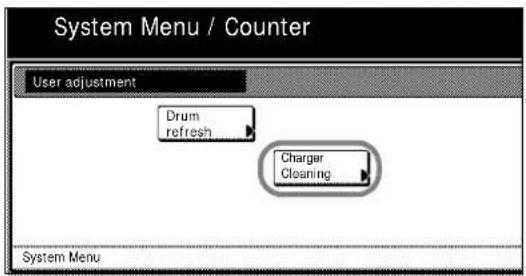
7 Press [Charger Cleaning].
![in charger. 1.Open the front cover and then remove the waste toner box. 2.Clean the main charger. 3.After cleaning, install the waste toner box. Close the front cover and press [End]. The machine executes adjustment for 5 min. See the leaflet supplied with the toner container or Operation Guide for cleaning. End](/content/2026/05/764886/images/7cbab03d9143f6e62b1299f5a07a90279666cb6c3327231dd2efff11763152eb.jpg)
8 Press [End]. Adjustment begins. Wait 5 minutes.
Toner Container and Waste Toner Box Replacement
When the touch panel displays Add toner, replace the toner without delay even if several more copies are still possible. When replacing the toner container, replace the waste toner box as well.
Each time you replace the toner container, be sure to clean the parts as instructed below. Dirty parts may deteriorate output quality.

CAUTION Do not attempt to incinerate the toner container or the waste toner box. Dangerous sparks may cause burns.

CAUTION Do not attempt to force open or destroy the toner container or the waste toner box.
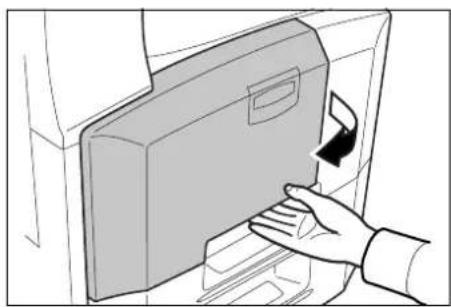
natural_image
Illustration of a hand inserting a card into a folder (no text or symbols visible)1 Open the front cover.

WARNING High voltage is present in the charger section. Take sufficient care when working in this area, as there is a danger of electrical shock.
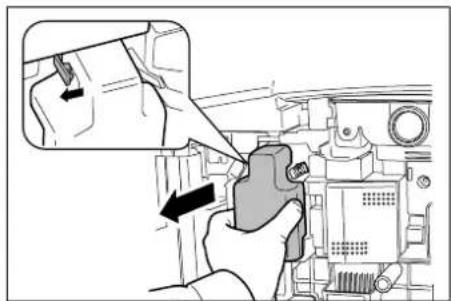
natural_image
Mechanical assembly diagram showing a hand operating a component with arrows indicating motion (no text or symbols present)2Remove the waste toner box.

natural_image
Illustration of two hands holding a small object with directional arrows indicating movement (no text or symbols)3 Peel the sticker off the waste toner box and remove the cap.

natural_image
Illustration of two hands holding a small device with a knob, connected by a scroll (no text or symbols present)4 Fit the cap into the opening in the waste toner box and attach the sticker over the cap.
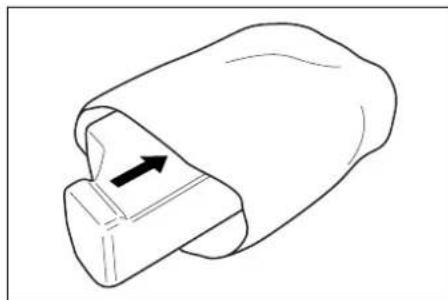
natural_image
Simple line drawing of a mechanical component with an arrow indicating direction (no text or symbols)5 Place the used waste toner box in the provided plastic disposal bag.

CAUTION Do not attempt to incinerate the toner container or the waste toner box. Dangerous sparks may cause burns.

CAUTION Do not attempt to force open or destroy the toner container or the waste toner box.
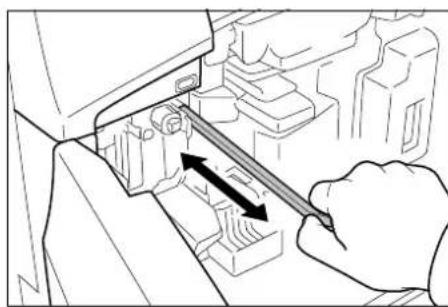
natural_image
Line drawing of a hand using a tool to adjust or install electronic components (no text or symbols visible)6 Pull the cleaner rod out slowly as far as it will go, and then push it back in.
Repeat 2 or 3 times.
IMPORTANT Do not pull strongly on the rod or pull it out completely.

natural_image
Line drawing of a hand inserting a screwdriver into a mechanical component (no text or symbols)7 Hold the main charger to the right and pull out about 5 cm.

flowchart
graph TD
    A["Rectangular Box"] --> B["Device with Box"]
    B --> C["Arrow Up"]
    C --> D["Arrow Down"]
8 Take the grid cleaner provided out of its bag and remove the cap.

natural_image
Mechanical assembly diagram showing a belt switch inserted into a housing component (no text or labels)9 Align the grid cleaner with the notch and attach it to the machine.

10 While gently holding the grid cleaner in place with your left hand, pull the main charger out fully and then push it back to a position where the roller A does not quite reach the white pad on the grid cleaner. Repeat 2 or 3 times.
IMPORTANT When pushing the main charger back in, take care not to push it all the way in. This could result in damage to copies.

natural_image
Mechanical assembly diagram showing a hand operating a component with an inset close-up of a mechanical component (no text or symbols visible)1.1 With the main charger pulled out about 5 cm (2 inches), remove the grid cleaner. Then push the main charger back in fully, applying pressure in the direction shown by the arrow so that the main charger is in its designated position.
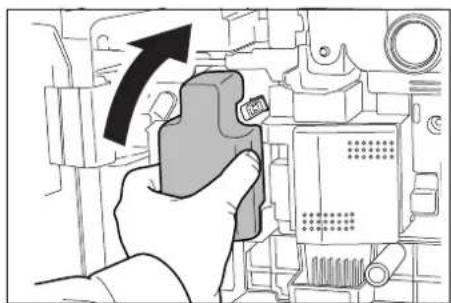
natural_image
Hand holding a device with an arrow pointing to it, inspecting internal components (no text or symbols visible)12 Install a new waste toner box.
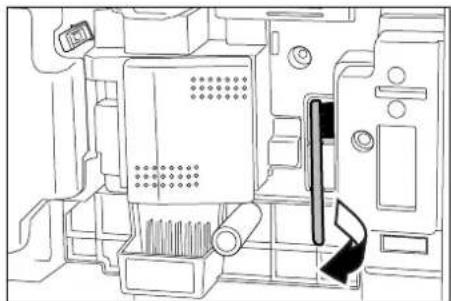
natural_image
Technical line drawing of a mechanical assembly with no visible text or symbols13 Remove cleaning brush (blue colored).
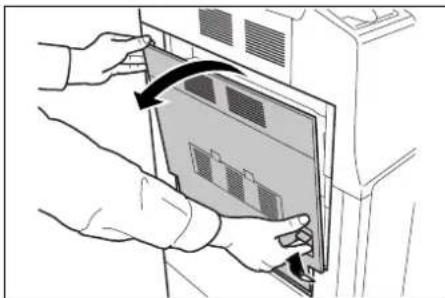
natural_image
Person inserting a device into a control panel (no text or symbols visible)14 Pull up left cover 1 lever and open left cover 1.
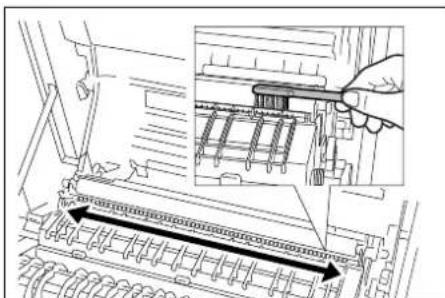
natural_image
Technical diagram showing a mechanical assembly with an inset view of a component being inserted (no text or symbols present)15Run the brush from side to side along the separator as shown to remove any soiling.

natural_image
Illustration of a hand using a tool to adjust or install a mechanical component, with no visible text or symbols.16Run the brush from side to side along the transfer roller as shown, rotating by the gear at the end, to remove any soiling.

natural_image
Hand inserting a device into a computer monitor (no text or symbols visible)17 After cleaning, replace the cleaning brush and close left cover 1.
IMPORTANT Push in the position indicated to ensure that left cover 1 is securely closed.

natural_image
Diagram showing a hand operating a device with an inset close-up of a component (no text or symbols visible)18 Push the toner container stopper to the right and pull out the old toner container.
IMPORTANT Do not pull the toner container out completely as it could drop onto the floor.
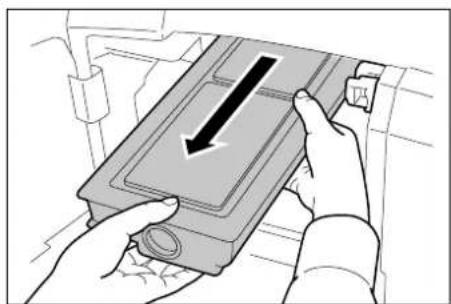
natural_image
Illustration of hands installing a component with a black arrow indicating direction (no text or symbols present)19Hold the toner container in both hands and remove slowly.

natural_image
Simple line drawing of a cylindrical device with a rectangular housing and an arrow indicating direction (no text or symbols)20 Place the used toner container in the provided plastic disposal bag.

21 Hold the new toner container upright and tap the top of the container 5 or more times.
Then turn the container the other way up and again tap the top of the container 5 or more times.
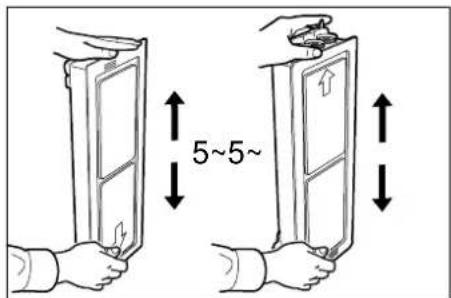
22 Then shake the toner container up and down 5 or more times.
Again turn the container the other way up and shake it another 5 or more times.
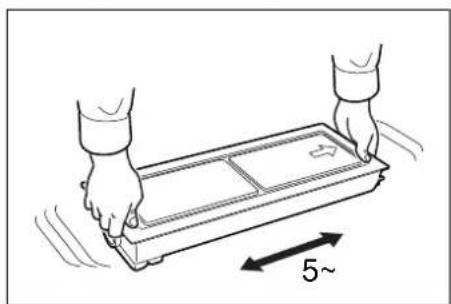
natural_image
Illustration of two hands holding a tray with a 5~ height dimension arrow (no text or symbols)23 Shake the toner container from side to side 5 or more times so that the toner inside the container is distributed evenly.
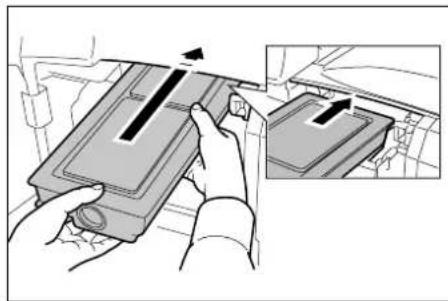
natural_image
Illustration of hands installing or adjusting a device component with an inset view (no text or symbols)24Hold the new toner container in both hands and gently push it into the machine.

natural_image
Illustration of hands installing or adjusting a device component with an arrow indicating direction (no text or symbols present)25 Using both hands, push the toner container in until it locks.

natural_image
Line drawing of a hand inserting a device into a door panel (no text or symbols)26Open the MP tray.
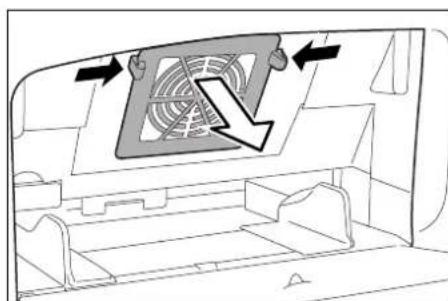
natural_image
Diagram of a car interior showing airflow or ventilation system with arrows indicating direction (no text or symbols)27Remove the filter.

natural_image
Diagram of a mechanical component with internal blades and a tool interacting with it (no text or symbols)28 Remove dust from the filter using a vacuum cleaner or dry cloth. IMPORTANT Do not wash the filter with water. Do not use the attached cleaning brush.
29Put the filter back in place and close the MP tray.
30Close the front cover.
31 When Replaced the toner container? appears, press [Yes].
32 When Cleaned the main charger? appears, press [Yes].
33 Adjustment begins. Wait 5 minutes.
After use, always dispose of the toner container and the waste toner box in accordance with Federal, State and Local rules and regulations.
6 Troubleshooting
This chapter explains how to solve problems with the machine.
Solving Malfunctions 6-2
Responding to Error Messages 6-4
Clearing Paper Jams 6-8
Jam Location Indicators.... 6-8
Paper Jam Precautions 6-9
Cassette 1 6-9
Cassette 2 6-10
Optional Cassettes 3 and 4 ....6-11
MP Tray 6-12
Inside the Left Covers 1, 2 and 3.... 6-12
Duplex Unit 6-13
Duplex Unit and Cassette 1....6-13
Paper Feed Unit 6-14
Optional Built-in Finisher 6-16
Optional Document Processor.... 6-18
Optional Document Finisher 6-19
Optional Job Separator.... 6-19
Solving Malfunctions
The table below provides general guidelines for problem solving.
If a problem occurs with your machine, check the checkpoints and perform procedures indicated on the following pages. If the problem persists, contact your Service Representative.
| Symptom Checkpoints Corrective Actions | Reference Page | ||
| The operation panel does not respond when the machine is turned on ( | position). | Is the machine plugged in? Plug the power cord into an AC outlet. — | ||
| Pressing the Start key does not produce copies. | Is a message displayed on the touch panel? | Determine the appropriate response to the message and take action accordingly. | page 6-4 |
| The original size is not detected properly. | Are the originals loaded correctly? When placing originals on the platen, place them face-down and align them with the original size indicator plates. | page 2-14 | |
| Place originals face-up in the optional document processor. | |||
| Is the machine installed beneath fluorescent lights? | Do not install this machine beneath fluorescent lights. | — | |
| Blank sheets are output. Are the originals loaded correctly? When placing originals on the platen, place them face-down and align them with the original size indicator plates. | page 2-14 | ||
| Place originals face-up in the optional document processor. | |||
| Do not install this machine beneath fluorescent lights. | |||
| Copies are too light. Is the machine set to Manual Density? Use the density adjustment key to set the correct density. | page 3-5 | ||
| Copies are too dark. Is the machine set to Manual Density? Use the density adjustment key to set the correct density. | page 3-5 | ||
| Copies have a moire pattern (dots grouped together in patterns and not aligned uniformly). | Is the original a printed photograph? | Set the original image to [Photo]. | page 3-4 |
| Copies are not clear. Did you choose appropriate image quality for the original? | Select an appropriate original image mode. | page 3-4 | |
| Is the paper damp? Replace the paper with new paper. page 2-2 | |||
| Copies are dirty. Are the original cover or platen dirty? | Clean the original cover or platen glass. | page 5-2 | |
| Copies are fuzzy. Is the paper damp? | Replace the paper with new paper. | page 2-2 | |
| Symptom | Checkpoints | Corrective Actions | Reference Page | |
| Copies are skewed. Are the originals loaded correctly? When placing originals on the platen, place them face-down and flush against the original size indicator plates. | page 2-14 | |||
| When placing originals in the document processor, align the original width guides securely before placing the originals. | page 2-15 | |||
| Is the paper loaded correctly? Check the position of the paper width guides. | page 2-2 | |||
| Paper jams frequently occur. | Is the paper loaded correctly? | Load the paper correctly. | page 2-2 | |
| Is the paper of the supported type? Is it in good condition? | Remove the paper from the cassette, turn it over, and reload it. | page 2-2 | ||
| Is the paper curled, folded, or wrinkled? | Replace the paper with new paper. page 2-2 | 2-2 | ||
| Are there any loose scraps or jammed paper in the machine? | Remove any jammed paper. page 6-8 | |||
| Is the paper damp? Replace the paper with new paper. page 2-2 | ||||
| Copies from the optional document processor have black lines. | Is the slit glass dirty? Clean the slit glass. page 5-2 | |||
| Copies are wrinkled. | Is the separator dirty? | Clean the separator. | page 5-3 | |
| Is the paper damp? Replace the paper with new paper. page 2-2 | ||||
| Is the paper set in a proper orientation? | Change the orientation in which the paper is positioned. | — | ||
Responding to Error Messages
If the touch panel displays any of these messages, follow the corresponding procedure.
| Error Messages Checkpoints | Corrective Actions Reference Page | ||
| Close ### cover. Is the indicated | cover open? Close all covers securely. — | ||
| Check the cover. Are any covers | open?Does the message indicate which cover is open? | Close all covers securely. — | |
| Close Document Processor. Is the | e optional document processor open while loading the original? | Close the document processor. — | |
| Close Document processor cover. | Is the optional document processor top cover open? | Close the document processor top cover. | page 2-15 |
| Set cassette #.(Close paper cassette #.) | Is the indicated cassette not fully closed? | Pull out the cassette and push in securely. | — |
| Open cassette #, check and remove paper from inside of the machine.(Open cassette #, check and remove paper from inside of machine.) | — Completely pull out the | indicated cassette and remove any paper inside. | — |
| Reset feeding unit for paper cassette. | Is the paper feeder securely pushed into the machine? | Pull out the paper feeder and securely push it all the way into the machine. | page 6-11 |
| Add paper in cassette #.(Add paper cassette #.) | Is the indicated cassette out of paper? | Load paper. If the same type of paper is loaded in another cassette in the same orientation, you can press either one of paper selection keys on the left of the touch panel to switch to that cassette for copying. | — |
| Add paper in the Multi Purpose Tray.## size(Place paper on the Multi Purpose Tray.## size) | Is paper of the specified size loaded in the MP tray? | Load paper of the size indicated in the MP tray. | page 2-4 |
| Add paper in the Multi Purpose Tray.(Add paper on the Multi Purpose Tray.) | Has all the paper on the MP tray been fed? | Load paper in the MP tray. page | 2-4 |
| Change the size of MP tray. Is the | e specified size paper loaded in the MP tray? | Reconfigure the size of the MP tray. | page 2-9 |
| Check paper size. Is the specified | size paper loaded? | Load paper of a size that can be used. | — |
| Reposition original. | Is the orientation of the specified paper different from that of the original? | Change the orientation of the original. If you press the Start key without doing so, the original will be copied at the current size. | — |
| Error Messages Checkpoints | Corrective Actions Reference Page | ||
| Check paper size. Copy paper is not the same size as original.(Paper size in cassette differs from actual size.Check paper size in cassette.) | Is the specified paper loaded?Or are the settings incorrect? | Load the specified paper. Adjust any settings that are incorrect. | — |
| Reposition original or change cassette.(Reset original or select another paper cassette.) | Is the orientation of the specified paper different from that of the original? | Change the orientation of the original. | — |
| Is the copier installed beneath fluorescent lights? | Do not install this machine beneath fluorescent lights. | — | |
| Reset originals in processor. — | Remove originals from the | optional document processor, stack them uniformly and reset them. | page 2-15 |
| Reset all originals in processor.(Reset originals in processor.) | — Remove originals from the | optional document processor, and reset them in the original order. | page 2-15 |
| Reset all originals in Document Processor.(Reset originals in Document Processor.) | Are there any originals left in the optional document processor? | Reset all originals in the optional document processor. | — |
| Cannot copy this paper type. Can | the specified copy functions be used with the selected media type? | Select another type of media. — | |
| Cannot staple this paper type. Did you select a media type that cannot be stapled? | Select another type of media. Refer to the optional Document Finisher Operation Guide. | ||
| Cannot staple this size.(Cannot staple this paper size.) | Is stapling available for the size of the loaded paper? | Change the paper size. page 7-9 | |
| Refer to the optional Document Finisher Operation Guide. | |||
| Cannot staple.## :maximum capacity (Staple)(Cannot staple.## :Max. staples) | Is the maximum page quantity for stapling exceeded? | Decrease the number of sheets to be stapled to less than the maximum staple sheet count. | page 7-9 |
| Refer to the optional Document Finisher Operation Guide. | |||
| The top tray is full of paper.Remove paper, and press Start key. | During copying, is the maximum capacity of the top tray exceeded? | Remove some pages from the top tray and press theStartkey.Printing continues. | — |
| The top tray is full of paper.Remove paper, and press Continue key. | During printing, is the maximum capacity of the top tray exceeded? | Remove some pages from the top tray and press [Continue]. Printing continues. | — |
| Paper capacity exceeded.(Finisher)Remove paper, and press Start key. | During copying, is the maximum capacity of the optional document finisher output tray exceeded? | Remove some pages from the optional document finisher and press theStartkey.Printing continues. | — |
| Paper capacity exceeded.(Finisher)Remove paper, and press Continue key. | During printing, is the maximum capacity of the optional document finisher output tray exceeded? | Remove some pages from the optional document finisher and press [Continue]. Printing continues. | — |
| Error Messages | Checkpoints | Corrective Actions | Reference Page |
| Remove paper. Finisher tray. Is the maximum capacity of the optional document finisher output tray exceeded? | Remove some pages from the optional document finisher. | — | |
| These functions cannot be combined. | Have you selected functions that cannot be used together? | Check the settings. — | |
| Insert key counter. Is the optiona | key counter inserted correctly? | Insert the optional key counter securely and completely. | — |
| Memory full — The current copy | cannot be | processed because there is no more copy memory free space, or the number of original pages exceeded the maximum 999 pages. When the following message is displayed select the resolution method.[Cancel]: Cancels copying.[Continue]: Copies up to the last scanned page. | — |
| Toner will be empty soon. — The toner container will need to | be replaced soon. Prepare the replacement toner container. | page 5-7 | |
| Ready to copy.Add toner. | — The machine is running low on toner; only one page may be printed at a time. Prepare the replacement toner container. | page 5-7 | |
| Add toner. | — | Replace the toner container. | page 5-7 |
| Set the toner container. Is the toner container securely installed? | Open the front cover and pull the toner container out. Shake the container well and set back in place. | page 5-7 | |
| Clean the main charger. Have you cleaned the main charger? | Clean the main charger after replacing the toner container. After cleaning, press [End]. Adjustment begins. Wait 5 minutes. | page 5-7 | |
| Image cycle.(Now adding toner.) | — Toner replenishment is in progress. Wait until the process is completed. | — | |
| Please wait.Now in the fusing temperature adjustment process. | — Performing internal maintenance. Wait until the process is completed. | — | |
| Check waste toner box. Is the waste toner box securely fastened? | Securely fasten the waste toner box. | page 5-7 | |
| Replace the waste toner box. | — | Replace the waste toner box. | page 5-7 |
| Clean the slit glass for original fed from DP.(Clean the slit glass for original fed.) | — Rub the slit glass with the included dry cleaning cloth. | page 5-2 | |
| Install duplex unit. Is the duplex unit securely installed? | Open left cover 1 and install the duplex unit in place securely. | — | |
| Out of staples.Add staples.(Stapler empty.Add staples.) | Is the optional document finisher or built-in finisher out of staples? | Refill staples. | page 4-4 |
| Refer to the optional Document Finisher Operation Guide. | |||
| Error Messages Checkpoints Corrective Actions Reference Page | |||
| Time for maintenance. — Periodic maintenance is | required to keep your machine in good condition. Contact your Service Representative or Authorized Service Center promptly. | — | |
| Paper misfeed. — If a paper jam occurs, the | location of the jam will be indicated on the touch panel and the machine will stop. Leave the machine switched on (| position) and follow the instructions to remove the jammed paper. | page 6-8 | |
| Remove paper from inner tray of Finisher. | Is there any paper left in the optional document finisher? | Remove all paper left in the optional document finisher. | — |
| Staple jam. Is the optional document finisher or built-in finisher experiencing a staple jam? | Remove the jammed staple. page 4-5 | Refer to the optional Document Finisher Operation Guide. | |
| System error. Call service. | Is it re-displayed after opening and closing the front cover, turning off and on the main power switch, and plugging out and plugging in the power plug in the power outlet? | Make a note of this message (C followed by a number). Turn off the machine (position), unplug the power cord, and contact your Service Representative or Authorized Service Center. | — |
| Paper cassette is out of order. Select another paper cassette. (Paper cassette is out of order. Select other paper cassette.) | — The cassette in use has a | problem and is temporarily unavailable. Contact your Service Representative or Authorized Service Center promptly. To continue copying, use another cassette. | — |
| System error. Main Power Switch Off / On. | — A system error has occurred. | Turn the main power switch off and on again. | — |
| Please wait. Remote edit. (Please wait. Remote editing.) | Is Job account editing being done from a network connected computer? | Copying is not possible until editing is complete. | — |
Clearing Paper Jams
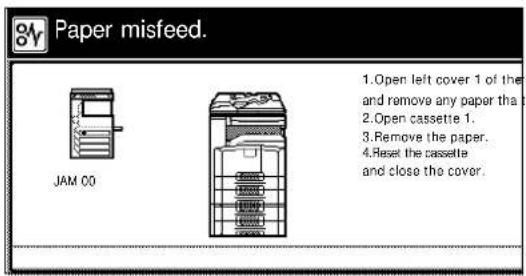
If a paper jam occurs, the touch panel will display Paper misfeed and the copying will stop. Refer to these procedures to remove the jammed paper.
Jam Location Indicators
When a paper jam occurs, the jam location indicators and corrective action are displayed. Jam location indicators indicate the paper jam position, as shown below.
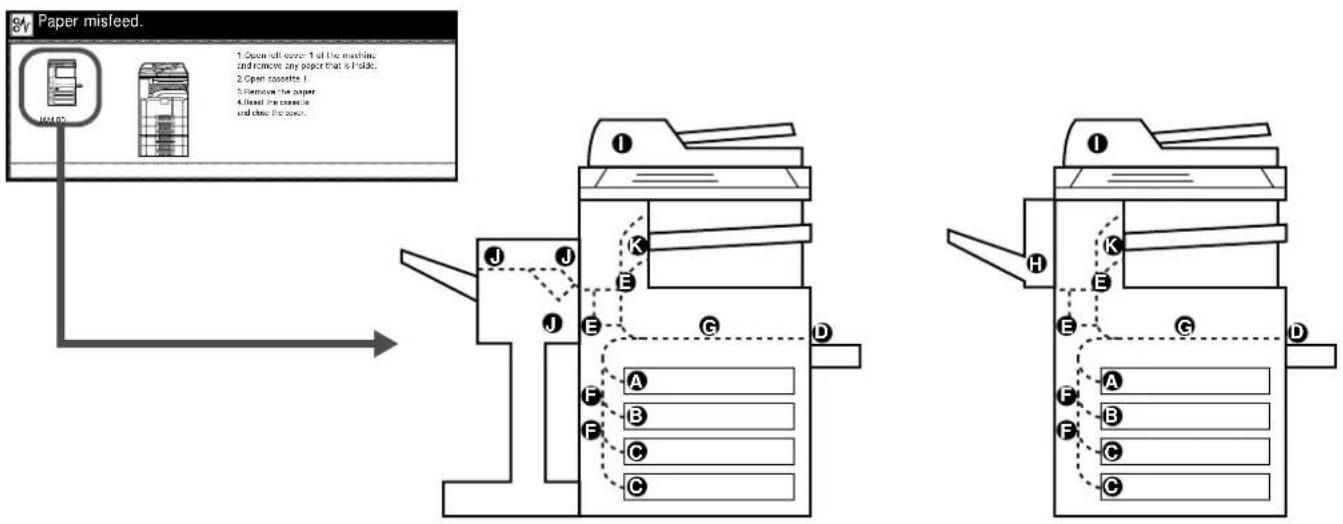
flowchart
graph TD
    A["Receipt"] --> B{Paper misfeed}
    B --> C["File 1"]
    B --> D["File 2"]
    B --> E["File 3"]
    B --> F["File 4"]
    B --> G["File 5"]
    B --> H["File 6"]
    B --> I["File 7"]
    B --> J["File 8"]
    B --> K["File 9"]
    B --> L["File 10"]
    B --> M["File 11"]
    B --> N["File 12"]
    B --> O["File 13"]
    B --> P["File 14"]
    B --> Q["File 15"]
    B --> R["File 16"]
    B --> S["File 17"]
    B --> T["File 18"]
    B --> U["File 19"]
    B --> V["File 20"]
| Jam Location Indicators | Paper Jam Location | Reference Page |
| A Cassette 1 page 6-9 | page 6-13 | |
| B Cassette 2 page 6-10 | ||
| C | Optional cassettes 3 and 4 | page 6-11 |
| D MP tray page 6-12 | ||
| E | Duplex unit, Inside the left cover 1 | page 6-12page 6-13 |
| F | Inside the left covers 2 and 3 | page 6-12 |
| G Paper feed unit page 6-14 | ||
| H | Optional built-in finisher | page 6-16 |
| I | Optional document processor | page 6-18 |
| J | Optional document finisher | page 6-19 |
| K | Optional job separator | page 6-19 |
After clearing the jam, the machine will warm up again and the error message will be cleared. The machine resumes from the page on which the jam occurred.
Paper Jam Precautions
- Do not reuse paper cleared from a jam.
- If the paper was torn during removal, be sure to remove any loose scraps of paper from the machine inside. Scraps of paper left in the machine may cause subsequent jamming.
- Jammed paper from the document finisher (option) will be fed out again. Do not return this paper to the document finisher tray.

WARNING High voltage is present in the charger section. Take sufficient care when working in this area, as there is a danger of electrical shock.

CAUTION The fixing unit is extremely hot. Take sufficient care when working in this area, as there is a danger of getting burned.
Cassette 1
Follow the steps below to clear paper jams in cassette 1.

natural_image
Person inserting a device into a control panel (no text or symbols visible)1 Pull up left cover 1 lever and open left cover 1.

natural_image
Illustration of a hand using a tool to adjust or install a component, with no visible text or symbols.2 Remove the jammed paper.

natural_image
Technical line drawing of a hand operating a tool on a mechanical component (no text or symbols)3 Pull out cassette 1.

natural_image
Line drawing of a hand pressing down on a printer tray with a black arrow indicating the process (no text or symbols)4 Remove the jammed paper. If the paper tears, remove every loose scrap from inside the machine.
5 Push cassette 1 securely back in place.
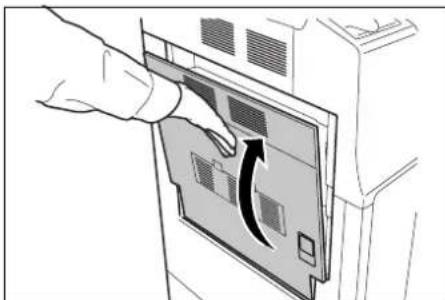
natural_image
Hand inserting a device into a computer monitor (no text or symbols visible)6 Press the indicated position to close left cover 1.
Cassette 2
Follow the steps below to clear paper jams in cassette 2.
1 Open left cover 2.
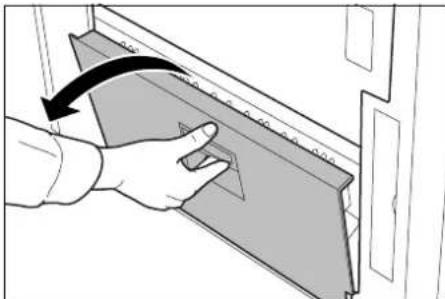
natural_image
Illustration of a hand inserting a card into a drawer with an arrow indicating the direction (no text or symbols present)2 Remove the jammed paper.

natural_image
Illustration of a hand holding a cloth or paper over a cabinet, with no visible text or symbols.3 Pull out cassette 2.

natural_image
Illustration of a hand inserting a component into a device (no text or symbols visible)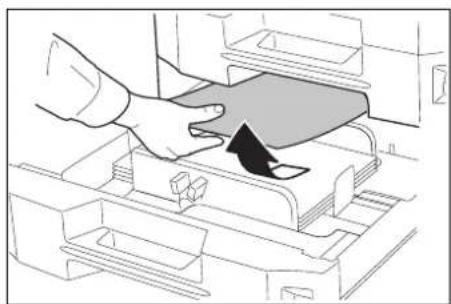
natural_image
Line drawing of a hand pressing down on a mechanical component with an arrow indicating motion (no text or symbols)4 Remove the jammed paper.
If the paper tears, remove every loose scrap from inside the machine.
5 Push cassette 2 securely back in place.
6 Close left cover 2.
Optional Cassettes 3 and 4
Follow the steps below to clear paper jams in cassettes 3 or 4 when using the optional paper feeder.

natural_image
Hand inserting a card into a folder, showing the number 10 (no text or symbols present)1 Open left cover 3.
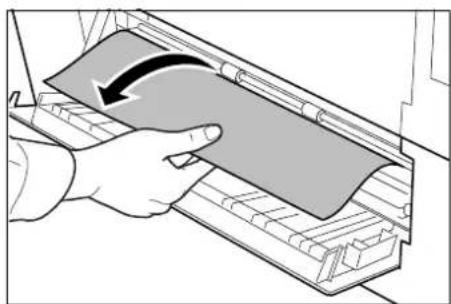
natural_image
Illustration of a hand inserting a card into a file folder with an arrow indicating rotation (no text or symbols present)2 Remove the jammed paper.
If the paper tears, remove every loose scrap from inside the machine.
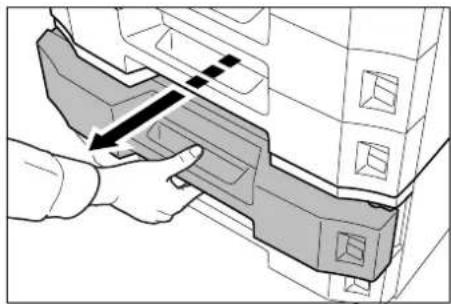
natural_image
Illustration of a hand inserting a component into a device (no text or symbols visible)3 Pull out the cassette in use.

natural_image
Line drawing of a hand pressing down on a mechanical component with an arrow indicating motion (no text or symbols)4 Remove the jammed paper.
5 Push the cassette securely back in place.
6 Close left cover 3.
MP Tray
Follow the steps below to clear paper jams in the MP tray.

natural_image
Illustration of a hand inserting a component into a device (no text or symbols visible)1 Remove all papers from the MP tray.

natural_image
Illustration of a hand pressing down on a device component with a downward arrow indicating compression (no text or symbols)2 If paper is jammed inside, pull the paper toward you to remove.
Inside the Left Covers 1, 2 and 3
Follow the steps below to clear paper jams inside left cover 1, 2 or 3 (option).
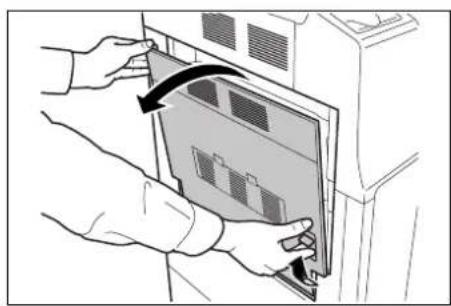
natural_image
Person inserting a device into a control panel (no text or symbols visible)1 Open the left cover where paper is jammed inside.

natural_image
Illustration of a hand using a tool to adjust or install a component, with no visible text or symbols.2 Remove the jammed paper. If the paper tears, remove every loose scrap from inside the machine.
3 Close the left cover.
Duplex Unit
Follow the steps below to clear paper jams in the duplex unit.

natural_image
Person inserting a device into a rack unit, showing a scroll with an arrow (no text or symbols)1 Pull up left cover 1 lever and open left cover 1.

natural_image
Illustration of a hand using a tool to adjust or install a component, with no visible text or symbols.2 Remove the jammed paper.

natural_image
Illustration of a hand inserting a component into a rack, with an arrow indicating the direction (no text or symbols present)3 Lift up the duplex unit and remove the jammed paper.

natural_image
Hand inserting a device into a control panel with an arrow indicating rotation (no text or symbols)4 Press the indicated position to close left cover 1.

natural_image
Person inserting a device into a computer case (no text or symbols visible)Duplex Unit and Cassette 1
Follow the steps below to clear paper jams in duplex unit and cassette 1.
1 Pull up left cover 1 lever and open left cover 1.

natural_image
Illustration of a hand using a tool to adjust or install a component, with no visible text or symbols.2 Remove the jammed paper.

natural_image
Illustration of a hand inserting a spring into a device panel (no text or symbols visible)3 Lift up the duplex unit and remove the jammed paper.
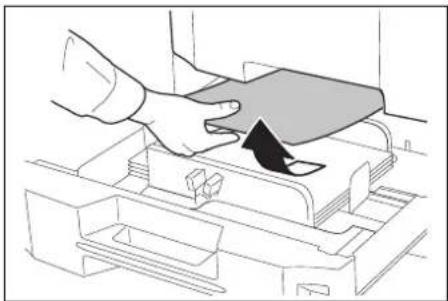
natural_image
Line drawing of a hand pressing down on a printer tray with a black arrow indicating the process (no text or symbols)4 Pull out cassette 1 and remove the jammed paper. If the paper tears, remove every loose scrap from inside the machine.
5 Push cassette 1 securely back in place.

natural_image
Hand inserting a device into a control panel with an arrow indicating rotation (no text or symbols)6 Press the indicated position to close left cover 1.

natural_image
Person inserting a device into a control panel (no text or symbols visible)Paper Feed Unit
Follow the steps below to clear paper jams in the paper feed unit.
1 Pull up left cover 1 lever and open left cover 1.
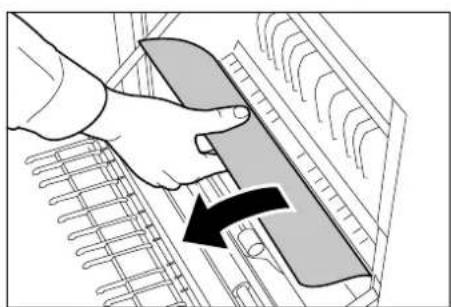
natural_image
Illustration of a hand using a tool to adjust or install a grid pattern, with no visible text or symbols.2 Remove the jammed paper.
If the paper tears, remove every loose scrap from inside the machine.
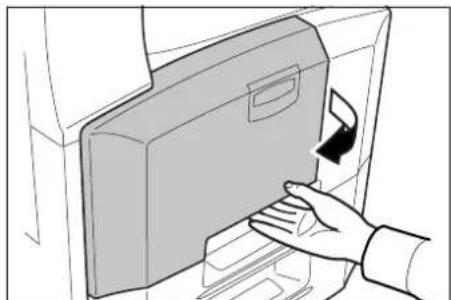
natural_image
Line drawing of a hand opening a rectangular device with a handle, showing internal components and a small arrow (no text or symbols)3 Open the front cover.

natural_image
Line drawing of a hand holding a button next to an electronic device panel with a black arrow indicating rotation (no text or symbols present)4 Turn the lower green knob (A1) clockwise.

natural_image
Illustration of a hand using a tool to adjust or install a grid-like structure with a black arrow indicating the process (no text or symbols present)5 Remove the jammed paper.
If you cannot remove the paper, proceed with the next step.
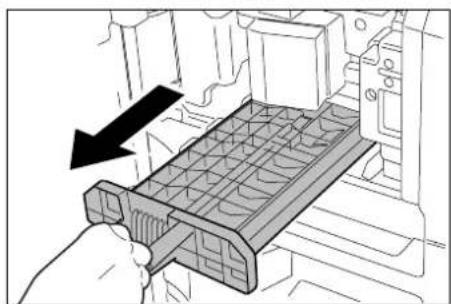
natural_image
Diagram of a hand inserting a plastic component into a housing (no text or symbols visible)6 Pull out the paper feed unit (A2).

natural_image
Diagram of a hand operating a mechanical component with an arrow indicating rotation (no text or symbols present)7 Open the paper feed unit cover (A3) and remove the jammed paper.
8 Push the paper feed unit (A2) back in place, and close the front cover.

natural_image
Hand inserting a device into a control panel with an arrow indicating rotation (no text or symbols)9Press the indicated position to close left cover 1.
Optional Built-in Finisher
Follow the steps below to clear paper jams in the optional built-in finisher.
1 Remove any paper left in the finisher output slot.
2Remove the output tray.


natural_image
Illustration of hands installing or adjusting a device panel with a scroll arrow (no text or symbols)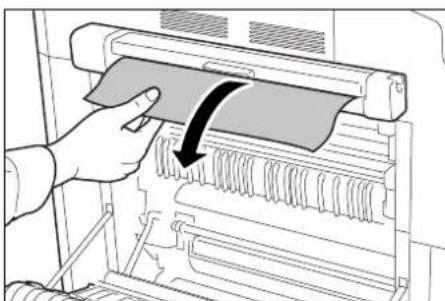
natural_image
Illustration of a hand inserting a plastic sheet into a machine (no text or symbols visible)3 Pull up left cover 1 lever and open left cover 1.
4Remove the jammed paper.

natural_image
Illustration of a hand inserting a device into a tray with an arrow indicating rotation (no text or symbols)5Press the indicated position to close left cover 1.
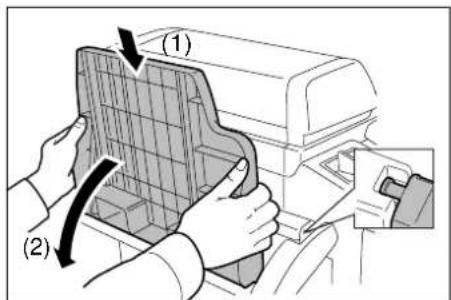
6Reattach the output tray.

natural_image
Illustration of a hand holding a small object with arrows indicating rotation or adjustment (no text or symbols present)7Turn the dial to lower the finisher process tray.

natural_image
Illustration of a hand holding a small object with an arrow indicating rotation (no text or symbols present)8Remove any paper from the tray.

natural_image
Hand pressing a button on a mechanical component with an arrow indicating rotation (no text or symbols present)9Push the tray upward back into place.
Optional Document Processor
Follow the steps below to clear paper jams in the optional document processor.

natural_image
Illustration of a hand pressing down on a printer cover with a curved arrow indicating motion (no text or symbols)1 Remove the original from the original tray.
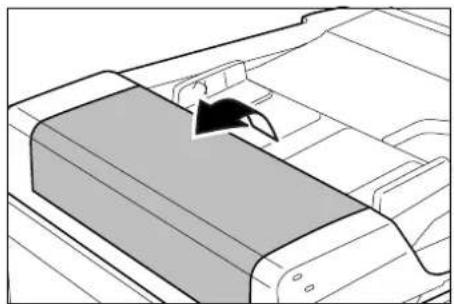
natural_image
Diagram of a printer or printer component with a black arrow pointing to a portion of the cover (no text or symbols present)2 Open the document processor top cover.
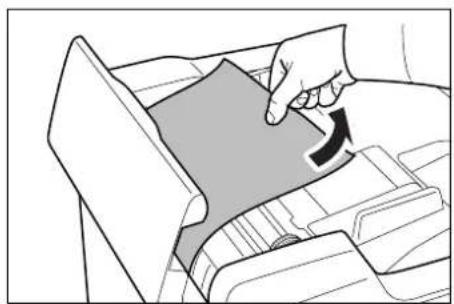
natural_image
Illustration of a hand inserting a card into a printer (no text or symbols visible)3 Remove the jammed original.
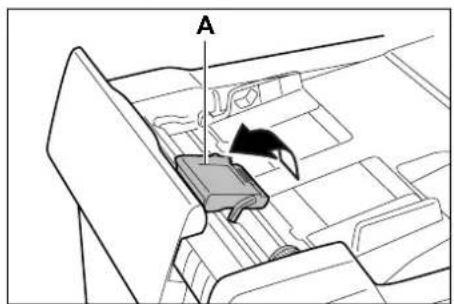
4 Lift up the paper feed unit A.
5 Remove the jammed original. If the original tears, remove every loose scrap from inside the machine.
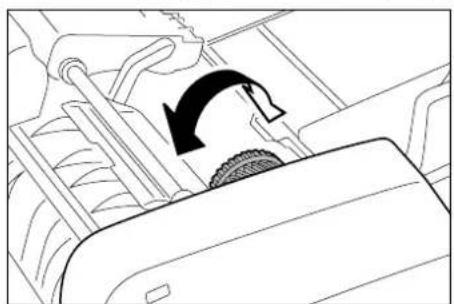
natural_image
Diagram of a vehicle's wheel and gear assembly with directional arrow (no text or symbols)6 Remove the original by turning the dial as shown.
7 Put the paper feed unit A back in place and close the document processor top cover.
8 Reload the originals on the document processor tray.
Optional Document Finisher
If a misfeed occurs in the optional document finisher, refer to the Document Finisher Operation Guide to clear the jam.
Optional Job Separator
Follow the steps below to clear paper jams in the optional job separator.

natural_image
Illustration of a hand holding a folded garment with a black arrow indicating direction (no text or symbols)1 If jammed paper can be seen through the paper output slot, pull it out toward you.
If the paper tears, remove every loose scrap from inside the machine.

natural_image
Person inserting a device into a computer case (no text or symbols visible)2 Pull up left cover 1 lever and open left cover 1.

natural_image
Illustration of a hand inserting a card into a rack device (no text or symbols visible)3 Remove the jammed paper.
If the paper tears, remove every loose scrap from inside the machine.

natural_image
Hand inserting a device into a control panel with an arrow indicating rotation (no text or symbols)4 Press the indicated position to close left cover 1.
7 Appendix
This chapter explains how to enter text, describes the paper types that can be used with the machine and lists the machine specifications.
Entering Characters on Touch Panel 7-2
Paper 7-5
Specifications 7-6
Body 7-6
Document Processor (option).... 7-8
Paper Feeder (option) 7-8
Document Finisher (option) 7-9
Built-in Finisher (option).... 7-9
Job Separator (option).... 7-10
Environmental Specifications.... 7-10
Entering Characters on Touch Panel
To enter characters on the touch panel such as department names (for job accounting) or copying programs, etc., use the following procedures.
Input Screen
Inch models
Keyboard
![1 6 7 9 10 Name to display Stop End Char. Limit:32 including # AllDel. Del. prow 1 2 3 4 5 6 7 8 9 0 - = / q w e r 1 y u i o p [ ] \ a s d f g h j k l : / j x a v b n m , . / Capital Letter /Sym. Space 2 3 4 5](/content/2026/05/764886/images/4248a438cd87e4b0e2a9a60d36f7efbbcf7557eb33669b6f3c2bd2f059ebd30a.jpg)
1 Character display: Displays the characters entered.
2 [Capital]: Press this key to enter capital letters.
3 [ L e t t e r ] : Press this key to enter lowercase letters.
4 [ N u m . / S y m . ] : Press this key to enter the num
5 [Space]: Press this key to enter a space.
6 [ A I I D e I . ] : Press this key to delete all characters ent
7 [←][→]: Press these keys to move the cursor left and right.
8 [Del. prev]: Press this key to delete the character to the left of the cursor.
9 [ S t o p ] : Press this key to return to the previous screen.
10 [End]: Press this key to confirm the characters you entered.
Capital keyboard

Numeral/Symbol keyboard
![Name to display Stop End Char.Limit:32 including # AllDel. Del Pre+ 1 2 3 4 5 6 7 8 9 0 | " # $ % & ' | ) * + , - . / : ; < = > ? @ ! \ ] ^ _ ` ( | ) ~ Capital Letter /Sym. Space](/content/2026/05/764886/images/56e39192ffe8940f056d6270180529f688e884eccc680f05c6d9758808b99ded.jpg)
Metric Models
Keyboard
![1 7 8 10 11 Name to display Stop End Char. Limit:32 including # AIDef. Del. pre 9 1 2 3 4 5 6 7 8 9 0 - = * q w e r 1 y u i o p [ ] / a s d f g h j k l ; z x c v b n m . . . Capital Letter bol 1 Symbol 2 Space 2 3 4 5 6](/content/2026/05/764886/images/97189c5ef08ac1f4560a2bac999cc385ae06582a0550cab0abc4bd749b97e0f7.jpg)
1 Character display: Displays the characters entered.
2 [ C a p i t a l ] : Press this key to enter capital letter
3 [Letter]: Press this key to enter lowercase letters.
4 [ Symbol 1 ] : Press this key to enter the numeric
5 [ Symbol 2 ] : Press this key to enter other symb
6 [Space]: Press this key to enter a space.
7 [AIDel.]: Press this key to delete all characters entered.
8 [←][→]: Press these keys to move the cursor left and right.
9 [Del. prev]: Press this key to delete the character to the left of the cursor.
10 [Stop]: Press this key to return to the previous screen.
11 [End]: Press this key to confirm the characters you entered.
Capital keyboard
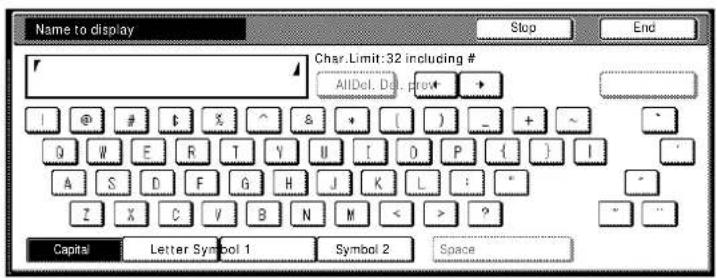
Symbol 1 keyboard
![Name to display Stop End Char.Limit: 32 including # AIDel Del pre+ 1 2 3 4 5 6 7 8 9 0 ! " # $ % & ' | ) * + , -, / : ; < = > ? @ [ \ ] ^ _ ( | ) -- E ∫ - ... + ‡ ‰ %∞ $ < € Capital Letter Symbol 1 Symbol 2 Space](/content/2026/05/764886/images/28695dd0e1f75c1695c117e66dd0ef1d00ba548042fad0d657f53e892ff9b321.jpg)
Symbol 2 keyboard
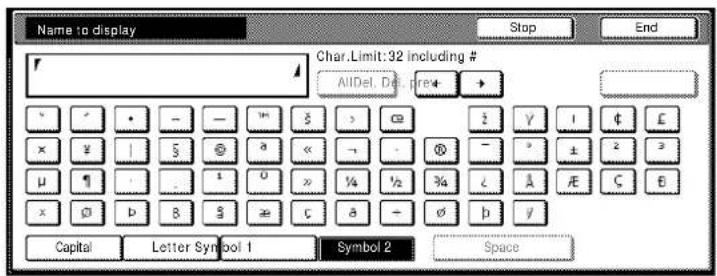
Entering Characters
The following is an example of how to enter 'Abcde' using the keyboard.

1 Press [Capital] and press [A] on the keyboard.
2 Press [Letter].
3 Press [b], [c], [d] and [e] in order.
4 When entering all characters are complete, press [End].
Paper
This section explains the paper sizes and types that can be used in the paper source.
Cassettes 1 and 2 and the optional paper feeder
| Supported types Supported paper sizes | No. of sheets | |
| Plain paper (60 to 120 g/m2)Recycled paper (60 to 120 g/m2) | 11 × 17", 8 1/2 × 14", 11 × 8 1/2", 8 1/2 × 11",5 1/2 × 8 1/2", 8 1/2 × 13" (Oficio II), 8 1/2 × 13 1/2", 8K,16K, 16KR | 500 (80 g/m2) |
| Plain paper (60 to 120 g/m2)Recycled paper (60 to 120 g/m2) | A3, B4, A4, A4R, B5, B5R, A5R, Folio 500 (80 g/m2) |
MP tray (Multi Purpose tray)
| Supported types Supported paper sizes | No. of sheets | |
| Plain paper (45 to 200 g/m2)Recycled paper (45 to 200 g/m2)Colored paper (45 to 200 g/m2) | 11 × 17", 8 1/2 × 14", 11 × 8 1/2", 8 1/2 × 11",5 1/2 × 8 1/2", 8 1/2 × 13" (Oficio II), 8 1/2 × 13 1/2",Executive, A3, B4, A4, A4R, B5, B5R, A5R, B6R, 8K,16K, 16KROther sizes:Portrait - 3 7/8 to 11 5/8" or 98 to 297 mmLandscape - 5 7/8 to 17" or 148 to 432 mm | 200 (80 g/m2) |
| Transparency 11 × 8 1/2", A4, A4R 25 | ||
| PostcardsOUFUKU HAGAKI (return postcard) | Postcards (100 × 148 mm)Return postcard (148 × 200 mm) | 80 |
| Envelopes Envelope DL, Envelope C5, Envelope C4, Comm. #10,Comm. #9, Comm. #6-3/4, Monarch, ISO B5, Youkei 2,Youkei 4Other sizes:Portrait - 3 7/8 to 11 5/8" or 98 to 297 mmLandscape - 5 7/8 to 17" or 148 to 432 mm | 20 |
Specifications

Note These specifications are subject to change without notice.
Body
| Item | Description | ||||
| 25 cpm model 30 cpm model | |||||
| Type Desktop | |||||
| Copying Method Electrophotography by semiconductor laser | |||||
| Supported Original Types | Sheet, Book, 3-dimensional objects (maximum original size: 11 × 17"/A3) | ||||
| Original Feed System Fixed | |||||
| Paper Weight Cassette 1, 2 60 to 120 g/m2 (Duplex: 60 to 80 g/m2) | |||||
| MP Tray 45 to 200 g/m2 | |||||
| Media Type Cassette 1, 2 Plain, Rough, | Vellum, Recycled, Preprinted, Bond, Color (Colour), Prepunched, Letterhead, Thick paper, High Quality, Custom 1 to 8 (Duplex: Same as Simplex) | ||||
| MP Tray Plain, Transparency, Rough, Vellum, Labels, Recycled, Preprinted, Bond, Cardstock, Color (Colour), Prepunched, Letterhead, Thick paper, Envelope, High Quality, Custom 1 to 8 | |||||
| Paper Size | Cassette 1, 2 | Maximum: 11 × 17"/A3 (Duplex: 11 × 17"/A3)Minimum: 5 1/2 × 8 1/2"/A5R (Duplex: 5 1/2 × 8 1/2"/A5R) | |||
| MP Tray Maximum: | 11 × 17"/A3Minimum: 5 1/2 × 8 1/2"/A6R | ||||
| Zoom Level | Manual mode: 25 to 400%, 1% incrementsAuto mode: Preset Zoom | ||||
| Copying Speed | Simplex | 11 × 17"/A3: 12.5 sheets/min8 1/2 × 14"/B4: 12.5 sheets/min11 × 8 1/2"/A4: 25 sheets/min8 1/2 × 11"/A4R: 17.5 sheets/minB5: 25 sheets/minB5R: 20 sheets/min | 11 × 17"/A3: 15 sheets/min8 1/2 × 14"/B4: 15 sheets/min11 × 8 1/2"/A4: 30 sheets/min8 1/2 × 11"/A4R: 22 sheets/minB5: 30 sheets/minB5R: 20 sheets/min | ||
| Duplex | 11 × 17"/A3: 9 sheets/min8 1/2 × 14"/B4: 9 sheets/min11 × 8 1/2"/A4: 19 sheets/min8 1/2 × 11"/A4R: 10 sheets/minB5: 20 sheets/minB5R: 11 sheets/min | 11 × 17"/A3: 9 sheets/min8 1/2 × 14"/B4: 10 sheets/min11 × 8 1/2"/A4: 20 sheets/min8 1/2 × 11"/A4R: 11 sheets/minB5: 21 sheets/minB5R: 11 sheets/min | |||
| First Copy Time (A4, feed from Cassette) | 4.7 seconds or less | ||||
| Warm-up Time (22°C/71.6°F, 60%) | Power on | 15 seconds or less | |||
| Low Power | 10 seconds or less | ||||
| Sleep | 15 seconds or less | ||||
| Paper Capacity Cassette 1, 2 500 sheets (80 g/m2) | |||||
| MP Tray 200 sheets (80 g/m2) | |||||
| Output Tray Capacity | Top tray 250 sheets (80 g/m2) | ||||
| with optional built-in finisher | 100 sheets (80 g/m2) | ||||
| with optional job separator | 150 sheets (80 g/m2) | ||||
| Continuous Copying 1 to 999 sheets | |||||
| Image Write System Semiconductor laser and electrophotography | |||||
| Image Storage Memory 64 MB (standard) | |||||
| Resolution 600 × 600 dpi | |||||
| Monthly Duty Average | age 8,000 pages 10,000 pages | ||||
| Maximum 80,000 pages 100,000 pages | |||||
| Operating Environment | Temperature 10 to 32.5°C/50 to 90.5°F | ||||
| Humidity 15 to 80 % | |||||
| Altitude | 2,500 m/8,202 ft maximum | ||||
| Brightness | 1,500 lux maximum | ||||
| Dimension (W × D × H) | 22 7/16 × 25 3/16 × 30 3/16" (Main unit only)570 × 640 × 767.2 mm | ||||
| Weight (without toner container and waste toner box) | 165 lb/75 kg | ||||
| Space Required (W × D) | 28 9/16 × 25 3/16" (Using MP tray)725 × 640 mm | ||||
| Power Source | 120 V AC, 60 Hz, 11.2 A/220 to 240 V AC, 50 Hz, 6.0 A | ||||
| Power Consumption 1360 W | |||||
| Options | Document processor, Paper feeder, Document finisher, Built-in finisher, Job separator, Key counter, Printer kit and Fax kit | ||||
Document Processor (option)
| Item Description | |
| Original Feed Method Automatic feed | |
| Paper Weight 45 to 160 g/m2 | |
| Supported Original Types Sheet originals | |
| Paper Size Maximum: 11 × 17"/A3 | Minimum: 5 1/2 × 8 1/2"/A5R |
| Original No. of Sheets 75 sheets or less (50 to 80 g/m2) | Mixed original sizes: 30 sheets or less (50 to 80 g/m2) |
| Device Dimensions (W × D × H) 22 × 19 3/16 × 5 | 3/16" |
| 559 × 487 × 131 mm | |
| Weight 15.4 lb or less/7 kg or less |
Paper Feeder (option)
| Item Description | |
| Paper Supply Method | Friction Feed (No. Sheets: 500, 80 g/m2, 2 cassettes) |
| Paper Weight 60 to 120 g/m2 | |
| Media Type Plain, Rough, Vellum, Recycled, Preprinted, Bond, Color (Colour),Prepunched, Letterhead, Thick paper, High Quality, Custom 1 to 8 | |
| Paper Size | 11 × 17", 8 1/2 × 14", 11 × 8 1/2", 8 1/2 × 11", 5 1/2 × 8 1/2",8 1/2 × 13" (Oficio II), 8 1/2 × 13 1/2", A3, B4, A4, A4R, B5, B5R, A5R,Folio, 8K, 16K, 16KR |
| Dimensions (W × D × H) | 22 7/16 × 24 3/8 × 12 3/16"570 × 618.7 × 309 mm |
| Weight 55 lb or less/25 kg or less | |
Document Finisher (option)
| Item Description | |
| Number of Trays 1 tray | |
| Paper Weight Stapling: 80 g/m2 or less | |
| Paper Size and Maximum Sheets (Non-stapling) | 11 × 17", 8 1/2 × 14", 8 1/2 × 13" (Oficio II), 8 1/2 × 13 1/2", A3, B4, Folio, 8K: 500 sheets11 × 8 1/2", 8 1/2 × 11", A4, A4R, B5, 16K: 1000 sheets |
| Maximum Sheets for Stapling (Paper weight 80 g/m2 or less) | 11 × 17", 8 1/2 × 14", 8 1/2 × 13" (Oficio II), 8 1/2 × 13 1/2", A3, B4, Folio, 8K: 20 sheets11 × 8 1/2", 8 1/2 × 11", A4, A4R, B5, 16K: 30 sheets |
| Dimensions (W × D × H) | 22 × 20 11/16 × 36 1/16"558 × 526 × 916 mm |
| Weight Approx. 55 lb/Approx. 25 kg |
Built-in Finisher (option)
| Item Description | |
| Number of Trays 1 tray | |
| Paper Weight 60 to 105 g/m2 or less | |
| Paper Size and Maximum Sheets (Non-stapling) | 11 × 17", 8 1/2 × 14", 8 1/2 × 13" (Oficio II), 8 1/2 × 13 1/2", A3, B4, Folio, 8K: 250 sheets11 × 8 1/2", 8 1/2 × 11", A4, A4R, B5, 16K: 500 sheets |
| Maximum Sheets for Stapling (Paper weight 80 g/m2 or less) | 11 × 17", 8 1/2 × 14", 8 1/2 × 13" (Oficio II), A3, B4, Folio, 8K: 20 sheets11 × 8 1/2", 8 1/2 × 11", A4, A4R, B5, 16K: 30 sheets |
| Dimensions (W × D × H) | 12 13/16 × 17 11/16 × 6 1/2"325 × 450 × 165 mm |
| Weight 17.6 lb or less/8 kg or less |
Job Separator (option)
| Item Description | |
| Number of Trays 1 tray | |
| Paper Weight 45 to 160 g/m2 | |
| Media Type Plain, Rough, Vellum, Recycled, Bond, Color (Colour), Thick paper | |
| Paper Size | 11 × 17", 8 1/2 × 14", 11 × 8 1/2", 8 1/2 × 11", 7 1/4 × 10 1/2", 5 1/2 × 8 1/2", 8 1/2 × 13" (Oficio II), 8 1/2 × 13 1/2", A3, B4, A4, A4R, B5, B5R, A5R |
| Maximum Sheets 100 sheets (80 g/m2) | Bond, Thick paper: 20 sheets |
| Device Dimensions (W × D × H) | 21 7/16 × 17 11/16 × 2 3/4" 545 × 450 × 70 mm |
| Weight Approx. 3.3 lb/Approx. 1.5 kg | |
Environmental Specifications
| Item | Description | ||
| 25 cpm model 30 cpm model | |||
| Noise emission | During standby 47 dB (A) (L wad) | ||
| During copying 64.7 dB (A) (L wad) 66.5 dB (A) (L wad) | |||
| Power consumption | During copying (with full optional equipment) | 1360 wh | |
| During standby 160 W or less | |||
| During the Low Power mode | 60 W or less | ||
| Recovery time from Low-Power mode | 10 seconds | ||
| Recovery time from Sleep mode | 15 seconds | ||
| During the Off mode (default settings) | 3.2 W or less | ||
| During the Sleep mode (with full optional equipment) | 13 W or less | ||
| Time to Low-Power mode (factory default setting) | 1 minute | ||
| Time to Sleep mode (factory default setting) | 9 minutes | ||
| During the Plugged-In mode | 0.1 wh or less | ||
| Power consumption in the Plugged-In mode can only be terminated by removing the power plug from the outlet. | |||
| Duplexing | Standard | ||
| Paper supply capability | Paper with 100 % recycled paper content may be used | ||

Note Contact your Dealer or Service Representative for recommended media types.
Index
A
Adjusting density 3-5
Auto Low-Power mode 3-17
Auto Sleep mode 3-17
B
Built-in finisher 4-3
Adding staples 4-4
Clearing staple jams 4-5
Paper jams 6-16
Specifications 7-9
C
Carrying handles 1-4
Cassette
Cassette 1 1-2
Cassette 2 1-2
Loading paper 2-2
Paper jams 6-9, 6-10, 6-11, 6-13
Specifying the media type 2-8
Specifying the paper size 2-7
Caution/Warning labels ....iii
Cleaner rod 5-8
Cleaning
Main charger 5-5
Original cover, document processor and platen .....5-2
Separator 5-3
Slit glass 5-2
Transfer roller 5-4
Cleaning brush 1-3
Clip holder 1-2
Collate mode 3-15
Conventions in this guide ......xvii
Copy
Adjusting density 3-5
Basic copying procedures 3-2
Collate mode 3-15
Duplex mode 3-10
Interrupt copy 3-16
Selecting image quality 3-4
Split mode 3-13
Zoom 3-6
Copying speed 7-6
D
Document finisher 4-6
Paper jams 6-19
Specifications 7-9
Document processor 4-3
Cleaning 5-2
Loading originals 2-16
Paper jams 6-18
Part names ......2-15
Specifications 7-8
Duplex mode 3-10
Duplex unit
Paper jams 6-13
E
Energy saving control function xi
Energy Star program xi
Entering characters on touch panel 7-2
Environmental specifications 7-10
Error messages 6-4
F
Fax kit 4-8
Front cover 1-4
G
Green knob 1-3
Grid cleaner 5-8
Grounding the machine .... v
|
Installation precautions iv
Interrupt copy 3-16
J
Job separator 4-6
Paper jams 6-19
Specifications 7-10
K
Key counter 4-7
How to insert ....4-7
L
Language 2-18
Left cover 1 1-2
Paper jams 6-12
Left cover 1 lever 1-2
Left cover 2 1-2
Paper jams 6-12
Legal information and conventions
About this Operation Guide ......xvii
Automatic 2-sided copy function .... xi
Conventions in this guide ......xvii
Energy saving control function .... xi
Energy Star program xi
Legal information ....x
Originals and paper sizes ......xviii
Recycled paper xi
Regarding tradenames ....x
Low-Power mode xi, 3-17
M
Main charger 1-3
Cleaning 5-5
Main power switch 1-4
Maintenance 5-1
MP tray 1-4
Loading paper 2-4
Paper jams 6-12
Specifying the media type 2-13
Specifying the paper size 2-9
N
Names
Body 1-2
Operation panel 1-5
Touch panel 1-6
0
Operation panel 1-2, 1-5
Option
Built-in finisher 4-3
Document finisher 4-6
Document processor 4-3
Fax kit 4-8
Job separator 4-6
Key counter 4-7
Overview of optional equipment 4-2
Paper feeder 4-3
Printer kit 4-7
Original
Loading in the document processor 2-15
Loading on the platen 2-14
Size ......xviii
Original cover 1-2
Cleaning 5-2
Original placement indicator 2-15
Original size indicator plates 1-2
Output stopper 1-4
Output tray 3-3
P
Paper 7-5
Loading paper in the MP tray 2-4
Loading paper into cassette 1, 2 ......2-2
Loading paper into paper feeder 2-2
Note 2-2
Size ......xviii
Specifying the media type 2-8, 2-13
Specifying the paper size 2-7, 2-9
Paper feeder 4-3
Loading paper 2-2
Paper jams 6-11
Specifications 7-8
Specifying the media type 2-8
Specifying the paper size 2-7
Paper feed unit 1-3
Paper jams 6-14
Paper feed unit cover 1-3
Paper jams 6-8
Built-in finisher 6-16
Cassette 1 6-9, 6-13
Cassette 2 6-10
Cassette 3 and 4 6-11
Document finisher 6-19
Document processor 6-18
Duplex unit 6-13
Jam location indicators 6-8
Job separator 6-19
Left covers 1, 2 and 3 6-12
MP tray 6-12
Paper feeder 6-11
Paper feed unit 6-14
Paper jam precautions 6-9
Paper length guide 1-4
Paper width adjusting tab 1-4
Paper width guide 1-4
Platen 1-2
Cleaning 5-2
Loading originals 2-14
Power supply ......v
Precautions for use ...... vi
Preparation 2-1
Printer kit 4-7
S
Safety conventions ......i
Selecting image quality 3-4
Separator Cleaning 5-3
Sleep mode xi, 3-17
Slit glass Cleaning 5-2
Solving malfunctions 6-2
Specifications Body 7-6
Built-in finisher 7-9
Document finisher 7-9
Document processor 7-8
Environmental specifications 7-10
Job separator 7-10
Paper feeder 7-8
Split mode 3-13
Symbols ......i
T
Toner container 1-3
Replacement 5-7
Toner container stopper 1-3
Top tray 1-4
Touch panel 1-6
Transfer roller
Cleaning 5-4
W
Warm-up 3-2
Waste toner box 1-3
Replacement 5-7
Z
Zoom
Auto zoom 3-6
Manual zoom 3-6, 3-7
Preset zoom 3-6, 3-7
XY zoom 3-6, 3-8
DIRECTIVE 2002/96/CE ON THE TREATMENT, COLLECTION, RECYCLING AND DISPOSAL OF ELECTRIC AND ELECTRONIC DEVICES AND THEIR COMPONENTS
INFORMATION
1. FOR COUNTRIES IN THE EUROPEAN UNION (EU)
The disposal of electric and electronic devices as solid urban waste is strictly prohibited: it must be collected separately.
The dumping of these devices at unequipped and unauthorized places may have hazardous effects on health and the environment.
Offenders will be subjected to the penalties and measures laid down by the law.
To dispose of our devices correctly:
a) Contact the Local Authorities, who will give you the practical information you need and the instructions for handling the waste correctly, for example: location and times of the waste collection centres, etc.
b) When you purchase a new device of ours, give a used device similar to the one purchased to our dealer for disposal.

The crossed dustbin symbol on the device means that:
- when it to be disposed of, the device is to be taken to the equipped waste collection centres and is to be handled separately from urban waste;
- The producer guarantees the activation of the treatment, collection, recycling and disposal procedures in accordance with Directive 2002/96/CE (and subsequent amendments).
2. FOR OTHER COUNTRIES (NOT IN THE EU)
The treatment, collection, recycling and disposal of electric and electronic devices will be carried out in accordance with the laws in force in the country in question.
- PUBLICATION ISSUED BY:
- Included Guides
- Operation Guide (This Guide)
- Advanced Operation Guide
- Quick Start Guide
- Safety Conventions in This Guide
- Symbols
- Contents
- Caution/Warning Labels
- Installation Precautions
- Environment
- Caution
- Other precautions
- Power supply/Grounding the machine
- Warning
- Handling of plastic bags
- Precautions for Use
- Cautions when using the machine
- Cautions when handling consumables
- Legal Information and Conventions
- Legal Information
- Regarding Tradenames
- Energy Saving Control Function
- Low Power Mode
- Off Mode
- Sleep Mode (If the copier has printer and/or facsimile function)
- Automatic 2-Sided Copy Function
- Recycled Paper
- Energy Star (ENERGY STAR®) Program
- Laser Safety (Europe)
- Safety Instructions Regarding the Disconnection of Power
- Radio Frequency Transmitter
- Radio Tag Technology
- About this Operation Guide
- Part Names
- Preparation for Usage
- Basic Operation
- Optional Equipment
- Maintenance
- Troubleshooting
- Appendix
- Conventions in This Guide
- Originals and Paper Sizes
- Part Nam
- Touch Panel
- Loading Paper 2-2
- Setting Media Type and Paper Size for the Cassettes and MP Tray 2-7
- Loading Originals 2-14
- Loading Paper
- Before Loading Paper
- Loading Paper into Cassette 1, 2
- Loading Paper in the MP Tray
- Loading Envelopes
- Setting Media Type and Paper Size for the Cassettes and MP Tray
- Specifying Paper Size for the Cassettes
- Specifying the Media Type for the Cassettes
- Specifying the Paper Size for the MP Tray
- Auto Detect
- Other Standard Sizes
- Size Entry
- Custom Size
- Assignment Method
- Setting Method
- Specifying the Media Type for the MP Tray
- Loading Originals
- Loading Originals on the Platen
- Loading Originals in the Document Processor (option)
- Originals Supported by the Document Processor
- Originals Not Supported by the Document Processor
- How to Load Originals
- Original placement indicator
- Language
- Basic Copying Procedures 3-2
- Selecting Image Quality 3-4
- Adjusting Density 3-5
- Zoom 3-6
- Duplex Mode 3-10
- Split Mode 3-13
- Collate Mode 3-15
- Interrupt Copy 3-16
- Basic Copying Procedures
- Turning off the main power switch
- Selecting Image Quality
- Adjusting Density
- Zoom
- Auto Zoom
- Manual Zoom
- Preset Zoom
- keys
- XY Zoom
- keys # keys
- Duplex Mode
- One-sided to Two-sided
- Two-sided to Two-sided
- Book to Two-sided
- Place the original and press the Start key.
- Split Mode
- Two-sided to One-sided
- Book to One-sided
- Collate Mode
- Interrupt Copy
- Low-Power Mode
- Auto Low-Power Mode
- Sleep Mode
- Auto Sleep Mode
- Overview of Optional Equipment
- Document Processor
- Paper Feeder
- Built-in Finisher
- Adding Staples
- Clearing Staple Jams
- Document Finisher
- Job Separator
- Key Counter
- Inserting the Key Counter
- Printer Kit
- Fax Kit
- Cleaning 5-2
- Cleaning
- Original Cover, Document Processor and Platen
- Slit Glass
- Separator
- Transfer Roller
- Main Charger
- Toner Container and Waste Toner Box Replacement
- Solving Malfunctions 6-2
- Responding to Error Messages 6-4
- Clearing Paper Jams 6-8
- Solving Malfunctions
- Responding to Error Messages
- Clearing Paper Jams
- Jam Location Indicators
- Paper Jam Precautions
- Cassette 1
- Cassette 2
- Optional Cassettes 3 and 4
- MP Tray
- Inside the Left Covers 1, 2 and 3
- Duplex Unit
- Duplex Unit and Cassette 1
- Paper Feed Unit
- Optional Built-in Finisher
- Optional Document Processor
- Optional Document Finisher
- Optional Job Separator
- Appendix
- Entering Characters on Touch Panel 7-2
- Paper 7-5
- Specifications 7-6
- Entering Characters on Touch Panel
- Input Screen
- Metric Models
- Entering Characters
- Paper
- Specifications
- Index
- A
- B
- C
- D
- E
- F
- G
- |
- J
- K
- L
- M
- N
- 0
- P
- S
- T
- W
- Z
- DIRECTIVE 2002/96/CE ON THE TREATMENT, COLLECTION, RECYCLING AND DISPOSAL OF ELECTRIC AND ELECTRONIC DEVICES AND THEIR COMPONENTS
- INFORMATION
- FOR COUNTRIES IN THE EUROPEAN UNION (EU)
- To dispose of our devices correctly:
- FOR OTHER COUNTRIES (NOT IN THE EU)
Brand : OLIVETTI
Model : d-Copia 2500
Category : Uncategorized