
EliteCook K50 - Uncategorized TESLA - Free user manual and instructions
Find the device manual for free EliteCook K50 TESLA in PDF.


| Product Type | Electric Pressure Cooker |
| Brand | TESLA |
| Model | EliteCook K50 |
| Power Rating | 230 V ~ 50/60 Hz |
| Power Cord | Detachable |
| Cooking Functions | Pressure Cook, Slow Cook, Brown/Sauté, Keep Warm |
| Pressure Levels | High and Low |
| Preset Programs | 10 (Rice, Multigrain, Meat-Chop/Rib, Meat-Roast, Poultry, Fish, Soup, Stew, Vegetables-High, Vegetables-Low, Desserts, Beans) |
| Timer Range | 0 minutes to 2 hours |
| Keep Warm Duration | Up to 4 hours, then auto shut-off |
| Safety Features | Quick pressure release valve, air vent/cover lock, pressure indicator |
| Material | Stainless steel body, nonstick inner pot, silicone sealing ring |
| Inner Pot Capacity | Approximately 6 quarts (5.7 L) |
| Inner Pot Coating | Nonstick |
| Accessories Included | Steam rack |
| Display | Digital LED |
| Control Buttons | Pressure, Keep Warm/Cancel, Brown/Sauté, Slow Cook, preset buttons, +/– |
| Cleaning | Lid parts hand wash, inner pot dishwasher safe |
| Certifications | CE compliant |
| Intended Use | Household only |
Frequently Asked Questions - EliteCook K50 TESLA
User questions about EliteCook K50 TESLA
0 question about this device. Answer the ones you know or ask your own.
Ask a new question about this device
Download the instructions for your Uncategorized in PDF format for free! Find your manual EliteCook K50 - TESLA and take your electronic device back in hand. On this page are published all the documents necessary for the use of your device. EliteCook K50 by TESLA.
USER MANUAL EliteCook K50 TESLA
natural_image
Illustration of a medical procedure showing a hand holding a tool over a patient's abdomen (no text or symbols present)A
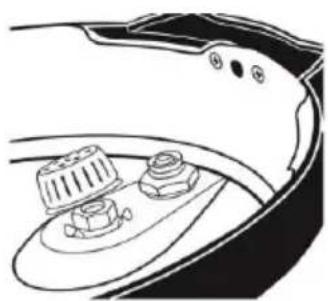
natural_image
Technical line drawing of a mechanical component with two bolts and a central hub (no text or symbols)B
natural_image
Illustration of a hand holding a tool interacting with a small object on a curved surface, labeled 'A' (no text or symbols on the diagram itself)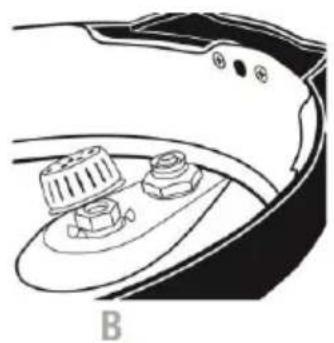
natural_image
Technical line drawing of a mechanical component with two ports and a base, labeled B (no text or symbols present)1 Odvzdušňovací ventil
2 Vypustenie pary (STEAM OUT)
Thank you for choosing the TESLA EliteCook K50.
Please, read the safety rules carefully and follow all common safety rules before using a robotic vacuum cleaner.
- read through the instructions for use thoroughly before using
- keep the user manual for future reference
• proper use of the device will greatly extend its service life
- follow the rules stated in this manual to reduce the risk of damage to the robotic vacuum cleaner and possible injury
IMPORTANT SAFETY WARNINGS
THIS PRODUCT IS FOR HOUSEHOLD USE ONLY.
This device is a complex electromechanical device, please pay attention to the following guidelines:
- Read all instructions. Incorrect use may result in bodily injury or damage to property.
- Check ventilation duct and vent prior to each use to make sure they are free of any blockage. Remove and clean any debris from the bleeder valve.
- Do not immerse the cable, plug or pressure cooker in water or other liquid to protect it from electric shock.
- Connect the plug to the pressure cooker before plugging in the power cord. To disconnect the device, press the "Cancel" button once, then disconnect the plug from the socket.
- Disconnect the cable from the socket before cleaning and let the appliance cool down.
- Do not use the appliance with a damaged cord if the pressure cooker is not working properly or has been damaged in any way. Return the pressure cooker to the TESLA service department for inspection, repair or for electrical and mechanical adjustment.
• To prevent electric shock, cook only in the supplied internal removable cooking utensil.
• Use of accessories not recommended by the appliance manufacturer can cause injury. - CAUTION! During cooking and when opening the upper lid, there may be a strong vertical leakage of hot steam. The casing, receptacle and metal parts of the instrument heat up! Be careful!
- Do not place the pressure cooker on a gas burner, electric burner or in a heated oven.
- Do not fill the pressure cooker more than two-thirds. In addition, the pressure cooker should not be filled to more than half the volume if you cook food that foams or expands such as rice, grains, dry beans, peas and lentils, or foods that are predominantly liquid, such as soups. You can block the venting of the pressure cooker and exert excessive pressure.
- Do not use pressure to cook apples, cranberries, rhubarb, cereals, pasta, sliced peas and dried soups. These foods tend to foam, the foam and splashing may block the venting or vent/air lock.
- This appliance is cooked under pressure. Incorrect use may result in scalding. Always make sure that the pressure cooker is properly closed before operation.
- Do not open the pressure cooker until all internal pressure is released. The release valve must be rotated to the “Steam Out” position.
- Carefully dispose of the pressure cooker due to very hot liquid. Do not touch the hot surfaces.
Always use the pressure cooker grips.
- To ensure safe operation and satisfactory performance, replace the silicone sealing ring if this has diminished, hardened, deformed, cracked or torn. Only use original TESLA accessories that are designed for this model.
- A close check is required when using a pressure cooker near children.
- Children are not recommended to use a pressure cooker separately.
- Do not use this device for any other purpose than the intended use.
- Do not use this appliance for frying.
- Do not use outside.
- Do not use the pressure cooker in too hot, dusty or humid environments.
- Do not touch the parts that are plugged into the mains if you have wet hands.
- Do not repair the pressure cooker, risking electric shock and loss of warranty.
- Do not use a pressure cooker if you have wet hands or feet.
- Keep it away from flammable and volatile substances.
- The manufacturer and importer to the European Union is not responsible for any damage caused by the operation of the device, such as injuries, scalding, fire, injury, damage to other things etc.
IMPORTANT INFORMATION - THE POWER CABLE
To reduce the risk of electric shock, do not attempt to modify the cable connector in any way. The length of the power cord reduces the risk of entanglement or tripping of the power cord.
DO NOT USE THIS INSTALLATION WITH AN EXTENSIVE CABLE.
Plug the power cord directly into a 230 V outlet.
PARTS OF THE ELECTRIC PRESSURE COVER
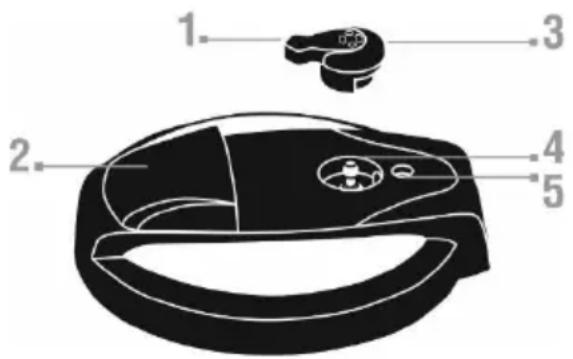
1 Valve lever
2 Cover handle
3 Quick pressure release valve
4 Vent pipe
5 Blue air vent/cover lock
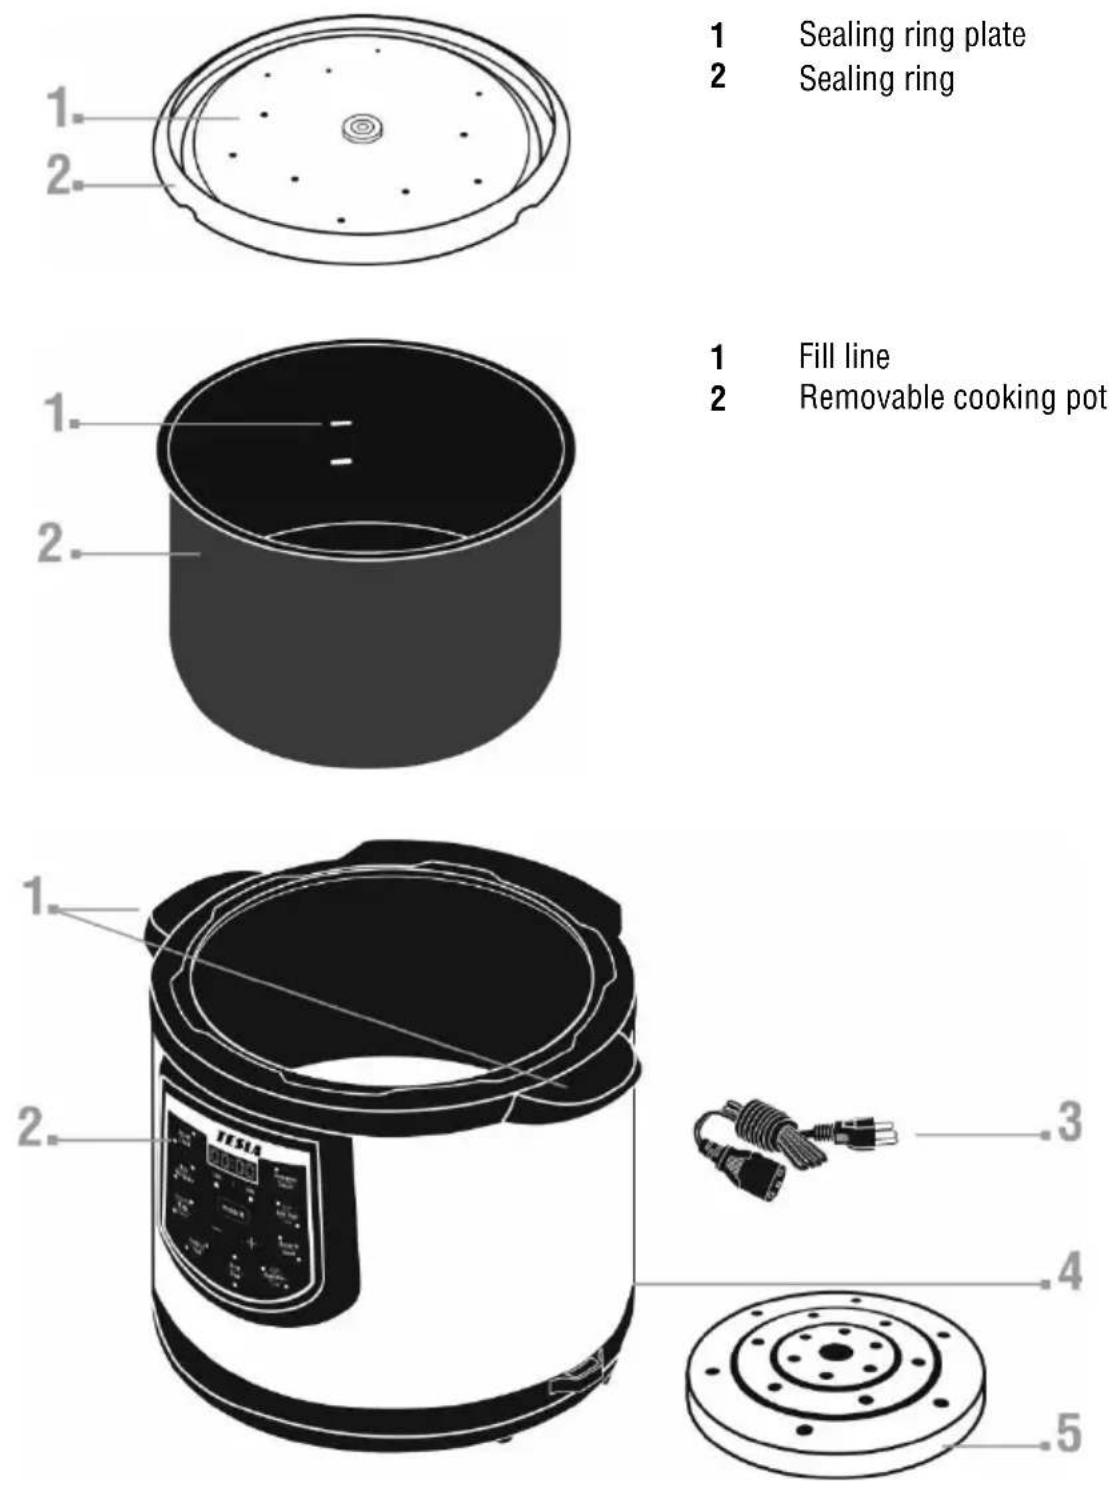
1 Sealing ring plate
2 Sealing ring
1 Fill line
2 Removable cooking pot
1 Carrying handle
2 Digital control panel
3 230 V detachable power cord
4 Cord receptacle
5 Steam cooking rack
BEFORE FIRST USE
Your electric pressure cooker is delivered completely assembled. Follow the instructions below and remove it to remove any contamination and familiarize yourself with the various parts prior to first use.
1 Grasp the lid of the pot and rotate it counter clockwise until the vertical mark is aligned with the symbol on the pressure cooker body. Then lift the cover upwards. Turn the top lid and place it on the table.
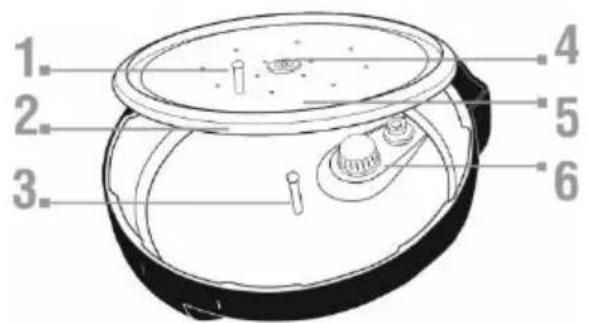
1 Grip pin
2 Sealing ring
3 Cover post
4 Grommet
5 Sealing ring plate
6 Metal vent filter
Use the grip pin (1) and pull up to remove the sealing ring plate (5) from the lid of the pot. Remove the sealing ring (2) from the sealing ring plate (5).
Remove the metal vent filter (6), see picture:
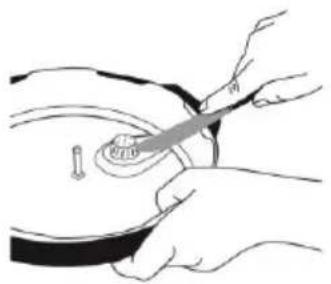
natural_image
Illustration of a medical procedure showing hand positioning a patient's abdomen with a tool (no text or symbols present)A
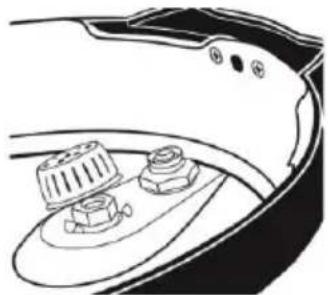
natural_image
Technical line drawing of a mechanical component with two nuts and a knob (no text or symbols)B
Although you do not need to clean the metal filter after every use, you should check it regularly and clean it if necessary.
2 Pull out the steam cooker and the removable inner receptacle from the pot body.
3 Remove all packaging materials.
4 Then clean the lid cover with a damp, soapy cloth. Do not immerse the pot lid in water. Wash the sealing cap, silicone sealant and metal valve in warm, soapy water. Thoroughly rinse and dry the parts.
ATTENTION! Never pour water into the pressure cooker and immerse the power cord in water. Always make sure the inner removable container is completely dry before placing it in the pressure cooker body.
5 After initial cleaning, reattach the top lid of the pot. When attaching the metal vent filter, secure it over all three retaining clips. Then push it in place to hear the click sound when it is in the correct position.
6 Install the silicone sealing ring. Grasp the retaining grip pin and use it to push the sealing cap back on the lid of the pressure cooker.
IMPORTANT: In the correct position, the Grip pin (1) will be facing you.
IMPORTANT INFORMATION FOR USE
Make sure that the pressure cooker is working properly before each use:
ATTENTION! To avoid electric shock, NEVER COOK WITHOUT REMOVABLE COOKING INNER POT!
Also make sure that the outside of this cooking container is completely dry before placing it in the pot body. Check that the vent filter is clean. If not, clean the hole to remove clogging.
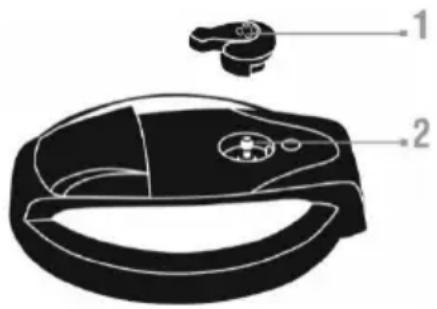
1 Quick pressure release valve
2 Vent pipe
CLOSE – to close cover
OPEN – to open cover
Make sure you do not overfill the 2/3 pot, check fill line.
When cooking foods that are foaming or expanding like rice, grains, dry beans, peas and lentils, or foods that are mostly liquids like soups, never fill the pot with more than half of the pot volume, see the picture.
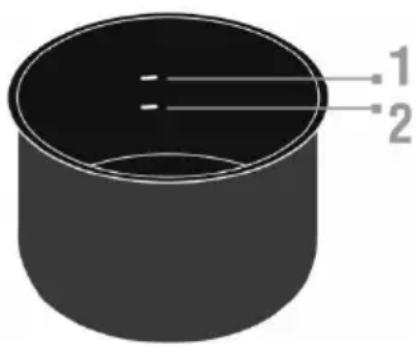
1 2/3 line
2 1/2 line
Always make sure you pour enough liquid into the internal removable pot before cooking, at least one cup at least. The teflon inner pot is to be protected from scratches, therefore use plastic or wooden spoons and ladles.
CAUTION
When cooking food such as dry beans, peas or lentils, we recommend that you first dip them. During cooking, these foods tend to foam and cause blockage of the breather pipe. Never cook under the pressure of apple, cranberry, rhubarb, pasta and dried soup mix.
COOKING
1 Place the food in the inner removable pot.
2 You can Brown/Sauté.
3 Pour the food with water.
4 Close the pressure cooker properly by turning the upper lid into position.
5 Select the cooking program on the front panel.
6 After a few minutes, the time on the display starts to count.
7 After the time has elapsed, the pressure cooker beeps and switches to "Keep warm" mode.
8 To end the cooking, press the "Cancel" button.
- First, the correct pressure must be created in the pot and the cooking time is then started
- If nothing happens make sure the pot is properly closed, there is not much liquid in it and the cooking program is really selected
- Pressing the "Cancel" button will always cancel your selection and you can enter the program, time or pressure again
HOW TO OPERATE THE DIGITAL CONTROL PANEL
Whenever you plug in the unit, it will beep once and four blue dashes will appear in the display window on the digital control panel. It will not move during the „Keep Warm“ mode or when the pot is switched off.
KEEP WARM/CANCEL BUTTON
When the cooking time has expired, the unit will automatically switch to the keep warm mode (about 65^ C). When in the keep warm mode, the light on the „Keep Warm“ button will illuminate and the blue dashes will scroll continuously. The unit will remain on for four hours and then shut automatically, unless the „Cancel“ button is pressed. The „Cancel“ button allows you to cancel the cooking or keep warm function at any time. Simply press the „Cancel“ button once. When you press „Cancel“, the light on the button will go out and the four blue dashes will stop scrolling.
BROWN/SAUTÉ
Use this function to „Brown“ or „Sauté“ foods prior to pressure cooking or slow cooking. Browning is typically used for meats and poultry, the heating temperature is approximately 170°C. Sautéing is used for vegetables and to reduce liquid after pressure cooking to make a sauce for your food, the heating temperature is approximately 150°C.
Press the button once to „Brown“ and twice to „Sauté“. The blue light next to the function selected will light up and the left digit will scroll continuously. Allow unit to preheat for 3 to 4 minutes before browning or sautéing your food.
When you finish „Brown„/“Sauté“, press the „Cancel“ button and select the next program.
PRESSURE COOKING PRESET BUTTONS
Each pressure cooking preset button has two cooking functions. To select the top cooking function, press the button once. To select the bottom cooking function, press the button twice. The blue light next to the selected cooking function will be illuminated. In addition, either the high or low pressure light will be illuminated; this will depend on the food you have selected. When "Fish" or "Vegetables - low" is selected, the blue light next to LOW pressure will be illuminated; when selecting any other food, the red light next to HIGH pressure will be illuminated.) The preset cook time for the food you have selected will appear in the display window. The default time will blink six times and then the digit on the far left will start to scroll as the unit begins heating.
| Button | Time | Pressure |
| Rice | 10 minutes | High |
| Multigrain | 25 minutes | High |
| Meat - Chop/Rib | 25 minutes | High |
| Meat - Roast | 45 minutes | High |
| Poultry | 10 minutes | High |
| Fish | 2 minutes | Low |
| Soup | 15 minutes | High |
| Stew | 12 minutes | High |
| Vegetables - high | 10 minutes | High |
| Vegetables - low | 0 minutes | Low |
| Desserts | 10 minutes | High |
| Beans | 8 minutes | High |
Because of the great variety of foods within a food grouping, the preset time may need to be adjusted manually. This is easily done by pressing the „+“ or „-”, buttons immediately after pressing the cook function button. You must do this within the first six seconds of pressing the cook function button, before the unit begins to heat. If you fail to change the time, press „Cancel“ and try again.
For all pressure cooking preset buttons, the maximum cooking time is 2 hours and the minimum cooking time is 0 minutes. While pressure is building, the time will not change. The unit begins counting down when the correct pressure is reached for the food selected.
PRESSURE BUTTON
If you prefer to manually set the pressure, instead of using the preset buttons, simply press the „PRESSURE“ button once for the low setting or twice for the high setting. The blue light next to the selected pressure will be illuminated. The default cook time is 30 minutes for low and 15 minutes for high. Adjust the cook time, if desired, by pressing the „+“ or „-, buttons immediately after pressing the „PRESSURE“ button. You must adjust the time within the six seconds, before the unit begins
to heat. If you accidentally press the wrong setting or time, simply press „Cancel“ and reset the cooker.
• High pressure is suitable for most foods.
- Use low pressure for delicate foods such as fish and some vegetables.
HOW TO USE FOR PRESSURE COOKING
Before you begin cooking, review the “IMPORTANT INFORMATION FOR EVERY USE” instructions and always verify that the unit is properly assembled.
1 Place the pressure cooker on a dry, level surface. To avoid steam damage to cabinets, position the cooker so the air vent/cover lock and quick pressure release valve are not directly under cabinets.
2 Put the top lid on the pressure cooker and rotate it until the “LOCK” mark is aligned with the symbol ☐
3 Push the quick pressure release valve onto the vent pipe and point the lever to the "COOK" position
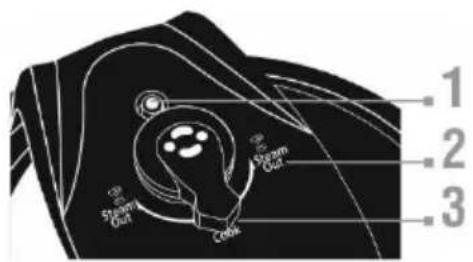
1 Blue air vent/cover lock in up position
2 Steam out
3 Cook
4 Select the appropriate preset button on the control panel for the type of food you are cooking. Adjust the cooking time as necessary or, if preferred, select „PRESSURE” and manually set the cooker.
5 As the unit is heating, air will automatically exhaust around the air vent/cover lock. You will hear this venting. When pressure begins to build, the blue air vent/cover lock will slide up, locking the cover on. Once the unit is at pressure, the timer will start to count down.
6 During cooking you may notice some steam releasing from the quick pressure release valve. This is normal.
7 It is also normal for the heat to cycle on and off during cooking to control the pressure in the cooker.
8 When the cook time has expired, the unit will beep 10 times and automatically switch to the "Keep Warm" mode.
9 You will know the pressure is completely reduced when the blue air vent/cover lock drops.
10 When the pressure drops completely or you turn it down to „Steam Out“, carefully turn the
upper lid counterclockwise until the mark | with the symbol is aligned.
11 Lift cover straight up and, while still holding the cover over the cooker, angle it 90 degrees so residual liquid drips into the pot.
CAUTION! Steam may escape and hot liquid may drip from the cooker cover when removing it. Steam and hot liquid can cause burns.
12 When cooking is complete, unplug power cord from wall outlet and then from pressure cooker.
13 Allow cooker to cool completely before cleaning.
PRESSURE RELEASE METHODS
Quick Pressure Release
This method is used when cooking vegetables, seafood, and other delicate foods. When cooking time is up, press the „Cancel“ button once and immediately move the valve lever to the „Steam Out“ position.
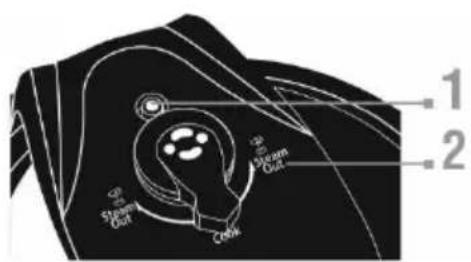
1 Blue air vent/cover lock
2 Steam Out position
1 Blue air vent/cover lock 2 Steam Out position
You will hear sputtering and steam will release for approximately 2 to 3 minutes. Pressure is completely reduced when the blue air vent/cover lock has dropped.
- CAUTION! During cooking and when opening the upper lid, there may be a strong vertical leakage of hot steam. Be careful!
- The casing, receptacle and metal parts of the instrument heat up!
- When cooking, until it cools down, steam may escape from the pressure valve of the pot and there is a risk of scalding.
- While pressure is pressurized (blue safety valve is in the upper position), do not climb over the pot as hot steam may escape.
- Hold the valve lever (not the entire valve) to release the pressure in the pot and turn it slightly to the "Steam Out" position.
Let pressure drop of its own accord
This method is used when cooking foods such as meats, soups, and grains. When cooking time is up, keep the quick pressure release valve in the „Cook“ position. Let the pressure cooker cool until the blue air vent/cover lock drops.
SLOW COOKING
Due to the slow cooking nature, the meat does not brown, as if cooked in a pan or oven. Before Slow cooking, it is not necessary to fry the meat or poultry, but you can do this if the meat tastes better.
Frying minced beef, bacon and sausage before Slow cooking may be desirable if you want to remove excess fat from the meat. Avoid opening the pot during Slow cooking as this will cause considerable heat and steam loss. If you still have to open the pot, do it as quickly as possible. Some foods such as carrots, potatoes and beets require longer cooking than meat, so cut them into smaller pieces before adding them to the meat.
1 Follow steps 1 through 7 „HOW TO USE FOR PRESSURE COOKING“.
2 Push the quick pressure release valve onto the vent pipe.
IMPORTANT: Point the lever to the „Steam Out“ position.
3 Press the "Slow Cooking" button once to set a higher temperature (approx. 93°C) or twice for a lower temperature (approx. 82°C). The blue light next to the function selected will light up.
Adjust the slow cooking default time, if desired, by pressing the „+“ or „-“ buttons. The left digit will scroll throughout slow cooking.
4 When the cook time has expired, the unit will beep and automatically switch to the „Keep
Warm" mode. The left digit will stop scrolling.
5 Press the „Cancel“ button once and carefully remove the cover. Rotate counterclockwise until
the mark | vertical mark is within the mark on the cooker body.
6 Lift cover straight up and, while still holding the cover over the cooker, angle it 90 degrees so residual liquid drips into the pot.
CAUTION! Steam may escape and hot liquid may drip from the cooker cover when removing it. Steam and hot liquid can cause burns.
7 When cooking/keep warm are complete, unplug power cord from wall outlet and then from pressure cooker.
8 Allow cooker to cool completely before cleaning.
CLEANING
After every use:
1 Unplug power cord from wall outlet and then from pressure cooker. Allow cooker to cool completely before cleaning.
2 After each use, remove the quick pressure release valve from the cover. Then detach the sealing ring plate from the cover by pulling the grip pin. Remove the sealing ring from the plate. Do not remove the center grommet on the sealing ring plate. If the vent filter appears dirty or contains debris, remove it from the underside of the cover.
3 Clean the cooker cover with a damp, soapy cloth and then dry completely. Do NOT immerse the cooker cover in water. Wash the sealing ring, sealing ring plate, and vent filter in warm, soapy water. Do NOT wash these parts in the dishwasher. Thoroughly dry all cover parts after cleaning.
4 To be sure the vent pipe is clear, hold the cover up to the light and look through the vent pipe. Clean it with a small brush or pipe cleaner if it is blocked or partially blocked. If necessary, clean the vent filter with a small brush to remove any food particles from the slots and holes.
5 Rinse and dry all parts thoroughly and reassemble.
6 If you have used it during cooking the steam cooking rack in warm, soapy water. Do NOT wash in the dishwasher.
7 Remove the cooking pot from the cooker body. Wash the pot in warm water and a mild detergent. The cooking pot may also be washed in the dishwasher.
8 The nonstick surface may be cleaned with a non-metal cleaning pad. Do not use steel wool or abrasive cleaners on the cooking pot or the cooker body.
9 Soaking the cooking pot to loosen food residue is not necessary. If, however, soaking the pot is desired, do not soak for more than two hours. Soaking the pot for more than two hours may damage the nonstick finish.
10 CAUTION! Never pour water into the cooker body or immerse it or the power cord in water. Always be sure the pot is COMPLETELY DRY before placing it back in the cooker body.
11 Clean the plastic rim of the cooker body with a damp cloth. Avoid getting water inside of the cooker body.
CARE AND MAINTENANCE
- When not in use, store your pressure cooker in a dry place. To prevent unpleasant odors from lingering, store the unit with the cover inverted on the cooker body.
- As is the case with all cookware, avoid chopping or cutting food inside the cooking pot with a knife or other sharp utensil. Do not use metal utensils as they may scratch the nonstick surface.
- Do not strike the rim of the cooking pot with any cooking utensil. This could cause nicks in the rim which may allow steam to escape and prevent the pressure cooker from sealing.
- Periodically check the vent pipe nut for looseness.
- Any required maintenance for this product, other than normal household care and cleaning, should be performed by the TESLA service department.
QUESTIONS AND ANSWERS
- What does it mean when E3 appears in the display window and the unit stops working? The cooker has overheated. You likely operated the unit in pressure cooking mode with insufficient or no liquid. If this occurs, unplug the unit and allow it to cool. Then remove the cover and add liquid to the cooker. Plug the unit back in, place the cover on, and reprogram the cooker.
- What does it mean when E1, E2, E4, or E5 appear in the display window and the unit stops working?
E1: Sensor error, E2: Short circuit, E4: Low pressure sensor error, E5: High pressure sensor error. Contact TESLA service department.
- Sometimes when pressure cooking, I notice beads of moisture forming in the area of the pressure release valve. I also sometimes hear what sounds like escaping steam prior to the point in time that the timer begins to count down. Is there something I am doing wrong?
No. Both are normal and can be expected as part of pressure cooking.
- I pressed the wrong button by accident and the cooker is not allowing me to press the right one. What can I do?
Press "Cancel" button. This will enable you to start over and press the correct button.
- When I tried to adjust the time, it did not change. What am I doing wrong?
You did not adjust the time within the first six seconds. Press "Cancel" and begin again by choosing the desired setting and adjusting the time as needed.
- I can see steam escaping from around the cover. Why?
You forgot to put the sealing ring on the sealing plate or you forgot to install the sealing ring plate in the cooker cover.
NOTICE: If either of these parts are not in place during cooking, the cooker will leak, pressure will not build, and you may damage the unit.
- I can hear steam venting from the quick pressure release valve and pressure is not building. Why?
You have the quick pressure release valve in the "Steam Out" position. The quick pressure release valve must be in the "Cook" position in order for pressure to build and the cooker to seal.
- Sometimes when I'm pressure cooking foods such as a roast, the time doesn't change. Why?
The pressure cooker has not reached operating pressure. Countdown will begin as soon as the cooker reaches operating pressure.
• Occasionally the cover is hard to open. What causes this? What should I do?
If the cover seems difficult to open, there may still be pressure in the cooker. Be sure the air vent/cover lock has dropped before trying to open the cooker. If the cover rotates but it seems to catch on the rim of the body, you are not lifting the cover straight up off the cooker body.
- Sometimes my food is not completely done after the recommended cooking time. When I try to put the cover back on the cooker, so I can cook it longer, the cover will not close. How can
I get the cover closed?
Allow the pressure cooker to cool slightly. When the cooker is still hot, the air vent/cover lock will lift, preventing you from closing the cover. Before placing the cover back on, be sure the quick pressure release valve is in the “Steam Out” position. Once the cover is closed, move the lever to the “Cook” position.
• What can be done if the food prepared in the pressure cooker has more liquid than desired?
With the cover removed, press “Sauté” and allow the excess liquid to evaporate. Next time you prepare the same recipe, you may want to use less liquid.
- I believe I am thoroughly cleaning my cooker, but sometimes I notice the odor of my last meal remains in the cooker. Is there something I am doing wrong?
The sealing ring is made of silicone. Silicone has many wonderful properties but it does tend to retain odors. Over time, the odor will dissipate.
PRACTICAL PROCEDURE - an example of cooking a soup in a pressure cooker
This pressure cooker is perfect for preparing delicious soups and stews. If adding dry beans and peas, they first must be soaked.
CAUTION! Do not pressure cook soups containing barley, rice, pasta, grains, split peas, and dried soup mixes because they have a tendency to foam, froth, and sputter and could block the vent pipe. These foods should be added to the soup AFTER pressure cooking.
FOR SOUPS AND STEWS, DO NOT FILL COOKING POT OVER 12 FULL!
Chicken broth
chicken can be frozen celery, cut into pieces split onion 3 cloves of garlic, split salt, pepper, soup spices
Add chicken, celery, onion, garlic, salt, pepper, spices and water to the cooking pot. Close the top lid, press the "Soup" button, the display shows "15" and the light on "High" (pressure) lights up. The pressure cooker will start heating and when the desired pressure is reached, the cooking begins - a 15 minute time-out on the display. After completing the time off, let pressure drop of its own accord (you can always customize your cooking time by yourself, extend or shorten it according to your needs).
WARRANTY REPAIR
For warranty repair, contact the dealer where you purchased the TESLA product.
The warranty DOES NOT APPLY to:
• using the device for other purposes than it was designed to
- failure to observe the "IMPORTANT SAFETY WARNINGS" stated in the user manual
• electrical or mechanical damage caused by improper use
- damage caused by natural elements such as water, fire, static electricity, power surges etc.
• damage caused by an unauthorized repair
- unreadable serial number
DECLARATION OF CONFORMITY
We, INTER-SAT LTD, org. slozka, declare that this device complies with the essential requirements and other relevant provisions of the standards and regulations relevant to the type of equipment.

This product complies with the requirements of the Europe Community.
natural_image
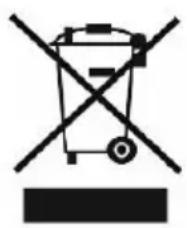
Symbol of a trash bin crossed with a diagonal line, no text or numbers presentWhen this crossed-out wheeled bin symbol is attached to a product it means that the product is covered by the European Directive 2002/96/EC. Please inform yourself about the local separate collection system for electrical and electronic products. Please act according to your local rules and do not dispose of your old products with your normal household waste. Correct disposal of your old product helps to prevent potential negative consequences for the environment and human health.
Due to the fact that the product is being developed and improved, we reserve the right to edit the user manual. The current version of this user manual can always be found at www.tesla-electronics.eu.
Design and specifications are subject to change without notice, print errors reserved.


- IMPORTANT SAFETY WARNINGS
- IMPORTANT INFORMATION - THE POWER CABLE
- PARTS OF THE ELECTRIC PRESSURE COVER
- BEFORE FIRST USE
- IMPORTANT INFORMATION FOR USE
- ATTENTION! To avoid electric shock, NEVER COOK WITHOUT REMOVABLE COOKING INNER POT!
- Make sure you do not overfill the 2/3 pot, check fill line.
- CAUTION
- COOKING
- HOW TO OPERATE THE DIGITAL CONTROL PANEL
- KEEP WARM/CANCEL BUTTON
- BROWN/SAUTÉ
- PRESSURE COOKING PRESET BUTTONS
- PRESSURE BUTTON
- HOW TO USE FOR PRESSURE COOKING
- PRESSURE RELEASE METHODS
- Quick Pressure Release
- Let pressure drop of its own accord
- SLOW COOKING
- CLEANING
- After every use:
- CARE AND MAINTENANCE
- QUESTIONS AND ANSWERS
- I get the cover closed?
- PRACTICAL PROCEDURE - an example of cooking a soup in a pressure cooker
- FOR SOUPS AND STEWS, DO NOT FILL COOKING POT OVER 12 FULL!
- Chicken broth
- WARRANTY REPAIR
- The warranty DOES NOT APPLY to:
- DECLARATION OF CONFORMITY
Brand : TESLA
Model : EliteCook K50
Category : Uncategorized