
C7 - Dash cam Lamax - Free user manual and instructions
Find the device manual for free C7 Lamax in PDF.


| Product type | Dashboard camera |
| Brand | Lamax |
| Model | C7 |
| Display | 2.4" HD LCD |
| Angle of view | 150° |
| Video resolution | 1920x1080 FHD 30fps, 1280x720 HD 60fps, 1280x720 HD 30fps, 640x480 VGA 30fps |
| Video format | AVI |
| Image resolution | Up to 14 MP |
| Photo format | JPG |
| Memory type | microSDHC up to 32 GB (Class 10 or higher recommended) |
| Connectivity | USB, HDMI, TV out |
| GPS | Optional external module |
| Power supply | 5V via USB / cigarette lighter; built-in battery for parking mode |
| Battery | Non-removable, rechargeable (for parking mode) |
| Dimensions (approx.) | 70 x 50 x 30 mm (estimated based on 2.4" display) |
| Weight (approx.) | 60 g (estimated) |
| Key features | Full HD recording, G-sensor, loop recording, parking mode, motion detection, timelapse recording, GPS support |
| Mounting | Suction cup mount |
| Operating temperature | Not specified; avoid extreme heat |
| Care and cleaning | Use soft lint-free cloth; do not clean when powered; avoid solvents |
| Safety | Do not use controls while driving; mount away from airbags; use only supplied charger |
| Spare parts / repairability | Not user-serviceable; contact dealer for warranty |
| General information | Complies with EU directive 2014/30/EU; 2-year warranty |
Frequently Asked Questions - C7 Lamax
User questions about C7 Lamax
0 question about this device. Answer the ones you know or ask your own.
Ask a new question about this device
Download the instructions for your Dash cam in PDF format for free! Find your manual C7 - Lamax and take your electronic device back in hand. On this page are published all the documents necessary for the use of your device. C7 by Lamax.
USER MANUAL C7 Lamax
LAMAX C7 car camera features and functions....1
Pack contents....1
Product picture ....1
Product installation....2
Quick functions....2
Icons annotation....2
Using the LAMAX C7 car camera ....3
1) Inserting Micro SDHC card ....3
2) Power....3
3) Turning the camera on and off .... 3
4) Changing modes and menu navigation....3
5) Recording / taking photos / gallery 3
6) Timelapse recording 4
7) Deleting the entries on the camera 4
8) Protecting the files on the camera 4
9) Connecting to a PC....4
GPS function....4
LAMAX Player 4
LAMAX C7 car camera settings – video mode....4
1) Video settings....4
2) Video quality....5
3) Recording duration 5
4) Auto power off 5
5) SOS recording duration 5
6) Microphone....5
7) Microphone sensitivity 5
8) Exposure....5
9) White balance....5
10) ISO sensitivity....5
11) Parking mode....5
LAMAX C7 car camera settings – photo mode....5
1) Image size 5
2) Photo quality 5
3) Exposure....5
4) White balance....5
5) ISO sensitivity 5
LAMAX C7 car camera general settings 6
1) Key tones....6
2) Auto power off....6
3) Date/Time 6
4) Date format 6
5) Display location....6
6) Display speed....6
7) Display GPS 6
8) Refresh rate 6
9) USB....6

10) Rotate display....6
11) Screensaver....6
12) G-sensor level 6
13) Motion detection....6
14) GPS status....6
15) Choose time zone 6
16) Restore factory settings 6
17) Format SD card....6
18) SD card info ....7
19) Firmware version ....7
Language settings....7
LAMAX C7 car camera parameters....7
Safety measures....8
Precautions and notices....8
Safety precautions 8
Caring for your device 8
Other information....9
Declaration of Conformity 9
Introduction
Thank you for purchasing the LAMAX C7 car camera. You are now the owner of a reliable companion for your car journey. A complete multilingual manual can be downloaded from the product page at www.lamax-electronics.com.
LAMAX C7 car camera features and functions
- Full HD video 1920 x 1080
- G-senzor
- Loop recording
- Parking mode
- Motion sensor
- Video timelapse
- GPS modul (optional)
- Multilingual menu
Pack contents
- LAMAX C7 car camera
- Power cable
- USB cable
- Camera suction mount
- User Manual
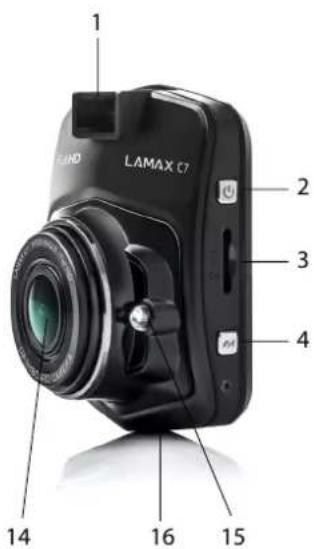
Product picture
- Suction mount slot
- ON/OFF
- Micro SDHC slot
- MENU
- OK (shutter)
- Down arrow
- Parking mode (video timelapse)
- Up arrow
- MODE
- Mini USB device
- A/V device
- HDMI device for GPS modul
- Display
- Lens
- LED diod
- Microphone
- RESET

Product installation
1) Connect the power cable to the cigarette lighter. Ensure the cable is placed around the windscreen so as not to obstruct the driver's view and then fix it securely in place. Attach the device between the glass and the mirror. This will give you the optimal picture.
2) Do not install in a position which obstructs the driver's view or distracts them.
3) Some vehicles continue to supply power to the cigarette lighter, even when the engine is turned off. In this case, before leaving the vehicle, unplug the cable from the cigarette lighter.
4) When using the device for the first time, the battery may be low. If you cannot switch on the device due to low power, manually connect the external power cable to charge the battery.
5) Use only a high-quality micro SDHC card of class 10 or higher. For optimal recording use, we recommend cards with a capacity of at least 8GB up to a maximum of 32GB. If this is the first use of the card, we recommend formatting it first.
Quick functions
1) LED light - tap the UP arrow to switch between ON/OFF/Auto.
2) Parking mode – tap the „PARKING MODE“ button.
3) ON/OFF LCD - tap the DOWN arrow.
4) Lock/unlock file – file can be lock/unlock during recording by tap MODE button.
5) Timelapse – for ON/OFF timelapse pushand hold red button (P) at least for two seconds.
6) Mute/Unmute Microphone - hold the "MODE" button.
Icons annotation
| DISPLAY | |||
 | Mem card not detected |  | LED light OFF |
 | Mem card detected | [88A7] | LED light ON |
| [103H] | Battery status | [10C3] | LED light Auto |
| [12XW] | Video Mode |  | Exposure Value |
| [07ZA] | Photo Mode | [7902] | Motion Detection |
| [10KCI] | Video Resolution |  | Parking Mode |
 | File locked | [145Z] | Timelapse |
| DISPLAY: White Balance | |||
| AWB | White Balance – Auto |  | White Balance – Fluorescent |
 | White Balance – Daylight |  | White Balance – Tungsten |
 | White Balance – Cloudy | ||
| MENU: Gallery | |||
 | Delete file |  | Delete all |
 | Lock file |  | Unlock file |
 | Lock all |  | Unlock all |
| MENU: White Balance | |||
 | White Balance – Auto |  | White Balance – Fluorescent |
 | White Balance – Daylight |  | White Balance – Tungsten |
 | White Balance – Cloudy | ||
Using the LAMAX C7 car camera
1) Inserting Micro SDHC card
Insert or remove the micro SDHC card from the card slot only when the camera is turned off and not connected to a computer or power supply.
2) Power
a) Camera can be powered using a USB cable connected to a computer or using the car cigarette lighter.
b) Camera is designed to be powered continuously. Built-in battery can not be removed or replaced.
c) Integrated battery is primarily for use in parking mode.
3) Turning the camera on and off
a) To switch on the camera, press and hold the ON/OFF button for 3-5 seconds.
b) Cameras automatically turns on when connected to a power supply.
c) To switch off the camera, press and hold the ON/OFF button for 3-5 seconds.
d) Camera automatically turns off after disconnecting the power supply.
4) Changing modes and menu navigation
a) Repeatedly tap the "MODE" button to toggle between video/camera/videogallery/photogallery.
b) Camera menu has 4 sections—general settings/video settings/photo settings/language. To toggle between these use the "UP" and "DOWN" arrows and select by pressing. To enter to the each menu push MENU button. Under each section move vertically using the "UP" and "DOWN" arrows and select by pressing "OK".
c) To independently change the settings in video/photo mode, you must access the settings from the relevant mode. Therefore, you can only enter video settings in video mode and photo settings in photo mode.
d) To go back a level use the "MENU" button. To completely exit the setting, press the "MODE" button.
5) Recording / taking photos / gallery
a) To start the camera recording press the "OK" button. Press it again to stop recording. The camera must be in record mode.
b) Automatic recording – the automatic recording function is always enabled. Automatic recording starts after connecting the camera to a power supply. If the car's power only starts after the ignition is turned on then the camera turns on and starts recording when the car is started.
c) Automatically start/stop recording – the camera automatically stops recording and turns off after the engine is turned off and the power cut. In some cars the cigarette lighter is powered permanently. In this case, be sure to unplug the cable from the cigarette lighter.
d) Take photos by pressing the "OK" button. The camera must be in photo mode.
e) After switching to the gallery, which displays a list of recorded videos and photos, navigate between these using the "UP" and "DOWN" arrows. To start and stop a recording press the "OK" button.
6) Timelapse recording
For start timelapse recording press and hold red button (P) at least for two seconds. Camera starts timelapse recording and red icon (T) appears on a display. For stop recording tap the OK button. Press it again to start recording in timelapse mode. Press and hold red button (P) at least for two seconds again to turn off timelapse mode.
7) Deleting the entries on the camera
a) Deleting single entry directly on the camera – can be done in the gallery. Press the MENU button, choose „Delete“ and then choose „recycle bin separately“ icon and then choose the file you want to delete.
b) Deleting all entries – can be done in the gallery. can be done in the gallery. Press the MENU button, choose "Delete" and then choose "recycle bin wholesale" icon and then choose video or photo icon.
8) Protecting the files on the camera
a) Locking the current entry – can be done in the gallery. Press the MENU button, choose „Protect“ and then choose „book with lock“ icon and then choose the file you want to protect.
b) Unlocking the current entry – can be done in the gallery. Press the MENU button, choose „Protect“ and then choose „book without lock“ icon and then choose the file you want to unlock.
c) Locking all entries – can be done in the gallery. Press the MENU button, choose „Protect“ and then choose „file with lock“ icon and then choose video or photo icon.
d) Unlocking all entries - can be done in the gallery. Press the MENU button, choose „Protect“ and then choose „file without lock“ icon and then choose video or photo icon.
9) Connecting to a PC
Camera can be connected to a PC via the supplied mini USB cable. Camera now acts like a webcam or a plug'n'play device.Connection type can be set in General Menu, USB section.
GPS function
The device supports an external GPS module which can record the rout of the journey. GPS is displayed in red on the screen when it is searching for a signal and green when it has located its position.
GPS function is needed to be turned on in „General settings“. The current longitude, latitude and speed is then displayed on the screen and in the video.
LAMAX Player
It is possible to download LAMAX Player on LAMAX Electronics webpage. Google maps are part of the Player. When playing a video, the complete driving route and current position are displayed simultaneously.
G-sensor curves which notice movement and potential impact are displayed under video screen. Thanks to it you have the evidence that the accident actually occurs.
LAMAX Player can be downloaded on following link:
https://www.lamax-electronics.com/download/lamax-drive-c7/gps-app-lamax-drive-c7.zip
LAMAX C7 car camera settings – video mode
1) Video settings
Video resolution can be set in the video settings menu. Access the video settings menu by pressing "MENU" in video mode. Use "UP" and "DOWN" to scroll to "Video settings" and choose one of the options – FHD/30p (1920x1080, 30 fps), HD/30p (1280x720, 30 fps), HD/60p (1280x720, 60 fps) a VGA/30p (640x480, 30 fps).
2) Video quality
Compresses video directly to the memory card with minimal loss of quality.
SHQ – shot in high-quality, lossless
HQ - shot in a slightly lower quality, reduces amount of data by half.
3) Recording duration
Camera recording is subdivided into individual sequences, whose length can be manually adjusted or turned off completely. The sequences may be 1, 3, 5 or 10 minutes.
4) Auto power off
Sets the time delay for powering off after disconnecting the power supply, from 0 to 3 min.
5) SOS recording duration
Sets the recording duration when using motion detection in the range 5 – 60 s.
6) Microphone
Microphone can be disabled to prevent unwanted audio recording. Audio recording can also be turned on or off using a dedicated button.
7) Microphone sensitivity
Allows two levels of microphone sensitivity.
8) Exposure
Allows you to adjust exposure if necessary. Exposure of the recording can be set from -2 – +2 in increments of 1/3.
9) White balance
Sets the white balance of the shot – auto, daylight, overcast, incandescent, fluorescent.
10) ISO sensitivity
ISO setting determines the sensitivity of the video chip. The darker the subject of the shot, the higher the ISO should be set. A higher ISO leads to more noise. It can be set to auto, 100, 200 and 400.
11) Parking mode
In parking mode, the camera begins recording when a collision or a break-in are detected. It can be set at different levels of sensitivity (2G, 4G, 8G), with the highest sensitivity being 2G and the lowest being 8G. Can be easily turned on and off using a dedicated button. Parking mode lasts for up to 24 hours on a single charge.
LAMAX C7 car camera settings – photo mode
1) Image size
Adjusts individual settings in the photo settings menu. Photo settings are accessed by pressing the "MENU" button on the camera. Use "UP" and "DOWN" to scroll to "image size" and choose one of the options – 14 MP, 12 MP, 8 MP, 5 MP, 3 MP, 2 MP, 1.2 MP or VGA.
2) Photo quality
Sets the overall quality and size of the photos. Quality can be set at very high (SHQ) or high (HQ).
3) Exposure
Allows you to adjust the exposure if necessary. Set the photo exposure from -2 - +2 in increments of 1/3.
4) White balance
Sets the white balance of the shot – auto, daylight, overcast, incandescent, fluorescent.
5) ISO sensitivity
ISO setting determines the sensitivity of the video chip. The darker the subject of the shot, the higher the ISO can be set. A higher ISO leads to more noise. Can be set at auto, 100, 200 and 400.

LAMAX C7 car camera general settings
1) Key tones
Enables or disables key tones.
2) Auto power off
Allows you to set auto power off after 1 or 5 minutes.
3) Date/Time
Sets the date and time on the device. Date format can also be chosen.
4) Date format
Sets the format of the displayed date (year/month/day, month/day/year, day/month/year) or turns it off completely.
5) Display location
Allows you to display the GPS coordinates on the video. Works only when GPS module is connected correctly.
6) Display speed
Displays actual movement speed on screen and on the video. Works only when GPS module is connected correctly.
7) Display GPS
Should be enabled for the proper functioning of the camera with the GPS module. The GPS icon appears on the display and the speed (when enabled) is shown in km/h.
8) Refresh rate
Sets the frequency in accordance with the grid frequency (on the European continent the frequency is 50Hz , in the Americas and parts of Asia it is 60Hz ).
9) USB
Sets how the camera behaves when connected to a PC. Can be connected as a webcam (PC CAM) or plug, n' play (MSDC) device.
10) Rotate display
Allows you to rotate the screen 180°. Handy when mounting the camera on the dashboard.
11) Screensaver
Sets the display to auto power off when idle for 3, 5 or 10 minutes.
12) G-sensor level
Connected to other functions of the car camera. Can be set at three different levels of sensitivity (high, medium and low). Setting the proper sensitivity affects the functionality of the camera's other features. For the proper functioning of "parking mode" we recommend a higher sensitivity for capturing minor collisions (when parking, vandalism). For the proper functioning of the file locking feature we recommend a lower sensitivity to prevent unwanted locking, for example, when on rough terrain. The g-sensor icon can be seen on the left of the display.
13) Motion detection
When motion detection is enabled, the camera begins recording the moment movement is detected in the lens field of view. Camera stops recording after motion ceases.
14) GPS status
Information about the GPS connection.
15) Choose time zone
Select the time zone where you are.
16) Restore factory settings
Restores all settings back to their original state.
17) Format SD card
Formats the microSDHC card.
18) SD card info
Information about the duration of video that can be recorded on the memory card before it is full.
Information about the current firmware version.
Language settings
Access the language menu by pressing "MENU". Use arrow keys to scroll to language and press OK. Use the arrows keys to select your language and press OK.
LAMAX C7 car camera parameters
| Display | 2,4" HD LCD |
| Angle of view | 150° |
| Video resolution | 1920x1080 FHD 30 fps, 1280x720HD (60 fps), 1280x720 HD (30 fps), 640x480 VGA (30 fps) |
| Video format | avi |
| Image resolution | up to 14 MP |
| Photo format | jpg |
| Memory type | microSDHC up to32 GB |
| Connectivity | USB, HDMI, TV out |
| Frequency | 50/60 Hz |
| GPS | yes (optional) |
| Operating system compatibility | MS Windows, Mac OS |
Note: Specifications are subject to change when replacing a piece of equipment or after software updates.
Note that some European Union countries have specific laws governing recording with a car camera. Therefore we recommend that before each trip abroad find out about the local legislation, ideally from local car clubs. The camera may be used as evidence, even when dealing with the police. Again we recommend getting to know the legal rights in each individual country. Please note that recorded material can also be used against the author of the recording. The brand LAMAX Electronics is not responsible for the illegal use of cameras or material recorded by these cameras.
Safety measures
- Do not drop camera or subject it to physical shocks or anything which may lead to mechanical damage.
- Do no place the camera near objects with a strong magnetic field, such as magnets or electric motors. Do not place the camera too close to buildings emitting strong radio waves such as antennas. Strong magnetic fields and radio waves can cause damage to the camera or damage to the captured images and audio recordings.
- Do no expose the camera to high temperatures or direct sunlight.
- Use only microSDHC cards from reputable brands. Cards from generic manufacturers do not guarantee proper data storage functioning.
- Do no place the microSDHC card near a magnetic field or a source of static electricity. This will prevent the loss of stored data.
- In the event that the device overheats whilst charging, gives off smoke or a suspicious odour, unplug the device immediately and stop charging.
- Whilst charging, keep the device out of reach of children. Power cable can cause electric shock or asphyxiation to a child.
- Store in a cool, dry and dust-free environment.
Precautions and notices
- For your own safety, do not use the camera's controls while driving.
- A window mount is needed when using the recorder in a car. Make sure that you place the recorder in an appropriate place, so as not to obstruct the driver's view or deployment of airbags.
- Make sure that no object is blocking the camera lens and no reflective material is placed near the lens. Please keep the lens clean.
- If the car's windshield is tinted or coated, it may impact the recording quality.
Safety precautions
- Use only the charger supplied with your device. Use of another type of charger may result in malfunction and/or danger.
- Do not use the charger in high moister environment. Never touch the charger when your hands or feet are wet.
- Allow adequate ventilation around the charger when using it to operate the device or to charge the battery. Do not cover the charger with paper or other objects that will reduce cooling. Do not use the charger while it is inside a carrying case.
- Connect the charger to a proper power source. The voltage requirements are found on the product case and/or on the packaging.
- Do not use the charger if it is visibly damaged. In case of damage, do not repair the equipment yourself!
- In case of device overheating, immediately disconnect the power source.
- Charge the device under supervision only.
Caring for your device
- Taking good care of your device will ensure trouble-free operation and reduce the risk of damage.
- Keep your device away from excessive moisture and extreme temperatures and avoid exposing your device to direct sunlight or strong ultraviolet light for extended periods of time.
- Do not drop your device or subject it to severe shock.
- Do not subject your device to sudden and severe temperature changes. This could cause moisture condensation inside the unit, which could damage your device. In the event of moisture condensation, allow the device to dry out completely before use.
- The screen surface can easily be scratched. Avoid touching it with sharp objects.
- Never clean your device when it is powered on. Use a soft, lint-free cloth to wipe the screen and the exterior of your device. Do not use paper towels to clean the screen.
-
Never attempt to disassemble, repair or make any modifications to your device. Disassembly, modification or any attempt at repair could cause damage to your device and even bodily injury or property damage and will void any warranty.
-
Do not store or carry flammable liquids, gases or explosive materials in the same compartment as your device, its parts or accessories.
- To discourage theft, do not leave the device and accessories in plain view in an unattended vehicle.
- Overheating may damage the device.
Other information
1) For households: This marking indicates that this product should not be disposed with other household wastes throughout the EU. To prevent possible harm to the environment or human health from uncontrolled waste disposal, recycle it responsibly to promote the sustainable reuse of material resources. To return your used device, please use the return and collection systems or contact the retailer where the product was purchased. They can take this product for environmental safe recycling. In case of incorrect disposal of this kind of wastes user can be fined according to

national laws. User information for disposal of electric and electronic devices in countries outside the EU: The symbol stated above (crossed recycle bin) is valid only in countries in European Union. For correct disposal of electric and electronic devices ask your city hall or distributor of these devices. Everything is expressed by the symbol of crossed recycle bin on product, cover or printed materials.
2) You can determine a warranty service at the place of purchase. In case of technical problems or queries contact your dealer who will inform you about the following procedure. Follow the rules for work with electric devices. User is not allowed to disassembly the device neither replace any of its components. To reduce the risk of electric shock, do not remove or open the cover. In case of incorrect setup and plug in of device you will expose yourself risk of electric shock.
Declaration of Conformity
Hereby, elem6 s.r.o., declares that all LAMAX products are in compliance with the essential requirements and other relevant provisions of Directive 2014/30/EU. Products are intended for sale without any restriction in Germany, Czech Republic, Slovak Republic, Poland, Hungary and other EU countries. Products are covered for two years warranty, unless otherwise stated. You can download the Declaration of Conformity from the website: www.lamaxelectronics.com.

Manufacturer:
elem6 s.r.o.,
Misprints and changes in the manual are reserved.
LAMAX
ELECTRONICS
DE - BENUTZERHANDBUCH
LAMAX C7

INHALTSVERZEICHNIS
Einleitung....1
https://www.lamax-electronics.com/download/lamax-drive-c7/gps-app-lamax-drive-c7.zip
https://www.lamax-electronics.com/download/lamax-drive-c7/gps-app-lamax-drive-c7.zip
SK – UŽÍVATELŠKÝ MANUÁL
LAMAX C7

OBSAH
Úvod....1
Autokamera LAMAX C7 má tieto vlastnosti a funkcie....1
Obsah balenia ....1
Nákres produktu....1
https://www.lamax-electronics.com/download/lamax-drive-c7/gps-app-lamax-drive-c7.zip
Nastavenie autokamery LAMAX C7 – režim video
1) Nastavenie video
Rozlíšenie videa môžete nastaviť v samostatnej časti menu nastavenia videa. Do menu nastavenia videa sa dostanete stlačením tlačidla „MENU“ v režime video. Šípkami „HORE“ a „DOLE“ prejdite na položku „Nastavenie videa“ a zvolte jednu z možností – FHD/30p (1920x1080, 30 sn/s), HD/30p (1280x720, 30 sn/s), HD/60p (1280x720, 60 sn/s) a VGA/30p (640x480, 30 sn/s).
2) Kvalita video
https://www.lamax-electronics.com/download/lamax-drive-c7/gps-app-lamax-drive-c7.zip
https://www.lamax-electronics.com/download/lamax-drive-c7/gps-app-lamax-drive-c7.zip
https://www.lamax-electronics.com/download/lamax-drive-c7/gps-app-lamax-drive-c7.zip
Automobilinio registratoriaus LAMAX C7 nustatymai - video režimas
https://www.lamax-electronics.com/download/lamax-drive-c7/gps-app-lamax-drive-c7.zip
HR - UPUTE ZA UPORABU
LAMAX C7

OBSAH
Uvod....1
Funkcije i karakteristike automobilske kamere LAMAX C7 ....1
Sadržaj kompleta....1
Opis uređaja ....1
Instalacija uređaja 2
https://www.lamax-electronics.com/download/lamax-drive-c7/gps-app-lamax-drive-c7.zip
Potavke kamere LAMAX C7 – video režim
1) Rezolucija video
Rezoluciju videa možete postaviti u posebnom odjeljku izbornika za postavke videa. U izbornik video postavki ulazi se pritiskom na tipku „Izbornik“ u video režimu. Pomoću strelica „Gore“ i „Dolje“ izaberite opciju „Postavke videa“ i izaberite jednu od dostupnih mogućnosti: FHD / 30p (1920x1080, 30 fps), HD/30p (1280x720, 30 fps), HD/60p (1280x720, 60fps) lub VGA/30p (640x480, 30fps).
2) Kvaliteta video
Funkcija omogućuje kompresiju videa neposredno na memorijsku karticu, takva datotea zauima puno menje prostora bez gubitka kvalitete.
SHQ – snima u najboljoj kvaliteti, ne gubi kvalitetu



- Language settings....7
- LAMAX C7 car camera parameters....7
- Safety measures....8
- Precautions and notices....8
- Safety precautions 8
- Caring for your device 8
- Other information....9
- Declaration of Conformity 9
- Introduction
- LAMAX C7 car camera features and functions
- Pack contents
- Product picture
- Product installation
- Quick functions
- Using the LAMAX C7 car camera
- 1) Inserting Micro SDHC card
- 2) Power
- 3) Turning the camera on and off
- 4) Changing modes and menu navigation
- 5) Recording / taking photos / gallery
- 6) Timelapse recording
- 7) Deleting the entries on the camera
- 8) Protecting the files on the camera
- 9) Connecting to a PC
- GPS function
- LAMAX Player
- LAMAX C7 car camera settings – video mode
- 1) Video settings
- 2) Video quality
- 3) Recording duration
- 4) Auto power off
- 5) SOS recording duration
- 6) Microphone
- 7) Microphone sensitivity
- 8) Exposure
- 9) White balance
- 10) ISO sensitivity
- 11) Parking mode
- LAMAX C7 car camera settings – photo mode
- 1) Image size
- 2) Photo quality
- 3) Exposure
- 4) White balance
- 5) ISO sensitivity
- LAMAX C7 car camera general settings
- 1) Key tones
- 2) Auto power off
- 3) Date/Time
- 4) Date format
- 5) Display location
- 6) Display speed
- 7) Display GPS
- 8) Refresh rate
- 9) USB
- 10) Rotate display
- 11) Screensaver
- 12) G-sensor level
- 13) Motion detection
- 14) GPS status
- 15) Choose time zone
- 16) Restore factory settings
- 17) Format SD card
- 18) SD card info
- Language settings
- Safety measures
- Precautions and notices
- Safety precautions
- Caring for your device
- Other information
- Declaration of Conformity
- Manufacturer:
- LAMAX
- ELECTRONICS
- LAMAX C7
- INHALTSVERZEICHNIS
- OBSAH
- Nastavenie autokamery LAMAX C7 – režim video
- 1) Nastavenie video
- 2) Kvalita video
- Automobilinio registratoriaus LAMAX C7 nustatymai - video režimas
- Potavke kamere LAMAX C7 – video režim
- 1) Rezolucija video
- 2) Kvaliteta video
Brand : Lamax
Model : C7
Category : Dash cam