
PDV4875SS - Cooker Concept - Free user manual and instructions
Find the device manual for free PDV4875SS Concept in PDF.


User questions about PDV4875SS Concept
0 question about this device. Answer the ones you know or ask your own.
Ask a new question about this device
Download the instructions for your Cooker in PDF format for free! Find your manual PDV4875SS - Concept and take your electronic device back in hand. On this page are published all the documents necessary for the use of your device. PDV4875SS by Concept.
USER MANUAL PDV4875SS Concept
natural_image
Top-down view of a gas stove with four flares and a central vent, no visible text or symbols on the main components.PODĚKOVÁNÍ
text_image
1 concept 2 3 4 5 6RADY A TIPY K ÚSPOŘE ENERGIE
text_image
25 mm (MIN.) 45 mmObr. 4
text_image
1 concept 2 3 4 5 6RADY A TIPY NA ÚSPORU ENERGIE
text_image
25 mm (MIN.) 45 mmObr. 4
Pripojenie do elektrickej siete
text_image
1 concept 2 3 4 5 6text_image
25 mm (MIN.) 45 mmRys. 4
text_image
1 concept 2 3 4 5 6IETEIKUMI UN PADOMI PAR ENERGIJAS TAUPIŠANU
Pannas dibena diametram ir jāatbilst degla diametram.
| Degla veids | Ediena gatavošanas piederuma dibena diametrs | |
| Min. Maks. | ||
| WOK deglis 200 mm 2 | 40 mm | |
| Vidēja izmēra deglis 1 | 60 mm 180 mm | |
| Mazais deglis 120 mm | 160 mm | |
| liels deglis 200 mm 24 | 0 mm | |
Piezime.
text_image
25 mm (MIN.) 45 mm- att.
Thank you for purchasing a Concept product and we wish you to be satisfied with our product throughout its use.
Carefully read the entire user manual before first use and keep it. Ensure that other people handling this product are familiar with this manual.
CONTENTS
Technical parameters
Important notices
Product description
Advice and tips for saving energy
User manual
Replacement of nozzles and adjustment of the minimum flame height
Cleaning and maintenance
Installation of the appliance
Troubleshooting
TECHNICAL PARAMETERS
| Voltage 230 V ~ 50 Hz | |||
| Type of natural gas G20, 20 mbar | |||
| Type of propane-butane (after nozzle replacement) | G30/G31, 28-30 mbar | ||
| Type and size of gas connection G 1/2" | |||
| Small burner | Heat output 1.0 kW | ||
| Nozzle designation ∅ 0.78 ∅ 0.50 | |||
| Gas consumption 73 g/h (LPG) | |||
| Medium burner | Heat output 1.75 kW | ||
| Nozzle designation ∅ 1.03 ∅ 0.67 | |||
| Gas consumption 127 g/h (LPG) | |||
| Big burner | Heat output 3.0 kW | ||
| Nozzle designation ∅ 1.28 ∅ 0.87 | |||
| Gas consumption 219 g/h (LPG) | |||
| WOK burner | Heat output 4.2 kW | ||
| Nozzle designation ∅ 0,68 x 1∅ 1,02 x 2 | ∅ 0,45 x 1∅ 0,69 x 2 | ||
| Gas consumption 308 g/h (LPG) | |||
| Max. total heat output 11,7 kW | |||
| Outer dimensions (W x D x H) 750 x 510 x 99 | |||
| Dimensions for installation (W x D x H) 560 x 480 x 45 | |||
| Weight 13,5 kg | |||
The manufacturer reserves the right to make any technical changes, printing errors and differences in the representation without prior notice.
IMPORTANT NOTICES
Upon receiving the gas hob
- Immediately after delivery, check the packaging and the appliance for damage caused by transport.
- ATTENTION! Some corners and edges of the appliance that will be hidden after installation can be sharp! Take care to avoid injury!
- If the appliance is damaged, do not put it into operation. Contact your supplier as soon as possible.
- Before first use, remove all packaging and marketing materials from the appliance.
- Keep the packaging out of the reach of children or dispose of it properly.
- This appliance must be installed in accordance with the regulations in force and should only be used in a well-ventilated area. Read the manuals before installing and using the appliance.
During installation
- The appliance is designed to be inserted into a cutout in a kitchen furniture worktop.
- The sealing attached to the edges of the hob prevents liquids from leaking under the hob.
• Use the appliance only as described in this manual.
- During installation, the appliance must be disconnected from the mains and the main gas valve must be closed.
- Verify that the connected voltage and gas supply correspond to the data on the nameplate. Only use power supply with earthing.
• After installation, there must be free access to the electric plug or circuit breaker and gas supply valve.
• This appliance can be used in households and similar areas, such as:
• Kitchenettes in shops, offices and other workplaces.
• Appliances used in agriculture.
• Appliances used by guests in hotels, motels and other areas.
• Appliances used in bed and breakfast establishments.
- When using the appliance, ensure adequate ventilation of the room, because gas combustion causes burning of oxygen in the room and creation of harmful flue gases!
• Make sure the room is well ventilated during cooking. It is recommended that the cooker hood be turned on during cooking to remove harmful flue gases and the steam generated during cooking.
- Power cables of other appliances must not touch hot burner grates. This can damage both the cable insulation and the appliance itself.
-
Do not touch hot surfaces during use or shortly after using the appliance.
-
Do not touch the appliance with damp or wet hands.
-
Do not use this appliance if it comes in contact with water.
-
If there is a drawer under the appliance, do not store any flammable objects or sprays in it. Risk of fire!
- Do not allow children or incompetent persons to handle the appliance, use it out of their reach.
• Children must not play with the appliance.
• Take extra care when using the appliance near children.
• Do not allow the appliance to be used as a toy.
- This appliance may be used by children over the age of 8 and persons with reduced physical, sensory or mental capabilities or without appropriate experience and knowledge only under supervision or if they were familiarized with the instructions for use of the appliance in a safe way and understand its risks.
- In the case of a fault, turn off the appliance, pull out the plug from the electrical socket and close the gas supply to the appliance.
- When unplugging the appliance from the electrical socket, never pull the power cord, but grasp the plug and pull it out.
- Do not immerse the power cord or the plug in water or any other liquid.
• Regularly check the appliance and power cord for damage.
• Do not turn on a damaged appliance.
- If the appliance is not in operation, make sure all knobs are in the off position.
- Use the burners only if there is cookware on top of them. Do not heat empty cookware.
-
ATTENTION! Risk of fire! Make sure that the burner diameter on the gas stove or gas hob corresponds with the used cookware. When using cookware with a smaller diameter than recommended, the flame might start to burn also on the sides of the cookware and melt plastic handles.
-
Do not use cookware with a curved bottom or with a smaller bottom diameter than recommended. This would reduce cooking efficiency.
• Cookware must stand on burner grates, not directly on burners!
- Place cookware in the centre of burners, otherwise it could tip over.
- Do not place hot cookware on the control panel or the edge of the appliance. This could cause damage.
- If you remove cookware from a gas burner, reduce its flame to a minimum or completely turn it off!
- It is not recommended to heat cookware simultaneously on several burners, because the resulting heat build-up under the cookware may damage the appliance.
- Never use plastic or aluminium foil cookware on the appliance.
- Do not place flammable objects on the appliance. There is a risk of fire!
- Do not use the appliance as a work or storage surface!
- Keep the appliance clean. Food residues could ignite during operation and cause fire!
- When frying, keep eye on the food at all times. Overheated oil can cause fire!
- Never heat fat or oil unattended. Overheated oil or fat may rapidly ignite. There is a risk of fire!
- If oil should ignite, never extinguish the fire with water. Immediately cover the cookware with a lid or a plate. Switch off the appliance and allow the cookware to cool down.
- Do not use accessories other than those recommended by the manufacturer.
- Do not use accessories with a damaged surface, worn out or with other defects.
- Do not use a corrosive cleaning agent for cleaning. Regular maintenance and cleaning extends the life of the appliance.
- Cleaning and maintenance must not be performed by children under 8 years of age without supervision.
Possible defects
- The appliance may only be repaired and interfered with by a qualified professional.
- When repairing or interfering with the appliance, it must be disconnected from the mains. Switch off the circuit breaker or pull out the plug from the electrical socket.
- When unplugging the appliance from the electrical socket, never pull the power cord, but grasp the plug and pull it out.
• If the power cord is damaged, contact an authorized service centre.
If you fail to follow the manufacturer's instructions, the potential repair will not be covered under warranty.
PRODUCT DESCRIPTION
1 Glass plate
2 Small burner
3 Big burner
4 WOK burner
5 Medium burner
6 Controls of individual burners
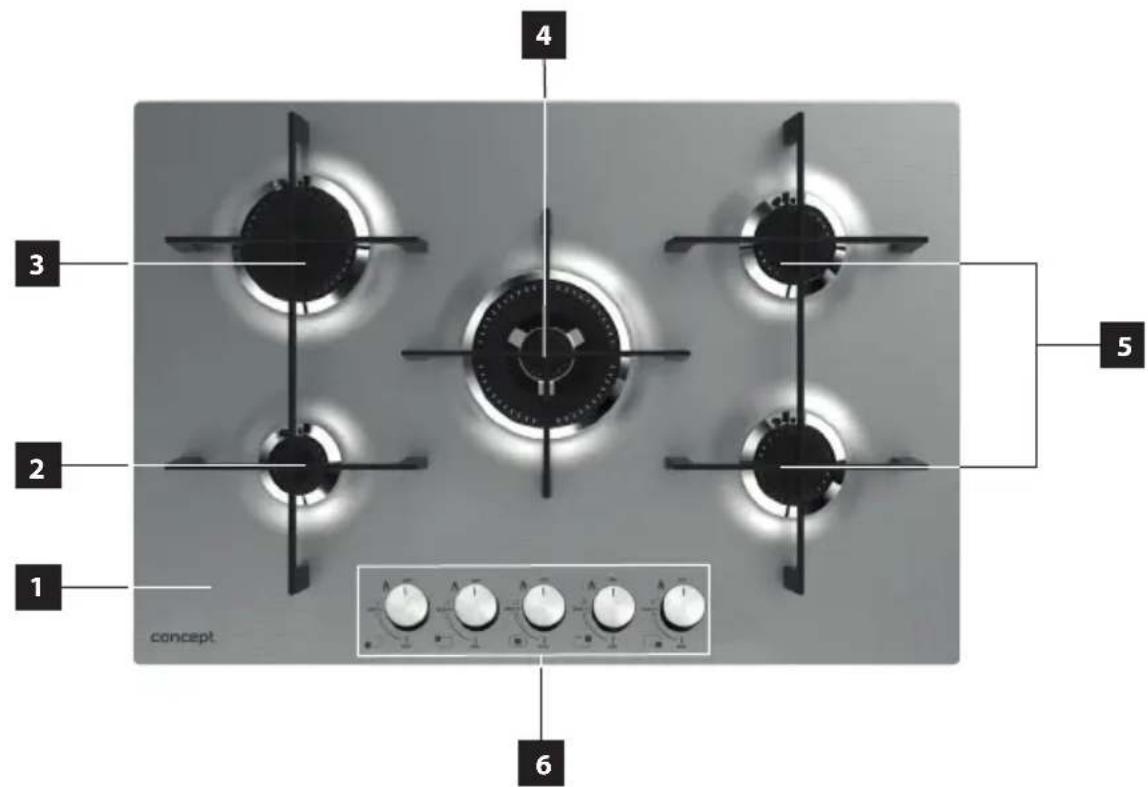
text_image
1 concept 2 3 4 5 6ADVICE AND TIPS FOR SAVING ENERGY
The diameter of the bottom of the pan should correspond to that of the burner.
| Burner type | Cookware bottom diameter | |
| Min. Max. | ||
| WOK burner 200 mm | 240 mm | |
| Medium burner 160 mm | 180 mm | |
| Small burner 120 mm | 160 mm | |
| Big burner 200 mm | 240 mm | |
Note:
- Do not use cookware exceeding the edge of the burner or smaller than the burner.
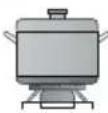 | Always use cookware that is suitable for each burner, to avoid wasting gas and discolouring the cookware. | Do not use small diameter cookware on large burners. The flame should not reach the sides of the cookware. | 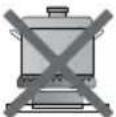 |
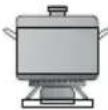 | To minimize energy loss, cover the cookware with a lid. | Avoid cooking without a lid or with the lid half off – this leads to energy losses. | 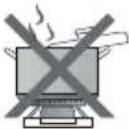 |
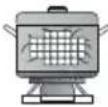 | Only use flat bottom cookware. | Do not use a pan with a convex or concave bottom. | 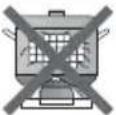 |
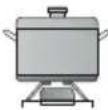 | Always place the cookware right above the centre of the burner, not to one side. | Do not place cookware on the edge of the burner, as it could tip over. | 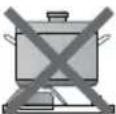 |
| Do not use cookware with a large diameter on the burner grates near the knobs, which when placed on the middle of the burner may touch the knobs or be so close to them that they increase the temperature in this area and may cause damage. | |||
| Always place cookware on the burner grate. | Never place cookware directly on the burner cover. | 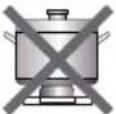 | |
| Do not place anything between the cookware and the burner grate (flame limiter, asbestos plate, etc.). This could cause serious damage to the appliance. | 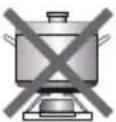 | ||
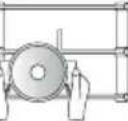 | Handle cookware carefully when it is placed on the burner grate. | Do not overload the appliance (hob). Avoid impacts of heavy objects. | 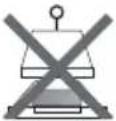 |
USER MANUAL
Before first use
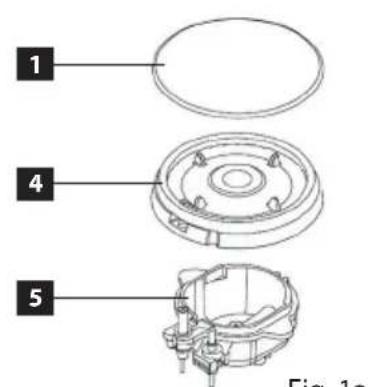
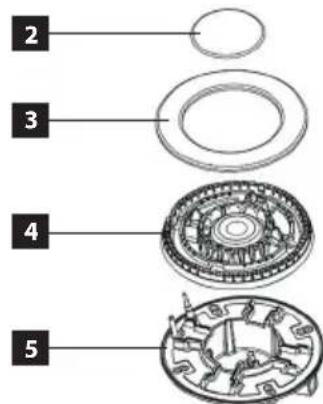
Before putting a new appliance into operation, you should wipe it with a damp cloth for hygienic reasons. Carefully assemble all burners according to Fig. 1a and Fig. 1b, so that all parts fit properly and the flame is uniform.
- Burner cover
- WOK burner cover - internal
- WOK burner cover – external
- Flame spreader
- Burner body
text_image
1 4 5 Fig. 1aFig. 1a
text_image
2 3 4 5Fig. 1b
- Place the flame spreader (4) on the burner body (5) so that the ignition electrode and the thermoelectric cell extend through their respective holes in the flame spreader (4).
- Place the burner cover (1), the WOK covers of the burner (2) and (3), on the flame spreader (4).
Ignition of a burner
Each burner is fitted with a safety device designed to stop the gas supply if the flame goes out.
The symbol next to each burner knob indicates which burner it operates.
- Press and turn the respective burner knob counter-clockwise to the maximum position (MAX).
- Automatic ignition of the burner occurs only if you hold the burner knob in the maximum position.
- After igniting the burner, hold the pressed burner knob for about 15 seconds. Release the pressed knob.
- After releasing the pressed burner knob, adjust the flame by turning the knob to the desired position. The operating position must be selected between the maximum (MAX) and minimum (MIN) position.
- To switch off the burner, turn the knob clockwise to the OFF position.
Note:
-
Never hold a pressed burner knob for more than 15 seconds. If the burner does not ignite within 15 seconds, release the pressed knob and turn it to the OFF position, wait for 1 minute and then try again.
-
In case of power failure, the burners can be lit by carefully using a match.
Protection against gas leakage without flame
It is a thermoelectric cell located near the burner, which monitors the flame on the basis of heat radiation and if the flame accidentally goes out, it closes the gas supply of the specific burner.
If a flame accidentally goes out, turn the respective knob clockwise to the OFF position. Wait one minute and reignite the burner.
REPLACEMENT OF NOZZLES AND ADJUSTMENT OF THE MINIMUM FLAME HEIGHT
Replacement of burner nozzles and adjustment of the minimum flame height may be performed only by a qualified professional or authorized service personnel.
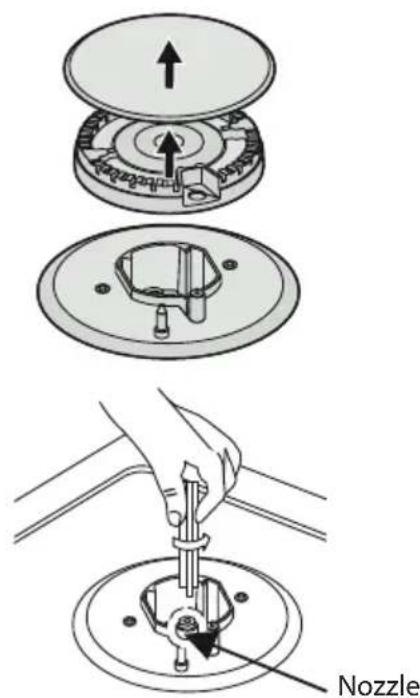
Replacement of burner nozzles
- Close the gas supply and pull out the plug from the electrical socket.
- Remove the burner grate, burner cover and flame spreader.
- Unscrew the nozzle using a 7mm socket spanner and replace it with a nozzle for a different gas type. Firmly tighten the nozzle.
- Reassemble all parts of the burner (flame spreader, cover and grate).
text_image
Diagram illustrating the step-by-step installation of a mechanical component, showing pressurizing and disassembly with labeled parts.Adjustment of minimum flame height
-
Ignite the respective burner and turn the burner knob to the minimum position (MIN).
-
Pull the knob up to remove it.
-
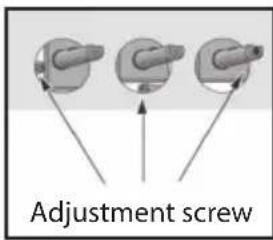
Adjust the minimum flame height using a screwdriver. Depending on the appliance model, the adjustment screw is located either in the shaft of the gas valve or next to the gas valve (see Fig. 2).
-
The ideal minimum flame height should be 3–4 mm. When using propane-butane, screw in the adjustment screw almost completely.
-
Mount the burner knob.
text_image
Adjustment screwFig. 2
-
Make sure that the flame does not go out by quickly turning from maximum flow to minimum flow. If it does, pull the knob up to remove it, readjust the minimum flame height and perform another check.
-
Adjust the minimum flame height for all burners.
Note:
-
Do not disassemble the valve shaft. In the event of a malfunction, change the whole valve.
-
Before mounting all burner parts, make sure that the nozzles are not clogged.
-
After replacing burner nozzles for a different gas type, it is necessary to perform a full operation test and leakage test.
CLEANING AND MAINTENANCE
- Before maintenance and cleaning, disconnect the power cord from the electrical socket or switch off the circuit breaker of the electrical socket of the appliance.
- Do not clean the appliance until it has completely cooled down.
- Clean the surface of the appliance with a damp cloth, soft brush or soft sponge, then wipe dry.
- Do not clean the appliance using coarse abrasive cleaners or sharp metal scrapers so as not to scratch the surface of the appliance.
- Do not clean the appliance using a steam cleaner or any other high-pressure cleaning device!
- Clean the appliance regularly, preferably after each use.
Cleaning of burner grates
• Take off the burner grates.
- Clean the grates with a soft brush or soft sponge in warm water with a dish-washing detergent. For stubborn dirt, soak beforehand.
• Wipe the grates with a clean dish towel.
• Grates cannot be washed in a dishwasher.
Cleaning of the glass plate
- Regularly wipe the glass plate using a soft sponge soaked in warm water with a small amount of dish-washing detergent.
• Dry thoroughly after cleaning. - Remove salty foods or liquids as soon as possible.
• Over time, a change in colour may occur in the stainless steel parts of the appliance. This is a normal phenomenon resulting from the effect of high temperatures. Each time the appliance is used these parts should be cleaned with a product that is suitable for stainless steel.
Cleaning of burners
- Remove the burner covers and flame spreaders.
- Soak them in hot water and a small amount of dish-washing detergent.
• After cleaning and washing, thoroughly dry them or let them air dry. Make sure that the flame holes are clean and dry. - Clean the burner bodies with a damp sponge and dry them. Wipe the ignition electrode and thermoelectric cell with a wrung-out sponge and then wipe them dry with a clean dish towel.
• Before mounting the burners back on the glass plate, make sure that the nozzles are not clogged.
INSTALLATION OF THE APPLIANCE
ATTENTION!
There is a risk of electric shock! Before installation of the appliance, disconnect the power cord from the electrical socket.
- Defects caused by improper installation are not covered under warranty.
- The responsibility for the installation of the appliance is on the buyer, not the manufacturer.
- The manufacturer bears no responsibility for damages to persons, animals and objects due to improper installation.
- Placing the appliance into suitable furniture will ensure its correct operation.
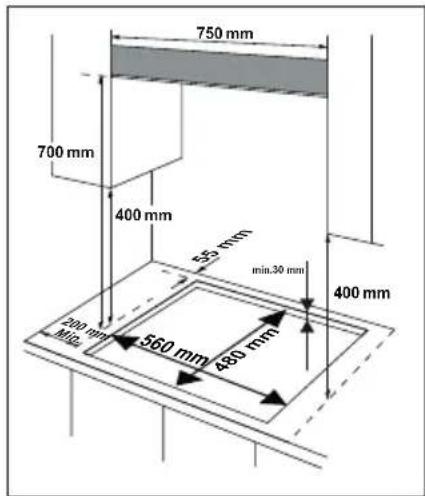
- The appliance is installed into standard kitchen furniture designed for built-in appliances or in appropriately modified furniture with dimensions according to Fig. 3.
- The edges of the hob must be at a minimum distance of 60 mm from a side or rear wall.
- There must be at least a 700mm gap between the highest point of the hob (including burners) and the bottom side of the horizontal surface located directly above the hob (excluding the kitchen hood).
- If the side edge of the upper horizontal plate is flush with the side edge of the hob, the minimum distance between the side edge of the hob and the bottom of the horizontal plate above the hob must be 400 mm.
text_image
750 mm 700 mm 400 mm 55 mm min.30 mm 400 mm 200 mm MHz 560 mm 480 mmFig. 3
- If the bottom of the horizontal plate above the side edge of the hob is lower than 400 mm, its side edge must be at least 50 mm away from vertical plane of the side edge of the hob.
- The kitchen furniture must be made of heat-resistant material resistant to temperatures of at least 120°C. The materials and adhesives used must withstand the warming of the appliance according to CSN EN 60335-2-6. Materials and adhesives not complying with this standard may deform or peel off.
- The appliance must not be installed in the immediate vicinity of a kitchen cabinet made of flammable material that extends over the surface of the worktop.
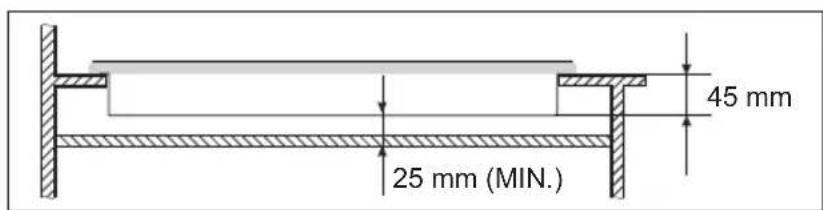
- If there is an appliance located under the hob, there must be at least a 25mm gap between these two appliances (see Fig. 4).
text_image
25 mm (MIN.) 45 mmFig. 4
Electrical connection
- Verify that the connected voltage and current protection correspond to the data on the nameplate.
- Only use electrical sockets with earthing.
-
Do not use splitter sockets, connectors or extension cords.
-
The plug of the power cord must be freely accessible even after its installation.
• Changes to the connection my only be made by a qualified professional. - The electrical safety of the appliance can only be guaranteed if the protective terminal of the appliance is connected to the protective conductor of the power distribution network.
- The manufacturer is not responsible for damage to persons or objects due to missing or incorrect protective connection.
- The power cord must be positioned so that it does not come into contact with the hot parts of the appliance and is not deformed or excessively bent.
- If the appliance is connected to a terminal block or to a distribution box, observe the colour coding or description of individual conductors.
Gas connection
- Connection of the appliance may only be performed by a qualified professional!
- This appliance must be installed and connected in accordance with the provisions of CSN 38 6441 and CSN 38 6460.
- When using propane-butane (LPG) or propane-butane in cylinders, the provisions of CSN 38 6460 must be observed.
- Verify that the connected gas inlet corresponds to the data on the nameplate.
- This appliance is designed to run on LPG or natural gas (NG). Adjustment for use on LPG and natural gas (NG) may only be performed by a qualified professional.
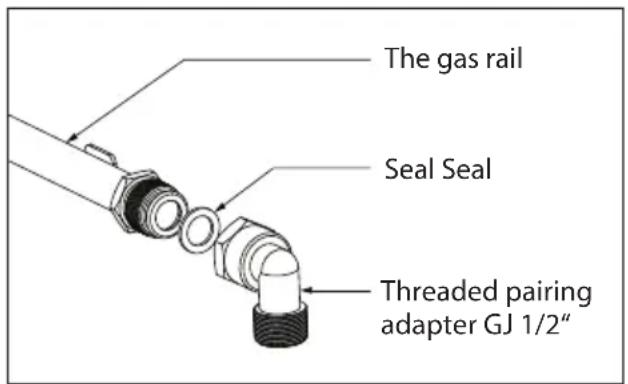
- If the appliance is connected to natural gas (NG), use a threaded pairing adapter GJ 1/2" (see Fig. 5).
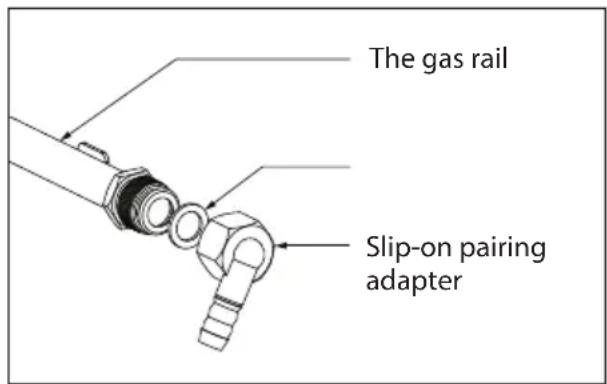
- If the appliance is connected to LPG, use the plug-in pairing adapter (see Fig. 6).
- The gas inlet must be positioned so that it does not come into contact with the hot parts of the appliance and is not deformed or bent.
- If there is an oven located under the gas hob, place the inlet pipe or gas hose so that it does not come into contact with the oven surface.
text_image
The gas rail Seal Seal Threaded pairing adapter GJ 1/2"Fig. 5 Fig. 6
text_image
The gas rail Slip-on pairing adapterFollow these steps to install the appliance:
- Before first use, remove all packaging and marketing materials from the appliance.
- Turn the appliance upside down and place it on a soft pad. Be careful not to damage the ignition electrodes and thermoelectric cells when turning the appliance over.
- Attach sealing along the perimeter at the bottom of the appliance. The sealing must not overlap at the corners and must not form a gap between the joints.
- Attach clamps to the appliance to adjust their position.
- Place the appliance on the edge of the worktop and insert the power cord through the worktop so that the plug or terminal block remains accessible after installation.
- Carefully insert the appliance into a prepared cutout in the worktop. Be careful not to pinch the power cord.
- Connect the inlet pipe or gas hose to the appliance (see section Gas connection).
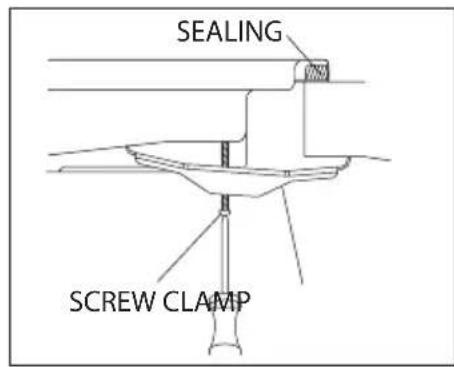
- Adjust the clamps on the bottom of the appliance so that they fit properly on the edge of the worktop (see Fig. 7) and tighten the clamps.
- Connect the power cord to an electrical socket or terminal block (see section Electrical connection).
text_image
SEALING SCREW CLAMPFig. 7
Note:
Do not use silicones or any adhesives to seal the appliance to the worktop. This would make it difficult to remove the appliance for possible repairs (servicing).
Removal
When removing the appliance, it is important to follow these steps in the correct order:
- First disconnect the power cord from the mains (pull out the plug or switch off the circuit breaker).
- Close the gas supply to the appliance. Disconnect the inlet pipe or gas hose.
- Loosen the fastening clamps and remove the appliance from the worktop.
TROUBLESHOOTING
The appliance may only be repaired and interfered with by a qualified professional or authorized service centre. Improper repairs and interference with the appliance may pose a serious risk to you and your surroundings.
Some minor defects that appear when using the gas hob can be removed by the user with the help of the following overview.
| Description of the defect | Possible cause Solution | |
| The burner does not burn | The ignition electrode does not spark | Make sure the power cord is correctly connected. |
| The burner cover is mounted incorrectly | Verify correct mounting of the burner cover on the flame spreader. | |
| Closed gas inlet | Open the gas inlet or check the gas pipe (hose) for any deformation. | |
| The burner is burning poorly | The gas inlet is not open completely | Open the gas supply completely. |
| The burner cover is mounted incorrectly | Verify correct mounting of the burner cover on the flame spreader. | |
| Dirty ignition electrode Clean the ignition electrode with a soft sponge. | ||
| The burner covers are wet Dry the burner covers. | ||
| The holes in the flame spreader are clogged | Clean the flame spreader. | |
| The burner can be ignited but goes out immediately | You have not held the knob of the respective burner pressed sufficiently long | Ignition of the burner occurs only if you hold the burner knob in the maximum position. After igniting the burner, hold the pressed burner knob for about 15 seconds. Release the pressed knob. |
| Noise when the burner is ignited and burning | The burner cover is mounted incorrectly | Verify correct mounting of the burner cover on the flame spreader. |
| A burner goes out when in use | Dirty thermoelectric cell Clean the thermoelectric cell with a soft sponge. | |
| The boiled food overflowed and extinguished the flame | Turn the burner knob to the OFF position. Wait one minute and reignite the burner. | |
| There is too much draft in the room | Turn the burner knob to the OFF position. Make sure there is not too much draft in the room. Wait one minute and reignite the burner. | |
| Yellow flame burning | The holes in the flame spreader are clogged | Clean the flame spreader. |
| Different gas type is used | Verify that the connected gas type corresponds to the data on the nameplate. | |
| Uneven flame | The holes in the flame spreader are clogged | Clean the flame spreader. |
| The burner cover is mounted incorrectly | Verify correct mounting of the burner cover on the flame spreader. | |
| There is a gas smell in the room | Gas leakage – failure of the function of one of the thermoelectric cells | Stop using the appliance. Close the gas supply, ventilate the room and have the tightness of the gas connection checked or have the appliance repaired by a qualified professional or authorized service centre. |
ENVIRONMENTAL PROTECTION
• Prefer recycling of packaging materials and old appliances.
• The box from the appliance can be disposed of as sorted waste.
- Hand over the plastic polyethylene (PE) bags to a collection point for recycling.
Recycling of the appliance at the end of its life:
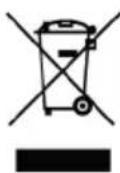
This appliance is labelled in accordance with European Directive 2012/19/EU on Waste Electrical and Electronic Equipment (WEEE). The symbol on the product or its packaging indicates that this product does not belong to household waste. It must be taken to a collection point for recycling electrical and electronic equipment. By ensuring proper disposal of this product, you will help prevent any negative consequences for the environment and human health that would otherwise be resulting from improper disposal of this product. The disposal must be in accordance with the waste management regulations. For more detailed information about recycling of this product, please contact your local authority, household waste disposal service or the shop where you purchased the product.
concept