
HS300 - Home Automation TP-LINK - Free user manual and instructions
Find the device manual for free HS300 TP-LINK in PDF.

| Product Type | Smart Wi-Fi Power Strip, 6-Outlet |
| Model Number | HS300 |
| Number of Smart Outlets | 6 (individually controlled) |
| USB Ports | 3 always-on USB ports (5V/2.4A each, 5V/2.4A total) |
| Surge Protection | ETL certified surge protection |
| Overcurrent Protection | Automatic shut-off when overloaded |
| Power Rating | 125V~, 15A max General/Resistive Load; 1/6HP Motor Load |
| Wireless Connectivity | Wi-Fi (2.4 GHz), no hub required |
| App Control | Kasa Smart app (iOS/Android) |
| Voice Control | Amazon Alexa, Google Assistant, Microsoft Cortana |
| IFTTT Support | Yes |
| Scheduling | Set schedules, timers, and away mode per outlet |
| Energy Monitoring | Monitor energy consumption and runtime per outlet |
| Scenes and Groups | Create scenes and groups for simultaneous control |
| Smart Actions | Motion sensing, control with switch, schedule scene, auto-off timer |
| Reset Methods | Via app or press and hold control button (5s setup mode, 10s factory reset) |
| Status Indicators | SYS Wi-Fi LED, Grounded LED, Protected LED, outlet status LEDs |
| Operating Temperature | 0°C to 40°C (32°F to 104°F) |
| Storage Temperature | -40°C to 60°C (-40°F to 140°F) |
| Safety Certifications | FCC, ETL, RoHS (implied), indoor use only |
| Mounting | Horizontal surface or wall-mounted (screws not included) |
| Software Version | Features may vary by model and software version |
Frequently Asked Questions - HS300 TP-LINK
User questions about HS300 TP-LINK
0 question about this device. Answer the ones you know or ask your own.
Ask a new question about this device
Download the instructions for your Home Automation in PDF format for free! Find your manual HS300 - TP-LINK and take your electronic device back in hand. On this page are published all the documents necessary for the use of your device. HS300 by TP-LINK.
USER MANUAL HS300 TP-LINK
Main Device Controls 6
Set Schedules 7
Set Timer....9
Set Away Mode 10
Check Energy Usage and Runtime……11
Manage Device Settings 12
Reset Your Smart Power Strip 15
Create Groups 18
Create Scenes 23
Smart Actions 25
Voice & 3rd Party Support 36
Authentication 40
About This Guide
This guide provides a brief introduction to Kasa Smart Wi-Fi Power Strip and the Kasa app, as well as regulatory information.
Please note that features of Kasa Smart Wi-Fi Power Strip may vary slightly depending on the model and software version you have, and on your location, language and internet service provider. All images, steps, and descriptions in this guide are only examples and may not reflect your actual experience.
Conventions
In this guide, the following convention is used:
| Convention | Description |
| Teal | Key information appears in teal, including management page text such as menus, items, buttons and so on. |
| Underline | Hyperlinks are in teal and underlined. You can click to redirect to a website. |
More Info
- Specifications can be found on the product page at https://www.tp-link.com.
• Our Technical Support and troubleshooting information can be found at https://www.tp-link.com/support.
Introduction
With independent control of 6 smart outlets and always-on USB ports to charge 3 others, the Kasa Smart Wi-Fi Power Strip is ideal for family rooms, home offices and small businesses. Download the Kasa app and control your outlets remotely. The Kasa app provides easy step-by-step installation instructions and convenient remote control from anywhere.
Note: DO NOT plug the Kasa Smart Wi-Fi Power Strip to a 220V outlet.
- 6 Smart Outlets - Independently control 6 smart outlets from your smartphone with Kasa Smart app.
- Surge Protection - ETL certified surge protection shields electronics from power surges and overloading.
• 3 USB Ports - Charge your tablet, smartphone, or other devices using the always-on USB ports.
• Energy Monitoring - Monitor energy consumption of devices plugged into your smart power strip. - No Hub Required - Connect to your existing Wi-Fi router.
- Scheduling - Set a schedule to automatically turn devices on and off.
• Voice Control - Use Alexa, Google Assistant, or Microsoft Cortana to control your devices with voice commands. - Works with IFTTT - Have your smart power strip work together with other devices through support from IFTTT.
Supported Load Types
125V\~, 15A max General/Resistive Load; 1/6HP, Motor Load
Construction of Switch: Micro-gap Switch(μ)
Appearance
Smart Power Strip has 6 individual smart outlets, with control buttons to turn on/off devices plugged in and LEDs to show you the current status. SYS, Grounded and Protected LEDs change color according to its status. See the explanation below:
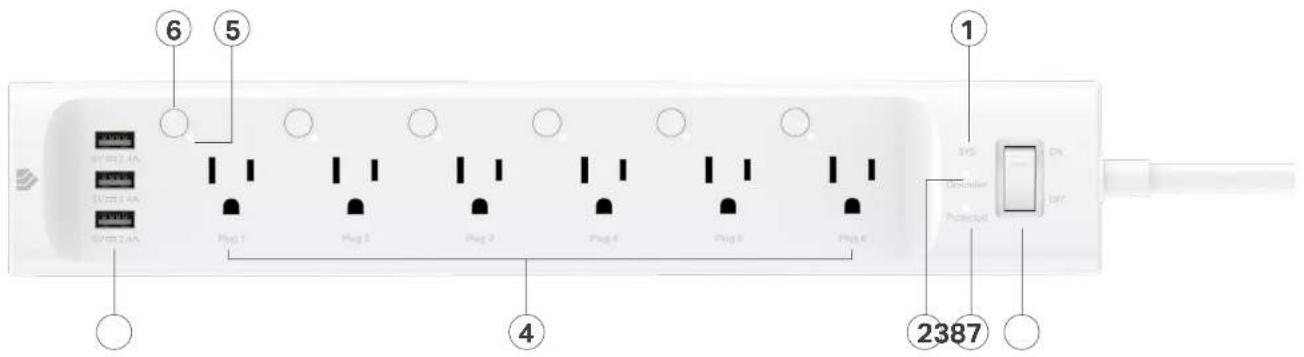

○ SYS Wi-Fi LED 1
Orange Rebooting.
Blinking Orange and Green Setup mode initiated.
Blinking Green Searching for Wi-Fi.
White Connected to Wi-Fi network successfully.
Blinking Orange Resetting.
Red No Wi-Fi connection.
2 Grounded LED Lit up when it is grounded normally.
③ Protected LED Lit up when it is under surge protection.
4 Smart Outlet (1-6 from left to right) Plug in your device and control it from your smartphone. Each outlet is independent.
⑤ LED of Smart Outlet (1-6 from left to right) Lit up when the corresponding smart outlet is on.
6 Control Button (1-6 from left to right) - Press the control button to turn on or off the corresponding outlet. - Press and hold a control button for 5s to reenable setup mode. - Press and hold a control button for 10s to restore your Smart Power Strip to factory default settings.
⑦ USB Port Charge your tablet, smartphone or other devices. Output: 5V/2.4A each; 5V/2.4A total
⑧ Overcurrent Protection Switch • Turn on or off your Smart Power Strip manually. • Your Smart Power Strip turns off automatically when it's overloaded in electricity. To reconnect it to power, please turn it on manually.
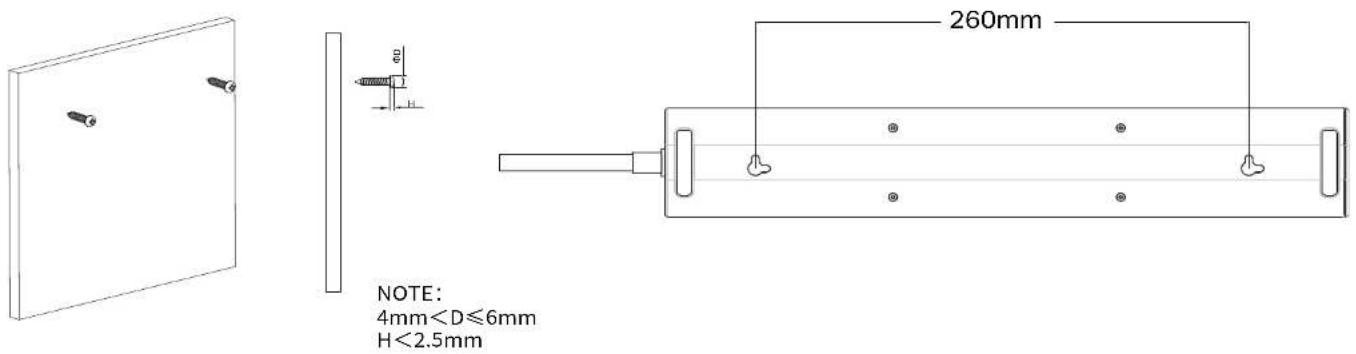
Position Your Power Strip
Put your power strip within the Wi-Fi range of your home Wi-Fi network and control the plugged-in devices individually and easily with the Kasa Smart app.
Generally, the power strip is placed on a horizontal surface, such as a shelf or desktop. The device also can be mounted on the wall as shown below.
3. Add Device
Tap the + button in the Kasa app, select Smart Power Strip and then follow step-by-step app instructions to complete the setup. Main Device Controls
After you successfully set up your Smart Wi-Fi Power Strip, you will see the home page of the Kasa Smart app. Here you can view and manage all devices that you've added to Kasa. Tap a smart power strip to control and manage it.Home Page
You can see all your Kasa devices listed in the Home page. Turn on/off the smart outlet
Turn on/off any outlet of your Smart Wi-Fi Power Strip quickly by tapping the switch of each device. Tapping in the device, you can also check or change its status.  Set Schedules
Schedule: Set schedules to automatically turn on/off the devices plugged in to the smart outlets of your Smart Power Strip respectively according to your daily routine. 1. Tap a smart outlet that you want to set a schedule for in the Home page, and then Tap Schedule  2. Tap + on the top right corner. 2. Set a schedule to turn the smart outlet on or off.  E.g. I want to turn off my Air Cleanser at 11:00 PM every day.  4. You can also choose to turn on/off the smart outlet simply at Sunrise or Sunset. Note: The Sunrise and Sunset times are based on your location.  5. Tap Save and you'll see your schedule listed in the Schedule Page. You can add more schedules following the same steps.  6. You can turn off your schedule any time at the Schedule page. Set Timer
Timer: Set the timer for your smart outlet to automatically turn on/off after the time ends. 1. Tap a smart outlet that you want to set a timer for in the Home page, and then tap 2. Set the time after which the smart outlet will be automatically turned on/off. E.g. when I start cooking rice, I want it to turn off after 30 minutes. 2. Tap START and you'll see the timer is counting down. Tap Stop to stop the Timer at any time.  Set Away Mode
Away Mode: Set Away Mode for the smart outlet of your power strip to turn on/off automatically at random intervals while you are away to make the appearance that someone is at home. 1. Tap a smart outlet that you want to set Away Mode for in the Home page, and then  2. Set the start and end time during which the smart outlet will be automatically turned on and off at random intervals, then choose the repeating frequency. E.g. I want my Night Light to turn on/off between 7:00 PM to 11:50 PM every Friday and Saturday. Note: The start and end time must be on the same day.   Check Energy Usage and Runtime
Energy: Check how much energy each outlet of your Smart Power Strip has used. Runtime: Keep track of how long each outlet of your Smart Power Strip has been working. 1. Tap a smart outlet whose energy you want to check in the Home page, and then  2. Check the energy for today, the past 7 days, or the past 30 days. Swipe left to check the runtime for today, the past 7 days, or the past 30 days.   Manage Device Settings
1. Tap any outlet of your smart power strip and then tap ⚙️ 2. Change the name and icon of each outlet.   3. Tap Re-Order to change the order of the devices connected to the six outlets of your Smart Power Strip. 4. Toggle on/off Status LED to turn on/off the LEDs of the six smart outlets altogether.   5. Tap Feature Tutorial to have a glance of the advanced features of your Smart Power Strip. More details on configuring these features Reset Your Smart Power Strip
TP-Link provides three methods to reset your Smart Power Strip.Method 1
Swipe left any of the outlets of your Smart Power Strip and tap Delete. Then tap Remove Device. Your Smart Power Strip will be removed from your Kasa account and restored to factory settings.  Method 2
Tap any of the outlets of your Smart Power Strip and go to the Devices Settings page. Then tap Remove Device in the bottom. Your Smart Power Strip will be removed from your Kasa account and restored to factory settings.  Method 3
Press and hold any of the control buttons of the six smart outlets for 10s to restore your Smart Power Strip to factory default settings. Press and hold any of the control buttons of the six smart outlets for 5s to reenable setup mode. natural_image
Front panel of a white electronic power strip with multiple indicator lights and ports (no visible text or symbols)Create Groups
With groups, you can control multiple outlets simultaneously. This page allows you to add the outlets of your Smart Power Strip to a group for unified management.1. Create groups for your Smart Power Strip
1. Tap the button in the Home page of the Kasa Smart app, and select Group. 2. Select the smart outlets that you want to add in a group and tap Save. E.g. I want to group the Cooker and the Fan together for unified control. 3. Name the group.    4. The created group is listed in the Home page. You can tap ON or OFF to turn on or off the smart outlets together in the group. E.g. if I turn off the Cooking Group, the following Cooker and Fan devices, which are in the Light Group, will also show the status as off.  2. Manage the group
1. Tap the group you want to manage. 2. Turn on or off the Group in the status page.   3. Tap 1 the top right corner to enter the settings page.  4. Tap Group Name to rename the group. 5. Tap Devices to add devices to or remove devices from the group.  6. Tap Remove Group if you want to remove the group from your device list. All devices in the group will remain accessible on the device list. Create Scenes
A scene is a preset group of smart devices that can be programmed, customized and activated simultaneously at the touch of a button from your smartphone or tablet, allowing you to easily set your mood, activity or fit any special occasion. This page allows you to preset how your smart home devices should act automatically at specific occasions. 1. Tap at the bottom, then tap + at the top right corner. 2. Select a scene or create your own scene. E.g. I want to turn off Air Cleanser light and turn on Fan simultaneously with just a tap in the Kasa Smart app. 3. Select devices for the scene to work on and set their status respectively.    4. Pick an icon for your scene. 5. Name your scene. 6. Your scene is created and is displayed in the scene list. Just tap the scene to activate it.   Smart Actions
 is a function provided that enables device interconnections and home automations. With Smart Actions, your Kasa devices can work together to create a smarter smart home. From the moment you wake up to the moment you drift asleep, Smart Actions make your home safer and more comfortable. Note: At most three smart actions can be enabled simultaneously.1. Tap at the bottom, then tap Add
an Action. 2. Select an automation type for your Smart Actions.   Motion Sensing: Take actions when a Kasa camera senses a motion. Control With a Switch: Extend the Smart Switch control to other Kasa Smart devices. Turn on/off a group of devices with the Smart Switch all together. Schedule a Scene: Schedule a "Scene" to be turned on automatically at the time specified. Auto-off Timer: Whenever a Smart device is turned on, turn it off after the designated amount of time.1. Configure Motion Sensing If you already have a Kasa Smart Camera
E.g. I want to turn the living room light on when my Kasa camera senses a motion. 1. Tap Motion Sensing then select a camera. 2. Select the outlet of your Smart Power Strip which your living room light is plugged in.  3. Set the time when you want to be notified. You can choose Always or tap Custom to choose time according to your needs. E.g. I want the motion to trigger the light on from 11:00 PM to 7:00 AM every day.  4. (Optional) Set an auto-off timer then tap COMPLETE. Then your living room light will be turned off after the time you set. 5. Name your action for easy identification.   6. The Smart Action is created successfully and displayed in the Smart Actions list.  2. Configure Control With a Switch If you already have a Kasa Smart Switch
E.g. I want to turn the living room light on when I turn on my switch, and turn the light off when I turn off the switch. 1. Tap Control With a Switch. 2. Add a Kasa smart switch. Then select the outlet of your Smart Power Strip which your living room light is plugged in. flowchart
graph TD
    A["Select A SWITCH"] --> B["No Switch Selected"]
    B --> C["SELECT A DEVICE OR GROUP"]
    C --> D["My Plug-Living Room"]
    D --> E["Turn On/Off"]
    E --> F["Complete"]
3. Configure Schedule a Scene
E.g. I want to turn on the scene I have created automatically at scheduled time. 1. Tap Schedule a Scene then select a scene you have created. E.g. I want to turn on my Good Morning scene, which turns on my bedroom and kitchen light with just a tap, at 7:20 AM every weekday. 2. Set the time and frequency at which you want your scene to be turned on.  3. Name your action for easy identification. 4. The Smart Action is created successfully and displayed in the Smart Actions list.   4. Configure Auto-Off Timer
E.g. I want to turn off my air cleaner after 30 minutes whenever it is turn on. 1. Tap Auto-Off Timer then select a device. 2. Set the time.  3. Name your action for easy identification.  4. The Smart Action is created successfully and displayed in the Smart Actions list.  Voice & 3rd Party Support
Use the Kasa Smart app to pair your Smart Wi-Fi Power Strip with Amazon Alexa or Google Home Assistant, and enjoy a full hands-free experience. Kasa helps manage the rest of your smart home too, working with Samsung SmartThings to trigger changes when you arrive home or leave for the day. Launch the Kasa Smart app. Go to the sidebar and tap Works with Kasa. You can choose Amazon Alexa / Google Assistant / IFTTT / Samsung SmartThings for detailed instructions. 1. Set up Amazon Alexa
1. Tap Amazon Alexa. 2. Tap Connect. 3. Sign in with your amazon account.  3. After sign-in, tap LINK. 4. Your TP-Link ID has been successfully linked with your amazon account. You can use Alexa voice commands to control your Smart Wi-Fi Power Strip.  2. Set up Google Assistant
1. Tap Google Assistant. 2. Follow instructions to connect your device to your Google Home. Or find the FAQ at https://www.tp-link.com/en/support/faq/1534/. Authentication
FCC compliance information statement  Product Name: Kasa Smart Wi-Fi Power Strip,6-Outlet Model Number: HS300 Responsible party: TP-Link USA Corporation Address: 10 Mauchly, Irvine, CA 92618 Website: https://www.tp-link.com/us/ Tel: +1 626 333 0234 Fax: +1 909 527 6804 E-mail: sales.usa@tp-link.com This equipment has been tested and found to comply with the limits for a Class B digital device, pursuant to part 15 of the FCC Rules. These limits are designed to provide reasonable protection against harmful interference in a residential installation. This equipment generates, uses and can radiate radio frequency energy and, if not installed and used in accordance with the instructions, may cause harmful interference to radio communications. However, there is no guarantee that interference will not occur in a particular installation. If this equipment does cause harmful interference to radio or television reception, which can be determined by turning the equipment off and on, the user is encouraged to try to correct the interference by one or more of the following measures: - Increase the separation between the equipment and receiver. - Connect the equipment into an outlet on a circuit different from that to which the receiver is connected. - Consult the dealer or an experienced radio/ TV technician for help. This device complies with part 15 of the FCC Rules. Operation is subject to the following two conditions: 1. This device may not cause harmful interference. 2. This device must accept any interference received, including interference that may cause undesired operation. Any changes or modifications not expressly approved by the party responsible for compliance could void the user's authority to operate the equipment. Note: The manufacturer is not responsible for any radio or TV interference caused by unauthorized modifications to this equipment. Such modifications could void the user's authority to operate the equipment.FCC RF Radiation Exposure Statement
This equipment complies with FCC RF radiation exposure limits set forth for an uncontrolled environment. This device and its antenna must not be co-located or operating in conjunction with any other antenna or transmitter. "To comply with FCC RF exposure compliance requirements, this grant is applicable to only Mobile Configurations. The antennas used for this transmitter must be installed to provide a separation distance of at least 20 cm from all persons and must not be co-located or operating in conjunction with any other antenna or transmitter." We, TP-Link USA Corporation, has determined that the equipment shown as above has been shown to comply with the applicable technical standards, FCC part 15. There is no unauthorized change is made in the equipment and the equipment is properly maintained and operated. Issue Date: 2021.10.21NCC Notice
注意! 取得審驗證明之低功率射頻器材,非經核准,公司、商號或使用者均不得擅自變更頻率、加大功率或變更原設計之特性及功能。 低功率射頻器材之使用不得影響飛航安全及干擾合法通信;經發現有干擾現象時,應立即停用,並改善至無干擾時方得繼續使用。 前述合法通信,指依電信管理法規定作業之無線電通信。 低功率射頻器材須忍受合法通信或工業、科學及醫療用電波輻射性電機設備之干擾。BSMI Notice
安全諮詢及注意事項
- 請使用原裝電源供應器或只能按照本產品注明的電源類型使用本產品。 - 清潔本產品之前請先拔掉電源線。請勿使用液體、噴霧清潔劑或濕布進行清潔。 - 注意防潮,請勿將水或其他液體潑灑到本產品上。 - 插槽與開口供通風使用,以確保本產品的操作可靠並防止過熱,請勿堵塞或覆蓋開口。 - 請勿將本產品置放於靠近熱源的地方。除非有正常的通風,否則不可放在密閉位置中。 - 不要私自拆開機殼或自行維修,如產品有故障請與原廠或代理商聯繫。 限用物質含有情況標示聲明書| 設備名稱: 型號(型式):Equipment name Type designation (Type)Kasa Smart Wi-Fi Power Strip, 6-Outlet HS300 | ||||||
| 單元Unit | 限用物質及其化學符號Restricted substances and its chemical symbols | |||||
| 鉛Lead(Pb) | 汞Mercury(Hg) | 鎘Cadmium(Cd) | 六價鉻Hexavalent chromium(Cr+6) | 多溴聯苯Polybrominated biphenyls(PBB) | 多溴二苯醚Polybrominated diphenyl ethers(PBDE) | |
| PCB ○○○ ○○○ | ||||||
| 外殼 ○○○ ○○○ | ||||||
| 電源供應板-○○○○○ | |||||
| 其他及其配件-○○○○○ | |||||
| 備考1.“超出0.1wt%”及“超出0.01wt%”係指限用物質之百分比含量超出百分比含量基準值Note 1:“Exceeding 0.1 wt %” and “exceeding 0.01 wt %” indicate that the percentage content of the restricted substance exceeds the reference percentage value of presence condition.備考2.“○”係指該項限用物質之百分比含量未超出百分比含量基準值。Note 2:“○” indicates that the percentage content of the restricted substance does not exceed the percentage of reference value of presence.備考3.“—”係指該項限用物質為排除項目。Note 3: The “—” indicates that the restricted substance corresponds to the exemption. | |||||
Safety Information
- Keep the device away from water, fire, humidity or hot environments. - Do not attempt to disassemble, repair, or modify the device. - Do not use the device where wireless devices are not allowed. - The socket-outlet shall be installed near the equipment and shall be easily accessible. - Operating temperature: 0^ 40^ (32 °F \~104 °F); Storage Temperature: -40^ 60^ (-40 °F \~140 °F) Please read and follow the above safety information when operating the device. We cannot guarantee that no accidents or damage will occur due to improper use of the device. Please use this product with care and operate at your own risk. CAUTION
Electronic switch integrated in this product is only intended for functional purposes. Unplug the appliance before servicing.CAUTION
\- Do not install this device if there is not at least 10 meters (30 feet) or more of wire between the electrical outlet and the electrical service panel. - To reduce the risk of electric shock - Use only indoors. - Risk of electric shock. Do not plug into another relocatable power tap or an extension cord. - Use only in dry locations. - Not intended to be mounted on a desk or similar furnishing surface. - WARNING: Timer could turn on unexpected without the user being present. To reduce the hazardous condition - Unplug the appliance that is plugged into the receptacle(s) controlled by the timer before servicing. Explanation of the symbols on the product label| SymbolExplanation | |
| Indoor use only | |
| AC voltage | |
| DC voltage | |
| RECYCLINGThis product bears the selective sorting symbol for Waste electrical and electronic equipment (WEEE). This means that this product must be handled pursuant to European directive 2012/19/EU in order to be recycled or dismantled to minimize its impact on the environment.User has the choice to give his product to a competent recycling organization or to the retailer when he buys a new electrical or electronic equipment. | |
| μ | Switch of micro-gap construction (for US version)Switch of micro-gap / micro-disconnection construction (for other versions except US) |

- About This Guide
- Conventions
- More Info
- Introduction
- Supported Load Types
- Appearance
- ○ SYS Wi-Fi LED 1
- Position Your Power Strip
- Set Up Your Smart Power Strip
- Download and install Kasa app
- Log in or sign up with TP-Link ID
- Add Device
- Main Device Controls
- Home Page
- Turn on/off the smart outlet
- Set Schedules
- Set Timer
- Set Away Mode
- Check Energy Usage and Runtime
- Manage Device Settings
- Reset Your Smart Power Strip
- Method 1
- Method 2
- Method 3
- Create Groups
- Create groups for your Smart Power Strip
- Manage the group
- Create Scenes
- Smart Actions
- Tap at the bottom, then tap Add
- Configure Motion Sensing If you already have a Kasa Smart Camera
- Configure Control With a Switch If you already have a Kasa Smart Switch
- Configure Schedule a Scene
- Configure Auto-Off Timer
- Voice & 3rd Party Support
- Set up Amazon Alexa
- Set up Google Assistant
- Authentication
- FCC RF Radiation Exposure Statement
- NCC Notice
- BSMI Notice
- 安全諮詢及注意事項
- Safety Information
- CAUTION
Brand : TP-LINK
Model : HS300
Category : Home Automation