
SSD7101A-1 - Pilote Highpoint - Free user manual and instructions
Find the device manual for free SSD7101A-1 Highpoint in PDF.


| Product Type | NVMe M.2 RAID Controller |
| Model | SSD7101A-1 |
| Host Interface | PCIe 3.0 x16 |
| Number of M.2 Slots | 4 (dedicated PCIe 3.0 x4 each) |
| Supported M.2 Form Factor | M.2 NVMe (e.g., Samsung SSD 960) |
| RAID Levels | Single RAID disk (0, 1, 10) with variable block size (16K-1024K) |
| Operating Systems | Windows 10 or later, Linux kernel 3.19 or later |
| Management Software | HighPoint NVMe Manager (web-based) |
| Dimensions (PCB only) | Approximately 167.65 mm x 111.15 mm (standard PCIe card) |
| Weight | Approximately 120 g |
| Power Consumption | ~15 W (via PCIe slot) |
| Cooling | Passive heatsink (requires adequate airflow) |
| Data Transfer Performance | Over 8x faster than onboard NVMe, up to 40x faster than SATA SSD |
| Monitoring Features | S.M.A.R.T. (Storage Health Inspector), event log, email notification |
| Installation | Easy: insert SSDs, secure with screws, install driver and software |
| Customer Support | Web support at highpoint-tech.com |
| Included Accessories | 1x controller card, 1x quick installation guide |
| Compatibility | Refer to official compatibility list for motherboards and SSDs |
| Reliability | Dedicated PCIe lanes eliminate DMI bottleneck |
Frequently Asked Questions - SSD7101A-1 Highpoint
User questions about SSD7101A-1 Highpoint
0 question about this device. Answer the ones you know or ask your own.
Ask a new question about this device
Download the instructions for your Pilote in PDF format for free! Find your manual SSD7101A-1 - Highpoint and take your electronic device back in hand. On this page are published all the documents necessary for the use of your device. SSD7101A-1 by Highpoint.
USER MANUAL SSD7101A-1 Highpoint
4x M.2 Port to PCIe 3.0 x16 NVMe RAID Controller
User Guide
V1.00
Table of Contents
SSD7101A-1 Overview....3
Kit Contents....3
System Requirements......4
SSD7101A-1 Hardware ....5
Setting up the SSD7101A-1 for a Windows operating system ....8
Setting up the SSD7101A-1 for a Linux Distribution....11
Using the HighPoint NVMe Manager....11
Customer Support....18
SSD7101A-1 Overview
The SSD7101A-1 is the industry's fastest NVMe M.2 RAID Controller. Designed for high-end desktop & workstation platforms, it is capable of delivering transfer performance over 8x faster than onboard NVMe solutions, and over 40x faster than conventional SATA SSD's. The SSD7101A-1 RAID Controller's unique hardware architecture provides dedicated PCIe 3.0 x4 (32Gb/s) bus bandwidth for each M.2 SSD, and unlocks the true performance potential of NVMe based storage configurations.
Key Features
• Dedicated PCIe 3.0 x16 bus bandwidth
• Dedicated PCIe 3.0 x4 bandwidth for each NVMe M.2 SSD
• Over 8X faster than NVMe storage locked behind Intel DMI 3.0
- Independent, Stand-Alone NVMe SSD Solution
- Scale Performance across Multiple SSD7101A-1 NVMe RAID Controllers
• Supports Windows & Linux Systems
Kit Contents
• 1x SSD7101A-1 Controller Card
• 1x Quick Installation Guide
System Requirements
PC Requirements
- Windows 10 or later
• Linux Kernel 3.19 or later
For motherboard and SSD compatibility list, please refer to the below link: SSD7101A-1 Compatibility list
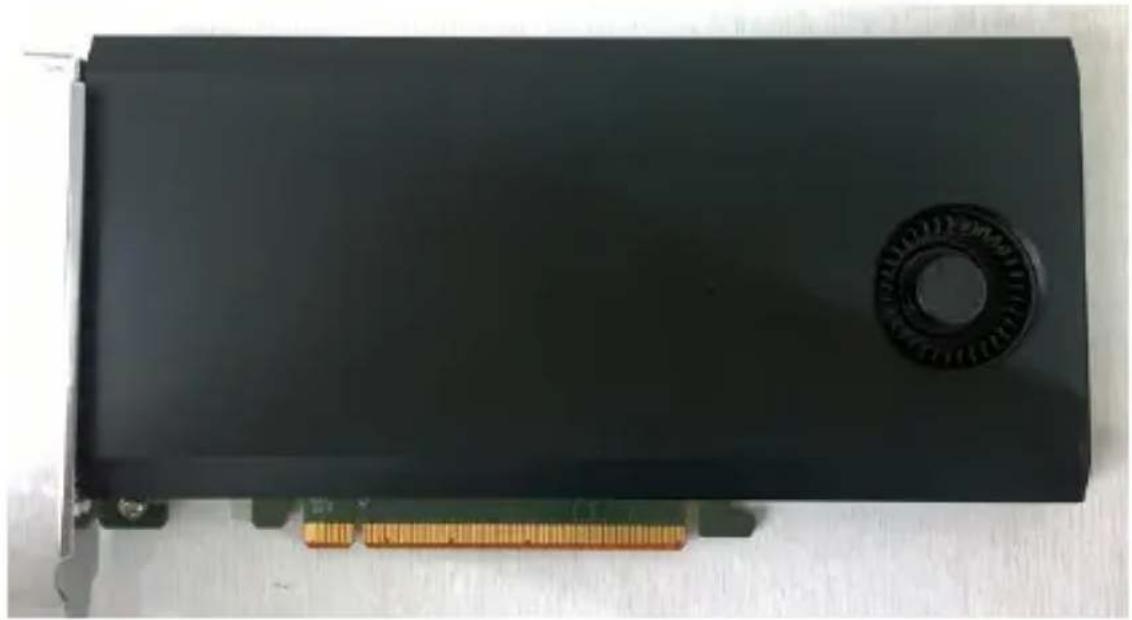
SSD7101A-1 Hardware
Front View
natural_image
Top-down view of a black rectangular electronic device with a circular button and gold resistor on a circuit board (no visible text or symbols)NVMe Drive Installation:
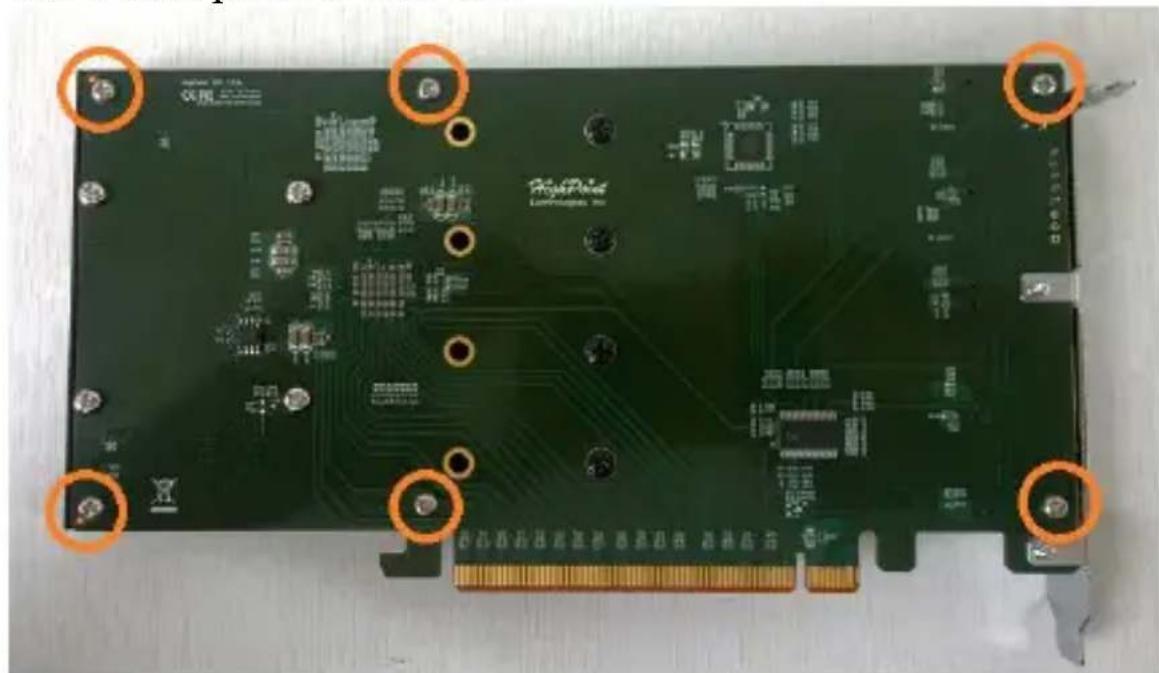
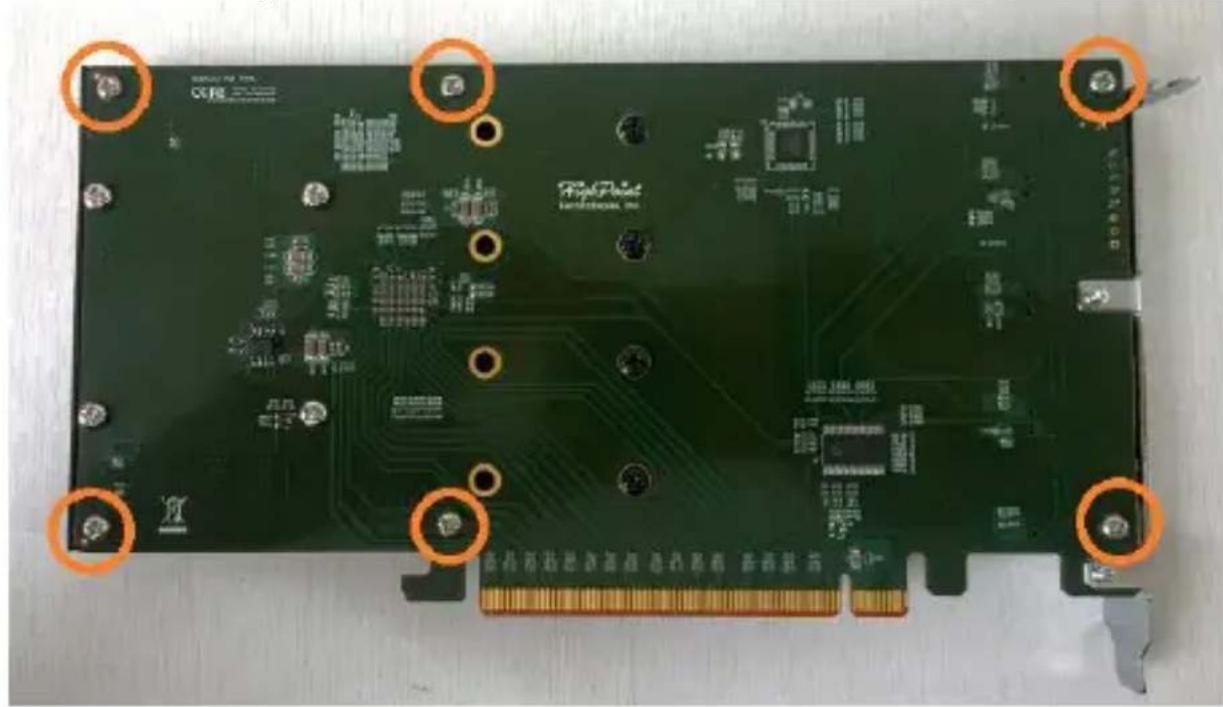
Step 1. On the rear of the SSD7101A-1, remove the six screws that secure the unit's front panel to the PCB.
natural_image
Close-up of a green printed circuit board with orange circular annotations highlighting specific components (no readable text or symbols)After removing the screws, carefully remove the front panel from the SSD7101A-1.
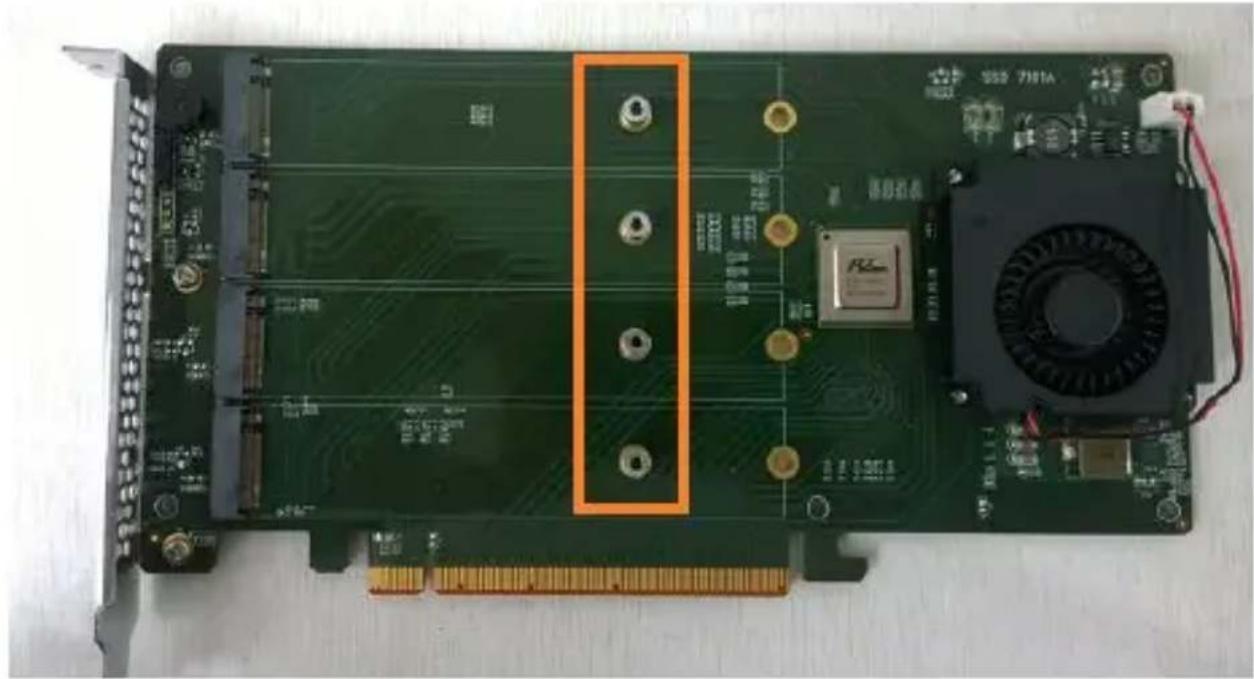
Step 2. These 4 screws are used to install the NVMe SSD's.
natural_image
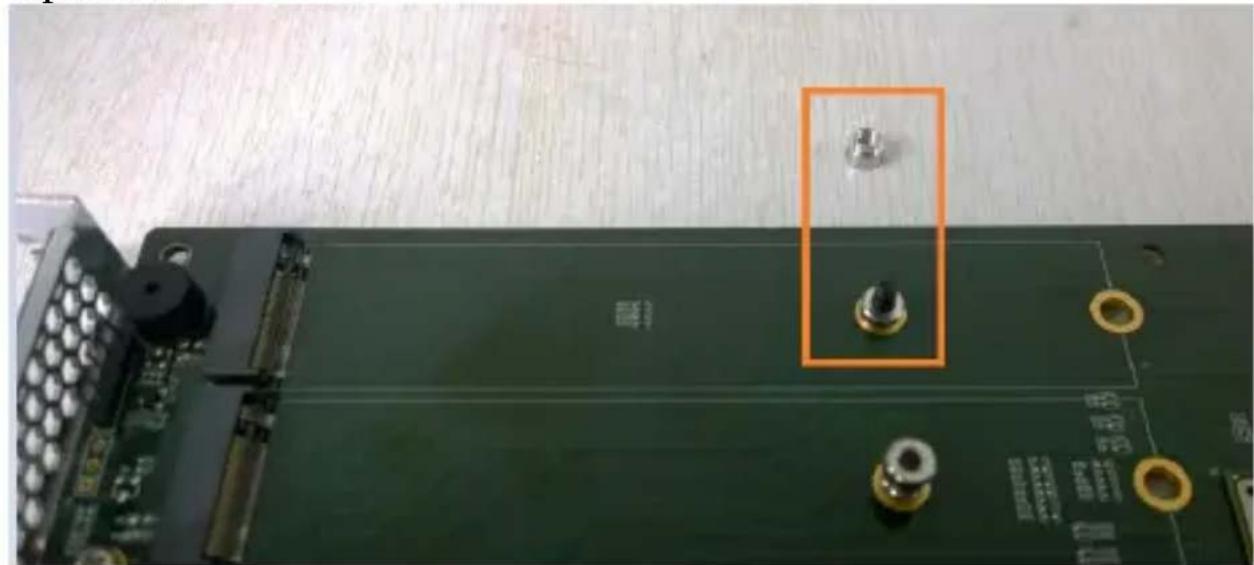
Top-down view of a green printed circuit board with electronic components and a central chip (no visible text or symbols)Step 3. The SSDs should be installed from top to bottom. To begin, remove the top screw.
natural_image
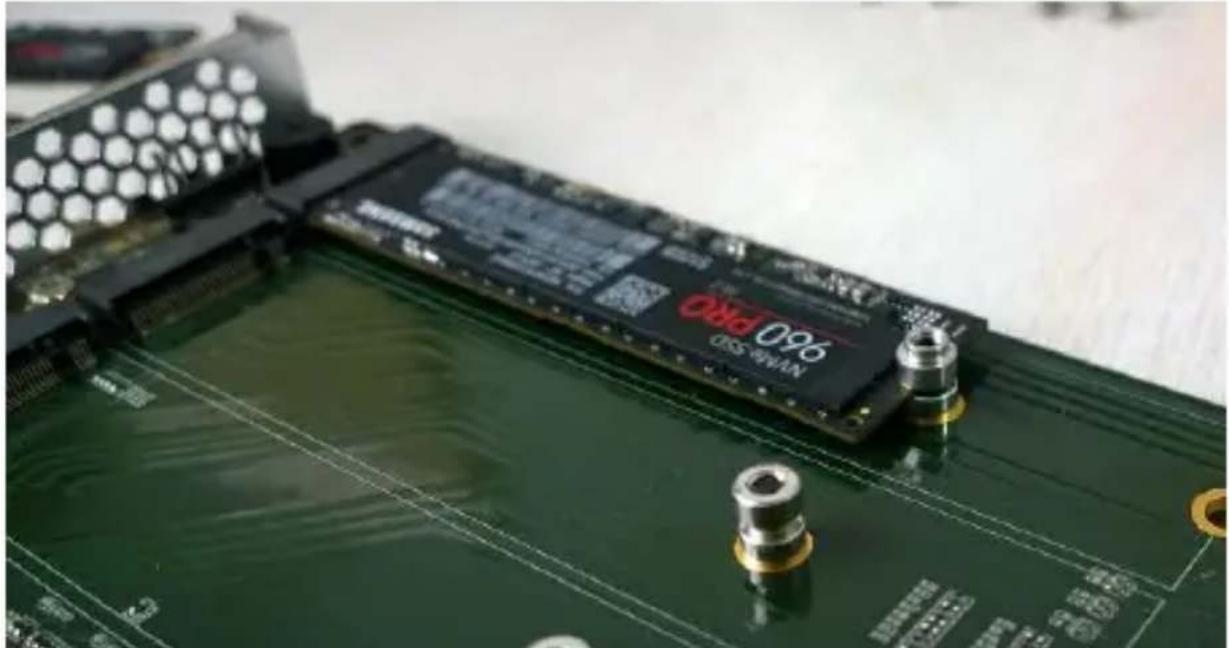
Close-up of a green electronic circuit board with two metallic connectors and mounting holes, no visible text or symbols.Step 4. Gently insert the SSD into the slot.

Step 5. Refasten the screw to secure the SSD.
natural_image
Close-up of a green printed circuit board with a black NAM-550 microprocessor and metal fittings (no readable text or symbols)Repeat Steps 3 to 5 to install the remaining SSDs.
Step 6. Replace the front panel after installing all SSDs
Step 7. On the rear of the SSD7101A-1, refasten the 6 screws that were removed in step 1.
Setting up the SSD7101A-1 for a Windows operating system
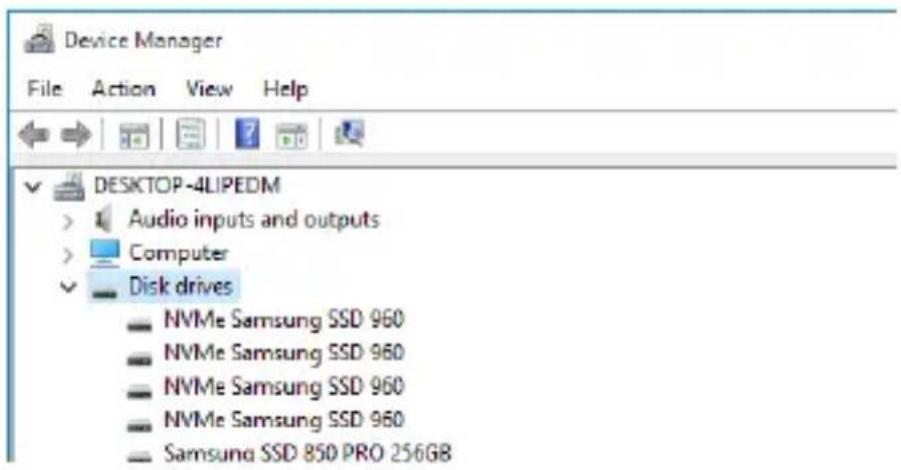
1. Verifying Installation
After booting Windows, open Device Manager, and expand Disk drives. The installed NVMe Samsung SSD 960 should be displayed:
2. Driver Installation
1) Download the Windows driver package from the HighPoint website: http://highpoint-tech.com/USA_new/series-ssd7101a-1-download.htm
2) Once downloaded, locate the folder you downloaded the driver to. Extract the driver package and double click the setup.exe file to start the Driver Setup Wizard.
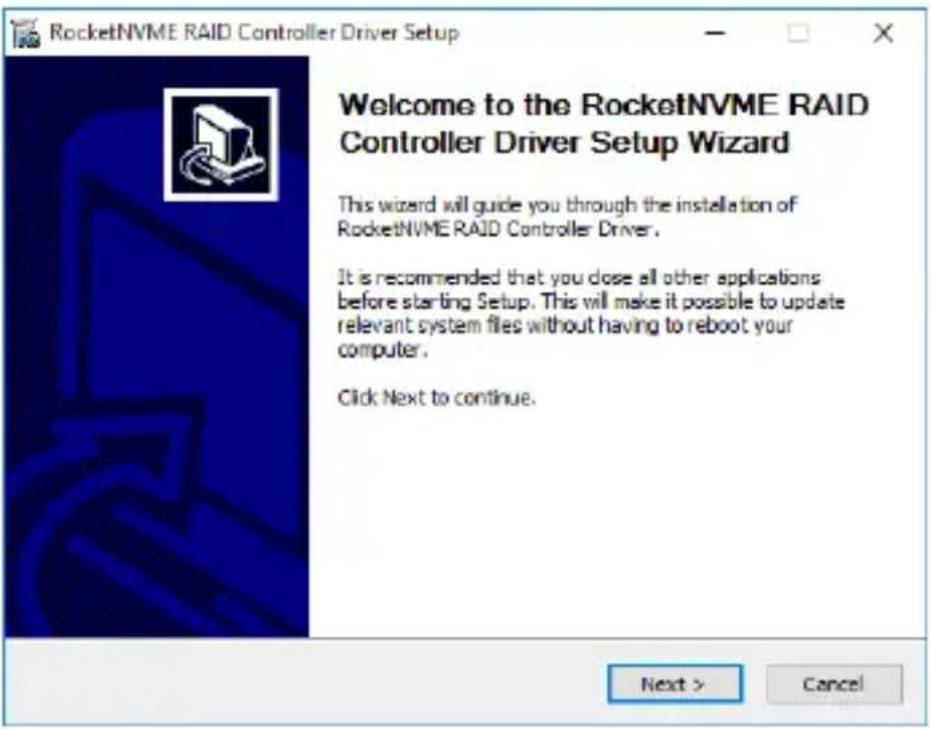
3) Follow the wizard and reboot system to complete the driver installation.
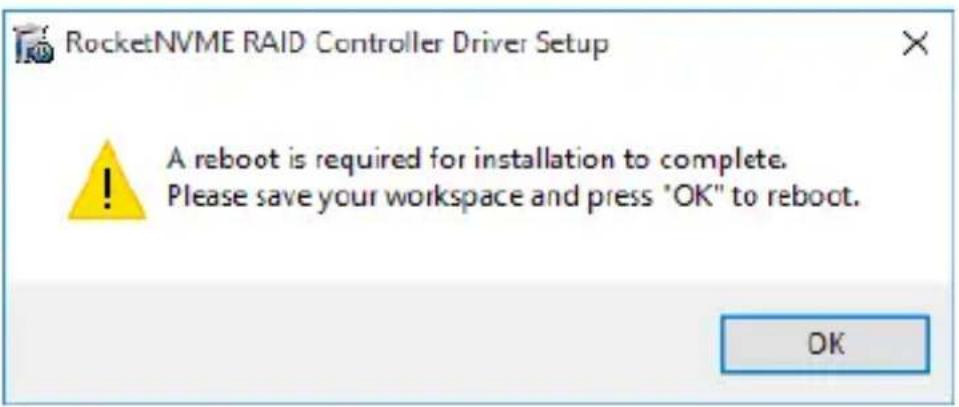
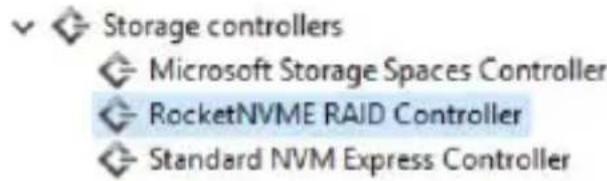
4) Rebooting. A RocketNVME RAID Controller entry should be displayed under Storage Controllers:
- Installing the HighPoint NVMe Manager software
The HighPoint NVMe Manager is used to configure and monitor the SSD7101A-1. Download the HighPoint NVMe Manager Software package from the HighPoint website:
http://highpoint-tech.com/USA_new/series-ssd7101a-1-download.htm
1) Extract the package and double-click the setup.exe program to install the software.
2) The HighPoint NVMe RAID Manager will configure the SSD7101A-1 NVMe drive automatically after installation is complete.
3) Open Windows Disk Management and check to make sure the SSD drive is configured.
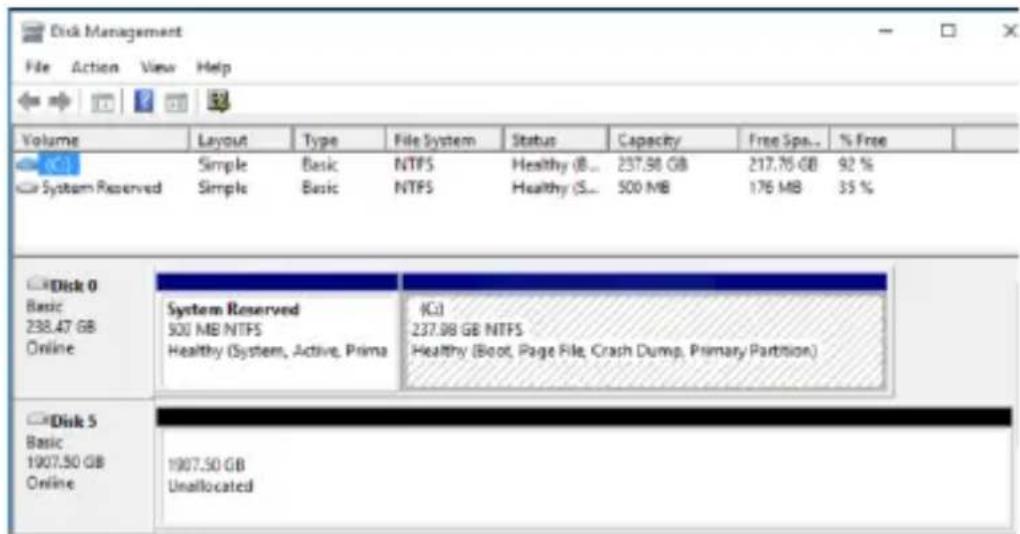
4) Create and format the partition using Disk Management to start using the SSD7101A-1 drive.
Setting up the SSD7101A-1 for a Linux Distribution
Please download the Linux Software Package from the HighPoint Website:
http://highpoint-tech.com/USA_new/series-ssd7101a-1-download.htm
Please follow the Linux Installation guide included with the software package to install and setup the SSD7101A-1 drive.
Using the HighPoint NVMe Manager
1. Starting the HighPoint NVMe Manager
Double click the Desktop ICON to start the Web browser. It will automatically log-in to the HighPoint NVMe Manager using the default password.
The password can be set after the first log-in. To change the password, select Setting>Security from the menu bar (see page 15 for more information).

2. Verify the SSD7101A-1 Status
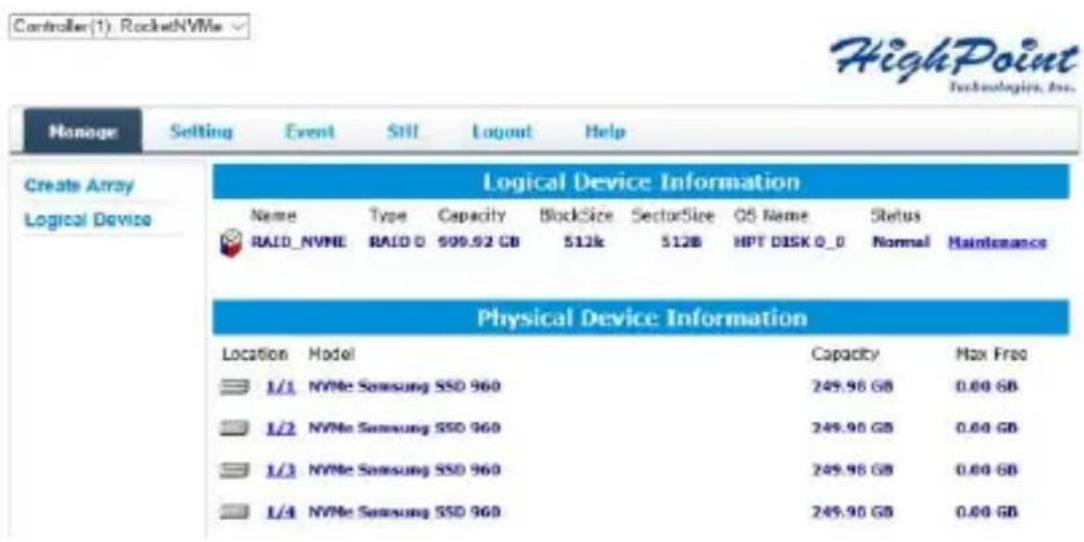
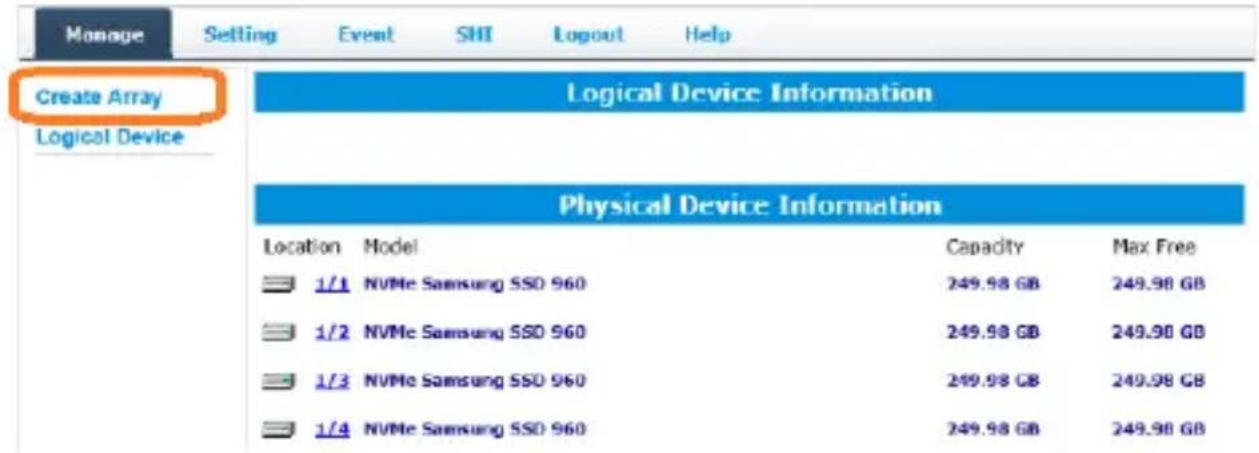
The Manage Tab will display the status of the installed SSD7101A-1. The Virtual Disk is listed under Logic Device Information. The individual M.2 SSDs are listed under Physical Device Information.
3. Manage the RAID disk
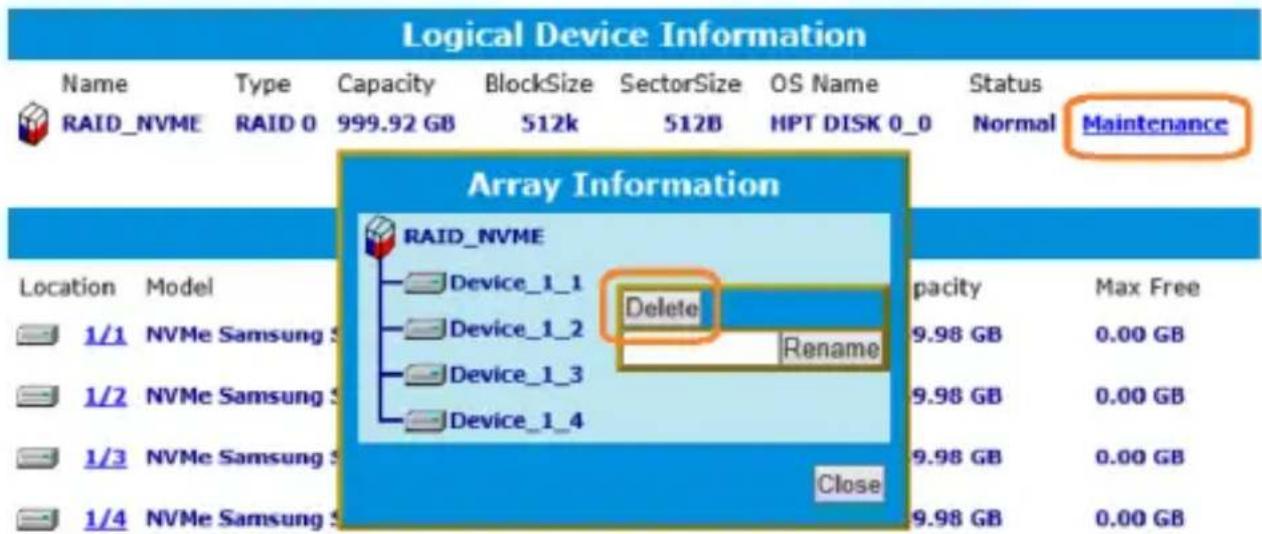
The SSD7101A-1 only supports one RAID disk, and NVMe Manager will automatically configure this RAID disk after the software has been installed. If you need to add another M.2 SSD, you must first delete the existing RAID disk, and then re-create a new RAID disk using all of the M.2 SSDs.
To delete an existing RAID disk:
Under Logical Device Information, click the Maintenance link located to the right of the Status column. Click the Delete button from the pop-up Array Information Window:
Warning:
Deleting the RAID disk will destroy all data on the existing RAID array. Please make sure to back up important data before proceeding.
Rename a RAID disk:
The NVMe Manager will automatically name a RAID disk as RAID_NVME. It will display the disk name under the system device list. You may rename the RAID disk at any time, by clicking Maintenance and accessing the Array Information window.
To create a new RAID disk:
1) Click the Create Array link from the Manage page:
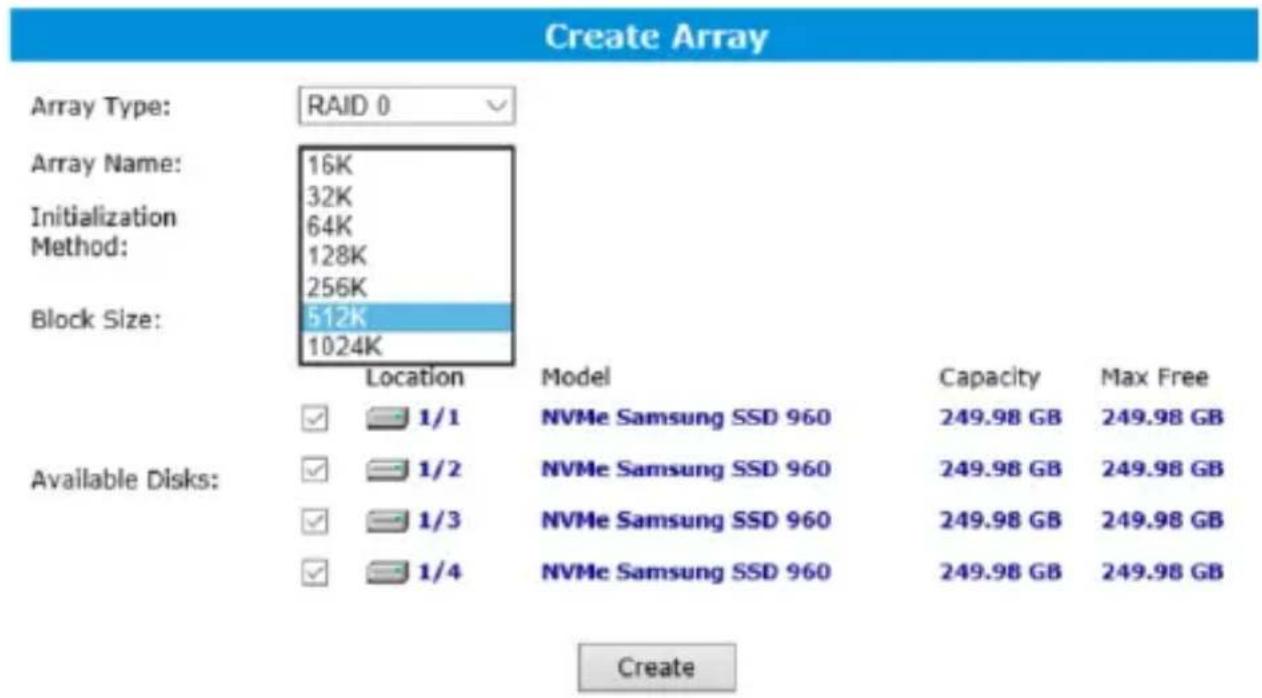
2) Review the array settings and confirm RAID creation. The SSD7101A-1 supports variable RAID Block Sizes from 16K to 1024K. You may adjust the RAID Block size from the Create Array page. Click the Create Button to create the RAID disk.
4. Product Information and Settings
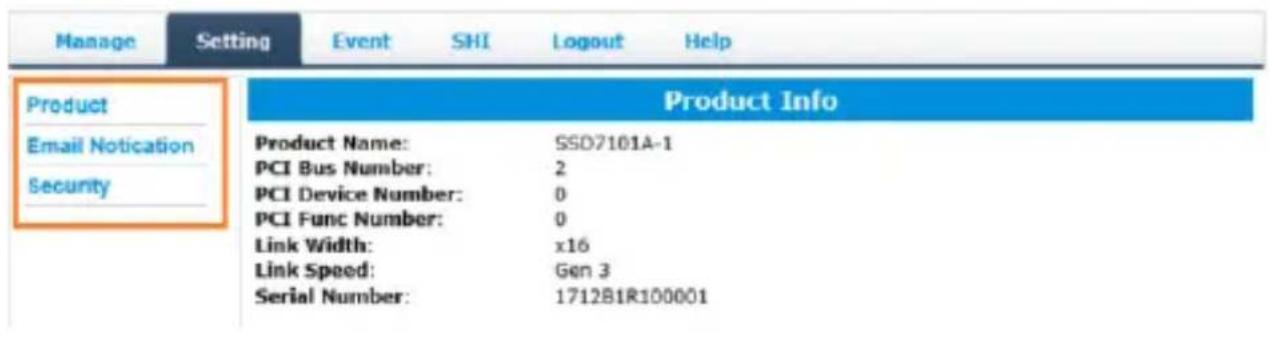
The Setting page includes Product Information, Email notification and Security settings.
Product Information:
This section reports the SSD7101A-1's PCI Bus information and PCIe Link status.
Email Notification:
This feature allows you to configure email notification. You can instruct NVMe Manager to send all, or specific Event Log notifications to an Email address of your choice.
Security:
This option allows you to set the NVMe Manager's Log-in port number and Password.
5. Event log
All NVMe Manager operations and disk status updates will be recorded to the Event log. The Event log can be downloaded and saved to a file by clicking the Download button.
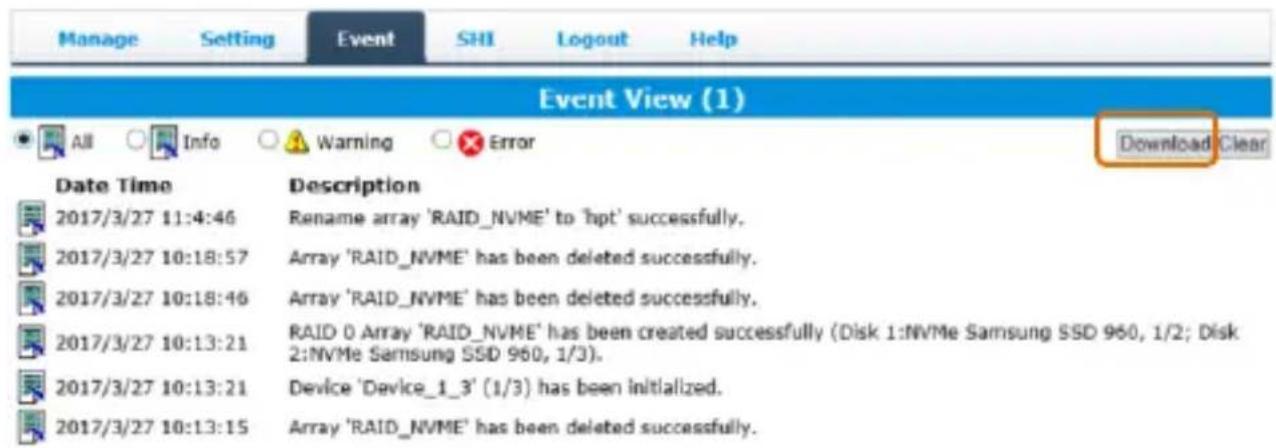
The Clear button can be used to delete all entries and reset the event log.
Warning:
We recommend downloading and saving a copy of the current Event Log before using the Clear option.
6. SHI (Storage Health Inspector)
The SHI page will display S.M.A.R.T. data for each individual M.2 SSD. Click the Detail link to the right of each SSD to view the corresponding S.M.A.R.T. attributes. The SSD's TBW (Total Bytes Written) information may help you review and track the SSD's life cycle.
| Manage | Setting | Event | SHT | Logout | Help | |
| Storage Health Inspector(SHI) | ||||||
| Port# | Device Serial Number | RAID | Temperature | Total Bytes Written | S.M.A.R.T | |
| 1 | S3ESNX0106927R | RAID_NVME | Normal | 28.97 TB | Detail | |
| 2 | S3ESNX0106901R | RAID_NVME | Normal | 31.39 TB | Detail | |
| 3 | S3ESNX0106493B | RAID_NVME | Normal | 31.17 TB | Detail | |
| 4 | S3ESNX0106922W | RAID_NVME | Normal | 31.07 TB | Detail | |
| Device Name | Device_1_1 | |||||
| Model Number | NVMe Samsung SSD 960 | |||||
| Temperature Celsius 22 | ||||||
| NVME S.M.A.R.T Attributes | ||||||
| Name | Value | |||||
| Critical Warning | 0x0 | |||||
| Composite Temperature (C) | 22 | |||||
| Available Spare | 100% | |||||
| Available Spare Threshold | 10% | |||||
| Percentage Used | 11% | |||||
| Data Units Read | 0x3fb452d | |||||
| Data Units Written | 0x3b5735d | |||||
| Host Read Commands | 0x108c6260 | |||||
| Host Write Commands | 0xfb7c00e | |||||
| Controller Busy Time | 0x733 | |||||
| Power Cycles | 0x90 | |||||
| Power On Hours | 0x35 | |||||
| Unsafe Shutdowns | 0x36 | |||||
| Media and Data Integrity Errors | 0x0 | |||||
| Number of Error Information Log Entries | 0x184 | |||||
| Warning Temperature Time | 0x0 | |||||
| Critical Composite Temperature Time | 0x0 | |||||
| Temperature Sensor 1 (C) | 22 | |||||
| Temperature Sensor 2 (C) | 27 | |||||
Customer Support
If you encounter any problems while utilizing the SSD7101A-1 drive, or have any questions about this or any other HighPoint Technologies, Inc. product, feel free to contact our Customer Support Department.
Web Support: http://www.highpoint-tech.com/websupport/
HighPoint Technologies, Inc. websites: http://www.highpoint-tech.com
© Copyright 2017 HighPoint Technologies, Inc. All rights reserved.
- 4x M.2 Port to PCIe 3.0 x16 NVMe RAID Controller
- Table of Contents
- SSD7101A-1 Overview
- Key Features
- Kit Contents
- System Requirements
- PC Requirements
- SSD7101A-1 Hardware
- Front View
- NVMe Drive Installation:
- Setting up the SSD7101A-1 for a Windows operating system
- Verifying Installation
- Driver Installation
- Setting up the SSD7101A-1 for a Linux Distribution
- Using the HighPoint NVMe Manager
- Starting the HighPoint NVMe Manager
- Verify the SSD7101A-1 Status
- Manage the RAID disk
- To delete an existing RAID disk:
- Warning:
- Rename a RAID disk:
- To create a new RAID disk:
- Product Information and Settings
- Product Information:
- Email Notification:
- Security:
- Event log
- SHI (Storage Health Inspector)
- Customer Support
Brand : Highpoint
Model : SSD7101A-1
Category : Pilote