
RocketRAID 2680 - Controller Highpoint - Free user manual and instructions
Find the device manual for free RocketRAID 2680 Highpoint in PDF.


| Product Type | RAID Controller Card |
| Model | RocketRAID 2680 |
| Brand | HighPoint |
| Host Interface | PCI Express 2.0 x8 |
| Supported Drives | Up to 8 SATA 6Gb/s drives |
| RAID Levels | 0, 1, 5, 6, 10, JBOD |
| Number of Ports | 8 internal SATA ports |
| Form Factor | Low-profile PCIe card |
| Dimensions (L x W x H) | 167 x 64 x 20 mm |
| Weight | 100 g |
| Power Consumption | 15 W (max) |
| Operating Temperature | 0°C to 55°C |
| Operating System Support | Windows, Linux, macOS |
| Management Software | Web GUI, CLI, API |
| RAID Initialization | Background initialization supported |
| Hot Swap Support | Yes (with compatible backplane) |
| Maintenance | Keep slots clean; ensure adequate airflow |
| Safety | Install in ESD-safe environment; turn off power before installation |
| Spare Parts | Low-profile bracket and SATA cables available |
| Repairability | No user-serviceable parts; contact support for RMA |
Frequently Asked Questions - RocketRAID 2680 Highpoint
User questions about RocketRAID 2680 Highpoint
0 question about this device. Answer the ones you know or ask your own.
Ask a new question about this device
Download the instructions for your Controller in PDF format for free! Find your manual RocketRAID 2680 - Highpoint and take your electronic device back in hand. On this page are published all the documents necessary for the use of your device. RocketRAID 2680 by Highpoint.
USER MANUAL RocketRAID 2680 Highpoint
Copyright © 2008 HighPoint Technologies, Inc. This document contains materials protected by International Copyright Laws. All rights reserved. No part of this manual may be reproduced, transmitted or transcribed in any form and for any purpose without the express written permission of HighPoint Technologies, Inc.
Trademarks
Companies and products mentioned in this manual are for identification purpose only. Product names or brand names appearing in this manual may or may not be registered trademarks or copyrights of their respective owners. Backup your important data before using HighPoint's products and use at your own risk. In no event shall HighPoint be liable for any loss of profits, or for direct, indirect, special, incidental or consequential damages arising from any defect or error in HighPoint's products or manuals. Information in this manual is subject to change without notice and does not represent a commitment on the part of HighPoint.
Notice
Reasonable effort has been made to ensure that the information in this manual is accurate. HighPoint assumes no liability for technical inaccuracies, typographical, or other errors contained herein.
Table of Contents
Congratulations
Specifications and Features ....6
Operating System Support ....8
Physical Specifications 8
Kit Contents 8
Hardware Description and Installation
1 - RocketRAID 2680 Host Adapter layout ....9
2 - LED Connections .... 10
3 - Hardware Installation .... 11
4 - Verifying Installation .... 12
RocketRAID BIOS Utility
1 - BIOS Command Overview .... 13
2 - Creating RAID Arrays .... 14
3 - Deleting Arrays .... 17
4 - Adding/Remove Spare Disks 18
5 - Settings 19
Device Driver CD and HighPoint RAID Management
1 - Creating a Driver Diskette .... 20
2 - Device Driver Installation .... 21
3 - HighPoint RAID Management Utilities (HRM) 30
Customer Support
Troubleshooting Checklist ....33
Contact Us....34
HighPoint Technologies, Inc.
HighPoint Technologies, long recognized as a leader in mass storage technologies specializes in the design and manufacturer of HBA (Host Bus Adapters) and HighPoint RAID IP (Intellectual Property). HighPoint provides a broad range of scalable hardware HBA's that meet the storage requirements from Enterprise to SMB (Small Medium Sized Business) to PC enthusiast.
The HighPoint RAID IP includes TerabyteArchitecture™ for (Performance, Protection and Prevention).
TerabyteStream™ - leverages the built-in Intel Xscale XOR Engine to deliver unprecedented RAID 5 and 6 performances.
TerabyteGuard™ - prevents data lose and increases data reliability with advanced hard drive inspection features utilizing bad sector repair and remapping.
TerabyteSaver TM - optimizes data protection with a battery backup and with write journaling thus preventing data loss.
Congratulations
You have purchased one of the highest performing and most cost effective 8 channel SAS RAID controllers available. The RocketRAID 2680 offers the flexibility to support both the highest performing SAS 15,000 RPM hard drives, and larger capacity cost sensitive SATA hard drives in homogeneous and heterogeneous storage environments. The RocketRAID 2680 has the versatility to meet the bandwidth requirements for high performance applications like video capture and editing, CAD/CAM and digital graphics.
Remember to visit the HighPoint websites at http://www.highpoint-tech.com and http://www.hptmac.com. There you can find information on all of HighPoint's products with FAQ's, online manuals, BIOS and driver updates.
Specifications and Features
Host Adapter Architecture
- PCI-Express x4 (Compatible with PCI- Express x8, x16 slots). A jumper is used to select between x1 or x4 (default is x4)
- 8 Internal SAS/SATA 3Gb/s Device Ports
- Directly supports up to 8 3Gb/s SAS or SATA hard drives, and up to 128 3Gb/s SAS or SATA hard drives via SAS Expander
• NVRAM for write journaling
• NCQ (Native Command Queuing) - Low Profile
- RoHS compliant
Advanced RAID Features
• Supports RAID 0,1,5,10,50 and JBOD
- Multiple RAID array support
- Multiple logical drive support
• BIOS booting support
- Online Array roaming
• Automatic hard drive (insert / remove) detection
• Automatic RAID rebuild
- 64bit LBA support greater than 2TB per volume
Array Monitors, Alerts and Indicators
- Hard Drive LED Indicators (Activity and Failed)
- Email Notification
- Alarm/Buzzer alerts for drive/array failure
• SAF-TE (I2C) and SGPIO enclosure management
RAID Management
• Online Capacity Expansion (OCE) and Online RAID Level Migration (ORLM)
- Quick and Background initialization for instant RAID configuration
- Write Back and Write Through support
- API library for customization
- CLI (Command Line Interface)
- Web GUI RAID management (local and remote monitoring)
• SHI (Drive analysis driven from S.M.A.R.T)
Operating System Support
• Windows XP, 2003, Vista, 2008 (32 and 64-bit versions)
• Linux (Fedora Core, Red Hat Enterprise / CentOS, SuSE, Debian, Ubuntu)
• Mac OS X 10.4.x and above FreeBSD
- Freebsd
Physical Specifications
Size: (79.3mm*65mm) 3.12"±L x 2.56"±W
EMI: FCC Part 15 Class B and CE
Thermal and Atmospheric Characteristics:
Work Temperature Range: +5 C \~ + 55 C
Relative Humidity Range: 5% \~ 60% non condensing
Storage Temperature: \~20 \~ 80 C MTBF: 920,585 Hours
Electrical Characteristics:
| PCI-E | 3.3V | 12V |
| Power | 6W max | 0.5W max |
Kit Contents
RR2680 Host Adapter
2 Internal Mini-SAS to Mini-SAS cables
Low-profile bracket
User Manual
HighPoint Products Software CD
Hardware - Description and Installation
1 - RocketRAID 2680 Host Adapter layout
RocketRAID 2680
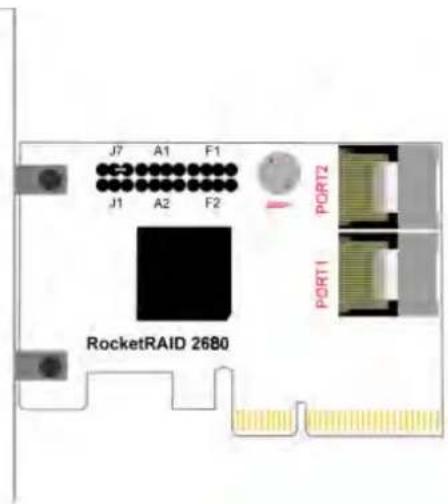
Port1- Port2 - These represent the RocketRAID 2680's 2 Internal Mini-SAS ports. Each port can direct connect up to 4 SATA/SAS hard disks.
BEEP1 – (alarm/speaker): the speaker emits and audible alarm in the case of disk/array failure.
J1 - This jumper is the SAF-TE connector port (for disk enclosures/chassis)
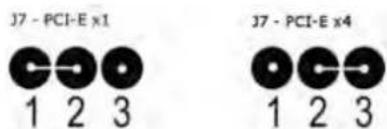
J7 - This jumper is used to select the PCI -Express bus speed:

2 - LED Connections
LED connectors (Drive-activity/Drive-failure): LED support is discussed in greater detail in the LED Connection section. The RocketRAID 2680 host adapter has 4 LED connectors that are used to indicate the activity and failure status of hard drives to the card's 8 SATA/SAS channels.
Active and Failure LED
A1-A2 provides LED support for Drive Activity, while F1-F2 supports Drive Failure.
A1/A2/F1/F2

| Pin NumberConnections | Pin 1 | Pin 2 | Pin 3 | Pin 4 |
| A1 | Drive1 | Drive2 | Drive3 | Drive4 |
| A2 | Drive5 | Drive6 | Drive7 | Drive8 |
| F1 | Drive1 | Drive2 | Drive3 | Drive4 |
| F2 | Drive5 | Drive6 | Drive7 | Drive8 |
3 - Hardware Installation
Note: Make sure the system is powered-off before installing the RocketRAID host adapter.
The RocketRAID 2680 include both standard and low-profile brackets. It may be necessary to attach the low-profile bracket in place of the standard bracket, depending upon the chassis design. Open the system chassis and locate an unused PCI-Express x4.
-
Remove the PCI slot/bracket cover.
-
Gently insert the RocketRAID card into the PCI-Express slot, and secure the bracket to the system chassis (illustration shows RR2680).

- After installing the adapter, attach hard drives to the host adapter using the data cable. The RocketRAID 2680 model utilizes 2 Mini-SAS to Mini-SAS Cables are included in each retail box. This card can support up to 8 3Gb/s SAS or SATA Hard Drives directly or upto 128 3Gb/s SAS or SATA Hard Drives via SAS Expander.
Note: Many server-level chassis include hard-disk hot-swap bays. For these system chassis, cables are attached to the chassis backplane, rather than directly to each individual hard disk. Consult the chassis's manual for proper installation procedure.
- Close and secure the system chassis.
4 - Verifying Installation
Once the host adapter and hard disks have been installed into the chassis, boot-up the system to verify that the hardware is properly recognized.
- Power on the system. If the system detects the presence of the adapter, the RocketRAID BIOS Utility will be displayed during bootup.
- Press Ctrl+H to access the RocketRAID adapter's BIOS Utility.
The BIOS Utility will display information about hard disks attached to the adapter. Make sure all attached disks are detected by this utility. If any of the hard disks are not detected, power down the system and check the power and cable connections.
RocketRAID BIOS Utility
The RocketRAID 2680 card will display it's BIOS screen during the system's boot process.
Press Control + H when prompted, to access the BIOS settings Menu.
1 - BIOS Settings Overview
The RocketRAID 2680 BIOS utility is an interface that provides management commands and controller related settings.

Using the BIOS Utility
The following keys utilized by the RocketRAID 2680 BIOS utility:
Alt - press Alt to highlight the tool bar.
Arrow keys – use these to move between different menu items
Enter - Open the selected toolbar command/execute the selected command.
Esc – move back to the previous menu, cancel the selected operation, or exit the BIOS Utility.
BIOS Commands

Create - this command is used to open the RAID Creation menu.
Delete - this command will delete the selected RAID array.
Add/Remove Spare - this command is used to assign hard disks to function as spare disks. The controller is capable of using spare disks to automatically rebuild broken or faulted RAID arrays.
Settings - this command opens the settings menu (selecting the boot disk/array, staggered drive spinup)
View – this command is used to select between two views: Devices (HARD DISKS), and Arrays (configured RAID arrays).
Initialize - this command is used to prepare disks for use with RAID arrays. Disks must be initialized before they can be used to create arrays.
2 - Creating RAID Arrays
Initializing Disks:
Before creating a RAID array, the disks must be initialized. Disk initialization writes necessary RAID configuration information to the hard disks. Select the Initialize command from the toolbar, and press ENTER.

Highlight the target disks using the arrow keys, then select using Enter. A numeral will be displayed before each selected disk. Once all target disks have been selected, press ESC. The utility will display a warning, and ask you to press Y (yes) to initialize, or N (no) to cancel. Once initialized, these disks can be used to create RAID arrays.
Warning: Initialization will destroy all pre-existing data on the selected hard disks. Only initialize disks that do not contain critical data.
Creating Arrays:
Select Create from the toolbar and press Enter.
![RocketRAID 2680 BIOS Setting Utility v1.0 RAID 0: Striping RAID 1: Mirroring RAID 1/0: Striping over Mirroring RAID 5: Striping with Rotating Parity RAID 5/0: Striping over RAID 5 JBOD (Volume) Help For high performance usage. Requires at least 2 disks. ↑↓+: Next Item [Enter]:Select [ESC]:Backward](/content/2026/06/1257888/images/650ce637ed54c2f9b1f94536c12ad3f84934b68694ecda1efca1b4ad6d1771ef.jpg)
- Use the arrow keys to select the RAID level and press ENTER.
![RocketRAID 2680 BIOS Setting Utility vi.0 RAID 5 Array Name: RAID_S_0 Select Devices: 0 Selected RAIDS member count: N/A Capacity(GB): 0 Cache Policy: Write Back Sector Size: 5128 Start Creation: Create Help Use A-Z, a-z, 0-9, _ and -. Maximum name length is 15. T++: Next Item [Enter]:Select [ESC]:B…](/content/2026/06/1257888/images/830f8f14a1d14c0108179ae41e212a6824efa82c943adf8c2796416e151c5161.jpg)
- Use the arrow keys to highlight the Array Name option and press Enter. The array name dialogue box will appear. Use the keyboard to input a new Array Name, and press the Enter key.
Note: the Array Name command is optional – it is not necessary to name the array. The array can be named at a later time, and the name of the array can be changed at any time.
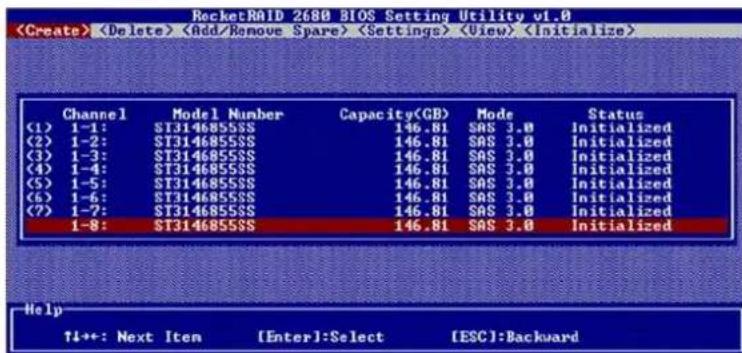
- On the Create menu, use the arrow keys to highlight the Select Devices item and press Enter. A device list will appear, and display all available hard disk drives.
-
Highlight the target disks that you want to use, and press Enter to select them. A numeral will be displayed before each selected disk. This number designates disk order. After all of the disks have been selected and press the ESC key to return to the Create Menu.
-
Next, Use the ↓ arrow key to highlight the Capacity (GB) option and press Enter. The total available capacity will be displayed. Press ENTER if you wish to use all available space. If you wish to reserve disk space for additional arrays/single disks, use the keyboard to input the amount of space (in GB) you wish to set aside for this particular array, and press Enter.
Note: Multiple arrays can be created using the same set of hard disk drives. The Capacity option allows you to set aside disk space that be used to create another array, set as a spare disk, or partitioned to act as a single disk (by the operating system).
- Enter. For redundant RAID arrays (RAID 1, 5, 10), select the Cache Policy:

Write Back – utilizes disk cache (higher performing)
Write Through – writes directly to the disks (may reduce the risk of data loss during a critical failure, but at the cost of lower performance)
-
Sector Size – Also known as “Variable Sector Size”. Use this option if you are using an older 32-bit Windows operating system. This allows older operating systems to support volumes over 2TB in size. Do not use if the operating system already supports large volumes (such as GPT).
-
To complete the creation procedure, use the arrow key to highlight the Start Creation item and press Enter. Press the Y (yes) key to create the array, or N (no) key to cancel the creation process.
3 - Deleting Arrays
Highlight the Delete command from the toolbar, and press Enter.
The BIOS utility will display a list of available RAID arrays. Select the array you wish to delete, and press Enter.
![RocketRAID 2680 BIOS Setting Utility v1.0 No. Array Name RAID Level Capacity(GB) Status OCE/ORLM 1 RAID_0_0 Striping 586.79 Normal 2 RAID_5_0 RAID 5 440.09 Uninitialized Help Delete a RAID array attached to RocketRAID 2680. T1++: Next Item [Enter]:Select [ESC]:Backward](/content/2026/06/1257888/images/ce1bc12852f198860b37dff81a10e72539aa57d53bc74a6a32632783fdd2ad90.jpg)
The utility will display a warning message. Press Y (yes) to delete the array, or select N (no) to cancel.
![RocketRAID 2680 BIOS Setting Utility vi.0 No. Array Name 1 RAID_0_0 2 RAID_5_0 Warning: The data will be lost.Are you sure to delete it? Press Y(es) or M(o) to confirm. OCE/ORLM alized Help Delete a RAID array attached to RocketRAID 2680. ↑4++: Next Item [Enter]:Select [ESC]:Backward](/content/2026/06/1257888/images/7eecd5efa287f3812f2300eb9e08a9d7efd0c72cdc6d112f8825155e57cef29c.jpg)
Warning: all data stored on the array will be lost – do not delete if the array contains critical data.
4 - Adding/Remove Spare Disks
This Add/Remove Spare command is used to assign a hard disk to act as a Spare Disk. Spare Disks are used to automatically rebuild Redundant RAID arrays (RAID 1, 5, 10) in the case of disk failure. As with creating RAID arrays, disks must be initialized before they can be used as spares. To set a hard disk to act as a Spare Disk, use the arrow keys to select the target disk from the list of initialized disks, and press Enter. To remove the Spare Disk setting from a hard disk, highlight the spare disk, and press Enter.

Generally, single disks are designated to act as spares (disks that are not configured into RAID arrays).
However, in some instances, disks that are members of RAID arrays may also be designated to act as a spare. If the disks in question are part of a RAID array that did not utilize the full available capacity at the time of creation, these disks may be used as spares. For example: a RAID 0 array was created between two 200GB hard disks, but only 200GB of space (out of a grand total of 400GB), was assigned to that array. In this example, 200GB of disk space remains unallocated. This unallocated space would allow these disks to be set as spares for a separate redundant array that falls into the same capacity range (200GB).
5 - Settings
To access the Settings menu, highlight the Settings command from the toolbar, and press Enter.

Select Boot Device – select which disk or array will act as the boot disk, if the motherboard BIOS instructs the card to act as the boot device.
Staggered Drive Spinup – This option is disabled by default. Enabling this setting will instruct the card to power up the hard disks, sequentially (one disk approximately every 2 seconds). Not all disk support this setting – consult the disk documentation for more information.
Device Drive CD and HighPoint RAID Management
Each retail box includes a copy of the HighPoint Products Software CD.
This CD can be used to generate driver diskettes, and install the HighPoint RAID Management Utility Suite for a variety of operating systems.
1 - Creating a driver diskette
Windows 2000, 2003 and several distributions of Linux and FreeBSD require driver diskettes when installing the operating system directly to a disk or array hosted by the Rocket RAID host adapter.
To create a driver floppy diskette:
-
Insert the CD into the system's CD/DVD drive. The program should start automatically.
-
Insert a blank floppy diskette into the system's floppy drive.
-
Click on "Create Driver Diskette".
-
Click on the "Please Select a Product" drop-down button, and select the appropriate host adapter model from the list.
-
Click on the "Please Select the Diskette you want to create" drop-down button, and select the desired operating system from the list.
-
Click on the "OK" button to create the driver diskette.

2 - Device Driver Installation
We recommend visiting the RocketRAID 2680 download page for the latest Windows Device Driver updates:
http://highpoint-tech.com/USA/bios_rr2680.htm
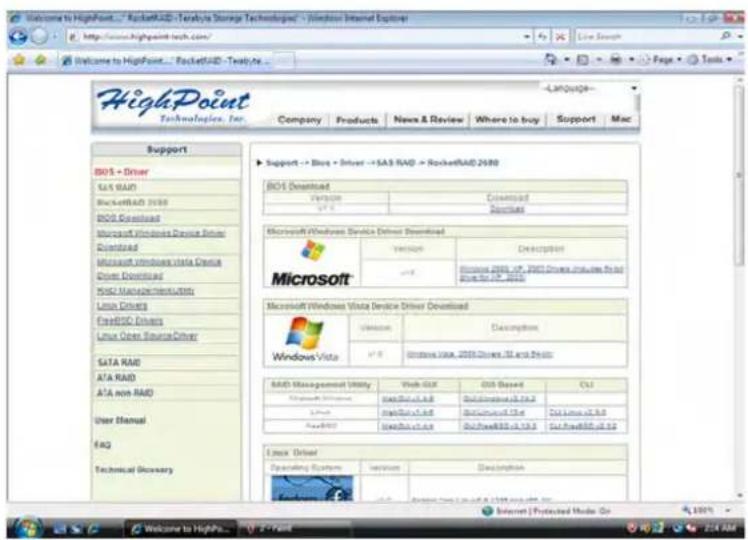
Drivers are posted in .zip archive format. Most Windows operating systems will recognize this archive format, natively. Double click the driver download to view and extract their contents. Drivers can be extracted and/or copied to various media.
Windows Driver Installation (Win2000, XP, Win 2003)
Before installing the RocketRAID 2680 host adapter's device driver, make sure the host adapter and all required hard disks have been installed into the system's chassis/disk enclosure. If you are working with a supplied driver, or driver download, you will want to extract the contents directly to a directory of your choice (or device). You will need to browse to this location, in order to load the driver (see step 2, below).
Installing the RocketRAID 2680 driver for an existing Windows system.
After the operating system has booted, Windows will automatically detect the RocketRAID 2680 host adapter, and request that a device driver be installed. To install the device driver, follow the steps outlined below:
- When the “Found New Hardware Wizard” window appears, select “Install from a list or specific location (Advanced)”, and click Next to continue.
- Click on the “Include this location in the search” option, and select the system’s floppy drive (generally Disk A). Next, insert the Driver Installation diskette into the system’s floppy drive, or select Browse, and browse to the location of the driver. If you are using the RocketRAID 2680 software CD, the drivers are located in RR2680 – Driver – Windows – Windows (then select the appropriate folder).
- Windows may display a warning message that states the driver has "not been signed". Select "Continue Anyway", then click Finish when prompted. When windows asks to reboot the system, choose No.
- Remove the Driver Installation diskette from the floppy drive, then Shut down and restart the computer.
Installation Verification
After the driver has been installed, and the system has been restarted:
- Click the Start button, then right-click the "My Computer" icon. Select the Properties item from the pop up menu.
- In the popup window, click the "Hardware" tab then click Device Manager button.
- Double click the "SCSI and RAID controllers" entry. If the RocketRAID 2680 device entry is not displayed, or there are "?" or "!" marks displayed near the RocketRAID 2680 entry, the driver has not been installed properly. Delete the entries and reinstall the driver.
Installing the RocketRAID driver during a fresh Windows installation
- After booting from the Windows CD or DVD-ROM, when the Windows Setup blue screen appears, look towards the bottom of the screen. Windows will prompt you to press the F6 key if you want to install a third party SCSI or RAID driver. Press the F6 key at this time.
- The setup procedure will continue, and will later instruct you to press the "S" key to specify additional adapters. Press the "S" key as instructed.
- Next, the setup program will prompt for the insertion of the driver diskette. Please insert the driver diskette, and then press ENTER to continue.
- The next window will display several driver options. Please select the driver for the corresponding operating system, and press ENTER to continue.
Device Driver CD and HighPoint RAID Management
Windows Vista/2008 Driver Installation
Installing the driver during a fresh Windows Vista/2008 installation
- Boot from Windows Vista DVD.
- When the screen “where do you want to install Windows” appears, click “Load driver” and browse for the driver location. Windows Vista will accept install drivers from various sources: floppy diskette, USB flash disk or CD. If you are using the RocketRAID 2680 software CD, the drivers are located in RR2680 – Driver – Windows – VistaWin2008 – 32 (or 64, if you are running a 64-bit version of the operating system).
- Select the RocketRAID 2680 controller driver, and click "Next".
- The driver is now installed – you can now commence with the standard OS installation procedures.
Installing the driver for an existing Windows Vista/2008 system
- Install the RocketRAID 2680 host adapter into the PC, then boot up Windows.
- Windows should automatically detect the card, and display the "Found New Hardware" wizard pop-up window. Select "Locate and install driver software". When Windows asks: "Windows needs your permission to continue", select "continue".
- Select “I don’t have disc, show me other options” and then select “Browse my computer for driver software”.
- Specify the location of the driver and click "Next". If you are using the RocketRAID 2680 software CD, the drivers are located in RR2680 – Driver – Windows – VistaWin2008 – 32 (or 64, if you are running a 64-bit version of the operating system).
- When asked: "Would you like to install this driver software?", select "Install".
- Reboot the system when prompted. The RocketRAID 2680 will be available for use after Windows reboots.
Installation Verification
After the driver has been installed, and the system has been restarted:
-
Click the Start button, then right-click My Computer icon. Select the Properties item from the popup menu.
-
In the popup window, select Hardware tab and then click Device Manager button.
-
Double click the "Storage Controllers" entry. If the RocketRAID 2680 device entry is not displayed, or there are "?" or "!" marks displayed near the RocketRAID 2680 entry, the driver has not been installed properly. Delete the entries and reinstall the driver.
Linux and FreeBSD Device Driver installation
Visit our website for the latest Linux and FreeBSD related driver and software updates http://www.highpoint-tech.com
Binary and source driver updates are routinely posted for a variety of Linux operating systems including Red Hat Enterprise, CentOS, OpenSuSE, and Fedora Core. Drivers are also available for several FreeBSD revisions, and are available from the same support page. Driver updates are typically posted as .tgz archive files.
http://highpoint-tech.com/USA/bios_rr2680.htm
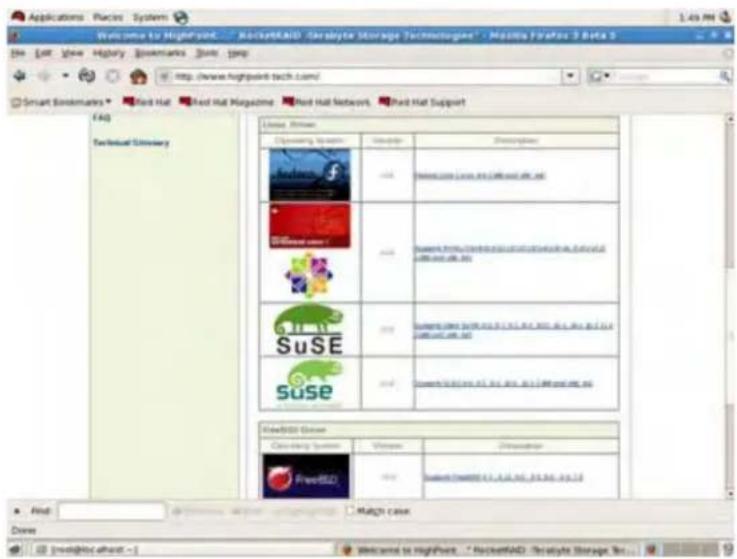
Several driver sets are also included with the RocketRAID 2680 Software CD.
Each binary driver and source package includes an installation guide (.pdf format).
Linux Driver sets:
RR2680/Driver/Linux directory.
FreeBSD Driver sets:
RR2680/Driver/FreeBSD directory.
Mac OS X Driver and Web-based RAID Management Utility
The driver and software package for the RocketRAID 2680 includes both the device driver for OS X, and a copy of the Web RAID Management utility.
Please check http://www.hptmac.com for the latest software/driver packages.
Driver updates are posted on the card's product page, under the "Download Center" section.
The latest package is posted towards the right-hand side of the page, under “Mac Driver”. On the left-hand side of the page, there is a section devoted to user documentation. The latest versions of the Product, and Web-based RAID Management Manuals are posted here.

Installing the driver and Web-based RAID Management Interface
Copy the Mac driver and software package from the RR2680 Software CD, to the Mac Desktop. If you are using a copy from our website, locate the downloaded .dmg package. Open the .dmg file, and double click "RR2680" to begin installation.
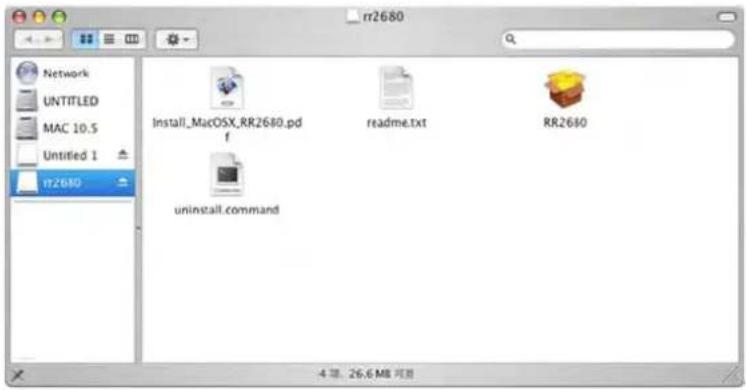
Click "Continue" to proceed with installation

Select the installation destination:

Click "Restart" – after OS X reboots, the card will be recognized by the system. You can configure arrays using the Web RAID Management interface.

3 - HighPoint RAID Management Utilities (HRM)
The HighPoint RAID Management Utility Suite, also known as "HRM", includes several user interface options. The latest version of the Web Management utility user manual, is available from the following link: http://www.highpoint-tech.com/PDF/RR26xx/RR2680-UM-EN.pdf
Windows Operating Systems – Installing the Web-based Management Utility
Click on "Install RAID Management Software".
Select the desired software from the drop down menu, and click on the "OK" button.

Red Hat Enterprise/CentOS, Fedora Core, Open SuSE – Installing the Web-based Management utility
Linux operating systems that support .rpm packages, allow you to double-click the HighPoint Web RAID Management .rpm file to start the installation process.
- Copy the Web RAID Management package from the RR2680 Software CD, to the desktop of the Linux operating system. The .rpm file is located in HighPoint RAID Management Software – RR2xxx - Linux – WebGui-Linux.tbz.
- Extract the .tbz file to the desktop, and browse to the appropriate .rpm file (there are 32 and 64-bit options).
- Double click the .rpm file – this should open the operating systems' software installer. Enter the Administrative password when prompted and proceed with installation.
- The package can also be installed manually, using a terminal. Lon in as "root", open a terminal, and browse to the location of the .rpm file. Run the following command:
-
rpm -i hptsvr-https-1.4-8.i386.rpm (or hptsvr-https-1.4-8.x86_64.rpm)
Note: The i386 rpm package can also work on 64-bit systems if you have 32-bit runtime libraries installed. If you use the x86_64 rpm package, please make sure the controller driver has 64-bit ioctl support.
Debian/Ubuntu Linux Distributions – Installing the Web-based Management Utility
For Debian/Ubuntu Linux distributions, you can use alien to convert the rpm packages to a .deb package, then use "dpkg -i" command to install each package. Some script files may be lost during the conversion process from rpm to .deb, so you may need to make manual corrections.
The following files will be installed/configured:
/usr/bin/hptsvr - service program
/etc/hptcfg - service config file
/etc/rc.d/init.d/hptdaemon - service control script
/usr/share/hpt/webguiroot - data files
If there is no /etc/hptcfg present, you can add it manually using by using the "echo" command on the driver file name to /etc/hptcfg.
Forexample:
# echo rr26xx.ko >/etc/hptcfg
Uninstalling the Utility
Open a terminal, and use the following command:
# rpm -e hptsvr-https
Linux Distributions - Command Line Interface (CLI)
Command Line interface versions of the RocketRAID management utilities are available for Linux and FreeBSD operating systems.
These packages are posted on the HighPoint Technologies, Inc. website, under the BIOS & Driver downloads page for the RocketRAID 2680.
The latest version of the CLI user manual is available from the following link: http://www.highpoint-tech.com/PDF/RR26xx/RR2680-UM-EN.pdf
Customer Support
If you encounter any problems while utilizing the RocketRAID host adapter, or have any questions about this or any other HighPoint product, feel free to contact our Customer Support Department.
Troubleshooting Checklist
Before contacting our Customer Support department:
- PCI-Express x4 (Compatible with PCI- Express x8, x16 slots). A jumper is used to select between x1 or x4 (default is x4)
- Make sure the latest BIOS, driver and HighPoint RAID Management softto ware has being installed for the host adapter. The latest updates are available from our website.
- Prepare a list of the computer system's hardware and software (motherboard, CPU, memory, other PCI-E devices/host adapters, operating system, applications)
Contact Information
E-mail address: support@highpoint-tech.com
Phone: 408-240-6119
9:00AM-5:00PM, Pacific Standard Time
Additional information about HighPoint products is available from our web site:
http://www.highpoint-tech.com
Contact Us
HighPoint Corporate Headquarter USA
Address 1161 Cadillac Ct.
Milpitas, CA, 95035
Website: http://www.highpoint-tech.com
Phone: 1-408-942-5800 (9 am \~ 6 pm PST, M-F) Fax: 1-408-942-5801
E-mail: sales@highpoint-tech.com
Support: support@highpoint-tech.com
Support Phone: 1-408-240-6108 (9 am \~ 5 pm PST, M-F)
HighPoint Taiwan
5F., No.3, Swei Lane, Jhongjheng Rd.
Sindian City, Taipei County 231, Taiwan (R.O.C.)
Website: http://www.highpoint-tech.com/Taiwan/indextw.htm
Phone: +886-2-2218-3435 (9 am \~ 6 pm)
Fax:+886-2-2218-3436
E-mail:sales@highpoint-tech.com
Support: support@highpoint-tech.com
HighPoint China
4th Floor Kehaifulin Building, N0. 12
Zhong Guan Cun South Rd.
Haidian District Beijing, China 100081
Website: http://www.highpoint-tech.cn/
Phone: +86-10-6213-0920 (9 am \~ 6 pm)
Fax:+86-10-6897-5074
E-mail: sales@microaurora.com.cn
Support: support@microaurora.com.cn
FCC Part 15 Class B Radio Frequency Interference statement
This equipment has been tested and found to comply with the limits for a Class B digital device, pursuant to part 15 of the FCC Rules. These limits are designed to provide reasonable protection against harmful interference in a residential installation. This equipment generates, uses and can radiate radio frequency energy and, if not installed and used in accordance with the instructions, may cause harmful interference to radio communications. However, there is no guarantee that interference will not occur in a particular installation. If this equipment does cause harmful interference to radio or television reception, which can be determined by turning the equipment off and on, the user is encouraged to try to correct the interference by one or more of the following measures:
●Reorient or relocate the receiving antenna.
- Increase the separation between the equipment and receiver.
- Connect the equipment into an outlet on a circuit different from that to which the receiver is connected.
- Consult the dealer or an experienced radio/TV technician for help.
Modifications not expressly approved by the manufacturer could void the user's authority to operate the equipment under FCC rules.
This device complies with part 15 of the FCC Rules. Operation is subject to the following two conditions: (1) this device may not cause harmful interference, and (2) this device must accept any interference received, including interference that may cause undesired operation.
European Union Compliance Statement
This Information Technologies Equipment has been tested and found to comply with the following European directives:
●European Standard EN55022 (1998) Class B
●European Standard EN55024 (1998)
Thank You
Thank you for purchasing the RocketRAID 2680 SATAII/SAS RAID Host adapter. We appreciate your support, and welcome any questions, comments or product suggestions you may have.
- TRADEMARKS
- NOTICE
- TABLE OF CONTENTS
- CONGRATULATIONS
- HARDWARE DESCRIPTION AND INSTALLATION
- ROCKETRAID BIOS UTILITY
- DEVICE DRIVER CD AND HIGHPOINT RAID MANAGEMENT
- CUSTOMER SUPPORT
- HIGHPOINT TECHNOLOGIES, INC
- SPECIFICATIONS AND FEATURES
- HOST ADAPTER ARCHITECTURE
- ADVANCED RAID FEATURES
- ARRAY MONITORS, ALERTS AND INDICATORS
- RAID MANAGEMENT
- OPERATING SYSTEM SUPPORT
- PHYSICAL SPECIFICATIONS
- THERMAL AND ATMOSPHERIC CHARACTERISTICS
- ELECTRICAL CHARACTERISTICS
- KIT CONTENTS
- HARDWARE - DESCRIPTION AND INSTALLATION
- ROCKETRAID 2680 HOST ADAPTER LAYOUT
- LED CONNECTIONS
- ACTIVE AND FAILURE LED
- HARDWARE INSTALLATION
- VERIFYING INSTALLATION
- BIOS SETTINGS OVERVIEW
- USING THE BIOS UTILITY
- BIOS COMMANDS
- CREATING RAID ARRAYS
- INITIALIZING DISKS
- CREATING ARRAYS
- DELETING ARRAYS
- ADDING/REMOVE SPARE DISKS
- SETTINGS
- DEVICE DRIVE CD AND HIGHPOINT RAID MANAGEMENT
- CREATING A DRIVER DISKETTE
- TO CREATE A DRIVER FLOPPY DISKETTE
- DEVICE DRIVER INSTALLATION
- WINDOWS DRIVER INSTALLATION (WIN2000, XP, WIN 2003)
- INSTALLING THE ROCKETRAID 2680 DRIVER FOR AN EXISTING WINDOWS SYSTEM
- INSTALLATION VERIFICATION
- INSTALLING THE ROCKETRAID DRIVER DURING A FRESH WINDOWS INSTALLATION
- WINDOWS VISTA/2008 DRIVER INSTALLATION
- INSTALLING THE DRIVER DURING A FRESH WINDOWS VISTA/2008 INSTALLATION
- INSTALLING THE DRIVER FOR AN EXISTING WINDOWS VISTA/2008 SYSTEM
- LINUX AND FREEBSD DEVICE DRIVER INSTALLATION
- LINUX DRIVER SETS
- FREEBSD DRIVER SETS
- MAC OS X DRIVER AND WEB-BASED RAID MANAGEMENT UTILITY
- INSTALLING THE DRIVER AND WEB-BASED RAID MANAGEMENT INTERFACE
- HIGHPOINT RAID MANAGEMENT UTILITIES (HRM)
- WINDOWS OPERATING SYSTEMS – INSTALLING THE WEB-BASED MANAGEMENT UTILITY
- RED HAT ENTERPRISE/CENTOS, FEDORA CORE, OPEN SUSE – INSTALLING THE WEB-BASED MANAGEMENT UTILITY
- RPM -I HPTSVR-HTTPS-1.4-8.I386.RPM (OR HPTSVR-HTTPS-1.4-8.X86_64.RPM)
- DEBIAN/UBUNTU LINUX DISTRIBUTIONS – INSTALLING THE WEB-BASED MANAGEMENT UTILITY
- THE FOLLOWING FILES WILL BE INSTALLED/CONFIGURED
- UNINSTALLING THE UTILITY
- LINUX DISTRIBUTIONS - COMMAND LINE INTERFACE (CLI)
- TROUBLESHOOTING CHECKLIST
- CONTACT INFORMATION
- CONTACT US
- HIGHPOINT CORPORATE HEADQUARTER USA
- HIGHPOINT TAIWAN
- HIGHPOINT CHINA
- FCC PART 15 CLASS B RADIO FREQUENCY INTERFERENCE STATEMENT
- EUROPEAN UNION COMPLIANCE STATEMENT
- THANK YOU
Brand : Highpoint
Model : RocketRAID 2680
Category : Controller