
WM-D5200 - Microphone TOA - Free user manual and instructions
Find the device manual for free WM-D5200 TOA in PDF.


| Product Type | Digital Wireless Microphone |
| Brand | TOA |
| Model | WM-D5200 |
| Dimensions | ø47 × 239.5 mm |
| Weight | 220 g (with battery) |
| Power Supply | Rechargeable battery WB-2000 (optional) or AA alkaline batteries |
| Battery Life | Approx. 8 hours |
| Microphone Sensitivity | Switchable H (0 dB) / L (-10 dB) |
| Frequency Range (A2 version) | 694 – 703 MHz |
| Number of Channels | 160 channels |
| Encryption | Yes, with ON/OFF setting and ID number |
| Identification Code | 10 patterns (0 to 9) |
| Output Power | H: 10 mW / L: 1 mW |
| Modulation Type | FSK |
| Bandwidth | 100 Hz to 12 kHz |
| Maximum Input Level | 132 dB SPL (sensitivity L) / 122 dB SPL (sensitivity H) |
| Antenna | Built-in type |
| Operating Temperature | -10 to +50 °C |
| Operating Humidity | 30 to 85% RH |
| Finish | Body: Black ABS resin, coating; Head: Black steel, paint |
| Supplied Accessories | Carrying case, screwdriver, microphone stand |
| Maintenance and Cleaning | Dry cloth; avoid benzene, thinner, or chemical wipes |
| Safety | Use dedicated charger; remove batteries if unused for 2 weeks; do not open the case |
| Spare Parts / Repairability | Optional WB-2000 battery; repair by authorized TOA dealer |
Frequently Asked Questions - WM-D5200 TOA
User questions about WM-D5200 TOA
0 question about this device. Answer the ones you know or ask your own.
Ask a new question about this device
Download the instructions for your Microphone in PDF format for free! Find your manual WM-D5200 - TOA and take your electronic device back in hand. On this page are published all the documents necessary for the use of your device. WM-D5200 by TOA.
USER MANUAL WM-D5200 TOA
natural_image
Line drawing of a cylindrical mechanical component with threaded ends and internal slots (no text or symbols)TABLE OF CONTENTS
- SAFETY PRECAUTIONS .... 3
- GENERAL DESCRIPTION ...... 5
- FEATURES .... 5
- HANDLING PRECAUTIONS .... 5
- NOMENCLATURE AND FUNCTIONS ...... 6
- PREPARING BATTERIES 8
6.1. Battery Insertion 8
6.2. Guide to Battery Operating Times 8
6.3. When Operating on Rechargeable Battery 9
8.1. Setting the Bank and Channel Numbers 10
8.2. Performing Encryption Settings 11
8.3. Performing Code Settings (When Encryption Function Is OFF) 14
8.4. Performing Transmission Output Changeover Switch Settings 15
-
CONVENIENT FUNCTIONS (MICROPHONE SENSITIVITY SELECTOR SWITCH SETTINGS) 16
-
SPECIFICATIONS 17
Accessories 17
1. SAFETY PRECAUTIONS
- Before use, be sure to carefully read all the instructions in this section for correct and safe operation.
- Be sure to follow all the precautionary instructions in this section, which contain important warnings and/or cautions regarding safety.
• After reading, keep this manual handy for future reference.

WARNING
Indicates a potentially hazardous situation which, if mishandled, could result in death or serious personal injury.
When the Unit is in Use
- Be sure to use a dedicated battery charger when recharging a battery. Using other battery charger may cause the battery to leak or explode, resulting in a fire, personal injury, property damage, and/or pollution.
- To prevent the electromagnetic wave from badly influencing medical equipment, make sure to switch off the unit's power when placing it in close proximity to the medical equipment.

CAUTION
Indicates a potentially hazardous situation which, if mishandled, could result in moderate or minor personal injury, and/or property damage.
When the Unit is in Use
- When the unit is not in use for 2 weeks or more, be sure to take the batteries out of the unit because battery leakage may cause a fire, personal injury, or contamination of environment.
- Make sure to observe the following handling precautions so that a fire or personal injury does not result from leakage or explosion of the battery.
-
Do not short, disassemble, heat nor put the battery into a fire.
-
Avoid using both new and old batteries together.
- Never charge batteries of the type which are not rechargeable.
- Do not solder a battery directly.
- Be sure to use the specified type of batteries.
- Note correct polarity (positive and negative orientation) when inserting a battery in the unit.
- Avoid locations exposed to the direct sunlight, high temperature and high humidity when storing batteries.
Do not place the dry cell battery into charger. Placing non-rechargeable batteries in the charger may cause the battery to crack resulting in a fire and/or harm to the body.
When recharging, please only use the BC-2000A Battery charger and WB-2000 Battery.
Do not use other battery types.
When the battery becomes inflated or leaks, discontinue use and replace with new one immediately.
If there's any burning and/or peculiar smell while charging the battery, please switch off the power immediately.
CAUTION TO USER:
Changes or modifications not expressly approved by the party responsible for compliance could void the user's authority to operate the equipment.
IMPORTANT NOTE: To comply with the FCC RF exposure compliance requirements, no change to the antenna or the device is permitted. Any change to the antenna or the device could result in the device exceeding the RF exposure requirements and void user's authority to operate the device.
This device complies with Industry Canada's licence-exempt RSSs. Operation is subject to the following two conditions:
(1) This device may not cause interference; and
(2) This device must accept any interference, including interference that may cause undesired operation of the device.
This device operates on a no-protection, no-interference basis. Should the user seek to obtain protection from other radio services operating in the same TV bands, a radio licence is required. For further details, consult Innovation, Science and Economic Development Canada's document Client Procedures Circular CPC-2-1-28, Voluntary Licensing of Licence-Exempt Low-Power Radio Apparatus in the TV Bands.
The WM-D5200 is a digital wireless microphone employing a condenser microphone element that features high sensitivity and clear sound quality. The microphone is specially designed to be used in conjunction with TOA's WT-D5800 digital wireless receiver.
3. FEATURES
- Employs the PLL-synthesizer system.
• TOA's unique digital audio processing technology ensures high quality sound. - Digital transmission is highly resistant to radio interference and noise, enabling clearer, more stable communication.
- When used for important conferences or in other high-security venues, TOA's unique encryption software combines with digital transmission technology to prevent leakage of or eavesdropping on sensitive information.
- Switchable microphone sensitivity allows the unit to be used in a wide range of applications.
- Power can be supplied by either the dedicated rechargeable (NiH2 = nickel-hydrogen) battery or an AA alkaline battery. When replacing the rechargeable battery, use the optional TOA WB-2000-2 (package of 2).
- Employs an internal antenna.
4. HANDLING PRECAUTIONS
- Do not expose the unit to rain or an environment where it may be splashed by water or other liquids, as doing so may result in unit failure.
- Never open nor remove the unit case to modify the unit. Refer all servicing to your nearest TOA dealer.
- Take care not to drop the unit onto the floor nor bump it against a hard object as the unit could fail.
- Do not place the unit in locations of high temperature (ex. in an ill-ventilated car in summer) or high humidity as the unit could fail.
- Do not use the unit in locations where it is exposed to seawater.
- To clean, use a dry cloth. When the unit gets very dirty, wipe lightly with a cloth damped in a dilute neutral cleanser, then wipe with a dry cloth. Never use benzine, thinner, or chemically-treated cleaning towel.
- Avoid using a mobile telephone near the unit in use. Noise could be picked up.
- When using two or more units, keep them at least 50 cm away from each other to avoid malfunctions or noise.
- Keep the unit at least 3 m away from the receiving antenna. Using the unit in close proximity to the antenna could result in malfunctions or noise.
5. NOMENCLATURE AND FUNCTIONS
[Front]

1. Power switch [ON/OFF]
Power can be turned on by sliding the power switch to the ON position, while it can be turned off by sliding it back to the OFF position.
2. Battery checker (green/orange/red)
Lit: Power ON
Unlit: Power OFF*
The remaining battery power is represented by the color of the indicator.
Green: Battery power is at full charge.
Orange: Battery power depletion has started.
Red: Battery power is almost depleted, and battery replacement is required.
* When the battery power is depleted, the indicator will not light up.
Note
The microphone does not transmit the signal if the bank and channel selector switches are set to the empty channel.
In this case, the indicator flashes red and green alternately.
3. Microphone grip (Battery compartment cover)
The internal parts consist of the battery compartment and switches for various settings.
![[Battery case internals – front] [Battery case internals – side] TOA ON OFF OFF ENCRYPTION BANK CHANNEL CODE ④ ⑤ ⑥ ⑦ ⑧ ⑨ ⑪ ⑪ ⑫ ⑪ ⑪ ⑪ ⑪ ⑪ ⑪ ⑪ ⑪ ⑪ ⑪ ⑪ ⑪ ⑪ ⑪ ⑪ ⑪ ⑪ ⑪ ⑪ ⑪ ⑪ ⑪ ⑪ ⑪ ⑪ ⑪ ⑪ ⑪ ⑪ ⑪ ⑪ ⑪ ⑪ ⑪](/content/2026/05/760670/images/bb1b932f2a1ded49e6430e05aa0d747722ae6b5a2a569c2ba918eb5d11cb869b.jpg)
4. Bank selector switch
Make sure that the microphone is identical to the wireless receiver in the bank number.
5. Channel selector switch
Make sure that the microphone is identical to the wireless receiver in the channel number.
6. Maintenance port
Not used.
Note
Never open the rubber cover.
7. Encryption indicator
Lit: Encryption ON
Unlit: Encryption OFF
8. Encryption setting switch
9. Code setting switch [0 - 9]
10. Transmission output changeover switch [H/L]
H: 10 mW
L: 1 mW
11. Battery compartment
Insert and use a dedicated rechargeable battery or AA alkaline batteries.
12. Microphone sensitivity selector switch [H/L]
H: 0 dB
L: -10 dB
6. PREPARING BATTERIES
The WM-D5200 can operate on both the optional rechargeable battery or replaceable dry batteries. Please carefully read the corresponding sections for correct use.
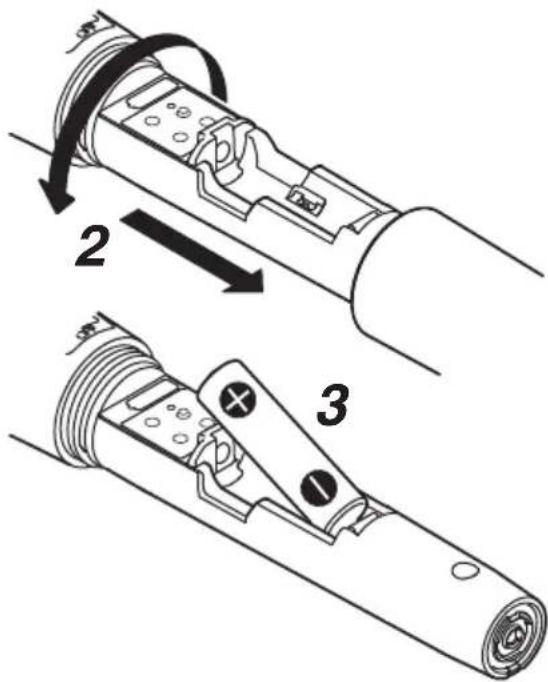
6.1. Battery Insertion
Step 1. Turn off the power switch.
Step 2. Hold the microphone body and rotate the battery compartment cover counterclockwise to remove it.
Step 3. Insert an AA battery according to (+) and (−) indications on the battery compartment. For the rechargeable battery, use the optional TOA WB-2000-2 (package of 2). For dry batteries, use either the supplied battery or commercial AA alkaline batteries (LR6).
Step 4. Replace the battery compartment cover by sliding and rotating it clockwise.
6.2. Guide to Battery Operating Times
6.2.1. Remaining operating time
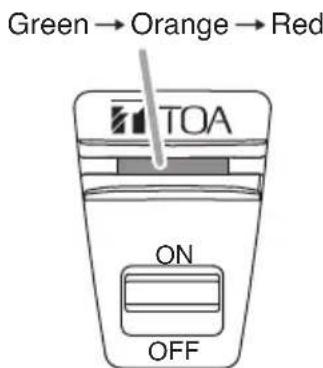
The color of the battery checker changes from green to orange as battery consumption progresses, and to red if the battery is further continuously used. When the battery checker turns red, charge the battery if the dedicated rechargeable battery is used. In the case of dry batteries, replace it with a new one.
[Guide to the remaining operating time based on the battery charge indicator status]
| Battery checker status | Remaining operating time |
| Lights green 2 – 8 hours | |
| Lights orange Less than | 2 hours |
| Lights red Battery requires charge or replacement. | |
6.2.2. Continuous operating time
Guide to continuous operating times: Approx. 8 hours (for fully-charged dedicated rechargeable battery or alkaline battery)
Note
Operating times may vary depending on usage conditions, such as ambient temperature.
6.3. When Operating on Rechargeable Battery

CAUTION
Do not charge the unit with an alkaline dry battery installed.
Charge the dedicated rechargeable battery*.
Failure to observe these instructions could cause fire or personal injury due to a bursting battery.
* The optional TOA WB-2000-2 (package of 2).
Notes
- When operating on rechargeable batteries, the optional BC-2000A Battery charger is required.
- For rechargeable batteries, be sure to use the optional WB-2000-2 (package of 2).
- Avoid using other makes of rechargeable batteries.
- When using the WB-2000 rechargeable battery for the first time or when using it after it has been stored for a long period of time, be sure to charge it before use.
- The WB-2000 battery is designed to cycle through about 500 charges and discharges. When the microphone operation interval becomes extremely short after prolonged repeated use, change the battery with a new one.
- Charge the rechargeable battery after it has been fully used. (The wireless microphone will continue to operate for approx. 8 hours per charge.) Frequent charging at short intervals may shorten the operating life of the rechargeable battery.
[How to charge]
Step 1. Place the WB-2000 rechargeable battery in the wireless microphone.
(See p. 8, "Battery Insertion.")
Step 2. Set the wireless microphone's power switch to the OFF position.
Step 3. Fully insert the wireless microphone into the microphone receptacle of the BC-2000A Battery charger.
The BC-2000A's charging indicator lights red and charging begins.
Charging is completed in approximately 2 hours and the BC-2000A's full-charge indicator lights green.
- If the red charging indicator does not light even if the wireless microphone has been inserted into the charger, check to see if the microphone has been correctly inserted.
- The wireless microphone becomes warm after charging completion, however this is not a failure.
- When disconnecting the wireless microphone from the charger, firmly hold the charger so that it does not move.
For more information, see the instruction manual enclosed with the BC-2000A Battery charger.
WM-D5200
Digital wireless microphone
![TOA WM-D5200 - [How to charge] - 1](/content/2026/05/760670/images/3c5cf8959159b58aff08dd089c3e39b42931eb137e39f59e7a0426e2d379ddb5.jpg)
natural_image
Technical line drawing of a device with a cylindrical component inserted into a tray (no text or symbols)BC-2000A
Battery charger
7. OPERATION
Step 1. Confirm that the wireless microphone and the wireless receiver are identical in the bank and channel numbers If not identical, turn the power switch to the OFF position, then set the bank and channel numbers to the same ones as the receiver.
Step 2. Turn the Power switch to the ON position. Then, confirm the battery checker will light green or orange.
Step 3. Turn the Power switch to the OFF position after use.
8. FUNCTION SETTINGS
8.1. Setting the Bank and Channel Numbers
Step 1. Switch off the power.
Step 2. Rotate the battery compartment cover counterclockwise to detach it.
Step 3. Using the supplied screwdriver, set the bank selector switch's pointer to the desired number, and set the channel selector switch's pointer likewise.
Step 4. Replace the battery compartment cover.

8.2. Performing Encryption Settings
To enhance security, the WM-D5200 is provided with an encryption setting function that prevents leakage of transmitted information.
This function also has the advantage of eliminating radio interference if enabled. Before enabling the encryption setting, be sure that bank and channel settings are completed first.
Tip
In addition to the WM-D5200, the WT-D5800 Digital Wireless Receiver also requires setup. Therefore, be sure to see the receiver's instruction manual as well.
8.2.1. Encryption settings summary
[Before use (preparatory operation for setting)]
Transmit an ID number from the wireless microphone to the receiver. The ID number is randomly selected on the wireless microphone side. The ID number to be used is selected from an extensive number of combinations and cannot be designated by the operator, nor can it be identified from outside.
[In use] (No operations required.)
When the receiver detects a signal from the wireless microphone, it simultaneously reads the microphone's ID information, ensuring that only the audio of the wireless microphone assigned with the same ID number as the receiver can be output. Even if the bank/channel numbers are identically set in an attempt to enable reception of a radio signal from outside, since no audio is output if the ID number does not match, the possibility of leakage of transmitted information to the outside is quite low.
[Encryption setting ON/OFF confirmation]
Step 1. After removing the battery compartment cover, switch ON the microphone power switch.
Step 2. Confirm the status of the Encryption indicator.
The setting is ON when the indicator is lit, and OFF when the indicator is unlit.
Note: The encryption setting is factory-preset to OFF

8.2.2. Performing encryption settings
[Switching the Encryption function from OFF to ON]
See also the instruction manual enclosed with the WT-D5800 receiver.
Step 1. Enable the receiver's encryption function.
Step 2. With the battery compartment cover removed, switch ON the microphone power switch and confirm that the Encryption indicator is unlit.
If the indicator is lit, switch encryption from ON to OFF (see p. 13).
Step 3. Switch OFF the microphone power switch.
Step 4. Switch ON the microphone power switch while holding down the microphone's Encryption setting switch (continue holding until Step 6).
Confirm that the microphone's Encryption indicator is flashing.
An ID number is transmitted while the microphone's Encryption setting switch is held down.
Step 5. Perform pairing setting at the receiver.
The receiver waits for the microphone's transmitted ID number for as long as the Set key is held down. The "RECEIVING" indication is displayed on the receiver's LCD screen until the ID number is correctly received.
Step 6. After confirming that the LCD display has switched to the "SUCCESS" indication, release both the microphone's Encryption setting switch and the receiver's Set key.
Step 7. Confirm that the microphone's Encryption indicator is lit.
The encryption setting is now ON.
ENCRYPTION
![TOA WM-D5200 - [Switching the Encryption function from OFF to ON] - 1](/content/2026/05/760670/images/55ff2874031d36f501289914cbd5168f03f0b1a86b5be539de4463ceb5b866c1.jpg)
ENCRYPTION
![TOA WM-D5200 - [Switching the Encryption function from OFF to ON] - 2](/content/2026/05/760670/images/12192c745c5610250e07dcbae1b5bf0c67d99d076eb114690b131b00ff890905.jpg)
ENCRYPTION
![TOA WM-D5200 - [Switching the Encryption function from OFF to ON] - 3](/content/2026/05/760670/images/f86125fa35d3a5c2862b9b09c28bebd3c3e714859438e7e3b2feb5c36b3c038b.jpg)
![TOA WM-D5200 - [Switching the Encryption function from OFF to ON] - 4](/content/2026/05/760670/images/165377e68db9cdac857955c44792a916921a894b53c4ecc76715ddfb4a2172f3.jpg)
Notes
- Do not switch OFF the power to the microphone or receiver during setting.
- Hold down the microphone's Encryption setting switch and the receiver's Set key until the "SUCCESS" indication appears on the receiver's LCD screen.
If the microphone's Encryption setting switch or the receiver's Set key is released while the "RECEIVING" indication is displayed on the receiver's screen, the receiver will not have correctly received the new ID number, leaving the ID number unchanged from the previous value. To match the receiver ID number with the microphone ID number, switch OFF the microphone's encryption setting, then repeat Steps 1 – 7 above.
Tips
- The ID number is updated when the encryption is switched from OFF to ON again. (The encryption ON/OFF status and ID number are retained even if the power switch is switched OFF.)
- Settings can be performed regardless of whether the microphone or receiver Encryption setting switch was depressed first.
- The receiver does not output audio during ID number setting, even if it receives a radio signal from the microphone.
[Switching the Encryption function from ON to OFF]
Step 1. With the battery compartment cover removed, switch ON the microphone power switch and confirm that the Encryption indicator is lit.
Step 2. Switch OFF the power switch.
Step 3. Switch ON the microphone power switch while holding down the Encryption setting switch.
Note
Do not switch OFF the microphone power switch during setting.
Step 4. Confirm that the Encryption indicator has extinguished, then release the Encryption setting switch.
The encryption setting switches to OFF.
ENCRYPTION


ENCRYPTION


8.3. Performing Code Settings (When Encryption Function Is OFF)
8.3.1. Code Setting Summary
By presetting the specified code between the wireless microphone and receiver, audio is only output when a digital signal received from the wireless microphone has the same ID code as the receiver. Even if another signal is received from an adjacent area, if the code does not match, audio is not output.
Ten varieties of code can be selected ([0] - [9]) for appropriate use, depending on circumstances.
8.3.2. Code settings
Code is factory-preset to "0."
Note
Switch OFF the microphone power switch when performing settings. If the power switch is left ON, the codes will remain unaffected even if the settings are manually changed.
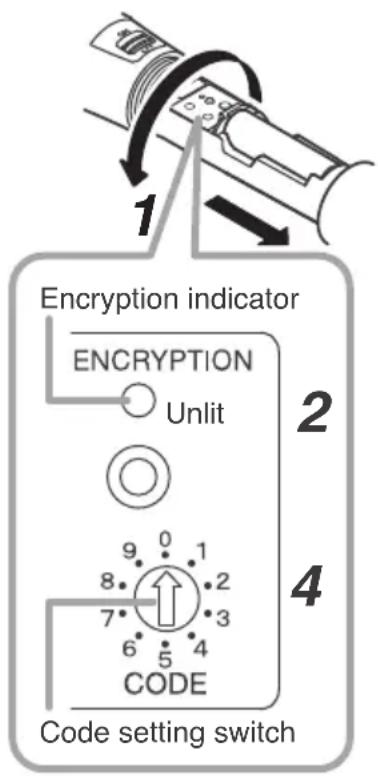
Step 1. After removing the battery compartment cover, switch ON the microphone power switch.
Step 2. Confirm that the Encryption indicator is unlit. If it is lit, switch encryption from ON to OFF, referring to p.12, "Switching the Encryption function from OFF to ON."
Step 3. Switch OFF the power.
Step 4. Using the supplied screwdriver, set the code setting switch to the desired code number.
Step 5. Reinstall and securely tighten the battery compartment cover, as it was before. This puts the code into the set state.
Step 6. Set the same code number for the receiver, as well. For the setting method, see the instruction manual enclosed with the receiver.
flowchart
graph TD
    A["1"] --> B["Encryption indicator"]
    B --> C["ENCRYPTION"]
    C --> D["Unlit"]
    D --> E["Code"]
    E --> F["CODE setting switch"]
    style A fill:#f9f,stroke:#333
    style B fill:#ccf,stroke:#333
    style C fill:#cfc,stroke:#333
    style D fill:#fcc,stroke:#333
    style E fill:#cff,stroke:#333
    style F fill:#ffc,stroke:#333
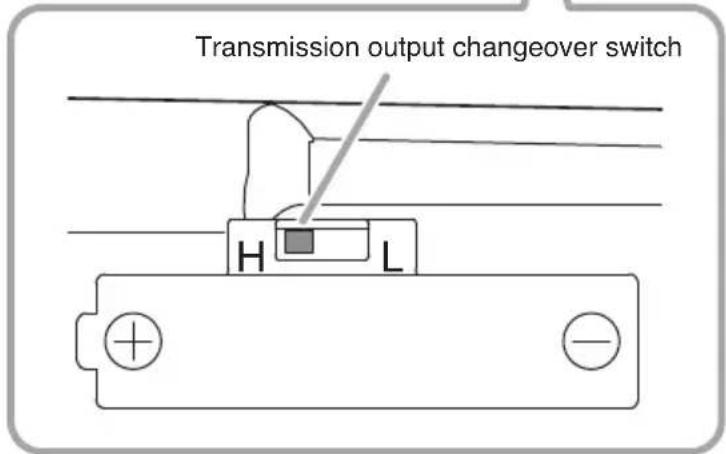
8.4. Performing Transmission Output Changeover Switch Settings
Transmission can be set for either of two outputs: 'H' (10 mW) or 'L' (1 mW). The switch is factory-preset to the 'H' position.
Note
Be sure to turn the microphone's power switch OFF before performing settings.
Step 1. Confirm that the power switch is turned OFF, then remove the battery compartment cover and battery.

Step 2. Using the supplied screwdriver, set the changeover switch to the desired transmission output. Set the switch to the 'H' position when using the microphone in a wide area. If the same bank and channel are used in close proximity in adjacent locations, set the switch to the 'L' position to shorten the radio wave transmission range for each location to minimize interference.
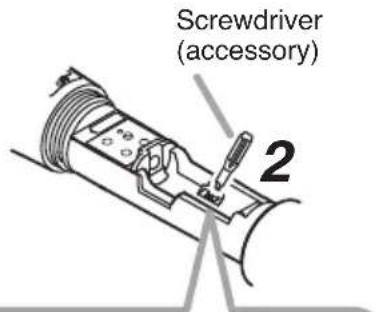
Step 3. Reinsert the battery and securely replace the battery compartment cover.
9. CONVENIENT FUNCTIONS (Microphone Sensitivity Selector Switch Settings)
Microphone sensitivity can be set to "0 dB" (H) or "-10 dB" (L).
Notes
- Switch OFF the power switch when selecting the sensitivity.
- When the sensitivity is set to "H," avoid positioning the microphone too close to the mouth and speaking in a loud voice, as the sound could become muddled and difficult to understand.
Step 1. Confirm that the power switch has been switched off, then remove the battery compartment cover.
Step 2. Using the supplied screwdriver, set the switch to the desired sensitivity.
Step 3. Reinstall and securely tighten the battery compartment cover, as it was before.

10. SPECIFICATIONS
| Microphone Element Electret condenser unit: Unidirectional | |
| Modulation type FSK | |
| Version and Frequency Range | WM-D5200 -A2: 694 – 703 MHzWM-D5200 -C4, -C7: 798 – 832 MHz(803 – 806 MHz for Thailand)WM-D5200 -G1: 606 – 636 MHzWM-D5200 -H1: 576 – 606 MHz |
| Channel Selectable 160 channels(The number of channels may differ from country to country.) | |
| RF Carrier Power Less than 50 mW | |
| Maximum Input Level 132 dB SPL (Sensitivity: L)/122 dB SPL (Sensitivity: H) | |
| Audio Frequency Response | 100 Hz – 12 kHz |
| Antenna Built-in type | |
| Dynamic Range Typ. 90 dB (when used with WT-D5800) | |
| ID Selectable 10 patterns | |
| Battery WB-2000 rechargeable battery (option) or AA Alkaline dry cell battery | |
| Battery Life Approx. 8 hours | |
| Operating Temperature | -10 to +50 °C (14 to 122 °F) (except battery) |
| Operating Humidity | 30 to 85 %RH (no condensation) |
| Finish | Body: ABS resin, black, coatingHead: steel, black, paint |
| Dimensions | ø47 × 239.5 mm (ø1.85" × 9.43") |
| Weight | 220 g (0.49 lb) (with battery) |
Note: The design and specifications are subject to change without notice for improvement.
- Accessories
Storage case .... 1
Screw driver (for setting) 1
Microphone holder 1
Note
The WM-D5200 cannot communicate with the TRANTEC Wireless System (S4 and S5 Series) nor with the TOA Analog Wireless System (WT-5800, WT-5805, and WT-5810 etc.).
DIGITALES DRAHTLOSMIKROFON WM-D5200

natural_image
Line drawing of a cylindrical mechanical component with threaded ends and internal slots (no text or symbols)natural_image
Technical line drawing of a handheld device with a cylindrical component inserted into a housing (no text or symbols)BC-2000A
Batterieladegerät
7. BEDIENUNG
natural_image
Line drawing of a cylindrical mechanical component with threaded ends and internal slots (no text or symbols)natural_image
Technical line drawing of a device with a cylindrical component inserted into a housing (no text or symbols)BC-2000A
10. SPÉCIFICATIONS
natural_image
Line drawing of a cylindrical mechanical component with threaded ends and internal slots (no text or symbols)natural_image
Technical line drawing of a device with a cylindrical component inserted into a tray (no text or symbols)DECLARATION OF CONFORMITY
We: TOA Electronics Europe GmbH
as the authorised representative of the
Manufacturer: TOA Corporation
7-2-1, Minatojima-nakamachi, Chuo-ku, Kobe, Japan 650-0046
declare, under our sole responsibility, that the product
Product Name: DIGITAL WIRELESS MICROPHONE
Model Number: WM-D5200
conforms with following specifications:
RED:
EN 301 489-1 V2.2.0 (2017-03)
EN 301 489-9 V2.1.1 (2017-03)
EN 300 422-1 V2.1.2 (2017-01)
EN 62368-1: 2014 + A11: 2017
RoHS: EN 50581: 2012
Health: EN 62479: 2010
The product herewith complies with the requirements of the EU directives:
2014/53/EU relating to the radio equipment (RED),
2011/65/EU and (EU)2015/863 relating to the restrictions of hazardous substances (RoHS).
Remark:
This Declaration of Conformity replaces all previous ones of the above model(s).
CE
Hamburg, 20 December 2020
(place, date)
Wolfgang Pini
Wolfgang Pein, Managing Director (authorised signature)
COMPLIANCE STATEMENT TO
WM-D5200, WM-D5300
URL: www.toa.eu
| AT BE CH DE | ÖsterreichBelgienSchweizDeutschland | Hiermit erklärt TOA Electronics Europe GmbH die Übereinstimmung des Funkmikrofons mit den grundlegenden Anforderungen und den anderen relevanten Festlegungen der Richtlinie 2014/53/EU.(verantwortlich für die Schweiz: GoWild (Zug); URL: http://www.gowild.ch) |
| BE CH FR LU | BelgiqueSuisseFranceLuxembourg | Par la présente TOA Electronics Europe GmbH déclare que l'appareil microphone sans fil est conforme aux exigences essentielles et aux autres dispositions pertinentes de la directive 2014/53/UE.(CH: GoWild (Zug); URL: http://www.gowild.ch) |
| BE NL | BelgiëNederland | Hierbij verklaart TOA Electronics Europe GmbH dat deze draadloze microfoon in overeenstemming is met de essentiële eisen en de andere relevante bepalingen van richtlijn 2014/53/EU. |
| BG | Държава | С настоящото TOA Electronics Europe GmbH декларира, че този безжичен микрофон е в съответствие със съществените изисквания и другите приложими разпоредби на Директива 2014/53/EC. |
| CY | Купроσ | Н TOA Electronics Europe GmbH, δηλώνει ότι το ασύρματο μικρόφωνο συνάδει με τις βασικές απαιτήσεις και άλλες σχετικές διατάξεις της Οδηγίας 2014/53/EE. |
| CZ | Česká republika | TOA Electronics Europe GmbH tímto prohlašuje, že tento bezdrátový mikrofon je ve shodě se základními požadavky a dalšími příslušnými ustanoveními směrnice 2014/53/EU. |
| DK | Danmark | Undertegnede TOA Electronics Europe GmbH erklærer herved, at følgende udstyr Trådløs Mikrofon overholder de væsentlige krav og øvrige relevante krav i direktiv 2014/53/EU. |
| EE | Eesti | Käesolevaga TOA Electronics Europe GmbH, teatab, et see traadita mikrofon on kooskõlas põhinõuetele ja muudele asjakohastele direktiivi 2014/53/EL. |
| ES | España | TOA Electronics Europe GmbH declara que el micrófono inalámbrico cumple con los requisitos esenciales y otras disposiciones aplicables o exigibles en la Directiva 2014/53/UE. |
| FI | Suomi / Finland | TOA Electronics Europe GmbH vakuuttaa täten tämä langaton mikrofoni on direktiivin 2014/53/EU oleellisten vaatimusten ja sitä koskevien direktiivin muiden ehtojen mukainen. |
| UK IE | United Kingdom Eire | Hereby, TOA Electronics Europe GmbH, declares that this wireless microphone is in compliance with the essential requirements and other relevant provisions of Directive 2014/53/EU. |
| GR | Ελλαδα | Με την παρούσα η εταιρεία TOA Electronics Europe GmbH δηλώνει ότι το ασύρματο μικρόφωνο συμμορφώνεται με τις ουσιώδεις απαιτήσεις και τις λοιπές σχετικές διατάξεις της οδηγίας 2014/53/EE. |
| HR | Hrvatska | Ovime, TOA Electronics Europe GmbH, izjavljuje, da je ovaj bežični mikrofon u skladu s osnovnim zahtijevima i relevantnim odredbama direktive 2014/53/EU. |
| HU | Magyarország | A TOA Electronics Europe GmbH ezennel kijelenti, hogy ez a vezeték nélküli mikrofon megfelel az 2014/53/EU Irányelv alapvető követelményeinek és egyéb vonatkozó rendelkezéseinek. |
| ITCH | Italia Svizzera | Con la presente TOA Electronics Europe GmbH dichiara che questo Radiomicrofono è conforme ai requisiti essenziali ed alle altre disposizioni pertinenti stabilite dalla direttiva 2014/53/UE. |
| LT | Lietuva | Šiuo, Toa Electronics Europe GmbH ", deklaruoja, kad šis bevielis mikrofonas atitinka esminius reikalavimus ir kitas susijusias nuostatas Direktyvos 2014/53/ES. |
| LV | Latvija | TOA Electronics Europe GmbH, deklarē, ka bezvadu mikrofons atbilst būtiskajām prasībām un citiem ar to saistītajiem noteikumiem Direktīvā 2014/53/ES. |
| MT | Malta | TOA Electronics Europe GmbH tistqarr li l-mikrofonu wajerless jissodisfa l-obbligi necessarji u provvedimenti oħra relevant tad-direttiva 2014/53/UE. |
| NO | Norway (Norwegian) | TOA Electronics Europe GmbH erklærer herved, at denne trådløse mikrofon er i samsvar med de vesentlige egenskapene og øvrige relevante krav i direktiv 2014/53/EU.(N: Scandec Systemer AS, URL: www.scandecsystemer.no) |
| PL | Polska | My, TOA Electronics Europe GmbH, niniejszym deklarujemy, iż ten mikrofon bezprzewodowy jest zgodny z zasadniczymi wymaganiami oraz innymi stosowanymi postanowieniami Dyrektywy 2014/53/UE. |
| PT | Portugal | TOA Electronics Europe GmbH declara que este Microfone Emissor está conforme com os requisitos essenciais e outras disposições da Directiva 2014/53/UE. |
| RO | Romania | TOA Electronics Europe GmbH, deklarē, ka bezvadu mikrofons atbilst būtiskajām prasībām un citiem ar to saistītajiem noteikumiem Direktīvā 2014/53/UE. |
| SE | Sverige (Swedish) | Härmed intygar TOA Electronics Europe GmbH att denna Trådlös mikrofon står I överensstämmelse med de väsentliga egenskapskrav och övriga relevanta bestämmelser som framgår av direktiv 2014/53/EU. |
| SI | Slovenija | S tem, TOA Electronics Europe GmbH, izjavlja, da je ta brezžični mikrofon v skladu z bistvenimi zahtevami in drugimi ustreznimi določbami Direktive 2014/53/EU. |
| SK | Štát | TOA Electronics Europe GmbH týmto prehlasuje, že tento bezdrōtový mikrofón je v zhode so základnými požiadavkami a d'alšími príslušnými ustanoveniami smernice 2014/53/EÚ. |
- TABLE OF CONTENTS
- SAFETY PRECAUTIONS
- WARNING
- When the Unit is in Use
- CAUTION
- CAUTION TO USER:
- FEATURES
- HANDLING PRECAUTIONS
- NOMENCLATURE AND FUNCTIONS
- Power switch [ON/OFF]
- Battery checker (green/orange/red)
- Note
- Microphone grip (Battery compartment cover)
- Bank selector switch
- Channel selector switch
- Maintenance port
- Encryption indicator
- Encryption setting switch
- Code setting switch [0 - 9]
- Transmission output changeover switch [H/L]
- Battery compartment
- Microphone sensitivity selector switch [H/L]
- PREPARING BATTERIES
- Battery Insertion
- Guide to Battery Operating Times
- Remaining operating time
- Continuous operating time
- When Operating on Rechargeable Battery
- Notes
- [How to charge]
- OPERATION
- FUNCTION SETTINGS
- Setting the Bank and Channel Numbers
- Performing Encryption Settings
- Tip
- Encryption settings summary
- [Before use (preparatory operation for setting)]
- [In use] (No operations required.)
- [Encryption setting ON/OFF confirmation]
- Performing encryption settings
- [Switching the Encryption function from OFF to ON]
- Tips
- [Switching the Encryption function from ON to OFF]
- Performing Code Settings (When Encryption Function Is OFF)
- Code Setting Summary
- Code settings
- Performing Transmission Output Changeover Switch Settings
- CONVENIENT FUNCTIONS (Microphone Sensitivity Selector Switch Settings)
- SPECIFICATIONS
- - Accessories
- DIGITALES DRAHTLOSMIKROFON WM-D5200
- BEDIENUNG
- SPÉCIFICATIONS
- DECLARATION OF CONFORMITY
- Product Name: DIGITAL WIRELESS MICROPHONE
- COMPLIANCE STATEMENT TO
- WM-D5200, WM-D5300
Brand : TOA
Model : WM-D5200
Category : Microphone