
EUROPORT PPA200 - Hi-Fi BEHRINGER - Free user manual and instructions
Find the device manual for free EUROPORT PPA200 BEHRINGER in PDF.

| Product Type | Ultra-Compact 200-Watt 5-Channel Portable PA System |
| Amplifier Output Power | 2 x 100 W at 4 Ω (200 W total) |
| Frequency Response | 40 Hz – 25 kHz |
| Signal-to-Noise Ratio | 85 dB (A-weighted) |
| Number of Input Channels | 5 (2 x Mic/Line, 1 x Mic/Instrument, 1 x Stereo Line RCA) |
| Wireless Input | BEHRINGER ULM digital wireless (USB dongle, up to 2 mics) |
| Effects Processor | KLARK TEKNIK Multi-FX with 24-bit Delta-Sigma converter, 40 kHz sampling |
| Graphic EQ | 9-band with FBQ Feedback Detection |
| Speaker Configuration | 2 x 4" speakers with 1" tweeter |
| Power Supply | 100-120 V~ or 220-240 V~, 50/60 Hz (T 3.15 A H 250 V fuse) |
| Power Consumption | 45 VA at rated power |
| Dimensions (H x W x D) | 339 x 615 x 136 mm (3.4 x 24.1 x 7.2 in) |
| Weight | 12 kg (26.5 lbs) |
| Input Connectors | 2 x XLR/TRS combo (balanced), 1 x 1/4" TS (unbalanced), 2 x RCA (stereo), USB for wireless |
| Output Connectors | 2 x RCA (unbalanced), 1 x 1/4" TS mono, 1 x 1/4" TRS stereo (headphones) |
| Included Accessories | Speaker cables, microphone with clip, 3.5 mm mini-jack to stereo RCA adapter |
| Maintenance & Cleaning | Disconnect power before cleaning; use dry cloth; avoid liquids and solvents |
| Safety Features | Fuse protection; replace only with same type and rating; avoid feedback by proper mic placement |
| Spare Parts & Repairability | Contact Music Group Authorized Service; visit behringer.com for support |
| General Information | Designed for portable PA applications; supports wireless microphone option; FBQ feedback detection |
Frequently Asked Questions - EUROPORT PPA200 BEHRINGER
User questions about EUROPORT PPA200 BEHRINGER
0 question about this device. Answer the ones you know or ask your own.
Ask a new question about this device
Download the instructions for your Hi-Fi in PDF format for free! Find your manual EUROPORT PPA200 - BEHRINGER and take your electronic device back in hand. On this page are published all the documents necessary for the use of your device. EUROPORT PPA200 by BEHRINGER.
USER MANUAL EUROPORT PPA200 BEHRINGER
natural_image
Technical line drawing of a mechanical device with internal components and mounting brackets (no text or symbols)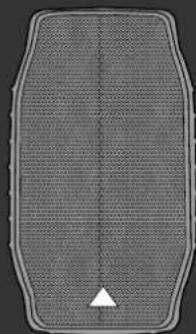
natural_image
Gray rectangular object with a vertical seam and a small white triangle at the bottom (no text or symbols)
natural_image
Pure geometric shape with a central vertical line and a small triangle at the bottom (no text or symbols)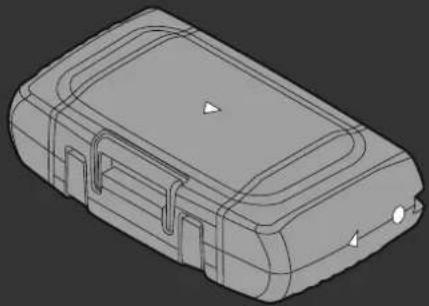
natural_image
3D wireframe model of a rectangular electronic device casing with handle and mounting points (no text or symbols)Quick Start Guide
(Check out behringer.com for Full Manual)

natural_image
Black-and-white photo of a person in motion, possibly dancing or performing a martial arts pose (no visible text or symbols)
natural_image
Close-up of a person wearing a hooded garment and holding a small object (no visible text or symbols)
natural_image
Black-and-white photo of a person operating a CD mixer console with visible keyboard and speaker (no text or symbols)
natural_image
Black-and-white photo of a concert stage with silhouetted audience and spotlights (no visible text or symbols)
natural_image
Crowd at a concert with raised hands under spotlights (no visible text or symbols)
natural_image
Black-and-white photo of a concert stage with dramatic lighting and silhouetted audience (no visible text or symbols)
natural_image
Black-and-white photo of a performer on stage with raised hand, surrounded by audience (no visible text or symbols)EUROPORT PPA200
Ultra-Compact 200-Watt 5-Channel Portable PA System with Wireless Microphone Option, KLARK TEKNIK Multi-FX Processor and FBQ Feedback Detection

BESCHRÄNKTE GARANTIE
EUROPORT PPA200 Hook-up
Step 1: Hook-Up
ES Paso 1: Conexión
Etape 1 : Connexions
DF Schritt 1: Verkabelung
PT Passo 1: Conexões
text_image
Diagram showing connections between audio equipment modules and a control panel with labeled ports and connectionsAndaminin Sakar Sakar Andrenkurs Ares/Phosol
Hyper-Separtler Performance Setup Configurations Performance Setup Custroom/Pulsoryset Hyper-Separtler Performance Setup Configurations Performance Setup

text_image
Diagram showing audio equipment connections including microphones, guitar, keyboard, and a control panel with a close-up of the switch.
flowchart
graph TD
    A["Device 1"] --> B["Power Supply Unit"]
    C["Device 2"] --> B
    D["Device 3"] --> B
    E["Device 4"] --> B
    F["Device 5"] --> B
    G["Device 6"] --> B
    H["Device 7"] --> B
    I["Device 8"] --> B
    J["Device 9"] --> B
    K["Device 10"] --> B
    L["Computer"] --> M["Laptop"]
    N["Ground"] --> O["Power Supply Unit"]
Holding/Sale/Amsterdam Alterskurs/Sales/Amsterdam Davon/Amsterdam Astrasse/Bachan/Presenzen Sanskys/Presenzen/davon
EUROPORT PPA200 Set-up
Step 2: Set-up
ES Paso 2: Conexión
IR Etape 2 : Mise en œuvre
DL Schritt 2: Einrichtung
PT Passo 2: Ativação

④ Open the case and prep the id open using the built-in brace.
[1] Remove the speakers by lifting them out of their grooves. Place them to either side of the stage, facing the audience.
If possible, elevate them at or above audience head level.
natural_image
Diagram of a mobile phone box with an arrow indicating rotation (no text or symbols present)
natural_image
3D mechanical assembly diagram showing internal components and directional arrows (no text or symbols)
Remove the contents of the accessory pouch, including: speaker cables, microphone, microphone clip
35" mini-pug-to-stereo RCA adapter.
Recommended speaker placement, left and right (angled)
Colocación recomendada para los altavores, izquierda y derecho (inclinados)
Positionnement recommandé gauche/droite des enceintes (avec un angle de diffusion)
16. Empfohlene Burenaufstellung, links und rechts (abgewinkelt)
Colocação recomendada de alto-falantes, esquerdo e direito (om angulo)
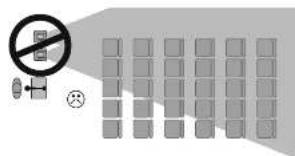
Speaker placement, not recommended
Colocadón NO recomendada para los altavoces
☒ Positionnement des enceintes à éviter
18. Boxenaufstellung, nicht empfohlen
Colocação de alto-falante, não recomendado
Recommended speaker height
03: Altura recomendada para los altavones
Placement en hauteur recommandé des enceintes
Empfohlene Boxenhohe
(1) Altura de alto-falante recomendada

flowchart
graph TD
    A["Input"] --> B{Decision}
    B -->|Yes| C["Output"]
    B -->|No| D["Feedback Loop"]
    D --> E["End"]

flowchart
graph TD
    A["Input Node 1"] --> B["Processing Block"]
    C["Input Node 2"] --> B
    D["Input Node 3"] --> B
    B --> E["Output Grid"]
    style A fill:#f9f,stroke:#333
    style C fill:#f9f,stroke:#333
    style D fill:#f9f,stroke:#333
text_image
Safety warning symbol with no sign, a crossed-out hand icon, and numbered blocks
text_image
Diagram illustrating a presentation or meeting process with speaker, audience, and speaker at different times, including speech bubbles and speech bubble icons.EUROPORT PPA200 Controls
Step 3: Controls
ES Paso 3: Controles
FR Etape 3 : Réglages
DF Schritt 3: Bedienelemente
PT Passo 3: Controles
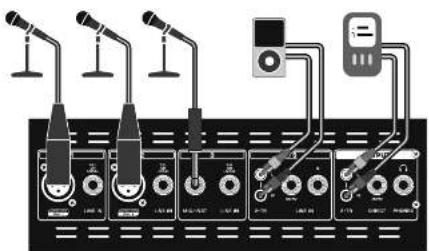
LINE IN Instruments, C-players, sub-mixers, or other fine-level sources may be connected to these jacks using cables with 12 plugs. These jacks accept both balanced and unbalanced signals.
MIC INPUT Dynamic (transistor) or condenser microphones can be plugged into this input using an ALR cable. These ALR inputs contain mix pramps with phantom power to operate condenser microphones.
NIGINST INPUT Correcta a "high importance ("high 2") table, such as from a guitar or high 2 microphone, into the input.
STEREO LINE IN (Channel 4/5 only) Flag stereo RCA cables into these jacks to connect a CD player, tape rack, no3 player, other sound source.
2-TR OUTPUT Send a line-level stereo signal out to a tape desc, digital recorder, or other scanning frame.
2-TR IMPUT Plug stereo EGA cables into their jacks in connect a CD player, tape desk, mp3 player, or other sound source.
DIRECT Send a line-level mono-signal cut to a tape desk, digital recorder, or other recording device.
PHONES Connect headphones using a 1" TRS stereo plug. Some headphones require an adapter.
FX determine how much of each individual channel's signal goes to the MULT-HX PROCESSOR.
FX: detrim na qué cantidad de la serial de cada canal individual es enviada al procesador digital de efectos.
FX Déterminé le niveau des effels numériques appliqués à chaque voie.
PROGRAM Rotate this smell to smell through effects patches, and push to select a patch.
PROGRAM: Cre este
mando para ir avanzando
a través de los programas
te efectos y paísela para
seleccionar uno de ellos.
PROGRAM Tournez réocation pour faire télher les programmes d'effels, et appuyescour le sélectionner.
PROGRAM: Cre este
mando para ir avanzando
a través de los programas
te efectos y paísela para
seleccionar uno de ellos.
PROGRAM Tournez réocation pour faire télher les programmes d'effels, et appuyescour le sélectionner.
PROGRAM: Cre este
mando para ir avanzando
a través de los programas
te efectos y paísela para
seleccionar uno de ellos.
PROGRAM Tournez réocation pour faire télher les programmes d'effels, et appuyescou les sélectionner.
PROGRAM: Cre este
mando para ir avanzando
a través de los programas
te efectos y paísela para
seleccionar uno de ellos.
PROGRAM Tournez réocation pour faire télher les programmes d'effels, et appuyescour le sélectionner.
text_image
EUROPORT PPA200 INTRA- SYSTEM MULTI- IMPACT 60kW-AWT 5-CHANNEL PORTABLE PA WITH WHEELS OF CYPICAL PLANE STANCK & PROCESSOR AND FBG FEEDBACK DETECT GN EQ WITH FBG FEEDBACK DETECTION BLANK HUHSING DETECTION BEV 1.12 10 12 14 16 18 20 22 24 26 28 30 32 34 36 38 40 42 44 46 48 50 52 54 56 58 60 62 64 66 68 70 72 74 76 78 80 82 84 86 88 90 92 94 96 98 100 102 104 106 108 110 112 114 116 118 120 122 124 126 128 130 132 134 136 138 140 142 144 146 148 150 152 154 156 158 160 162 164 166 168 170 172 174 176 178 180 182 184 186 188 190 192 194 196 198 200 202 204 206 208 210 212 214 216 218 220 222 224 226 228 230 232 234 236 238 240 242 244 246 248 250 252 254 256 258 260 262 264 266 268 270 272 274 276 278 280 282 284 286 288 290 292 294 296 298 300FBQ Activates the feedback selection system, which has not feedback frequencies and lights the matching GMPHC E0 slides. The E0 button must also be activated for this feature to work. FBQ Action of the sistema de reteedor de realimentation, thus localiza las frequencies de realimentación y que hace que se luminentes mandos correspondientes del E0 grafica. Dele estar activado el botón E0 para que esta funda en operadora.
EUROPORT PPA200 Getting started
Step 4: Getting started
[15] Paso 4: Puesta en marcha
Etape 4 : Mise en oeuvre
DF Schritt 4: Erste Schritte
[PI] Passo 4: Primeiros Passos

Make sure the POWER SWITCH is OFF and the MAIN LEVEL CONTROL faders are all the way down.
① Ascignese de tout el interruptor POWER este en OFF y que cada los laders MAIN LEVEL CONTROL están al mínimo.
② Placez Interrupteur POADI sur OFF et les laders de sorte MAIN LEVEL CONTROL au minimum.
(1) Der POTATER SCHALTER muss auf OFF/NUS stehen und die MAIN LEVEL CONTROL müssen ganz nach unter geschobet sein.
(1) Certifi que se de que a POWER SWITCH está OFF e que no MAIN LEVEL CONTROL estejam totalmente para basso.


☑. Plug a speaker cable from the LEFT SPEAKER OUTPUT into the left speaker, and from the RIGHT SPEAKER OUTPUT into the
right speaker. NOTE: Use only the included speaker cables or similar to connect speakers. Do not use instrument cables. Do not connect any other speakers to this system.
text_image
SPEAKER OUTPUTS R L R L R R R
☑ If using the PPA200 for speech or singing, plug the included mic into CHANNEL 1 or 2. The male one of the mic cable
(3 pins) plugs into the mic input, and the female end plugs into the bottom of the microphone.
Si está usando el PPA200 para voz hablanta o cantada, conecte el microfono incluida al CAMAL 1 ó 2. El extremo macho del cable (3 puntas), debe ser conectado a la entrada de micro y el hembra a la parte inferior del microfono.
(4) Si vous utilise l'PPA200 pour les discours ou le chant, connectez le micro locami aux entrées CHANNEL 1 ou 2. La 1 che malle du cordon micro (3 brochés) se rete à l'entrée micro, et la 4 che femelle se connecte au micro lui-même.
(4) Wenn Sie das PMA202 für Sprache oder Gesang verwenden, schließen Sie das mitgelieferte Mikrofon an KAHAL 1 oder 2 an. Der Stecker des Mikrofonkabels (3 Pole) wird an den Mikrofneinigung und die Buchse des Kabels an die Unterselte des Mikrofons angeschlossen.
☑ If you are using BHRINGER wireless microphones, play the wireless dangle into the DIGITAL WIRELESS USB input.
The DIGITAL WIRELESS LEDs will light up when the wireless microphones become active.
(5) In acoustic/electric guitar may be plugged into the CHANNEL 3 MIC/NST Input, or a keyboard can be plugged into any LINE IN. Do not plug multiple sources into
text_image
Diagram of audio recording setup with microphones, keyboard, headphones, guitar, and output board labeled 'STEPSO'6 If playing a CD tape, MP3 player, or other audio source, plug the device into CHANNEL 4/5 using the stereo RC inputs.
A 1/4" mini plug to stereo RCA adapter is included. 25 Si quiete usar un reproductor de CD, cinta, MPS, u otra fuente audio, concrete dichro disposicao al CAMAL 4/5 cuando las entrdas RCA stereo. Con esta unidad se induye un adaptador de conector mini 3,5 mm a RCA stereo.
2.0 Si vous utiliser un lecteur de CD, de cassette, de MP3, ou toute autre source audio, connectez la aux CMAUX 4/5 par les embases stéré en RCA. Nous vous fournisseux un adaptantur mini-jade/RCA.
38. CD/MP3 Player, Cassettendecke oder andere Audio quellen schließen Sie am die Stereo Cinch-Lingänge vor KAPAL 475 an. Ein 3,5 mm Miniminken-auf-Storoodinch Adapterist im Lieferumfang enthalten.
EUROPORT PPA200 Getting started
Step 4: Getting started
[TS] Paso 4: Puesta en marcha
Etape 4 : Mise en oeuvre
DF Schritt 4: Erste Schritte
[PI] Passo 4: Primeiros Passos
8 Raise the individual channel fader(s) for your mix, instrument, and/or CD player to desired level. Point the mix away from the speakers as much as possible to avoid feedback.
1 Set the FX knob on the MULTI-FX PROCESSOR to approximately a 75% setting. 13 Coloque el mando FX del MULTI-FX PROCESSOR a approximamente al 75%.
3 Press the PROGRAM | PUSH| knob to select the effect. The number will stop if ashing
[15] Pulse el mando PROGRAM [PUSH] para activar el efecto elegido. El número dejará de parpasear en pantalla.
[14] Appuyez sur le location PROGRAM [PHISH] pour sélectionner l'eff et. Le numéro cesse de digister.
3) Drücken Sie den PROGRAM [PUSH]-Drichsnogf, um den Effekt zu wählen. Die Nummer hört auf, zu hinken.
21 Pressorte o PROGRAM [FUSH] para selecionar o
feito. O número irá partir de piscar.


33 While speaking, singing, or playing, turn the channel FX knob up to the desired level on each channel to which you wish to
Mientras hasta o canta al micrófono o toca su Instrumento, suba el mando IX de canal hasta conseguir el nivel que quiera en cada uno de los canales en los que vaga a añadir los efectos.
Tout en parlant, chantant ou jouant, montez le bouton l'X de la voie jusqu'à obtenir le niveau d'eff et souhaité pour la voie.
31 Während Sie sprechen, singen oder Musik spielen, drehen Sie den TX-Drehkoupf des Kanab bis zum gewürschten Pegel auf.
27. No falar, cantar, ou tocar, coloque a botão de 14 para rima no nível desejado com canais que você querir adikionar efeitos senzes.


[Ex] Adjust the FX knob on the MULTI FX PROCESSOR up or down from the Initial 75% setting to achieve your desired overall effects main mix
(15) A quote hasta amiba o abajo el mancio FX del MULTI FX PROCESSOR con respecto a su presión de partida del 75% hasta conseguir en la mezcla principal el nivel de efecto final que quiera.
Réchez le bouton FX de la zone MULTI-FX PROCESSOR (depuis sa position initiale à 75% de sa course) jusqu'à obtenir le niveau global d'effet voutaite dans le mixage général.
Verstellen Sie den FX-Drechnopf am MULTI-FX PROCESSOR ausgehend von der anlinglichen 75% Einstellung nach oben oder nach unten, um den gewünschten Gesamtanteil der LII este im Haupt-Mix zu schalten.
[21] Ajuste o botão de FX no MULTI-FI PROCESSOR para batoo ou para dina a partir da ajuste inicial de 75% para atingir o nível de efeito desejado no mose principal.

FX

FX
Feedback Detection
1 [6]. If feedback occurs, press the EQ and FSC buttons.
E5 Si se produce una realimentación, pulse los barones EQ y FBQ.
13 En présence de Larsen, appuyez sur les touches E0
[26] Beim zurüsten eines Feedbacks drücken Sie die EQ- und EQ-Tasten.
Se acmer retroto, pressione as botus EU e FBQ.


An LED will light on the EQ slider that corresponds with the specific sound frequency feeding back.
Se luminará un plato LED en el mando deslizante ED que corresponda a la frecuencia concreta del sorado que esté produciendo la realimentación.
(28) Une Led s'allume sur le curseur d'égalisation correspondant à la fréquence du Larsen
[16] Am EQ Sider wird eine LED leuchten, die der spezifischen Feedback-Tonfrequenz entspricht.
☐ Um LED irá de ascender no EU correspondente com a frequência de som especifica.


CRO Lower the fit CD slider until feedback stops.
Vaya bajando el mano destizante
CO que este iluminado hasta que se detenga
la alimentación.
Baissez progressivement le curseur de la fréquence jusqu'à ce que le Larsen reuse.
(10). Schieben Sie den beleuchteten EQ-Slider nach unten, bis es kein Feedbackmehr gibt.
Aboxe de E0 até que não haja mais resama.

EN Specifications
| Mixer Section | |
| Inputs | 2 x HR3 x 4" TBS balanced1 x 4" TS, unbalanced2 x ROA, unbalanced1 x 2 channel REDRINGER UIM Digital Wireless |
| Outputs | 2 x ROA, unbalanced1 x 4" TS, unbalanced mono1 x 4" TBS, stereo |
| Wireless Input | |
| USB bridge (not included); USB socket accepts signals from max. 2 REDRINGER | ULM microphones |
| Signal indicator: LID 2 (green) | |
| Amplifi er | |
| Maximum output power | 2 x 100 W y 4.0" |
| Frequency response | 40 Hz to 25 kHz |
| Signal-to-noise ratio | 85 dB, 6-weighted |
| Outputs | 3/4" TS, Left and Right |
| Speakers | 4" transformer and 1" towereter |
| Function Switches | |
| FREQ | Activates the FREQ Feedback Detection System |
| EQ | Activates the graphic EQ |
| Graphic EQ | |
| Type | I-band |
| Eff. bits | |
| Type | 4L/kW TX/RK |
| Converter | 24-bit Delta-Sigma |
| Sampling frequency | 40 kHz |
| Display | 2 digits, 7 segment |
| Power Supply / Voltage (Tires) | |
| USA / Canada | 100-120 V~, 50-60 Hz (T 3.15 A H 250 V) |
| Japan | 100 V~, 50/60 Hz (T 3.15 A H 250 V) |
| UK / Australia / Europe / Korea / China | 220-240 V~, 50/60 Hz (T 3.15 A H 250 V) |
| Power consumption @ 5V rated power | 45 V |
| Units connection | Standard I/O receptacle |
| Dimensions / Weight | |
| Dimensions (H x W x D) | 339 x 615 x 136 mm (3.4 x 24.1 x 7.2") |
| Weight | 12 kg 26.5 lbs |
Tukkojali maed hao buu jiaol
Other important information

Important information
- Register online. Please register your new MUSK Group equipment right after you purchase it by visiting behinger.com. Registering your purchase using our simple online form helps us to process your repair claims more quickly and efficiently. Also, read the terms and conditions of our warranty, if applicable.
- Malfunction. Should your MUSIC Group Authorized Seller not be located in your vicinity, you may contact the MUSIC Group Authorized Fuller for your country listed under "Support" at behringer.com. Should your country not be listed, please check if your problem can be dealt with by our "Online Support" which may also be found under "Support" at behringer.com. Alternatively, please submit an online warranty claim at behringer.com BEFORE returning the product.
- Power Connections. Before plugging the unit into a power socket, please make sure you are using the correct mains voltage for your particular model. Faulty fuses must be replaced with loses of the same type and rating without exception.
[Non-Text]

Responsible Party Name: MUSIC Group Services US Inc.
Address: 18912 North Creek Parkway, Suite 200 Bothell, WA 98011, USA
Phone Number: +1 425 672 0816
EUROPORT PPA200
complies with the FCC rules as mentioned in the following paragraph:
This equipment has been tested and found to comply with the limits for a Cass 5 digital device, pursuant to part 13 of the FCS Rules. These limits are designed to provide reasonable protection against harmful interference in a residential installation. This equipment generates, uses and can radiate radio frequency energy and, if not installed and used in accordance with the instructions, may cause harmful interference to radio communications. However, there is no guarantee that interference will not occur in a particular installation. If this equipment does cause harmful interference to radio or television reception, which can be determined by turning the equipment off and on, the user is encouraged to try to correct the interference by one or more of the following measures:
- Reorient or relocate the receiving antenna
- Increase the separation between the equipment and receiver
- Connect the equipment into an outlet on a circuit different from that to which the receiver is connected
- Consult the dealer or an experienced radio/TV technician for help
This device complies with Part 15 of the FCC rules. Operation is subject to the following two conditions:
(1) this device may not cause harmful interference, and (2) this device must accept any interference received, including interference that may cause undesired operation.
Important information:
Changes or modifications to the equipment not expressly approved by MUSIC Group can void the user's authority to use the equipment.

natural_image
Black-and-white portrait of a smiling woman with hands touching her face (no text or symbols visible)We Hear You