
U-PHORIA UMC1820 - Hi-Fi BEHRINGER - Free user manual and instructions
Find the device manual for free U-PHORIA UMC1820 BEHRINGER in PDF.

| Product Type | USB Audio/MIDI Interface |
| Brand | Behringer |
| Model | U-PHORIA UMC1820 |
| Audio Conversion | 24-bit, up to 96 kHz |
| Mic Preamps | 8 x MIDAS designed |
| Phantom Power | +48V, switchable for inputs 1-4 and 5-8 |
| Analog Inputs | 8 x Combo XLR/TRS (2 front, 6 rear) |
| Analog Outputs | 8 x TRS line, 2 x TRS main, 2 x TRS headphone |
| Digital I/O | Coaxial S/PDIF (1 in/1 out), Optical ADAT/S/PDIF (1 in/1 out) |
| MIDI I/O | 5-pin DIN (1 in/1 out) |
| USB Connection | USB 2.0 Type B |
| Dynamic Range | 126 dB (A-weighted) |
| Frequency Response | 10 Hz - 85 kHz (+0/-3 dB) direct monitor |
| Maximum Input Level | Mic/Line: +11 dBu, Instrument: +18 dBu |
| Maximum Output Level | Line/Main: +16 dBu, Headphone: +21.5 dBu |
| Input Impedance | Mic: 3 kΩ, Instrument: 1 MΩ |
| Monitoring | Direct mix (0 ms latency), stereo/mono, dim, mute |
| Power Supply | 12 V DC, 20 W (external adapter) |
| Dimensions | 46 x 483 x 130 mm (1.8 x 19 x 5.1 in) |
| Weight | 1.8 kg (4.0 lb) |
| Compatible Operating Systems | Windows XP or higher, Mac OS X 10.9 or higher |
| Cleaning | Wipe with dry cloth; unplug before cleaning. Avoid liquids. |
| Safety | Use only supplied adapter; avoid moisture; do not open. |
| Repairability | No user-serviceable parts; contact authorized service center. |
Frequently Asked Questions - U-PHORIA UMC1820 BEHRINGER
User questions about U-PHORIA UMC1820 BEHRINGER
0 question about this device. Answer the ones you know or ask your own.
Ask a new question about this device
Download the instructions for your Hi-Fi in PDF format for free! Find your manual U-PHORIA UMC1820 - BEHRINGER and take your electronic device back in hand. On this page are published all the documents necessary for the use of your device. U-PHORIA UMC1820 by BEHRINGER.
USER MANUAL U-PHORIA UMC1820 BEHRINGER
Quick Start Guide

natural_image
Black-and-white collage of three music events: a singer with headphones, a CD studio performance, and a man on a keyboard (no visible text or symbols)U-PHORIA UMC1820
Audiophile 18 x 20, 24-Bit/96 kHz USB Audio/MIDI Interface with MIDAS Mic Preamplifiers
LEGAL DISCLAIMER
MUSIC Group accepts no liability for any loss which may be suffered by any person who relies on other wholly or in part upon any description, photograph, or statements contained herein. Technical specific claims, appearances and other information are subject to change without notice. All trademarks are the property of their respective owners. MIDAS, KLARK TERNIK, LAB GRUPPEN, LAKE, TANKHY, TURBOSOUNO, TC ELECTRONIC, TC HELLOON, BENJINGER, BUGERA and DOA are trademarks or registered trademarks of MUSIC Group IP Ltd. 92 MUSIC Group IP Ltd. 2016 All rights reserved.
LIMITED WARRANTY
For the applicable warranty terms and conditions and additional information regarding MUSIC Group's Limited Warranty, please see complete details online at music-group.com/warranty.
NEGACIÓN LEGAL
GARANTÍA LIMITADA

BESCHRÄNKTE GARANTIE
U-PHORIA UMC1820 Hook-up
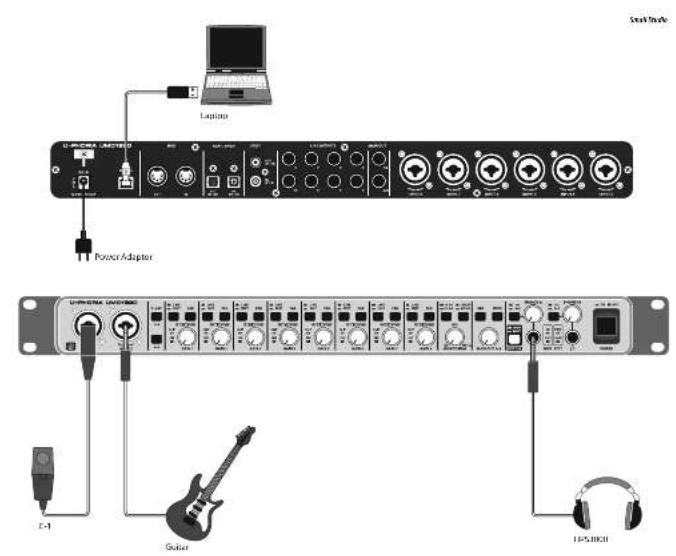
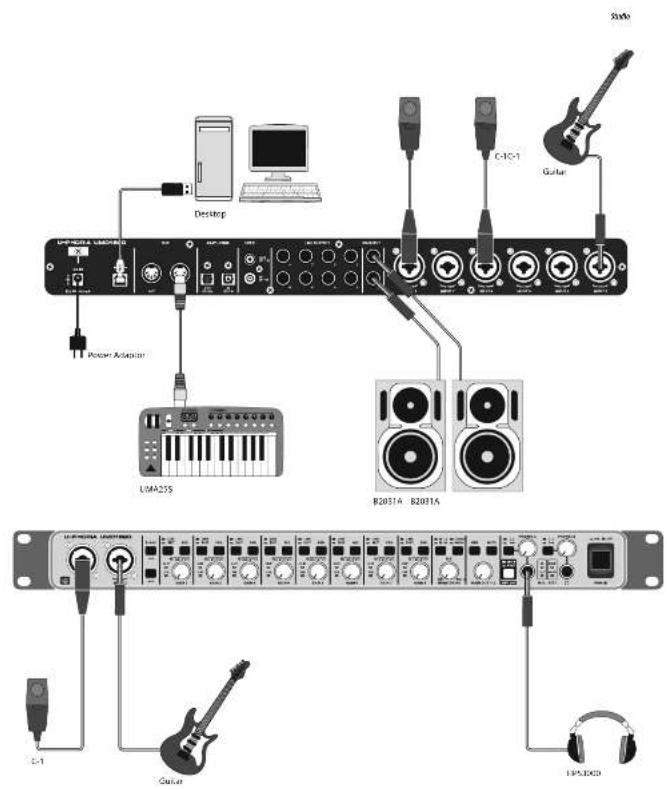
Step 1: Hook-Up
ES Paso 1: Conexión
Etape 1: Connexions
Schritt 1: Verkabelung
PT Passo 1: Conexões
U-PHORIA UMC1820 Controls
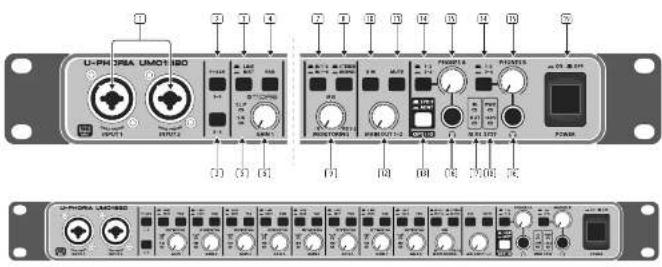
Step 2: Controls
① INPUTS accept XLR or N" connections from microphones, instruments, or line level audio sources.
[3] P+48V switches turn on +48 Volt Phantom Power to XLR inputs 1 to 4, and 5 to 8. Carefully read your microphone's documentation before turning on phantom power, as it can damage some microphones.
LINE / INST selects line level or instrument level input source at the W connector. Select INST when connecting a quitar directly
4 PAD reduces the level of input signals from the XLR and W' Inputs. For example, this is useful if the XLR input is not from a microphone.
SIG LED indicates an audio signal is present. The CLIP LED turns on if the audio input signal is too high.
[6] GAIN knob adjusts the input level. Adjust so the CLIP LED does not turn on, even during the highest peaks.
IN 1-2 or 1-8 selects direct analog input sources 1-2 or 1-8 for monitoring.
5 STEREO/MONO selects stereo or mono monitoring.
MONITORING knob adjusts the mix between the direct inputs and computer playback: IN: only direct inputs (0 ms latency) MIX: 50/50 mix of inputs and playback from computer PB 1-2: only playback from computer
10. DIM switch reduces the MAIN OUT output level.
MUTE switch cuts the MAIN OUT signal.
12 MAIN OUT knob controls the MAIN OUT output level.
11 OPT I/O selects the operation of the rear panel optical and coaxial RCA I/O ports:
SPDIF: Optical input S/PDIF 9-10, Optical output S/PDIF 11-12. Coaxial input off Coaxial output S/PDIF 11-12.
ADAT:
(@ 96 or 88.2 kHz) Optical input S/MUX 11-14, optical output S/MUX 13-16, Coaxial input S/PDIF 9-10, Coaxial output S/PDIF 11-12.
(@ 48 or 44.1 kHz) Optical input ADAT 11-18, optical output ADAT 13-20, Coaxial input S/PDIF 9-10, Coaxial output S/PDIF 11-12.
Caution: Do not change between S/PDIF and ADAT modes while operating your DAW / music program, because the UMC1820 does a quick re-boot. Close all applications before changing modes, and then wait until
the unit has been recognized again by your operating system before restarting your music application.
(14) PHONES source selector switch:
1-2: Listen to the stereo MIX signal channels
1-2 from the monitoring section.
3-4: Listen to the playback signal from
computer output channels 3-4.
15 PHONES level adjustment. Start at minimum and then turn up to a comfortable and safe listening level.
16 PHONES 14" TRS stereo headphone outputs.
17 MIDI I/O LEDs indicates MIDI activity.
16 POWER LED is on if the power switch is pressed in and the unit is powered via the supplied power adaptor.
+48V LED is on if either phantom power switch (1-4/5-8) is on.
15 POWER switch. Press in to turn on the unit. The POWER LED will turn on.
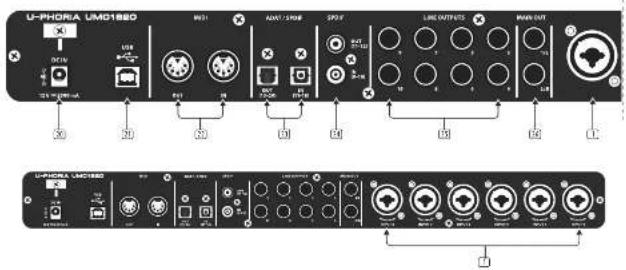
Rear Panel
POWER IN connect to the supplied power adaptor only. Connect the power adaptor to an AC mains supply that is properly configured for the unit. A cable holder above the input prevents the power connection from being accidentally pulled out.
USB type B connector. Connect to a computer USB port with the supplied USB cable.
(2) MIDI IN/OUT connect to external MIDI controllers and modules.
(2) ADAT or S/PDIF Optical I/O ports support S/PDIF, ADAT, S/MUX. Input channels are 11 to 18, outputs are 13 to 20. The front panel OPT I/O-switch ☑ selects the operation of these ports.
S/PDIF I/O ports: RCA coastal S/PDIF inputs come in from external sources as input channels 9 to 10. S/PDIF output channels are 11 and 12.
LINE OUT 3-10 balanced N° TRS outputs for additional monitoring and recording. The output signals come directly from the computer after being converted to analog by the UMC1820. The output levels are only controlled by the DAW.
MAIN OUT balanced 14" TRS outputs connect to powered studio monitors for playback and mixing. Adjust the source using the front panel MONITORING controls, and adjust the level using the front panel MAIN OUT controls.
U-PHORIA UMC1820 Controls
FS Paso 2: Controles
U-PHORIA UMC1820 Getting started
Step 3: Getting started

*Windows® users: Please visit behringer.com and download the latest UMC1820 USB driver. Unlop the file, ck the setup.exe and follow the on-screen s. Mac® users: For OS X®, no drivers 1.

Connect Instruments and audio sources to the UMC1820. Connect to a computer via the provided USB cable. Connect a board, controller, or other MIDI device via ports on the rear panel. Connect a pair of monitors to the MAIN OUTPUTS. Connect a radio headphones to monitor input levels back from your audio software.

Start with the GAIN, MONITORING, and PHONES level at minimum.

Turn on the UMC1820 first, followed by any other external equipment.

Check to see if any of your microphones require Phantom Power.

Make sure your RAW software recognizes the UMC1820 as the audio and MIDI input and output device.

While playing a source, such as a guitar, or singing into a microphone, adjust the GAIN of each analog input. You can first up, and then turn the GAIN down just the CLIP LED does not come on, and the highest peaks.

Listen to your playing in the headphones or studio monitors, and adjust the PHONES or MAIN OUT volume controls to ble and safe listening level.

On your DAW, make sure that all input and MIDI channels are working correctly, with audio and MIDI present. Play each time at a time to confirm it is present in

Verify that the playback from your DAW is reaching the UMC1820. Adjust the MIX knob in the monitoring section to hear it. Note that the volume level of the other 10 and the digital outputs is adjusted to DAW.

Enjoy playing along and making recordings on your DNA. Playback and listen in your studio or headphones. Adjust the monitoring of as desired.
*Not and OS X are trademarks of Apple Inc. Windows is either a registered trademark or trademark of Microsoft Corporation in the United States and/or other countries.
U-PHORIA UMC1820 Getting started
FR Etape 3 : Mise en oeuvre
U-PHORIA UMC1820 Getting started
| Input | |
| Primups 8 x MADS designed | |
| Type AUR: TBS combo connector 'MicroLine' instrument, 2 front / 5 rear | |
| Input level attenuation 6 x pad switch | |
| Frequency response 10 Hz - 85 kHz (1.0V-3 dB) direct monitor | |
| Impedance Mic in: 3 kΩ / instruments in: 1/AD | |
| Max. Input level MHz: 11 dBu / Line: 11 dBu / instrument: 18 dBu | |
| Phantom power - 48 V switchable inputs 1-4 and 5-3 | |
| Output | |
| Type | 8 x 5/4" TBS, line outputs2 x 5/4" TBS, main outputs2 x 5/4" TBS stereo, headphone outputs |
| Frequency response 10 Hz - 85 kHz (+40/-3 dB) direct monitor | |
| Max. output level | +16 dBu line outputs+16 dBu male outputs+21.5 dBu headphone outputs |
| System Data | |
| Dynamics range 126 dB, A weighted | |
| Frequency response: 10 Hz - 40 kHz (1.0V-3 dB) at 95 kHz sampling rate | |
| Digital Audio I/O | |
| Type | Coastal RCX - 1 In, 1 OutOpocal: IOSURK - 1 In, 1 Out |
| Supported formats | 40AT, 5/POF, 5/00K |
| Motor v/v | |
| Type 5 pin 30h, 1 in / 1 out | |
| Monitoring | |
| Direct monitor control | Mix control [inputs/playback 1-2]Source select (porting inputs 1-2/1.6)Stereo/Mono select |
| Main L/R control | Output Level I/L - 2/8 center, dim and mode switch |
| Headphones 20 charging | Monitor switches (monitor mix 1-2 / playback cut 5-7) |
| Digital Processing | |
| Converter resolution 24-bit | |
| Supported sample rates | 44.1, 48, 88.2, 96 Hz |
| Digital I/O Reating | |
| S/PDT selected (OPT I/O switch out) | RCA In = offOpocal In = 5/PDF (ch, 9-10)RCA Out = Optical Out = 5/PDF (ch, 11-12) |
| ADAT selected (OPT I/O switch in) | RCA In = 5/PDF (ch, 9-10)Opocal In = 96 / 88.2 Hz = 5/MOX (ch, 11-14)Opocal In = 48 / 44.1 Hz = 60MT (ch, 11-18)RCA Out = 5/MUX (ch, 11-12)Opocal Out = 96 / 88.2 Hz = 5/MOX (ch, 13-16)Opocal Out = 48 / 44.1 Hz = 60AT (ch, 15-20) |

| Computer Bars Connectivity | |
| Type USB 2.0, type B | |
| Software Support | |
| Operating systems | Fully compatible with Windows XP or higherFully compatible with Max OS 10.9 (Maximide) or higherFor older OS X version, the following restrictions apply:10.8 (Mountain Lion) + 10.7 (Lion):After charging the "BPT X" mode with the front panel switch, you must refresh the OS X Audio Mini Setup window to get the current U/O channel numbers indicated.10.6 (Snow Leopard):The U/O/LED can only be used in S/P/DIF mode ("BPT X" switch not pressed in).ADAT operation is RDT supported by this OS version.10.5 + earlier versions are not supported |
| Drivers | Mac No driver required (CoreAudio/CoreMID compliant)Windows 2 drivers are availableone driver for Windows XP or Windows Vistaone driver for Windows 3 to 10Download the correct driver for your system from Beholder.com |
| Power Supply / Voltage | |
| Voltage | 12 V DC (from supplied AC/DC adapter) |
| Power consumption 20 W | |
| Dimensions / Weight | |
| Dimensions [4 x 4" x 6"] | 46 x 483 x 130 mm (1.8 x 19 x 5.1") |
| Weight | 1.8 kg (4.0 lbm) |
Other important information

Important information
- Register online. Please register your new MUSIC Group equipment right after you purchase it by visiting behringer.com. Registering your purchase using our simple online form helps us to process your repair claims more quickly and efficiently. Also, read the terms and conditions of our warranty, if applicable.
- Malfunction, Should your MUSIC Group Authorized Reveller not be listed in your vicinity, you may contact the MUSIC Group Authorized Futility for your country listed under "Support" at behringer.com. Should your country not be listed, please check if your problem can be dealt with by our "Online Support" which may also be found under "Support" at behringer.com. Alternatively, please submit an online warranty claim at behringer.com BEFORE returning the product.
- Power Connections. Before plugging the unit into a power socket, please make sure you are using the correct mains voltage for your particular model. Faulty fixes must be replaced with fixes of the same type and rating without exception.

Responsible Party Name: MUSIC Group Services NV Inc.
Address: 5270 Procyon Street
et
Las Vegas, NV 89118
USA
Phone Number: +1 702 800 8290
U-PHORIA UMC1820
complies with the FCC rules as mentioned in the following paragraph:
This equipment has been tested and found to comply with the limits for a Class B digital device, pursuant to part 15 of the FCC Rules. These limits are designed to provide reasonable protection against harmful interference in a residential installation. This equipment generates, uses and can radiate radio frequency energy and, if not installed and used in accordance with the instructions, may cause harmful interference to radio communications. However, there is no guarantee that interference will not occur in a particular installation. If this equipment does cause harmful interference to radio or television reception, which can be determined by turning the equipment off and on, the user is encouraged to try to correct the interference by one or more of the following measures:
• Reorient or relocate the receiving antenna
- Increase the separation between the equipment and receiver
- Connect the equipment into an outlet on a circuit different from that to which the receiver is connected
- Consult the dealer or an experienced radio/TV technician for help
This device complies with Part 15 of the FCC rules. Operation is subject to the following two conditions:
(1) this device may not cause harmful interference, and
(2) this device must accept any interference received, including interference that may cause undesired operation.
Important information:
Changes or modifications to the equipment not expressly approved by MISC Group can void the user's authority to use the equipment.
Dedicate Your Life to Music