
CONTROL1USB - DJ Equipment BEHRINGER - Free user manual and instructions
Find the device manual for free CONTROL1USB BEHRINGER in PDF.


| Product Type | DJ Controller with USB Audio Interface |
| Channels | 2 |
| USB Interface | USB 2.0, Class Compliant |
| Bit Depth / Sample Rate | 16-bit / 44.1–48 kHz |
| Crossfader | Assignable, replaceable |
| EQ | 3-band (High, Mid, Low) |
| Inputs | 2 x RCA (Line), 1 x Mic (1/4"), 1 x USB |
| Outputs | 2 x RCA (Master), 1 x 1/4" (Headphones) |
| Dimensions (W x D x H) | 310 x 200 x 50 mm |
| Weight | 1.2 kg |
| Power Supply | USB bus-powered (5V, 500mA) |
| Compatibility | Windows, macOS, iOS (with adapter) |
| Supported Software | Virtual DJ, Serato DJ Lite, Traktor, others |
| Cleaning Instructions | Wipe with a soft, dry cloth. Do not use solvents. |
| Safety Precautions | Keep away from moisture, heat sources; do not open. |
| Spare Parts / Repairability | Contact Behringer service for crossfader and knobs. |
| Included Accessories | USB cable, software download card, user manual |
| Warranty | 2 years limited |
Frequently Asked Questions - CONTROL1USB BEHRINGER
User questions about CONTROL1USB BEHRINGER
0 question about this device. Answer the ones you know or ask your own.
Ask a new question about this device
Download the instructions for your DJ Equipment in PDF format for free! Find your manual CONTROL1USB - BEHRINGER and take your electronic device back in hand. On this page are published all the documents necessary for the use of your device. CONTROL1USB by BEHRINGER.
USER MANUAL CONTROL1USB BEHRINGER
Quick Start Guide
(Check Out behringer.com for More Information)
EN
ES
FR
DE
PT

natural_image
Black-and-white collage of six diverse scenes: laughing, playing guitar, laughing with hands, playing guitar with heart, smiling with headphones, and smiling with a child (no text or symbols visible)XENYX CONTROL1USB
High-End Studio Control and Communication Center with USB Audio Interface
EN

Important Safety Instructions


This equipment is Class II compliant.
Terminals marked with this symbol carry electrical current of sufficient magnitudes to constitute risk of electric shocks. Use only high-quality professional speaker cables with 15" TS or twist-locking plugs pre-installed. All other installation or modification should be performed only by qualified personnel.

This symbol, wherever it appears, alerts you to the presence of uninsulated dangerous voltage inside the
enclosure - voltage that may be sufficient to constitute a risk of shock.

This symbol, wherever it appears, alerts you to important operating and maintenance instructions in the literature. Please read the manual.

Caution
To reduce the risk of electric shock, do not remove the top cover (or the rear section). No user serviceable parts inside. Refor servicing to qualified personnel.

Caution To reduce the risk of fire or electric shock, do not expose this appliance to rain and apparatus shall not be exposed to shipping fluids and no objects filled with liquids, shall be placed on the apparatus.

Caution These service instructions are for use by qualified service personnel only, risk of electric shock do not perform any than that contained in the operation pairs have to be performed by qualified
- Read these instructions.
- Keep these instructions.
- Need all warnings.
- Follow all instructions.
- Do not use this apparatus near water.
- Clean only with dry cloth.
- Do not block any ventilation openings. Install in
accordance with the manufacturer's instructions -
Do not install near any heat sources such as
radiators, heat registers, stoves, or other apparatus (including amplifiers) that produce heat. -
Do not defeat the safety purpose of the polarized or grounding-type plug. A polarized plug has two blades with one wister than the other. 4 grounding-type plug has two blades and a third grounding prong. The wide blade or the third prong are provided for your safety. If the provided plug does not fit into your outlet, consult an electrician for replacement of the obsolete outlet.
-
Protect the power cord from being walked on or pinched particularly at plugs, convenience receptacles, and the point where they exit from the apparatus.
-
Use only attachments/accessories specified by the manufacturer.

- Use only with the cart, stand, tripod, bracket, or table specified by the manufacturer, or sold with the apparatus. When a cart is used, use caution when moving the cart/apparatus combination to avoid
injury from tip-over.
-
Unplug this apparatus during lightning storms or when unused for long periods of time.
-
Refer all servicing to qualified service personnel. Servicing is required when the apparatus has been damaged in any way, such as power supply cord or plug is damaged, liquid has been spilled or objects have fallen into the apparatus, the apparatus has been exposed to rain or moisture, does not operate normally, or has been dropped.
-
Where the MARS plug or an appliance coupler is used as the disconnect device, the disconnect device shall remain readily operable.

LEGAL DISCLAIMER
TECHNICAL SPECIFICATIONS AND APPEARANCES ARE SUBJECT TO CHANGE WITHOUT NOTICE AND ACCURACY IS NOT GUARANITED. BEHRINGER IS PART OF THE MUSIC GROUP (MUSIC GROUP) COM. ALL TRADEMARKS ARE THE PROPERTY OF THEIR RESPECTIVE OWNERS. MUSIC GROUP ACCEPTS NO LIABILITY FOR ANY LOSS WHICH MAY BE SUFFERED BY ANY PERSON WHO RELIES EITHER WHOLLY OR IN PART FROM ANY DESCRIPTION, PHOTOGRAPH OR STATEMENT CONTAINED HEREIN, COLORS AND SPECIFICATIONS MAY VARY FROM ACTUAL PRODUCT. MUSIC GROUP PRODUCTS ARE SOLD THROUGH AUTHORIZED FULFILLERS AND RESELLERS ONLY. FULFILLERS AND RESELLERS ARE NOT AGENTS OF MUSIC GROUP AND HAVE ABSOLUTELY NO AUTHORITY TO BIND MUSIC GROUP BY ANY EXPRESS OR IMPLIED UNDERTAKING OR REPRESENTATION. THIS MANUAL
IS COPYRIGHTED. NO PART OF THIS MANUAL MAY BE REPRODUCED OR TRANSMITTED IN ANY FORM OR BY ANY MEANS, ELECTRONIC OR MECHANICAL, INCLUDING PHOTOCOPYING AND RECORDING OF ANY KIND, FOR ANY PURPOSE, WITHOUT THE EXPRESS WRITTEN PERMISSION OF MUSIC GROUP IP LTD.
ALL RIGHTS RESERVED.
© 2012 MUSIC Group IP Ltd. Trident Chambers, Wickhams Cay, P.O. Box 146, Road Town, Tortola, British Virgin Islands
LIMITED WARRANTY
§ 1 Warranty
This limited warranty is valid only if you purchased the product from a MUSIC Group Authorized Reseller in the country of purchase. A list of authorized resellers can be found on BEHRINGER's website behringer.com under "Where to Buy", or you can contact the MUSIC Group office closest to you.
(2) MUSIC Group® warrants the mechanical and electronic components of this product to be free of defects in material and workmanship if used under normal operating conditions for a period of one (1) year from the original date of purchase (see the Limited Warranty terms in % below), unless a longer minimum warranty period is mandated by applicable local laws. If the product shows any defects within the specified warranty period and that defect is not excluded under %, MUSIC Group shall, at its discretion, either replace or repair the product using suitable new or preconditioned product or parts. In use MUSIC Group decides to replace the entire product, this limited warranty shall apply to the replacement product for the remaining initial warranty period, i.e., one (1) year (or otherwise applicable minimum warranty period) from the date of purchase of the original product. (3) Upon satisfaction of the warranty claim, the required or replacement product will be returned to the user freight prepared by MUSIC Group.
(4) Warranty claims other than those indicated above are expressly excluded.
PLEASE RETAIN YOUR SALES RECEIPT. IT IS YOUR PROOF OF PURCHASE COVERING YOUR LIMITED WARRANTY. THIS LIMITED WARRANTY IS VOID WITHOUT SUCH PROOF OF PURCHASE.
§ 2 Online registration
Please do remember to register your new BEHRINGER equipment right after your purchase at beholder. com under "Support" and kindly read the terms and conditions of our limited warranty carefully. Registering your purchase and equipment with us helps us process your repair claims quicker and more efficiently. Thank you for your cooperation!
§ 3 Return materials authorization
(7) To obtain warranty service, please contact the retailer from whom the equipment was purchased. Should your MUSIC Group Authorized Reseller not be located in your vicinity, you may contact the MUSIC Group Authorized Fulti for your country listed under
"Support" at behringer.com. If your country is not listed, please check if your problem can be dealt with by our "Online Support" which may also be found under "Support" at behringer.com. Alternatively, please submit an online warranty claim at behringer.com BEFORE returning the product. All inquiries must be accompanied by a description of the problem and the serial number of the product. After verifying the product's warranty eligibility with the original sales receipt, MUSIC Group will then issue a Return Materials Authorization ("BMA") number.
② Subsequently, the product must be returned in its original shipping carton, together with the return authorization number to the address indicated by MUSK Group.
① Shipments without freight prepaid will not be accepted.
§ 4 Warranty Exclusions
(1) This limited warranty does not cover consumable parts including, but not limited to, lines and batteries. Where applicable, MUSIC Group warrants the valves or meters contained in the product to be free from defects in material and workmanship for a period of ninety (90) days from date of purchase.
C21 This limited warranty does not cover the product if it has been electronically or mechanically modified in any way. If the product needs to be modified or adapted, in order to comply with applicable technical or safety standards on a national or local level, in any country which is not the country for which the product was originally developed and manufactured; this modification/adaptation shall not be considered a defect in materials or workmanship. This limited warranty does not cover any such modification/adaptation, regardless of whether it was carried out properly or not under the terms of this limited warranty, MUSIC Group shall not be held responsible for any cost resulting from such a modification/adaptation.
(3). This limited warranty covers only the product hardware. It does not cover technical assistance for hardware or software usage and it does not cover any software products whether or not contained in the product. Any such software is provided "AS IS" unless expressly provided for in any enclosed software limited warranty.
④ This limited warranty is invalid if the factory- applied serial number has been altered or removed from the product.
3.1 Free Inspections and maintenance/repair work are expressly excluded from this limited warranty, in particular, if caused by improper handling of the product by the user. This also applies to defects caused by normal wear and tear, in particular, of faders, crossfaders, potentiometers, keys/buttons, quitar strings, illuminants and similar parts.
6 Damage/defects caused by the following conditions are not covered by this limited warranty:
- improper handling, neglect or failure to operate the unit in compliance with the instructions given in BEHRINGER user or service manuals;
- connection or operation of the unit in any way that does not comply with the technical or safety regulations applicable in the country where the product is used;
- damage/defects caused by acts of God/Nature (accident, fire, flood, etc) or any other condition that is beyond the control of MUSK Group.
(7) Any repair or opening of the unit carried out by unauthorized personnel (user included) will void the limited warranty.
If an inspection of the product by MUSIC Group shows that the defect in question is not covered by the limited warranty, the inspection costs are payable by the customer.
Products which do not meet the terms of this limited warranty will be repaired exclusively at the buyer's expense. MUSIC Group or its authorized service center will inform the buyer of any such circumstance. If the buyer fails to submit a written repair order within 6 weeks after modification, MUSIC Group will return the unit C.O.D. with a separate invoice for freight and packing. Such costs will also be invoked separately when the buyer has sent in a written repair order.
(7) MUSIC Group Authorized Resellers do not sell new products directly in online auctions. Purchases made through an online auction are on a "buyer beware" basis. Online auction confirmations or sales receipts are not accepted for warranty verification and MUSIC Group will not repair or replace any product purchased through an online auction.
§ 5 Warranty transferability
This limited warranty is extended exclusively to the original buyer (customer of authorized reseller) and is not transfensible to anyone who may subsequently purchase this product. No other person (reseller, etc.) shall be entitled to give any warranty promise on behalf of MUSIC Group.
§ 6 Claim for damage
Subject only to the operation of mandatory applicable local laws, MUSIC Group shall have no liability to the buyer under this warranty for any consequential or indirect loss or damage of any kind. In no event shall the liability of MUSIC Group under this limited warranty exceed the Involved value of the product.
§ 7 Limitation of liability
This limited warranty is the complete and exclusive warranty between you and MUSIC Group. It supersedes all other written or oral communications related to this product. MUSIC Group provides no other warranties for this product.
§ 8 Other warranty rights and
national law
This limited warranty does not exclude or limit the buyer's statutory rights as a consumer in any way.
2 The limited warranty regulations mentioned herein are applicable unless they constitute an infringement of applicable mandatory local laws.
This warranty does not detract from the seller's obligations in regard to any lack of conformity of the product and any hidden defect.
§9 Amendment
Warranty service conditions are subject to change without notice. For the latest warranty terms and conditions and additional information regarding MUSIC Group's limited warranty, please see complete details online at behringer.com.
* MUSIC Group Macau Commercial Off-shore Limited of Puerto Pequim No. 202 A, Macau Finance Centre 501, Macau, Including all MUSIC Group companies
EN


RESERVADOS TODOS LOS DERECHOS. © 2012 MUSIC Group IP Ltd. Irident Chambers, Wickhams Cay, P.O. Box 146. Road Town, Tortola, British Virgin Islands
GARANTÍA
§ 1 Garantía
* M.JRC Group Macao Commercial Oil Share Center of Racca Poplar No. 202 A, Wain Square Center Stl. Macau, Indus Investee Research M.JRC Group

ALLE RECHTE VORSEHALTEN. © 2012 MUSIC Group IP Ltd. Trident Chambers, Wickhams Gay, P.O. Box 146, Road Town, Tortola, British Virgin Islands.
EINGESCHRÄNKTE GARANTIE
§ 1 Garantie
* M.SIC Group, Macau Commercial Office Limited of Bayer Program No. 210 A, Macau Bureau Center St., Macau, Industrial and Financial Services M.SIC Group


* M.KK Group plc Commercial SW history index data the de Trquam No. 210-A, Centro Finance de Marau St, Macau, induando lade M.KK Group companies
12 XENFX CONTROLSB
XENYX CONTROL1USB Hook-up
Step 1: Hook-Up
Paso 1: Conexión
Etape 1 : Connexions
Schritt 1: Verkabelung
PT Passo 1: Conexões

13 Quick Start Guide

flowchart
graph TD
    A["Laptop"] --> B["Keyboard"]
    B --> C["Headphone-disk button amp"]
    C --> D["PowerPLAY PRO 6 HABO0B"]
    D --> E["Back view"]
    E --> F["Footswitch"]
    G["ICU/HDGSM Active studio monitors"] --> H["CDIA Active studio monitors"]
    H --> I["BEHINGER ASIO Reference amplifier"]
    I --> J["TIPTH R203 IP Passive studio monitors"]
    K["Record player"] --> L["Back view"]
    M["Computer"] --> N["Laptop"]
behringer.com
behringer.com
XENYX CONTROL1USB Controls

behringer.com

Step 2: Controls
☐ SOURCE SELECT buttons determine which input source will be muted to outputs on the back panel.
LEVEL METERS shows the input or output signal strength of the active connected stereo source.
[2] METER switch determines whether the input or output signal will be shown on the LEVEL METERS.
4 MONITOR SELECT activates or deactivates the speakers connected to A, B or C outputs.
TALBACK microphone allows a microphone signal to be sent to the PHONES/STUDIO OUT outputs or the RECOBBING OUT outputs.
4) TALBACK level knob adjusts the gain of the TALKBACK MIC.
TO PHONES/STUDIO button sends the TALI/BACK MIC signal to the PHONES and STUDIO outputs.
TO 2-TRACK button sends the TALBACK MIC signal to the 2-TRACK A, B and DAW outputs.
[5] DIM switch reduces the signal going to MON TCR A, B and C by 20 dB.
VOLUME knob adjusts the volume of signals going to the Monitor A, B and Outputs. It does not affect the volume of the signal going to the RECORDING OUT, PHONES, or STUDIO OUT jacks.
MUTE switch silences the signal going to the MONITOR A, B, and C outputs.
MONO switch turns the stereo input signal into a monogenic signal out of the MONITOR A, B and C outputs.
PHONES-STUDIO switch changes the signal being led to the PHONES and STUDIO outputs between the input sources and the MONITOR/MON INPUT.
[14] Headphone jacks.
35 PHONES volume adjustment knots.
19 ON button turns the signal to the STUDIO OUT jacks.
12 STUDIO OUT volume knob adjusts the volume of the speakers connected to the STUDIO OUT jacks.
[16] USB jack for connecting your CONTROL USB to the computer, working as a 2-in/2-out soundcard.
Level switch changes between the balanced +4 dB professional equipment standard and the unbalanced -10 dB consumer equipment standard (same for 2-TRACK B, DAW inputs, PHONES, MONITOR MIX inputs and INPUTS 1, 2 and 3).
STUDIO OUT trim knob adjusts the signal sent via the STUDIO OUT jacks
[20] Trim control knob adjusts the input sensitivity of the incoming signal by +/-10 dB (same for INPUTS 2, 3 and 4).
(25) INPUT jacks for connecting a balanced or unbalanced stored signal. If a mono signal is plugged into the L input, it is automatically routed to the left and right inputs (same for INPUTS 2 and 3).
[23] TALKBACK FOOTSW input jack for connecting remote TALKBACK microswitch. When the switch is activated, the talkback circuit opens for the PHONES/STUDIO OUT outputs, both PHONES outputs and the three RECORDING OUT outputs (2-TRACK A, B and DAN).
LINE:PHONE switch changes the input source from (unbalanced) photo to line level.
23 Grounding Screw (GND) for connecting the grounding wire from the attached photograph.
(26) Stereo RGA inputs for connecting a photograph or other stereo line signal.
21 MONITOR MIX INPUT allows the connection of an alternate stereo mix from the DIN.
21 STUDIO OUT pass for connecting speakers in a recording space for monitoring and talkback.
(26) PHONES output jacks for connecting a headphone distribution amplifier.
18 2-TRACK output jacks for sending a balanced or unbalanced stereo signal to an external recorder (same for 2-TRACK B and DATA outputs).
MONITOR OUT A output jacks for connecting powered speakers or an amplifier for passive speakers (same for B and C).
(6) MONITOR A trim knob adjusts the MONITOR A output signal between the professional 1-4 dB standard to the 10 dB consumer standard. It allows the balancing of signal between the three monitor outputs (same for B and C).
Connect the included EC connector to this AC socket and a suitable power source.
POWER switch turns the unit on and off. When in the off (standby) position, the circuits are still line. To remove power altogether, remove the power and from the AC mains supply.
behringer.com
XENYX CONTROL1USB Controls
FS Paso 2: Controles
☐ O botão TO PHONES/STUDIO ensia o sinal TALKBACK INC as saidas PHONES e STUDIO.
① O botão TO 2-TRACK envia o sinal TALKBACK MK is said as 2-TRACK A, B e DAW.
XENYX CONTROL1USB Getting started
Step 3: Getting started
1 Push the Power button on the rear panel to the OFF position (pushed out).
2 Turn the volume and all level knobs (top and rear panel) to the far left position.
3 Push all SOURCE SELECT, MONITOR SELECT, and routing switches to the out position.
4 Connect the included power cable to the input on the back panel.
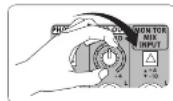
5 Connect the audio outputs from your DAW (Digital Audio Workstation) audio interface to the MONITOR MIX INPUT.
6 Connect active monitors or passive monitors via powered amp to the MONITOR OUT jacks A, B, and C.
7 If you have a studio space separate from your work station, you can connect a pair of powered speakers or passive speakers via separate amplifier to the STUDIO OUT jacks.
8 Connect a headphone distribution amplifier to the rear PHONES output jacks.
9 Connect the 2-TRACK A and B outputs to external recording devices to record the signal coming out of your INPUTS 1-4.
10 Connect the DAW output jacks to the Inputs on your recording Interface to record the signal from your INPUTS 1-4.
11 INPUTS 1, 2 and 4 can be recorded individually or mixes together (depending on the position of the SOURCE SELECT switches) via the internal USB audio interface as a stereo signal to your computer. The signal from INPUTS cannot be recorded via USB, but if you press SOURCE SELECT 3, you can listen to the stereo playback signal coming back from your computer. By this logic it is possible to "rec while play" to your computer without the danger of producing a feedback loop. If you press SOURCE SELECT 3 along with 1, 2 or 4 while audio signals are coming in via the rear line inputs. These signals will be mixed together. The USB audio Interface is class-compliant, and can be used with ASIO drivers for extra low latency (such as ASIO-4ALL or our BCHRINGER USB ASIO driver, available for download from behringer.com);
Feedback Loop
A feedback loop will cause a doubling of your recorded DAW signal. If you hear this doubling effect, go to your DAW and switch off the recorded signal's monitoring output.
Setting the levels:
1 With all external sources turned down or off, push the POWER button to the ON position.
2 Turn on external powered speakers, passive speaker amplifiers, and headphone amplifiers.
3 Select which monitor source you wish to hear by pushing in the A, B or C button on the top panel.
4 Play a song from your DAW to test and adjust monitor levels. Adjust the monitor out trim level knob on the back panel
if necessary.
5 Adjust the gain on the input channel you selected using its trim knob on the back panel. Gauge the amount of gain necessary by observing the level meter on the top panel.
6 Depending on the type of output from your sound card (-10 dBV for consumer or +4 dBV for professional); you might need to push the input level switch in or out.
7 Tum the VOLUME knob up slowly. If the volume is lower than expected, adjust the trim knob for the monitor option you selected (A, B or C).
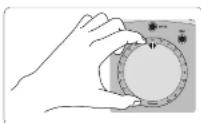
8 If you have a headphone amplifier connected to the rear PHONES output jacks, set the input level appropriate for your sound card via the input level switch.

Gradually turn up the volume on your headphone amplifier to an appropriate level.
9 Each of the PHONES jacks on the front of the unit has its own volume control. Connect a pair of headphones to either of the phones input jacks and adjust volume to preference.
10 To set the level for recording back to your DAW or external recording device, select the input source you wish to send on the top panel (deselect any other input sources to avoid potential feedback loop). Connect the RECORDING OUT on the back panel to your DAW audio interface or external recording device and set the output level with the +4/- 10 switch.
11 To set the level of the phonograph input, push 4 from the SOURCE SELECT section on the top panel. Make sure the rear LINE/PHONO switch is set to PHONO. Begin playback on your phonograph and adjust the trim level on input 4 (back panel). Make final adjustments with the VOLUME knob.
12 The built in TALKBACK microphone signal can be routed to the RECORDING OUT outputs (2-TRACK A, B and DAW) or to the PHONES/STUDIO OUT outputs (including both front panel headphones output(s)). Push the button of the destination you wish to address them speak into the MIC. Make any adjustments to the signal by adjusting the TALKBACK knob.
13 To adjust the volume of the speakers connected to the STUDIO OUT jacks, turn the STUDIO OUT knob on the top panel clockwise. If the speakers require stronger signal output, adjust the STUDIO trim knob on the back panel.
| Frequency Response | |
| Line-Level Inputs and Outputs | |
| N° jacks, balanced or unbalanced: 10 Hz to 40 MHz (-0 dB / 1 dB) | |
| Photo Input 20 Hz to 20 kHz (-1 dB) | |
| Retention (TWD & IWD) | |
| Line level inputs to line-level outputs family gain: <0.01%, 20 Hz to 20 kHz: ≤ +4 dB; | |
| Photo Input <0.10%, 20 Hz to 20 kHz: ≥ +4 dBu | |
| Noise Floor | |
| Unit gain with Input 1, 2 and 3 assigned: -86 dBu, 20 Hz to 20 kHz | |
| Monitor A, B and C outputs, studio output, DAV, 2 Track A, S, 8 outputs: 95 dBu, 20 Hz to 20 kHz | |
| Photo Input -75 dBu, 20 Hz to 20 kHz | |
| Equivalents input noise (E.I.K., -115 dBu, 20 Hz to 20 kHz | |
| Dynamic Range | |
| Line inputs 107 dB | |
| Photo Input 85 dB | |
| Crestalk | |
| Adjacent inputs 95 dB @ 1 kHz | |
| Left to right / right to left 85 dB @ 1 kHz | |
| Rated / level off 95 dB @ 1 kHz | |
| Central Range | |
| Input level ≥ 30 dB | |
| Output level -12 dB to 0 dB | |
| Dim switch | 0 dB / -30 dB |
| Rated Input Voltage | |
| Line Inputs (+4 dB level setting) +4 dB u / +30 dBu (nominal/maximum) | |
| Line inputs (-10 dB level setting) -10 dB u / +15 dBu (nominal/maximum) | |
| Phone input ≤ 1 kHz, nominal gain | 5 mV / 90 mV (nominal/maximum) |
| Rated Output Voltage | |
| All line-level outputs (+4 dB level setting) | +4 dB u / +21 dBu (nominal/maximum) |
| All line-level outputs (-10 dB level setting) | -10 dB u / 8 dBu (nominal/maximum) |
| Maximum Voltage Gain | |
| Input 1, 2 and 3 tor | |
| Monitor A, B and C outputs | +32 dB |
| DAV, 2 Track A, S, B, and phones (user) outputs | 122 dB |
| Studio output | 32 dB |
| Phones 1 & 2 outputs | 32 dB (output loaded ≤ 100 kΩ) |
| Monitor Mix Input tor | |
| Phones (new) outputs | 12 dB |
| Studio output | 22 dB |
| Phones 1 & 2 outputs | 22 dB (output loaded ≤ 100 kΩ) |
| Phone input ≤ 1 kHz tor | |
| Monitor A, B and C outputs | 65 dB |
| DAV, 2 Track A, S, B, and phones (new) outputs | 55 dB |
| Studio output | 66 dB |
| Phones 1 & 2 outputs | 66 dB (output loaded ≤ 100 kΩ) |
| Input Impedance | |
| Line Input | 20 kHz balanced / 14 kHz unbalanced |
| Phone input 40 kHz | |
| Output Impedance | |
| Line output | 200 dB balanced / 100 dB unbalanced |
| Headphone output | 50 Ω |
| Input/Output VU Meters | |
| 12 segment IED CLP, +10, +2, +4, -2, 0, -2, 4, 7, 10, 30, 10 dB | |
| Talkback Section | |
| Automatic gain control (ACC) | Yes |
| Nominal output level | -4 dBtu +4 dB output level settings |
| Output level range | - to +10 dB |
| Power Supply / Voltage (Vrms) | |
| Maine voltage | 100 ~ 240 V~, 30/50 Hz |
| Fuse | 100 ~ 240 V~, T 100 / 250 V |
| Power consumption | max. 35 W |
| Maine connection | Standard IEC receptacle |
| USB | |
| Audio | Sensible / out |
| Connector | Type B |
| Sample rate | 46.1 Hz, 48 Hz |
| Dimensions/Weight | |
| Dimensions [16.5 W x B] | 3.4 x 15.4 x 8 / 87 x 390 x 201 mm |
| Weight | 5.1 Lbs / 2.3 kg |
Responsible Party Name: MUSIC Group Services US Inc.
Address: 18912 North Creek Parkway,
Suite 200 Bothell, WA 98011,
USA
Phone/Fax No.: Phone: +1 425 672 0816
Fax:+1 425 673 7647
XENYX CONTROL1USB
complies with the FCC rules as mentioned in the following paragraph:
This equipment has been tested and found to comply with the limits for a Class B digital device, pursuant to part 15 of the PCB rules. These limits are designed to provide reasonable protection against harmful interference in a residential installation. This equipment generates, uses and can radiate radio frequency energy and, if not installed and used in accordance with the instructions, may cause harmful interference to radio communications. However, there is no guarantee that interference will not occur in a particular installation. If this equipment does cause harmful interference in radio or television reception, which can be determined by turning the equipment off and on, the user is encouraged to try to correct the interference by one or more of the following measures:
• Reorient or relocate the receiving antenna
• Increase the separation between the equipment and receiver
- Connect the equipment into an outlet on a circuit different from that to which the receiver is connected
• Consult the dealer or an experienced radio/TV technician for help
This device complies with Part 15 of the FCC rules. Operation is subject to the following two conditions:
(1) this device may not cause harmful interference, and (2) this device must accept any interference received, including interference that may cause undesired operation.
Important information:
Changes or modifications to the equipment not expressly approved by MUSIC Group can void the user's authority to use the equipment.
Other important information

Important Information

Informations Importantes

natural_image
Black-and-white photo of a person making a heart gesture with both hands (no text or symbols visible)We Hear You


- XENYX CONTROL1USB
- EN
- Caution
- LEGAL DISCLAIMER
- LIMITED WARRANTY
- § 1 Warranty
- § 2 Online registration
- § 3 Return materials authorization
- § 4 Warranty Exclusions
- § 5 Warranty transferability
- § 6 Claim for damage
- § 7 Limitation of liability
- § 8 Other warranty rights and
- national law
- §9 Amendment
- GARANTÍA
- § 1 Garantía
- EINGESCHRÄNKTE GARANTIE
- § 1 Garantie
- XENYX CONTROL1USB Hook-up
- Step 2: Controls
- XENYX CONTROL1USB Controls
- FS Paso 2: Controles
- XENYX CONTROL1USB Getting started
- Step 3: Getting started
- Important information:
- Other important information
Brand : BEHRINGER
Model : CONTROL1USB
Category : DJ Equipment