
EF-60 - Flash FUJIFILM - Free user manual and instructions
Find the device manual for free EF-60 FUJIFILM in PDF.

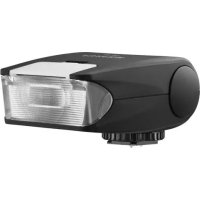
| Product Type | Flash (Speedlight) |
| Brand | Fujifilm |
| Model | EF-60 |
| Compatible Cameras | Fujifilm X-series and GFX series (hot shoe) |
| Guide Number (GN) | 60 (ISO 200, m) at 200mm zoom |
| Flash Coverage | 24–200mm (with built-in wide panel: 16mm) |
| Recycle Time | Approx. 1.5 seconds (fresh alkaline batteries) |
| Number of Flashes | Approx. 200–300 (fresh alkaline batteries) |
| Power Source | 4× AA alkaline, Ni-MH, or lithium batteries |
| Dimensions (W×H×D) | 76 × 120 × 94 mm (without foot) |
| Weight | 350 g (without batteries) |
| Operating Temperature | 0°C to 40°C |
| Color Temperature | Approx. 5800 K |
| Flash Modes | TTL auto, Manual (1/1–1/128), Multi (stroboscopic) |
| Sync Modes | 1st curtain, 2nd curtain, high-speed sync (HSS), slow sync |
| Wireless Control | Optical slave (S1, S2), Fujifilm wireless commander/receiver (channels 1–4, groups A/B/C) |
| Firmware Update | Via USB connection to computer or compatible camera |
| Included Accessories | Flash unit, stand, carrying case, user manual |
| Maintenance | Clean with dry soft cloth; avoid moisture, extreme heat, and dust |
| Safety Features | Auto power-off (adjustable), overheat protection |
| Spare Parts & Repairability | Contact Fujifilm authorized service centers for replacement parts |
Frequently Asked Questions - EF-60 FUJIFILM
User questions about EF-60 FUJIFILM
0 question about this device. Answer the ones you know or ask your own.
Ask a new question about this device
Download the instructions for your Flash in PDF format for free! Find your manual EF-60 - FUJIFILM and take your electronic device back in hand. On this page are published all the documents necessary for the use of your device. EF-60 by FUJIFILM.
USER MANUAL EF-60 FUJIFILM
natural_image
Technical line drawing of a Fujifilm camera module (no text or symbols on body)Thank you for your purchase of this product. Before using this flash unit, please read this owner's manual and refer your camera owner's manual carefully to get a better understanding of the proper operation to enjoy flash photography.
Contents
Name of the Components and Accessories 4
Power saving mode, overheat prevention function, and charging sound 5
Before using 6
Inserting batteries 6
Basic Operation 7
Mounting on the camera 7
Removing from the camera 7
Turn on the flash power 8
Mode dial 9
Flash modes and functions 9
LED light mode 10
Secondary Mode SF 11
Secondary Mode SD 11
Manual (M) mode 12
Full automatic (A) mode 13
TTL mode 14
Wireless ( ^15 ) remote mode 15
Optical communication wireless remote 15
Radio wireless remote 16
Function button 17
Channel setting 17
Setting the coverage (Zoom) 18
Beep on/off 19
Operation lock button 20
Remote shooting method 21
Other functions 22
FP (High speed sync.) 22
Red-eye correction/Rear curtain sync. 22
Auto Focus Assist Light 22
Flash Head Operations 23
Light Diffusing Panel/Bounce 23
Soft Box 24
Fill-in Reflector 24
Guide No. table 25
Trouble shooting 25
Specifications 26
Names of the Components and Accessories
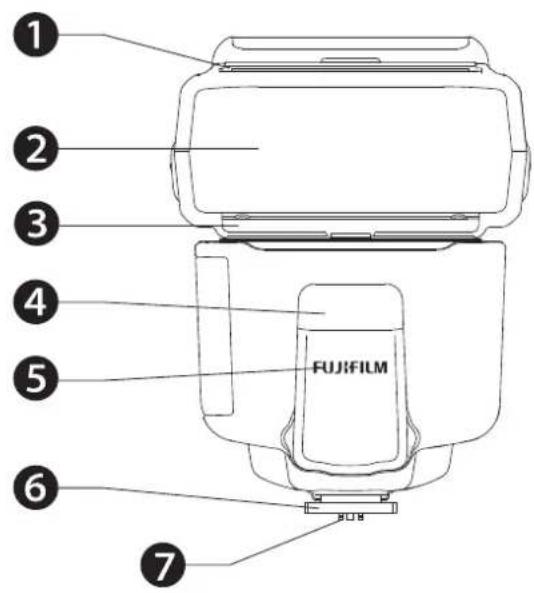
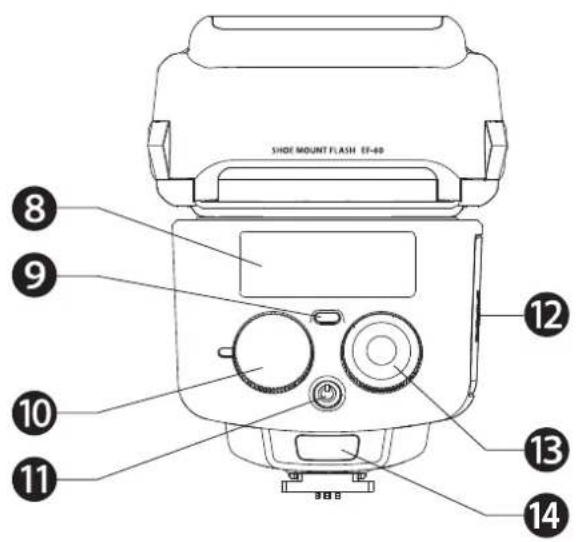
① Fill-in reflector
② Flash head
③ Light diffusing panel
④ LED light
⑤ Optical wireless sensor
6 Mounting foot
⑦ Hot shoe contacts
⑧ Color monitor
9 Pilot button (Test flash button)
10 Mode dial
11 Power button
⑫ Battery compartment door
13 Control wheel and buttons
14 Unlock button
Accessory:
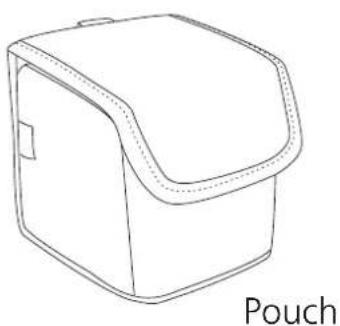
natural_image
Line drawing of a pouch with a lid and handle (no text or symbols)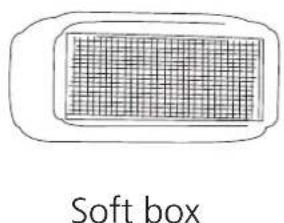
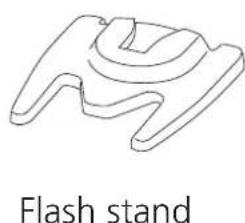
natural_image
Simple line drawing of a flash stand (no text or symbols on the diagram itself)Power saving mode, overheat prevention function, and charging sound
Power saving mode
To save battery energy, EF-60 automatically switches to power saving mode. In A, TTL, and M modes, it automatically enters power saving mode in synchronization with the camera power. In SD, SF and wireless remote mode, it will automatically enter power saving mode after 5 minutes from idle state.
While EF-60 is in the power saving mode a Pilot button blinks every 2 seconds showing the flash unit is in power saving mode. To turn on EF-60 again, press the camera's shutter button halfway or press any button of the flash unit. In case EF-60 is not in use for over 60 minutes, the unit is completely turned off.
To turn on EF-60 again, take the first step of turning the flash unit on.
Overheat Prevention function
EF-60 is automatically turned off when repeating hi power full flash continuously over 20 to 30 times to protect the flash circuitry from overheating. The pilot button flashes red every 1.5 seconds while the overheat protection is active. The overheat protection is automatically deactivated and can be used again.
Charging sound
When using EF-60 in modes other than the LED light mode, charging will be repeated in preparation for light emission. If you shoot a movie in this state, the charge sound may be recorded. Turn off the flash or use the LED light mode when shooting a movie.
Before Using
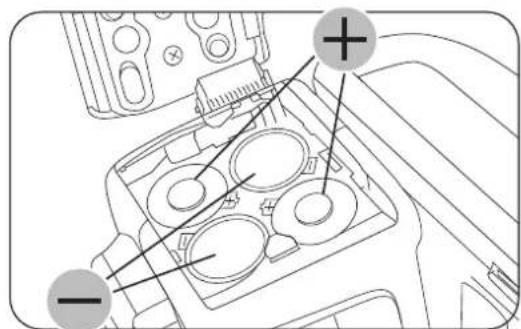
Inserting batteries
Usable batteries - Alkaline batteries or NiMH batteries
-
Open the battery compartment door and insert 4 x size AA batteries as 2 shown by the picture.
-
Make sure the + and - battery contacts are correctly inserted at the battery compartment.
-
Close the battery compartment door and slide it back in place.
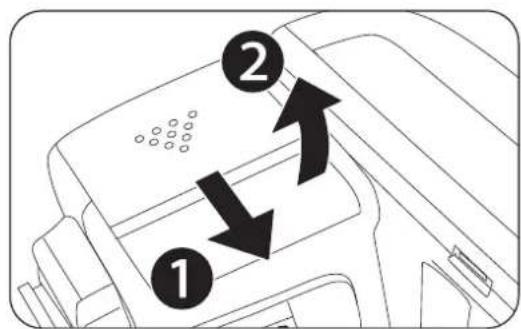
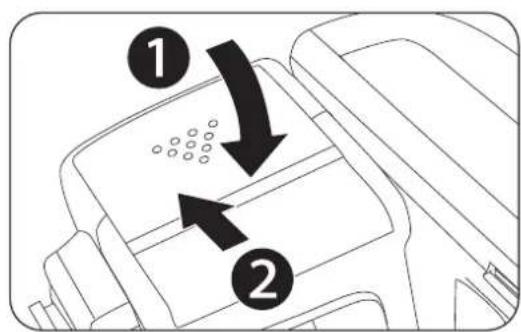
When the recycle time becomes longer than 30 seconds, replace the batteries with fresh ones or recharge the batteries (rechargeable batteries).
! Caution
It is recommended to use all 4 batteries of the same brand and type, and replace them all at the same time. In case of rechargeable batteries, please use batteries that are all charged at the same time.
Basic Operation
Mounting EF-60 on the camera
-
Slide the mounting foot of EF-60 into the hot shoe of the camera.
-
Make sure that the mounting foot will lock (with a "click") when it has been inserted completely.

Removing EF-60 from the camera
- Press the unlock button and slide the mounting foot of EF-60 off the hot shoe of the camera.
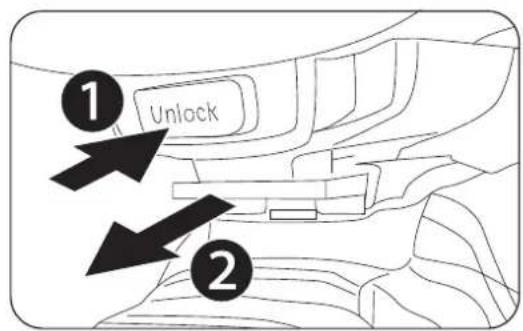
Caution
When attaching the camera to EF-60, do not grasp or lift the camera. The mounting foot of EF-60 and camera hot shoe may be damaged.
Basic Operation
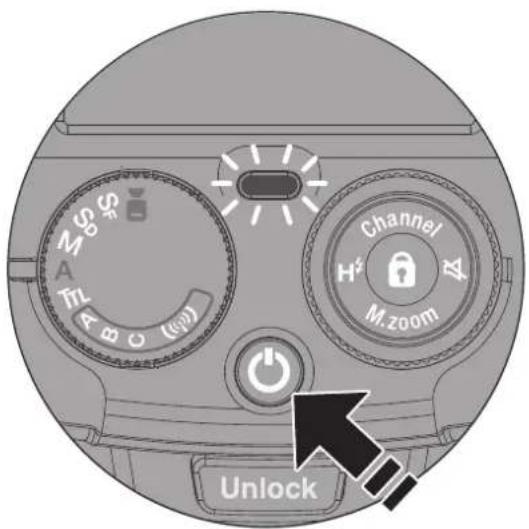
Turn on the flash power
- Press the Power button, and Pilot button turns red, showing the unit is turned on.
- In a few seconds, the Pilot button turns green. The EF-60 is ready to shoot.
- For a test flash, press the Pilot button.
- To turn off the flash unit manually, press the Power button once.
Mode Dial
EF-60 Flash Mode and Functions
Rotate the mode dial to select a function.
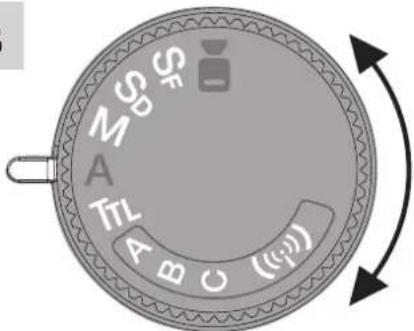
| LED Light ModeUsed when shooting movies etc. Can be adjusted the light output in 9 steps. | |
| SF | Secondary Mode SFThe flash is triggered by a light from another flash unit (primary flash). |
| SD | Secondary Mode SDThe flash is triggered by a light from another flash unit (primary flash).It ignores monitoring pre-flash for TTL operation. |
| M | Manual ModeSet the flash output manually. |
| A | Full Automatic ModeFlash light is fully controlled by the camera for the most proper exposure. |
| TTL | TTL ModeFlash light is automatically controlled by the camera.The flash exposure value can be compensated. |
| Wireless Remote Mode (Radio type / optical type)* If the Wireless Commander EF-W1 etc. is not used, it automatically starts up as an optical remote.Radio wireless remoteA: Group A B: Group B C: Group COptical wireless remoteA: Group A B: Group B C: Group C* Controllable by the wireless remote (commander) function of the EF-X500. |
Mode Dial

LED Light Mode
- Set EF-60 to the camera's hot shoe and press the Power button to power on.
- Set the Mode dial to ▶ mode.
- You can select the power by rotating the Control wheel and buttons, 9 steps of output level can be adjusted.
* The LED light can also function as a catch light or auto focus (AF) assist lamp. For details, see "LED LIGHT SETTING" in the camera's owner's manual.
Mode Dial
SF
Secondary Mode SF
The flash is triggered by a light from another flash unit (primary flash).
SD
Secondary Mode SD
The flash is triggered by a light from another flash unit (primary flash). It ignores monitoring pre-flash for TTL operation.
Setting Method
- Set the mode dial to SF when the flash mode of the primary flash (commander) is manual, or to SD when the flash mode of the primary flash (commander) is TTL.
- Set the mode button to select SF mode or SD mode.
- Rotate the control wheel and buttons to set the flash output. The flash output can be adjusted from 1/1 to 1/256 in 1/3EV steps.
- Press the shutter button to shoot.
- Check the exposure of the shot image and adjust the flash output if the optimum exposure cannot be obtained.

Mode Dial
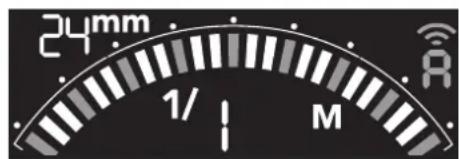
M
Manual Mode
In manual mode, you can adjust the flash output manually. The amount of light emission can be adjusted in 25 steps from 1/1 to 1/256 in 1/3EV steps.
- Turn the mode dial to select M mode.
- Turn the control wheel to set the flash output.
The flash output can be adjusted from 1/1 to 1/256 in 1/3EV steps.
- Press the shutter button to shoot.
- Check the exposure of the shot image and adjust the flash output if the optimum exposure cannot be obtained.

Mode Dial

Full Automatic Mode
When EF-60 is set to A mode, the TTL automatic light control system works in the following camera's exposure modes. Full auto mode is a mode for beginners, where most operations can be performed on the camera side.
Camera exposure mode
When the camera's shooting mode is [P], [A], [S] or [M], TTL automatic flash control can be performed.
In all of the camera's exposure modes listed above, EF-60 will fully work in TTL automatic-flash system.
- Rotate the Mode dial to "A" mode.
- Press the shutter button of your camera halfway to focus the subject.
- Shutter speed, aperture and flash mark (⚡) are indicated in camera's view Finder or LCD.
- Press the shutter button to shoot.
- When the focal length of the lens is changed, the zoom unit in the flash head of EF-60 is automatically moves, covering the focal length efficiently. Covers 24mm to 200mm (35mm equivalent).
Mode Dial
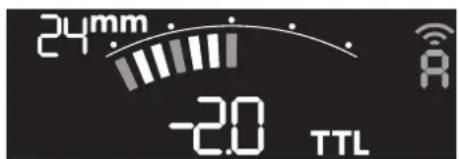
TTL TTL Mode
In TTL mode, you can automatically obtain the optimal exposure. You can also make fine adjustments using the flash compensation function. EF-60 is very convenient because the control wheel and buttons allows quick and reliable dimming correction.
Camera's exposure mode
When the camera's exposure mode is [P], [A], [S] or [M], TTL automatic flash control can be performed.
- Turn the mode dial to select TTL mode.
- Turn the control wheel and buttons to perform flash compensation.
- Turn clockwise for +EV compensation. Turn counterclockwise for -EV compensation.
- The correction value can be adjusted from - 2.0EV to +2.0EV in 1/3EV steps.
- The shutter speed, aperture, and flash mark are displayed on the camera's viewfinder or LCD.
- Press the shutter button to shoot.
- Depending on the camera, flash compensation can be performed from the camera. (For details, see the camera's owner's manual.) If you are using a camera that does not have a FLASH FUNCTION SETTING menu, the flash and camera correction values will be added together.
If you are using a camera that does not have a FLASH FUNCTION SETTING menu, only the correction values set on this unit will be displayed on the display of EF-60.
* The flash compensation value on the camera is not reflected.
Mode Dial

Wireless Remote Mode
EF-60 synchronizes as a wireless TTL remote flash and emits TTL light. There are optical type and radio type.
((i)) Optical wireless remote
By using it together with a flash compatible with the commander mode of optical wireless such as EF-X500, multi-light shooting by optical wireless is possible. For details on the commander flash settings, please refer to the commander flash owner's manual.
- Turn the mode dial to select [ («i») ]mode group A, B or C.
- Select the same group in the group settings on the commander flash, set the mode, set values, etc., and control.
* For channel settings, select channels 1 to 4 according to the settings of the commander unit. Refer to page 17 for the manual channel setting method.

Mode Dial

Wireless Remote Mode
((i)) Radio wireless remote
EF-60 is compatible with Nissin Digital's Nissin Air System (NAS). EF-60 has a built-in remote function for the radio wireless remote. The TTL, M (manual) and Zoom (manual zoom) can be remotely controlled by the commander.
- First, perform pairing with a commander (such as EF-W1).
* Please refer to the owner's manual of the commander for the method of pairing. - Turn the mode dial to select [((p))] mode group A, B or C.
- Select the same group in the group settings on the commander side, set the mode and set values, and control.
Display on EF-60 when remotely controlled by EF-W1
TTL Mode
Manual Mode
Equipment that can be used as a commander
• EF-W1, Air10s made by Nissin Digital
! Caution
If EF-60 is set to ((i)) mode while the commander is turned off, the optical wireless remote mode starts automatically.
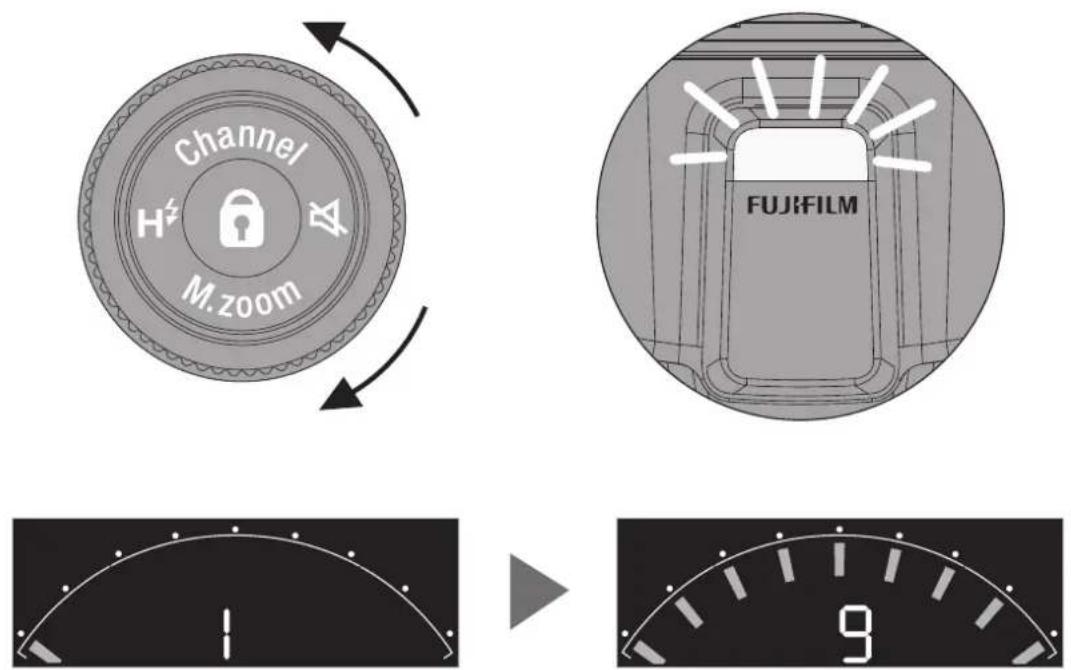
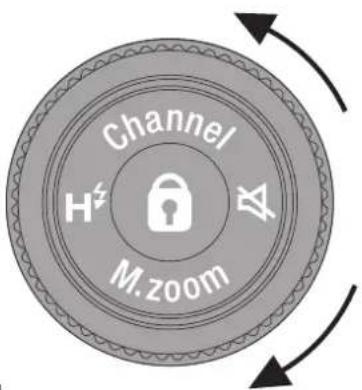
Function Button
Channel
Channel Setting
No changes are required during normal use, but in places where other communication devices that use the 2.4 GHz band, such as wireless LAN, Bluetooth, handy phones, and hand-free microphones, are frequently used, in rare cases, the radio wireless remote system may not work properly due to radio interference. In such cases, changing the communication channel may improve the situation.
To switch the channel, press "Channel" of "Control wheel and buttons" for 1 second. Turn the "Control wheel" to change the channel value. After 7 seconds, the mode automatically returns to the original mode. To return to the original mode manually, press "Channel" again for 1 second.
Automatic channel setting
Change the channel of EF-60 to A, and change the channel of the commander.

natural_image
Pure black background with a white wireless signal icon and 'A' symbol, no text or numbers present.[Reference]: (Do this only if automatic channel setting does not improve.)
Manual channel setting
Manually set channels 1 to 8 according to the commander channel.

natural_image
Dark background with a small white icon resembling a Wi-Fi symbol (no text or numbers present)Function Button
M.zoom
Setting the coverage (zoom)
- In SF / SD / M / TTL / Optical wireless remote mode, manual zoom can be set.
- Press "M. Zoom" of "Control wheel and buttons" for 1 second to switch the zoom. The default setting is "A" Auto.
- Turning the control wheel changes the coverage (zoom) of the flash head.
- Return to the "A" position to switch to auto zoom.
- Press "M. Zoom" again for 1 second to return to the previous mode.

! Caution
The values set with manual zoom are retained even when the power is turned off.
! Caution
The coverage (zoom) is fixed at 35mm when the wireless mode (SF, SD) is set, even if auto zoom is set.
Caution
Please note that the focal length displayed on the color LCD is a 35mm equivalent.
Function Button

Beep on/off
When using the EF-60 as a remote flash, it is set by default to emit a beep sound. To stop the beep sound, press and hold the beep button ( ) of "Control wheel and buttons".
To return to the setting that sounds, press and hold the beep button ( ) again.
The beep sound types and operating modes are as follows.
| Type | Operation Mode |
| Beep sound during charging | SF/SD |
| A/B/C (radio and optical communication) | |
| Beep sound when changing commander setting value | A/B/C (radio wave type) |
* When the power of EF-60 is turned off and on again, the beep sound setting is canceled.
Function Button

Operation lock button
Press 🔒 for 1 second at the center of the “Control wheel and buttons” to lock the set value. While the lock is on, the settings and functions that can be set with the “control wheel and buttons” cannot be changed, and the power does not turn off. (However, the mode can be changed using the "mode dial.")
To unlock, press the center 🔒 again for 1 second.
Remote shooting method
Attach the commander to the camera and turn on the power.
• Install the remote flash (EF-60) anywhere.
- Perform a test flash of the commander flash or commander to check the synchronization of the remote flash.
- Shooting is possible once the remote flash is synchronized.
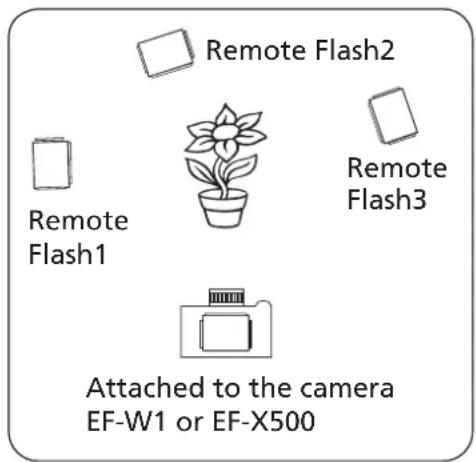
* Maximum No. of flashes that can be paired around the subject is 30 pcs.
* The power turns off after 60 minutes by the remote auto power off function.
* It does not switch to power saving mode when remote.
* Remote tuning may not be possible depending on the location of this unit.

Important
When attaching this unit to a metal accessory shoe, be careful not to short-circuit the contacts.
Other Functions
FP (High Speed Sync.)
EF-60 supports FP (High Speed Sync.), which synchronizes up to 1/8,000 shutter speed. EF-60 can be used in A, M, TTL and “(<<i))” modes.
How to enable high speed sync.
With EF-60 attached to the camera, turn on the camera and EF-60, and set the synchronization mode to AUTO FP (HSS) in the camera's "FLASH FUNCTION SETTING" menu. It cannot be set with the [ H ^2 ] button of the "Control wheel and buttons" of EF-60.
! Caution
In the FP mode, the light emission method places a heavy load on the flash, so if the flash head overheats, a safety function to protect the device will be activated and the charging interval will be automatically limited to 12 seconds. The limit is automatically released when the temperature drops.
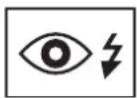
Red-eye Correction
If you turn on the "RED EYE REMOVAL" in the camera menu, the pre-flash will be fired just before the main flash to mitigate the red-eye effect of the subject.
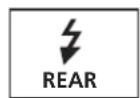
Rear curtain sync.
If you set the REAR curtain sync. on the "FLASH FUNCTION SETTING" in the camera menu, the flash will fire just before the shutter closes.
Auto Focus Assist Light
When shooting a low-contrast object or in a dark place, the auto focus assist light is automatically emitted to the subject to facilitate focusing. The irradiated autofocus assist light does not appear in the captured image.
* The LED light can also function as a catch light not only as an auto focus (AF) assist light. For details, see "LED LIGHT SETTING" in the camera's owner's manual.
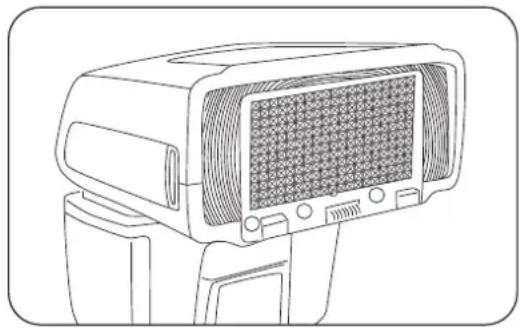
Flash Head Operations
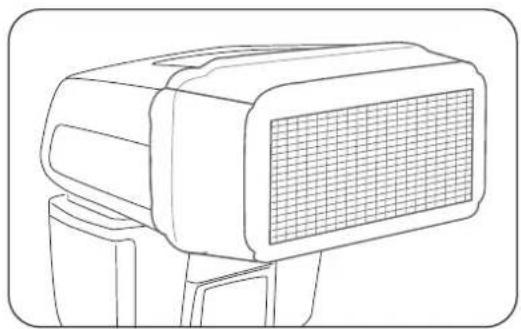
Light Diffusing Panel
By pulling out the Light Diffusing Panel and covering it in front of the flash head as shown in the figure, a shooting angle of view of 16 mm can be supported.
natural_image
Line drawing of a portable electronic device with a grid-patterned front panel (no text or symbols)Bounce
When you bounce the flash mainly by reflecting flash light on the ceiling or walls indoors, you can soften the unnatural shadows of the subject and make them look natural.
- Manually turn the flash head vertically and horizontally.
- The head rotates 90^ upward, 180^ to the left and 180^ to the right.
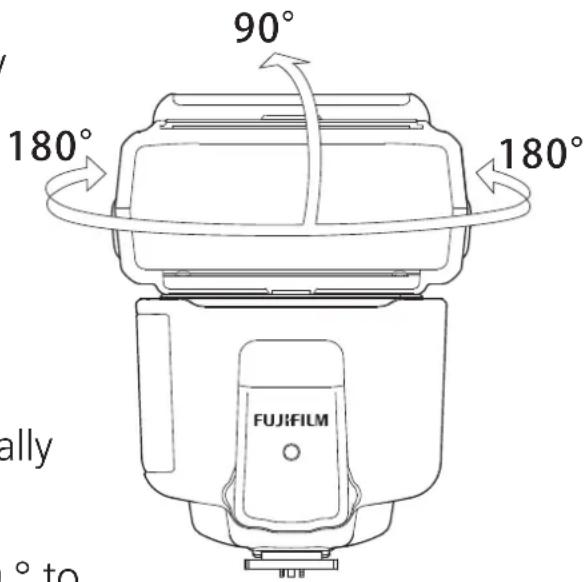
! Caution
- When bouncing, the flash coverage is fixed at 50 mm when auto zoom is set. (except for radio wireless remote)
- If the distance to the ceiling or wall is long, the flash light may not be reflected sufficiently and the effect may not be obtained.
- The flash light during bounce shooting may be colored due to the influence of the color of the ceiling and walls.
- When bouncing, the light is attenuated. If the effect is not sufficiently obtained, adjust the exposure setting such as increasing the ISO sensitivity of the camera.
Flash Head Operations
Soft Box
Used to diffuse the flash light.
natural_image
Line drawing of a portable electronic device with a grid-patterned front panel (no text or symbols)Fill-in Reflector
If you use the Fill-in Reflector at a short distance during bounce shooting, the light will enter the eyes of the subject and the facial expression will become brighter.
- When using the Fill-in Reflector, bounce upward 90^ .
natural_image
Line drawing of a mechanical device with a handle and mounting bracket (no text or symbols)* The Fill-in Reflector can be used with Soft Box attached.
Guide Number (ISO100·m, Flash output 1/1)
| Flash Emission | |||||||||
| Irradiation angle35mm format(X series Format/GFX series format) | 24 mm(16 mm / 30 mm) | 28 mm(18 mm / 36 mm) | 35 mm(23 mm / 44 mm) | 50 mm(33 mm / 63 mm) | 70 mm(46 mm / 89 mm) | 85 mm(56 mm / 108 mm) | 105 mm(66 mm / 133 mm) | 135 mm(89 mm / 171 mm) | 200 mm(131 mm / 254 mm) |
| Guide Number | 27.0 | 29.0 | 32.0 | 39.0 | 42.0 | 45.0 | 50.0 | 60.0 | |
| FP (HSS) Emission | |||||||||
| Irradiation angle 35mm format(X series Format/GFX series format) | 24 mm(16 mm / 30 mm) | 28 mm(18 mm / 36 mm) | 35 mm(23 mm / 44 mm) | 50 mm(33 mm / 63 mm) | 70 mm(46 mm / 89 mm) | 85 mm(56 mm / 108 mm) | 105 mm(66 mm / 133 mm) | 135 mm(89 mm / 171 mm) | 200 mm(131 mm / 254 mm) |
| Guide Number | 16.9 | 18.2 20 | 0 24.4 | 26.3 2 | 8.2 31 | 3 33.8 | 37.6 | ||
* The guide number for FP (HSS) emission is the value when EF-60 is used with X-T3 and shutter speed 1/500 seconds.
If the shutter speed increases by one step, the guide number will decrease by one step.
Trouble Shooting
Flash does not charge
- Check the direction of the battery, and if it is the wrong way, insert it correctly.
- Make sure that the batteries are not exhausted, and if so, insert fresh batteries.
The flash does not fire
- If the flash is not firmly fixed, mount it all the way in.
- If the hot shoe contacts are dirty, wipe them with a dry cloth.
- If the power is off due to the auto power function, turn it on again.
Photos are overexposed or underexposed
- Check the mode and if it is in manual mode, set it to "TTL" mode.
Specifications
| Type | |
| Type | Shoe Mount Flash |
| Model | EF-60 |
| Compatible Cameras *1 | GFX100, GFX 50S, GFX 50R, X-H1, X-Pro2, X-Pro3 |
| X-T1, X-T2, X-T3, X-T4, X-T20, X-T30, X-E3, X100F, X100V | |
| Some functions can be used with the X-series cameras equipped with hot shoes, FinePix HS20EXR, HS30ERX, and HS50EXR. | |
| Flash Head | |
| Guide Number | Max. Guide No. approx. 60 (ISO 100·m) |
| (When focal length coverage is set to 200 mm and the format is set to 35 mm) | |
| The Coverage (zoom) | 24-200mm (the format set to 35mm), Auto Zoom function |
| 24mm–200mm (16mm when using built-in diffuser) (the format set to 35mm) | |
| Bounce Position | Up: 0-90°, Down: 0°, Left: 180°, Right 180° |
| Color Temperature | approx. 5,300K (at full flash) |
| FP (High Speed Sync) emission | Compatible (When using compatible cameras) |
| Exposure control | |
| exposure control, Flashing method | TTL, Manual control |
| EV compensation on flash | +/- 2EV in increments of 1/3 of EV |
| Manual mode *2 | 1/1- 1/256 with 1/3EV step selection (flashing) |
| 1/1-1/32 with 1/3EV step (FP (HSS) emission) | |
| Charging | |
| Recycling Time (Full flashing, fully charged) | approx. 3 sec. (NiMH battery) * Nickel metal hydride |
| No. of flashes (Full flashing, fully charged) | approx. 170 times (NiMH battery) * Nickel metal hydride |
| Wireless remote function | |
| Communication method | 2.4GHz NAS *3 |
| Action mode | Remote (TTL, Manual, OFF) |
| Compatible commander device | FUJIFILM EF-W1, Nissin Air10s *4 |
| Communication Channel | Compatible with channel 1 to 8 of wireless commander |
| Remote group | A, B, C |
| Optical communication remote wireless function | |
| Communication method | Optical pulse method |
| Compatible commander device | FUJIFILM EF-X500 |
| Action mode | Remote (TTL, Manual, OFF) |
| Communication Channel | Compatible with channel 1 to 4 of commander flash |
| Remote group | A, B, C |
| Other functions | |
| Linked emission | Secondary Mode SF (N-MODE), Secondary Mode SD (P-MODE) |
| LED video light | Compatible (built-in) |
| LED AF auxiliary light | Compatible (built-in) |
| Fill-in Reflector panel | Compatible (built-in) |
| Soft Box | Compatible (accessory) |
| Power supply & others | |
| Power Source | 4 x AA batteries (nickel-metal hydride (NiMH) battery, Alkaline battery) |
| Using temperature range | -10 degrees to 40 degrees Celsius |
| Dimension (Height x Width x Depth) | approx. 97 mm x 73 mm x 113 mm |
| Weight | approx. 300 g (without battery) |
* 1 Please see https://fujifilm-x.com/support/compatibility/accessories/ for the latest compatible information.
* 2 Depending on the shooting conditions, the setting value may not be reflected because it exceeds the adjustable range.
* 3 NAS (Nissin Air System) is a registered trademark of Nissin Japan Ltd.
* 4 Nissin Air10s is a product of Nissin Digital (https://nissindigital.com)
Specifications are subject to change without notice.
Ver. 20071101
- Contents
- Name of the Components and Accessories 4
- Power saving mode, overheat prevention function, and charging sound 5
- Before using 6
- Basic Operation 7
- Mode dial 9
- Function button 17
- Remote shooting method 21
- Other functions 22
- Flash Head Operations 23
- Guide No. table 25
- Trouble shooting 25
- Specifications 26
- Names of the Components and Accessories
- Accessory:
- Power saving mode, overheat prevention function, and charging sound
- Power saving mode
- Overheat Prevention function
- Charging sound
- Before Using
- Inserting batteries
- Usable batteries - Alkaline batteries or NiMH batteries
- ! Caution
- Basic Operation
- Mounting EF-60 on the camera
- Removing EF-60 from the camera
- Caution
- Turn on the flash power
- Mode Dial
- EF-60 Flash Mode and Functions
- LED Light Mode
- SF
- Secondary Mode SF
- SD
- Secondary Mode SD
- Setting Method
- M
- Manual Mode
- Full Automatic Mode
- Camera exposure mode
- TTL TTL Mode
- Camera's exposure mode
- Wireless Remote Mode
- ((i)) Optical wireless remote
- ((i)) Radio wireless remote
- Display on EF-60 when remotely controlled by EF-W1
- Equipment that can be used as a commander
- Function Button
- Channel
- Channel Setting
- Automatic channel setting
- Manual channel setting
- M.zoom
- Setting the coverage (zoom)
- Beep on/off
- Operation lock button
- Remote shooting method
- Attach the commander to the camera and turn on the power.
- Important
- Other Functions
- FP (High Speed Sync.)
- How to enable high speed sync.
- Red-eye Correction
- Rear curtain sync.
- Auto Focus Assist Light
- Flash Head Operations
- Light Diffusing Panel
- Bounce
- Soft Box
- Fill-in Reflector
- Guide Number (ISO100·m, Flash output 1/1)
- Trouble Shooting
- Flash does not charge
- The flash does not fire
- Photos are overexposed or underexposed
- Specifications
Brand : FUJIFILM
Model : EF-60
Category : Flash