HWM 614 A3 IT - Washing machine Hanseatic - Free user manual and instructions
Find the device manual for free HWM 614 A3 IT Hanseatic in PDF.


User questions about HWM 614 A3 IT Hanseatic
0 question about this device. Answer the ones you know or ask your own.
Ask a new question about this device
Download the instructions for your Washing machine in PDF format for free! Find your manual HWM 614 A3 IT - Hanseatic and take your electronic device back in hand. On this page are published all the documents necessary for the use of your device. HWM 614 A3 IT by Hanseatic.
USER MANUAL HWM 614 A3 IT Hanseatic
natural_image
Line drawing of a hanseatic washing machine with control panel and display (no text or symbols on the device itself)Gebrauchsanleitung
Anleitung/Version:
195768 DE 20180302
natural_image
Line drawing of a front-loading washing machine with control panel and dials (no text or symbols)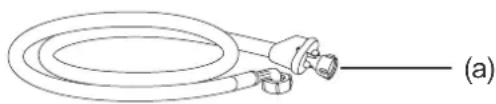
natural_image
Line drawing of a coiled hose with connectors, labeled (a), showing no text or symbols on the diagram itself.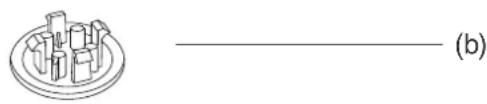
natural_image
Simple line drawing of a mechanical component with no text or symbols
text_image
200 150 100 (c)
text_image
(c) 200 150 100text_image
hanseatic 0000 (2)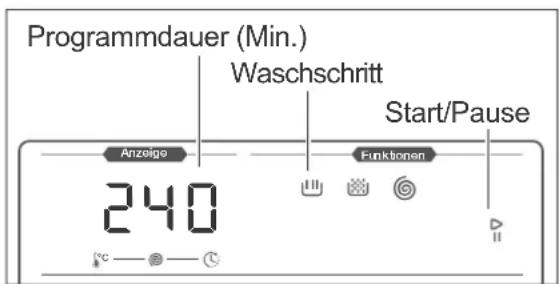
text_image
Aanseatic (2)natural_image
Line drawing of hands holding a circular mechanical component, labeled (15), with no text or symbols on the diagram itself.natural_image
Line drawing of a hand holding a mobile phone with a cable inserted, showing no text or symbolstext_image
(22) (23)text_image
(12) (27)natural_image
Diagram showing a circular component rotating around a bowl with an arrow indicating rotation (no text or symbols)natural_image
Diagram of a mechanical component with a rotating arrow indicating rotational motion (no text or symbols)natural_image
Mechanical assembly diagram showing a bolt inserted into a housing with a magnified inset view (no text or labels)natural_image
Mechanical assembly diagram showing a rotating component with three blades and a central shaft (no text or symbols)natural_image
Diagram of a curved pipe or duct with internal bands and a looped extension (no text or symbols)natural_image
Diagram of a pipe fitting attached to a sink, showing tubing and a circular component (no text or symbols)text_image
(12) (28) (a)natural_image
Line drawing of a hanseatic washing machine with control panel and display (no text or symbols on the device itself)User manual
Manual/version:
195768_GB_20180302
Order no.: 257757, 862010,
493707, 508039
Reproduction, even of excerpts,
is not permitted!
Washing machine
Table of contents
Delivery GB-3
Delivery contents . . . . . . . . . . . . . . GB-3
Checking delivery contents . . . . . . GB-3
Controls and appliance parts . . . . . . GB-4
Safety GB-5
Intended use GB-5
Explanation of terms . . . . . . . . . . . GB-5
Safety instructions . . . . . . . . . . . . . GB-5
Preparing laundry and wash ..... GB-11
Sorting through laundry . . . . . . . GB-11
Special materials GB-11
Other tips GB-11
Amount of laundry . . . . . . . . . . . GB-11
Washing detergent . . . . . . . . . . GB-11
Dosage GB-12
Dispensing washing detergent and fabric-care products . . . . . . . GB-12
Loading laundry . . . . . . . . . . . . . . . GB-13
Standard cycles . . . . . . . . . . . . . . . . GB-14
First steps . . . . . . . . . . . . . . . . . . . . . GB-17
Selecting the cycle . . . . . . . . . . . GB-17
Adjusting the temperature . . . . . . GB-17
Adjusting the spin speed. . . . . . . GB-18
Starting the cycle . . . . . . . . . . . . GB-18
Suspending and continuing the cycle . . . . . . . . . . . . . . . . . . . . . . . . . . . . . . . . . . . . . . . . . . . GB-18
Suspending the cycle . . . . . . . . . GB-19
Pumping water . . . . . . . . . . . . . . GB-19
Cycle end . . . . . . . . . . . . . . . . . . . . . GB-19
Functions . . . . . . . . . . . . . . . . . . . . . . . . . . . . . GB-20
Start time preselection . . . . . . . GB-20
Anti-crease function . . . . . . . . . GB-20
Button lock (child lock) . . . . . . . . GB-21
Automatic control functions ..... GB-22
Foam detection . . . . . . . . . . . . . . . GB-22
Overflow protection system ..... GB-22
Dynamic quantity control . . . . . . GB-22
Imbalance correction system . . . . GB-22
Care and maintenance . . . . . . . . . GB-23
Regular checks . . . . . . . . . . . . . . . . GB-23
Cleaning the loading door . . . . . . GB-23
Cleaning the drum . . . . . . . . . . . GB-24
Cleaning the dispensing drawer . . GB-24
Cleaning the filter and replacing the gasket . . . . . . . . . . . . . . . . . . . . . GB-24
Cleaning the lint trap/Emergencydraining . . . . . . . . . . . . . . . . . . . . . GB-25
Emptying residual water . . . . . . . GB-26
Start-up GB-27
Transport GB-27
Removing/installing transport safety devices . . . . . . . . . . . . . . . . GB-27
Installing the appliance . . . . . . . . GB-28
Aligning the appliance. . . . . . . . GB-28
Creating a water drain . . . . . . . . GB-29
Creating a water inlet . . . . . . . . GB-30
Creating an electrical connection . GB-31
Carry out a test run . . . . . . . . . . . . GB-31
Troubleshooting table . . . . . . . . . . . . GB-33
Service. GB-37
Advice, order and complaint ..... GB-37
Repairs, replacement parts and accessories . . . . . . . . . . . . . . . . . . . GB-37
Technical specifications . . . . . . . . . GB-38
Environmental protection . . . . . . . GB-39
Disposing of old electrical devices in an environmentally-friendly manner . . . . . . . . . . . . . . . . . . . . . . . . . GB-39
Packaging . . . . . . . . . . . . . . . . . . . . GB-39

You can find more information on installation and connecting the appliance from page GB-27.
Delivery
text_image
Diagram of a washing machine with labeled parts including control panel, hose, and base components
Before using the appliance, please first read through the safety instructions and user manual carefully. This is the only way you can use all the functions reliably and reliably. Be absolutely sure to also observe the national regulations in your country, which are also valid in addition to the regulations specified in this user manual.
Keep all safety notices and instructions for future reference. Pass all safety notices and instructions on to the subsequent user of the product.
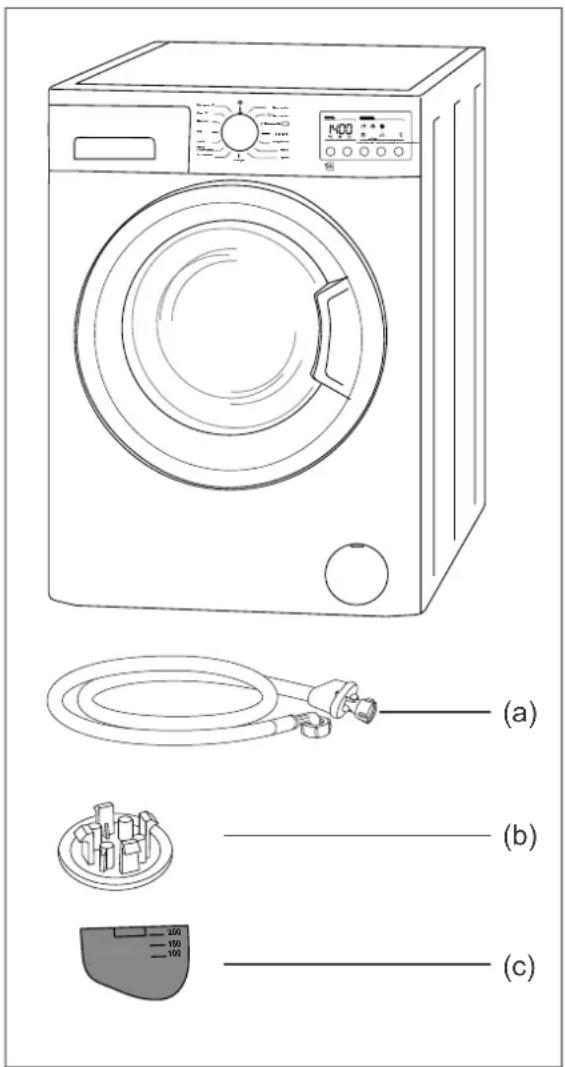
Delivery contents
1× Washing machine
1× Water supply hose (a)
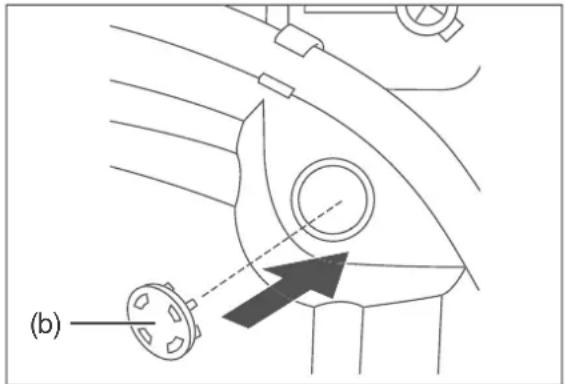
4× Cover for transport safety holes (b)
1× Partition for dispensing drawer (c)
1× Short manual
1× Guarantee supplement
Checking delivery contents
- Move the appliance to a suitable place and unpack it (see page GB-27).
- Remove all parts of the packaging, plastic profiles, tape and foam padding.
- Check that the delivery is complete.
- Check whether the appliance was damaged during transit.
- If the delivery is incomplete or the appliance has been damaged during transit, please contact our service department (see page GB-37).

WARNING!
Risk of electric shock!
Never use a damaged appliance.
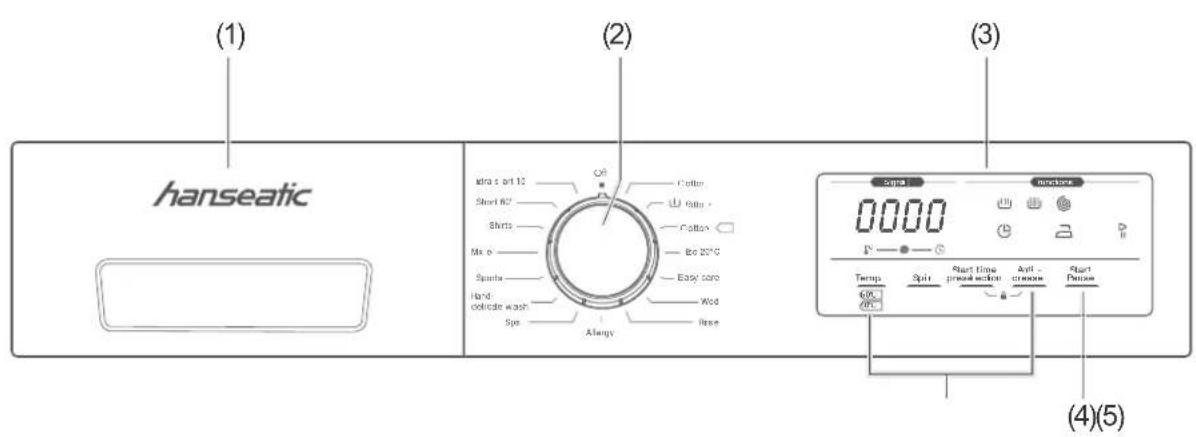
Controls and appliance parts
text_image
(1) hanseatic (2) Extra cut 10 Short 60° Shirts Mix e Sparks Hand dolicate wash Spa Alengy Cotton Cotton Be 20°C Easy core Wool Rice (3) sma 0000 Temp Spir Start time preparation Avt - crisose Start Pancise (4)(5)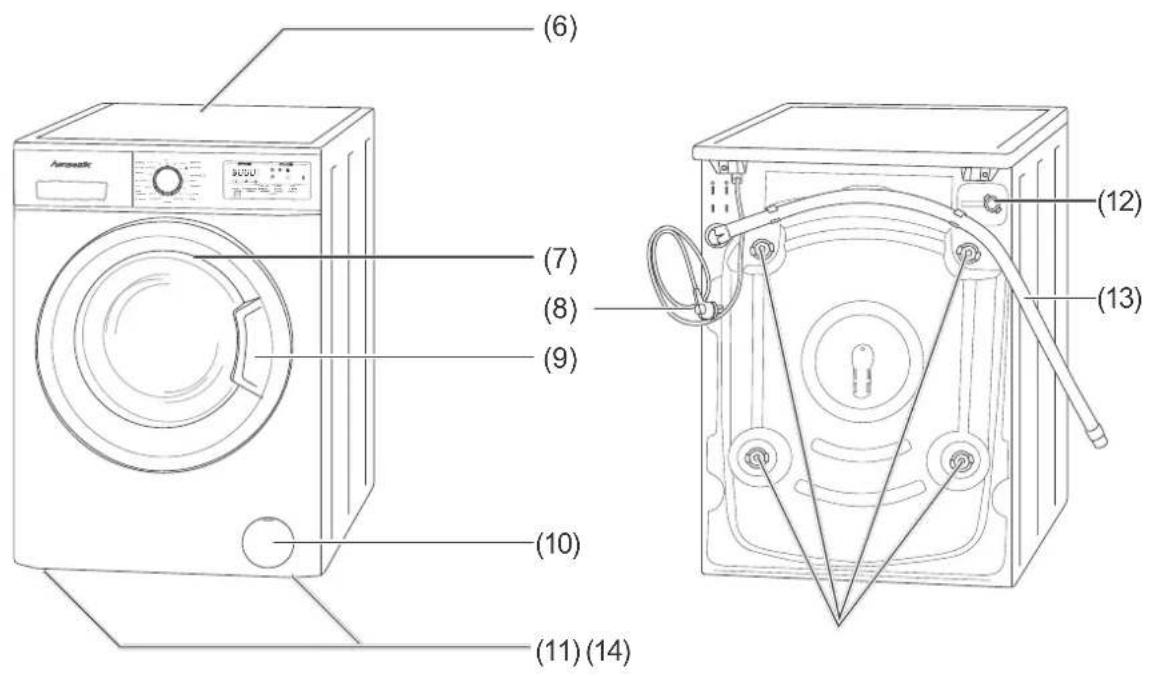
text_image
(6) (7) (8) (9) (10) (11) (14) (12) (13)(1) Dispensing drawer
(2) Cycle selector
(3) Display
(4) Sensor button to start, suspend and continue the cycle
(5) Sensor buttons to adjust the wash cycle
(6) Cover plate
(7) Loading door
(8) Mains cord with mains plug
(9) Door handle
(10) Lint trap with shutter
(11) Screw-on feet, × 4 (not visible)
(12) Connection for water inlet hose
(13) Water outlet hose
(14) Transport safety devices, × 4
Safety
Intended use
The appliance is suitable for washing, rinsing and spinning laundry in normal household quantities.
It was designed exclusively for use in private households and is not designed for commercial use or multiple use (e.g. use by several parties in a block of flats).
Use the appliance only as described in this user manual. Any other use is deemed improper and may result in damage to property or even personal injury. The manufacturer accepts no liability for damage caused by improper use.
Explanation of terms
The following symbols can be found in this user manual.

WARNING!
This symbol indicates a hazard with a medium level of risk which, if not avoided, could result in death or serious injury.

CAUTION!
This symbol indicates a hazard with a low level of risk which, if not avoided, could result in minor or moderate injury.

NOTICE
This symbol warns against possible damage to property.

This symbol refers to useful additional information.
Safety instructions
Read important safety instructions carefully and store for future use. In this chapter you will find general safety instructions which you must always observe for your own protection and that of third parties. Please also observe the warning notices in the individual chapters.

WARNING
Risks in handling household electrical appliances
Risk of electric shock!
Touching live parts may result in severe injury or death.
■ Only use the appliance indoors.
■ Do not operate or continue to operate the appliance, if
– it shows visible signs of damage, e.g. the power cord is defective.
- it starts smoking or there is a smell of burning.
- it makes unusual sounds.
In these cases, remove the mains plug from the socket or isolate/unscrew the fuse and contact our service department (see page GB-37).
■ The appliance corresponds to protection class 1 and may only be connected to a plug with a protective conductor that has been installed properly. When connecting, make sure that it has the right voltage. You can find more detailed information about this on the nameplate.
■ Do not operate the appliance with an external timer or a separate remote control system.
- If the mains plug is no longer accessible after installing the device, an all-pole disconnecting device complying with overvoltage category III must be connected into the house wiring with a contact gap of at least 3 mm; this includes fuses, circuit breakers and contactors.
- Do not kink or pinch the mains cord or lay it over sharp edges. This can result in a break in the cable.
- Keep the appliance, the mains plug and the mains cord away from open flames and hot surfaces.
■ Always touch the mains plug, not the mains cord.
■ Never touch the mains plug with wet hands.
■ Never immerse the mains cord or mains plug in water or any other liquids.
■ If the mains cord of the appliance is damaged, it must be replaced by the manufacturer, through customer service or by a qualified specialist.
■ Investigations and repairs to the appliance may only be carried out by authorised specialists, such as our service department (see page GB-37).
■ Independent or improper repairs made to the appliance may cause damage to property and personal injury and any lability and warranty claims will be forfeited. Never try to repair a defective or suspected defective appliance yourself.
■ Only parts corresponding to the original appliance specifications may be used for repairs. This appliance contains electrical and mechanical parts which are essential for protection against potential sources of danger.
■ In the event of a fault, as well as before cleaning and maintenance, unplug the mains plug or isolate/un-screw the fuse. - Do not put any objects in or through the housing openings, the dispensing drawer or the washing drum, and also make sure that children cannot insert any objects through them.
- Check whether the responsible electricity supplier has provisions regarding the connection of washing machines. We recommend using a pulse-sensitive residual-current device (RCD).
■ Never spray the device with a water jet or a high-pressure cleaner. Steam could reach live components through cracks.
- Check the appliance regularly for damage.
Risks to children
Risk of suffocation!
Children can become entangled in the packaging fi lm or swallow small parts and suffocate.
■ Do not allow children to play with the packaging fi lm.
■ Stop children from pulling small parts from the device or taking them out of the accessory bag and putting them in their mouths.
CAUTION!
Risks for certain groups of people
Danger for children and people with limited physical, sensory or mental capacity!
■ This appliance can be used by children aged eight years and above and by persons with reduced physical, sensory or mental abilities, or who lack experience and/or knowledge, if they are supervised or have been instructed in the safe use and understand the dangers associated with its use.
■ Cleaning and maintenance must not be carried out by children unless they are supervised.
Children can lock themselves in the drum when playing, putting their lives in danger.
■ Children must not be allowed to play with the appliance.
■ Make sure that children have no access to the appliance when unsupervised, regardless of whether the appliance is switched on or off.
■ Children under the age of 3 should be kept away from the appliance, unless they are being supervised the whole time.
Risks in handling washing machines
Fire hazard!
Improper handling of the appliance can lead to fire and property damage.
- Only connect the appliance to a properly installed and earthed electric socket. Do not connect to a multi-socket extension cable or a multi-socket plug.
Risk of poisoning!
Washing detergents and fabric-care products can be harmful to health.
- Keep these products out of the reach of children and pets.
Risk of scalding!
Improper handling of the appliance can lead to scalding caused by hot suds.
- Fix the water outlet hose properly to the basin, sink or bath to prevent it from slipping due to the recoil caused by pumping.
■ If the water outlet hose is fixed to the edge of the sink or bath, do not use the sink or bath whilst the washing machine is in operation.
■ For washbasins and sinks in particular, make sure that the cross section of the discharge pipe is great enough that the washbasin or sink cannot overflow.
■ Leave the suds to cool before draining them (e.g. as part of emergency draining).
■ Never open the loading door with force.
Risk of burns!
Improper handling of the appliance can lead to burns.
■ The glass of the loading door can get hot during operation. Do not touch the glass during operation.
■ Do not touch the water outlet hose during pumping.
Risk of injury!
Improper handling of the appliance may result in injury.
■ The appliance is very heavy, so never transport or carry it alone, but rather always with at least two persons.
■ Remove all obstacles on the transport route and from the installation location, e.g. open doors and clear away objects lying on the floor.
- Do not use the loading door as a step, seat or for support. Make sure that children and pets do not stand or sit on the open loading door.
■ Take care to prevent any risk of tripping when laying the mains cord and hoses.
! NOTICE
Risk of damage
Improper installation and set-up of the appliance may result in damage.
■ If a trolley is used to move the appliance, the appliance must be lifted as shown on the packaging. Always transport the appliance vertically and with a built-in transport safety device.
■ If the appliance is standing in a room susceptible to frost, the water in the appliance can freeze in below-zero temperatures. For this reason, drain away the leftover water if there is a risk of frost to avoid damages to the appliance.
■ Remove all transport safety devices prior to installation.
- Do not stand the appliance on top of other appliances. Do not use the appliance as a stand for other appliances (e.g. tumble dryer) and never sit or stand on the appliance.
- Do not stand the appliance on rugs or carpets. Otherwise it will not be ventilated well enough and can overheat and become damaged as a result.
For rugs, carpet, parquet or wooden floorboards, place a stable wooden plate measuring at least 60×60 cm underneath the appliance. Improper handling of the appliance can lead to water damage.
- Do not leave the appliance unsupervised for long periods of time while the valve is open. When draining as a result of leakiness, substantial amounts of water may leak out.
■ Do not connect the appliance to the hot water supply. - Only connect the appliance to a water supply with an inlet water pressure between 0.1 Mpa and 1.0 Mpa (1.0 to 10.0 bar). For higher water pressure, a pressure regulator needs to be installed. Enquire about the water pressure with the local waterworks.
■ Close the water valve after every use. - Close the water valve before cleaning the water inlet fi Iter.
■ Only use the hose set delivered with the appliance to connect to the water supply. Do not use old hose sets. - Do not extend the water outlet hose or replace it with another hose.
■ Make sure that the water outlet hose is not bent or twisted.
■ Be aware that substantial amounts of water may leak out during emergency draining.
■ Make sure that the curvature of the water outlet hose is at least 60 cm (max. 100 cm) above the ground to ensure the water drain functions perfectly.
■ Ensure that the water outlet hose is in the retaining clips on the back of the appliance so that the curvature always remains above the waterline.
■ Do not submerge the end of the hose in the pumped water.
Improper fi lling of the appliance can lead to damage.
■ Make sure that there are no foreign objects in the pockets of garments in the laundry, e.g. needles, nails, coins, matches, staples, clips, etc.
■ Only use dyeing or bleaching agents that are suitable for washing machines.
■ Only use tap water for washing.
- Do not wash any textiles in the washing machine that have been treated with chemical cleaning agents such as white spirit or stain remover shortly before. Textiles treated in this way must first be aired out until they are dry.
■ Never try to open the loading door with force whilst a cycle is in progress or once a cycle has ended. Only open the loading door once it has been released automatically.
Improper cleaning of the appliance can cause damage.
■ Never use harsh, granular, soda, acid, solvent-based or abrasive cleaners. They can damage the surfaces or make the rubber sleeve brittle and fragile. All-purpose cleaners with a neutral pH are recommended.
- Do not use pointed, sharp or angular objects for cleaning the rubber sleeve. They can make the rubber sleeve leaky.
- Check and clean filters and gaskets regularly.
- Replace defect filters and gaskets immediately. Never operate the appliance without filters and gaskets.
Preparing laundry and wash
Sorting through laundry

NOTICE
Risk of damage!
Improper handling of the appliance can lead to damage.
■ Make sure that there are no foreign objects in the pockets of garments in the laundry, e.g. needles, nails, coins, matches, staples, clips, etc.
The washing instructions of the textile manufacturer/the international care symbols on the labels contain precise information about how to handle each piece of laundry.
We recommend sorting through the laundry according to the following criteria:
- Type of fabric
- Boil wash/coloured wash (cotton)
– Easy-care synthetics
– Delicates, wool and hand wash
- Colour
- Wash white laundry separately, otherwise it will turn grey.
- Wash new dark pieces separately at first, as they lose their colour a lot the first few times they are washed.
– Level of dirtiness
– If possible, remove stains when still fresh, otherwise they will become particularly stubborn.
- It is best to pre-treat stains with water and ox-gall soap.
Special materials
– Small and delicate pieces, such as baby socks, stockings and underwire bras are best washed in a small pillowcase or small washbag.
- Curtains need to be handled especially carefully, as their threads can pull quickly. Only put curtains on a spin cycle if this is specified in the textile label.
– Before washing curtains, you will need to remove the plastic and metal hooks
Other tips
- Repair unstitched seams and tears before washing. Sew loose buttons tight. Close zips. Knot the ties on aprons, etc.
- Empty pockets before washing. Turn the pockets inside out and brush them out if needed.
- Turn clothing made from delicate fibres and coloured clothing inside out to protect the surface.
Amount of laundry
The amount of laundry that can be put in depends on the type and dirtiness of your laundry and the respective wash cycle. You can find the maximum wash load in the tables from page GB-16.
As a rule of thumb: Load dry washing up to one hand width below the upper edge of the drum. Overfilling the drum can compromise the wash result.
Washing detergent
Only use detergent suitable for washing machines. Other cleaning products, such as scouring powder, household cleaning agents, etc. will damage the appliance and your laundry.
Recommendations for washing detergent
- White laundry made from boil-proof cotton or boil-proof linen:
Heavy-duty detergent with bleaching agents and optical brighteners
- Colourful laundry made from cotton or linen:
Colour detergent without bleaching agents and optical brighteners
- Colourful laundry made from easy-care fibres or synthetic material:
Colour or mild detergent without optical brighteners
– Delicate textiles, silk, viscose: Mild washing detergent
– Wool: Special wool detergent
– Down jackets: Special detergent for down-lined jackets
Dosage
The motto ‘more is better’ does not apply to detergents and fabric-care products. They must be dosed properly to achieve the perfect wash result.
- If necessary, use a smaller dosage of detergents and fabric-care products if the drum is not filled completely. For example, for half loads, only use about half the amount needed for a full drum.
- Always adjust the amount of detergent to the hardness of the water. If your tap water is soft, you need less detergent.
Information about the water hardness in your area is provided by the waterworks responsible. The water hardness is also shown on the invoice from your water supplier.
- Dose detergent according to how dirty your laundry is. Laundry that is less dirty requires less detergent.
– Highly concentrated detergent (also known as compact detergent) in particular requires accurate dosage. Even small deviances can have a major impact when it comes to this.
The following wash results are a sign of incorrect dosage of detergent:
- Too much detergent
– Heavy foam formation
– Poor washing and rinsing result
– Skin irritation caused by leftover detergent in the clothing
- Not enough detergent
– Laundry turns grey
- Grease marks (grey clumps of grease and dirt on laundry)
– Build-up of limescale deposits on the drum, heating elements and/or laundry
Dispensing washing detergent and fabric-care products
Before dispensing washing detergent and fabric-care products, here are a few tips:
- Do not use fabric softener in the same wash as starch, sizings or finishes.
- Before dispensing viscous fabric-care products, mix them together with a little water to thin them out.
- Only use powder starch according to the instructions on the packet and not with high temperatures, or it may form clumps.
- Do not use liquid detergent for prewash cycles.
- Instead of dispensing the detergent in the dispensing drawer, you can also place the eco-bag provided by the manufacturer or the dosing balls for liquid detergent directly in the drum. The detergent then reaches the right place quicker, does not stick, and you also save yourself the effort of cleaning the drawer.
text_image
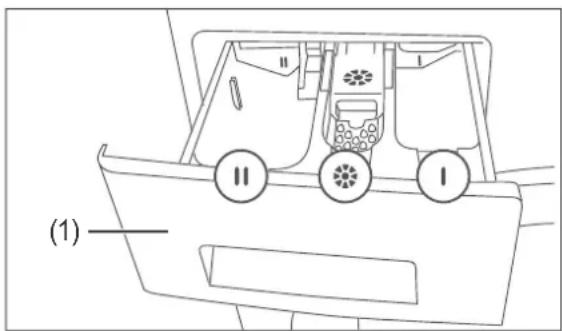
(1)The dispensing drawer (1) has 3 dispensing compartments:
- Dispensing compartment II (left): You will fill dispensing compartment II for every wash. Only use powder or liquid detergent or anti-limescale agent in this compartment.
text_image
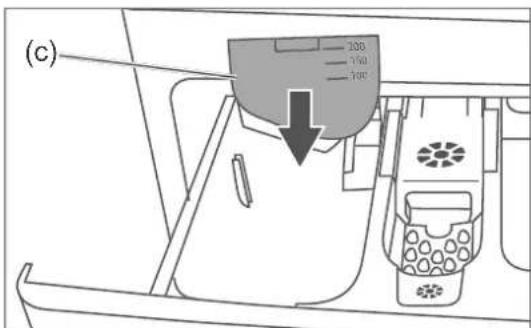
(c) 100 150 100If you wish to use dispensing drawer II with liquid detergent, first insert the partition for liquid detergent (c) as shown in the image.
- Fabric softener/starch compartment (middle): Dispense fabric softener or starch in the fabric softener/starch compartment.
We recommend that you only use the type and amount recommended by the fabric softener/starch manufacturer.
- Dispensing compartment I (right): Only use dispensing compartment I if you select a cycle with a prewash cycle Ⓤ. We recommend only using cycles with a prewash cycle for very dirty clothing.
- Dispense the detergent and fabric-care product into the dispensing compartments intended for this.
Loading laundry
! NOTICE
Risk of damage!
Improper handling of the appliance may result in damage.
■ Never try to open the loading door with force whilst a cycle is in progress or once a cycle has ended. Only open the loading door once it has been released automatically.
text_image
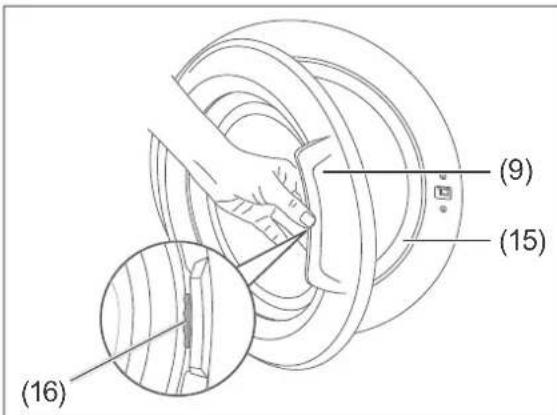
(9) (15) (16)- Push the latch (16) in the direction of the door handle (9) and pull the loading door open at the same time.
- Load the laundry. Make sure that no pieces of laundry get stuck between the loading door and the rubber sleeve (15).
- Push the loading door closed until you hear it snap shut.
Standard cycles
text_image
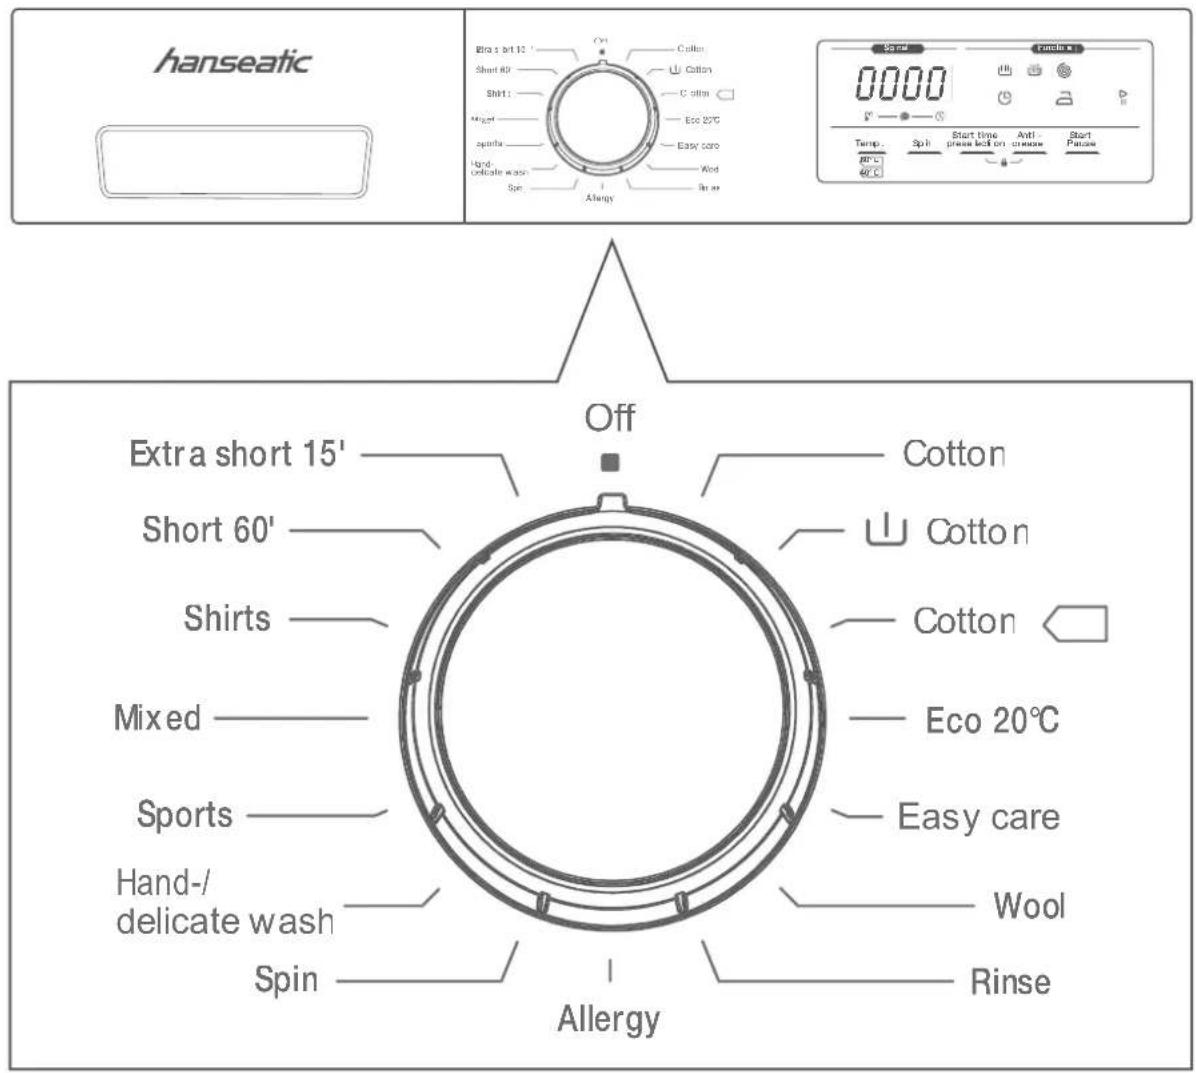
hanseatic Extra short 15' Short 60' Shirts Mixed Sports Hand-/delicate wash Spin Cotton Cotton Cotton Eco 20°C Easy care Wool Rinse Allergy Off Screw Candle x 0000 Temp. Spil Start time please left on Anti- cnewer Start Pause 80°C 40°CThe table on the following page lists all the standard cycles and shows you the important characteristics of each cycle, such as wash temperature, spin speed, cycle duration, etc.
This helps you select the right standard cycle that best suits the type and dirtiness of your laundry.
Table: Standard cycles models HWM 614 A3IT and HWM 714 A3IT
| Cycle | Type of laundry | HWM 614 A3IT HWM 714 A3IT | |||||||
| Amount of laun-dry/towels, maxi-mum in kg ^1) | Temperature in °C | Speed, maximumin rpm. ^2) | Duration of cycle, ^1) in min | Amount of laun-dry/towels, maxi-mum in kg ^1) | Temperature in °C | Speed, maximumin rpm. ^2) | Duration of cycle, ^1) in min | ||
| Cotton | very dirty laundry; cotton, lin-en, underwear, sheets, table linen | 6/3 90 | 1400 | 180 7/3 | 3.5 90 | 1400 187 | |||
| U Cotton(with prewash) | normal dirty laundry; coloured fabrics; cotton, linen, under-wear | 6/3 60 | 1400 | 165 7/3 | 3.5 60 | 1400 165 | |||
| Cotton | normal dirty laundry; coloured fabrics; cotton, linen, under-wear | 6/3 60 | 1400 | 240 7/3 | 3.5 60 | 1400 215 | |||
| Eco 20°C | not very dirty laundry; cotton, linen, underwear | 3/2 20 | 1400 | 95 3.5/2 | 20 1400 95 | ||||
| Easy-care | normal dirty synthetic laundry, synthetic mixed fabrics: nylon socks, shirts, blouses, trousers which are partly synthetic, etc. | 3 40 | 1200 1 | 10 3.5 | 40 1200 110 | ||||
| Wool | machine-safe woollen laundry | 2 | 30 | 600 | 43 | 2.5 | 30 | 600 | 43 |
| Rinse | all clothing | 6 | - | 1400 | 42 | 7 | - | 1400 | 42 |
| Allergy | e.g. baby clothing | 3 | 60 | 800 | 197 | 3.5 | 60 | 800 | 226 |
| Spin | all types of laundry | 6 | - | 1400 | 17 | 7 | - | 1400 | 17 |
| Hand/delicate wash | hand and delicate wash, deli-cate clothing | 2 | 30 | 600 | 90 | 2.5 | 30 | 600 | 90 |
| Sports | sportswear | 3 | 30 | 800 | 80 | 3.5 | 30 | 800 | 80 |
| Mixed | normal dirty laundry; cotton, synthetic clothing, mixed coloured fabrics and linen | 3 | 30 | 800 | 80 | 3.5 | 30 | 800 | 81 |
| Shirts | normal dirty laundry; cotton, synthetic clothing, partly syn-thetic shirts and blouses | 3 | 60 | 600 | 112 | 3.5 | 60 | 600 | 112 |
| Short 60' | normal dirty laundry; cotton, coloured fabrics, linen | 3 60 | 1400 60 | 3 60 | 1400 60 | ||||
| Extra short 15' | only slightly dirty laundry; cot-ton, coloured fabrics, linen | 2 | 30 | 800 | 15 | 2 | 30 | 800 | 15 |
1) The duration of the cycle can change depending on the amount of laundry, tap water, environmental temperature and additional functions selected.
2) If you have selected the 'Anti-crease' function, the spin speed will be reduced.
Table: Standard cycles models HWM 814 A3IT and HWM 914 A3IT
| Cycle | Type of laundry | HWM 814 A3IT HWM 914 A3IT | |||||||
| Amount of laun-dry/towels, maxi-mum in kg ^1) | Temperature in °C | Speed, maximum in rpm. ^2) | Duration of cycle, ^1) in min | Amount of laun-dry/towels, maxi-mum in kg ^1) | Temperature in °C | Speed, maximum in rpm. ^2) | Duration of cycle, ^1) in min | ||
| Cotton | very dirty laundry; cotton, lin-en, underwear, sheets, table linen | 8/4 90 | 1400 | 187 9/4 | 90 14 | 400 193 | |||
| U Cotton (with pre-wash) | normal dirty laundry; coloured fabrics; cotton, linen, under-wear | 8/4 60 | 1400 | 165 9/4 | 60 14 | 400 165 | |||
| Cotton | normal dirty laundry; coloured fabrics; cotton, linen, under-wear | 8/4 60 | 1400 | 215 9/4 | 60 14 | 400 240 | |||
| Eco 20°C | not very dirty laundry; cotton, linen, underwear | 4/2 20 | 1400 | 95 4.5/2 | 20 14 | 400 96 | |||
| Delicates | normal dirty synthetic laundry, synthetic mixed fabrics: nylon socks, shirts, blouses, trousers which are partly synthetic, etc. | 3.5 40 | 1200 | 110 3.5 | 40 12 | 200 110 | |||
| Wool | machine-safe woollen laundry | 2.5 | 30 | 600 | 43 | 2.5 | 30 | 600 | 43 |
| Rinse | all clothing | 8 | - | 1400 | 42 | 9 | - | 1400 | 45 |
| Allergy | e.g. baby clothing | 4 | 60 | 800 | 226 | 4.5 | 60 | 800 | 212 |
| Spin | all types of laundry | 8 | - | 1400 | 17 | 9 | - | 1400 | 17 |
| Hand/delicate wash | hand and delicate wash, deli-cate clothing | 2.5 | 30 | 600 | 90 | 2.5 | 30 | 600 | 90 |
| Sport | sportswear | 3.5 | 30 | 800 | 80 | 3.5 | 30 | 800 | 80 |
| Mixed | normal dirty laundry; cotton, synthetic clothing, mixed coloured fabrics and linen | 3.5 | 30 | 800 | 81 | 3.5 | 30 | 800 | 81 |
| Shirts | normal dirty laundry; cotton, synthetic clothing, partly syn-thetic shirts and blouses | 4 | 60 | 600 | 112 | 4 | 60 | 600 | 112 |
| Short 60' | normal dirty laundry; cotton, coloured fabrics, linen | 4 | 60 14 | 400 60 | 4 | 60 | 1400 | 60 | |
| Extra short 15' | only slightly dirty laundry; cot-ton, coloured fabrics, linen | 2 | 30 | 800 | 15 | 2 | 30 | 800 | 15 |
1) The duration of the cycle can change depending on the amount of laundry, tap water, environmental temperature and selected additional functions.
2) If you have selected the 'Anti-crease' function, the spin speed will be reduced.
First steps
Requirements
-
You have read chapter "Safety" and understand all the safety instructions.
– The appliance is prepared as described in chapter "Start-up" on page GB-27. -
Check whether the water inlet hose (a) and water outlet hose (13) are sitting securely.
- Open the valve completely.
- Make sure that the drum is empty.
- Load the laundry that has been sorted through into the drum.
- Push the loading door (7) closed tightly.
- Dispense washing detergent and fabric-care products.
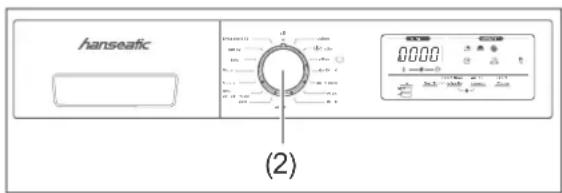
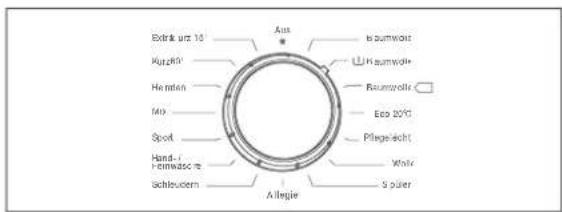
- Set the cycle selector (2) to the desired cycle. The appliance switches on. Signals light up on the display (3).
Selecting the cycle
text_image
hanseatic 0000 (2)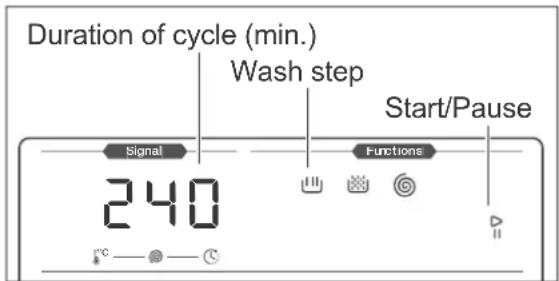
text_image
Duration of cycle (min.) Wash step Start/Pause Signal 240 Functions- Set the cycle selector (2) to the desired cycle.
The display (3) shows the cycle duration. The wash step signal and Start/Pause signal are flashing.
Adjusting the temperature
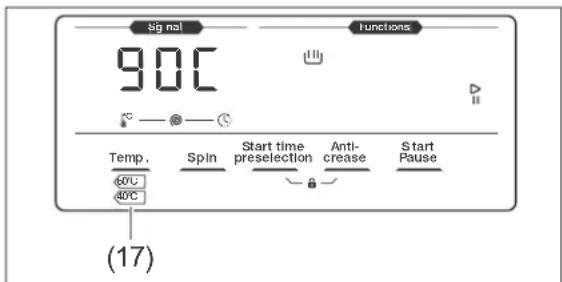
You can adjust the temperature for most cycles.
text_image
Signal 90°C Functions Temp. Spin Start time preselection Anti- crease Start Pause 60°C 40°C (17)- Press the 'Temp.' (17) sensor button. The temperature at which the cycle runs as standard will appear on the display. You now have 3 seconds to set the desired temperature.
- Press the 'Temp.' sensor button again, several times if necessary. The temperature setting reduces in steps of 10 °C .
text_image
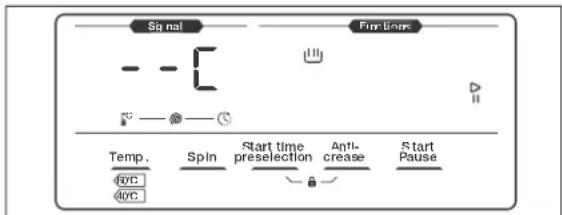
Signal Finitions Temp. Spin Start time preselection Anti- crease Start Pause 40°C 40°CAfter '30[’ or '20[’ the next step is ‘- - [’. If you have selected the setting ‘- - [’, the wash will be without heated water (cold wash).
You can undo the temperature setting by
- pressing the 'Temp.' (17) sensor button enough times that the original temperature setting is displayed again.
- positioning the cycle selector (2) in the 'Off' position and re-setting the cycle.
Adjusting the spin speed
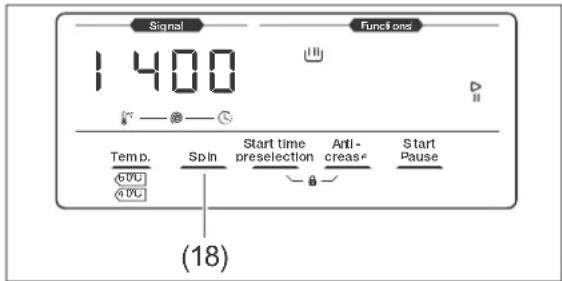
You can adjust the spin speed for most cycles.
text_image
Signal 1 400 Functions Temp. Spin Start time preselection Anti- creas* Start Pause (18)- Press the 'Spin' (18) sensor button.
The spin speed at which the cycle runs as standard will appear on the display (3). You now have 3 seconds to set the desired spin speed.
- Press the 'Spin' sensor button again, several times if necessary.
The spin speed reduces in steps of 200 rotations.
flowchart
graph TD
    A["Signal"] --> B{Function Block}
    B --> C["Start time preselection"]
    B --> D["Start I-crease"]
    B --> E["Start Pause"]
    C --> F["Temp. 60°C"]
    C --> G["Spin 40°C"]
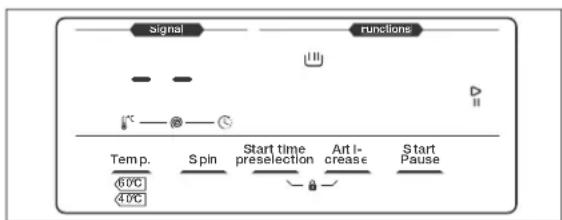
After '400', the next step is '--'.
The spin function has now been switched off. Select this setting if you do not wish the laundry to be spun at the end of the cycle.

You can undo adjustments to the spin speed by
- pressing the 'Spin' (18) sensor button enough times that the original spin speed is displayed again.
- turning the cycle selector (2) to the 'Off' position and re-setting the cycle.
Starting the cycle
text_image
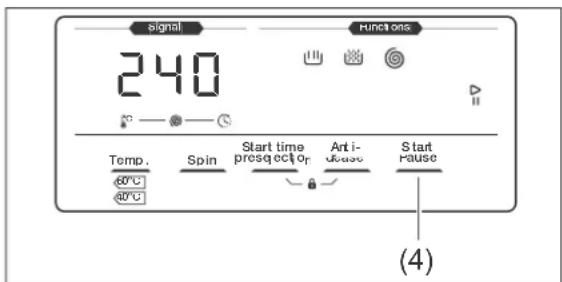
signal 240 Functions Temp. Spin Start time prosq octior Anti- ulase Start rause (4)- Press the 'Start/Pause' (4) sensor button. The wash cycle begins. The display shows the remaining cycle time as well as the progress of the wash cycle:
Wash
- Rinse
Spin.
Once the cycle has finished, the word 'End' will appear on the display.
Suspending and continuing the cycle
Please note that a long pause can affect the wash result, as the suds cool down.

text_image
Signal 240 Functions Temp. Spin Start time presdecl or Anti- crease Start Pause (4)- Press the 'Start/Pause' sensor button (4) to stop the running cycle.
The display will flash for as long as the cycle is suspended. - To continue, press the 'Spin' sensor button again.
Suspending the cycle
text_image
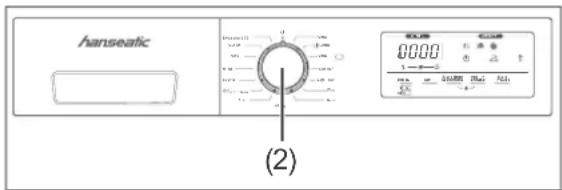
Aanseatic 0000 1 - 5 (2)- To suspend a running cycle, turn the cycle selector (2) to the 'Off' position.
The wash cycle will stop and the laundry will remain in the suds/rinse water. - To pump the water, please refer to the next steps.
Pumping water
- Turn the cycle selector to the 'Off' position.
- Turn the cycle selector to any cycle.
The water is now pumped. - You can now switch off the appliance or start any cycle.
Cycle end
The appliance stops automatically as soon as the selected cycle is finished.
- If the 'End' signal appears on the display, you can open the loading door and take out the laundry.
- Open the loading door and remove the laundry from the drum.
- Leave the loading door open and pull the dispensing drawer out slightly so that the appliance can dry off inside.
- Turn the cycle selector (2) back to the 'Off' position to switch off the appliance.
- Disconnect the mains plug (8) from the socket.
- Close the valve.
Functions
As well as the different cycles, the appliance also has additional functions which you can select as required.
To be able to select the additional functions, you must have already selected a cycle.
Please note that
– not all additional functions are possible with all cycles.
– an additional function cannot be selected if the cycle is already in progress.
You can identify an additional function that cannot be selected by the relevant signal flashing quickly on the display (3). The signal of this additional function will then turn off.
Start time preselection
Select this function if you want the wash cycle to begin at a later time.
The start time preselection can be set in intervals of 1 hour. The maximum start time preselection is 23 hours.
text_image
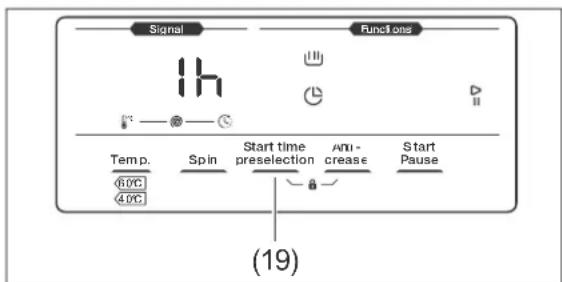
Signal Functions 1h Temp. Spin Start time preselection Anti-crease Start Pause (19)- Press the 'Start time preselection' (19) sensor button.
The signals ⏻ and ‘1h’ – i.e. the selected cycle starts in one hour – will appear on the display (3). - Press the 'Start time preselection' sensor button enough times until the desired start time is achieved.
- Activate the start time preselection by pressing any sensor button (5). The signal ⏻ will stay lit.
To switch off the start time preselection, turn the cycle selector (2) to the 'Off' position. Select a new cycle as required.
Anti-crease function
Select this function to avoid deep creases in your laundry.
The appliance will reduce the spin speed by 200 to 600 rpm depending on the cycle selected.
The duration of the cycle will increase by approx. four minutes.

text_image
Signal 244 Functions Temp. 60°C 40°C Spin Start time presetior Art i- crease. Start rause (20)- Press the 'Anti-crease' (20) sensor button. The signal will stay on the display (3).
The duration of the cycle will be extended by approx. 4 minutes.
To de-select the anti-crease function, press the 'Anti-crease' sensor button again.
Button lock (child lock)
The button lock allows you to secure the appliance from unwanted use of the buttons.
You cannot activate the button lock if the cycle selector is on 'Off'.
text_image
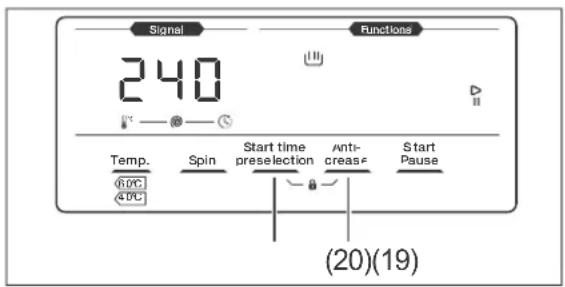
Signal 240 Functions Temp. 6.0°C 4.0°C Spin Start time preselection Anti- crease Start Pause (20)(19)- To activate the button lock, press both 'Start time preselection' (19) and 'Anti-crease' (20) sensor buttons at the same time for longer than 3 seconds.
text_image
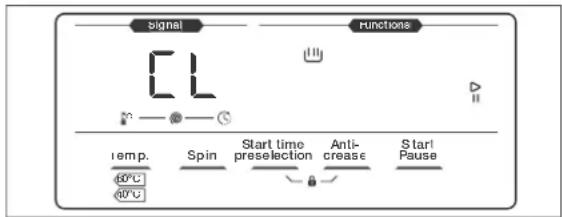
signal functions CL = temp. Spin Start time preselection Anti-crease Start Pause 60°C 60°CThe flashing ‘L’ signal will appear for a few seconds on the display (3). After that, the previous signal will be shown.
If you now press any sensor button, or turn the cycle selector (2), only the flashing signal 'L' will appear.
To deactivate the button lock, hold both sensor buttons 'Start time preselection' (19) and 'Anti-crease' (20) down at the same time until '[L] flashes 8 times in a row and the original signal can be seen on the display once again.
Automatic control functions
The following functions run automatically. You cannot change them.
Foam detection
The electronic foam detection makes sure that more water is added to the first rinse cycle for certain amounts of foam.
Overflow protection system
This system prevents the water from leaking out over the dispensing drawer (1). As soon as a certain water level is exceeded, the outlet pump will automatically switch on.
Dynamic quantity control
If the appliance is only half-loaded or loaded with less laundry than the highest capacity, the consumption of water and cycle duration reduce for certain cycles. This helps you save energy.
Imbalance correction system
This system protects the appliance in the event of an imbalance that is too large when spinning starts. This can happen with small loads or with large individual pieces of laundry. The laundry is distributed again and the spin speed increased if the laundry distribution is right.
Care and maintenance

WARNING!
Risk of electric shock!
The appliance operates with dangerous voltages. Improper cleaning and maintenance may result in severe injury or death.
■ Before cleaning and maintenance of the appliance, unplug the mains plug from the socket or isolate/unscrew the fuse.
■ Always touch the mains plug, never the mains cord.
■ Never spray the device with a water jet or a high-pressure cleaner. Steam could reach live components through cracks.

NOTICE
Risk of damage!
Improper cleaning and maintenance of the appliance can lead to damage. The surface of the appliance can scratch and the rubber sleeve can become brittle, fragile and leaky.
■ Never use harsh, granular, soda, acid, solvent-based or abrasive cleaners. They can damage the surfaces or make the rubber sleeve brittle and fragile. All-purpose cleaners with a neutral pH are recommended.
- Do not use pointed, sharp or angular objects for cleaning the rubber sleeve. They can make the rubber sleeve leaky.
Regular checks
A few simple and regular checks can save you from unpleasant surprises.
Check regularly whether
– the fittings of the water inlet hose (a) are sitting securely and are sealed when the valve is open.
– the water outlet hose (13) is sitting securely and tightly on the edge of the bath or on the siphon.
– the water outlet hose is sitting tightly in the retaining clip at the point where it comes out of the casing.
– the hoses are brittle, cracked or creased.
– the lint trap (10) is closed tightly.
– the rubber sleeve (15) of the loading door is free from foreign objects such as button, paper clips, etc.
– the drum is free from foreign objects.
– the drum shows signs of rust.
Cleaning the loading door
natural_image
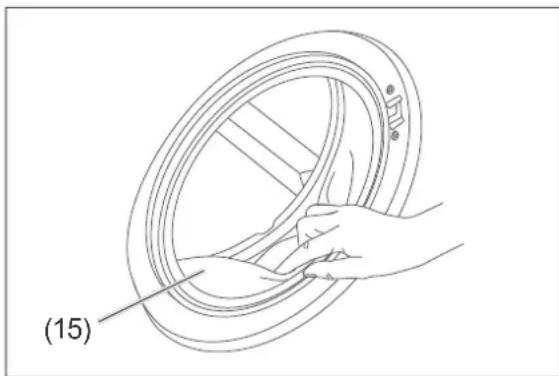
Line drawing of hands holding a circular mechanical component, labeled (15), with no text or symbols on the diagram itself.- Pull back the folds of the rubber sleeve (15) carefully and remove all objects behind it.
- Wipe the loading door (7) and rubber sleeve with a soft and damp cloth on the outside and inside, and then wipe them both dry.
Cleaning the drum
- If you have used starch or fabric sizing, wipe out the drum with a moist cloth.
- After wiping, leave the loading door (7) open to let moisture evaporate from the inside.
Cleaning the dispensing drawer
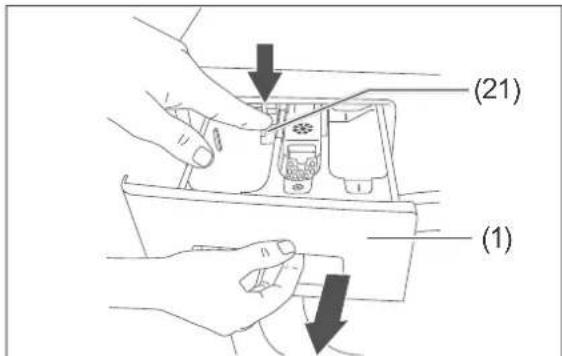
- Pull the dispensing drawer (1) out as far as possible.
text_image
(21) (1)- Press the release spot (21) and pull the dispensing drawer out completely.
natural_image
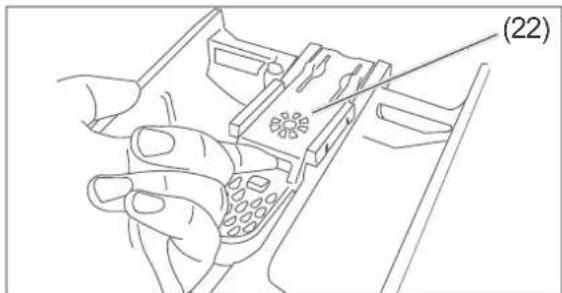
Line drawing of hands holding a mobile phone with a flower design, no text or symbols present- Remove the insert (22).
text_image
(23)-
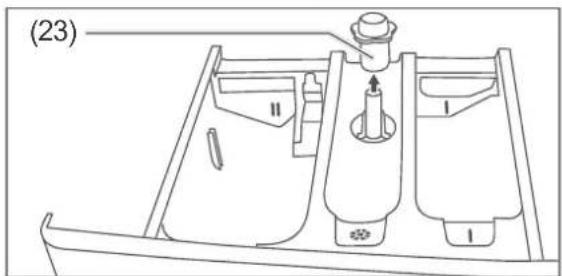
Remove the cap (23).
-
Rinse the dispensing drawer, the insert and the cap under running water.
- Remove any leftover detergent in the drawer runner and compartments with a small brush for dishes or bottles or a toothbrush.
text_image
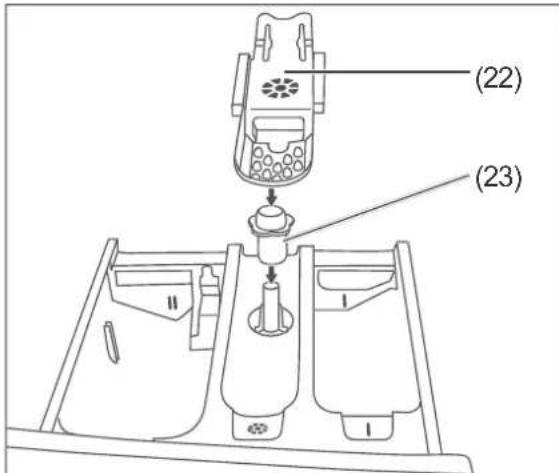
(22) (23)- Insert the cap (23) and insert (22) again correctly.
- Insert the dispensing drawer into the rinsing chamber and close it.
Cleaning the filter and replacing the gasket
! NOTICE
Risk of damage!
Improper handling of the appliance can lead to water damage or damage of the appliance.
■ Close the valve before cleaning the filter or replacing the gaskets.
- Check and clean filters and gaskets regularly.
- Replace defect fi Iters and gaskets immediately. Never operate the appliance without fi Iters and gaskets.
In the water inlet, the appliance contains filters that prevent foreign particles from penetrating the appliance.
Clean the filter every 2 months or if the appliance is not getting enough water despite the valve being open completely.
- Switch off the appliance.
- Close the valve.
- Unscrew the water inlet hose (a) from the valve.

text_image
(24) (25) (26)- Pull the filter (24) with gasket (25) out of the union nut (26), e.g. with tweezers or pliers.
- Rinse the filter and gasket under clear water and clean with a small, soft brush if necessary.
- Replace a faulty gasket including filter.
- Insert the filter and gasket again.
- Screw the water inlet hose onto the valve again.
- Unscrew the water inlet hose from the appliance.
text_image
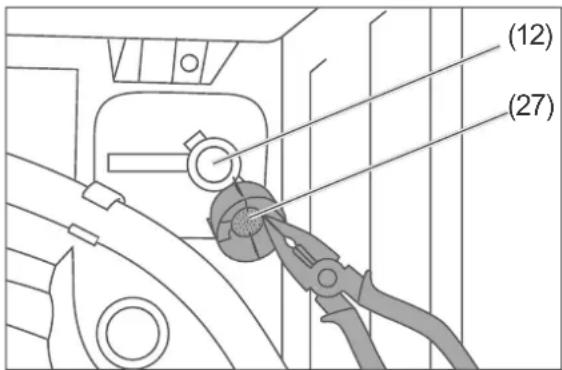
(12) (27)- Pull the gasket (27) out of the water inlet hose connection (12), e.g. with tweezers or pliers.
- Rinse the gasket under clear water and clean with a small, soft brush.
-
Insert the gasket again.
-
Screw the water inlet hose onto the connection again.
- Open the valve to check whether the water inlet hose and connections are sealed.
Cleaning the lint trap/ Emergency draining
CAUTION!
Risk of scalding!
Improper handling of the appliance can lead to scalding caused by hot suds.
■ Leave the suds to cool before draining them.
NOTICE
Risk of damage!
Improper handling of the appliance may result in damage.
■ Be aware that substantial amounts of water leak out during emergency draining.
The lint trap stops threads and other foreign bodies ending up in the pump with the suds. Clean the lint trap every two months.
- Switch off the appliance.
- Close the valve tightly.
text_image
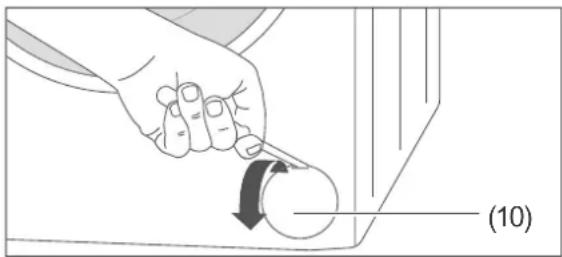
(10)- Open the shutter of the lint trap (10) with a flat object.
- Place a flat container underneath the lint trap.
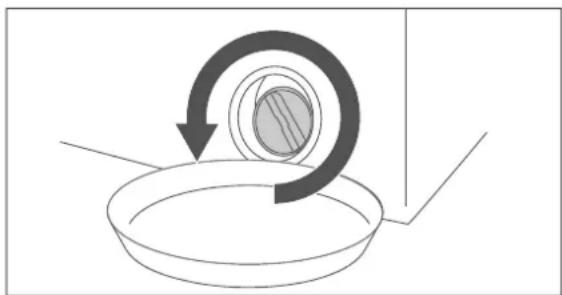
natural_image
Diagram showing a circular arrow rotating around a ring with a shaded inner circle, no text or symbols present- Only open the lint trap anticlockwise to the point where water flows out. In the meantime, empty the collecting vessel.
- If no more water flows out, open the lint trap completely and take it out.
- Remove the foreign body and clean the lint trap thoroughly under running water.
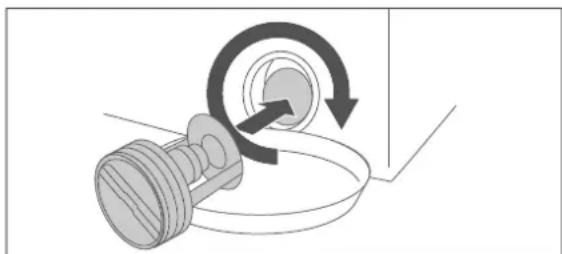
natural_image
Diagram of a mechanical component with a rotating shaft and curved arrow indicating rotation (no text or symbols)- Insert the lint trap again. Make sure that the handle is in a horizontal position.
- Turn the lint trap clockwise and tighten it as far as it will go.
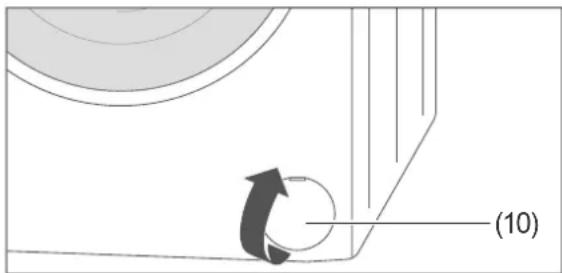
text_image
(10)- Insert the shutter (10) in such a way that the opening is pointing upwards and press it down firmly.
Emptying residual water
CAUTION!
Risk of injury!
Improper handling of the appliance may result in injury.
■ The appliance is very heavy. Never move the appliance alone, but rather always with at least two persons.
Sometimes – for example, if the appliance is in a room that isn't protected by frost – you should empty the residual water to prevent the cables in the appliance from freezing and causing damage.
Requirement: There is a second person to help you.
- Proceed as described in section "Cleaning the lint trap/Emergency draining". Only carry out steps 1-5 at first.
- Then tilt the appliance forwards slightly with the help of a second person and allow any remaining water to drain out of the appliance.
- After this, turn the lint trap clockwise again, tightening it as far as it will go, and insert the shutter (10) again.
Start-up

Possible residual water or drops in the machine are merely a sign that the appliance was tested for functionality during production.
Transport

CAUTION!
Risk of injury!
Improper handling of the appliance may result in injury.
■ The appliance is very heavy. Never transport or carry it alone, rather always with at least two persons.

NOTICE
Risk of damage!
Improper handling of the appliance may result in damage.
■ If a trolley is used to move the appliance, always lift the appliance as shown on the packaging.
■ Always transport the appliance vertically.
■ Only transport the appliance with built-in transport safety devices.
- Check whether the paths of transport and the installation location are suitable for the weight of the appliance. If in doubt, ask your landlord or property management.
Removing/installing transport safety devices

WARNING!
Risk of electric shock!
The appliance operates with dangerous voltages. Touching live parts may result in severe injury or death.
■ Make sure the appliance is not connected to the power supply whilst the transport safety devices are being removed or installed.

NOTICE
Risk of damage!
Improper installation and set-up of the appliance may result in damage.
■ Remove all transport safety devices prior to installation.
Removing the transport safety devices
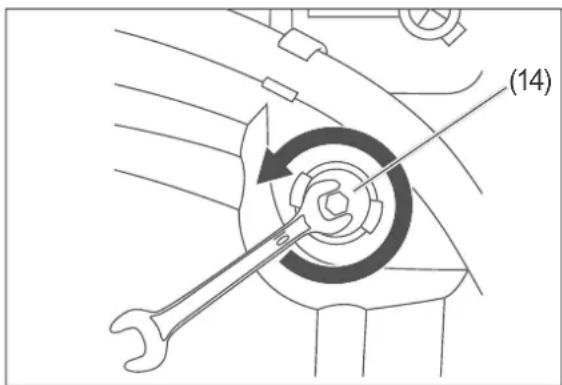
text_image
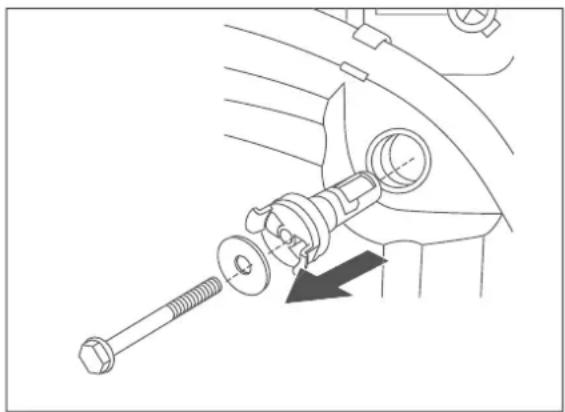
(14)- Loosen the screws of the transport safety devices (14) with a 10-mm spanner.
natural_image
Mechanical assembly diagram showing a bolt inserted into a housing with a magnified inset view (no text or labels)- Remove the transport safety devices.
text_image
(b)- Close off the transport safety holes with the enclosed covers (b).
- Keep the transport safety devices in a safe place for future journeys.
Installing the transport safety devices
Re-install the transport safety devices (14) for every journey, e.g. when moving home or returning the appliance.
- To install the transport safety devices, follow the steps in section “Removing the transport safety devices” on page GB-27 backwards.
Installing the appliance
When installing the appliance, make sure that
– the place of installation is protected from frost.
– a water connection as well as a bath or sink is available.
– even after installing the appliance, the mains plug (8) is easily accessible.
– the ground is secure, even, clean and dry.
– there is no rug or carpet under the appliance, as the appliance will otherwise not be ventilated well enough and can overheat.
- for rugs, carpet, parquet or wooden floorboards, you place a stable wooden plate measuring at least 60 × 60 cm underneath the appliance.
- when positioning on a wooden plate or base, these are equipped with indentations for the screw-on feet (11) so that the appliance does not fall over when spinning.
- you lay a smooth tiled floor or rubber mat under the screw-on feet.
Aligning the appliance
text_image
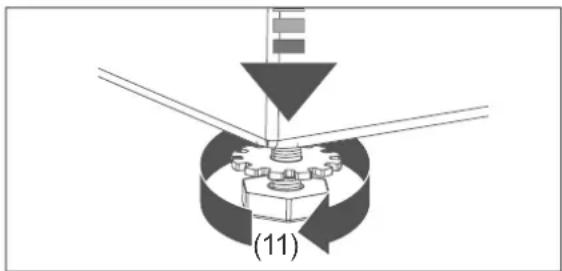
(11)- Loosen the lock nut of one of the screw-on feet (11) underneath the appliance.
- Screw the foot in or out as far as it is sensible. To adjust the foot,
-
twist it clockwise to screw it out.
– twist it anti-clockwise to screw it in. -
Repeat this for the other screw-on feet until the appliance is standing completely horizontally and securely.
-
Twist the lock nuts of all screw-on feet upwards to the underside of the appliance and tighten the lock nut against the underside of the appliance.
Creating a water drain

CAUTION!
Risk of scalding!
- Fix the water outlet hose to the sink or bath to prevent it from slipping due to the recoil caused by pumping.
■ For drains, make sure that the cross section of the discharge pipe is great enough that the sink cannot overflow.

NOTICE
Risk of damage!
Improper handling of the appliance can lead to water damage.
■ Only use the water outlet hose provided.
- Do not extend the water outlet hose or replace it with another hose.
■ Make sure that the water outlet hose is not bent or twisted.
■ Make sure that the curvature of the water outlet hose is at least 60 cm (max. 100 cm) above the ground to ensure the water drain functions perfectly.
■ Ensure that the water outlet hose is in the retaining clips on the back of the appliance so that the curvature always remains above the waterline.
■ Make sure that the end of the hose is not submerged in the pumped water.
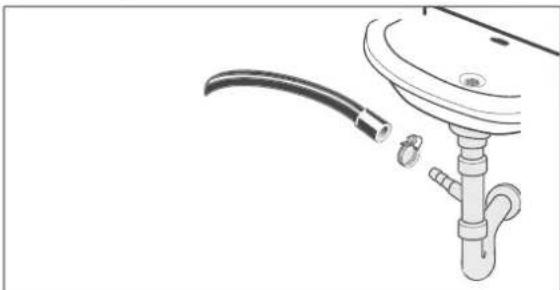
The water outlet hose (13) can be fixed in two ways:
a. Fixing with a hose holder for self-installation.
b. Fixing on the outlet manifold of a washbasin by a specialist.
a. Fixing with a hose holder
natural_image
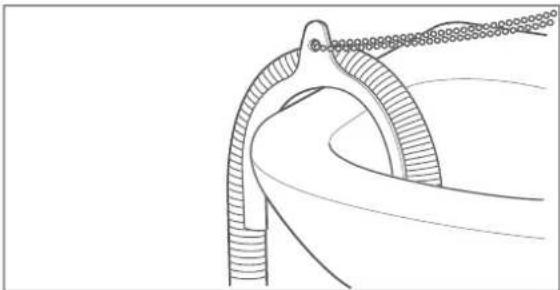
Line drawing of a curved pipe or tube with a looped end, no text or symbols present- Put the end of the water outlet hose (13) over a hose holder (not included in delivery) and hang it over the edge of a bath. You can find a hose holder in a specialist shop or DIY store.
b. Fixing on the outlet manifold
natural_image
Diagram of a kitchen sink with a pipe fitting and valve (no text or symbols)Have the fixing done by a specialist.
The water outlet hose (13) is mounted to a special device, which can be found on the outlet manifold of a washbasin.

In an unused outlet manifold, there is a washer so that no water can run out.
This washer must be replaced by a seal ring before connecting the outlet hose.
Creating a water inlet
NOTICE
Risk of damage!
Improper handling of the appliance may result in damage.
■ Only use the hose set delivered with the appliance to connect to the water supply. Never use old hose sets.
■ Do not connect the appliance to the hot water supply.
- Only connect the appliance to a water supply with an inlet water pressure between 0.1 Mpa and 1.0 Mpa (1.0 to 10.0 bar). For higher water pressure, a pressure regulator needs to be installed. Enquire about the water pressure with the waterworks.
■ Do not use a pipe wrench to screw down the union nuts on the valve. This can damage the union nuts.
For the water supply, you will need a valve with a 3/4 inch screw connection.
text_image
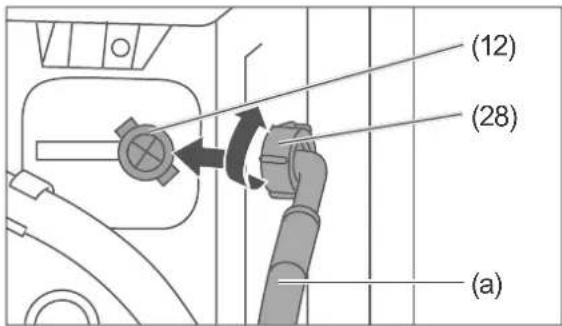
(12) (28) (a)- Screw down the water inlet hose (a) by hand onto the connection (12). Then turn the union nut (28) clockwise.
text_image
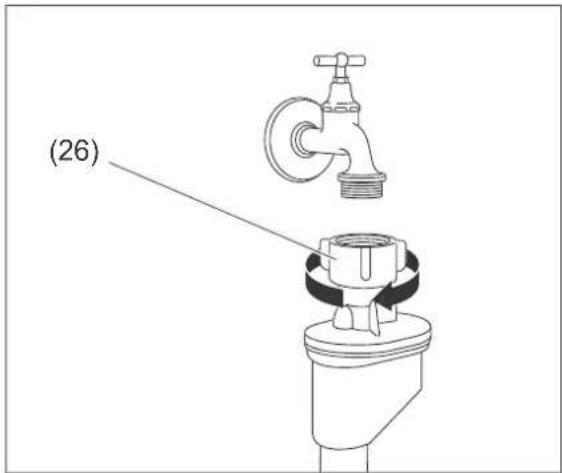
(26)- Secure the end by hand on the valve with the aqua-stop device on the water inlet hose. Then turn the union nut (26) clockwise.
- Open the valve completely and check whether the connections on the appliance and on the valve are sealed.
- Then close the valve again.
Creating an electrical connection

WARNING!
Risk of electric shock!
The appliance operates with dangerous voltages. Touching live parts may result in severe injury or death.
- Do not put into operation if the mains cord is faulty or the appliance displays other visible damage.
- Do not operate the appliance with an external timer or a separate remote control system.

CAUTION!
Fire hazard!
Improper handling of the appliance can lead to fire and property damage.
- Only connect the appliance to a properly installed and earthed electric socket. Do not connect to a multi-socket extension cable or a multi-socket plug.
- Plug the mains plug (8) into a properly installed and earthed electric socket that has been sufficiently secured (220-240 V, 50 Hz, 10 A).
Carry out a test run
Requirements
- You have read the chapter ‘Safety’ from page GB-5 and understand all the safety instructions.
The appliance requires an initial wash cycle without laundry, but with detergent. The aim of this is to rinse out possible residues from production.
- Check whether the water inlet hose (a) and water outlet hose (13) are sitting securely.
- Open the valve completely.
- Make sure that the drum is empty.
- Push the loading door (7) closed tightly.
text_image
(c) (1)-
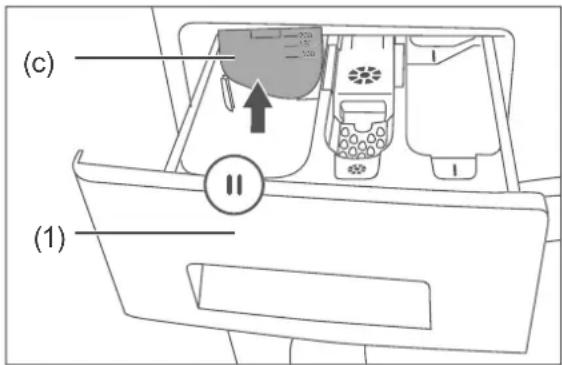
If the partition (c) is in the left dispensing compartment II of the dispensing drawer (1), take it out. Keep it safe as it is needed when liquid detergent is used.
-
Dispense a maximum of 25 ml of compact detergent into dispensing drawer II.
text_image
Duration of cycle (min.) Wash step Start/Pause Signal 165 Functions p. 60°C 40°C SpinTemp Start time preselection Anti- rease Start Pause (4)- Set the cycle selector to the cycle '山Cotton'.
The display shows the cycle duration. The wash step signal and the Start/Pause button flash.
- Press the 'Start/Pause' (4) sensor button.
The wash cycle begins. The display shows the remaining cycle time as well as the progress of the wash cycle: Wash, rinse, spin. After the cycle has finished, 'End' will appear on the display.
- Wait until the locking time is over and the loading door (7) is released with a click.
- Open the loading door and pull the dispensing drawer out slightly so that the washing machine can dry off inside.
- Turn the cycle selector back to the 'Off' position to switch off the appliance.
- Disconnect the mains plug from the socket.
- Close the valve.
Start-up is now finished.
Troubleshooting table
Malfunctions can occur in all electrical appliances. This does not necessarily mean there is a defect in the appliance. For this reason, please check the tables to see if you can correct the malfunction.

WARNING!
Risk of electric shock!
- Never try to repair a defective or suspected defective appliance yourself. You can put your own and future users' lives in danger. Only authorised specialists are allowed to carry out this repair work.
| Wash result is not satisfactory | ||
| Problem Possible causes | Solutions, tips | |
| Wash result is dissatisfactory/poor. | Not enough detergent used. | Use more detergent. |
| Water is too hard. | Use the amount of detergent recommended by the manufacturer for the water hardness in your area. | |
| Too much laundry in the drum. | Only load the drum with the maximum amount of laundry intended. | |
| Selected cycle is not right for the level of dirtiness of the laundry. | Wash laundry for longer; select another wash cycle (see page GB-14). | |
| Water temperature too low. | Wash laundry at a higher water temperature; select another wash cycle (see page GB-14). | |
| Stains weren't pre-treated. | Treat stains with ox-gall soap or stain remover if necessary. | |
| Too much foam is created during the wash cycle. | Too much detergent used. | Next time, use less detergent. |
| Detergent is not suitable for washing machines. | Use detergent suitable for washing machines. | |
| Fabric softener/fabric-care product was not dispensed. | Insert in fabric softener/starch compartment was not inserted properly or is clogged. | Remove insert and insert again properly; clean if necessary (see page GB-24). |
| Laundry is discoloured. | Laundry was washed at a temperature that was too hot. | Bleach laundry carefully if necessary. |
| Coloured pieces of laundry were added to the wash. | Sort through laundry before washing (see page GB-11). | |
| Laundry has mould stains. | Damp and/or worn laundry was kept in the machine. | Remove mould stains carefully before the next wash, preferably with a special cleaner. Ask for advice at a chemist's. |
| Detergent residue on laundry. | Too much detergent used. Wash laundry with the correct dosage of detergent. | |
| Colours of the laundry have faded. | Detergent contains bleaching agent. | Use colour freshener if necessary (available at chemist's). In future, use detergent without bleaching agent. |
| Stain remover or similar was used. | ||
| Malfunction | ||
| Problem Possible causes | Solutions, tips | |
| Appliance does not work. | Mains plug is not sitting properly in the socket or is not plugged in. | Plug the mains plug into the socket properly. |
| Socket has no voltage. Check fuse; | switch on if necessary. | |
| Fuse is not intact. Replace fuse. | ||
| Wash cycle does not start. | No wash cycle set. Set wash cycle. | |
| Door is not closed properly. Close d | door properly.(A ‘click’ must be heard). | |
| Cycle was not started. | Press ‘Start/Pause’ (4). | |
| Appliance is not receiving water. | Valve is closed. Open valve. | |
| Door is not closed properly. Close d | door properly. | |
| Inlet hose is bent. Check inlet hose; | dismantle if necessary and re-align. | |
| Inlet hose is clogged. Clean filter on | the inlet hose (see page GB-24). | |
| Filter on inlet is clogged. Clean filter | on inlet (see page GB-24). | |
| Water is not being pumped. | Outlet hose is clogged or bent. Check outlet hose; | dismantle if necessary and re-align. |
| Water is draining even though the appliance is not pumping. | Outlet hose is too low. | Place outlet hose higher. |
| Water is leaking.(Appliance is leaking). | Inlet or outlet hose is not screwed on tightly enough. | Screw down inlet or outlet hose down tighter. |
| Lint trap not closed properly. Close | lint trap properly (see page GB-25). | |
| Appliance is unsteady or vibrating strongly. | Transport security device(s) wasn't/weren't removed. | Remove the transport safety device(s) (see page GB-27). |
| Appliance was not installed or aligned properly. | Install or align appliance properly. | |
| The laundry in the drum is heavy or distributed unevenly. | Suspend the wash cycle and re-start it to distribute the laundry more evenly. | |
| Spin cycle is not running or is slow. | The imbalance correction system for imbalanced drum loads is running. | No error. Once the laundry is distributed evenly, the spin cycle starts automatically. |
| During the wash cycle, no water can be seen in the drum through the glass panel. | This is not an error. The water is at the bottom of the drum. | |
| Door won't open after the wash cycle has finished. | This is not an error. The opening mechanism contains a safety device that keeps the door closed another 2 minutes or so after the wash cycle has finished. | Turn the cycle selector back to the 'Off' position to switch off the appliance. Wait a few minutes and then open the door. |
| The cycle duration displayed is different to the actual duration of the cycle. | This is not an error. The cycle duration is always adapted to the circumstances and re-calculated. | |
| The display shows an error code | ||
| Problem | Possible causes Solutions, tips | |
| E01 | Loading door is not closed properly. Close loading door properly.If the problem persists, please contact our service centre (see page GB-37). | |
| E02 | Water level in the appliance is lower than the heating coil.It is possible that the water pressure to which the washing machine is connected is too low, or the water valve is closed. | If necessary, open the valve completely. If the problem persists, please contact our service centre (see page GB-37). |
| E03 | Pump is faulty, lint trap is clogged or electrical connection of pump is defective. | Clean lint trap (see page GB-25). If the problem persists, please contact our service centre (see page GB-37). |
| E04 | Too much water in the appliance. Overflow protection system was activated;the appliance is automatically pumping water away. After pumping, switch off the appliance and pull out the mains plug from the socket. Shut the valve and please contact our service centre (see page GB-37). | |
Service
In order for us to help you quickly, please tell us:
| Name of appliance Model Order number | ||
| hanseatic Washing machine | HWM 614 A3IT 257757 | |
| HWM 714 A3IT 862010 | ||
| HWM 814 A3IT 493707 | ||
| HWM 914 A3IT 508039 | ||
Advice, order and complaint
Please contact your mail order company's customer service centre if
– the delivery is incomplete,
– the appliance is damaged during transport,
– you have questions about your appliance,
- a problem cannot be fixed using the troubleshooting table.
Repairs, replacement parts and accessories
Customers in Germany
– Please contact our technical service: Tel. 0 18 06 18 05 00 (from landline 20 cents/call, mobile max. 60 cents/call)
Customers in Austria
- Please contact your mail order company's customer service centre or product advice centre.
Please note:
You are responsible for the condition of the appliance and its proper use in the household. If you call out for customer service due to an operating error, you will incur charges, even during the guarantee/warranty period. Damage resulting from non-compliance with this manual unfortunately cannot be recognised.
Technical specifications
Data sheet for household washing machines according to Regulation (EU) No. 1061/2010 and 1015/2010.
| Brand | hanseatic | |||
| Type/description HWM614A3IT | HWM714A3IT | HWM814A3IT | HWM914A3IT | |
| Order number 257757 862010 | 493707 508039 | |||
| Capacity 6 kg 7 kg 8 kg 9 kg | ||||
| Energy efficiency class 1) 6) | A+++ | |||
| Annual energy consumption 2) 6) | 121 kWh 135 | kWh 155 kWh | 168 kWh | |
| Energy consumption for cotton at 60 °C for full load 6) | 0.70 kWh 0.7 | 6 kWh 1.01 kWh | 1.15 kWh | |
| Energy consumption for cotton at 60 °C for partial load 6) | 0.40 kWh 0.4 | 7 kWh 0.44 kWh | 0.44 kWh | |
| Energy consumption for cotton at 40 °C for partial load 6) | 0.37 kWh 0.4 | 3 kWh 0.41 kWh | 0.41 kWh | |
| Weighted power consumption in off mode 6) | 0.5 W | |||
| Weighted power consumption in on mode 6) | 1.0 W | |||
| Weighted annual consumption 3) 6) | 9900 litres 99 | 00 litres 10224 | litres 12100 | litres |
| Spin efficiency class 4) 6) | B | |||
| Maximum spin speed 6) | 1400 rpm | |||
| Residual moisture 6) | 53% | |||
| Cycles to which the information on the label and in the data sheet refer 5) | Cotton 40 °C and 60 °C | |||
| Cycle duration for cotton at 60 °C for full load 6) | 240 | 240 | 215 | 240 |
| Cycle duration for cotton at 60 °C for partial load 6) | 200 | 200 | 175 | 185 |
| Cycle duration for cotton at 40 °C for partial load 6) | 195 | 195 | 170 | 180 |
| Noise emission during wash 7) | 50 dB(A) re 1 pW | |||
| Noise emission during spin 7) | 74 dB(A) re 1 pW | |||
| Type of installation | Floor-mounted appliance | |||
| Height | 84.5 cm | |||
| Width | 59.7 cm | |||
| Depth (with connections) | 52.7 cm | 52.7 cm | 55.7 cm | 58.2 cm |
| Weight (empty) | 70.5 kg | 70.5 kg | 73.4 kg | 77 kg |
| Max. power consumption | 2200 W | |||
| Voltage / frequency | 220–240 V~ / 50 Hz | |||
| Fuse | 10 A | |||
| Water pressure (flow pressure) | 1.0 ... 10 bar = 0.1 ... 1.0 MPa | |||
Key to table on previous page:
^1) A +++ = very low energy demand to D = very high energy demand
^2) Based on 220 standard wash cycles for 60 °C and 40 °C cotton cycles with full and partial loads as well as consumption of operating modes with lower power consumption. The actual energy consumption depends on the type of usage of the appliance.
^3) Based on 220 standard wash cycles for 60 °C and 40 °C cotton cycles with full and partial loads. The actual water consumption depends on the type of usage of the appliance.
^4) A = very good spin performance to G = very bad spin performance
^5) These cycles are suitable for cleaning normal dirty cotton laundry and are the most efficient with regards to the combined energy and water consumption.
^6) Determined according to Regulation (EU) No. 1061/2010. The applied measurement methods comply with Standard EN 60456.
7) Determined according to Regulation (EU) No. 1061/2010. The applied measurement methods comply with Standard EN 60704-2-4.
The actual water temperature can differ to the specified cycle temperature.
Notice: The above mentioned values are measured according to standards under precisely defined operating conditions. The results can differ greatly depending on the amount and dirtiness of laundry, the water hardness and amount of detergent, etc.
The user manual is based on the standards and regulations in force in the European Union.
Environmental protection
Disposing of old electrical devices in an environmentally-friendly manner
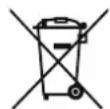
Electrical appliances contain harmful substances as well as valuable resources.
Every consumer is therefore required by law to dispose of old electrical appliances at an authorised collection or return point. They will thus be made available for environmentally-sound, resource-saving recycling.
You can dispose of old electrical appliances free of charge at your local recycling centre.
Please contact your dealer directly for more information about this topic.
Packaging

Our packaging is made of environmentally-friendly, recyclable materials:
– Outer packaging made of cardboard
- Moulded parts made of foamed, CFC-free polystyrene (PS)
– Films and bags made of polyethylene (PE)
– Tension bands made of polypropylene (PP)
– Saving energy also protects against excessive global warming. Your new appliance uses little energy due to its modern technology.
If you would like to dispose of the packaging, please dispose of it in an environmentally friendly way.