HWMT31014A - Washing machine Hanseatic - Free user manual and instructions
Find the device manual for free HWMT31014A Hanseatic in PDF.


| Type | Front-loading washing machine |
| Model | HWMT31014A |
| Dimensions (H × W × D) | 85.0 cm × 60.0 cm × 58.0 cm |
| Net weight | 74 kg |
| Rated capacity | 10 kg |
| Supply voltage / Frequency / Fuse | 220-240 V / 50 Hz / 10 A |
| Rated power | 2200 W |
| Maximum spin speed | 1400 rpm |
| Water pressure range | 0.05-1.0 MPa (0.5-10 bar) |
| Programs | Cotton, ECO 40-60, Coloured laundry, Wool, Allergy, Sports laundry, Down, Jeans/dark clothing, Short 60', Extra short 15', Hand/delicate wash, Rinse, Spin/drain |
| Key features | Auto dose liquid detergent & softener, steam assist, allergy function, pre-wash, extra rinse, eco & quick wash, start time pre-selection (1-23h), key lock (child lock), half-load detection |
| Safety features | AquaStop water inlet hose, child lock, door lock, overload protection, foam detection |
| Drum material | Stainless steel (not explicitly stated, but standard) |
| Display | Digital display with cycle info, temperature, spin speed, time remaining |
| Water connection | Cold water only, 3/4 inch thread |
| Water drainage | Max. height 100 cm, outlet hose included |
| Installation type | Freestanding, not built-in |
| Energy efficiency class | Not specified in manual |
| Annual energy consumption | Not specified |
| Annual water consumption | Not specified |
| Noise level (washing/spin) | Not specified |
| Maintenance | Regular cleaning of lint trap, drum, door seal, dispensing drawer; check inlet filters every 3 months |
| Spare parts availability | Minimum 10 years after last model placed on market |
Frequently Asked Questions - HWMT31014A Hanseatic
User questions about HWMT31014A Hanseatic
0 question about this device. Answer the ones you know or ask your own.
Ask a new question about this device
Download the instructions for your Washing machine in PDF format for free! Find your manual HWMT31014A - Hanseatic and take your electronic device back in hand. On this page are published all the documents necessary for the use of your device. HWMT31014A by Hanseatic.
USER MANUAL HWMT31014A Hanseatic
Transport ......DE-12
natural_image
Line drawing of a white front-loading washing machine with control panel and two separate components (no text or symbols)Waschmaschine mit
natural_image
Diagram of a device inside a box with a black arrow pointing to a component, labeled (21), showing internal structure without any text or symbols.natural_image
Diagram of a rope knot being inserted into a curved pipe (no text or labels)natural_image
Diagram of a kitchen sink with a pipe and valve, showing no text or symbolsnatural_image
Line drawing of a hand holding a circular tire with a wheel, labeled (30) at the bottom (no text or symbols on the diagram itself)natural_image
Mechanical assembly diagram showing a rotating component with a curved arrow indicating rotation (no text or symbols)natural_image
Simple line drawing of a door with a circular lid and a small inset showing a device (no text or symbols)User manual
Washing machine

Please read through the safety instructions and user manual carefully before using the appliance. Only in this way can all functions be used safely and reliably. Please also observe the national regulations in your country which are valid in addition to the regulations specified in this user manual. Keep all safety notices and instructions for future reference. Pass all safety notices and instructions on to the subsequent user of the product.
Table of contents
Explanation of terms/symbols ...... EN-4
Explanation of terms...... EN-4
Explanation of symbols...... EN-4
Safety EN-5
Intended use...... EN-5
Safety notices ...... EN-5
Delivery......EN-10
Package contents ......EN-10
Checking the delivery ......EN-10
Set-up, connection and initial start-up EN-11
Transport ......EN-11
Removing the transport safety devices....EN-11
Location for set-up...... EN-12
Aligning the appliance ......EN-12
Water connection...... EN-13
Electrical connections...... EN-14
Commissioning and test run ......EN-14
Appliance parts and control elements EN-16
Loading laundry and adding
detergent ......EN-17
Loading laundry ......EN-17
The dispensing drawer ......EN-17
Dispensing washing detergent/ fabric-care products...... EN-18
Program table...... EN-20
Standard cycles...... EN-22
Before getting started ......EN-22
Selecting the cycle...... EN-22
Starting the cycle ......EN-22
Interrupting and continuing the cycle....EN-22
Pause/Cancel running programme or adding laundry.... EN-23
Additional functions ......EN-24
Dosing of detergent ......EN-24
Fabric softener dosage ......EN-24
Water temperature...... EN-24
Spin speed...... EN-24
Start time pre-selection...... EN-25
Key lock (child lock) ......EN-25
Other additional features ......EN-26
Pre-wash......EN-26
Extra rinse......EN-26
Steam assist ....EN-26
Allergy function ......EN-26
Eco-laundering......EN-26
Quick wash ......EN-27
Washing tips ......EN-28
Preparing the laundry ......EN-28
The right washing load......EN-28
The right washing detergent ......EN-29
Fabric-care products...... EN-29
The right dosage...... EN-29
Environmentally friendly washing ....EN-29
Care and maintenance ......EN-30
Regular checks ......EN-30
Regular cleaning..... EN-30
Cleaning the appliance door ......EN-30
Cleaning the drum ......EN-31
Cleaning the dispensing drawer .....EN-31
Checking the water intake filter, cleaning and replacing the seals .....EN-31
Cleaning the lint trap...... EN-32
Emptying residual water ......EN-34
Troubleshooting table .....EN-35
Service......EN-38
Waste prevention, free return and disposal ....EN-39
Waste prevention...... EN-39

Please read through the safety instructions and user manual carefully before using the appliance. Only in this way can all functions be used safely and reliably. Please also observe the national regulations in your country which are valid in addition to the regulations specified in this user manual. Keep all safety notices and instructions for future reference. Pass all safety notices and instructions on to the subsequent user of the product.
Free return of old electrical
appliances......EN-39
Disposal...... EN-39
Packaging...... EN-40
Appendix ......EN-41
Product fiche concerning
Regulation (EU) No. 2019/2014 .....EN-41
Technical specifications...... EN-41
Explanation of terms/symbols
Explanation of terms
The following signal words can be found in this user manual:

WARNING
This symbol indicates a hazard with a medium level of risk which, if not avoided, could result in death or serious injury.

CAUTION
This symbol indicates a hazard with a low level of risk which, if not avoided, could result in minor or moderate injury.

NOTICE
This symbol warns against possible damage to property.
Explanation of symbols
The following symbols can be found in this user manual and/or on the appliance:

This symbol refers to useful additional information.

Protection class 1

The wool wash cycle of this washing machine has been approved by The Woolmark Company for washing machine-washable products made of wool, provided that the products are washed in accordance with the care instructions on the sew-in label and the manufacturer's instructions for this appliance.
WOOL CARE
Safety
Intended use
The appliance is designed for washing, rinsing and spinning laundry in normal household quantities.
It was designed exclusively for use in private households and is not designed for commercial use or multiple use (e.g. use by several parties in a block of flats).
The appliance is designed to hold up to a maximum of 10 kg of dry textiles.
The appliance is intended only for use with a water pressure of between 0.05 MPa and 1.0 MPa (0.5 to 10.0 bar).
An ideal ambient temperature of +5 °C to +25 °C must be maintained for optimal operation.
This appliance is not designed for use as a built-in appliance.
If the supply cord is damaged, it must be replaced by the manufacturer, its service agent or similarly qualified persons in order to avoid a hazard.
Persons who are unable to operate the appliance safely due to their physical, sensory or mental abilities or lack of knowledge must be supervised during use.
Do not make any technical changes to the appliance.
Use the appliance only as described in this user manual. Any other use is deemed improper and may result in damage to property or even personal injury. The manufacturer accepts no liability for damage caused by improper use.
Safety notices
In this chapter, you will find general safety notices which you must always observe for your own protection and that of third parties. Please also observe the warning notices in the individual chapters on operation, cleaning, etc.
Risks to children and certain groups of individuals
WARNING
Risk of suffocation for children!
Children can become entangled in the packaging film or swallow small parts and suffocate.
■ Do not allow children to play with the packaging film.
■ Prevent children from taking small parts out of the accessory bag and putting them in their mouths.
WARNING
Risk of injury for children and animals!
Children and pets could lock themselves in the drum when playing and so endangered their lives.
■ Ensure that children have no access to the appliance when unsupervised, regardless of whether the appliance is switched on or off.
■ Inspect the appliance before every operation.
CAUTION
Risk of injury!
Children and certain groups of people have a higher risk of being injured when handling the appliance.
■ This appliance can be used by children aged from 8 years and above and persons with reduced physical, sensory or mental capabilities or lack of experience and knowledge if they have been given supervision or instruction concerning use of the appliance in a safe way and understand the hazards involved.
■ Children shall not play with the appliance.
■ Children under the age of three should be kept away, unless they are under constant supervision.
■ Cleaning and user maintenance shall not be made by children without supervision.
Risks in handling household electrical appliances

WARNING
Risk of electric shock!
Touching live parts may result in severe injury or death.
■ Only use the appliance indoors. Do not use in wet rooms or in the rain.
■ Do not operate or continue to use the appliance, if it:
shows visible signs of damage (e.g. the mains cable is defective),
→ starts smoking or there is a smell of burning,
makes unfamiliar noises.
In such cases, remove the mains plug from the socket, or unscrew/isolate the fuse and contact our service department.
■ The appliance corresponds to protection class I and may be connected only to a socket with a protective conductor that has been properly installed. When connecting the appliance, make sure that the voltage is correct. You can find more detailed information about this on the type plate.
■ Since all poles of the appliance cannot be disconnected from the mains via an accessible disconnecting device, an all-pole disconnecting device in accordance with overvoltage category III must be connected within the house
installation with at least 3 mm contact clearance; consult a qualified professional if necessary.
■ The appliance must only be connected to the mains after completion of all installation and assembly work.
■ Do not put any objects in or through the housing openings, the dispensing drawer or the washing drum, and also make sure that children cannot insert any objects through them.
■ Never open the housing.
■ Mains cord / mains plug
→ Take care to prevent the risk of tripping when laying the mains cord.
Do not kink or pinch the mains cord or lay it over sharp edges.
Do not extend or modify the mains cord.
→ Keep the mains plug and cord away from naked flames and hot surfaces.
⇒ Never pull the mains plug out of the socket by the mains cord; always hold the mains plug itself.
⇒ Never touch the mains plug with wet hands.
⇒ Never immerse the mains cord or plug in water or any other liquids.
■ If the supply cord is damaged, it must be replaced by the manufacturer, its service agent or similarly qualified persons in order to avoid a hazard.
■ Independent or improper repairs made to the appliance may cause damage to property and personal injury; any liability and warranty claims will be forfeited. Never try to repair the appliance yourself.
■ Inspections and repairs to the appliance may only be carried out by authorised specialists. Please contact our Service department if necessary.
■ Only parts corresponding to the original appliance specifications may be used for repairs.
In the event of a fault as well as before extensive cleaning pull out the mains plug or isolate/unscrew the fuse.
■ Check the appliance regularly for damage.
■ Never clean the appliance with a high-pressure cleaner or steam cleaner.

WARNING
Fire hazard!
Improper handling of the appliance can lead to fire and damage to property.
■ Connect the appliance only to a properly installed and earthed electric socket. Do not connect to a multi-socket extension cable or a multi-socket plug.
■ Please note that the appliance is not intended to be operated by means of an external timer or a separate remote control system.
Risks in handling washing machines

WARNING
Risk of poisoning!
Washing detergents and fabric-care products can be harmful to health.
- Keep these products out of the reach of children and pets.

CAUTION
Risk of burns!
The appliance door and the drain hose may become hot during operation.
■ Do not touch the appliance door during operation.
■ Do not touch the water outlet hose when water is being pumped out.

CAUTION
Risk of scalding!
Improper handling of the appliance can lead to scalding caused by hot suds.
- Fix the water outlet hose properly to the drain or bath to prevent it from slipping due to the recoil caused by draining.
■ If the water outlet hose is fixed to the edge of the drain or bath, do not use the drain or bath whilst the appliance is in operation.
■ Do not touch the outlet hose during draining as the suds may be hot.
■ For drains make sure that the cross section of the discharge pipe is great enough that the drain cannot overflow.
■ Leave the suds to cool before draining them (e.g. during emergency draining).
■ Never open the appliance door with force.

CAUTION
Danger of explosion!
Improper handling of the appliance can lead to explosions.
- Do not store textiles in the appliance that have recently been treated with chemical cleaning agents – such as white spirit or stain remover. Such items should first be left to air and dry.
■ Do not store any combustible or easily flammable liquids near the appliance.

CAUTION
Fire hazard!
Insufficient ventilation can cause fires.
This applies, in particular, to appliances with ventilation openings in the bottom of the appliance.
■ Please note that the openings must not be obstructed by a carpet.
■ Do not close off air vents in the appliance housing.

CAUTION
Risk of injury!
The appliance is heavy and bulky. Improper handling of the appliance may result in injury.
■ When transporting, use a transport cart and call on the help of another person.
■ Remove all obstacles on the transport route and from the installation location, e.g. open doors and clear away objects lying on the floor.
■ Do not use the opened appliance door as a step, seat, or support. Make sure that children and pets do not stand or sit on the open appliance door.

NOTICE
Risk of damage to property!
Improper transport and installation may result in damage to the appliance.
■ If a trolley is used to move the appliance, the appliance must be lifted as shown on the packaging. Always transport the appliance vertically.
■ Do not use any sharp or pointed objects when unpacking the appliance.
■ Do not use the appliance door or the dispensing drawer to pull or lift the appliance.
■ Remove all packaging material before first use.
■ Make sure the appliance is not connected to the power supply whilst the transport safety devices are being removed or installed.
■ Do not stand the appliance on rugs or carpets. Otherwise, it may not be able to properly ventilate, which can result in overheating and damage to it.
■ For parquet or wooden flooring, be sure to place a sturdy wooden board of at least 60 × 60 cm under the appliance.
■ When positioning on a wooden plate or base, these must be equipped with indentations for the screw-on feet so that the appliance does not slip off when spinning.
■ Do not place the appliance on top of other appliances and do not use it as a base for other appliances (e.g. for dryers).
■ Do not sit or stand on the appliance.

NOTICE
Risk of damage to property!
Improper handling of the appliance can lead to water damage.
■ Do not leave the appliance unsupervised for long periods of time while the tap is open. When draining as a result of leakiness, substantial amounts of water may leak out.
■ CAUTION: Do not connect to the hot water supply.
■ Only connect the appliance to a water supply with an inlet water pressure between 0.05 Mpa and 1.0 Mpa (0.5 to 10.0 bar). For higher water pressure, a pressure regulator needs to be installed. Enquire about the water pressure with the local waterworks.
■ Close the water inlet tap after every use.
■ Close the water inlet tap before cleaning the water inlet filter.
■ Only use the hose set delivered with the appliance to connect to the water supply. Do not use old hose sets.
■ Do not extend the water outlet hose or replace it with another hose.
■ Make sure that the water outlet hose is not kinked or twisted.
■ Be aware that substantial amounts of water may leak out during emergency draining.
■ Ensure that the water drain does not exceed the maximum height (see chapter "Intended use").
■ Ensure that the water outlet hose is in the retaining clips on the back of the appliance so that the curvature always remains above the waterline.
■ Do not submerge the end of the hose in the pumped out water.
- Drain away the leftover water if there is a risk of frost to avoid damage to the appliance.
! NOTICE
Risk of damage to property!
Improper filling of the appliance can lead to damage.
■ Make sure that there are no foreign objects in the pockets of garments in the laundry, e.g. needles, nails, coins, matches, staples, clips, etc.
■ Only use dyes that are suitable for washing machines. Do not use decolourisers.
■ Never open the dispensing drawer when the machine is running.
■ Never fill more than the intended quantity of textiles at once (see chapter "Intended use").
■ Never try to open the appliance door with force whilst a cycle is in progress or once a cycle has ended. Only open the appliance door once it has been released automatically.
!NOTICE
Risk of damage to property!
Improper cleaning of the appliance can cause damage.
■ Never use harsh, granular, soda, acid, solvent-based or abrasive cleaners.
They can damage the surfaces or make the rubber sleeve brittle and fragile. All-purpose cleaners with a neutral pH are recommended.
■ Do not use pointed, sharp or angular objects for cleaning the rubber sleeve. They can make the rubber sleeve leaky.
■ Check and clean filters and gaskets regularly.
- Replace defect filters and gaskets immediately. Never operate the appliance without filters and gaskets or if the filters and gaskets are defective.
■ Never spray the appliance with a water jet or a high-pressure cleaner.
Delivery
Package contents
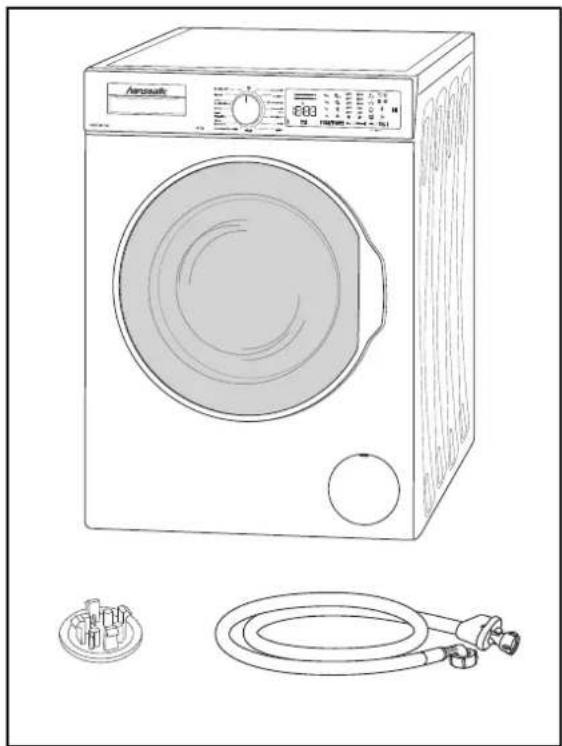
natural_image
Line drawing of a washing machine with control panel and two hoses (no text or symbols)Washing machine with
1× Water inlet hose with AquaStop
4× Cover for transport safety holes
1× User manual
1× Warranty document
Checking the delivery
- Unpack the appliance.
- Remove all parts of the packaging, plastic profiles, tape and foam padding. Possible residual water or drops in the appliance are merely a sign that it was tested for functionality during production.
- Check that the delivery is complete.
- Check whether the appliance was damaged during transit.
- If the delivery is incomplete or the appliance has been damaged during transport, please contact our Service department (see chapter "Service").
WARNING
Risk of electric shock!
Touching live parts may result in severe injury or death.
■ Never use a damaged appliance.
Set-up, connection and initial start-up
Transport

CAUTION
Risk of injury!
The appliance is heavy and bulky. Improper handling of the appliance may result in injury.
■ When transporting, use a transport cart and call on the help of another person.

NOTICE
Risk of damage to property!
Improper transport and installation may result in damage to the appliance.
If a trolley is used to move the appliance, the appliance must be lifted as shown on the packaging. Always transport the appliance vertically and with the built-in transport safety device.
- Check whether the paths of transport and the installation location are suitable for the weight of the appliance. If in doubt, ask your landlord or property management.
Removing the transport safety devices

WARNING
Risk of electric shock!
Touching live parts may result in severe injury or even death.
■ Make sure the appliance is not connected to the power supply whilst the transport safety devices are being removed or installed.
Four transport safety devices (18) are located on the rear side of the appliance.
These must be removed before commissioning.
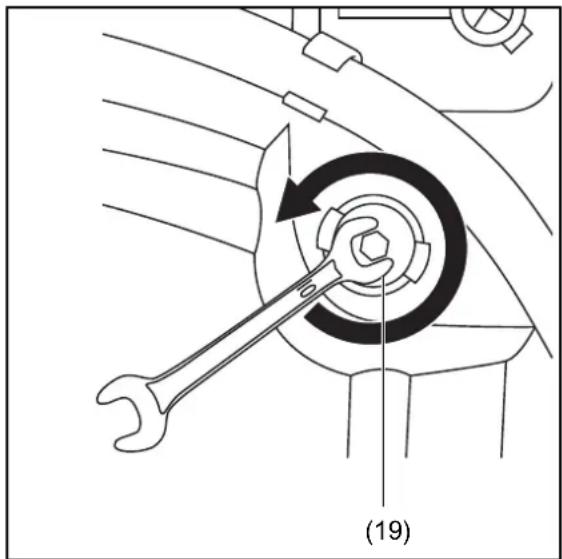
- Using a 10 mm-wrench, loosen the screws of the transport safety devices (19).
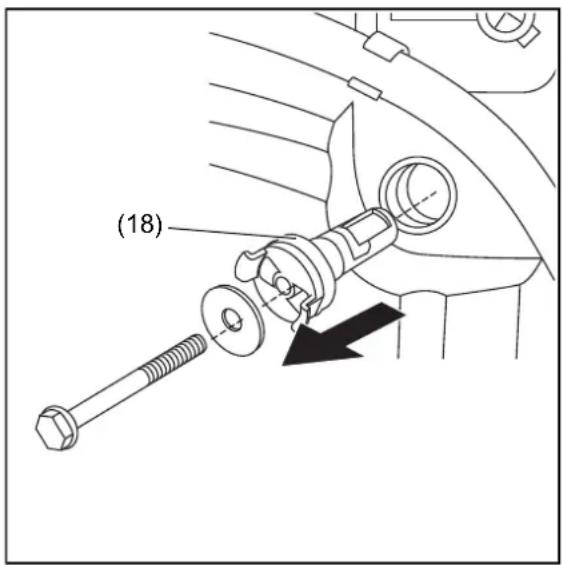
- Pull out the transport safety devices (18).
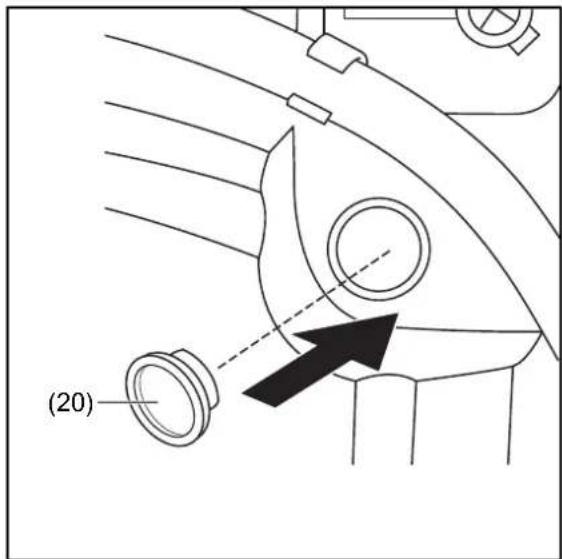
-
Close the openings with the enclosed covers (20).
-
Keep the transport safety devices in a safe place. Reinstall the transport safety devices every time the appliance is moved – when moving homes or returning the appliance!
natural_image
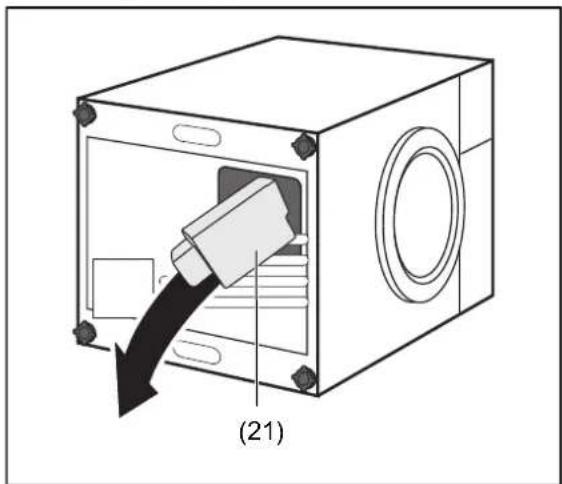
Diagram of a device inside a box with a black arrow indicating direction, labeled (21), showing internal components without any text or symbols.- Gently tip the unit to the side and make sure the styrofoam protection (21) is also removed. If it is still located in the recess in the bottom of the appliance, remove it.
Location for set-up
- Place the appliance in a frost-proof, well-ventilated room.
- Place the appliance far away from heaters that burn oil or coal.
- Set up the appliance in a place where there is a bathtub or sink.
- Set up the appliance so that the mains plug is easily accessible, even after the appliance has been set up.
- Set up the appliance on a firm, flat, clean, and dry surface.
- Do not place the appliance on a carpet or rug. The appliance will then not be sufficiently ventilated, and may overheat.
- Place a sturdy wooden panel (at least 60 × 60 cm, 3 cm thick), under the appliance if you are installing it on parquet or a wooden beam floor.
– Rubber mats are not suitable and must not be used.
- Position the appliance so that it is at least 2 cm away from side walls and the rear wall.
- The appliance feet must not be removed.
- When placing it on a base or other elevation, appropriate measures must be taken to protect the appliance from falling. These measures must not damage the appliance.
Aligning the appliance
-
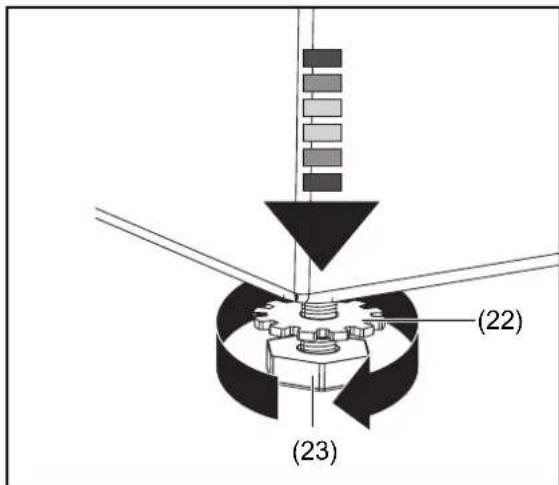
Loosen the lock nut (22) of a screw-on foot (23) on the bottom of the appliance.
-
Using your hand, screw the foot in or out as far as necessary.
- To unscrew the screw foot, turn anti-clockwise;
- To screw in the screw foot, turn clockwise.
- Repeat this for the other screw-on feet until the appliance is standing completely horizontally and securely.
- Twist the lock nuts of all screw-on feet upwards to the underside of the machine and tighten the lock nut against the underside of the machine.
Water connection
Establishing drainage for water

WARNING
Risk of scalding!
Improper handling of the appliance can lead to scalding caused by hot suds.
■ Fix the hose to the sink or bath to prevent it from slipping due to the recoil caused by pumping.
■ For drains, make sure that the cross section of the discharge pipe is great enough that the drain cannot overflow.

NOTICE
Risk of damage to property!
Improper handling of the appliance can lead to water damage.
■ Use only the water outlet hose provided.
■ Do not extend the water outlet hose or replace it with another hose.
■ The water outlet hose must not get bent or twisted.
■ The curvature of the water outlet hose must be at least between 60 cm and 100 cm above the ground to ensure the water drain functions perfectly.
■ The water outlet hose must be in the retaining clips on the back of the appliance so that the bend on the hose always remains above the waterline inside the appliance. Do not immerse the end of the hose in the pumped water.
The water outlet hose (17) can be fastened in 2 ways:
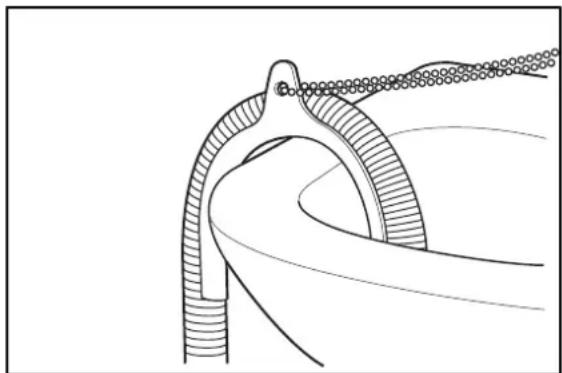
- Attaching with hose holder over the edge of a bathtub or washbasin
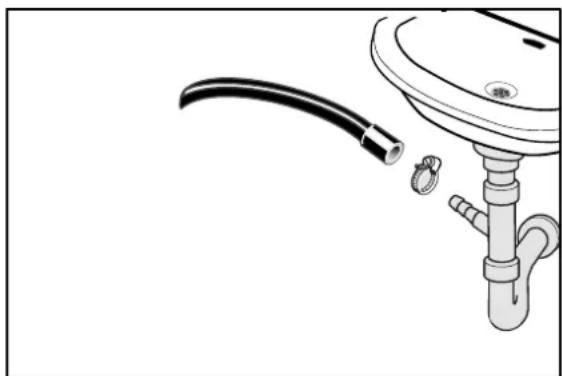
- Attaching the discharge manifold to a washbasin.
Attaching with a hose holder
natural_image
Diagram of a rope knot being inserted into a curved pipe (no text or labels)- Put the end of the water outlet hose (17) over a hose holder and hang it over the edge of a bath or a washbasin.
You can find a hose holder in a specialist shop or DIY store.
Attaching the discharge manifold to a washbasin
natural_image
Diagram of a pipe outlet with a hose and fittings, showing no text or symbols- Attach the water outlet hose (17) to a special fixture located at the outlet bend of a sink. In doing so the lock on the siphon must be removed.
Have this fixed by a specialist!
Establishing the water supply

NOTICE
Risk of damage to property!
Improper handling of the appliance may result in damage.
■ Only use the hose set delivered with the appliance to connect to the water supply. Do not use old hoses.
■ CAUTION: Do not connect to the hot water supply.
■ Only connect the appliance to a water supply with an inlet water pressure between 0.05 MPa and 1.0 MPa (0.5 to 10.0 bar). For higher water pressure, a pressure regulator needs to be arranged. Enquire about the water pressure with the water authority.
■ Do not use a pipe wrench to screw down the union nuts on the valve. This can damage the union nuts.
For the water supply, you will need a valve with a 3/4 inch screw connection.
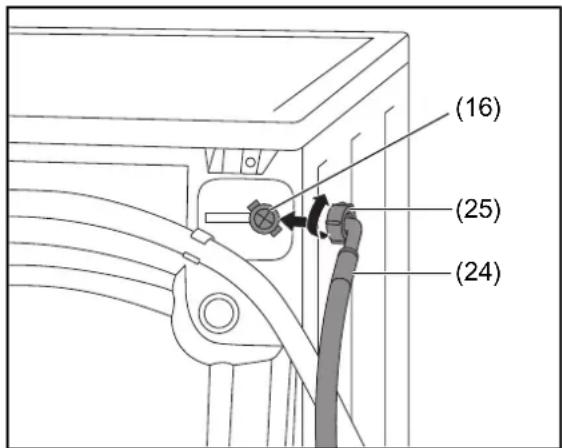
- Screw the enclosed water inlet hose (24) firmly to the connection (16). To do this, turn the union nut (25) clockwise.
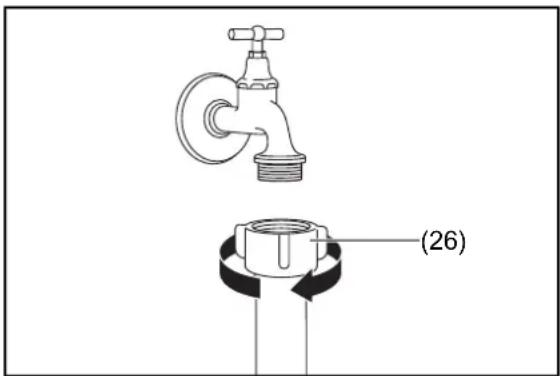
- Secure the other end on the water inlet hose to the tap by hand. To do this, turn the union nut (26) clockwise.
- Open the valve completely and check whether the connections on the appliance and on the valve are sealed.
- Then close the tap again.
Electrical connections

WARNING
Risk of electric shock!
Touching live parts may result in severe injury or death.
■ Do not put into operation if the mains cord is faulty or the appliance displays other visible damage.
■ Never connect the appliance via a multiple socket.
- Plug the mains plug into a properly installed and earthed electric socket that has been sufficiently secured (220-240 V, 50 Hz, 10 A).
Commissioning and test run
The appliance requires an initial wash cycle without laundry, but with detergent. The aim of this is to rinse out possible residues from production.
- Fill the liquid detergent compartment (27) with a maximum of 25 ml of compact detergent.
- Make sure that the drum is empty.
-
Press the appliance door (13) firmly closed.
-
Proceed as described in the section "Standard cycles", using the "Cotton" programme.
First use is completed once the cycle has finished.
Appliance parts and control elements
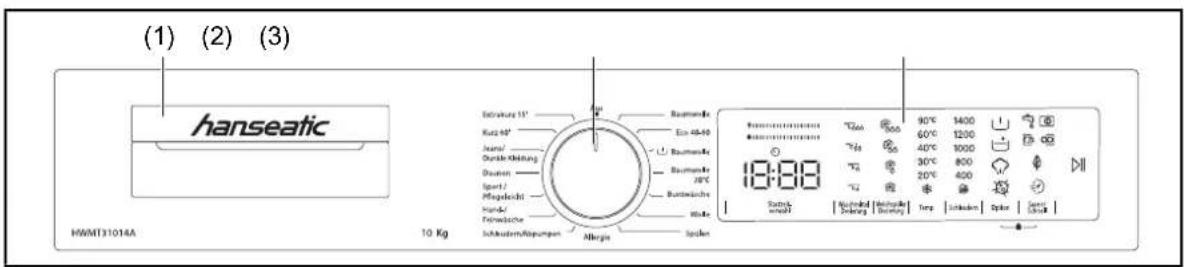
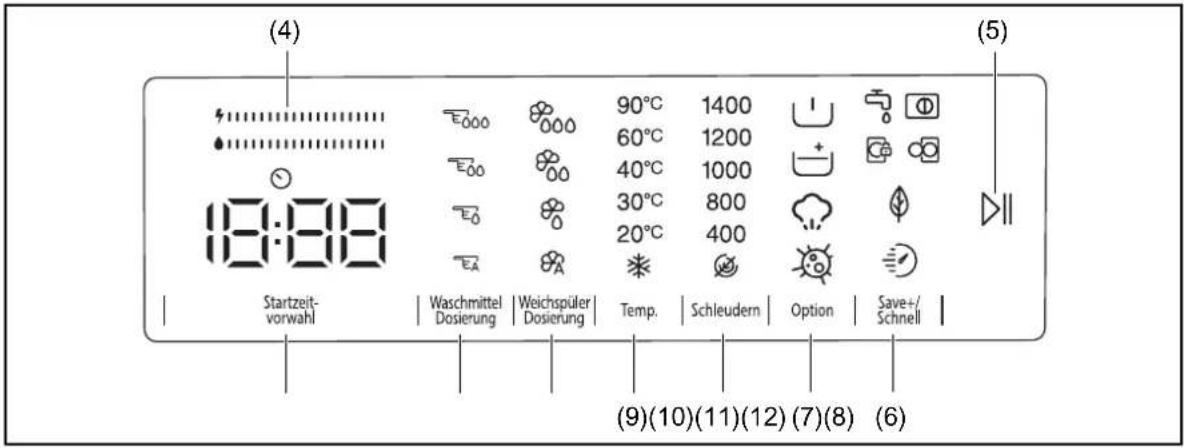
(1) Dispensing drawer
(2) Cycle selector
(3) Control panel
(4) Efficiency indicator
(5) Start/Pause button
(6) Save+/Quick Laundry button (ecological laundry, quick laundry - additional function)
(7) Options button
(8) Spin speed button
(9) Water temperature button
(10) Softener dosing button
(11) Detergent dosing button
(12) Start time preset button
(13) Appliance door
(14) Lint trap panel
(15) Supply cord with mains plug
(16) Connection for water inlet hose
(17) Water outlet hose
(18) Transport safety devices, 4×
Loading laundry and adding detergent
Loading laundry

CAUTION
Risk of fire/damage!
Improper handling of the appliance can lead to fire/faults.
■ Never try to open the appliance door with force whilst a cycle is in progress or once a cycle has ended. Only open the appliance door once it has been automatically released approx. two minutes after the cycle has ended.
- Open the appliance door (13) by pulling the door handle forward slightly.
- Load the laundry.
Keep to the maximum amount of laundry allowed, do not clamp laundry items between the appliance door and the rubber sleeve and observe the notices in the section "Washing tips".
- Push the appliance door closed until you hear it snap shut.

The device has a half-load detection system. If you put less than half of the maximum amount of laundry in the drum, the device automatically sets the half-load function, regardless of the selected programme. This means that the selected programme takes less time and consumes less water and electricity. When the half-load function is activated, the LED of symbol XX lights up in the display.
The dispensing drawer

NOTICE
Risk of damage to property!
Improper use of the dispensing drawer may result in damage to the appliance.
■ Do not open the dispensing drawer while the appliance is running.
■ When you remove the dispensing drawer, make sure it is empty.
■ When the dispensing drawer is full, do not pull, move, tip or tilt the device.
■ Do not leave the lids of the compartments in the dispensing drawer open to prevent the detergent inside from drying out.
■ After filling the detergent or while the appliance is running, make sure the dispensing drawer is properly closed. Otherwise, the device may not be able to use the detergent properly.
The dispensing drawer (1) consists of three compartments.
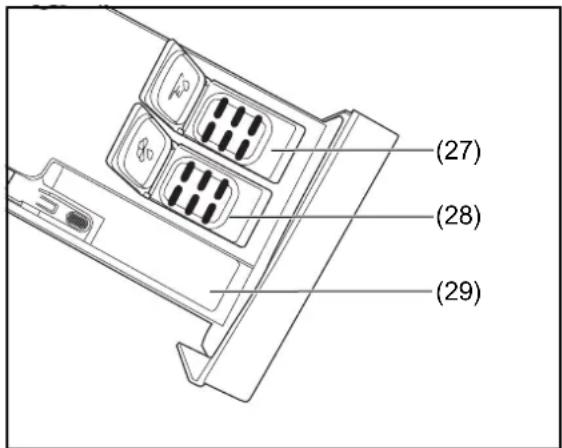
(27) liquid detergent compartment
(28) fabric softener compartment
(29) powder detergent compartment

If you have refilled the detergent but the device still does not detect it, there may be dried detergent in the dispensing drawer so that the dosing function does not work properly. In this case, clean the dispensing drawer.
Dispensing washing detergent/ fabric-care products
! NOTICE
Risk of damage to property!
Improper use of the dispensing drawer may result in damage to the appliance.
■ Do not mix detergents from different brands.
■ Do not mix detergent and fabric softener.
■ When changing the detergent, clean the dispensing drawer compartments.
■ Do not use detergent on which a layer has formed or which has solidified.
■ Do not use bleaches or products containing solvents.
■ When using concentrated detergent, dilute the detergent with a little water to keep the dispensing drawer compartments clog-free.
Powder detergent compartment
The powder detergent compartment (29) is intended for the main wash.
If you want to use powder detergent for washing, you must deactivate the liquid detergent dosing function. The dosing function is activated when the device is switched on.
- To deactivate the liquid detergent dosing function, press the detergent dosing button (11).
The liquid detergent dose indicator turns off.
- Now add the powder detergent to the powder detergent compartment (29).
Fabric softener compartment
The fabric softener compartment (28) is only to be used for detergents such as fabric softener or laundry starch. Follow the quantity and type recommended by the manufacturer.
The fabric softener dosing function is automatically activated on your appliance.
- To use the fabric softener function, press the softener dosing button (10) repeatedly until the desired setting appears on the display.
Softener amount:
| L3 | High | level |
| L2 | Medium | level |
| L1 | Low | level |
| Automatic |
If the fabric softener amount is too low, the fabric softener LED will blink and a beep will sound.

The choice of the fabric softener amount must be made before the programme starts. After the programme has started, the fabric softener amount can no longer be selected.
If you do not want to use the fabric softener function, you must disable the fabric softener function.
- To deactivate the fabric softener function, press the softener dosing button (10).
The softener dosage indicator turns off.

Sometimes fabric softener can remain in this compartment. This may be because the fabric softener has thickened. You should use only thin-liquid or water-diluted fabric softeners.
Liquid detergent compartment
The liquid detergent compartment (27) is provided for liquid detergents.
The liquid detergent dosing function is automatically activated on your appliance.
- To use the liquid detergent dosing function, press the detergent dosing button (11) repeatedly until the desired setting appears on the display.
Detergent amount:
| L3 | High | level |
| L2 | Medium | level |
| L1 | Low | level |
| Automatic |
If the detergent amount is too low, the detergent LED flashes and a beep is heard.

The detergent amount must be selected before starting the programme. After the programme has started, it is no longer possible to select a detergent amount.
If you do not want to use the liquid detergent dosing function, you must turn it off.
- To deactivate the liquid detergent dosing function, press the detergent dosing button (11).
The detergent level indicator turns off.

The level of detergent should be selected according to the degree of soiling of the laundry.
Program table
| Cycle | Type of laundry | Load capacity, maximum [kg]1) | Cycle time [hr/min] | Standard temperature [°C]2) | Energy consumption [kWh/operating cycle] | Water consumption [litres/operating cycle] | Residual dampness [%/Spin speed in rpm].3) |
| Cotton | Heavily soiled cotton and linen textiles. (underwear, bed linen, tablecloths, towels (maximum 4.5 kg), bedding, etc.) | 10 | 2:25 | 60 | 0,980 | 45 | 53/1400 |
| ECO 40-605) | Energy-saving: Heavily soiled cotton laundry declared washable at 40 °C or 60 °C may be washed together in this programme. | 10 | 3:59 | 406) | 1,032 | 62 | 53/1400 |
| Pre-wash Cotton | Heavily soiled cotton and linen textiles. (underwear, bed linen, tablecloths, towels (maximum 4.5 kg), bedding, etc.) | 10 | 2:44 | 60 | 1,765 | 93 | 53/1400 |
| Cotton 20 °C | Lightly soiled cotton laundry | 5 | 0:59 | 20 | 0,090 | 37 | 53/1400 |
| Coloured laundry | Cotton and linen textiles, lightly soiled. (underwear, bed linen, tablecloths, towels (maximum 4.5 kg), sheets etc.) | 10 | 2:10 | 40 | 0,778 | 38 | 53/1400 |
| Wool | Machine-washable wool and delicates as well as hand wash | 2,5 | 0:43 | 30 | 0,095 | 49 | 71/800 |
| Rinse | All clothing | 10 | 0:30 | kalt | 0,063 | 45 | 53/1400 |
| Allergy4) | Baby laundry | 5 | 3:32 | 60 | 3,110 | 109 | 71/800 |
| Spin/drain | Spin-dry clothing - spin cycle with freely selectable spin speed incl. draining | 10 | 0:17 | kalt | 0,040 | / | 53/1400 |
| Hand/ delicate wash | Sensitive textiles and textiles that need to be washed by hand. | 2,5 | 1:30 | 30 | 0,360 | 75 | 71/800 |
| Sports laundry/Easy care | Heavily soiled and synthetic mixed fibre textiles (nylon socks, shirts, blouses, pants with synthetic content, etc.). | 3,5 | 2:15 | 40 | 0,740 | 50 | 53/1200 |
| Down | For washing textiles with down, which according to the care label are suitable for washing machines (maximum 2.5 kg). | 2,5 | 1:40 | 40 | 0,260 | 50 | 71/800 |
| Jeans/dark clothing | Black and dark cotton laundry, mixed fabrics and jeans. | 3,5 | 1:36 | 30 | 0,430 | 59 | 71/800 |
| Short 60' | Normally soiled clothing, cotton and linen textiles at 60 °C. | 4 | 1:00 | 60 | 0,950 | 32 | 53/1400 |
| Extra short 15' | Slightly soiled clothing (we recommend using a small amount of detergent) | 2 | 0:15 | 30 | 0,057 | 32 | 71/800 |

Other than "ECO 40–60", the values specified for the cycles are only guidelines. The length of the cycle may differ from the information provided in this table, depending on the laundry load, the water temperature and ambient temperature, as well as any changed settings.
1) Maximum amount of dry textiles that can be treated in the respective wash cycle.
2) The highest temperature reached by the laundry in the wash cycle for at least five minutes. ‘--’ stands for ‘Washing water not heating up’.
3) Residual moisture after the wash cycle in water content percent and the spin speed at which this was achieved.
4) The appliance keeps the washing temperature above 60 °C for longer than 30 minutes in order to eliminate harmful bacteria.
5) ECO 40–60 is used to check compliance with EU ecodesign regulations.
6) These values are not displayed.
Standard cycles
Before getting started
- Read the "Intended use" and "Safety instructions" chapters first.
- Remove the transport safety devices and prepare the appliance as described in the chapter "Set-up, connection and initial start-up".
- Fit the water inlet hose (24) and the water outlet hose (17) correctly.
- Open the tap completely.
Selecting the cycle
The programme table shows you the programme that is suitable for your laundry.
- To power on the unit, turn the cycle selector (2) to the desired programme.
The display in the control panel (3) shows the settings of the selected programme.
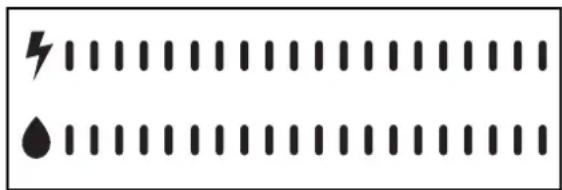
The efficiency indicator (4) displays the amount of energy and water consumed by the selected programme. It consists of 2 bars. The larger the bar, the more energy or water is consumed. The two bars of the efficiency indicator can expand or contract depending on the duration, temperature setting, spin speed, and other additional features of the selected programme.
Starting the cycle
- Ensure that the appliance door (13) is closed.
- Press the Start/Pause button (5).
The display in the control panel (3) shows - the remaining duration of the programme,
- the detergent and fabric softener dose symbols, the water temperature, the spin speed and the door lock.
Interrupting and continuing the cycle
- To interrupt a programme, press the Start/Pause button (5).
During the pause, the Start/Pause button LED flashes.
- To resume a programme, press the Start/Pause button again.

We recommend only interrupting the cycle for a brief period. Otherwise, the suds will cool down and this will negatively impact the washing result.
Pause/Cancel running programme or adding laundry

CAUTION
Risk of burns!
The appliance door may become hot during operation.
■ Do not touch the appliance door during operation.

CAUTION
Risk of scalding!
Improper handling of the appliance can lead to scalding caused by hot suds.
■ Never open the appliance door with force.
You can stop the running programme and add laundry to the drum.
- To stop the running programme, press the Start/Pause button (5).
When the door opening symbol appears, you can open the appliance door and add laundry.
If the door lock symbol ☐s displayed, the step to add laundry has been exceeded. Repeat the step in this case.
- To cancel the running programme, turn the cycle selector (2) to the "Off" position.
The appliance stops washing and the programme is stopped.
When you rotate the cycle selector to any programme position, the residual water is pumped out and the programme is cancelled.
You can choose a new programme after pumping and start it with the Start/Pause button.
Additional functions
You can set additional functions if required before starting the programme.
- To activate the desired auxiliary function, press the corresponding button (6) to (12) on the control panel (3).
If the auxiliary function symbol is continuously lit, the selected auxiliary function is activated.
If the auxiliary function symbol flashes, the selected auxiliary function is not activated.
Reason for not enabling the feature:
- The auxiliary function may not be available with the selected washing programme.
- The appliance may have exceeded the time window for enabling the auxiliary function.
- The auxiliary function may not be compatible with any of the previously selected auxiliary functions.
Dosing of detergent
With this additional function you can activate or deactivate the automatic dosing and adjust the amount of liquid detergent to the degree of soiling of the laundry (see chapter "Liquid detergent compartment").
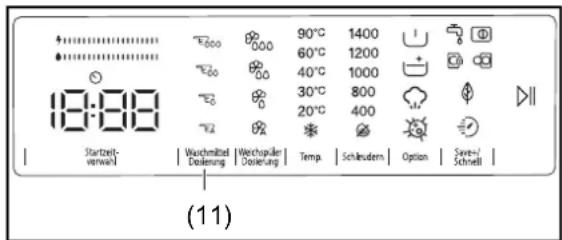
- To use the liquid detergent dosing function, press the detergent dosing button (11) repeatedly until the desired setting appears on the display.
Fabric softener dosage
With this additional function you can activate or deactivate the automatic dosing and adjust the fabric softener level (see chapter "Fabric softener compartment").
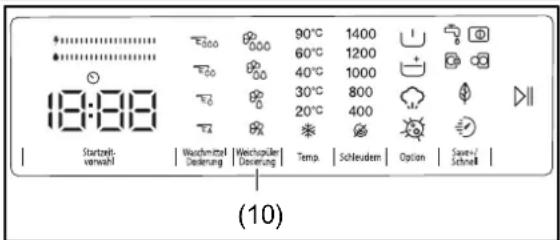
- To use the fabric softener function, press the softener dosing button (10) repeatedly until the desired setting appears on the display.
Water temperature
You can set the temperature of the washing water by pressing the water temperature button (9).
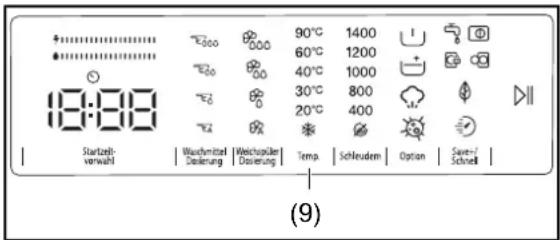
When you select a programme, the maximum temperature of the selected programme is displayed in the display.
- To set the water temperature, press the water temperature button until the desired water temperature is displayed.
The cold water wash is indicated by the symbol ✱
If you have skipped the desired water temperature, press the water temperature button repeatedly until the desired temperature is displayed again.
Spin speed
You can set the spin speed for your laundry by pressing the spin speed button (8).
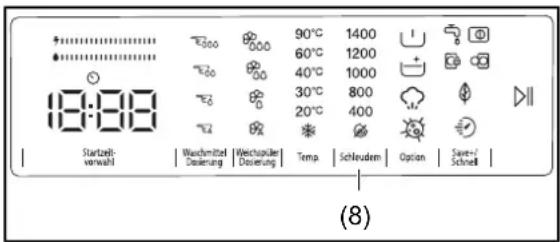
When you select a programme, the maximum spin speed of the selected programme is displayed in the spin speed display.
- To adjust the spin speed, press the spin speed button until the desired spin speed is displayed.
The deactivation of the spin is indicated by the symbol ☺
If you have skipped the desired spin speed, press the spin speed button repeatedly until the desired spin speed is displayed again.
Start time pre-selection
You can delay the start time of the washing programme by 1 to 23 hours with this additional feature.
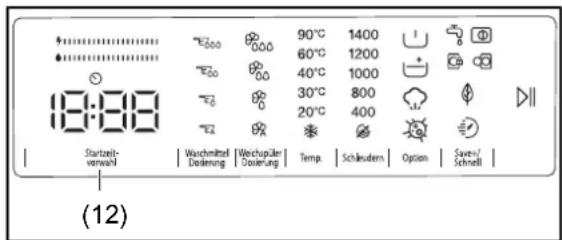
"1h" is displayed in the display.
- Press the start time preset button until the desired number of hours after which the washing programme should start is displayed.
- If you have skipped the desired number of hours, press the start time preset button until the desired number of hours appears.
- To apply the start time preset, press the Start/Pause button (5).
The device starts the washing programme after the time has elapsed.

After activating the start time preset, you can select further additional functions. You can then use the Start/Pause button to apply the start time preset.
To disable the start time preset:
- If you did not press the Start/Pause button, press the start time preset button until the display shows the duration of the programme you selected.
Once you see the programme time in the display, this means that the start time preset has been disabled. - If you have already pressed the Start/Pause button, press the start time preset button. The start time preset in the display turns off. You can then start the washing programme with the Start/Pause button.
Key lock (child lock)
The key lock allows you to lock the buttons to prevent accidental changes to the selected washing programme.
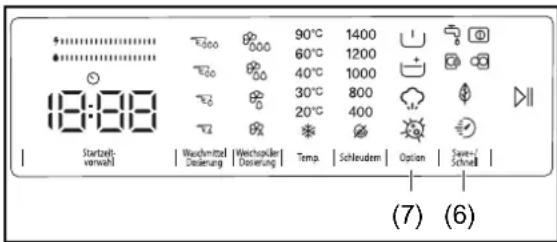
- To activate the key lock, press and hold the Save+/Quick Laundry button (6) and the Options button (7) simultaneously for approximately 3 seconds.
When the key lock is enabled, "CL" flashes for 2 seconds in the display.
When a button is pressed while the key lock is active, or when the selected programme is changed via the cycle selector (2), the "CL" symbol flashes for 2 seconds in the display.
When the key lock is active and a programme is running, when you turn the cycle selector to the "Off" position and select another programme, the previously selected programme will resume at the point where it was stopped.
- To deactivate the key lock, press and hold the Save+/Quick Laundry button (6) and the Options button (7) simultaneously for approximately 3 seconds.
"CL" disappears from the display.
The appliance door (13) remains unlocked when the key lock is active and the current is switched off.
Other additional features
Optionally, you can select an additional function for a selected washing programme.
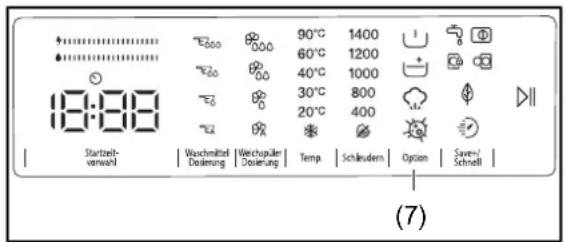
- To activate the desired auxiliary function, press the Options button (7) until the symbol of the desired auxiliary function is displayed.
If the auxiliary function icon is not displayed, this means that the auxiliary function is not available for the selected washing programme.
Pre-wash
With this additional function you can carry out a pre-wash in the case of heavily soiled laundry before the main wash.
When using this feature, you must place detergents in the fabric softener compartment (28) of the dispensing drawer.
- To activate the additional pre-wash function, press the Options button (7) until the pre-wash symbol is displayed.
Extra rinse
With this additional function, you can add an additional rinsing step to the washing programme.
- To activate the extra rinse auxiliary function, press the Options button (7) until the extra rinse icon is displayed.
Steam assist
With the steam application you can make your laundry less wrinkly after washing. The steam penetrates the clothes and loosens them, eliminates wrinkles and makes your clothes soft and delicate.
- To activate the steam assist auxiliary function, press the Options button (7) until the steam assist symbol 📇s displayed.
Allergy function
The allergy function allows you to add another rinse cycle for your laundry. The device uses hot water in all rinsing steps. Allergy function is recommended for clothing that comes in contact with sensitive skin, baby clothing, and underwear.
- To activate the allergy function, press the Options button (7) until the allergy icon is displayed.
Eco-laundering
With the eco-laundry function, the device slightly extends the duration of the washing programme. However, this reduces the energy and water consumption of the washing programme.
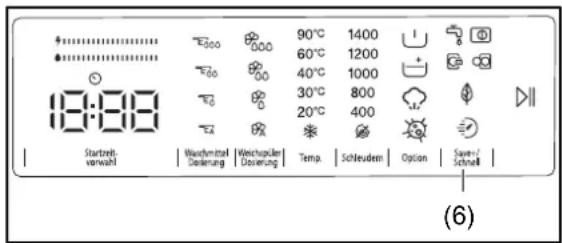
- To activate the eco-laundry function, press the Save+/Quick Laundry button (6) until the eco laundry icon is displayed.
Quick wash
With the quick-wash function, the device shortens the duration of the washing programme.
We recommend to load the appliance up to half the capacity of the selected washing programme.
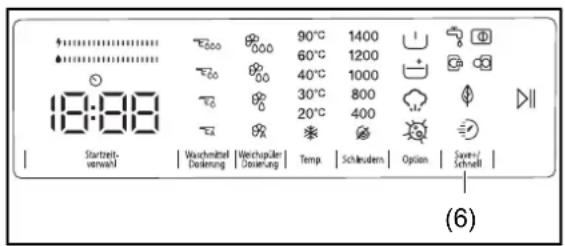
- To activate the quick-wash function, press the Save+/Quick Laundry button (6) until the quick wash icon is displayed.
Washing tips
Preparing the laundry
- Remove tissues and foreign objects such as needles, nails, coins, matches, paper clips, clips or similar from your pockets. Turn the pockets inside out if necessary and brush them out.
- Turn trousers, knitwear, T-shirts and tracksuits ‘inside out’ to protect the surface material.
- Repair unstitched seams and tears before washing; sew up loose buttons tightly. Close zippers; tie apron strings etc.
Sorting through laundry
The washing instructions of the textile manufacturer/the international care symbols on the labels contain precise information about how to handle each piece of laundry.
We recommend sorting through the laundry according to the following criteria:
Type of fabric
– Hot wash/coloured wash (cotton)
– Easy-care synthetic textiles
– Fine laundry, wool and hand wash
Colour
- Wash white laundry separately, otherwise it will turn grey.
- Wash new dark pieces separately at first; they stain heavily during their first wash.
Degree of soiling
- Remove stains as soon as they occur; otherwise, they are particularly stubborn.
– Stains are best pretreated with water and bile soap.
Tips for delicate textiles
Curtains
- Remove the curtains' plastic and metal hooks before washing.
- Handle curtains especially carefully; it is easy to get loose threads. Only put them on a spin cycle if this is specified on the textile label.
Small and delicate items
- Wash small and delicate pieces, such as baby socks, stockings and underwire bras, in a small pillowcase or small washbag.
The right washing load
The amount of laundry that can be loaded depends on the type and soiling of your laundry and the respective wash cycle.
As a rule of thumb: Load dry laundry up to one hand width below the upper edge of the drum.
If you overfill the drum, it may affect the outcome of your wash.
It is best to weigh your washing before you do the wash. Some washing weights can be found in the following table:
| Typical washing weights | |
| Bed sheets Approx. 550 g | |
| Duvet covers Approx. 700 g | |
| Cushion covers Approx. 180 g | |
| Tablecloths Approx. 250 g | |
| Terry towels Approx. 200 g | |
| Tea towels Approx. 90 g | |
| Men's shirts Approx. 250 g | |
| Women's nighties Approx. 180 g | |
| Pyjamas Approx. 450 g | |
| Bathrobes Approx. 1200 g | |
| Work overalls (synthetic) Approx. 300 g | |
| Handkerchiefs Approx. 20 g | |
The right washing detergent
- Do not use other cleaning agents, such as scouring powder, household cleaners, etc. These will damage the appliance and your laundry.
Fabric-care products
- Do not use fabric softener in the same wash cycle as starch, fabric conditioner, or finishes.
– Before dispensing viscous fabric-care products, mix them together with a little water to thin them out. - Only use powder starch according to the instructions on the packet and not with high temperatures, or it may form clumps.
The right dosage
The motto ‘more is better’ does not apply to detergents and fabric-care products. They must be dosed properly to achieve the perfect wash result. Here are some tips:
- If necessary, use a smaller dosage of detergents and fabric-care products if the drum is not filled completely. For example, for half loads, only use about half the amount needed for a full drum.
- Always adjust the amount of detergent to the respective hardness of the water. If your tap water is soft, you need less detergent. Information about the water hardness in your area is provided by the waterworks responsible. The water hardness is also shown on the invoice from your water supplier.
- Dose detergent according to how dirty your laundry is. Laundry that is less dirty requires less detergent.
– Highly concentrated detergent (also known as compact detergent) in particular requires accurate dosage. Even minor differences can have significant effects.
The following wash results are a sign of incorrect dosage of detergent.
Too much detergent
- strong foaming
- poor washing and rinsing performance
- skin irritation caused by leftover detergent in the clothing
Not enough detergent
- greying of the laundry
- 'Grease marks' (grey clumps of grease and dirt) on laundry
- Build-up of limescale deposits in the drum, heating elements and/or laundry
Environmentally friendly washing
The most efficient cycles with regard to energy and water consumption are generally those with a longer duration and lower temperatures.
The ECO 40–60 and 20 °C cotton programmes are efficient in terms of combined energy and water consumption:
- The ECO 40–60 programme is suitable for cleaning heavily soiled cotton laundry which is stated to be washable at 40 °C or 60 °C and can be washed together.
- The 20 °C cotton programme is suitable for lightly soiled cotton laundry which can be washed at a nominal temperature of 20 °C.
You can save energy and water if you use the specified maximum amount of laundry.
Care and maintenance

WARNING
Risk of electric shock!
Improper use of this appliance may lead to electric shocks.
■ Switch off the appliance before cleaning, and pull the mains plug out of the socket and/or disconnect the fuse.
■ Never clean the appliance with a high-pressure cleaner or steam cleaner.

NOTICE
Risk of damage to property!
Improper handling of the appliance may result in damage.
■ Do not use caustic, abrasive or scouring solvent-based cleaners. They can damage the surfaces or make the rubber sleeve brittle and fragile.
■ Do not use pointed, sharp or angular objects for cleaning the rubber sleeve. They can damage the rubber sleeve and make it leaky.
Regular checks
- Check regularly whether
– the screw connections of the water inlet hose (24) when the tap is turned on are tight,
– the water outlet hose (17) is firmly and securely seated on the edge of the bathtub or on the syphon,
– the water outlet hose is sitting tightly in the retaining clip at the point where it comes out of the housing.
– the water supply and outlet hose are brittle, cracked or kinked,
– the lint trap (37) is firmly closed,
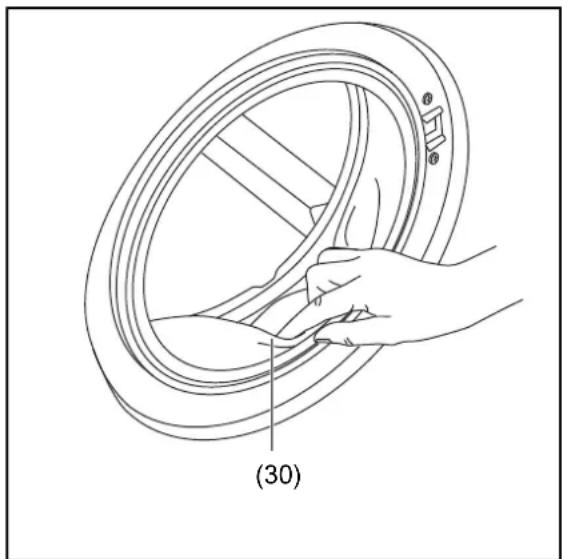
– the rubber sleeve (30) of the appliance door (13) is free from foreign bodies such as buttons, paper clips, etc.,
– the drum is free from foreign objects;
– the drum shows signs of rust.
Regular cleaning
Washing machine-cleaning agents for maintaining your appliance can be found in well-stocked supermarkets and drugstores. Cleaning the appliance using these products takes place when the washing machine is empty and is very intensive.
You should clean the appliance in this way every 30 wash cycles to prevent limescale deposits and to maintain your appliance. When doing so, please note the manufacturer's instructions on the packaging.

Limescale deposits can be avoided using the right detergent dosage.
Cleaning the appliance door
natural_image
Line drawing of a hand holding a circular mechanical component, labeled (30), with no text or symbols present.- Pull back the folds of the rubber sleeve (30) carefully and remove all objects from behind it.
- Wipe the appliance door (13) and the rubber sleeve with a soft, damp cloth on the outside and inside, and then wipe them both dry.
Cleaning the drum
! NOTICE
Risk of damage to property! Improper handling of the appliance may result in damage.
■ Never use harsh cleaning agents, such as pot cleaners or similar items.
- If you have used starch or fabric sizing, wipe out the drum with a moist cloth.
- Rusty metal parts in the washing (e.g. paper clips, etc.) can cause rust stains in the drum. Use a commercially available rust remover to remove such rust spots.
Cleaning the dispensing drawer
! NOTICE
Risk of damage to property! Improper handling of the appliance may result in damage.
■ The dispensing drawer and removable parts are not suitable for the dish-washer.
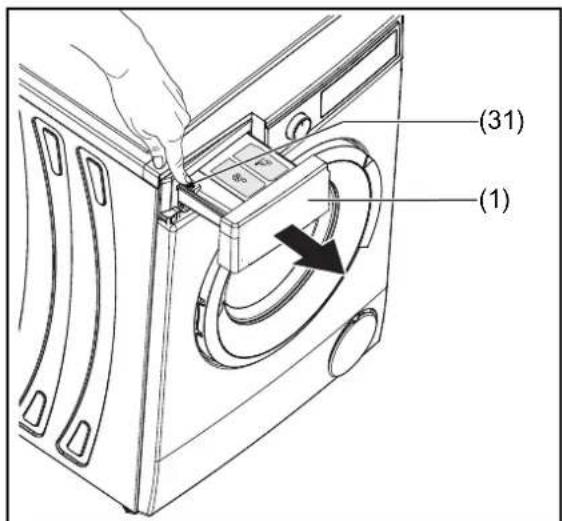
- Pull the dispensing drawer (1) out as far as possible.
- Push down on the release point (31) and pull the dispensing drawer all the way out.
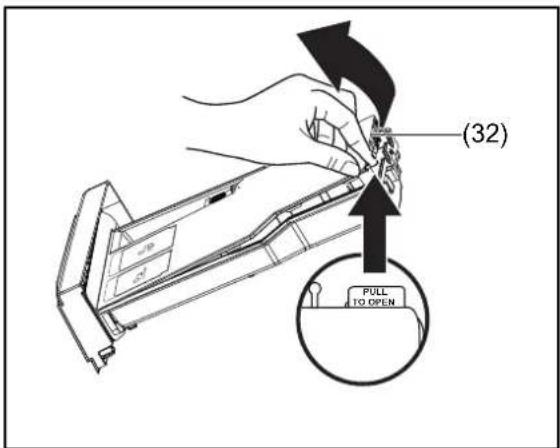
- Remove the cover (32).
- Clean the dispensing drawer and the cover with a soft brush under running water.
- Wipe all parts dry with a soft cloth.
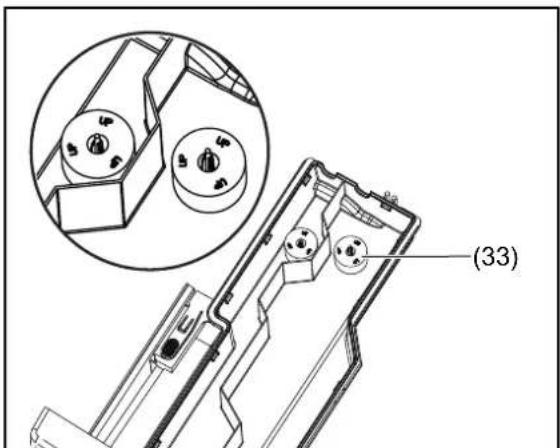
- Reinstall the inserts (33) correctly. The word 'UP' must face upward.
- Push the dispensing drawer back into the rinsing chamber.
Checking the water intake filter, cleaning and replacing the seals
In the water inlet, the appliance contains filters that prevent foreign particles from penetrating the appliance.
- Check and clean the filters every 3 months or if the appliance is not getting enough water despite the tap being open completely.
! NOTICE
Risk of damage to property! Improper handling of the appliance may result in damage.
■ Turn off the water intake tap after each use, before cleaning the water intake filter or replacing the seal. Otherwise there is a risk of water damage.
■ Close the tap before cleaning the filter or replacing the gaskets.
■ Check and clean filters and gaskets regularly.
- Replace defect filters and gaskets immediately. Never operate the appliance without filters and gaskets.
- Switch off the appliance, take the mains plug out of the socket and turn off the tap.
- Screw the water inlet hose (24) from the tap.
- Clean the filter with a small brush.
- Screw the water inlet hose onto the tap again.
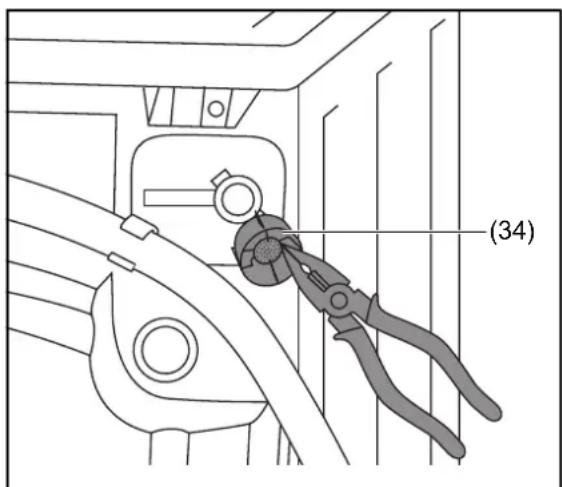
- Unscrew the water inlet hose from the appliance.
- Remove the water inlet filter (34) from the connection (16) by carefully pulling the plastic latch in the water inlet filter with a pair of pointed pliers.
A second water inlet filter is located at the water tap end of the water inlet hose.
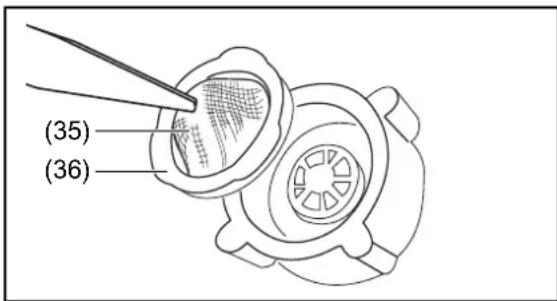
- Remove the second water inlet filter (35) by carefully pulling the plastic latch (36) in the water inlet hose with a pair of pointed pliers.
- Rinse the filters under clear water and clean them with a small, soft brush if necessary.
- Reinsert the filters and screw the water inlet hose back into place.
- Open the tap to check whether the hose and connections are sealed.
Cleaning the lint trap
WARNING
Risk of scalding! Improper handling of the appliance can lead to scalding caused by hot suds.
- Allow soapy water to cool before removing the lint trap.
! NOTICE
Risk of damage to property! When draining in an emergency, substantial amounts of water can leak out.
■ In case of an emergency emptying, place a suitable collection container under the lint trap.
The lint trap (37) stops threads and other foreign bodies ending up in the pump with the suds. Clean the lint trap every 2 months.
- Switch off the appliance and take the mains plug out of the socket.
- Close the tap.
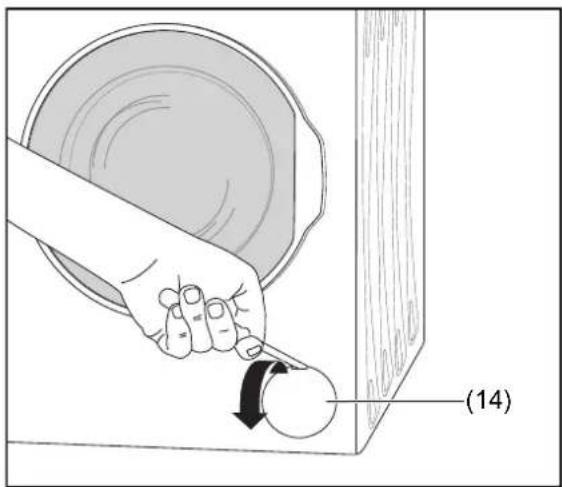
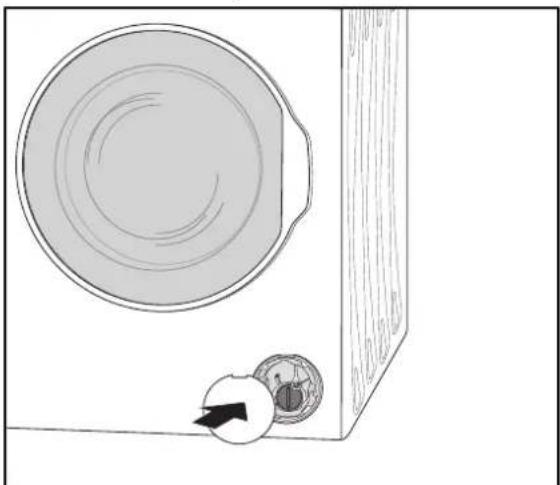
- Gently open the lint trap panel (14) with a flat object, such as a flat-tip screw-driver.
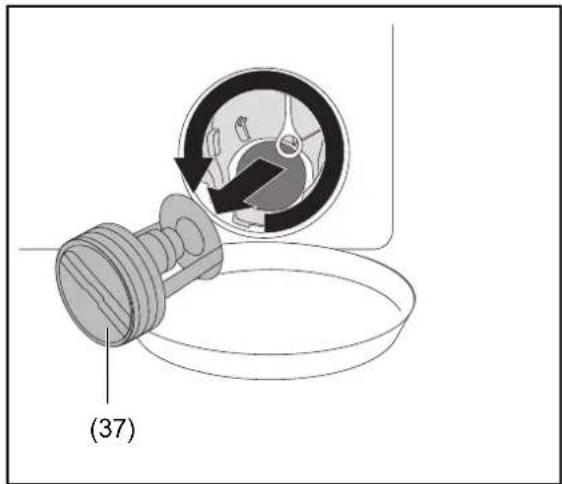
- Place a suitable collecting container underneath the lint trap.
- Only open the lint trap anticlockwise to the point where water flows out. You will have to repeatedly empty the collection container every now and then.
- Completely unscrew the lint trap once the water stops flowing.
- Remove all foreign bodies and clean the lint trap under running water.
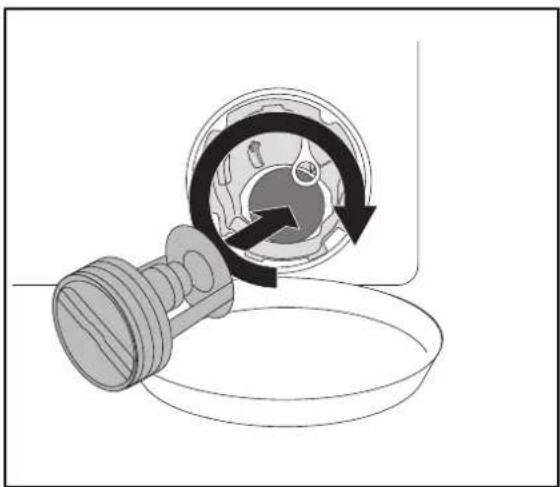
natural_image
Mechanical diagram showing a rotating component with a curved arrow indicating rotation (no text or symbols present)- Replace the lint trap and screw it clockwise all the way in.
natural_image
Diagram of a door with a circular component and a small inset showing a device (no text or symbols)- Re-insert the panel. When inserting the panel, ensure that the tabs located behind the panel are aligned with the corresponding holes on the inside.
Emptying residual water

CAUTION
Risk of injury!
The appliance is very heavy and can cause injury if it is allowed to fall.
■ Never move the appliance alone, but always with at least one other person.
If the appliance is in a frost-prone room, you must drain the residual water so that it does not freeze in the appliance and cause damage.
- Follow steps 1 to 9 as described in the chapter 'Cleaning the lint trap'.
- With the assistance of another person, tilt the appliance forward slightly to allow any residual water to drain from the appliance.
- Replace the lint trap (37) and screw it clockwise all the way in.
- Fold the panel (14) closed again.
- Unscrew the water inlet hose (24) from the water tap and remove it from the bathtub or the siphon to let the residual water in it drain off.
Troubleshooting table
Malfunctions can occur in any electrical appliance. This does not necessarily mean that there is a defect in the appliance. Therefore, please check whether or not you can correct the fault using the table.

WARNING
Risk of electric shock in case of improper repair!
Touching live parts may result in severe injury or death.
■ Never try to repair the appliance yourself. This could endanger yourself and subsequent users. Only authorised specialists may carry out such repairs.
| Problem Possible | cause Solutions, tips, explanations | |
| The appliance is not starting. | The mains plug has not been inserted into a socket. | Plug in the mains plug. |
| Fuse(s) faulty. Replace fuse(s). | ||
| No power supply. Check the power supply. | ||
| Start/Pause button not pressed. | Press the Start/Pause button. | |
| Cycle selector is set to OFF position. | Set the cycle selector to the desired position. | |
| Appliance door is not completely closed. | Close the appliance door. | |
| The appliance does not draw water. | The tap is turned off. Turn the tap on. | |
| Water inlet hose may be twisted. | Check the water inlet hose and straighten if necessary. | |
| Water inlet hose is blocked. | Clean the water inlet hose filter (see chapter "Checking the water intake filter, cleaning and replacing the seals"). | |
| Inlet filter is clogged. Clean the inlet filter (see chapter "Checking the water intake filter, cleaning and replacing the seals"). | ||
| Appliance door is not completely closed. | Close the appliance door. | |
| The appliance does not pump the water. | Outlet hose is clogged or twisted. | Inspect and clean or straighten outlet hose. |
| The lint trap is blocked. Clean the lint trap (see chapter "Cleaning the lint trap"). | ||
| Laundry was added too compactly to the drum. | Distribute the laundry evenly throughout the machine. | |
| The appliance is vibrating. | The feet have not been adjusted. | Adjust the feet (see chapter "Aligning the appliance"). |
| Transport screws have not been removed. | Remove the transport screws from the machine (see chapter "Removing the transport safety devices"). | |
| Your appliance is overloaded with laundry or the laundry is unevenly distributed. | Do not overload the drum. Spread your laundry evenly in the drum. | |
| Your appliance is not set up or aligned properly. | Set up or align the appliance correctly (see chapter "Location for set-up"). | |
| Excessive foaming in the dispensing drawer. | Too much detergent used. | Press the Start/Pause button. Stop foaming by diluting a tablespoon of fabric softener in 1/2 litre of water and putting it in the dispensing drawer. Press the Start/Pause button after 5 to 10 minutes. |
| Incorrect detergent used. | Use only detergents for automated washing machines. | |
| No satisfactory washing result. | Your laundry is too dirty for the selected programme. | To select the most appropriate programme, refer to the programme tables. |
| Not enough detergent used. | Follow the instructions on the package for the quantity of detergent. | |
| There is too much laundry in your appliance. | Check whether the maximum capacity for the selected programme has been exceeded. | |
| Hard water. Use more detergent according to the manufacturer's instructions. | ||
| The laundry was packed too tightly into the drum. | Be sure to spread the laundry evenly. | |
| The water is pumped out as soon as the appliance has filled with water. | The end of the water drain hose is mounted too low. | Check that the outlet hose is at an appropriate level (see chapter "Water connection"). |
| No water is visible in the drum during washing. | No error. Water is not located in the visible part of the drum. | |
| Laundry has detergent residues. | Insoluble particles of certain detergents may appear as white spots on your laundry. | Perform an additional rinse step or clean your laundry with a brush after drying. |
| Gray dots on the laundry. | This is unwashed oil, cream or ointment on your laundry. | For the next laundry, follow the instructions on the package for the quantity of detergent. |
| The laundry is not spun or is spinning later than expected. | No error. The uneven loading control system has been activated. | The uneven loading control system attempts to distribute your laundry. Your laundry will be spun as soon as it is evenly distributed.Evenly feed the laundry into the drum the next time. |
| Error code Possible error Solutions, tips, explanations | ||
| E01 the appliance | door is not closed properly. | A clicking sound indicates that the appliance door is properly closed.If the appliance still shows the fault, turn it off immediately, remove the mains plug from the socket and contact our service. |
| E02 Water pressure | or water level in the appliance is too low. | Check that the tap is fully turned on and that the water supply is not cut off. If the appliance still shows the fault, turn it off immediately, remove the mains plug from the socket and contact our service. |
| E03 The pump is faulty, or the lint trap is blocked, or the electrical connection of the pump is faulty. | Clean the lint trap. If the appliance still shows the fault, turn it off immediately, remove the mains plug from the socket and contact our service. | |
| E04 There is too much water in the appliance. | The appliance pumps water automatically.Turn off the power and remove the mains plug from the socket once the water has been pumped out. If the appliance still shows the fault, turn it off immediately, remove the mains plug from the socket and contact our service. | |
Service
Please note!
You are responsible for the condition of the appliance and its proper use in the household. If you call customer service because of an operating error, you will charged for the visit, even during the guarantee/warranty period.
Damage resulting from non-compliance with this manual will unfortunately not be recognised.
In order for us to help you quickly, please tell us:
| Name of appliance Model Order number | |
| Hanseatic washing machine HWMT3 | 1014A 14506928 |
Advice, complaints and orders
Please contact the customer service centre of your mail order company if:
– the delivery is incomplete,
– the appliance is damaged during transport,
– you have questions about your appliance,
- a malfunction cannot be rectified using the troubleshooting table,
- you would like to order further accessories.
You can find the contact details of your product advisor online on the service pages of your mail order company. The various sections of product advice are listed here.
Please have your appliance invoice ready. (Date of purchase and item no.).
For more information, visit www.hanseatic.de
Repairs and spare parts
You can prevent waste by having your defective appliances repaired. Please contact our Customer Service department.
Please have your appliance invoice ready. (Date of purchase and item no.).
Spare parts for your appliance are available for a minimum period of ten years after the last of the model has been placed on the market.
Customers in Germany
Place an order at
Customers in Austria
Please contact your mail order company's customer service centre or product advice centre.
Waste prevention, free return and disposal
Waste prevention
According to the provisions of Directive 2008/98/EC, waste prevention measures always take priority over waste management.
For electrical and electronic devices, waste prevention measures include extending the lifespan of defective devices through repair and reselling used working appliances instead of disposing of them.
Please help us reduce waste and contact our Service department if your product is faulty.
More information can be found in the brochure 'Waste Prevention Programme - of the German Government with the Involvement of the Federal Länder'.
Free return of old electrical appliances
Upon purchasing a new electrical appliance of the same type with essentially the same function, consumers may return an old electrical appliance to a distributor obliged to take back old appliances, at no extra cost for the consumers. This option also exists for deliveries made to a private household. For distance selling, the option of having old electrical equipment collected for free applies only in the case of the purchase of new electrical equipment with heat exchangers (e.g. refrigerators, dehumidifiers), screens, and display devices with a screen surface > 100 cm ^2 as well as large devices with at least one of its external dimensions measuring more than 50 cm.
In addition, consumers may return up to three old electrical appliances of the same type to a distributor's collection point for free without having to purchase a new electrical appliance. In this case, however, the old appliances' external dimensions may not exceed 25 cm.
Disposal
Disposing of old electrical devices in an environmentally-friendly manner
Electrical appliances contain harmful substances as well as valuable resources. Every consumer is therefore required by law to dispose of old electrical appliances at an authorised collection or return point.
They will thus be made available for environmentally-sound, resource-saving recycling.
You can dispose of old electrical appliances free of charge at your local recycling centre.
Please contact your dealer directly for more information about this topic.
Don't forget to erase data!
If necessary, each consumer is responsible for erasing personal data from electrical and electronic equipment
Batteries and rechargeable batteries, lamps and bulbs
If necessary, old single-use and rechargeable batteries that are not encased by an old electrical appliance as well as lamps/bulbs that can be removed from an old electrical appliance without being destroyed must be removed before you return the appliance.

The symbol shown here means that batteries and rechargeable batteries may not be disposed of with other household waste.
Consumers are required by law to bring all single-use and rechargeable batteries, regardless of whether they contain harmful substances or not, to a collection point operated by their communal authority or borough or to a retailer so that they can be disposed of in an environmentally friendly
manner and so that valuable resources (e.g. cobalt, nickel or copper) can be recovered.
Single-use and rechargeable batteries can be returned free of charge.
Some of the possible contents (e.g. mercury, cadmium and lead) are toxic and, if improperly disposed of, can have adverse effects on the environment. Heavy metals, for instance, can have detrimental health effects on humans, animals and plants and accumulate in the environment and food chain, and then enter the body indirectly through the consumption of food.
There is a high risk of fire with old lithium batteries. Special care must therefore be taken to properly dispose of old lithium batteries and rechargeable batteries. Improper disposal can also lead to internal and external short circuits due to thermal effects (heat) or mechanical damage. A short circuit can lead to a fire or an explosion and have serious consequences for people and the environment. It is therefore important to tape off the terminals of lithium batteries and rechargeable batteries before disposing of them to prevent an external short circuit.
Single-use and rechargeable batteries that are not built into the device should be removed before disposal and then disposed of separately.
Please only dispose of single-use and rechargeable batteries in a discharged state!
If possible, use rechargeable batteries in place of disposable batteries.
*) labelled with:
Cd = Cadmium
Hg = Mercury
Pb = Lead
Packaging

Our packaging is made from environmentally friendly, recyclable materials:
– Outer packaging made of cardboard
- Moulded parts made of foamed, CFC-free polystyrene (PS)
– Films and bags made of polyethylene (PE)
– Tension bands made of polypropylene (PP)
- Saving energy also protects against excessive global warming. Your new appliance uses little energy due to its environmentally friendly insulation and technology.

If you have sufficient space, we recommend retaining the packaging, at least during the warranty period.
If the appliance needs to be sent out for repairs, only the original packaging will provide sufficient protection. If you would like to dispose of the packaging, please dispose of it in an environmentally friendly way.
Appendix
Product fiche concerning
Regulation (EU) No. 2019/2014
The product fiche for your appliance is available to you online.
Visit https://eprel.ec.europa.eu and enter the model identifier of your appliance to download the product fiche.
The model code for your appliance can be found under Technical specifications.
Technical specifications
| Item number | 14506928 |
| Name of appliance | Washing Machine |
| Model identifier | HWMT31014A |
| Supply voltage / frequency / fuse | 220 - 240 V / 50 Hz / 10 A |
| Rated power | 2200 W |
| Device measurements (Height × Width × Depth) | 85,0 cm × 60,0 cm × 58,0 cm |
| Unloaded weight | 74 kg |
| Water pressure | 0,05–1,0 MPa / 0,5–10 bar |
- Table of contents
- Explanation of terms/symbols
- Explanation of terms
- WARNING
- CAUTION
- NOTICE
- Explanation of symbols
- Protection class 1
- Safety
- Intended use
- Safety notices
- Risks in handling household electrical appliances
- Fire hazard!
- Risk of injury!
- ! NOTICE
- !NOTICE
- Delivery
- Checking the delivery
- Set-up, connection and initial start-up
- Transport
- Removing the transport safety devices
- Location for set-up
- Water connection
- Establishing drainage for water
- Attaching with a hose holder
- Attaching the discharge manifold to a washbasin
- Establishing the water supply
- Electrical connections
- Commissioning and test run
- Appliance parts and control elements
- Loading laundry and adding detergent
- Loading laundry
- The dispensing drawer
- Dispensing washing detergent/ fabric-care products
- Powder detergent compartment
- Fabric softener compartment
- Liquid detergent compartment
- Standard cycles
- Before getting started
- Selecting the cycle
- Starting the cycle
- Interrupting and continuing the cycle
- Pause/Cancel running programme or adding laundry
- Additional functions
- Dosing of detergent
- Fabric softener dosage
- Water temperature
- Spin speed
- Start time pre-selection
- Key lock (child lock)
- Other additional features
- Pre-wash
- Extra rinse
- Steam assist
- Allergy function
- Eco-laundering
- Quick wash
- Washing tips
- Preparing the laundry
- Sorting through laundry
- Type of fabric
- Colour
- Degree of soiling
- Tips for delicate textiles
- Curtains
- Small and delicate items
- The right washing load
- The right washing detergent
- Fabric-care products
- The right dosage
- Too much detergent
- Not enough detergent
- Environmentally friendly washing
- Care and maintenance
- Regular checks
- Regular cleaning
- Cleaning the drum
- Cleaning the dispensing drawer
- Checking the water intake filter, cleaning and replacing the seals
- Cleaning the lint trap
- Emptying residual water
- Troubleshooting table
- Service
- Advice, complaints and orders
- Repairs and spare parts
- Customers in Germany
- Customers in Austria
- Waste prevention, free return and disposal
- Waste prevention
- Free return of old electrical appliances
- Disposal
- Don't forget to erase data!
- Batteries and rechargeable batteries, lamps and bulbs
- Packaging
- Appendix
- Product fiche concerning
- Regulation (EU) No. 2019/2014
Brand : Hanseatic
Model : HWMT31014A
Category : Washing machine