DX-303 - Gramophone Akiyama - Free user manual and instructions
Find the device manual for free DX-303 Akiyama in PDF.


User questions about DX-303 Akiyama
0 question about this device. Answer the ones you know or ask your own.
Ask a new question about this device
Download the instructions for your Gramophone in PDF format for free! Find your manual DX-303 - Akiyama and take your electronic device back in hand. On this page are published all the documents necessary for the use of your device. DX-303 by Akiyama.
USER MANUAL DX-303 Akiyama
CAUTION: To reduce the risk of electric shock, do not remove any cover. No user-serviceable parts inside. Refer servicing to qualified service personnel only.

The lightning flash with arrowhead symbol within the equilateral triangle is intended to alert the use to the presence of un-insulated “dangerous voltage” within the product's enclosure that may be of sufficient magnitude to constitute a risk of electric shock.

The exclamation point within the equilateral triangle is intended to alert the user to the presence of important operation and maintenance (servicing) instructions in the literature accompanying this appliance.
To prevent electric shock, do not use this polarized plug with an extension cord, receptacle or other outlet unless the blades can be fully inserted to prevent blade exposure.
- Read Instructions. All the safety and operating instructions should be read before this product is operated. unplugged from
- Retain Instructions. The safety and operating instructions should time. be retained for future reference. 15. Object and Liquid Entry. Care sl
- Heed Warnings. All warnings on the appliance and in the operating instructions should be adhered to. openings.
- Follow Instructions. All operating and use instructions should be followed.
- Water and Moisture. The appliance should not be used near water - for example, near a bathtub, washbowl, kitchen sink, laundry tub, in a wet basement, or near a swimming pool, and the like.
- Carts and Stands. The appliance should be used only with a cart or stand that is recommended by the manufacturer.
An appliance and cart combination should be moved with care. Quick stops, excessive force, and uneven surfaces may cause the appliance and cart combination to overturn

- Wall or Ceiling Mounting. The product should be mounted to a wall or ceiling only as recommended by the manufacturer.
- Heat. The appliance should be situated away from heat sources such as radiators, heat registers, stoves, or other appliances (including amplifiers) that produce heat.
- Power Sources. This product should be operated only from the type of power source indicated on the rating label. If you are not sure of the type of power supply to your home, consult your product dealer or local power company. For products intended to operate from battery power, or other sources, refer the operating instructions.
- Grounding or Polarization. This product may be equipped with a polarized alternation-current line plug (a plug having one blade wider than the other). This plug will fit into the power outlet only one way. This is a safety feature. If you are unable to insert the plug fully into the outlet, try reversing the plug. If the plug should still fail to fit, contact your electrician to replace your obsolete outlet. Do not defeat the safety purpose of the polarized plug.
- Power-Cord Protection. Power-supply cords should be routed so that they are not likely to be walked on or pinched by items placed upon or against them, paying particular attention to the cord in correspondence of plugs, convenience receptacles, and the point where they exit from the appliance.
- Cleaning. The appliance should be cleaned only as recommended by the manufacturer. Clean by wiping with a cloth slightly damp with water. Avoid getting water inside the appliance.
-
For AC line powered units. Before returning repaired unit to user, use an ohm-meter to measure from both AC plug blades to all exposed metallic parts. The resistance should be more than 100,000 ohms.
-
Non-use Periods. The power cord of the appliance should be when left unused for a long period of
be taken so that objects do
not fall and liquids are not spilled into the enclosure through
-
Damage Requiring Service. The appliance should be serviced by qualified service personnel when:
-
The power-supply cord or the plug has been damaged; or
- Objects have fallen, or liquid has been spilled into the appliance; or
- The appliance has been exposed to rain; or
- The appliance does not appear to operate normally or exhibits a marked change in performance; or
-
The appliance has been dropped, or the enclosure damaged.
-
Servicing. The user should not attempt any service to the appliance beyond that described in the operating instructions. All other servicing should be referred to qualified service personnel.
-
Ventilation. Slots and openings in the cabinet are provided for ventilation and to ensure reliable operation of the product and to protect it from overheating, and these openings must not be blocked or covered. The openings should never be blocked by placing the product on a bed, sofa, rug, or other similar surface. This product should not be placed in a built-in installation such as a bookcase or rack unless proper ventilation is the manufacturer's instructions have been adhered to.
- Attachments. do not use attachments not recommended by the product manufacturer as they may cause hazards.
- Accessories. Do not place this product on an unstable cart, stand, tripod, bracket, or table. The product may fall, causing serious injury to a child or adult, and serious damage to the product. Use only with a cart, stand, tripod, bracket, or table recommended by the manufacturer, or sold with the product. Any mounting of the product should follow the manufacturer's instructions, and should use a mounting accessory recommended by the manufacturer.
- Lightning. For added protection for this product during a lightning storm, or when it is left unattended and unused for long periods of time, unplug it from the wall outlet and disconnect the antenna or cable system. This will prevent damage to the product due to lightning and power-line surges.
- Replacement Parts. When replacement parts are required, be sure the service technician has used replacement parts specified by the manufacturer or have the same characteristics as the original part. Unauthorized substitutions may result in fire, electric shock, or other hazards.
- Safety Check. Upon completion of any service or repairs to this product, ask the service technician to perform safety checks to determine that the product is in proper operating condition.
TURNTABLE SECTION:
| Type | 3-speed full manual |
| Motor | 8 pole, 3phase,brushless DC motor |
| Driving Method | Direct Drive |
| Turntable Platter | 330mm dia. Aluminum diecast |
| Speeds | 33^1/_3 and 45 rpm and 78 Rpm |
| Wow and Flutter | Less 0.15% WRMS with 33^1/_3rpm |
| S/N Ratio | More than 60dB (DIN-B) |
| Pitch Controls | +/- 8%,12%,20% |
| Starting Time | Less than 1 sec |
| Starting Torque | More than 1.6 Kgf.cm |
| Braking system | Electronic brake |
| Braking Time | Less than 1 sec. |
| Time for Speed Change | Less than 1 sec. from 33^1/_3 to 45 rpm. |
| Less than 1 sec. from 45 to 33 | ^1/_3 rpm. |
| Less than 1 sec. from 33^1/_3 to 78 rpm | |
TONEARM SECTION:
| Type | Static balanced S-shaped tonearm with detachable headshell |
| Effective Arm Length | 230.5mm |
| Overhang | 15mm |
| Tracking Error Angle | Less than 3 degree |
| Applicable Cartridge Weight | 13~18g |
| Anti-skating Range | 0-3g |
| Output | 1.5~3.6mV at 1KHz 5cm/sec |
| Frequency Response | 20Hz-20KHz |
| Channel Separation | More than 15dB |
| Channel Balance | Within 2.5dB at 1KHz |
| Needle Pressure range | 3~4g |
| High of cue(first track) | 7.5~10mm |
| Descend of cue | 1~3sec |
GENERAL SECTION:
| Power Supply | AC 230V, 50Hz |
| Power Consumption | 10.5 Watts |
| Dimensions | 450 (W) x 370 (D) x 86 (H) mm |
| Weight | 8.5 Kgs |
ACCESSORIES SUPPLIED
| Instruction manual x 1,Headshell x 1, 45 rpm adaptor x 1,Counter weight x 1, AC cord x 1,RCA cable x 1, Platter x1Slipmat x 1, Target light x 1 |
TECHNICAL SPECIFICATIONS
| DESCRIPTIONS | UNIT | NORMAL | LIMIT |
| (1) Output Difference | dB | 2.3 | 2.5 |
| (2) Output Level | mv | 1.7~3.5 | 1.5~3.6 |
| (3) Speed (Speed Range) +/- 8% | Hz | 2760↓, 3240↑ | 2770↓,3230↑ |
| (3) Speed (Speed Range) +/- 12% | Hz | 2640↓, 3360↑ | 2650↓, 3350↑ |
| (3) Speed (Speed Range) +/- 20% | Hz | 2400↓, 3600↑ | 2410↓, 3590↑ |
| (4) Speed (Center Range) | Hz | 2995~3005 | 2990~3010 |
| (5) Wow and Flutter | % | 0.1 | 0.15 |
| (6) Channel separation | dB | 16 | 15 |
NOTE: CARTRIDGE(AT3600L)
text_image
15 16 17 18 VYNIK CULTURE 3 2 10 9 4 5 6 7 8 Merry OFF akiyama Professional/University X-303ustifue
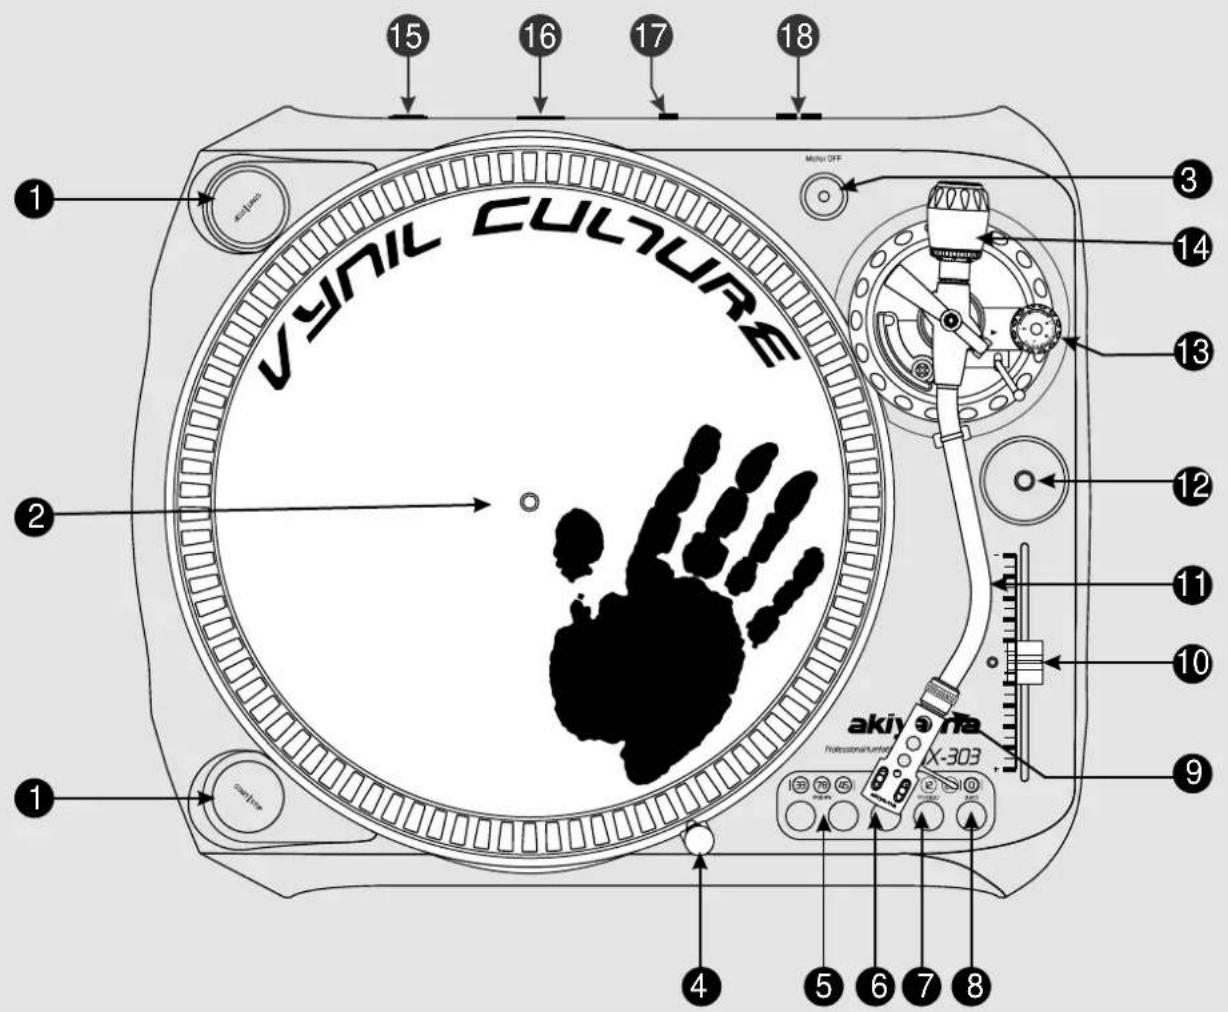
1) START/STOP Use this to change the speed of the platter when the PITCH indicator Press this button to start or stop the platter. is NOT lit.
3) MOTOR OFF stylus on the record using the headshell finger support. Do not press the button to enable motor off, and the led will be flash press the button again to disable function. tip and to the record.
This is a fully manual tone arm. To start playback, gently place the ot drop the stylus onto the record as it may cause damage to the diamond
4) TARGET LIGHT 12) 45 RPM ADAPTOR Insert target light to the deck and it will light up. Place on centre spindle fo eccords with large centre holes. r playing 7" r
5) PLATTER REVOLUTION SPEED BUTTONS 13) ANTI SKATE KNOB
33 rpm press 33
45 rpm press 45
78 rpm press 33 and 45
6) REVERSE This button is used to reverse the direction of the platter rotation.
7) +/-8%, +/-12%, +/-20% Press the button to switch to 8%, press again to switch to 12%, and again to 20%.
8) QUARTZ LOCK On will hold the revolution speed to 0%. Off will allow use of the pitch adjust.
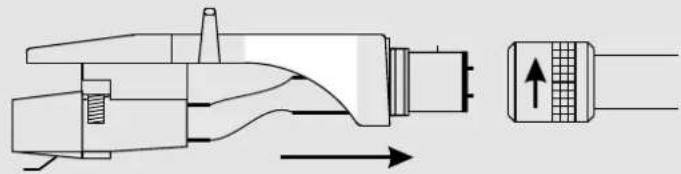
9) HEADSHELL LOCKING NUT Attach the headshell by inserting into the front end of the tone arm, then turn the locking nut clockwise with the head shell firmly held horizontally.
10) PITCH SLIDER
When a record is playing, a force is generated drawing the stylus towards the centre of the record. Set this knob to the same value as the stylus pressure to offset this force.
14) COUNTER WEIGHT Use this to balance the tone arm and to adjust the stylus pressure.
15) POWER SWITCH This switch turns the power on or off, including the motor and audio signal.
16) POWER CORD CONNECTOR Used to connect the included power cord.
17) OUTPUT SIGNAL SELECTOR Two forms of output audio signal are available: Phono and Line.
18) AUDIO OUTPUT CONNECTOR This is the audio output connector (RCA). Must be connected as explained at Connections part of this manual.
TONE ARM ASSEMBLY
text_image
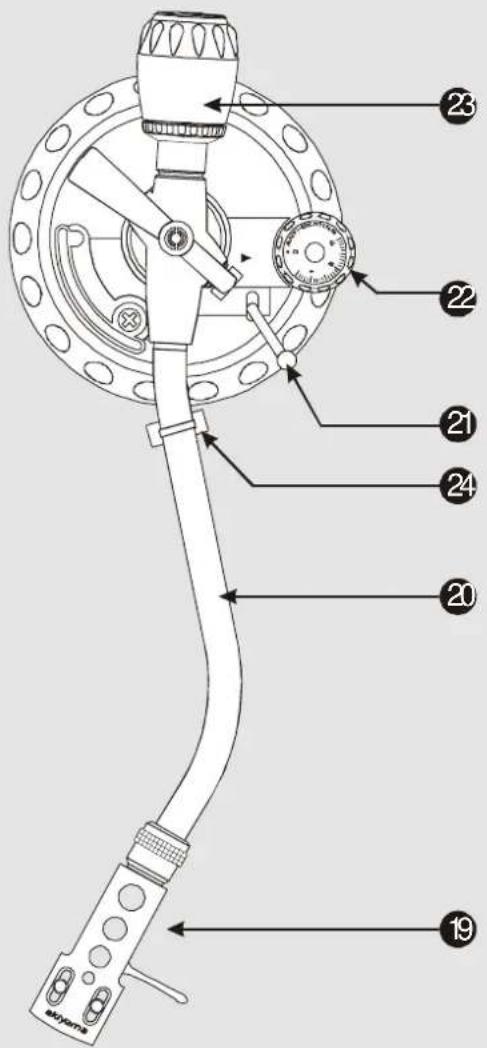
Technical diagram of a mechanical device with numbered parts labeled 19 to 24- Headshell - Install cartridge here. When installing a cartridge, refer to the installation instructions supplied by the manufacturer of that cartridge. During installation, attach the stylus protector to guard the stylus tip from damage. Attach wires as follows:
White (L+) Left channel+
Blue (L-) Left channel -
Red (R+) Right channel+
Green (R-) Right channel-
natural_image
Technical line drawing of a mechanical component with directional arrows indicating flow or movement (no text or symbols)20.S-Shaped Tone Arm
-
Tone Arm Lift - This elevates the tone arm above the record surface.
-
Anti-Skate Control - This applies inward force to the tone arm so it doesn't skip outward across the record due to the centrifugal force of the record spinning. Cartridge manufacturers usually specify the proper setting of this.
-
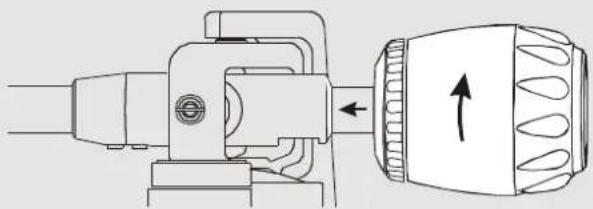
Counterweight - Adjustment creates the proper downward pressure of the stylus to the record. Attach now by sliding the counterweight onto the rear of the tone arm. Twist it lightly and it will screw onto the rear shaft of the tone arm.
natural_image
Technical line drawing of a mechanical device with directional arrows indicating motion (no text or symbols)- Tone Arm Clamp and Rest - Use this rest for the tone arm and clamp it in position during transportation.
OPERATION
-
Push the power to on and the speed indicator and the strobe-illuminator will light up. the desired pitch is reached.
-
Insert target light for illumination the stylus.
-
Place a record on the turntable mat. When playing a 45rpm record with a large center hole; place the 45-rpm adapter on the centre spindle.
-
Set the rotation speed (33/45/78) to match the record.
-
Release the arm clamp.
-
Set the cueing lever to the up position.
-
Press the Start/Stop button and the turntable platter will start to rotate.
-
Move the tone arm over the desired groove.
-
Set the cueing lever to the down position, the tone arm will descend slowly onto the record and play begins.
-
Set the desired pitch adjusts range by depressing the buttons until Options are +/-8% or +/-12% or +/-20%.
-
Adjust the pitch to a desirable speed. During play, observe the strobe dots. If the strobe dots appear to the right, the pitch is slower than the rated speed. If they flow to the left, the rated speed. If the strobe dots appear stationary, which means the platter is in normal turntable speed, move the pitch control slider up or down to adjust the speed.
-
To suspend play, lift tone arm with cueing lever.
-
When play is finished, raise the cueing lever, move the tone arm to the armrest and secure the tone arm with the arm clamp.
-
Press the Start/Stop button to stop the platter rotating.
-
Push the power to off.

RISK OF ELECTRIC SHOCK
DO NOT OPEN
CAUTION

natural_image
Technical line drawing of a mechanical component with directional arrows indicating flow or movement (no text or symbols)20.BRAZO METÁLICO TIPO "S"
natural_image
Technical line drawing of a mechanical device with an arrow indicating direction (no text or symbols present)FUNCIONAMIENTO
DX-303/DX-505 turntables offer two signal output possibilities, PHONO and LINE. The output mode will be selected by means of the selector switch located at the rear side of the turntable.
If PHONO is selected the unit must be connected to a device equipped with Phono input RIAA. Most likely this will be a stereo mixer as seen at the draw below.
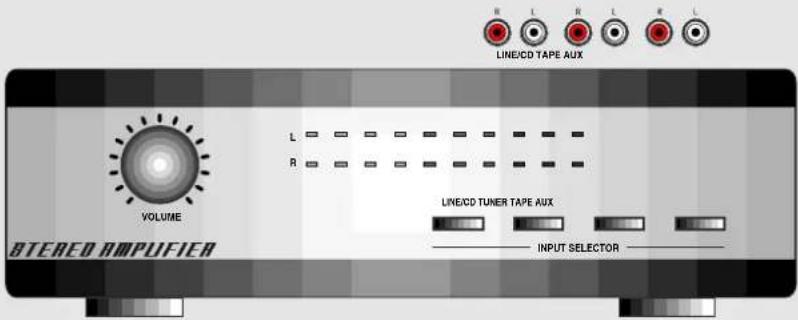
If LINE is selected the unit can be connected to almost all amplifying units. Just make sure that you connect it at the Line level input of the amplifier. This will be labelled as Line, CD, Tape or AUX.
español
text_image
akiyama R L L ON ONP PHONO LINE LINE MC3 akiyama ac Input DC R L Line Line Line line line line line line line line line line line line line line line line line line line line line line line line lineSTEREO MIXER
ANY OF THESE THREE INPUT IS SUITABLE
CUALQUIERA DE ESTAS TRES ENTRADAS ES ADECUADA
text_image
R L R L R L LINE/CD TAPE AUX L R LINE/CD TUNER TAPE AUX INPUT SELECTOR VOLUME STERED AMPUFIERDOMESTIC AMPLIFIER