
ES-FC8104W3 - Washing machine SHARP - Free user manual and instructions
Find the device manual for free ES-FC8104W3 SHARP in PDF.

| Product Type | Front-loading washing machine |
| Model | ES-FC8104W3 |
| Brand | Sharp |
| Dimensions (H x W x D) | 845 x 597 x 557 mm |
| Weight | Approx. 70 kg |
| Rated Voltage / Frequency | 220-240 V ~ 50 Hz |
| Total Power | 2200 W |
| Current | 10 A |
| Water Pressure (min/max) | 0.1 / 1.0 MPa |
| Maximum Dry Laundry Capacity | 8 kg |
| Spin Speed (max) | 1000 rpm |
| Number of Programmes | 15 |
| Control Type | Electronic display with rotary knob |
| Main Functions | Delay timer (up to 23h), child lock, dirtiness level selection, extra rinse (up to 3), anti-allergic, pre-wash, easy ironing |
| Temperature Selection | Cold to 90°C (adjustable per programme) |
| Safety Features | Child lock, door lock, overheating protection, anti-unbalanced load control, water cut-off warning |
| Installation Requirements | Remove 4 transportation screws; adjustable feet; minimum 60 cm, max 100 cm drain hose height |
| Maintenance | Clean pump filter every 2 months; clean water inlet filters; clean detergent drawer and flush stopper; dry drum after use |
| Spare Parts Availability | Via authorized service centers; common parts such as hoses, filters, belts |
| Reparability | Serviceable by qualified technicians; user-replaceable items like pump filter and inlet filters |
| Energy Efficiency Class (estimated) | A+ (based on typical model specifications) |
| Noise Level (est.) | Wash: ~58 dB, Spin: ~76 dB |
| Included Accessories | Water inlet hoses, transportation screw caps, liquid detergent level plate, spade, user manual |
Frequently Asked Questions - ES-FC8104W3 SHARP
User questions about ES-FC8104W3 SHARP
0 question about this device. Answer the ones you know or ask your own.
Ask a new question about this device
Download the instructions for your Washing machine in PDF format for free! Find your manual ES-FC8104W3 - SHARP and take your electronic device back in hand. On this page are published all the documents necessary for the use of your device. ES-FC8104W3 by SHARP.
USER MANUAL ES-FC8104W3 SHARP
natural_image
Simple white line icon of a T-shirt with a droplet, on a solid red background (no text or symbols)Laundry
natural_image
Simple red icon of a washing machine inside a square frame, with no text or symbols.Washing Machine
ES-FC8104W3-EE
CONTENTS
CHAPTER-1: BEFORE USING THE APPLIANCE
Safety warnings 4
CHAPTER-2: OVERVIEW OF YOUR DEVICE
Technical Specifications 8
General Appearance
CHAPTER-3: INSTALLATION
Removing transportation safety screws
Adjusting Adjustable Stays
Electrical connection
Water inlet hose connection
Water discharge connection
CHAPTER-4: INTRODUCTION OF CONTROL PANEL
Detergent drawer Programme knob 11
Digital display 11
CHAPTER-5: PRELIMINARY PREPARATION FOR LAUNDERING
Separating laundries 12
Adding detergent into machine
Operating your machine
Auxiliary functions
Start / Pause
Child lock
Cancelling programme
Finishing programme 15
Warning of water cut-off / low mains water pressure 15
Warning of clogged pump filter 15
CHAPTER-7: PROGRAM TABLE
CHAPTER-8: MAINTENANCE AND CLEANING OF YOUR MACHINE
W a r n i n g 1 8
Water inlet filters 18
Pump filter 18
Detergent drawer 18
Liquid Detergent Apparatus
Flush stopper
Body 19
Drum 19
CHAPTER-10: TROUBLESHOOTING 20
CHAPTER-11: AUTOMATIC FAULT WARNINGS AND WHAT TO BE DONE....22.... Disposal of your old machine....23
Dear Customer,
Our goal is to offer you, high quality products that exceed your expectations. Your appliance is produced in modern facilities and is carefully, particularly tested for quality.
This manual is prepared in order to help you use your appliance, which has been manufactured using the most recent technology with confidence and maximum efficiency.
Before using your appliance, carefully read this guide which includes basic information to safe installation, maintenance and use. Please contact your nearest Authorized Service centre for the installation of your product.
The operating instructions apply to several models. Differences may therefore occur.
CHAPTER -1: BEFORE USING THE APPLIANCE
SAFETY WARNINGS
| Operating voltage / frequency: |
| (V/Hz) (220-240) V~/50Hz; |
| Total current (A): 10 |
| Water pressure (Mpa) |
| Maximum: 1 Mpa / Minimum : 0.1 Mpa |
| Total power (W) : 2200 |
| Maximum dry laundry capacity (kg): 8 |
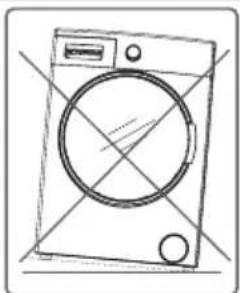
Do not install your machine on a carpet or such grounds that would prevent the ventilation of its base.
The appliance is not intended for use by people (including children) with reduced physical, sensory or mental capabilities, or lack of experience and knowledge unless they have been given supervision or instruction concerning use of the appliance by a person responsible for their safety.
Children should be supervised to ensure that they do not play with the appliance.
Call the nearest authorized service for a replacement if the power cord malfunctions.
Use only the new water inlet hose coming with your machine while making water inlet connections of your machine. Never use old, used or damaged water inlet hoses.
This appliance can be used by children aged from 8 years and above and persons with reduced physical, sensory or mental capabilities or lack of experience and knowledge if they have been given supervision or instruction concerning use of the appliance in a safe way and understand the hazards involved.
Children shall not play with the appliance.
Cleaning and user maintenance shall not be made by children without supervision.
Note: For softcopy of this user manual, please contact following address: "washingmachine@standardtest.info". In your e-mail, please provide the model name and serial number (20 digits) which you can find on the appliance door.
You must read these warnings. You can thus protect yourself and your beloved ones against fatal injuries and risks.
CHAPTER -1: BEFORE USING THE APPLIANCE
Danger of getting burnt!

Do not touch discharging hose and water during discharging as the appliance may reach high temperatures when running.
DEATH RISK DUE TO ELECTRICAL CURRENT!
- Do not use multiple receptacles or extension cord.
- Do not plug in damaged plug sockets
- Never pull the cable when unplugging – always grip the plug itself.
- Do not plug-in or out the plug from the receptacle with wet hands to prevent electrocution!
- Never touch the machine with wet hands or feet.
- Call the nearest authorized service for a replacement if the power cord malfunctions.

Flooding risk!
- Check whether the water runs fast or not before placing the discharge hose on the sink.
• Take necessary measures to prevent the slipping of your hose. - The backfiring force of a hose that is not placed appropriately can displace the hose. Prevent the stopper inside your sink from blocking the sink hole.

Danger of Fire!
- Do not keep inflammable liquids near your machine.
- The sulphure content of paint removers might cause corrosion. For this reason, never use paint-removing materials in your machine.
- Never use products that contain solvent material (like washing gas) in your machine.
- Remove all the objects in the pockets of your laundries (needle, paperclip, lighter, matches etc.) when placing them your machine.
Fire and Explosion risk may occur.

Fall and injury hazard!
- Do not climb on your machine. The upper table of your machine may break and you might get injured.
- Tidy the hose, cable and packaging of your machine during installation. You might trip over and fall.
- Do not turn your machine upside down, or on its side.
- Do not lift your machine by holding it from extruding parts (detergent
CHAPTER -1: BEFORE USING THE APPLIANCE
drawer, door). These parts might break and cause you to get injured.
- There’s the risk of tripping and injury if the materials like hose and cables are not properly stored after your machine is installed.

Machine must be carried by 2 people or more.
Child safety!
- Do not leave children unattended near the machine. Children might lock themselves up into the machine and death risk might occur.
- Door glass and surface might be extremely hot while your machine operates. Thus, especially touching the machine might give damage to the skins of children.
- Keep packaging material away from children.
- Poisoning might occur if the detergent and maintenance materials are consumed, and eyes or the skin might be irritated if they come into contact with the skin. Keep the cleaning materials away from the reach of children.
GENERAL WARNINGS
- The necessary ambient temperature for your machine's ideal operation is 15 - 25^ .
- Frozen hoses can tear and explode. In regions where temperature is below zero, ambient temperature might endanger the safe operation of electronic card.
- Please ensure that the clothes you will place in your machine do not contain any foreign substances (nail, needle, coins, lighter, matches, clip etc.) in their pockets. These foreign substances can damage your machine.
- Before starting to use your machine, you may call the nearest authorized service and request free-of-charge help for installation, operation and use of your machine.
- It is recommended to perform the first washing operation in 90^ Cotton programme and without laundry by inserting 1/2 scale of detergent in 2nd compartment of the detergent drawer.
- As detergent or softener exposed to air for a long time may cause residues, put your detergent or softener in the detergent drawer at the beginning of every washing.
- It is advised that you unplug your machine and close the water inlet tap if you will not use your machine for a long time. Also, leaving the door of your machine will prevent the formation of bad odors due to humidity.
- Some water might be left in your machine after the trials and tests
CHAPTER -1: BEFORE USING THE APPLIANCE
conducted due to Quality Control procedures. This will not damage your machine.
- Remember that packaging materials of your machine may be dangerous for children.
- Keep the packaging materials in a place where children cannot reach or dispose of them appropriately.
- Use pre-wash programs only for very dirty laundry.
- Never open the detergent drawer when the appliance is running.
- In case of any breakdown, unplug the appliance first and then turn the tap off. Do not attempt to repair by yourself, always contact for authorized service advice.
- The amount of laundry you put in your washing machine should not exceed the maximum amount indicated.
- Never force the door to open when the machine is running.
- Washing floury clothes in your machine damages the machine. Do not wash floury clothes in your machine.
- Please adhere to detergent/fabric conditioner manufacturers’ the use of fabric conditioner or similar products in your machine.
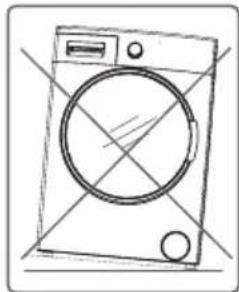
- Set up your machine in a place where its door can be completely opened. (Do not set up your machine in places where its door cannot be fully opened.)
- Set up your machine at locations that can be fully ventilated and could have constant air circulation.
- Definitely read the user's manual.
- Your machine is designed to be used domestically. Commercial use will cause your warranty to be cancelled.
- Keep your pets away from your machine.
- Please check the packaging of your machine before installation, and the outer surface after the package is opened. Do not operate damaged machines or machines with opened package.
- Have your machine installed only by authorized service. Any interference to your machine by anyone other than authorized services shall cause your warranty to be void.
- The appliance is not intended for use by people (including children) with reduced physical, sensory or mental capabilities, or lack of experience and knowledge unless they have been given supervision or instruction concerning use of the appliance by a person responsible for their safety.
CHAPTER -1: BEFORE USING THE APPLIANCE
- Use your machine only for laundries that have been specified as suitable for washing by the manufacturer.
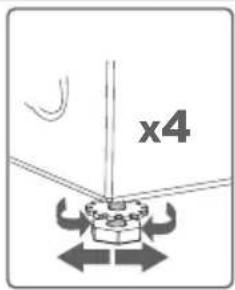
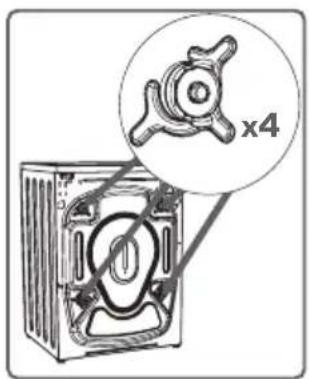
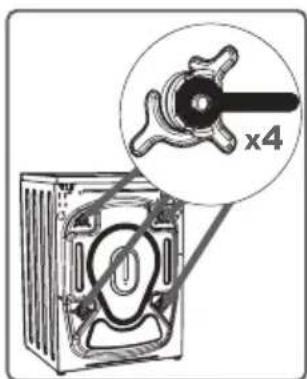
- Before operating the washing machine, remove the 4 transportation screws and rubber spacers from the back of the machine. If the screws are not removed, it may cause heavy vibration, noise and product malfunction, (voiding the guarantee).
- Your machine is not covered under warranty for faults caused by any kind of external factors (pesticides, fire, etc.).
- Please do not throw away this user manual; keep it for future reference. You or somebody else might need it in the future.
Note: Machinery specifications may vary depending on the product purchased.
REMOVAL OF PACKAGING MATERIALS
Packaging materials protect your machine from any damage that might occur during transportation. Packaging materials are environment friendly as they are recyclable.
Recycling material provides both raw material savings and decreases waste production.
CHAPTER-2: OVERVIEW OF YOUR DEVICE TECHNICAL SPECIFICATIONS
| Operating voltage / frequency (V/Hz) (220-240) V~/50Hz | |
| Total current (A) 10 | |
| Water pressure (Mpa) Maximum: 1 Mpa / | Minimum : 0.1 Mpa |
| Total power (W) 2200 | |
| Maximum dry laundry capacity (kg) 8 | |
| Spinning revolution (rev / min) 1000 | |
| Programme number 15 | |
| Dimensions (Height x Width x Depth) (mm) 845 x 597 x 557 | |
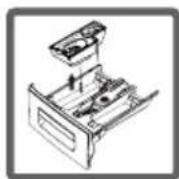
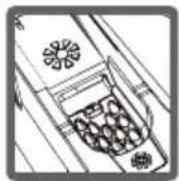
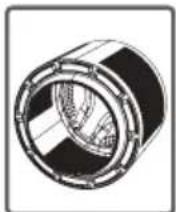
CHAPTER -2: OVERVIEW OF YOUR DEVICE GENERAL APPEARANCE
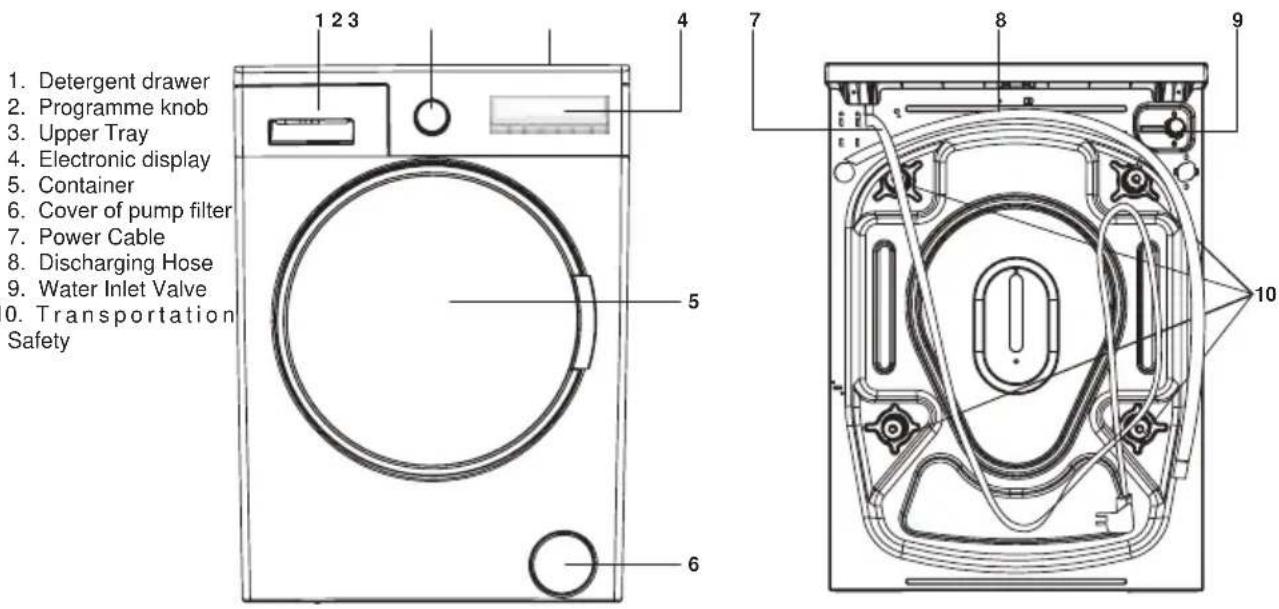
1. Detergent drawer
2. Programme knob
3. Upper Tray
4. Electronic display
5. Container
6. Cover of pump filter
7. Power Cable
8. Discharging Hose
9. Water Inlet Valve
- Transportation Safety
CHAPTER -3: INSTALLATION
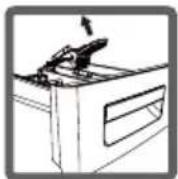
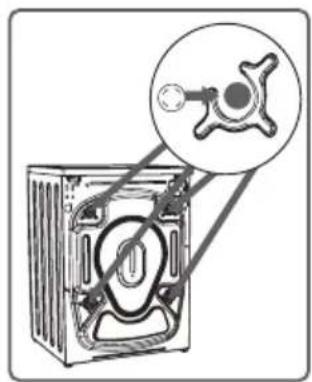
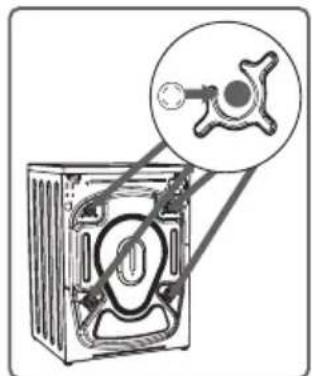
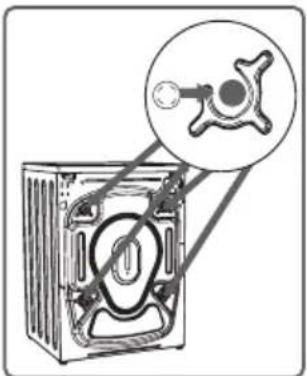
REMOVING TRANSPORTATION SAFETY SCREWS
Before operating the washing machine, remove the 4 transportation screws and rubber spacers from the back of the machine. If the screws are not removed, it may cause heavy vibration, noise and product malfunction, (voiding the guarantee). For this reason, transportation safety screws shall be loosened by being rotated in counterclockwise using an appropriate wrench.
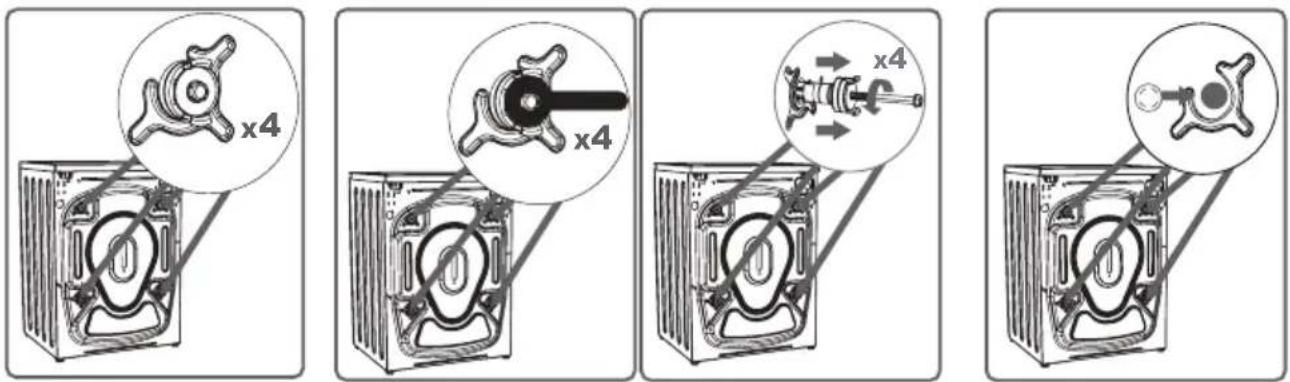
Before operating the washing machine, remove the 4 transportation screws and rubber spacers from the back of the machine. If the screws are not removed, it may cause heavy vibration, noise and product malfunction, (voiding the guarantee). For this reason, transportation safety screws shall be loosened by being rotated in counterclockwise using an appropriate wrench. Transportation screws shall be removed by pulling out. Fit the plastic transportation screw taps delivered in accessories bag to the palces where transportation screws have been removed. The transportation safety screws should be stored to be used in case of transportation.
NOTE: You should absolutely remove the transportation screws of your machine before the first usage. Faults occurring in the machines operated with transportation screw fitted shall be out of scope of warranty.
- Do not install your machine on a carpet or such grounds that would prevent the ventilation of its base.
- To ensure silent and vibration-free operation of your machine, it should be deployed on a non-sliding and firm ground.
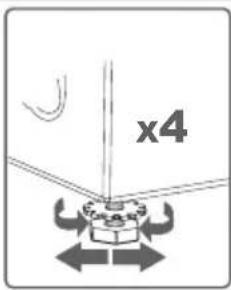
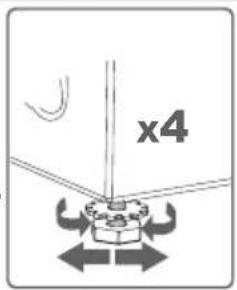
• You can adjust the balance of your machine through the stays. - Loosen the plastic adjustment nut.
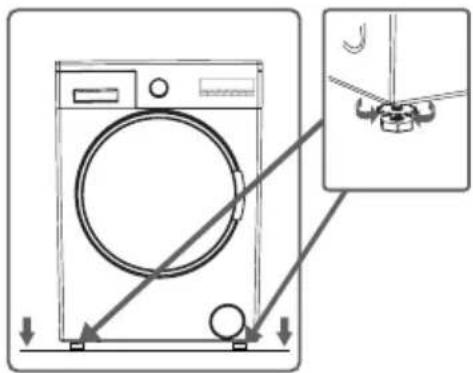
CHAPTER -3: INSTALLATION
- Adjust the stays upward and downward by rotating them.
• After maintaining the balance, compress the plastic adjustment nut upward again. - Never put cardboard, wood or suchlike materials under your machine if you are intending to stabilize the distortions on the ground.
- When cleaning the ground, on which your machine rests, be careful not to disorder stays stabilization.
natural_image
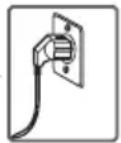
Line drawing of a washing machine with circular vent and side buttons (no text or symbols)ELECTRICAL CONNECTION
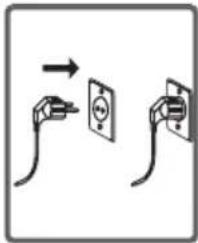
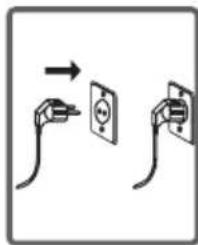
- Your washing machine is set to 220-240V and 50Hz.
- The mains cord of your washing machine is equipped with a specific earthed plug. This plug should always be inserted to a earthed socket of 10 amps. The current value of the fuse should be 10 amps. Fuse current value of the power line connected to this plug should also be 10 amperes. If you don't have such a receptacle and fuse confirming with this, please have it done by a qualified electrician.
- We do not take the responsibility of the damages that occur due to ungrounded usage. NOTE: Operating your machine under low voltage will cause the life cycle of your machine to be reduced and its performance to be restricted.
natural_image
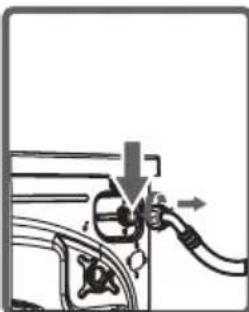
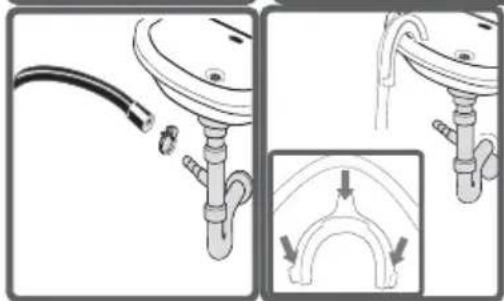
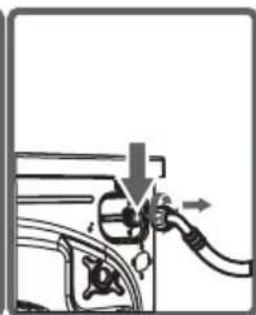
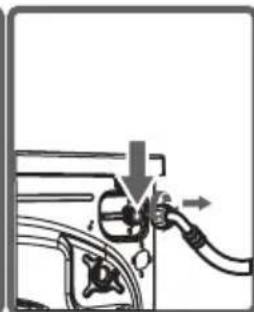
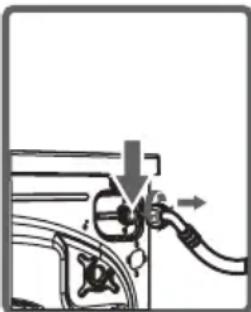
Two electrical plugs with wires, one open and one closed, showing a switch (no text or symbols)WATER INLET HOSE / WATER DISCHARGE CONNECTION
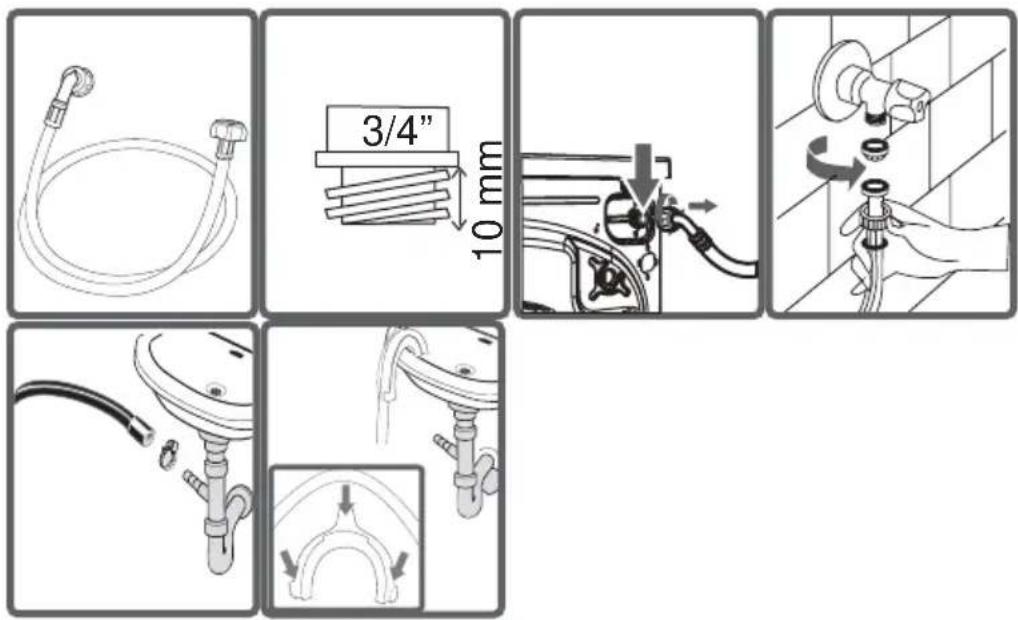
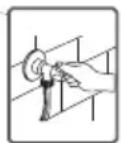
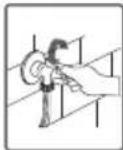
- Your machine may have either a single inlet (cold) or double water inlets (cold/hot) based on its specifications. White-capped hose should be connected to cold water inlet and red-capped hose to hot water inlet (applicable for machines with double water inlets). To eliminate water leakages in points of contact, 1 or 2 nuts are provided in the hose package (applicable for machines with double water inlets). Fit these nuts to the ends of new water inlet hoses on the side of faucet.
- Mount new water inlet hoses to a 3/4" , threaded faucet.
- Connect the white-elbow end of the water inlet hoses to the white-filtered water inlet valve on the rear side of the machine and the red-elbow end to red-filtered one (applicable for machines with double water inlets)
- Tighten plastic parts of the junctions using your hand. In uncertain conditions, have the connection works be done by a qualified plumber.
- Flow of water with pressure of 0,1-1 Mpa will allow your machine to operate more efficiently.) (0,1 Mpa pressure means that more than 8 litres of water will flow through a fully-tapped faucet per one minute.)
- Ensure that points of contact do not leak by tapping the faucet completely after carrying making the connections.
- Ensure that the new water inlet hoses are not bent, broken, crushed and resized.
- If your machine has double hot water inlets, the temperature of hot water inlet should be maximum 70^ . Note: Use only the new water inlet hose coming with your machine while making Water inlet hose connections of your machine. Never use old, used or damaged water inlet hoses.
- The end of water discharge hose can be fitted to a specific apparatus directly attached to dirty water discharge hole or outlet joint of the basin elbow.
- Never attempt to extend the water discharge hose by jointing.
- Do not put discharging hose of your machine in a vessel, bucket or sink.
• Make sure that the water discharge hose does not bend, buckle, be crushed or extended. Please note: - The water drain hose should be mounted at a height of minimum 60 cm, maximum 100 cm from the ground
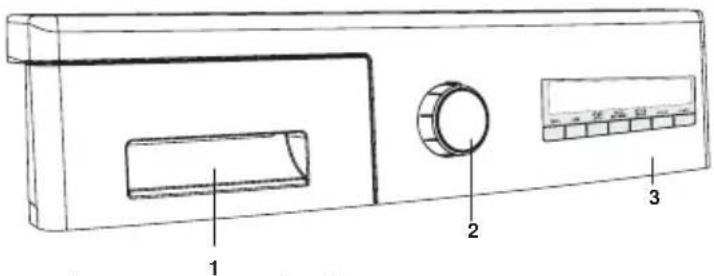
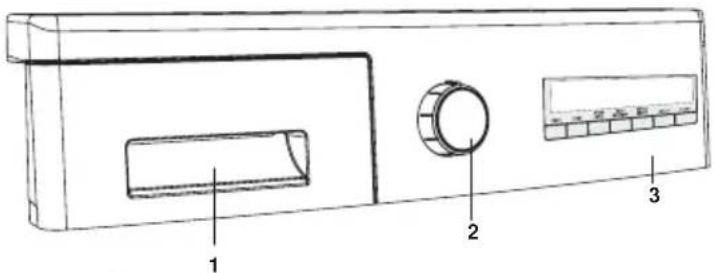
CHAPTER -4: INTRODUCTION OF CONTROL PANEL SECTIONS
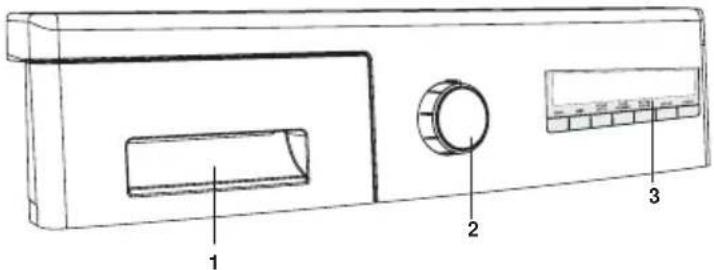
1-Detergent drawer
2-Programme knob
3-Elektronic Display and Additional
Functions
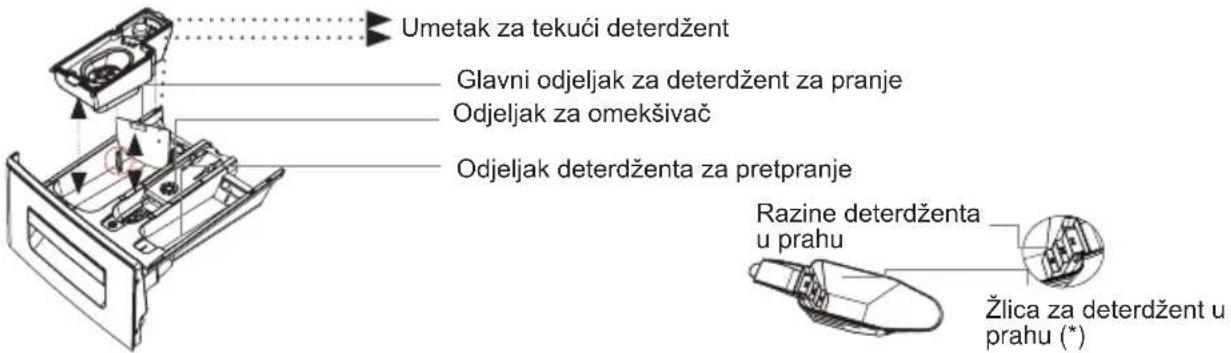
DETERGENT DRAWER
You can use the liquid level determination plate when you want to wash your laundry with liquid detergent. You can use your liquid detergents in all programs without prewashing. Place the liquid detergent apparatus in the second compartment (which is available inside the machine) of the detergent drawer (*) and set the detergent amount. (Use the recommended amount of liquid detergent by detergent producers). Do not exceed the MAX level, use only for liquid detergent, do not use this apparatus for powder detergent and take it out.)
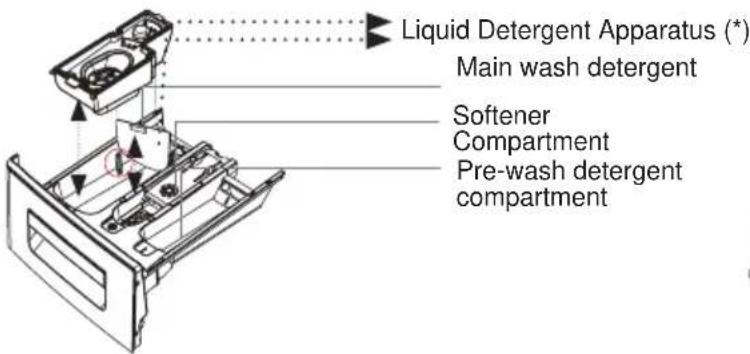
Main wash detergent compartment: "In this compartment, only materials like detergent (liquid or powder), lime preventer and such can be used. You can find the liquid detergent apparatus inside your machine at first installation. (*)
Fabric conditioner, starch, detergent compartment: You can use softener for your laundry recommended amount and type by the producer is recommended). Sometimes the fabric conditioners you use for your laundry mar remain in this compartment. The reason for this is that the conditioner is not viscous. To prevent this situation, more viscous liquid softeners are recommended to be used or the softener could be thinned and then used.
Pre-wash detergent compartment: This compartment must only be used when the pre-wash feature is selected. Pre-wash feature is recommended for very dirty laundry. (*) Machinery specifications may vary depending on the product purchased.
PROGRAM KNOB
- You can select the programme you want to wash your laundry in through progra mme knob.
- You may set the programme selection operation by rotating the programme knob in both directions.
- Ensure that the programme knob is exactly on the programme you want to select.
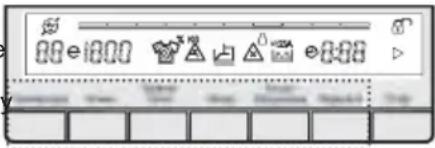
ELECTRONIC DISPLAY
- Display Panel
- Water Temperature Adjustment Buton
- Rpm Speed Adjustment Button
- Dirtiness Level Selection
- Auxiliary Functions
- Extra Rinsing Auxiliary Function
- Delay Timer Function
- Start / Pause button
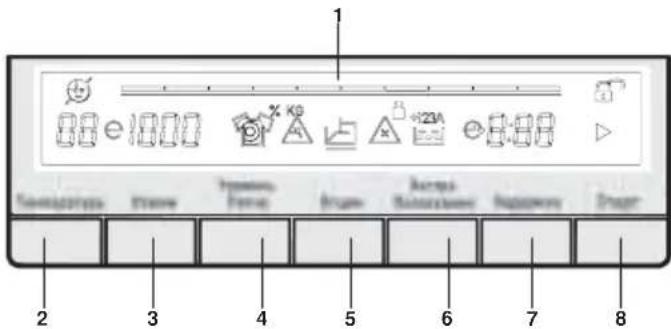
In the electronic display, you can see the washing water temperature of your machine, the wringing rpm, how long the machine has to finish washing, whether the door of your machine is locked or not, the auxiliary functions you have selected and the location of the programme you are running in your machine ( ) among the washing sequence. Furthermore, electronic display will warn you by means of fault symbols on the display when a fault occurs on your machine and notify you of the completion of the washing programme by revealing expression of "END" on the display as soon as the washing programme you have selected has finished as well.
CHAPTER -5: PRELIMINARY PREPARATION FOR LAUNDERING
SEPARATING LAUNDRIES
- Your laundry has product labels on them that specify their specifications. Wash or dry your laundry according to the specifications on the product label.
- Separate your laundries according to their types (cotton, synthetic, sensitive, wool etc.), their temperatures (cold, 30^ , 40^ , 60^ , 90^ ) and degree of contamination (slightly stained, stained, highly stained).
- Never wash your coloured and white laundry together.
- Wash your coloured laundries separately in the first washing as they may bleed.
- Ensure that there are no metallic materials on your laundries or in the pockets; if so, take them up.
WARNING: Faults that will emerge in case of penetration of foreign substances into your machine are not included within the scope of warranty. - Zip up and button up your laundries.
- Remove the metallic or plastic hooks of tulle curtains or curtains or place them in a washing net or bag and then muzzle them.
- Reverse textiles such as pants, knitwear, t-shirt and sweat suit.
- Wash socks, handkerchief and suchlike small laundries in a washing net.
- Open the door of your machine.
- Spread your laundries in your machine.

natural_image
Illustration of a washing machine with a curved pipe inserted (no text or symbols)
natural_image
Line drawing of a washing machine with a circular button and handle (no text or symbols)NOTE: Maximum loading capacity may vary based on the laundry type you will wash, degree of contamination and the programme you have chosen. Do not exceed maximum dry loading capacity indicated in the programme table for washing programmes. You can take the following table of weights as an example. • Put each item of laundry separately.
- Ensure that no laundry is stuck between the cover and bellow seal when closing the door of your machine." Push the door of your machine until hearing the locking sound to close it.
- Close the door of your machine properly, otherwise your machine will not start the washing operation.
| LAUNDRY TYPE WEIGHT (gr) | |
| Towel | 200 |
| Linen | 500 |
| Bathrobe | 1200 |
| Quilt cover | 700 |
| Pillow slip | 200 |
| Underwear | 100 |
| Tablecloth | 250 |
ADDING DETERGENT INTO MACHINE
The amount of detergent you will put in your machine will depend on the following criteria:
- Your detergent utilization will be based on the degree of contamination of your laundries. Do not prewash your less stained laundries and put your slight amount of detergent in the 2nd compartment of the detergent drawer.
- For your much stained laundries, select a programme including prewashing, and put 14 of the detergent you will put in the detergent drawer in the 1st compartment of the detergent drawer while putting the remaining 34 of it into 2nd compartment.
- Use detergents produced for automatic washing machine in your machine. The amount of detergent you will use for your laundries is printed on the detergent package.
- The higher the degree of hardness of the water the more detergent you will use.
- The amount of the detergent you will use will increase as the amount of your laundries increase.
- Put the softener in the softener compartment in the detergent drawer. Do not exceed the MAX level. Otherwise, softener will flow into washing water through flushing.
- Softeners with high density are required to be thinned to a degree before being put in the drawer. Because high-density softener will clog the flush and avoid the flow of the softener.
- You can use your liquid detergents in all programs without prewashing. For this, fit liquid detergent level plate in the accessories bag or the liquid detergent apparatus (*) into 2nd compartment of the detergent drawer and set the amount of liquid detergent according to the levels on this plate. Remember to detach the liquid detergent plate.
(*)Machinery specifications may vary depending on the product purchased.
- Plug your machine in.
- Open the water faucet.
- Open the machine door.
- Spread your laundries in your machine.
- Push the door of your machine until hearing the locking sound to close it.
- Selecting programme
- Select the convenient programme for your laundries on the programme table.
AUXILIARY FUNCTIONS
Before starting the programme, you can optionally select an auxiliary function.
- Press on the button of auxiliary function you would like to select.
- If auxiliary function symbol on electronic display flashes continuously, the auxiliary function you have selected will be activated.
- If auxiliary function symbol on electronic display blinks, the auxiliary function you have selected will not be activated.
Reason for non-activation:
• The auxiliary function you want to use in the washing programme you have selected is not applicable.
- Your machine has passed over the stage, during which the auxiliary function you would like to select would be implemented.
- It is not compatible with an auxiliary function you have selected previously.
1- Temperature selection
You can select the washing water temperature with the washing water temperature adjustment button. Whenever you select a new programme, the maximum washing water temperature is shown on the washing water temperature display. You can gradually decrease the washing water temperature between the maximum temperature and cold washing (--) by pressing washing water temperature adjustment button. If you have missed the washing water temperature you wanted, you can return to the intended temperature by continuously pressing the washing water temperature adjustment button.
2- Spin speed selection
You can set the spin revolution for your laundries via revolution
speed setting button. When you select a new programme, the maximum spin revolution speed of the programme you have selected will be viewed on the display of revolution speed. You can gradually reduce the revolution speed between cancel spinning (-) options through the maximum spin revolution of the programme selected by pressing revolution speed setting button. If you have skipped the spinning revolution you want to set, you can re-switch to the revolution by keeping the revolution setting button pressed.
3- Delay Timer function
By using this auxiliary function, you can let your machine start washing after 30 minutes to 23 hours. To use auxiliary function of delay timer:
- Press time delay button once. - Expression of "0.5h" will appear on the display. symbol will flash on electronic display. - Touch on time delay button until the time, on which you want washing operation to be started. • If you want to cancel during the selection, touch the time delay button once after the other until you see the duration of the programme you have selected on the electronic display. When you see the duration of the programme on the electronic display, the time delay is cancelled. (When the time delay button is touched continuously, the delay duration shall constantly rotate in its values.) * If you want to cancel the time delay operation after you touch the "Start/Standby" button, it will be enough to touch the time delay button just once. The symbol will go off on the electronic display, you should touch "Start/Standby" button for your machine to start washing operation.
4a- Pre-wash function
You can give your heavily soiled laundry a pre-wash before the main wash using this function. When using this function, you should put detergent in the front washing compartment of the detergent drawer. • Touch the symbol button to activate the pre-wash additional function.
Note: If the symbol is not displayed on the screen when you want to choose the pre-wash additional function, it means that this feature can not be used in the washing programme you selected.
4b- Easy ironing
- Touch the symbol button to activate the easy ironing additional function.
Note: If the symbol is not displayed on the screen when you want to select the easy ironing additional function, it means that the washing programme you selected does not use this feature.
5a- Extra rinse function
You can add an additional rinse or rinses to your laundry by using this function. Your machine offers you 3 rinsing options for this additional feature.

: One additional rinse is made at the end of washing.

: Two additional rinses are made at the end of washing.

: Three additional rinses are made at the end of washing.
- If you want to make more than one rinsing, touch the 📄 symbol button until you see the number of rinses you
wish. Note: If the Symbol is not displayed on the screen when you want to choose the additional rinsing function, it means that this feature is not used in the washing programme you selected.
5b- Anti-allergic function
You can add this additional rinse operation to your laundry by using this function. Your machine will carry out all rinsing steps with hot water (it is recommended for laundry worn on delicates skin, baby clothes, underwear)
- Touch the symbol button until you see the symbol to activate the anti-allergic additional function.
Note: If the symbol is not displayed on the screen when you want to select the anti-allergic additional function, it means that the washing programme you selected does not use this feature.
6-Dirtiness level selection
You can make dirtiness level selection according to the dirtiness level on your laundry and have your laundry washed in less or more time, lower or higher temperature.
The dirtiness levels are automatically set in certain programmes.
You can make changes as you like.
Note: If no change occurs when you touch the dirtiness level button, this means there is no dirtiness level selection in the programme you have selected.
Less dirty (no pre-washing) Dirty (apply pre-washing if necessary.) Very dirty (apply pre-washing if necessary.)
| PROGRAMMES DIRTINESS | SELECTION | FACTORY PRESET | SELECTABLE LEVELS | |
| Cotton 90°C S Dirty Very dirty Less dirty | ||||
| Cotton 60°C S Dirty Very dirty Less dirty | ||||
| *Cotton 60°C e S Dirty Very dirty Less dirty | ||||
| *Cotton 40°C e S Dirty Very dirty Less dirty | ||||
| Eco 20° NS Less dirty NS | NS | NS | ||
| Synthetic | S Dirty Very dirty Less dirty | |||
| Wool | S Less dirty | Dirty | Very dirty | |
| Delicate | S Less dirty | Dirty | Very dirty | |
| Rinse | NS Less dirty | NS | NS | |
| Baby Care | NS Dirty NS | NS | ||
| Spin | NS Less dirty | NS | NS | |
| Daily 60° | S Dirty Less dirty | NS | ||
| Quick 15' | NS Less dirty | NS | NS | |
| Mix | S Less dirty | Dirty | Very dirty | |
| Shirts | S Dirty Very dirty Less dirty | |||
| Sports | S Less dirty | Dirty | Very dirty | |
| Night Wash | S Dirty Very dirty Less dirty | |||
Start/Pause button
By touching on the Start/Pause button, you may start the programme you have selected or suspend a running programme. When you want to start your machine, ▷ symbol will be displayed on the screen. When you take your machine into the standby mode while running, ▷ symbol will flash on the display.
Main symbol explanations
1- ▷ Start/Pause symbol
2-0 / Door lock active/ Door lock not active
3- 8:88 Washing Programme remaining duration and delayed start remaining duration
4- Delayed Start symbol
5- +123A Extra rinsing and anti allergic auxiliary function symbol
6- Pump malfunction symbol
7- Water cut off malfunction symbol
8- Stain level symbol
9- Wringing speed indicator symbol
10- Economic washing temperature indicator symbol
11- Washing temperature indicator symbol
Child Lock
To avoid programme flow from being affected if programme buttons are pressed or programme button is turned when performing washing operation in your machine, child lock is available. Child lock will be activated in case pressed on both auxiliary functions 4 and 5 at the same time for more than 5 seconds.
“” symbol will flash on the electronic display when activated.
If pressed any button while child lock is active, the "CL" symbol will blink on the electronic display.
If while the child lock is engaged and any programme is running, the programme knob is switched to the OFF position and another programme is selected, the programme previously selected continues from where it left.
To deactivate it, it will be sufficient to press on the same buttons for more than 5 seconds. When the child lock is deactivated, the "F" symbol on the electronic display will go off.

Cancelling programme
If you want to cancel any programme running:
1- Switch the programme knob to "OFF" position.
2- Your machine will stop the washing operation and the programme will be cancelled.
3- To get rid of the water accumulated in the machine switch the programme knob to any programme.
4- Your machine will perform the necessary discharge operation and cancel the programme.
5- You can run your machine by selecting a new programme.
Finishing programme
Your machine will stop by itself as soon as the programme you have selected finishes.
- The expression of "END" will light on the electronic display for 2 minutes.

- door lock open symbol shall be displayed on the screen.
- You can open the machine's door and remove the laundry.
- Leave the door of your machine open to allow the inner part of your machine to dry after removing your laundries.
- Switch the programme knob to OFF position.
- Unplug your machine.
- Turn the water faucet off.
Warning of water cut-off / low mains water pressure
If symbol 📄 flashes on the electronic display:
• Water faucet may be closed. Check.
- Mains water may be cut-off. Check. If so, switch the programme knob to position OFF. You can select a programme and run your machine after the mains water is supplied.
- Mains water pressure may be low. Check.
• Water inlet hose may be twisted. Check.
- Water inlet hose may be clogged. Clean water inlet hose filters. (*)
- Valve inlet filter may be clogged. Clean the valve inlet filters. (*)
(*) See the chapter regarding maintenance and cleaning of your machine.
Warning of clogged pump filter
If symbol ✉ flashes on the electronic display:
- Pump filter may be clogged. Clean the pump filter. (*)
- Discharging hose may be clogged or twisted. Check the discharging hose. (*)
See the chapter regarding maintenance and cleaning of your machine.
| Program name | Washing temperature (°C) | Maximum dry laundry amount (kg) | Detergent | Prog. duration (Min.) | Laundry type / Descriptions |
| COTTON 90°C | *90°-80°-70°-60°-50°-40°-30°--" | 8,0 2 207 | Very dirty, cotton and flax textiles. (Underwear, linen, tablecloth, towel (maximum 4,0 kg), bedclothes, etc.) | ||
| COTTON 60°C | *60°e - 60°-40°e - 40°-30°--" | 8,0 2 200 | Dirty cotton and flax textiles. (Underwear, linen, tablecloth, towel (maximum 4,0 kg), bedclothes, etc.) | ||
| ECO 20° *20°--" | 4,0 2 98 | Less dirty, cotton and linen textiles. (Underwear, bed sheet, tablecloth, (towel max. 2,0 kg) bed cloth, etc.) | |||
| SYNTHETICS | 40°-30°--" 3,5 2 89 | Very dirty or synthetic-mixed textiles. (Nylon socks, shirts, blouses, synthetic-including trousers etc.) | |||
| WOOL *30°--" | 2,5 2 48 | Woolen laundries with machine wash labels. | |||
| DELICATE *30°--" 2,5 2 91 | Laundry recommended for hand wash or sensitive laundry. | ||||
| RINSE *--" 8,0 - 42 | If you want to additionally rinse your laundries upon completion of washing operation, you may use this programme for any kind of laundries. | ||||
| BABY CARE | *60°-50°-40°-30°--" | 4,0 2 200 | Baby clothes / all baby clothes with machine washable label can be washed. | ||
| SPIN *--" 8,0 - 17 | If you want to additionally spin your laundries upon completion of washing operation, you may use this programme for any kind of laundries. | ||||
| (*) DAILY 60 min. | *60°-50°-40°-30°--" | 4,0 2 60 | You can wash your dirty cotton, colour and flax textiles at 60°C in 60 minutes. You can wash your dirty cotton, colour and flax textiles at 60°C in 60 minutes. (*) Daily 60 mins. programme can wash your laundry for 30 mins depending on the dirtiness level selected. If you want your laundry to be washed with 30 minutes duration, you can make the "less dirty" selection from the dirtiness level selection. (See page 13) |
CHAPTER-7: PROGRAM TABLE
| OUICK 15' *30°--'' 2,0 2 15 | You can wash your dirty cotton, colour and flax textiles in 12 minutes that is a short period. As the washing period is short in this programme, less amount of detergent is required to be used compared to other programmes. The programme period will increase if your machine detects instable loading. You can open the door of your washing machine just after the washing operation is complete. | |||
| MIX *30°--'' 3,5 2 85 | Dirty cotton, synthetics, colour and flax textiles can be washed together. | |||
| SHIRTS | *60°-50°-40°-30°--'' | 4,0 2 116 | Dirty cotton, synthetic and synthetic-mixed shirts and blouses can be washed together. | |
| SPORTS *30°--'' 3,5 2 79 | Sportswear. | |||
| NIGHT WASH | *90°-80°-70°-60°-50°-40°-30°--'' | 8,0 2 177 | Very dirty, cotton and flax textiles. (Underwear, linen, tablecloth, towel (maximum 4,0 kg), bedclothes, etc.) |
NOTE: Night washing programme is a programme that will wash your laundry silently without any wringing stage during the washing. When your machine nears the end of the washing operation, it goes into sleep mode and can keep your laundry for a maximum of 10 hours without discharging the water inside. If the programme waiting duration exceeds 10 hours, your machine will automatically perform water discharge and wringing operations. Starting from the time your machine goes into this waiting operation, you can cancel this operation and resume the washing programme from where it is left. What you have to do is only to touch the Start / Standby button again. (In sleep mode, the remaining time is not calculated on the display, the remaining time on the display is the duration valid only for discharge and wringing operation.
NOTE: PROGRAM DURATION MIGHT CHANGE ACCORDING TO THE AMOUNT OF LAUNDRY, TAP WATER, AMBIENT TEMPERATURE AND SELECTED ADDITIONAL FUNCTIONS.
*60°e - 40°e Energy label declaration programmes. (*Black parts are factory preset)
CHAPTER -8: MAINTENANCE AND CLEANING OF YOUR MACHINE
Unplug your machine before starting the maintenance and cleaning of your machine. Turn the tap water off before starting the maintenance and cleaning of your machine.
CAUTION: Your machine's parts might be damaged if cleaners with solvent agents are used. Do not use cleaning materials with solvent agents.

WATER INLET FILTERS
Filters to avoid dirt and foreign substances in the water from penetrating into the machine are available both on the side of faucet and on the ends of water valves along the water inlet hose of your machine. If your machine cannot intake sufficient amount of water despite water faucet being open, these filters should be cleaned. (It is recommended that you clean your pump filter once in 2 months.)
- Detach the water inlet hoses.
- Remove the filters on water inlet valves using pliers and then clean it with a brush in water.
- Disassemble the filters on the side of faucet side of water inlet hoses manually and clean it.
- Having the filters cleaned, you can fit them in the same way reversely.
CAUTION:
Filters of water inlet valves may be clogged due to contaminated water faucet or lack of necessary maintenance or valves may be broken down, causing water leaking into your machine continuously. The breakdowns that may arise due to these reasons are out of the scope of warranty.
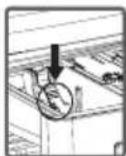
PUMP FILTER
A filter system which avoids threads remaining from your laundries and tiny materials from entering into the pump during water discharging operation carried out by your machine after completing washing so prolonging the lifecycle of your pump is available. It is recommended that you clean your pump filter once in 2 months. To clean pump filter:
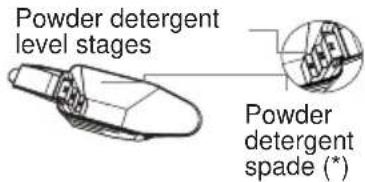
- To open the pump cover, you can use the powder detergent spade (*) or liquid detergent level plate coming out of your machine.
- Fit the end point of the plastic part to the gap of the pump cover and push it back. This will open the cover.
- Before opening the filter cover, settle a vessel in front of the filter cover to prevent the water remained in the machine from flowing on the ground.
- Loosen the filter cover in counter-clockwise and then empty water.
Note: You may have to empty the water collection vessel several times according to the amount of water in the machine.
- Clean the foreign materials in the filter with a brush.
• After cleaning the filter, fit the filter cover and tighten it by rotating it in clockwise direction. - While closing the pump cover, ensure that the parts on the inner side of the cover to match the holes on the front panel side.
- You can reattach the pump cover in the reverse order that you removed it.
WARNING!

As water in the pump may be hot, wait until it cools down.
(*) Machinery specifications may vary depending on the product purchased.

DETERGENT DRAWER
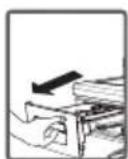
Your detergents may deposit residue in detergent drawer and housing of detergent drawer over time. To clean the residue formed, disassemble the detergent drawer in particular periods. It is recommended that you clean your detergent drawer every 2 months. To eject the detergent drawer:
Pull the detergent drawer up to the end

CHAPTER -9: FLUSH STOPPER / BODY / DRUM
Keep on pulling by depressing on the section shown below in the detergent drawer and keep pulling and then
unsettle the detergent drawer.
- Flsuh it using a brush.
- Collect residues in the housing of the detergent drawer without dropping them inside the machine. Assemble the detergent drawer after drying it using a towel or dry cloth.
- Do not wash your detergent drawer in dishwasher.
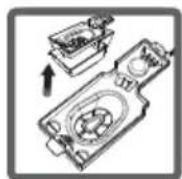
Liquid Detergent Apparatus (\*)
Take out the liquid detergent level apparatus for cleaning and maintenance purposes as shown in the picture and clean well detergent residues. Put the apparatus back into its place. Make sure no residues are left inside.
(*) Machinery specifications may vary depending on the product purchased.
FLUSH STOPPER
Flush stopper
Disassemble the detergent drawer. Disassemble the flush stopper and clean the softener residues completely. Refit the flush stopper after cleaning it. Check whether it has settled properly.
Body
Clean the outer body of your machine with warm water and a non-inflammable cleaning agent that will not abrade the body of your machine. After rinsing with some water, dry it using a soft and dry cloth.
Drum
Do not leave metallic objects such as needles, paper clips, coins etc. in your machine. This objects lead to formation of rust stains in the drum. To clean such rust stains, use a non-chlorine cleaning agent and follow the instructions of manufacturers of the cleaning agent. Never use wire wool or similar hard objects for cleaning rust stains.
CHAPTER -10: TROUBLESHOOTING
All repairing operations required for your machine should be carried out by our authorised service. If your machine requires a repair or if you cannot remove the fault by the help of the information provided as follows:
•Unplug your machine.
- Turn the water faucet off.
| FAULT POSSIBLE CAUSE TROUBLESHOOTING | ||
| Your machine does not start. | It is not plugged. Plug it. | |
| Fuse blown. Replace the fuses. | ||
| Electricity cut-off. Check mains power. | ||
| Start/pause button not pressed. Press on Start/Pause button | ||
| Programme dial ‘stop’ position. Switch the programme button to the desired position. | ||
| The machine door is not completely closed. | Close the machine door. | |
| Your machine does not intake water. | Water tap is turned off. Turn your faucet on. | |
| Turn your faucet Check water inlet hose and untwist. | ||
| Water inlet hose clogged. Clean water inlet hose filters. (*) | ||
| Valve inlet filter clogged. Clean the valve inlet filters. (*) | ||
| The machine door not completely closed. | Close the machine door. | |
(*) See the chapter regarding maintenance and cleaning of your machine.
| FAULT POSSIBLE CAUSE TROUBLESHOOTING | ||
| Your machine does not discharge water. | Discharging hose clogged or twisted. | Check the discharging hose, then either clean or untwist. |
| Pump filter clogged. Clean the pump filter. (*) | filter. (*) | |
| Laundry settled in the machine unevenly. | Spread your laundry in the machine evenly. | |
| Your machine vibrates. | The feet of your machine have not been adjusted. | Adjust the feet on your machine. (**) |
| Safety stays fitted for transportation not disassembled. | Disassemble the safety stays of your machine. (**) | |
| Less amount of laundry in the appliance. | This will not block operation of your machine. | |
| Your machine is overloaded with laundry or laundry settled unevenly. | Do not put in laundry more than the amount recommended and settle the laundry in the machine evenly. | |
| Your machine rests on a hard surface. | Prevent your machine from resting on hard surfaces. | |
(*) See the chapter regarding maintenance and cleaning of your machine.
(**) See the chapter regarding installation of your machine.
CHAPTER -10: TROUBLESHOOTING
| FAULT POSSIBLE CAUSE TROUBLESHOOTING | ||
| Excessive foam is formed in the detergent drawer. | Excessive amount of detergent used. | Press on Start/Pause button To eliminate foam formation, mix a spoon of softener with half litres of water, and pour the mixture in the detergent drawer. After 5-10 minutes, press on Start/Pause button again. In your next washing operation, Adjust the detergent dose accordingly. |
| Wrong detergent used. | Use detergents produced only for automatic washing machines in your machine. | |
| Unsatisfactory washing result. | The contamination degree of your laundries does not match the programme you have chosen. | Select the programme appropriate for the contamination degree of your laundries. (See programme table) |
| Amount of detergent used insufficient. | Adjust the amount of detergent based on the amount and contamination degree of your laundries. | |
| Laundries in excess of maximum capacity put in your machine. | Load your machine with laundries, amount of which will not exceed maximum laundry capacity. | |
| Water being hard. (Contaminated, lime water etc.) | Adjust the amount of detergent based on the instruction of detergent manufacturer. | |
| Laundries distributed in your machine non-homogenously. | Spread your laundries in the machine properly and homogeneously. | |
| As soon as the machine is loaded with water, water discharges. | The end of water discharging hose is too low for the machine. | Set the water discharging hose on appropriate height. (**) |
| No water appears in the drum during washing. | No fault. Water is in the unseen part of the drum. | - |
| Laundries have detergent residues on them. | Non-dissolving particles of some detergents may stick to your laundries as white spots. | Perform an extra rinsing by setting your machine to “Rinsing” programme, or clean the spots using a brush after your laundries dry. |
| Grey spots appear on the laundries. | The reason for such spots may be oil, cream or ointment. | Apply the maximum amount of detergent instructed by the detergent manufacturer in the next washing operation. |
| Spinning operation is not performed or runs late. | No fault. Unbalanced load control system has been activated. | Unbalanced load control system will try to spread your laundries homogeneously. Wringling operation will begin after your laundry is spread. Place the laundry in the machine in a balanced fashion the next time. |
(**) See the chapter regarding installation of your machine.
CHAPTER -11: AUTOMATIC FAULT WARNINGS AND WHAT TO BE DONE
| TROUBLE CODE POSSIBLE FAULT WHAT TO DO | ||
| E01 | The door of your machine is left open. | Close the machine door. If your machine persists to indicate fault, turn off your machine, unplug it and contact the nearest authorised service immediately. |
| E02 | The water pressure or the water level inside the machine is low. | Turn on the faucet. Mains water may be cut-off. If the problem still continues, your machine will stop after a while automatically. Unplug the machine, turn off your faucet and contact the nearest authorised service. |
| E03 | The pump is faulty or pump filter is clogged or electrical connection of the pump is faulty. | Clean the pump filter. If the problem persists, contact the nearest authorised service. (*) |
| E04 | Your machine has excessive amount of water. | Your machine will discharge water by itself. Pursuant to discharging operation, turn off your machine and unplug it. Turn off your faucet and contact the nearest authorised service. |
| FAULT POSSIBLE CAUSE TROUBLESHOOTING | ||
 | Water cut-off or low mains water pressure. | - Water faucet may be closed.Check.- Mains water may be cut-off.Check.- If so, switch the programme knob to position 0. You can select a programme and run your machine after the mains water is supplied.- Mains water pressure may be low. Check.- Water inlet hose may be twisted.Check.- Water inlet hose may be clogged.- Clean water inlet hose filters. (*)- Valve inlet filter may be clogged.- Clean the valve inlet filters. (*)If the problem persists, unplug your machine, turn off your faucet and contact the nearest authorised service. |
 | Pump is faulty or pump filter is clogged or electrical connection of the pump is faulty. | - Pump filter may be clogged.Clean the pump filter. (*)- Discharging hose may be clogged or twisted. Check the discharging hose.If the problem persists, contact the nearest authorised service. (*) |
DISPOSAL OF YOUR OLD MACHINE
This symbol on the product or package implies that the product should not be treated as domestic waste. Instead, it should be delivered to applicable waste collection places recycling electrical and electronic equipment. You will contribute to avoid potential negative results regarding environment and human health, which will arise due to wrong waste procedure for the product by ensuring that this product is annihilated properly. Recycling materials will help natural resources be preserved. For more detailed information regarding recycling of this product, please contact local municipality, domestic waste annihilation service or the shop you have purchased the product.
TARTALOMJEGYZÉK
- FEJEZET: A KÉSZÜLÉK HASZNÁLATA ELÖTT ..... 21
BIZTONSÁGI FIGYELMEZTETÉSEK 21
natural_image
Diagram of a refrigerator with an inset showing a close-up of the front panel (no text or symbols present)natural_image
Line drawing of a washing machine with circular vent and buttons (no text or symbols)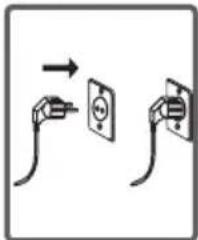
natural_image
Two electrical connectors with wires, one holding a switch and the other holding an outlet (no text or symbols visible)VÍZBEVEZETŐ CSŐ CSATLAKOZTATÁSA
natural_image
Line drawing of a coiled hose with two connectors (no text or symbols)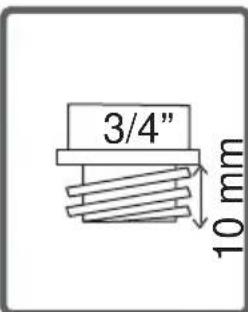
natural_image
Diagram of a vehicle fuel injection system with valve and hose (no text or labels)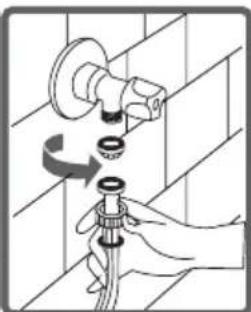
natural_image
Illustration of a hand holding a pipe with a faucet, showing mechanical components and a circular arrow indicating rotation (no text or symbols)
natural_image
Diagram of a pipe fitting with a bulb and valve (no text or symbols)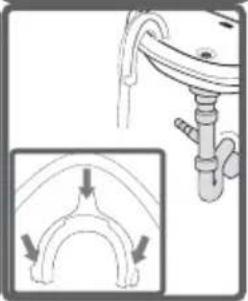
natural_image
Diagram showing a mechanical component with an inset view of a curved structural element (no text or symbols)4. FEJEZET: A KEZELÓPANEL LEÍRÁSA
natural_image
Illustration of a washing machine with a pipe inserted (no text or symbols)
natural_image
Line drawing of a washing machine with a circular button and handle (no text or symbols)(**) See the chapter regarding installation of your machine.
11. FEJEZET: AUTOMATIKUS HIBAÜZENETEK ÉS KEZELÉSÜK
Our goal is to offer you, high quality products that exceed your expectations. Your appliance is produced in modern facilities and is carefully, particularly tested for quality.
This manual is prepared in order to help you use your appliance, which has been manufactured using the most recent technology with confidence and maximum efficiency.
Before using your appliance, carefully read this guide which includes basic information to safe installation, maintenance and use. Please contact your nearest Authorized Service centre for the installation of your product.
The operating instructions apply to several models. Differences may therefore occur.
1. POGLAVJE: PRED UPORABO NAPRAVE
VARNOSTNAOPOZORILA
| Delovna napetost/frekvenca: |
| (V/Hz) (220-240) V~/50Hz; |
| Skupni tok (A): 10 |
| Vodni tlak (Mpa) |
| Maksimum: 1 Mpa / Minimum: 0,1 Mpa |
| Skupna moč (W): 2200 |
| Največja količina perila (pranje) (kg): 8 |
Stroja ne postavite na preprogo ali takšna tla, ki bodo onemogočila prezračevanje od spodaj.
3. POGLAVJE: NAMESTITEV
ODSTRANITEV TRANSPORTNIH VIJAKOV
3. POGLAVJE: NAMESTITEV
• Z obračanjem prilagodite nogice.
- Ko vzpostavite ravnotežje, znova stisnite plastično prilagoditveno matico navzgor.
- Pod pralni stroj nikoli ne postavljajte kartona, lesa ali podobnih materialov, će želite izničiti motnje na podlagi.
- Ko čistite podlago, na kateri stoji vaš pralni stroj, pazite na ravnotežje nogic.

natural_image
Line drawing of a washing machine with no text or symbolsELEKTRIČNE POVEZAVE
• Vaš pralni stroj deluje pri 220-240 V in 50 Hz.
natural_image
Diagram showing a pipe fitting with a cable and a cross-sectional view of the pipe (no text or labels)4. POGLAVJE: PREDSTAVITEV UPRAVLJALNE PLOŠČE
natural_image
Illustration of a washing machine with a curved pipe inserted into it (no text or symbols)
natural_image
Line drawing of a washing machine with a circular gasket and side blades (no text or symbols)OPOMBA: Največja kapaciteta perila je odvisna od vrste perila za pranje, stopnje umazanosti in izbranega programa. Kapaciteta suhega perila ne sme presegati navedene v programski tabeli za programe pranja.
• V sledeči tabeli lahko najdete primere.
- Vsak kos perila vstavite ločeno.
- Ensure that no laundry is stuck between the cover and bellow seal when closing the door of your machine." Push the door of your machine until hearing the locking sound to close it.
- Close the door of your machine properly, otherwise your machine will not start the washing operation.
| VRSTA PERILA TEŽA (gr) | |
| Brisača | 200 |
| Laneno platno | 500 |
| Kopalni plašč | 1200 |
| Prešita odeja | 700 |
| Blazina | 200 |
| Spodnje perilo | 100 |
| Namizni prt | 250 |
natural_image
Diagram showing two electrical connections: one with a plug and dashed lines, the other with a tool inserted into wires (no text or symbols)DODATNE FUNKCIJE
6. POGLAVJE: DELOVANJE PRALNEGA STROJA
+ 3

: Tri dodatna izpiranja na koncu pranja.
Kapitola 3 - Instalace
natural_image
Diagram of a refrigerator with an inset showing a close-up of the door handle (no text or symbols present)Kapitola 3 - Instalace
natural_image
Line drawing of a washing machine with circular vent and buttons (no text or symbols)
natural_image
Two electrical plugs with wires, one holding a plug and the other holding a socket (no text or symbols)natural_image
Line drawing of a coiled hose with two connectors (no text or symbols)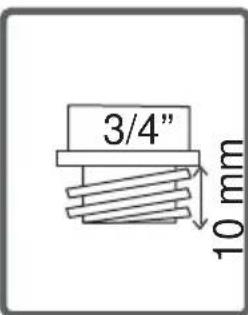
natural_image
Diagram of a car fuel pump assembly with valve and valve components (no text or labels)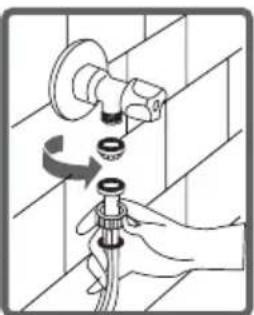
natural_image
Illustration of a hand using a tool to lift a wall-mounted pipe, showing mechanical components and a circular motion arrow (no text or symbols)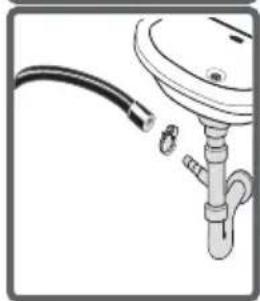
natural_image
Diagram of a pipe fitting with a bulb and valve (no text or symbols)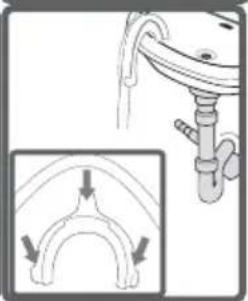
natural_image
Diagram showing a mechanical component with an inset view of a curved bracket or arch (no text or symbols present)natural_image
Technical line drawing of a mechanical device with internal components and mounting holes (no text or symbols)natural_image
Illustration of a washing machine with a pipe inserted (no text or symbols)
natural_image
Line drawing of a washing machine with a circular button and ventilation grille (no text or symbols)6-Dirtiness level selection
unsettle the detergent drawer.
natural_image
Diagram of a refrigerator with an inset showing a close-up of the front panel (no text or symbols present)- Adjust the stays upward and downward by rotating them.
• After maintaining the balance, compress the plastic adjustment nut upward again. - Never put cardboard, wood or suchlike materials under your machine if you are intending to stabilize the distortions on the ground.
- When cleaning the ground, on which your machine rests, be careful not to disorder stays stabilization.
natural_image
Line drawing of a washing machine with no text or symbolsnatural_image
Two electrical plugs with wires, one holding a socket and the other holding a socket (no text or symbols visible)Pripojenie vody / Pripojenie vody
natural_image
Illustration of a washing machine with a curved pipe inserted (no text or symbols)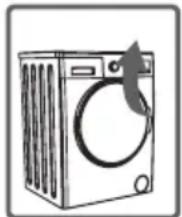
natural_image
Line drawing of a washing machine with a circular button and handle (no text or symbols)- Mains water pressure may be low. Check.
Do not install your machine on a carpet or such grounds that would prevent the ventilation of its base.
POGLAVLJE -3: POSTAVLJANJE
UKLANJANJE TRANSPORTNIH VIJAKA
Prije rada perilice rublja, uklonite 4 transportna vijka i gumene odstojnike iz zadnjeg dijela perilice rublja. Ako vijci nisu uklonjeni može doći do velikih vibracija, buke i kvara proizvoda (čime se poništava jamstvo za perilicu rublja). Transportni vijci se uklanjaju tako da ih se pomoću odgovarajućeg ključa okrene u smjeru suprotnom od smjera kretanja kazaljki na satu.

POGLAVLJE -3: POSTAVLJANJE
- Podesite nožicu okrečući je.
- Nakon balansiranja perilice, pritegnite ponovo plastičnu maticu za podešavanje.
- Ne postavljajte karton, drvene pločice ili slične materijale ispod nožica kako biste nivelirali perilicu.
- Kada čistite površinu, na kojoj se nalazi vaša perilica rublja, pazite da ne poremetite njenu ravnotežu.
ELEKTRIČNI PRIKLJUČAK

natural_image
Line drawing of a washing machine with circular vent and buttons (no text or symbols)• Vaša perilica rublja je podešena za rad na 220-240V i 50Hz.
- Perilica se priključuje na električnu instalaciju preko utikača i propisno instalirane zidne priključnice s uzemljenjem i osiguračem od 10 A. Električna instalacija mora biti izvedena tako da izdrži potrebnu struju.
- Ako nemate takvu utičnicu i osigurač koji odgovara ovom opisu, neka ju postavi kvalificirani električar.
- Proizvođač otklanja svaku odgovornost za ozljede i štete prouzročene uporabom aparata bez uzemljenja ili nepoštivanja ovih uputa za uporabu.
NAPOMENA: Rad vaše perilice rublja pri slabijem naponu može umanjiti karakteristike perilice i skratiti njen radni vijek.
natural_image
Diagram showing two electrical connectors with a switch, one pointing to the switch (no text or symbols present)PRIKLJUČAK CIJEVI ZA DOVOD VODE / PRIKLJUČAK ZA ODVOD VODE
natural_image
Line drawing of a coiled hose with two connectors (no text or symbols)
natural_image
Diagram of a fuel pump or valve assembly with no visible text or symbols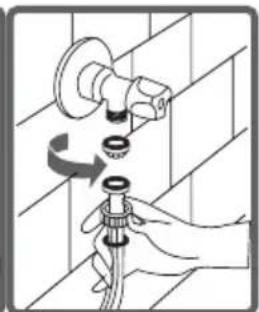
natural_image
Illustration of a hand using a tool to clean or repair a wall-mounted device (no text or symbols present)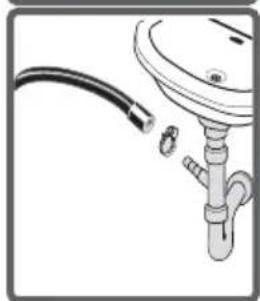
natural_image
Diagram of a pipe fitting with a bulb and valve (no text or symbols)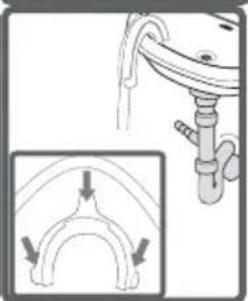
natural_image
Diagram showing a mechanical component with an inset view of a curved bracket or arch (no text or symbols present)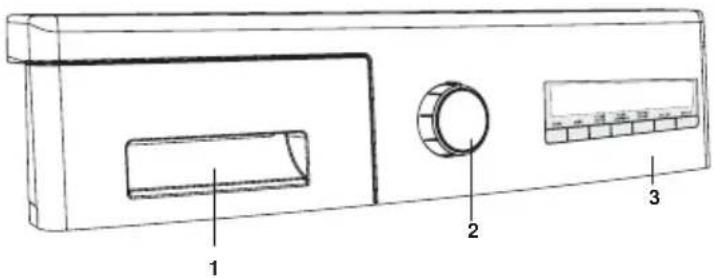
1-Ladica za deterdžent
2-Držak programatora
3-Elektronski prikaz i dodatna
Funkcije
LADICA ZA DETERDŽENT
Tekući deterdžent možete koristiti u svim programima bez pretpranja. Za uporabu tekućeg deterdženta postavite pregradnu pločicu u drugi odjeljak ladice za deterdžent i ulijte deterdžent do razine naznačene na pločici. Ne prelazite MAX i umetak koristite samo za tekući deterdžent, a pri uporabi deterdženta u prahu pločicu uklonite.
natural_image
Illustration of a washing machine with a curved pipe inserted, no text or symbols present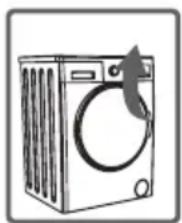
natural_image
Line drawing of a washing machine with a circular gasket (no text or symbols)NAPOMENA: Napomena: Maksimalna količina rublja koji odgovara kapacitetu perilice rublja zavisi od vrste rublja koji perete, razini zaprljanja i programu koji ćete odabrati. Ne prijekoračujte preporučeni maksimalni kapacitet suhog rublja za željeni program.
natural_image
Diagram of a front-mounted washing machine with a close-up inset showing internal components (no text or labels)LUKU-3: LAITTEEN ASENTAMINEN
natural_image
Line drawing of a washing machine with circular vent and buttons (no text or symbols)natural_image
Line drawing of a coiled hose with two connectors (no text or symbols)
natural_image
Diagram of a car fuel injection system showing valve and plug (no text or labels)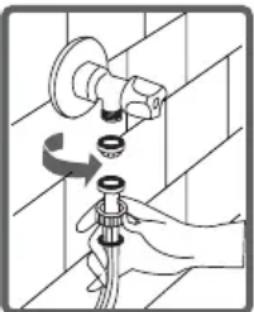
natural_image
Illustration of a hand using a tool to lift a showerhead onto a tiled wall (no text or symbols)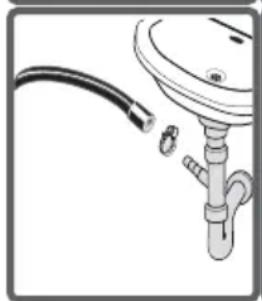
natural_image
Diagram of a pipe fitting with a bulb and valve (no text or symbols)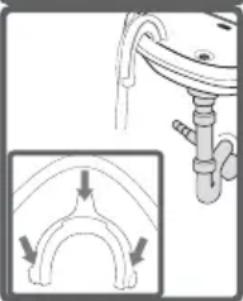
natural_image
Diagram showing a mechanical component with an inset view of a curved pipe or arch (no text or symbols present)1-Pesuainelokero
natural_image
Line drawing of a washing machine with a circular vent and handle (no text or symbols)(*) See the chapter regarding maintenance and cleaning of your machine.
www.sharphomeappliances.com
Or contact us:


YouTube