
MC-146 - Hi-Fi System LENCO - Free user manual and instructions
Find the device manual for free MC-146 LENCO in PDF.


| Product Type | Hi-Fi System with CD, Cassette, FM Tuner, USB/SD, Aux |
| Brand | Lenco |
| Model | MC-146 |
| Power Supply | AC mains (e.g., 230V~50Hz or 120V~60Hz depending on region) |
| Functions | CD/MP3/WMA playback, FM radio, Cassette tape player/recorder, USB/SD card playback, Aux input, Alarm clock, Sleep timer, Preset EQ (Flat, Classic, Rock, Pop, Jazz), Mute, Clock display, ID3 tag display |
| Remote Control | Included (requires 2x AAA batteries, not provided) |
| Headphone Jack | 3.5mm |
| Connections | USB socket, SD/MMC card slot, Aux-in (RCA), Speaker terminals, FM antenna (wire) |
| Disc Compatibility | Audio CD, CD-R/RW, MP3/WMA CD |
| Radio Bands | FM (with wire antenna) |
| Preset Stations | Up to 20 FM stations |
| CD Programming | Up to 20 tracks per disc |
| Cassette Deck | Playback and recording from CD, Tuner, USB, SD, Aux |
| USB/SD Playback | MP3 and WMA files only |
| Alarm Clock | Wake-up via CD, Tuner, USB, or SD; snooze function (9 min) |
| Sleep Timer | Adjustable from 10 to 90 minutes |
| Display | LCD with backlight, shows time, track info, radio frequency |
| Safety Features | Class 1 laser product; do not open or repair yourself |
| Maintenance | Clean with dry cloth; avoid liquids and solvents |
Frequently Asked Questions - MC-146 LENCO
User questions about MC-146 LENCO
0 question about this device. Answer the ones you know or ask your own.
Ask a new question about this device
Download the instructions for your Hi-Fi System in PDF format for free! Find your manual MC-146 - LENCO and take your electronic device back in hand. On this page are published all the documents necessary for the use of your device. MC-146 by LENCO.
USER MANUAL MC-146 LENCO
natural_image
Black audio workstation with two speakers and a digital display showing 20:58:32 (no visible text or symbols on main devices)INSTRUCTION MANUAL
For information and support, www.lenco.eu
KEY CONTROLS AND FUNCTIONS MAIN UNIT
1) Cassette buttons cover
2) Cassette buttons
3) LCD display
4) Volume knob
5) Function button
6) Alarm button
7) Snooze button
8) Display/ID3 button
9) Play Mode button
10) On/Standby button
11) Preset EQ button
12) USB Socket
13) 3.5mm Headphone jack
14) Standby LED indicator
15) Remote sensor
16) Memory/Clock-Adjust button
Caution:
Usage of controls, adjustments or performance of procedures other than those specified in this manual may result in hazardous radiation exposure.
This unit should not be adjusted or repaired by anyone except qualified service personnel.
Important:
Since movement of the CD mechanism and the sensitive circuitry may cause interference to the radio tuner nearby, switch this unit off while operating other radio devices
Precautions for use
Installation
- Unpack all parts and remove protective material.
• Do not connect the unit to the mains before checking the main voltage and before all other connections have been made.
- Do not cover any ventilation openings and make sure that there is a space of several centimeters around the unit for ventilation.
Connection
-
Connect the AC cord (26) to the AC outlet, the unit will turn to standby mode and the Standby LED indicator (14) will light up.
-
Connect the speaker wire to the Speaker Terminal (27) located on the back of unit.
-
Turn on the unit (10). If the backlight of the LCD display (3) is on, it means that the power supply is ok. Now your system is ready to operate.
Setting the clock
-
Set the unit in standby mode.
-
Press & hold the "Mem/Clk-Adj" button (16). First you can choose between 12 hour (AM/PM) or 24 hour clock presentation. Press Skip Up ▶▶ or Skip Down ◀◀ button (19) to set 12/24 hour. Press "Mem/Clk-Adj" button (16) to store the correct hour.
-
Now the hour digit(s) of "0:00" are flashing on the LCD display (3). Press Skip Up or Skip Down button (19) to set the correct hour. Press "Mem/Clk-Adj" button (16) to store the correct hour.
-
Now the minutes digits are flashing, press the Skip Up ▶▶ or Skip Down ◀◀ button (19) to set the correct minutes. Then press "Mem/Clk-Adj" button (16) to store the correct minute.
The clock setting mode will automatically quit if no button is being pressed in a period of about 5 seconds after pressing the “Mem/Clk-Adj” button.
The preset time will be reset completely if the unit is being disconnected from the main power supply. You are recommended to switch the system into standby mode for convenience usage.
Listening to the radio
Manual tuning
- Switch on the unit by pressing the On/Standby button (10), then press the function button (5) to select "Tuner" mode.
- Tune to the required station by pressing the Tuning Up or Down button (19).
- Press the Volume knob (4) to the desired volume level.
Auto tuning
- Press Function button (10) to select "Tuner" mode.
- Press and hold the Tuning Up or Down button (19) for 1-2 seconds and then release.
- The unit will start seeking automatically and stops when a radio station is found.
- Repeat step 2 & 3 until the desired radio station is being reached.
- Preset the Volume button (4) to the desired volume level.
Preset stations
You can store up to 20 radio stations in the memory
Switch to tuner mode.
- Go to the desired radio station by "Manual" or "Auto" tuning.
- Press and hold the Mem/Clk-Adj "button (16) until the "MEM" indicator and preset station number are flashing on the LCD display (3)
- Press the "Folder / Pre-up" button (21) to select the desired memory position to store this radio station.
- Press "Mem/Clk-Adj" button (16) again to confirm the setting.
- Repeat step 1 to 4 to store other radio stations.
- Now you can select the presets stations by pressing the "Folder/Pre-up" button (21)
The preset station memories will be erased completely if the unit is being disconnected from the main power supply. You are recommended to switch the system into standby mode for convenience usage.
When you don't push a button within 5 seconds, the unit will resume to normal tuner mode automatically.
➢ You can overwrite a present station by storing another frequency in its place.
FM-Stereo reception
- Press the “St/Mo” button (17) to switch from Stereo to Mono. In particular when stereo signals are weak, it is preferable to receive the program in mono for better quality.
- If a stereo signal is being received, the stereo indicator “(ST)” will appear on the LCD display (3).
Hints for best reception:-
- FM: the receiver has a build-in FM wire antenna (25) hanging at the rear cabinet. This wire should be totally unraveled and extended for the best reception.
Playing Compact Disc
- Getting started
- Press Function button (5) to select "CD" mode.
- Press CD Tray Open/Close button (20) to open the CD tray.
- Place a CD with the printed side facing up inside the tray & then close the CD tray by press the CD Tray Open/Close button(20) again.
- The LCD display (3) will show the total number of tracks & total playing time. Then, the unit will start to play the CD automatically.
- Press the Volume knob (4) to the desired volume level.
● Play / Pause mode ▶II
- To pause playback, press the "Play/Pause ▶II" button (18) once. "PAUZE" will flash in the LCD display (3). Press again to resume normal playback.
- Stop mode
- If the "Stop ■" button (17) is pressed during play or pause mode, the CD will stop playing.
- Skip mode (skip up ▶/ skip down ◀)
- If the "skip up ▶▶" button (19) is pressed during the play or pause mode, the unit will skip to the next track and continue to play this track. The pause mode will be reverted to play mode.
- If the "skip down ◀◀" button (19) is pressed during play or pause mode, the unit will skip to the previous track and continue to play this track. The pause mode will be reverted to play mode.
- Playing MP3/WMA CD
- After reading the CD, the total number of folders (F) and tracks (T) will be shown on the LCD display (3). The unit will start to play automatically with the first track in the first folder in alphabetical order.
- Press "Folder/Pre (21) or Pre" at remote control to select the folder number.
- Press "Skip Up ▶▶| or Skip Down ◀◀" button (19) to select the next or previous track number.
ID3/Display function
Press the "ID3" button (8) repeatedly, the LCD display (3) shows: "file - …" during playback of the MP3/WMA file. The song file/album/song/artist name/clock time is being displayed in sequence. Press the "ID3" button (8) again until the display shows the running time to disable the function.
Remark:-
- In case of no name or a not supportive language has been assigned for the track, the LCD display will stay blank (3) when pressing the ID3 button.
- No Title/Album name can be recognized if the disc format is not supported by the unit.
- The system supports only English and Arabic characters for the ID3 function.
MP3 track format requirement:-
- Bit rate : 32 kbps\~320kbps, sample rate : 32khz, 44.1khz and 48 kHz decodable
- The performance of playing MP3 Disc varies, depending on the quality and method of the recording. Furthermore, the searching lead-time for MP3-CD is longer than for an audio CD due to a different format.
- Repeat/Random mode
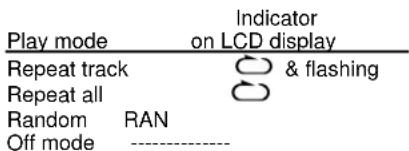
Press the "Play Mode" button (9) during playback to select repeat and random function, a single track, all the tracks repeat or folder repeat(MP3 only) and random can be played in difference mode as follow:-
For CD
(1) repeat 1 → (2) repeat all tracks (3) random (4) repeat off mode

For MP3/WMA Disc
(1) repeat 1 (2) repeat all tracks (3) repeat 1 folder

(5) off mode


(4) random
| Indicator | |
| Play mode on LCD display | |
| Repeat single track | & flashing |
| repeat all tracks | |
| Repeat single folder | FOLDER |
| Random mode | RAN |
| Off mode | |
- Repeat play means:
You can listen to the desired track or the entire disc repeatedly by using this function.
● Random play means:
You can listen to all the tracks in a random order by using this function.
CD programming
Up to 20 tracks can be programmed for play in any order. Before use, be sure to press the "stop ■" button (17).
- Switch to CD mode & stop the CD playback.
- Press the "Mem/Clk-Adj" button (16) and "MEM" will appear on LCD display (3).
-
Select the desired track by pressing skip up ▶▶ or down ◀◀ button (19).
-
Press the "Mem/Clk-Adj" button (16) to store the track into memory.
- Repeat steps 3 and 4 to enter additional tracks into the program memory if necessary.
- When all the desired tracks have been programmed, press "Play/Pause ▶" button (18) to play the tracks in given order.
- Press the "Stop ■" button (17) to stop playback, press the Stop button again to clear the program memory.
The programming mode will automatically stop if no button is being pressed in a period of about 10 seconds after pressing the "Mem/Clk-Adj" button.
Playback of MP3 song via USB storage media or memory Card
Connecting
The system is able to playback MP3 and WMA files which are stored on media such as an USB-drive or an SD/MMC memory card.
-
First switch the system to standby mode or set any function but SD or USB mode.
-
Plug-in the USB-drive with the face up & make sure it going into completely or insert the SD memory card in the direction of the arrow as shown on the label of the memory card slot. Insert it gently without bending.
- Inserting the USB-drive upside down or backwards could damage the audio system or the storage media (USB-drive/SD/MMC card). Check to be sure the direction is correct before insertion.
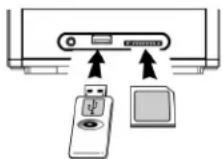
- Set function button (6) to "LSD/MMCcard or " USB mode.
- The system will start reading the storage media automatically after connecting, and the LCD display (3) will show the total number of MP3/WMA files being detected.
- Repeat the same playback procedure as playing CD/MP3 disc as above.
Remarks
- The system can detect and read MP3 / WMA files only in USB/SD mode. Other music file formats are not supported.
- Due to variances in MP3 encoding, some MP3 files will not play via the USB socket. This is not a malfunctioning of the unit.
- The USB port does not support the use of USB extension cables and is not designed for communication with a computer.
Removing USB-drive / memory card
To remove the USB-drive / memory card, turn off the power or switch the function mode to CD, Aux, Tape or Tuner first. For USB drive – unplug it by pulling out the USB drive directly. For memory card – pull out the SD/MMC card gently without bending.
Listening to tape recordings
General operation
Stop / eject ■▲ key Press to stop all deck operation. Press again to open the cassette door.
Fast Forward Key Press to start rapid tape winding in either forward or reverse
& Fast Rewind ◀◀ key direction. Press Stop key when the cassette spools stop turning.
Play ▶ key Press to start playing tape.
Pause Ⅱ key Press to stop tape operation temporarily. Press again to resume play.
Record ● key Press together with play key to start tape recording.
Playback
- Press the Function button (5) to select "Tape" mode.
- Insert the tape cassette with the opening facing upwards.
- Close the cassette lid.
- Press " play " key to active playback
- Press the Volume knob (4) to the desired volume level.
- Use the pause || key when you want to stop playback temporarily.
- Press Stop / Eject ■▲ key when finished.
Recording
The cassette deck can record from all sources (CD/Tuner/USB/SD/Aux) as following:
- Select the source you want to record from.
- Insert a blank tape cassette into the cassette deck.
- Press "record" & "play key together to start recording.
- Start to playback the music.
- Press the "pause" key and then "stop/eject" key at the cassette deck when you are finished recording. Press "stop/eject" key again to eject the tape.
More features
A. Sleep function
- Press the "Sleep" button on the remote control. "SLP-90" will be shown on the LCD display (3).
- Repeatedly press this button to adjust the sleep timer in the order of 90 > 80 > 70 >....10 minutes respectively. The sleep icon "Z" be shown on the LCD display.
- The system will stop and go to standby mode automatically after the selected time.
- To cancel the sleep mode, press the "Sleep" button until "SLP-off" is being displayed and the "ZZZ" indicator disappears from the LCD display.
B. Alarm clock setting
This function allows the system to turn on automatically and wake you up by CD, Tuner, USB or SD mode respectively.
- Press and hold the "Alarm" button(6) to enter the alarm setting mode. The first digits of the clock will flash together with the alarm icon
- Press Skip Up ▶▶/ Down ◀◀ button (19) to set the hour. Next press the “Alarm” button (6) again to confirm.
- Press the Skip Up ▶▶/ Down ◀◀ " button (19) to set the minutes and press the " Alarm " button (6) to confirm the alarm time.
- Press the Skip Up ▶/ Down ▶◀ " button (19) to select the wake up mode(TUNER/CD/USB/SD CARD) and press the " Alarm " button (6) to confirm.
- Press the "Volume" button (4) to adjust the wake up volume level.
- Press the "Alarm" to complete the alarm setting.
Remarks:
If there is no music source being detected (such as CD or USB) when the alarm time is reached, the system will go to "Tuner" mode automatically. The system will play the previous selected radio frequency.
In “Tuner mode” wake up, the system will play the previous selected radio frequency.
The programming mode will automatically stop if no button is being pressed in a period of about 4 seconds.
During the "alarm on" mode, pressing the "On/Standby" button(10) will switch off the system.
● Active/de-active timer function
- To activate the alarm function, press the "Alarm" button (6) repeatedly until the alarm indicator "21" is shown on the LCD display (7).
- To cancel the alarm function, press again the "Alarm" button (6) until the alarm indicator "41" disappears.
C. Mute function (on Remote)
Press to terminate the sound output from speakers temporarily and press again to resume normal playback. When active, the "MUTE" indication will continue flashing on the LCD display.
D. Pre-set EQ function
This unit provides 4 different sound modes to enhance your listening experience. You can select the desired effect by pressing the "Preset EQ" button (11) repeatedly in the following sequence:

flowchart
graph LR
    A["FLAT"] --> B["CLASSIC"]
    B --> C["ROCK"]
    C --> D["POP"]
    D --> E["JAZZ"]
E. Display time function
Press the "Display/ID3" button (8) when the unit is on at any mode. The LCD display (3) will show the current time.
F. Snooze function
During the alarm on mode, press the "Snooze" button(7) once to terminate the alarm mode temporarily. The unit will alarm again after 9 minutes. To cancel the alarm, press the "Alarm" (6) button or the "On/Standby" button (10) while the system is on.
Aux-in connection
Connect another audio device, e.g. (portable) CD player, MP3 player, (portable) cassette player, etc. to this system with an audio cord with RCA plugs (not supplied).
Connect one end of this cord to the external device and the other end to the Aux-in jack (24) on the back of the unit.
When connected, select the Aux mode by the "Function" button (5).
Remote control transmitter
The remote control requires 2 pcs "AAA" size battery for operation. (Not provided).
Control functions
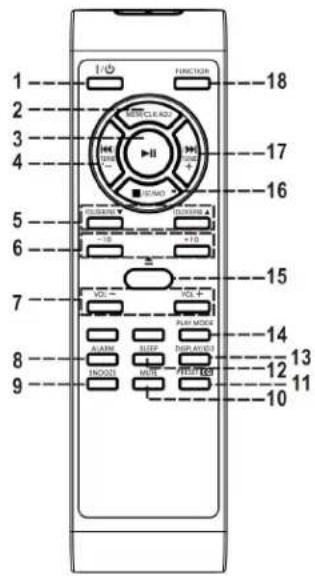
Button description
- On/standby Press to power on / standby the system
- Mem / Clk-adj In standby mode : press & hold to adjust clock In CD/USD/SD/Tuner mode : press to preset memory
- Play/pause▶ In CD/USB/SD mode : press to start playback/pause mode
- Skip up▶/down◀◀/Press to select previous/next tracks at CD/USB/SD card mode Tune+/- Press to step up/down of radio frequency at tuner mode
- Folder/Pre Up-Down In Tuner mode : press to select preset memory up/down In USB/SD mode : press to select folder up/down
- -10/+10 In CD mode: skip up/down 10 tracks
- Volume -/+ Press to adjust the volume level up/down
- Alarm Press to adjust the alarm clock or active/de-active the alarm
- Snooze Press to terminate the alarm mode temporarily
- Mute Press to active the mute function
- Preset EQ Press to select difference EQ modes
- Sleep Press to active the sleep function
- Display/ID3 Press to active the id3 function
- Play mode In CD mode : press to active random/repeat function
-
Eject mode Press to Eject the CD
-
Stop ■/St-MO In CD/USB/SD mode : press to stop the playback In Tuner mode : press to select stereo/mono mode
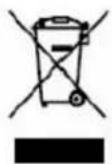
If at any time in the future you should need to dispose of this product please note that: Waste electrical products should not be disposed of with household waste. Please recycle where facilities exist. Check with your Local Authority or retailer for recycling advice. (Waste Electrical and Electronic Equipment Directive)

- KEY CONTROLS AND FUNCTIONS MAIN UNIT
- Caution:
- Important:
- Precautions for use
- Installation
- Connection
- Setting the clock
- Listening to the radio
- Manual tuning
- Auto tuning
- Preset stations
- FM-Stereo reception
- Hints for best reception:-
- Playing Compact Disc
- - Getting started
- ● Play / Pause mode ▶II
- - Stop mode
- - Skip mode (skip up ▶/ skip down ◀)
- - Playing MP3/WMA CD
- ID3/Display function
- Remark:-
- MP3 track format requirement:-
- - Repeat/Random mode
- For CD
- For MP3/WMA Disc
- - Repeat play means:
- ● Random play means:
- CD programming
- Playback of MP3 song via USB storage media or memory Card
- Connecting
- Remarks
- Removing USB-drive / memory card
- Listening to tape recordings
- General operation
- Playback
- Recording
- More features
- Sleep function
- Alarm clock setting
- Remarks:
- ● Active/de-active timer function
- Mute function (on Remote)
- Pre-set EQ function
- Display time function
- Snooze function
- Aux-in connection
- Remote control transmitter
- Control functions
- Button description
Brand : LENCO
Model : MC-146
Category : Hi-Fi System