USER MANUAL MDV-8 LENCO
natural_image
Exterior view of a modern audio recording device with two black speakers and a digital display (no visible text or symbols)
For information and support, www.lenco.eu
Table of Content
Table of Content 1
Safety Information 2
Locations and function of the player 3
Connection 6
Remote Control 9
DVD Operation 12
Radio Operation 22
Troubleshooting 24
Specification 25
Dear Customer:
Thank you for purchasing this DVD MICRO HI-FI SYSTEM WITH USB & SD/MMC. When opening the box for the first time, please check whether all the accessories are present. Before connecting parts and power, please carefully read the user manual and always keep these instructions close by your DVD MICRO HI-FI SYSTEM WITH USB & SD/MMC.
Accessoires list:
1 pcs main unit
2 pcs speaker
1 pcs remote control
1 set battery for remote control
1 pcs AV cable
1 pcs antenna

CAUTION
RISK OF ELECTRIC SHOCK DO NOT OPEN
RESQUE DE CHOC ELECTRIQUE-NE PAS OUVRIR


The lightning flash with an arrowhead symbol within an equilateral triangle is intended to alert the user of the presence of uninsulated "dangerous voltage" within the product's enclosure that may be of sufficient magnitude to constitute a risk of electric shock to persons.

The exclamation point within an equilateral triangle is intended to alert the user of the presence of important operating and maintenance (servicing) instructions in the literature accompanying the appliance.
THIS DEVICE COMPLIES WITH PART 15 OF THE FCC RULES.
OPERATION IS SUBJECT TO THE FOLLOWING TWO CONDITIONS:
(1) THIS DEVICE MAY NOT CAUSE HARMFUL INTERFERENCE, AND (2) THIS DEVICE MUST ACCEPT ANY INTERFERENCE RECEIVED. INCLUDING INTERFERENCE THAT MAY CAUSE UNDESIRED.
User Manual
- All the safety and operating instructions should be read before the product is operated.
- Retain Instructions - The safety and operating instructions should be retained for future reference.
- All warnings on the product and in the operating instructions should be adhered to.
- All operating and use instructions should be followed.
Laser
This Digital Video Disc Player employs a Laser System of the class 1.
- Make sure the device is shut down prior to opening player lid.
- Do not open the appliance. Do not attempt to dismantle the appliance.
- In order to avoid any danger: Have service work only carried out by the manufacturer or an authorized service workshop.
- Visible laser radiation when open and interlocks defeated.
- Use of controls or adjustments or performance of procedures other than those specified herein may result in hazardous radiation exposure.
USB connection
The USB memory stick should be plug in the unit directly. USB extension cable should not be used to avoid failing of data transferring and interference caused.
Locations and Function of the Player
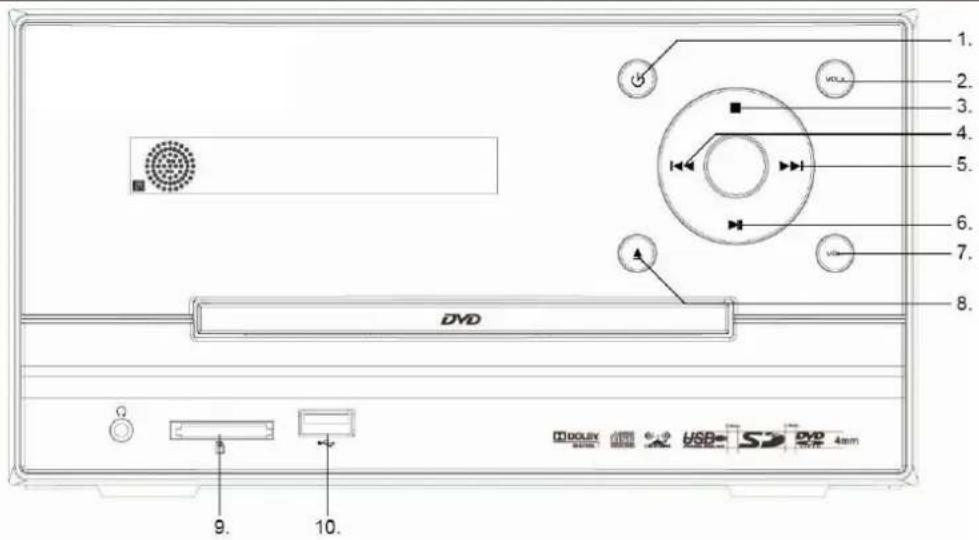
Front Panel
text_image
1.
2.
3.
4.
5.
6.
7.
8.
DVD
DOLBY
USB
S
DVD
4mm
9.
10.
- POWER
- / 7. VOLUME knob
- Stop button
- CHANNEL- button
-
CHANNEL+ button
-
▶AUTO
- FM/AM
- CARD READER interface
- USB interface
Notes:

Use the FUNCTION button to select the proper input signal source. The sequence is DVD → Radio → AUX 1 IN → AUX 2 IN. The DVD operation includes the source for USB and CARD. When in DVD mode, you can press FUNCTION button on the remote control to select USB or CARD signal source.
Locations and Function of the Player
Playback Content from USB or CARD
This unit has a USB/SD interface, you can insert a USB device or an SD card with USB/SD Interface to play the audio/video files and JPEG files. All the function is the same with the DISC operation. You can switch between the DVD/USB/SD function by pressing the FUNCTION button.
The unit starts to read the table of content (TOC) of the storage and displays the results into the file browser. By using the navigation buttons you can choose the content which you want to playback and start the playback by pressing the ENTER button.
Note:
To avoid damage, do not pull out the USB/SD when you playback the files in the USB. If you want to pull out the USB, please press STOP button first.
Locations and Function of the Playe
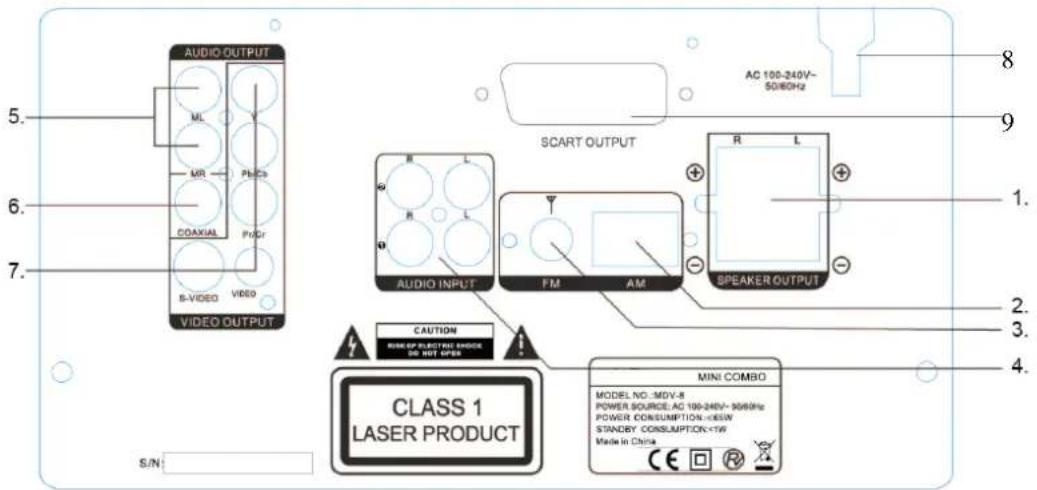
Rear Panel
text_image
AUDIO OUTPUT
ML
MR
Pb/Cb
COAXIAL
Pb/Cf
B-VIDEO VIDEO
VIDEO OUTPUT
5.
6.
7.
8
9
AC 100-240V~
50/80Hz
SCART OUTPUT
R L
R L
AUDIO INPUT FM AM
SPEAKER OUTPUT
CAUTION
MINI OF ELECTRIC SHOCK
ON NOT OPEN
CLASS 1
LASER PRODUCT
S/N
MODEL NO.:MDV-R
POWER SOURCE:AC 100-240V~30/80Hz
POWER CONSUMPTION:
Elements of the rear side
1. SPEAKER OUTPUT
2. AM Antenna jack
3. FM Antenna jack
4. AUDIO INPUT jacks
5. AUDIO OUTPUT jacks
6. COAXIAL OUTPUT jack
7. VIDEO OUTPUT jacks
8. AC Power cable
9. Scart socket
Connection
Connecting to TV/Amplifier

flowchart
graph TD
    A["Digital amplifier (for example)"] --> B["Connect the COAXIAL or OPTICAL port to the coaxial/optical input jack of a digital amplifier for superior digital sound effect."]
    B --> C["To TV composite AUDIO/VIDEO INPUT jacks"]
    A --> D["WHITE"]
    A --> E["RED"]
    A --> F["VIDEO"]
    D --> G["VIDEO OUT"]
    E --> G
    F --> G
    G --> H["VIDEO OUT"]
    I["WHITE"] --> J["AUDIO L"]
    K["AUDIO R"] --> L["AUDIO L"]
    M["VIDEO"] --> N["AUDIO R"]
    O["VIDEO"] --> P["AUDIO R"]
    Q["WHITE"] --> R["AUDIO L"]
    S["RED"] --> T["AUDIO R"]
    U["VIDEO"] --> V["AUDIO L"]
    W["WHITE"] --> X["AUDIO L"]
    Y["RED"] --> Z["AUDIO L"]
    AA["VIDEO"] --> AB["AUDIO L"]
    AC["WHITE"] --> AD["AUDIO L"]
    AE["RED"] --> AF["AUDIO L"]
    AG["VIDEO"] --> AH["AUDIO L"]
    AI["WHITE"] --> AJ["AUDIO L"]
    AK["RED"] --> AL["AUDIO L"]
    AM["VIDEO"] --> AN["AUDIO L"]
    AO["WHITE"] --> AP["AUDIO L"]
    AQ["RED"] --> AR["AUDIO L"]
    AS["VIDEO"] --> AT["AUDIO L"]
    AU["WHITE"] --> AV["AUDIO L"]
    AW["RED"] --> AX["AUDIO L"]
    AY["VIDEO OUT"] --> AZ["VIDEO OUT"]
Connection
Connecting the Speakers
Place the Spea kers
For the best result, please arrange the two speakers as shown in the following picture:
Align the speakers vertically at the ear level and at a horizontally angle of 45 degrees to the primary listening area.
1. Position of the unit and the TV set.
2. Left speaker
3. Right speaker
4. Position to enjoy sound and video

text_image
1
2
3
4
Con nec t the Sp eak ers
1. Please make sure, that the power is turned off and is not connected to the power outlet.
2. Press down the thumb levers and insert fully each tip of the wire into the connector. Then release the thumb levers to lock the wire in place.
3. Please pay attention that the color of the wire correspondent to the color of the thumb levers on the speaker and on the player itself.
Notes :
To prevent damage to circuits, do not short-circuit the positive and negative speaker output jacks.
Make sure the exposed tips of each speaker wire are separated to the distance that they can not touch each other after they are inserted into the connectors.
Do not connect any other speakers or devices that are not included with this system.
Connection
Connecting Antennas
Connect the supplied AM loop antenna and FM antenna to the respective terminals. Adjust the position of the antenna for optimum reception.

text_image
FM
AM
AM indoor loop antenna
Connect the AM Antenna
1. Open cable terminal by pressing back on tab
2. Insert wire end
3. Release tab; make sure wire is in terminal securely.
※ Position the antenna as far as possible form a TV, VCR or other radiation source.
FM indoor antenna
※ For better FM stereo reception, connect an outdoor FM antenna to the FM antenna terminal.
Remote Control
Insert batteries and Operation radius
Remove the battery cover on the back side of the remote control to place the batteries.
Remove battery during storage or when you are not using the DVD player for a long time.
Notes:
1. Weak batteries can leak and several damage by the remote control.
2. Leaking out battery acid can damage your health.
3. Remove the battery from the battery compartment as soon as it is exhausted or if the remote control is not going to be used for a longer period of time.
4. Wipe up leaked out battery acid with a cloth.
5. In case of skin contact immediately wash the affected area.
6. Seek medical advice if battery acid has been swallowed. In case of contact with your eyes wash out the eyes and seek medical advice.
Remote Control

natural_image
Pure black horizontal bar with no text, symbols, or markings

text_image
PICKER EQ FUNCTION OPEN/CLOSE
SUBTITLE ANGLE AUDIO SEARCH
1 2 3 TITLE
4 5 6 MENU
7 8 9 OSD
0/10 10+ PROGRAM VIDEO
ZOOM STEP SLOW A-B
PLAY/PAUSE STOP RETURN REPEAT
SETUP FM/AM
SLEEP ENTER
MUTE MEMORY
CHANNEL CHANNEL+ TUNING- TUNING+
LOUDNESS TONE VOLUME +
DVD
VIDEO
MDV-8
Remote Control
1. POWER button: press to turn on or off the unit.
2. EQ button: press to select different audio modes, such as NORMAL, CLASSIC, POP, JAZZ, ROCK and VOCAL.
3. FUNCTION button: press to select the different mode, such as DVD, radio, AUX 1 in and AUX 2 in.
4. Numeric buttons (0-9, 10+): press to input number to select the track or channel.
5. OPEN/CLOSE button: press to open/close the disc tray.
6. SUBTITLE button: press to select the subtitle language.
7. ANGEL button: press to change the view angle on multi-angle DVD disc
8. AUDIO button: press to display the audio information of the DVD/VCD disc.
9. SEARCH button: press to search the stations automatically in radio mode.
10. TITLE button: press to display the title menu of the DVD disc.
11. MENU button: press to display/exit the menu information of the disc.
12. OSD button: In media play mode, press to display OSD (the on-screen display) information.
13. PROGRAM button: In media play mode, press to enter into program mode to play the track in your desired sequence.
14. VIDEO button: Press