615890000 - Toaster Eta - Free user manual and instructions
Find the device manual for free 615890000 Eta in PDF.


| Product Type | Toaster |
| Brand | Eta |
| Model | 615890000 |
| Number of Slots | 2 |
| Power | 850 W |
| Voltage | 220-240 V, 50/60 Hz |
| Browning Control | Variable with 6 settings |
| Functions | Cancel, Defrost, Reheat |
| Self-Centering Racks | Yes |
| Crumb Tray | Removable, pull-out |
| Cord Storage | Yes, under base |
| Auto Shut-Off | Yes, with audible signal |
| Material | Stainless steel and plastic |
| Dimensions (W x D x H) | 27 x 18 x 20 cm |
| Weight | 1.2 kg |
| Cleaning | Wipe exterior with damp cloth; empty crumb tray regularly |
| Safety Features | Auto shut-off, cool-touch housing, non-slip feet |
| Spare Parts Availability | Crumb tray and cord available from authorized service |
| Repairability | Repairable by qualified technician; user-replaceable parts: crumb tray |
| Warranty | 2 years |
Frequently Asked Questions - 615890000 Eta
User questions about 615890000 Eta
0 question about this device. Answer the ones you know or ask your own.
Ask a new question about this device
Download the instructions for your Toaster in PDF format for free! Find your manual 615890000 - Eta and take your electronic device back in hand. On this page are published all the documents necessary for the use of your device. 615890000 by Eta.
USER MANUAL 615890000 Eta
natural_image
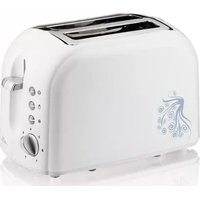
White standard tea maker with decorative swirl pattern and control buttons (no text or symbols on device body)1
NÁVOD K OBSLUZE
I. BEZPEČNOSTNÍ UPOZORNĚNÍ
- Before the first use, read the instructions for use carefully, look at the picture the instructions for use for the future. Consider the instructions for use as a pa appliance and pass them on to any other user of the appliance.
- Check whether the data on the type label correspond with the voltage in your The power cord plug has to be connected to the properly connected and grouf socket according.
- Never use the appliance if its power cord or plug is damaged, if it does not properly, if it fell down and was damaged or if it fell into water. In this case appliance to a special service to check its safety and proper function.
- Do not insert to or take out the plug from a socket with wet hands and do the power cord!
- The appliance is intended for use in households only and for similar use (heat and preparing food)! It is not designed for commercial use!
- This appliance is not intended for outdoor use.
- The appliance is not intended for use by people (including children) whose physical or mental inability or lack of experience and knowledge makes safe use. Appliance impossible if they are not supervised or if they have not been instructed regarding use of the appliance by a person responsible for their safety. Children be supervised to make sure they will not be playing with the appliance.
- Do not use the toaster for heating a room!
- Never leave the appliance unsupervised and check it during the whole time of preparing meals! Very dry bread may catch fire when toasted under certain con
- Never switch on the toaster in advance as it heats immediately!
- Never immerse the appliance into water (even its parts)!
- Use the appliance in the working position only at places with no risk of turning in a sufficient distance from flammable objects (e. g. curtains, drapes, wood, etc. sources (e. g. heater, stove etc.) and wet surfaces (e.g. sinks, wash-basins etc.).
- The space above the toaster must be free. It has to be made sure that air around the toaster.
- With regards to fire safety, the toaster complies with EN 60 335-2-3. Within the range of the standard, these are appliances that can be operated on a table or on a surface while safe distance must be maintained from flammable materials of at least 500 mm in the direction of the main heat radiation and 100 mm in the other directions.
- When handling the appliance, try to prevent injury (e.g. burns).
- Do not put any sugar-coated or fatty pastry in the toaster as it tends to mel
- Do not toast bread or pastry wrapped e.g. in an aluminum foil, paper, etc.
- Never cover the toasting slot and do not put fingers or metal tools into it. N objects on the toaster.
- Clean the breadcrumbs container regularly, thus you will prevent possible fire.
- If you see smoke caused e.g. by burning food, switch off the toaster immediat unplug it from the power supply.

- After finishing work, always disconnect the appliance from power supply by taking the connector of the power cord out of the electric socket.
- Make sure that the power cord does not hang over the edge of the working children could reach it.
- The power cord must not be damaged with sharp or hot objects, open fire, if be sunk into water or bent over sharp edges.
- The appliance is portable and it is equipped with a movable connector with a ensures double-pole disconnection from power supply.
- If you need to use the extension cord, it has to be uncorrupted and it has the valid standards.
- Check the condition of the power cord of the appliance regularly.
- If the power cord of the appliance is corrupted, it has to be replaced by the service technician or a similarly qualified person so as to prevent dangerous situ
- Never use the appliance for any other purpose than for that described in these instructions for use!
- The producer does not undertake any responsibility for damage caused by improvement of the appliance (e.g. deterioration of food, injury, burn, fire etc.) and its guarantee does not cover the appliance in the case of failure to comply with the safety above.
Do not use the appliance with a program, time switch or any other part that t the appliance on automatically as there is a risk of fire if the appliance is not covered or placed properly.
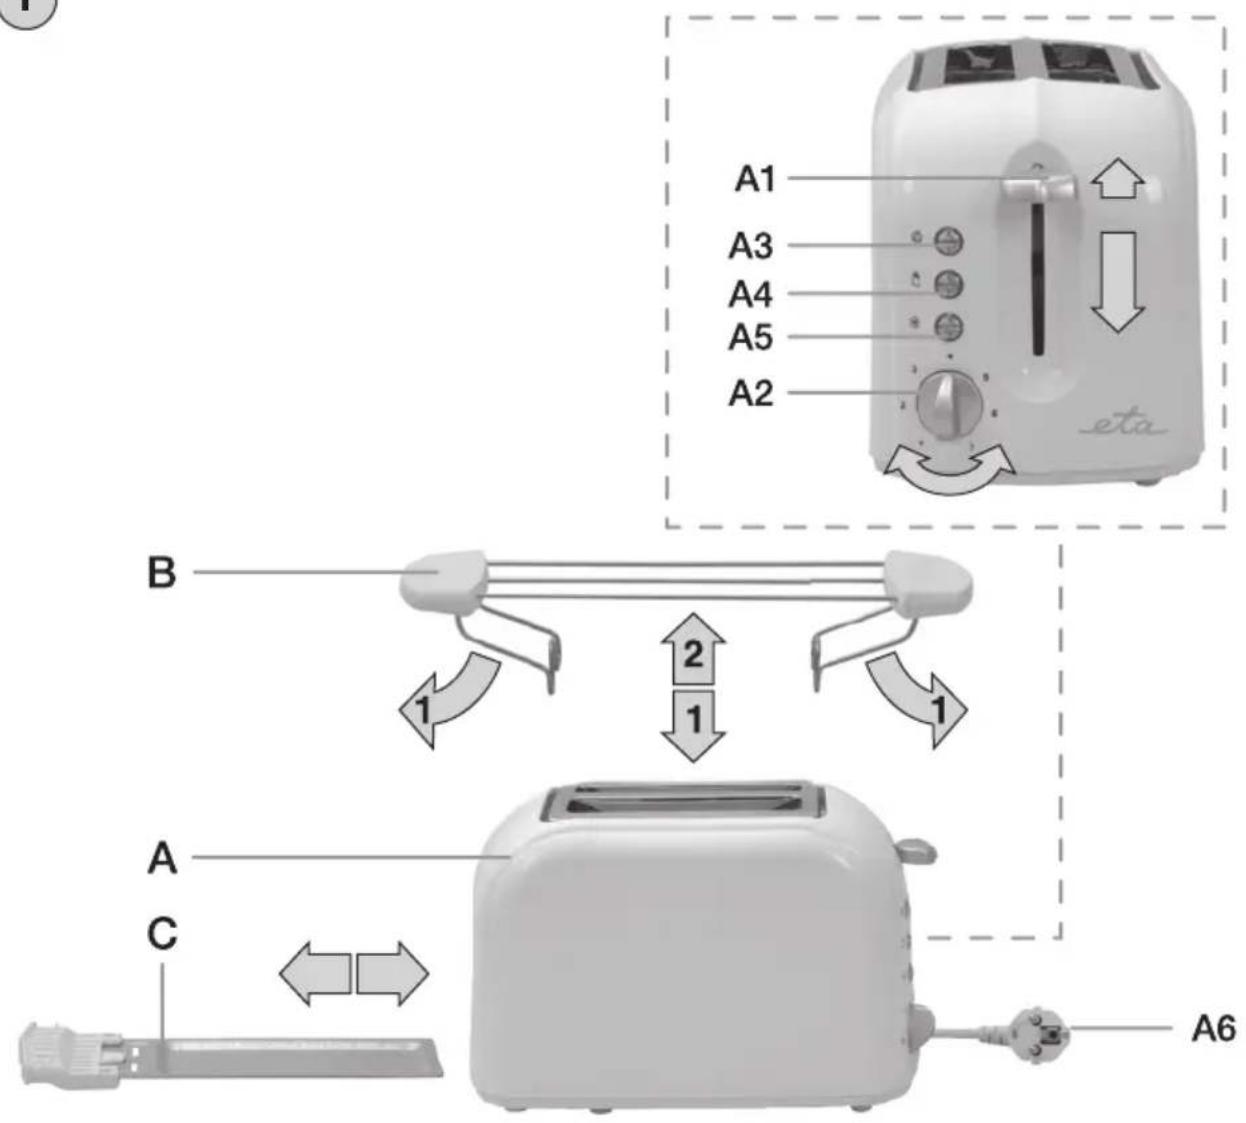
II. DESCRIPTION OF THE APPLIANCE (Fig. 1)
A - toaster
A1 - toasting guide
A2 - revolving toasting regulator
A3 - Stop button with control light of the operation
A4 - warming button with control light
A5 - defrosting button with control light
A6 - power supply
B - holder for crispy pastry
C - breadcrumbs tray
Note: When the control light is on, it signals that the function is on.
III. PREPARATION FOR USE
Remove all the packing material and take out the appliance. Remove all possible foils, stick-on labels or paper from the toaster. When you put the appliance into for the first time, set the revolving regulator to level 3 and switch on the toaster 4-5 times (without any bread in) with a window open and then leave to cool dc Moderate smoke for a short time does not mean any defect.
Toasting regulator (B)
Set the required toasting level by turning the regulator clockwise. If in doubt, start the lowest level.
Level 1 - the shortest toasting time, the toasted bread is the lightest.
Level 2-3 - slightly toasted bread.
Level 4-5 - moderately toasted bread.
Level 6-7 - the longest preparation time, the toasted bread is the darkest.

Warning
- Turn the regulator only in the range of level 1 to 7. If you turn the button force, you can damage the regulation system.
- If you toast one slice of bread only, set a lower level of toasting than for tv
Stop button used for immediate stopping of toasting By pressing the button you the set function of the toaster.
Warming button intended for warming cooled down toasts or finishing half-done toasts.
Defrosting button intended for preparation of frozen slices of bread.
IV. INSTRUCTIONS FOR USE
Consider the following tips for preparing food as examples and inspiration, the pu which is not to provide instructions, but to show various possibilities of preparing. The time of preparation ranges between tens of seconds to minutes and it deper kind and the size of the used bread or pastry and on how old it is. Place the a suitable flat and dry surface (see par. I. SAFETY WARNING), in the height of 85 cm, out of reach of children. Plug the power cord connector A6 to an electric
Toasting bread
Select the toasting level by the regulator A2. Put slices of bread to the toasting A1 guide down so that it is secured in the lower position. The operation control light A3
comes on and the appliance starts toasting immediately. After the set time the a _i is turned off automatically and the guide goes up. For easier removal of a small bread, move the guide upwards.
Note
If a slice is blocked or if a piece of bread is stuck in the toasting slot, first toaster from the electric power and let it cool down. Then take out the slice can not to damage the heating elements. Do not use sharp metal tools to take the
Warming function
The function is not dependent on setting the toasting regulator and the time of is shorter than in toasting at level 1. Follow the same procedure as in paragraph bread, and after pushing the guide A1 down push the warming button A4 🏠 (the control light will come on).
Defrosting function
When this function is selected, the preparation time at the selected level will be the bread will be defrosted first and then baked. Follow the same procedure as paragraph Toasting bread, and after pushing the guide A1 down push the defrosti button A5 (the control light will come on).

Warming pastry (not more than 2 breads or rolls)
GB Push the pastry warming holder B slightly to the toasting slots to the maxi position. Put pastry on the holder. Set the selected warming level by the regulate Push the guide A1 down so that it is secured in the lower position. After the s time the appliances is turned off automatically and the guide goes up. If you was bread from the other side too, turn it and repeat the steps.
Warning
- Never put pastry directly on the toasting slots, always use the warming holder.
- Do not put an aluminum foil on the holder. Do not toast pastry and warm by same time.
- Pause after 3 cycles of pastry warming so that the appliance can cool down.
V. MAINTENANCE
Unplug the appliance from power supply by taking the plug of the power cord (the socket! Clean the toaster only after it has cooled down! Clean the appliance regularly after every use. Pull out the breadcrumbs tray C from the lower part of the
appliance and remove the remaining pastry. Do not turn the appliance upside down do not throw out the breadcrumbs in this way. Push the tray in properly.
Do not use coarse and aggressive cleaning agents (e.g. sharp objects, scrapers, diluting agents or other solvents). For cleaning the toaster case, use the cleaning mentioned in the instructions for use, intended for plastic surfaces and clean it by with a soft wet cloth. It is normal that the surface colour changes in the course. But the change does not alter the surface properties in any way and there is no claim it as a defect!
You can wind the power cord A6 to the space in the lower part of the toaster cooled down appliance at a safe and dry place, out of reach of children and ir people.
VI. TROUBLESHOOTING
Problem Cause Solution
| The toaster does not work/toast connected | Power supply not Check the power cord, plug and the socket | |
| The guide is not secured Push the guide down so that it is in the lower position secured in the lower position. If the toaster is not working, contact an authorized service. | ||
| Bread is too light | The selected level of Set a higher level of toasting toasting was too low | |
| Bread is too dark | The selected level of Set a lower level of toasting toasting was too high | |
| Smoke is coming out of the toaster toasting | The selected level of was too high | Set a lower level of toasting |
| There are too many breadcrumbs in the breadcrumbs tray | Empty the tray | |
VII. ENVIRONMENTAL PROTECTION
If the dimensions allow, there are labels of materials used for production of pack components and accessories as well as their recycling on all parts. The symbols on the product or in the accompanying documentation mean that the used electric electronic products must not be disposed of together with municipal waste. For plastic disposal, hand them over at special collection places where they will be accepted charge. Suitable disposal of the product can help to maintain valuable natural resources and to prevent possible negative impacts on the environment and human health, I could be the possible consequences of improper waste disposal. Ask for more dethe local authority or at the local waste collection site. Fines can be imposed for disposal of this type of waste in agreement with the national regulations.
If the appliance is to be put out of operation for good, after disconnecting it from supply we recommend cutting off the power cord and in this way it will not be use the appliance again.
More extensive maintenance or maintenance requiring intervention in the inner part of the appliance must be carried out by a professional service! Failure to comply with the instructions of the manufacturer will lead to expiration of the right to guarantee repair!
VIII. TECHNICAL DATA
Voltage (V) specified on the type label
Input (W) specified on the type label
Weight (kg) about 1.23
The product has received ES declaration of conformity according to Act as amend product matches the requirements of the below statutory order as amended.
- Committee Regulation No. 2006/95/ES as amended, setting the technical requirement of the electrical appliance as low.
- Committee Regulation No. 2004/108/ES as amended, setting the technical required of products in terms of their electromagnetic compatibility.
The product is in conformity with the European Parliament and European Committee Regulation No. 1935/2004/ES re. Materials and objects designed for contact with fo
The manufacturer reserves the right for any insignificant deviations from the standa finished product which do not have any effect on the functioning of the product.

HOT. DO NOT COVER. DO NOT IMMERSE IN WATER OR OTHER LIQUIDS.
GB TO AVOID DANGER OF SUFFOCATION, KEEP THIS PLASTIC BAG AWAY FROM BABIES AND CHILDREN. DO NOT USE THIS BAG IN CRIBS, BEDS, CARRIAGES OR PLAYPENS. THIS BAG IS NOT A TOY.
MANUFACTURER: ETA a.s., Poličská 444, 539 01 Hlinsko, Czech Republic.
KEZELÉSI ÚTMUTATÓ
I. BIZTONSÁGTECHNIKAI FIGYELMEZTETÉS
Guarantee certificate is valid only for Czech Republic and Slovak Republic.
- NÁVOD K OBSLUZE
- BEZPEČNOSTNÍ UPOZORNĚNÍ
- DESCRIPTION OF THE APPLIANCE (Fig. 1)
- A - toaster
- PREPARATION FOR USE
- Toasting regulator (B)
- Warning
- INSTRUCTIONS FOR USE
- Toasting bread
- Note
- Warming function
- Defrosting function
- Warming pastry (not more than 2 breads or rolls)
- MAINTENANCE
- TROUBLESHOOTING
- ENVIRONMENTAL PROTECTION
- TECHNICAL DATA
- KEZELÉSI ÚTMUTATÓ
- BIZTONSÁGTECHNIKAI FIGYELMEZTETÉS
Brand : Eta
Model : 615890000
Category : Toaster