
400-00009 - Tablet Adj - Free user manual and instructions
Find the device manual for free 400-00009 Adj in PDF.


| Product Type | Tablet |
| Brand | Adj |
| Model | 400-00009 |
| Operating System | Android |
| Processor | Intel Atom Z2460, 1.6 GHz |
| Memory (RAM) | 1 GB LPDDR2 |
| Storage | 16 GB eMMC |
| Display | 10.1-inch HD touchscreen, 1280x800 pixels |
| Cameras | Front 0.3 MP, Rear 2.0 MP |
| Battery | Li-polymer 6600 mAh, up to 8 hours video playback |
| Dimensions | 261.58 x 173.34 x 12.6 mm |
| Weight | 660 g |
| Wireless | Wi-Fi 802.11 b/g/n, Bluetooth |
| Ports | Micro USB 2.0 (OTG), Mini HDMI, Headphone/Mic combo, Micro SD slot |
| Sensors | 3-axis G-sensor |
| Power Supply | AC adapter 5V/2A |
| Certifications | CE, FCC, SAR 1.095 W/kg (body) |
| Maintenance | Clean with a soft, dry cloth. Do not use harsh chemicals. |
| Safety | Do not expose to moisture. Use only approved chargers. |
| Repairability | Contact authorized service center. Do not disassemble. |
Frequently Asked Questions - 400-00009 Adj
User questions about 400-00009 Adj
0 question about this device. Answer the ones you know or ask your own.
Ask a new question about this device
Download the instructions for your Tablet in PDF format for free! Find your manual 400-00009 - Adj and take your electronic device back in hand. On this page are published all the documents necessary for the use of your device. 400-00009 by Adj.
USER MANUAL 400-00009 Adj
computer, peripherals
and security
natural_image
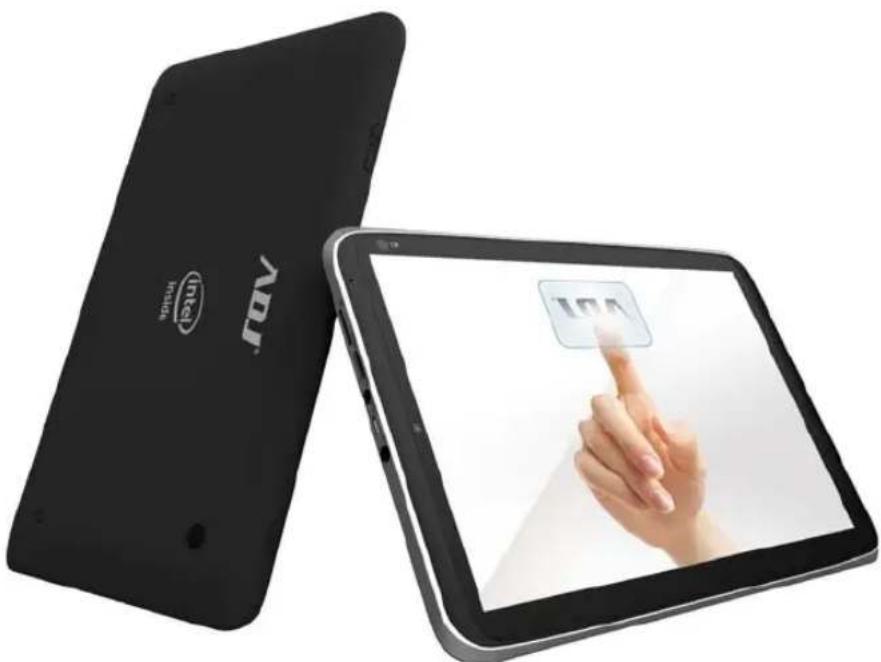
Two black tablets with visible logos and a touchscreen display showing a hand interacting with the screen (no text or symbols on the devices themselves)STYLE TAB 10.1
MANUALE UTENTE
@Copyright 2013.
RF exposure warning (SAR)
Canada, Industry Canada (IC) Notices
Radio Frequency (RF) Exposure Information
flowchart
graph LR
    A["This is a test."] --> B["This is a test."]
    B --> C["This is a test."]
5. Wireless networks e devices
La
natural_image
3D rendering of a black mechanical component with a handle and connector (no text or symbols)natural_image
Illustration of a hand interacting with a textured surface and lock icon, no text or symbols presentDrag to unlock your screen
natural_image
Black desktop computer tower with keyboard and mouse, no visible text or symbols on main body
natural_image
White ADJ Wireless port control device with visible sensor and antenna (no text or symbols on device body)
natural_image
Hand interacting with a black headboard displaying a 'LTA' button, displayed on a tablet screen (no text or symbols on the device itself)ADJ®
computer, peripherals
and security
natural_image
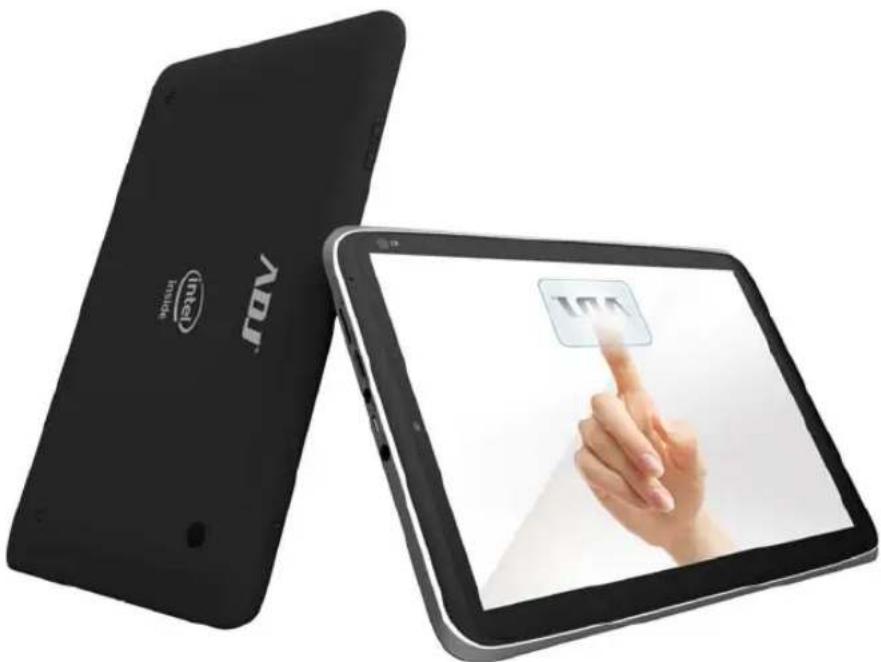
Two black rectangular tablets with Intel branding, one displaying a hand gesture on the screen (no visible text or symbols on the device body)STYLE TAB 10.1
USER MANUAL
@Copyright 2013.
All Rights Reserved.
The information in this document is subject to change without prior notice in order to improve reliability, design and function and does not represent a commitment on the part of the manufacturer.
In no event will the manufacturer be liable for direct, indirect, special, incidental, or consequential damages arising out of the use or inability to use the product or documentation, even if advised of the possibility of such damages.
This document contains proprietary information protected by copyright. All rights are reserved. No part of this manual may be reproduced by any mechanical, electronic, or other means in any form without prior written permission of the manufacturer.
FEDERAL COMMUNICATIONS COMMISSION INTERFERENCE STATEMENT
This equipment has been tested and found to comply with the limits for a Class B digital device, pursuant to Part 15 of the FCC Rules. These limits are designed to provide reasonable protection against harmful interference in a residential installation. This equipment generates, uses and can radiate radio frequency energy and, if not installed and used in accordance with the instructions, may cause harmful interference to radio communications. However, there is no guarantee that interference will not occur in a particular installation. If this equipment does cause harmful interference to radio or television reception, which can be determined by turning the equipment off and on, the user is encouraged to try to correct the interference by one or more of the following measures:
- Reorient or relocate the receiving antenna.
- Increase the separation between the equipment and receiver.
- Connect the equipment into an outlet on a circuit different from that to which the receiver is connected.
- Consult the dealer or an experienced radio/TV technician for help.
CAUTION:
Any changes or modifications not expressly approved by the party responsible for compliance could void the user's authority to operate the equipment.
This device complies with Part 15 of the FCC Rules. Operation is subject to the following two conditions:
(1) This device may not cause harmful interference and
(2) This device must accept any interference received, including interference that may cause undesired operation.
RF exposure warning (SAR)
- This device meets the government's requirements for exposure to radio waves. This device is designed and manufactured not to exceed the emission limits for exposure to radio frequency (RF) energy set by the Federal Communications Commission of the U.S. Government.
The exposure standard employs a unit of measurement known as the Specific Absorption Rate, or SAR. The SAR limit set by the FCC is 1.6 W/kg.
Tests for SAR are conducted using standard operating positions accepted by the FCC with the EUT transmitting at the specified power level in different channels.
The highest SAR value for the device as reported to the FCC is 1.095 W/kg when placed next to the body.
Canada, Industry Canada (IC) Notices
This device complies with Industry Canada license-exempt RSS standard(s). Operation is subject to the following two conditions: (1) this device may not cause interference, and (2) this device must accept any interference, including interference that may cause undesired operation of the device.
Radio Frequency (RF) Exposure Information
The radiated output power of the Wireless Device is below the Industry Canada (IC) radio frequency exposure limits. The Wireless Device should be used in such a manner such that the potential for human contact during normal operation is minimized.
This device has been evaluated for and shown compliant with the IC Specific Absorption Rate (“SAR”) limits when products operated in portable exposure conditions.
Canada, avis d'Industry Canada (IC)
This chapter provides an overview of the tablet, including the locations of the connectors and controls, tablet features, and accessories.
Package contents
Carefully unpack your box and take out the items listed below. If any of the items are missing or damaged, please contact your dealer immediately:
- One Tablet
- One AC adapter
- One USB cable
• One Warranty card
- One Quick Guide
- This manual
Tablet layout
This topic introduces the tablet hardware features and basic information you need to start using the tablet.
■ Front view
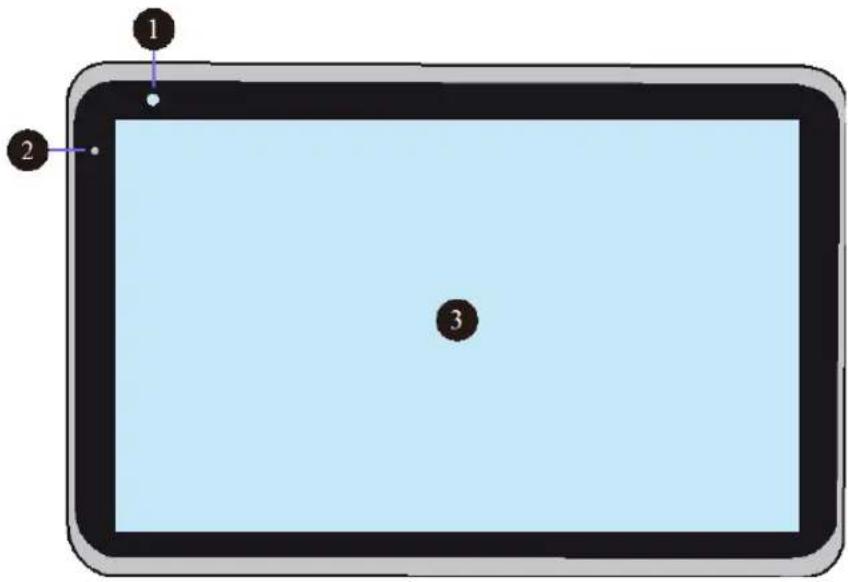
| No. | Name | Function |
| 1 | Front facing camera | Often for taking self-portraits as well as for video conferencing. |
| 2 | Front Microphone | Mainly for collecting the sound of your voice for speech recognition and communication purposes. |
| 3 Touchscreen | The touchscreen display is a see-touch device: You look at it and also touch it with your fingers to control the tablet. | |
■ Rear view
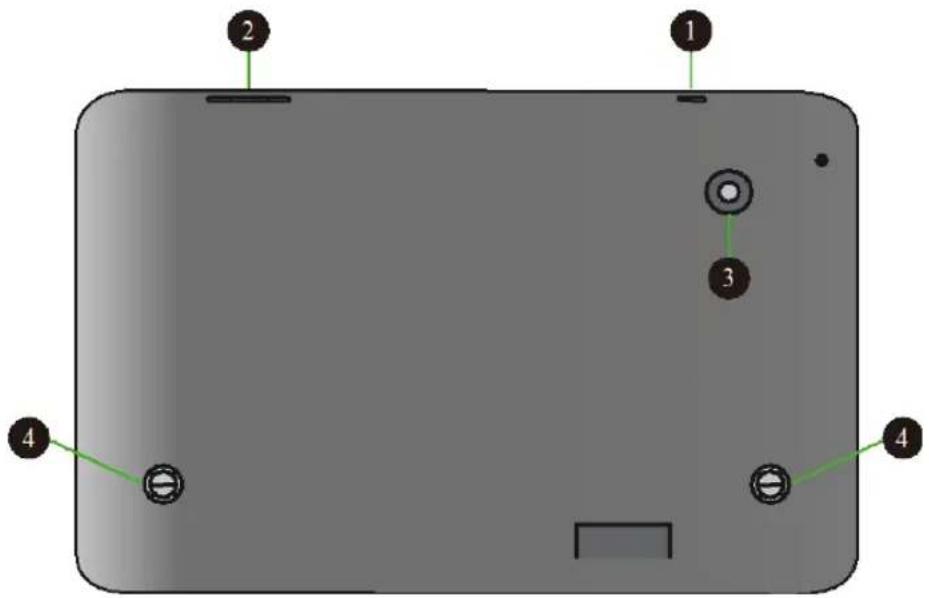
| No. | Name | Function |
| 1 | Power Lock | Push here to power on/off or lock on/off your tablet. |
| 2 | Volume up/Volume down | Press here to increase or decrease the sound volume. |
| 3 | Rear facing camera | The camera is mainly used when you are taking photos or recording videos. |
| 4 | Speaker | The sound system has two speakers for playing music, notification sounds, and other audio data. |
■ Left side view

| No. | Name | Function |
| 1 | Micro SD card slot | This is where you can insert a Micro SD memory card. |
| 2 HDMI port | This is where you can connect your HDMI external screen. | |
| 3 | Headphone connector | Here you can plug in a standard headphone. |
| 4 USB port | This is where you can establish a USB connection. | |
| 5 Power port | This is where you plug in the adapter to charge your tablet. | |
Initial Setup - Charge first then Turn on
Ensure you follow the instructions below:
-
Use the supplied AC adapter to connect your tablet to an electrical outlet. Charge your tablet until you see the battery indicator change from orange to blue (which means the battery is fully charged).
-
Press and hold the power button for two or three seconds to turn on the tablet.
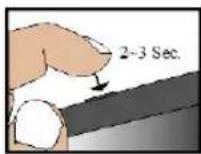
- Follow the onscreen instructions to complete the initial setup.
During this setup, you will be asked to:
a. Select your Wi-Fi network ;
b. Set your Google account;
c. Join Google+
d. Determine whether to keep your tablet backed up with your Google account.
e. Set date and time.
- The main Home screen appears.
2. Basic Operations
To operate a tablet, you need to be familiar with how to use the buttons and the touchscreen.
Power button operations
■ Locking your tablet to sleep
If you decide to leave your tablet for a while and intend to return soon, rather than powering it off, you can lock it to sleep by a brief press on the power button. This will block out any operation on your tablet until you press the power button again. This is also considered the best way to save power.
■ Waking your tablet
Your tablet may also lock itself automatically if it is not being used for a specific waiting time. The waiting time can be specified in the Setting page. For details, see Chapter 10.
To wake your tablet, press the power button.
■ Turning off your tablet
To turn off your tablet, follow these steps:
- Press and hold the Power Lock button.
- The Power-off menu appears, as shown below.
- Touch OK to power down your tablet.
Touchscreen operations
The most common methods are tapping and typing on the touchscreen directly with your fingers. In this section, you will learn to do this both ways.
■ Finger gestures
Most of the operations when using your tablet are done through the touchscreen with your fingertips. The most common fingertip operations, which we call “gestures”, are as follows:
| Gesture name Explanation | |
| Touch | Tap the screen once to open items and select options. |
Double-touch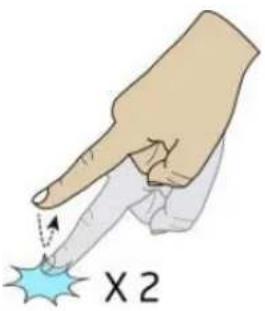 | Tap the screen twice in the same location.When viewing an image or a map,double-tapping can be used to zoom inand also zoom out. In this case, it isrecommended that you use the zoom-in orzoom-out gesture (as shown later in thistable) instead when you want to zoom. |
Drag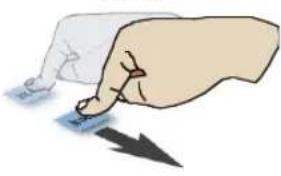 | Keep your finger touching the screen anddrag across the screen toward thedirection you desire. Use this gesturewhenever you want to select text or moveicons. |
Long-touch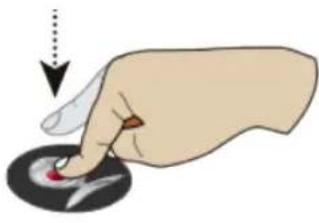 | Long touch an item to see a list of actions available for that item. |
Swipe or slide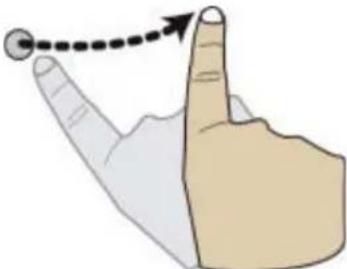 | Swipe your finger in a vertical or horizontal direction on the screen to scroll through Home screens, Web pages, lists, picture thumbnails, and so on. |
Zoom-out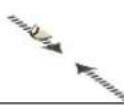 | Start out with two fingers separated and then bring them close together. |
Zoom-in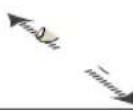 | Start out with your fingers together and then spread them. |
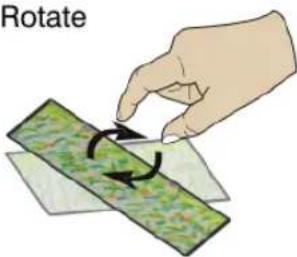 | A few apps let you rotate an image on the screen by touching it with two fingers and twisting them around a center point. |
■ Onscreen keyboard
The onscreen keyboard is a software keyboard displayed automatically
anytime you are required to type in some information. The software keyboard preinstalled in your tablet is the Android keyboard.
- Typing text, numbers, symbols, and other characters
When you need to type text, touch the text field to bring up the onscreen keyboard, then touch keys on the keyboard to type. To close the onscreen keyboard, touch the down arrow icon from the system bar.
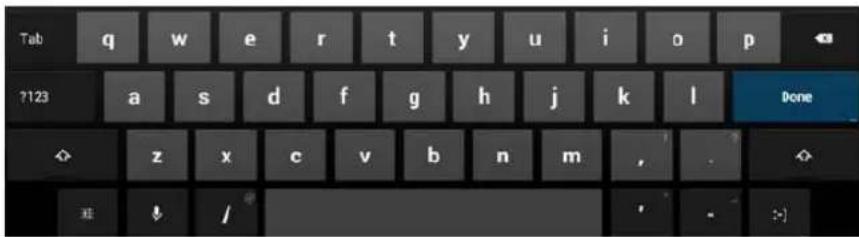
To type numbers and symbols, touch the 123 key to switch to the numbers and symbols keyboard.
To input text by speaking, touch the microphone key to start speaking.
Touch the shift key to capitalize a letter. Double-tap the shift key to capitalize all letters. By default, the auto-capitalization function is enabled when you are typing English.
Changing the input method when typing
To change the input method when typing, do the following:
- Long-touch the settings key to bring up the input method selection dialog box.
- Touch the desired input method from the list.
Using the onscreen keyboard in other languages
To configure the input language, do the following:
- Open Settings screen and touch Language & input. All the input methods are listed.
- Locate the input method you are using and touch the settings icon.
- Configure the language settings.
- Touch the back icon when you are done.
If you have configured multiple languages for the Android keyboard input method, and want to switch to another language when you are typing text, do the following:
- Touch the keyboard icon from the system bar to bring up the input method selection dialog box.
- Touch the desired language from the list.
- Editing text
To cut or copy text, do the following:
- Long-touch the word you want to use until the edit menu is displayed at the top right of the screen. The selected word is highlighted and two selection tabs are displayed under the word.
The edit menu shows up when you have text selected.
- Drag either selection tab to expand or reduce the range of the selected text. If you want to select all text, touch SELECT ALL from the edit menu.
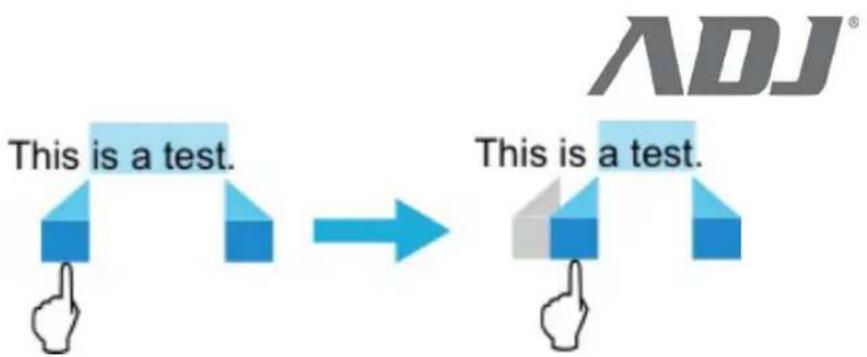
- Touch CUT or COPY from the edit menu. The text is saved to the clipboard.
To paste or replace text, do the following:
-
Long-touch the area where you want to paste the text that you have cut or copied. A pop-up option is displayed.
-
Touch PASTE to paste the text, or REPLACE to replace the text selected.
■ Dictionary
Your tablet has dictionaries in many languages which are helpful when composing messages and documents. The appropriate dictionary is activated automatically when you touch a supported keyboard.
The active dictionary suggests corrections or completes the word while you type. You do not need to interrupt your typing to accept the suggested word.
- Accepting or rejecting dictionary suggestions
To accept a dictionary suggestion, touch the correct word when the dictionary suggestion is displayed. To reject a dictionary suggestion, finish typing the word that you want, and then touch the space key.
- Correcting a word using the dictionary suggested corrections
If you misspell a word, the word is underlined with a red line. Touch the misspelled word and a list of suggested corrections is displayed. Touch the one that best matches your word. The misspelled word is replaced.
You also can create your own dictionary by using the Personal dictionary function.
To add a word to your dictionary, Open Android Settings and touch Language & input → Personal dictionary → Add.
3. Home screens
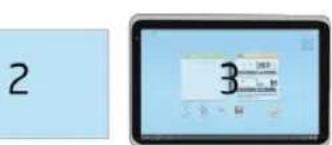
Whenever you turn on and unlock your tablet, it displays the main Home screen which looks like the one shown below.
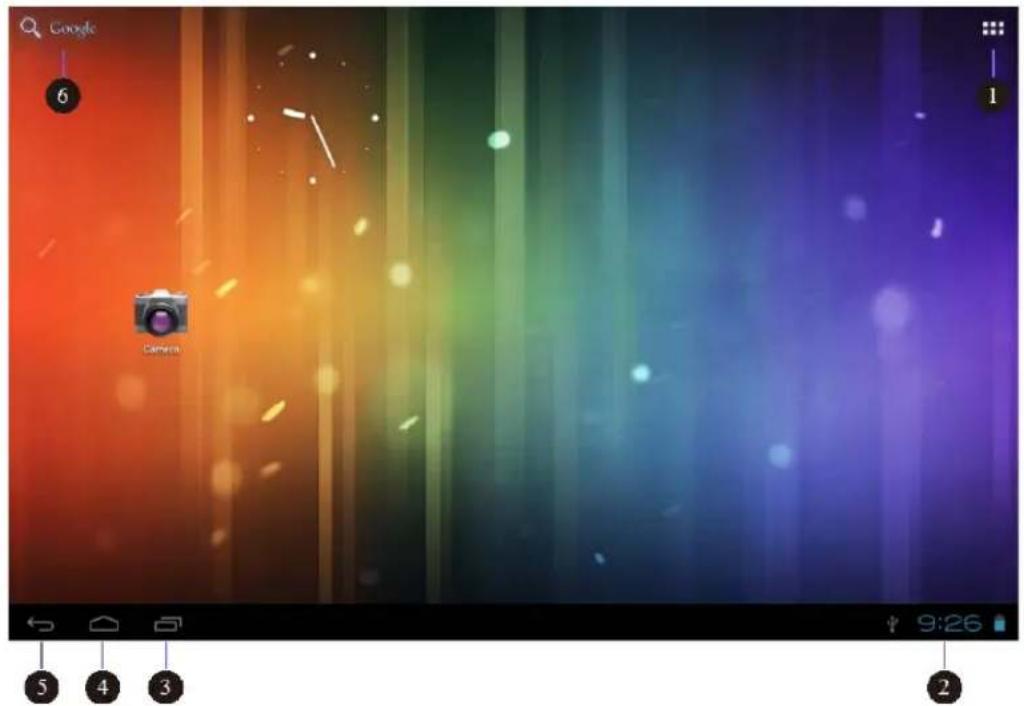
| No. | Name & icon | Function |
| 1 | All Apps | Tap on it when you want to view all apps installed in your tablet. (see Chapter 7) |
| 2 Status area | Displays your tablet's status and notifications. (see Page 15) | |
| 3 | Recent | Open a list of thumbnail images of applications you have launched recently. To switch to an application, touch the thumbnail. To close an application, long-touch the thumbnail to bring up the pop-up menu, and then touch Remove from list. |
| 4 | Home | A navigation button. Tap on it when you want to go back to the Home screen. |
| 5 | Back | A navigation button. Tap on it when you want to go back to the previous screen. |
| 6 | Google Search Google | Search for information on the Internet. See “Searching the Internet” on page 17 for more information. |
The main Home screen is actually the central one of the five Home screens.
1
4
5
Touch a blank area on the screen and slide your finger left or right horizontally to scroll to the other Home screens.
You can customize the five Home screens to meet your personal preferences. For more information, see next section.
Customizing your Home screens
You might want to customize the Home screens to meet your personal preferences. Read this topic to learn how to do this by adding an item to a Home screen, rearranging the Home screens, resetting the main Home screen, and changing the wallpaper.
■ Adding an item to a Home screen
It is simple and easy to add apps to your Home screens.
- Scroll to one of the Home screens for which you want to add the app shortcut.
- Tap the All Apps icon.
- Long-touch the app icon that you want to add.
When you touch the icon for long enough, you will see the background change from the All Apps screen into the Home screen. Do not remove your finger just yet. - Drag and position the icon in the place in which you want it to appear.
- Take your finger away at the place you want the icon to be.
■ Creating an application folder on a Home screen
By creating application folders on the Home screens, you can manage applications by function or by category. To create an application folder, simply drag an application onto another. Then touch the grouped icon and long-touch the name to change the name for the folder.
■ Moving a Home screen item
To move an item on a Home screen, do the following:
-
Long-touch the item you want to reposition until it becomes movable. Do not lift your finger away.
-
Drag the item to a new location on the same Home screen and release your finger. If you want to move the item to another Home screen, hold and drag the item to the left or right outline of another Home screen until the desired Home screen opens, and then release your finger.
■ Removing an item from a Home screen
To remove an item from a Home screen, do the following:
- Long-touch the item you want to remove until it becomes movable.
- Drag the item to the Remove icon displayed on the top of the screen.
- Release your finger when the Remove icon glows red.
■ Changing the Home screen wallpaper
To change the Home screen wallpaper, do the following:
- Long-touch a blank area of a Home screen. A pop-up menu is displayed
- Touch a source (Gallery, Live Wallpapers, or Wallpapers) to view available wallpapers.
- Touch the wallpaper you want to use. Then touch Set wallpaper.
Status area
When you touch the area, the Status Details panel opens displaying the current time, date, wireless connection status, and battery status.
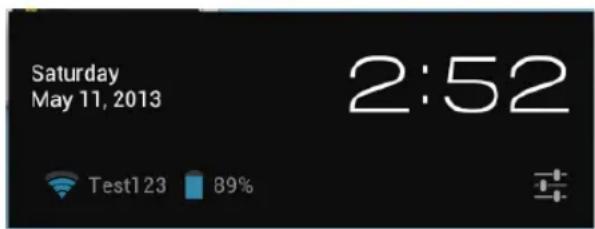
When any notifications are present, the summary is listed below the status details. Touch a notification to view the detailed information.
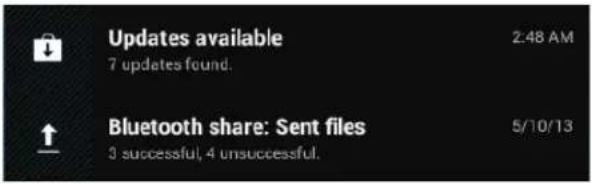
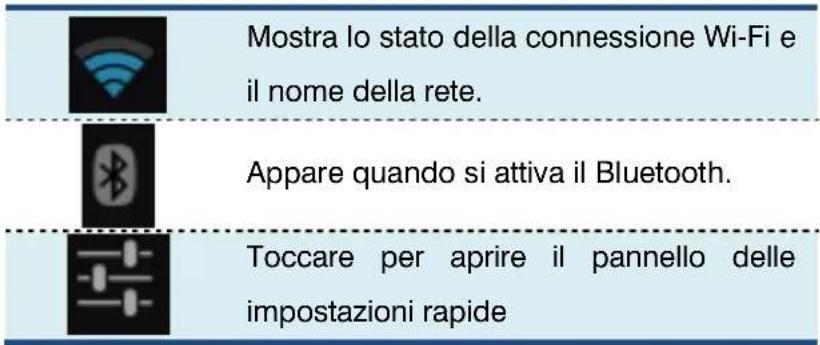
In here,
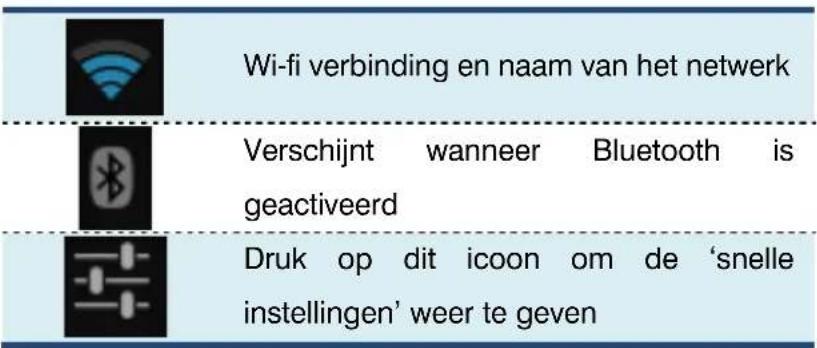
Shows the Wi-Fi connection status and the network name.
Appears when you activate the Bluetooth.
Touch to open the Quick Settings panel
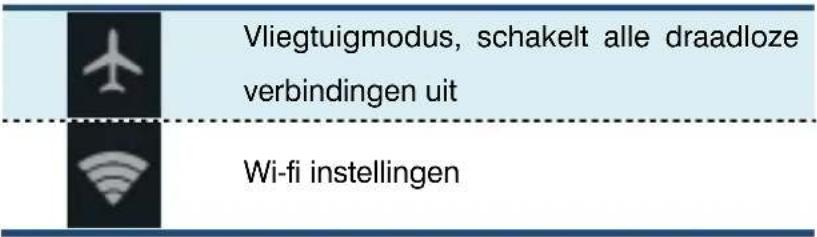
The Quick Settings panel is displayed below the status details.
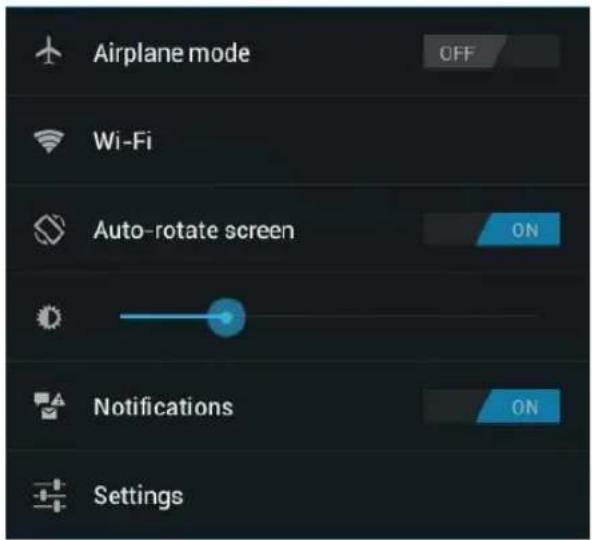
In here,
Switch on the Airplane mode, which will stop all wireless communications.
Touch here to open the Wi-Fi setting page.
Enable or disable the auto screen rotation function.
Drag the slider to adjust the brightness of your screen
Switch on or off the system notification function.
Touch to open the Settings screen, the same one you can open by running the Settings app.
To close the Quick Settings panel, touch anywhere else on the screen.
Searching the Internet
By typing or speaking, you can use Google Search or Google Voice Search to search for information on the Web.
■ Google Search
To search by typing, do the following:
- From a Home screen, touch the icon Google.
- Type a keyword or other text using the onscreen keyboard. As you type, the search results that fully or partially match the text being typed are displayed on a menu below the search box.
- Do one of the following:
- Touch one of the search results displayed on the menu.
- Finish typing and then touch the enter key on the Android keyboard.
■ Google Voice Search
You also can search for information on the Web by using Google Voice Search. To search by speaking, do the following:
- From a Home screen, touch the Google Voice Search icon.
- Touch Speak now and say the name or keyword of the item you are looking for.
- When you finish speaking, Google Voice Search analyzes your speech and the browser opens, displaying the search results.
Note: If Google Voice Search cannot understand what you say, it presents a list of similar-sounding search terms, which you can touch to continue your search.
4. Creating Accounts
While many features and services provided in your tablet are available only if you have set an account, you can also set multiple accounts to make the most of your tablet.
Creating an account
If you fail to add your Google account in the initial setup, or want to add another in addition to your Google account, do the following:
- Open Settings screen and touch Accounts&sync
- Touch Add account (you can find it in the upper right corner).
- Touch and select your desired option from the account type list.
- Follow the instructions on the screen to create your account.
Removing an Account
To remove an account, touch the account from the accounts list on the Accounts screen. Touch the menu icon. Then touch Remove account.
Synchronizing your Google Account
By default, the auto-sync function is enabled.
If you want to synchronize your account manually, follow the steps below:
- Go to the Accounts screen.
- Touch the account that you want to synchronize with your tablet.
Depending on the type of your selected account, a list of synchronizable features will be shown. - From the list, select the one that you want to synchronize.
- The information contained in the feature is updated.
5. Wireless networks and devices
Your tablet can connect to a variety of networks and devices, including Wi-Fi data networks and Bluetooth devices.
Wi-Fi networks
A Wi-Fi connection requires access to a functioning Wireless Access Point (WAP), also called a hotspot. Some hotspots are open to the public, but some others implement security features to limit access to specific groups or individuals.
■ Connecting to a Wi-Fi network
To establish a Wi-Fi network connection, do the following:
- Open the Settings screen and set the Wi-Fi button to ON. A list of available networks will be displayed.
- Touch a Wi-Fi network to connect to it. If the network is secured, type the required password or other credentials.
- For networks providing proxy service
If you are required to configure proxy settings when you are connecting to a Wi-Fi network, do the following:
-
Touch a network in the list of Wi-Fi networks you've added. A dialog appears.
-
Touch to add a check mark on the option "Show advance options". If you don't see this option, the network does not request proxy settings.
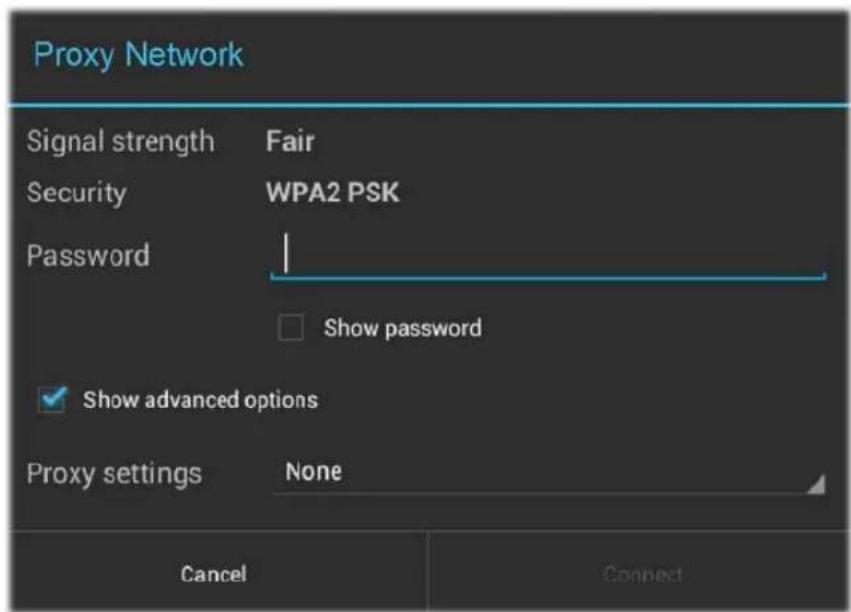
- Touch "None" and in the menu that opens, tap "Manual".
- Enter the proxy settings required for your network:
| Proxy hostname | The hostname of the proxy server. |
| Proxy port | The port on which the proxy server listens. |
| Bypass proxy for | Any domains to which you want to connect directly, bypassing the proxy server. |
(You may need to refer to your network administrator for details about these settings.)
- Touch "Connect".
■ Adding a Wi-Fi network
If you want to access a Wi-Fi network that does not broadcast its
network name (also called a service set identifier or SSID), you must add that Wi-Fi network before you can connect to it.
ADD NETWORK
To add a Wi-Fi network, touch this icon, which you can find in the upper right corner of the screen.
Then, type the required information for the network. Touch Save. The information about the network is saved. The Wi-Fi connection will be established automatically the next time you come within the range of this network.
■ Disabling an automatic Wi-Fi connection
If you do not want the tablet to automatically connect to a specific Wi-Fi network that you have previously configured, do the following with the Wi-Fi screen:
- Switch the Wi-Fi button to ON if it is set to OFF.
- Touch the name of the Wi-Fi network. The Wi-Fi status panel appears.
- Touch Forget on the panel. The details of the Wi-Fi network are erased.
Using Bluetooth devices
Bluetooth is a short-range wireless communication technology standard. It is more about connecting to a peripheral device, such as a keyboard, a mouse, a printer, a headphone, a set of speakers, and so on.
■ Enabling and disabling the Bluetooth function
To enable or disable the Bluetooth function, do either of the following:
- Open the Quick Settings panel and switch Bluetooth button to ON.
- Open the Settings screen and switch Bluetooth button to ON.
When enabled, the Bluetooth icon

is displayed on the system bar.
When you are not using Bluetooth, turn it off to extend the battery life.
■ Opening Bluetooth screen
In the Settings screen, touch Bluetooth to open Bluetooth screen. The Bluetooth screen shows your Bluetooth name ("Intel Education Tablet", by default) and a list of available devices. In addition, two icons appear in the upper right corner, which are:
| SEARCH FOR DEVICES | Touch to refresh the list of available devices |
| □□□ | This is the menu icon. Touch it to show more options. |
■ Changing your Bluetooth name
- Run the Settings app and turn on the Bluetooth button if it is disabled.
- Touch Bluetooth.
- Touch the menu icon and touch Rename tablet.
- Type a new name, and then touch Rename.
■ Pairing with a Bluetooth device
To exchange data with another Bluetooth device, pair your tablet with the Bluetooth device by doing the following:
- Open Android Settings and turn on Bluetooth if it is disabled.
- Touch SEARCH FOR DEVICES. A list of device IDs is displayed.
- Touch the ID of the Bluetooth device you want to pair with and follow the instructions on both devices to pair them.
- When the pairing is successful, the device is listed under PAIRED DEVICES.
■ Unpairing a Bluetooth device
To unpair a Bluetooth device, do the following:
- Open the Settings screen and touch Bluetooth.
- Locate the paired Bluetooth device and touch the settings icon.
- Touch Unpair to erase all pairing information for that device.
6. Battery and AC power
This chapter provides instructions on how to charge the battery, how to extend the battery life between charges, and how to view the battery status.
Charging the battery
Your tablet is shipped with an AC adapter to charge your tablet from any standard ac power outlet. Normally it will take around 3 to 4 hours to fully charge.
To charge the battery, do the following:
-
Insert the adapter into the power port on your tablet.
-
Plug the adapter into a standard ac power outlet.
-
Make sure the power indicator lights up in orange.
-
When the indicator changes to blue, disconnect the AC adapter from your tablet.
Extending the battery life between charges
With the battery fully charged, your tablet offers:
- Up to 8 hours while playing local 1080p video;
- Up to 34 hours while listening to local MP3 files;
- Up to 9 hours while surfing the web on Wi-Fi;
- Up to 6 hours while watching video streaming content.
You can extend the battery life by doing the following:
- Turn off Bluetooth, Wi-Fi when not in use.
To turn off Bluetooth, and Wi-Fi do the following:
- Touch the time area from the system bar to open the Status Details panel.
-
Touch anywhere in the panel. The Quick Settings panel is displayed.
-
Either switch on Airplane mode to disable all wireless connections, or switch off Bluetooth and Wi-Fi to disable the features.
- Turn off automatic synchronization for Gmail, Calendar, Contacts, and other applications if you do not need them.
To turn off the automatic synchronization function, open the Settings screen and touch Google, Email, or Corporate under Accounts category. Then, in the top right corner, touch the menu button and select Cancel sync to suspend the auto-sync function.
- Reduce the brightness of your screen.
Follow either of the following procedures to reduce the brightness of your screen:
- Open the Quick Settings panel. Locate the screen brightness icon and then drag the slider to the left to reduce the screen brightness.
- Open Android Settings and touch Display Brightness. Drag the slider to the left to reduce the screen brightness.
- Turn off the screen when the tablet is temporarily not in use.
Press the power button to turn off the screen.
- Power off your tablet if the tablet will not be used for a while.
-
Press and hold the power button until the Power off menu is displayed.
-
Touch OK.
Checking the battery status
Get the approximate status of your battery at any time by checking the battery status icon on the system bar.
| Battery is fully charged | |
| Battery is starting to drain | |
 | Battery is low, and you should charge it soon. |
 | Battery is about to completely drain, and you should stop using your tablet and charge it at once. |
 | Battery is being charged. |
To check for the accurate status, touch the battery status icon from the system bar to open the Status Details panel. The remaining battery power percentage is displayed in the panel.
You also can get much more detailed battery status by doing the following:
- Open the Settings screen.
- Touch Battery to check which apps are consuming battery power.
If you have used your tablet for a long time, check the battery condition and determine if the battery should be replaced with a new one by doing the following:
- Open the Settings screen and touch About tablet → Status.
- If Battery status shows Poor, contact your technical advisors for further instructions.
7. All Apps screen
In the All Apps screen, you can find all the application and widgets installed in your tablet.
Opening the All Apps screen

To view your applications and widgets, touch the All Apps button on a Home screen. Then, touch the APPS tab or the
WIDGETS to view all items.
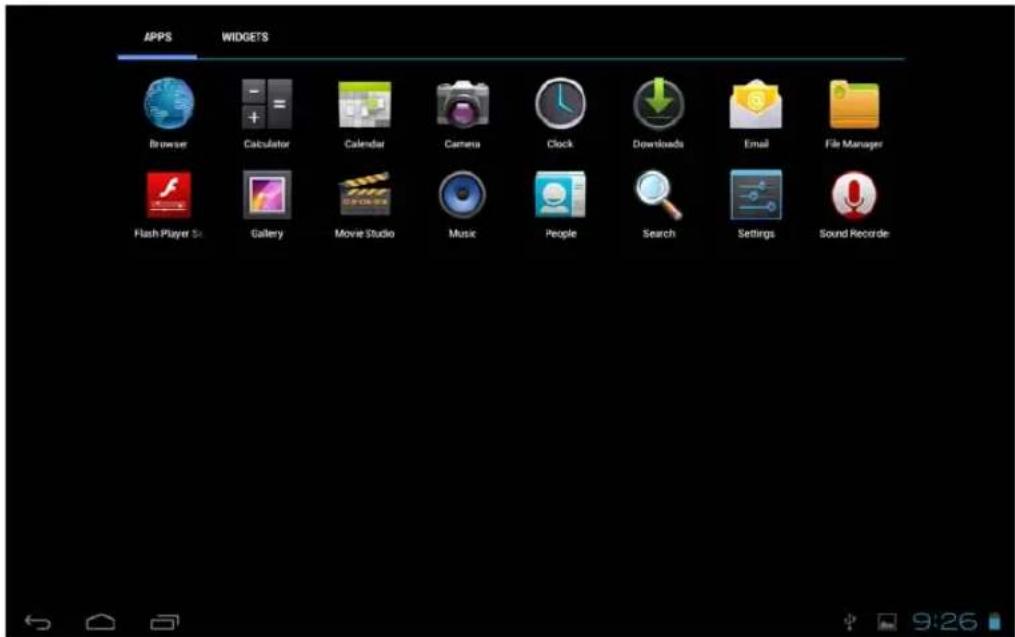
The following table provides a brief introduction to the applications that are pre-installed on your tablet.
(Note: Preinstalled applications vary depending on countries/regions.)
Icon Name Description

Browser Explore the Internet.

Calculator Perform basic arithmetic.
Calendar Manage your schedule.
Camera Take pictures and record videos.
Clock
* See Section "Using the clock" below.
Downloads Manage downloaded files.
Manage your emails in your non-Google account.
File Manager Manage your files.
Flash Player Open the Flash Player Settings
Settings page.
Gallery Now all pictures of Macose you have taken using the tablet camera.
Movie Studio Edit your videos.
Music Play music.
People manage the information of your contacts

Search Perform a search on your system and the Internet.
Settings Configure your tablet settings.

Sound Recorder Record your messages, etc.
Using the browser

To open the browser, do one of the following:
- Touch a bookmark from the predefined Bookmark Zone.
- Run the Browser app from the All Apps screen.
After the browser opens, use the following controls to navigate the Web, manage bookmarks, configure the browser's settings, and so on:
| Icon Name Function | ||
 | Back | Go back to the previous Web page. |
 | Forward | Go forward to a recently visited Web page. |
 | Refresh | Refresh the current Web page. |
 | Bookmark | Bookmark the current Web page. |
 | Search | Use Google Search to search for information. |
 | Bookmarks | View all bookmarks and browsing history. |
For more options, touch the menu icon.
Taking pictures and videos
Camera provides you the basic features to take photos and video. After activate the app, you can see the panel as shown
below.
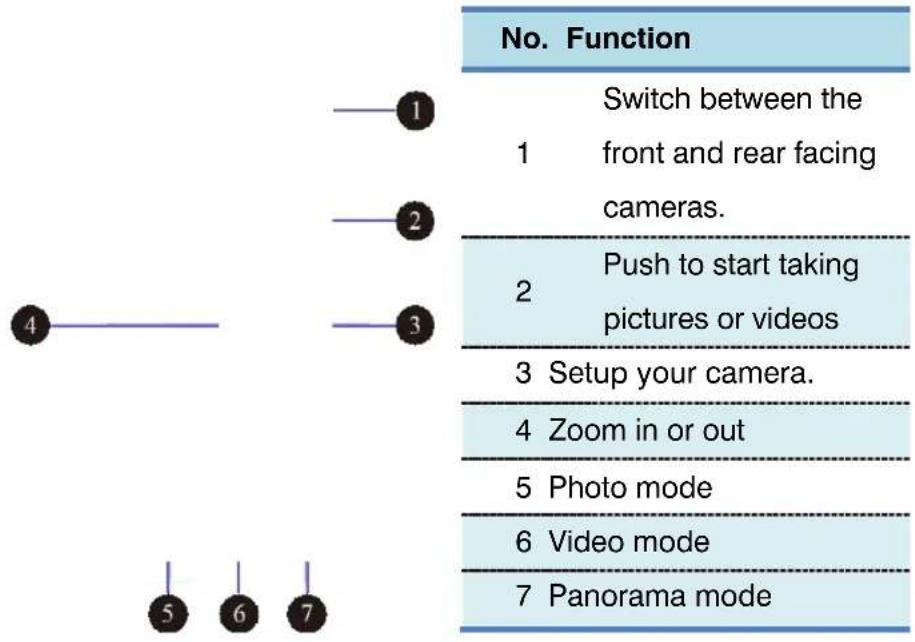
When you switch to the front-facing camera, you will see an indicator just near the camera light on in blue.
Viewing pictures and watching videos
Gallery stores all your pictures and videos that you have taken or recorded with your camera, as well as the ones you have downloaded or copied from other sources.
To view your pictures and videos, go to the All Apps screen and touch
Gallery.
Use following controls to manage or view your pictures and videos:

View pictures in a slide-show mode.

Share the picture or video through e-mail, Bluetooth, or an application.

Delete the picture or video file.

Touch the menu icon for more options.
Listening to music

Your tablet is preinstalled with several on-line music applications. These applications enable you to listen to your downloaded or purchased music.
To listen to music stored on your tablet, launch the preferred music application from the All Apps screen.
Note: Music applications can find your music files anywhere you put them on your tablet.
You can return to the playback screen from any other application by opening the notifications panel and touching the ongoing music notification.
Working with Email
Touch and start this app to send and receive emails using a non-Google account, and you can create and manage multiple non-Google accounts here.
■ Setting up your Email account
To set up an Email account, do the following
- Touch Email from the All Apps screen.
- Type the e-mail address and password of the e-mail account you want to add and then touch Next or Manual setup.
- Follow the instructions on the screen to set up your Email account.
Note: If you do not have an e-mail account, first consider using Gmail.
■ Reading an e-mail
- Launch the Email application.
- If you have multiple e-mail accounts, touch the e-mail address from the top-left corner to bring up a list of accounts you have added. Then, touch your desired e-mail box.
- Touch an e-mail to read it.
■ Sending an e-mail
Icon Name

New email

Reply

Reply all

Forward
If you want to reply to a received e-mail, touch the Reply or Replay icon from the top of the received e-mail. If you want to forward an email, touch the Forward icon.
If you want to compose a new e-mail, do the following:
- Touch the New email icon.
-
Type the recipient's e-mail address and the subject, then compose your message. If you want to add CC or BCC addresses, touch +CC/BCC.
-
Touch Send to send the e-mail.
■ Managing accounts
To manage your accounts, do the following:
-
Touch the menu icon from any email account view.
-
Touch Settings. The Settings screen is displayed.
-
Perform the following actions according to demand:
-
Touch Add account to add more accounts to the Email application.
- Select an account form the account list and touch Remove account to delete the account.
- Touch an account from the account list and configure the account settings.
Managing your contacts
The People application integrates all the contacts from your Google Accounts and corporate account in one place and enables you to reach everyone quickly and easily.
All the contacts managed and stored in your People application are available for Gmail, Google Talk, Google+, Messaging, and other applications that need contact information.
To view your contacts, go to the All Apps screen and touch People. All the contacts are listed on the screen. Contacts who are currently online and accessible from Google Talk or other networks are marked with a green dot.
Using the clock
Use the Clock application to display the date and time in large characters on your screen and to set alarms to sound once or on a repeating schedule.
■ Setting date and time
By default, your tablet automatically synchronizes the date and time with the Internet. If you want to set the date and time manually, do the following:
- Open the Settings screen and touch Date & time → Automatic date &
time to disable the auto-synchronization function.
- Touch Set date, Set time, Select time zone, and other options to set your date and time.
■ Setting an alarm
To set an alarm, do the following:
- Run the Clock application.
- Touch Set alarm and touch Add alarm to set the alarm time.
- Configure the alarm settings and touch OK.
Downloading applications
To extend the functionality of your tablet, download and install additional applications from Google Play, and also from a non-Google site. Google Play provides an easy and quick way for you to shop for games and mobile applications.
■ Downloading from Google Play
To download or buy an application or a game from Google Play, do the following:
- Open the All Apps screen and touch the Play Store icon.
- Sign in to Google Play with your Google Account. If you do not have one, follow the instructions on the screen to create one.
- Scroll and browse listed applications to locate the desired application. Touch the application to view detailed information.
- On the application details screen, touch Download or Buy and follow the instructions on the screen to start the download and installation. The downloading icon is displayed on the system bar.
- When the download finishes, touch the time area from the system bar to bring up the notification messages.
- Touch the installed application on the list and follow the instructions on the screen.
■ Downloading an app from non-Google sites
Before you start downloading from a non-Google site, make sure the site is a trustable source, and also follow the steps below to check your configuration:
- Open Settings and tap to select the Security option.
- In the Security screen, find the "Unknown sources" option.
- If unchecked, tap the option to add a check mark in the checkbox and then tap OK on the confirmation dialog box.
To download and install the app, follow the steps here:
-
Visit the source site and follow the instructions to start downloading the app.
Upon the download starting, you will see a download icon appear and flash in your status area. -
When the download is complete, open your notification and tap the file name in the format of ".apk".
The download has completed when you see the download icon stop flashing.
-
Tap "Install" on the popup.
-
If you want to use the app immediately, just tap "Open" button; otherwise, tap "Done".
8. USB and HDMI Connections
Working with the USB connector
Using the attached USB cable, you can connect USB compatible devices to your tablet.
Read this section to learn how to use the connector to connect different devices.
■ Share files with your Computer
Use the micro USB connector together with a USB cable to connect your tablet to your personal computer to transfer files, or share your mobile data connection.
- Open the Setting screen, and touch Storage.
- Touch the menu icon and select "USB computer Connection".
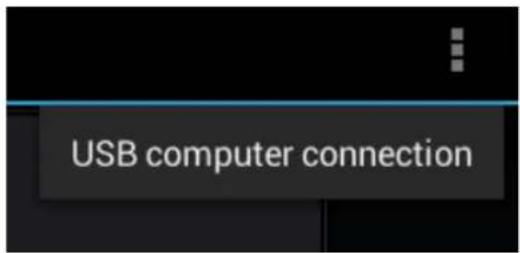
- Select either "Media device MTP" or "Camera (PTP)".
Note: Mac users need to select MTP and install a piece of software named "Android File Transfer" available from the website: www.android.com.
- Connect your tablet to your computer using a USB cable.
- Follow the instructions on your computer screen to share files.
Your tablet handles files by putting them into their respectively specified folders. Most frequently used files are as follows:
| Folder name Note | |
| Download | Stores the files you have downloaded |
| DCIM/Camera | Stores the photos you have taken and videos you have recorded |
| Music | Stores the music files organized by artist and then by album name. |
USB OTG (On-The-GO) connection
The USB port on your tablet is a USB OTG port that allows your tablet to become a host. In short, you can connect USB peripheral devices to your tablet, and those devices serve your tablet.
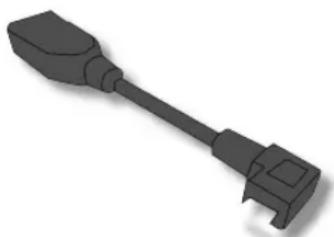
natural_image
3D rendering of a black mechanical connector or tool (no text or symbols visible)To achieve this, you need to get a USB
OTG (On-The-GO) adapter, which may look like the item shown on the right:
Such adapters are available from the market in many different forms. A USB OTG adapter is basically a female USB port that plugs into the Micro-USB port on your tablet, and lets you connect devices to it that use standard USB 2.0 connections.
There is no list whatsoever of what kind of USB accessories are compatible with it. The following USB devices are most likely supported but are not official:
- Mouse
- Keyboards: Some keys may not be supported.
-
USB Hubs
-
Card readers: Support FAT16/FAT32 formatted.
- USB drivers: Must be FAT16/FAT32 formatted and self-powered.
Using HDMI devices
Your tablet has a mini HDMI connector that you can use to connect an external display to provide video output. To locate the mini HDMI connector, see Page 4.
First, connect a mini HDMI (Type C) cable to your tablet then plug the other end of the HDMI cable into a HDMI port on your TV or monitor.
Usually, your tablet works well with most of the HDMI monitors, and the HDMI device shows exactly the same images as you see on your tablet's screen.
9.Locking and Security
This chapter provides information about how to protect the information stored on your tablet.
Screen lock mode
Use the screen lock mode to prevent unauthorized access to your data when the tablet is not in use. To lock the screen, press the power button once. The screen goes blank and the tablet enters sleep mode.
To unlock the screen, press the power button again to bring up the locked screen. Then touch and
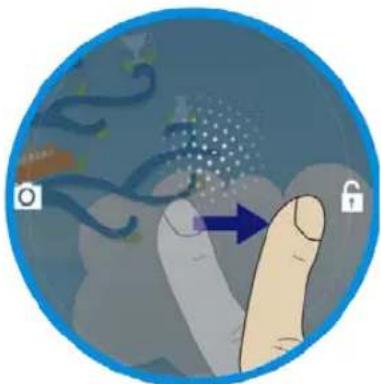
natural_image
Illustration of a hand interacting with a globe and a lock, showing abstract patterns and a blue arrow (no text or symbols)Drag to unlock your screen
drag the lock icon to the right until it circles the unlock icon.
If you have another unlock mode set, input the correct information (password, PIN, or pattern) to unlock the screen.
From a locked screen, you can perform the following operations without unlocking the screen:
- Use the camera to take pictures or videos.
- Check for notification messages.
- While listening to music, manage music tracks and check for music albums.
By default, the tablet is configured to lock the screen automatically after several minutes of inactivity. If you want to change the duration of
inactivity that elapses before the tablet enters the lock mode automatically, do the following:
- Open Android Settings and touch Display → Sleep.
- Select the duration you prefer.
For the longest battery life between charges, select the shortest convenient duration.
Locking the tablet screen
To protect your tablet data against unauthorized access, lock the screen and set an unlock mode for unlocking the screen. To enable the screen unlock function and set up a password, PIN, or a pattern to unlock the screen, do the following:
- Open the Settings screen.
- Touch and choose Screen Lock.
A tab called "Choose screen Lock" appears, and you will see several options described as below.
| None | The screen doesn’t lock. The main Home screen appears directly whenever you turn on your tablet. |
| Slide | This activates the standard and default sliding lock screen. |
| Pattern | This activates a pattern-tracing screen. You are required to trace the pattern in a specific order to unlock your tablet. |
| PIN | You are required to type a personal identification number (PIN) to unlock your tablet. |
| Password | You are required to type a password to unlock your tablet. |
- Follow the instructions to set your lock.
- Touch OK to save your setting.
- Make a note of your password, PIN, or pattern in case you forget it.
10. Settings
In Android system, the system setup is done using an application named "Settings". This is the app to open the Settings screen.
Where to find Settings
This is the icon of the Settings app, and you can find it in the All Apps screen. To open the All Apps screen, touch the All Apps button in the upper right corner of your Home screen.
In the Settings screen, there are five categories of Android settings, which are:
- "WIRELESS & NETWORKS" on page 46
- "DEVICE" on page 48
- "PERSONAL" on page 50
- "SYSTEM" on page 52
| Category | Main menu | Description |
| WIRELESS & NETWORKS | Wi-Fi | Configure and manage Wi-Fi connections. |
| Bluetooth | Configure and manage Bluetooth connections and devices. | |
| Data usage | Shows the data usage by application. | |
| More... | Configure and manage mobile network connections and other wireless connection related functions. | |
| DEVICE Sound | Configure the volume level and type; configure ringtones and alarms. | |
| Display | Configure brightness and other screen settings. | |
| HDMI | Configure HDMI connections. | |
| Storage | Monitor the used and available space on your tablet internal storage.Configure the USB mode when a USB storage device connects to the tablet. | |
| Battery | View the status and statics of the battery usage. | |
| Apps | View details about the applications installed on your tablet, manage application data, close applications, and set whether you want to permit the installation of applications obtained from sources other than from the Google Store. | |
| PERSONAL Accounts &sync | Create, delete, and setup your accounts. | |
| Location access | Configure how your tablet determines your location and how you want to share your location with others through Google. | |
| Security | Configure the security policies and settings. | |
| Language & input | Select the language that you want to work with on your tablet and configure the input method. | |
| Backup & reset | Back up data or reset your tablet. | |
| SYSTEM Date & time | Set the date and time. | |
| Accessibility | Enable or disable accessibility features. | |
| Developer options | Configure other features related to user interfaces and applications. | |
| About tablet | View information about your tablet. | |
WIRELESS & NETWORKS
In this category, you can configure and manage connections to networks and devices through Wi-Fi, Bluetooth, a mobile network, or a USB connector.
Note: To enable or disable a setting, touch the setting item to switch to ON or OFF.
■ Wi-Fi
Use the switch to turn on or off Wi-Fi.
When Wi-Fi is on, a list of available Wi-Fi networks is displayed. Touch a network and input the required information to connect to it.
In the top right corner of this screen, there are the following three options:
| SCAN | Touch to scan available networks. |
| ADD NETWORK | Touch to add a network that does not broadcast its name. For details, see Section “Adding a Wi-Fi network” in Chapter 5. |
| This is the menu icon. Touch to show the option named Advanced. Touch the Advanced and you will see:Network notificationKeep Wi-Fi on during sleepMAC addressIP address |
In the Advanced, you can configure the following functions:
- Receive a notification when an open network is available.
- Configure whether to keep Wi-Fi on when the tablet is in sleep mode.
- Check for the MAC address and IP address.
Bluetooth
Use the switch to turn on or turn off Bluetooth.
When Bluetooth is on, a list of available Bluetooth devices is displayed under your tablet name. Touch a device to pair with it.
On this screen, you can find the following three icons:
| SEARCH FOR DEVICES | Touch to refresh the list of available Bluetooth devices. For details, see Section “Connecting to a Wi-Fi network” in Chapter 5. |
| This is the menu icon. Touch to show options including:Rename tabletVisibility timeoutShow received files |
To configure the settings for your tablet Bluetooth, touch the menu icon and you can configure the following:
- Rename your tablet.
- Set how long you want to keep your device visible to unpaired devices after you turn on Bluetooth.
- Check for files received through Bluetooth.
Data Usage
This option lets you know how much data your apps have used and which of them consumed the most.
More...
Airplane mode
When the airplane mode is enabled, all wireless connections are disabled, and you cannot connect to networks. If allowed by the aircraft operator and applicable laws and regulations, you can continue to use other features, such as playing music, watching videos, checking your calendar, viewing pictures, and so on.
VPN
Add and edit VPN network manually.
Tethering
Share your tablet's mobile network data connection with your computer through a USB connection or a Bluetooth connection, or share your Wi-Fi connection with multiple devices at the same time by setting your tablet as a portable Wi-Fi hotspot.
Note: The Tethering function might not be supported by some carriers.
DEVICE
This category is used to configure settings of sound/display/HDMI /storage. You can also check for battery status, manage your applications, and calibrate the sensors.
Sound
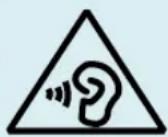
To prevent possible hearing damage, do not listen at high volume for a long period.
Volumes
Adjust the volume of music and audio from other media, notification
ringtones, and alarms.
Default notification
Select the ringtone to sound when you receive a notification, such as a notification of incoming e-mails.
Touch sounds
When enabled, sounds play when you touch icons and other items on the screen.
Screen lock sound
When enabled, tones play when you unlock and lock the screen.
■ Display
Brightness
Adjust the brightness of the screen. Drag the brightness slider horizontally or touch the desired portion on the slider. The length of the highlighted bar on the slider indicates the brightness of the screen.
By default, Automatic brightness is enabled and the tablet adjusts the screen brightness automatically using the ambient light sensor.
Wallpaper
Change your wallpaper.
Auto-rotate screen
This option comes with a checkbox. Check the box to enable this feature, and uncheck it to disable the feature.
Sleep
Select a timeout value for how long the screen remains on after the last operation. For the longest battery life between charges, use the shortest convenient timeout value.
Font size
Change the system font size.
■ Storage
INTERNAL STORAGE
View the total space of your internal storage device, the space used
by applications and media files, and the free space.
Micro SD CARD
Mount the Micro SD memory card inserted in the Micro SD card slot.
USB STORAGE
Mount the USB storage device.
This is the menu icon. Touch to show the only option:
- USB computer connection
Configure how you want to use your tablet when attached to a computer through the micro USB connector. For details, see Section “Share files with your Computer” in Chapter 8.
Battery
Check which applications are consuming battery power.
■ Apps
List the installed applications by category (DOWNLOADED, RUNNING, ALL). You can manage a specific application by its settings panel which can be opened by long-touching the application icon.
PERSONAL
Use this category to manage the settings related to your personal information, such as your accounts, location, security, and so on.
■ Accounts & sync
You can add, delete, view, and manage all your accounts here. Also you can turn on or turn off the auto-sync function for each account by touching it to configure the synchronization settings.
■ Location services
By checking checkbox, you allow your apps to collect your location data.
Furthermore, you can determine which location sources shown below
are available to your apps.
- Google's location service: if enabled, your apps are allowed to use Google's location service to estimate your approximate location.
■ Security
Screen lock
Configure the screen unlock mode. For details, see “Locking the tablet screen” in Chapter 9.
Owner info
Set whether you want to display information about yourself (such as your contact information) on the locked screen and type the text you want to display.
Encrypt tablet
Encrypt your accounts, settings, downloaded applications, and so on.
Make passwords visible
Enable the password to be shown as you type.
Device administrators
Activate or deactivate applications through which your IT personnel are able to perform administrative tasks on your tablet.
Unknown sources
Enable the installation of applications from other resources other than Google Play.
Trusted credentials
View the trusted credentials or certificates installed.
Install from SD card
Install certificates from an SD card.
Clear credentials (Disabled by default)
Delete all secure certificates and related credentials and erase the credential storage password.
■ Language & input
Language
Select the language to use for the text on your tablet.
Spelling checker
Enable or disable the spelling correction function when you are typing.
Personal dictionary
Create your own dictionary.
Default
Configure the default input methods. The installed input methods are listed under Default and each method has a settings icon. Touch the settings icon to configure the input method.
■ Backup & reset
BACKUP & RESTORE
The features here are only available when you have a Google account.
Factory data reset
Reset your settings to the factory default values. This setting erases all data from the tablet, including Google or other e-mail account settings.
SYSTEM
From this category, you can set the date and time, check for system information, and configure additional system settings in addition to those introduced in previous topics.
Date & time
Automatic date & time
Disable to manually set the date and time. Enable to obtain the current time from the wireless network.
Automatic time zone
Disable to manually set the time zone. Enable to obtain the time zone
from your wireless network.
Use 24-hour format
Enable to display the time using the 24-hour time format.
Select date format
Set the format for displaying dates.
■ Accessibility
Services
It shows a list of installed optional services that help you to use this tablet, such as TalkBack, which is a spoken feature that allows your tablet to offer feedback on your touch and other interactions.
Large text
Check to enlarge the system font size.
Auto-rotate screen
Enable or disable the screen auto-rotation function. When enabled, the screen switches the orientation to landscape or portrait view as you rotate the tablet.
Touch & hold delay
Configure how long you must keep your finger on an object before it is recognized as a long-touch operation.
Install web script
Touch to decide whether you want to install web scripts from Google.
■ Developer options
These settings are intended for development use only. Any change made here can cause your tablet and the applications on it to become erratic.
■ About the tablet
Check for the following system information:
• Available Android software updates
- Battery status, mobile network connection status, IP address, Wi-Fi
MAC address, and other information
- Legal information
- Model number
- Android version
- IFWI version
- Baseband version
- Kernel version
- Build number
11. Troubleshooting
This chapter describes some common problems and suggested solutions, and ways to recover your tablet from a crash.
Be aware that the problems and solutions described in this chapter are meant only as a guide. They are not definitive problem solving techniques. For certain problems, you might need help from your technical service provider.
When you observe a problem, stop operation immediately, because taking further action might result in data loss or damage. Take a note of what the system is doing and what actions you performed before the problem occurred. Provide detailed information to your service provider for quicker problem resolution.
For any problem, follow these steps:
- Restart your tablet.
- Check your Wi-Fi connection.
- Reset your Wi-Fi connection.
- Plug your tablet to a wall outlet to charge it for at least one hour.
If the problem still persists, contact your technical support group.
| No. Question Answer | ||
| 1 | My tablet won’t turn on or off. | 1. Press and hold the Power button for about 10 seconds, the tablet will either turn off or on.2. If it fails, wait for about 5 minutes and repeat step 1 again. |
| 2 | The battery won't charge. | 1. Check if the wall outlet is providing power.2. Check if your adapter is plugged into your tablet firmly. |
| 3 | The screen doesn't rotate. | 1. Not every app supports this feature. Go back to the Home screen to check if the tablet responds and rotates the screen.2. If it refuses to rotate, press the rotation lock key and make sure the “Auto-rotate screen” item is not locked. |
| 4 | No sound coming from my tablet. | If the headset is plugged into the device, the speaker is automatically shut off.Disconnect the headset.Check that the device volume setting is not muted.Check that the volume control is not at its lowest setting. |
| 5 | I cannot view my picture files. | 1. If the files are photos taken using your tablet, restart your tablet.2. If the files are from other sources, check if they are damaged.3. If they are not damaged, try to convert them to a more widely supported format such as JPEG. |
| 6 | I cannot play my video files. | 1. If the files are videos, recorded using your tablet, restart your tablet.2. If the files are from other sources, check if they are damaged.3. If they are not damaged, try to convert them to a more widely supported format such as MP4. |
| 7 | I cannot play my audio (or music) files. | 1. If the files are recorded using your tablet, restart your tablet.2. If the files are from other sources, check if they are damaged.3. If they are not damaged, try to convert them to a more widely supported format such as MP3. |
| 8 | I forgot my unlock pattern (or password). | If you have an active Google account on your tablet, the screen will prompt you to confirm your Google account after you fail to enter the correct pattern or password several times. Follow the instructions to reset the pattern or password.If this is not the case, you can clean boot the tablet, which can restore your tablet to default setting. See next section for details. |
| 9 | The tablet heats up when charging or operating for a long period. | It is normal for the device to heat up when charging. When charging is complete, it will return to its normal temperature.It is also normal for the tablet to heat up during long periods of use, such as watching a video or playing a game. |
| 10 | Unable to connect to the wireless network. | Ensure that:You are within the network's service range and the signal strength is good.Your tablet is not in Airplane mode. |
Restoring your tablet
When all else fails, you can reset all tablet software returning it to the factory state it was in. There are two ways to restore your table to default settings. One is done by the Setting app; the other is by the hardware buttons.
■ Using the Settings app
Before you start this operation, consider finding a technical support from your resellers or suppliers:
- Start the Settings app.
- Choose "Backup & Reset".
- Choose "Factory Data Reset".
-
Touch the "Reset Tablet" button.
-
You may need to enter your unlock pattern or password to confirm your operation.
- All the information you've set or stored is deleted and removed. It includes apps you've downloaded, music, synchronized accounts, everything.
■ By pressing hardware buttons
For some reasons you cannot unlock the screen, this could be the last and ultimate solution for you. Again, before even considering this operation, consider finding a technical support from your resellers or suppliers:
- Turn off your tablet.
- Press and hold the two volume buttons and the power button at the same time.
- Release the three buttons when you see the screen shows logos.
You tablet opens a screen with a list of options.
- REBOOT DROIDBOOT
- REBOOT
- RECOVERY
-
POWER OFF
-
Move the highlight to "RECOVERY" using the volume buttons. If you decide to quit here, select "POWER OFF" and press the power button.
-
Press the power button to confirm your selection.
- If any popup, follow the instruction to confirm again.
- All the information you've set or stored is deleted and removed. It includes apps you've downloaded, music, synchronized accounts, everything.
12. Specification
| Processor | Intel Atom Z2460, 1.6GhzL2 cache up to 512KB | |
| Memory | 1 GB LPDDR2 | |
| Storage | 16GBJEDEC/MMCA Version 4.41 interface | |
| Dimension | 261.58 (W) x 173.34 (H) x 12.6 (D) (mm) | |
| Weight | 660 g | |
| Wireless | Support WLAN and Bluetooth | |
| Display | 10-inch HD screen with multi-touch featureResolution: 1280x800Aspect ratio: 16:10Brightness: 200 nits (typical) | |
| Cameras | Front Facing Camera: 0.3MRear Facing Camera: 2.0M | |
| Battery | MBELL 3850143P2CellLi-polymer6600mAhSupport up to 8hrs | |
| Input/Output | 1 x DC-in1 x micro-USB 2.0, OTG port (Type A/B)1 x Mic/head phone jack combo(American-type)1 x Mini HDMI 1.3a type C1 x Micro SD card slot (Supports 128M~32G TF cards) | |
| Sensors | ■ 3-axis G-sensor | |
| Speaker & Mic | Speaker:■ Build-in 2 Speakers■ 1Wx8ohm■ Sound power level greater than 70 dB.Mic:■ Internal Digital MIC x 1 | |
| Language | ■ English■ Portuguese (Portugal)■ Portuguese (Brazil)■ Dutch (Holland)■ Spanish (Spain)■ Spanish (Latin)■ Turkish (Turkey)■ Arabic (Libya)■ Italian (Italy)■ French■ German■ Simplified Chinese (PRC) | |
| AC-Adapter | ■ Shenzhen Frecom F12W-050200SPAU/F12W-050200SPAI/ F12W-050200SPAV/F12W-050200SPAC■ Asian Power WA-10P05R/ WA-10P05Fy(y=A,B,C,G,K,N,S,T or U)■ DC Output: 5V/2A■ Input Voltage: From 100 - 240VACNominal■ Input Frequency: From 50 - 60Hz. | |
| Certification | EMC | ■ CE /FCC |
| RF | ■ FCC&SAR / R&TTE SRRC | |
| Safety& | ■ WEEE 2002/96/EC | |
| Environment | ■ CB report IEC60950-1 / EN60950-1■ ROHS 2011/65/EU | |
Warranty
This product is guaranteed against any manufacturing defect, as defined on the D.Lgs. February 2, 2002, No 24. In case of failure, please contact the retailer where you purchased it. You can be found at www.adj.it for standards guarantee.
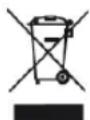
The symbol of the crossed out trash indicates that the product, at the end of its useful life, must be treated separately from domestic waste and must be taken to a recycling center for electrical and electronic equipment or delivered to the seller when buying a replacement. The separate waste collection contributes in preventing possible adverse effects on the environment and health and promote the recovery of materials it is made. You are responsible for assigning the equipment in question at the appropriate waste disposal center. For more detailed information contact your local waste disposal service or the shop where it was purchased. Anyone who does not carry the product in a recycling center for electrical and electronic waste shall be punished with administrative penalty provided by law on the illegal disposal of waste.
LET'S DISCOVER
ALL OUR PRODUCTS!

www.adjbenelux.com
natural_image
Black desktop computer tower with keyboard and mouse, no visible text or symbols on main body
natural_image
White ADJ Entertainment camera with visible sensor and antenna (no text or symbols on device body)
natural_image
Hand interacting with a black Audi headband displaying a 'LTA' button on a tablet screen (no text or symbols on the device)
computer, peripherals
and security
natural_image
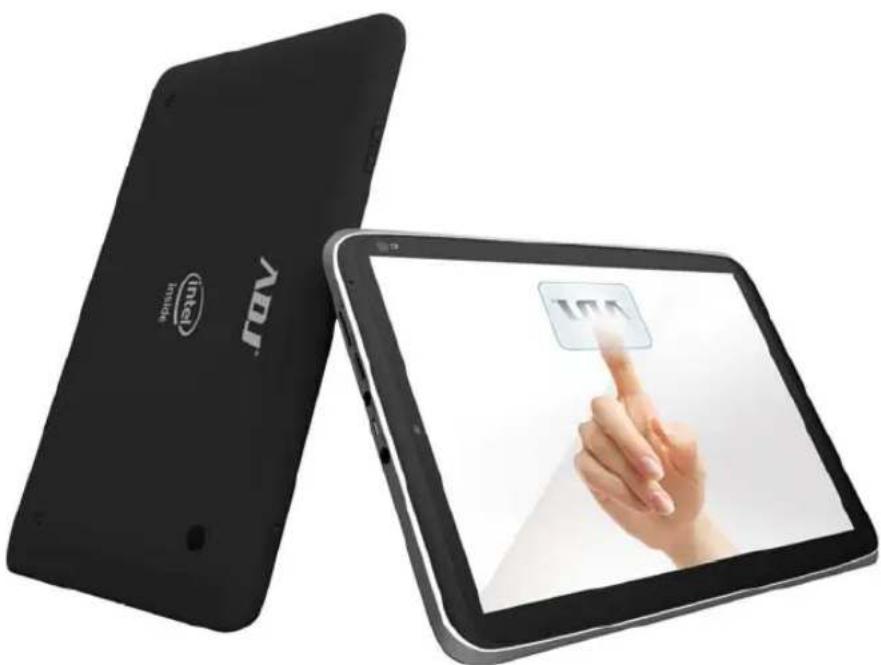
Two black tablets with visible brand logos and a touchscreen display showing a hand pointing at it (no text or symbols on the devices themselves)STYLE TAB 10.1
BEDIENINGSHANDLEIDING
@Copyright 2013.
All Rights Reserved.
The information in this document is subject to change without prior notice in order to improve reliability, design and function and does not represent a commitment on the part of the manufacturer.
In no event will the manufacturer be liable for direct, indirect, special, incidental, or consequential damages arising out of the use or inability to use the product or documentation, even if advised of the possibility of such damages.
This document contains proprietary information protected by copyright. All rights are reserved. No part of this manual may be reproduced by any mechanical, electronic, or other means in any form without prior written permission of the manufacturer.
FEDERAL COMMUNICATIONS COMMISSION INTERFERENCE STATEMENT
This equipment has been tested and found to comply with the limits for a Class B digital device, pursuant to Part 15 of the FCC Rules. These limits are designed to provide reasonable protection against harmful interference in a residential installation. This equipment generates, uses and can radiate radio frequency energy and, if not installed and used in accordance with the instructions, may cause harmful interference to radio communications. However, there is no guarantee that interference will not occur in a particular installation. If this equipment does cause harmful interference to radio or television reception, which can be determined by turning the equipment off and on, the user is encouraged to try to correct the interference by one or more of the following measures:
- Reorient or relocate the receiving antenna.
- Increase the separation between the equipment and receiver.
- Connect the equipment into an outlet on a circuit different from that to which the receiver is connected.
- Consult the dealer or an experienced radio/TV technician for help.
CAUTION:
Any changes or modifications not expressly approved by the party responsible for compliance could void the user's authority to operate the equipment.
This device complies with Part 15 of the FCC Rules. Operation is subject to the following two conditions:
(1) This device may not cause harmful interference and
(2) This device must accept any interference received, including interference that may cause undesired operation.
RF exposure warning (SAR)
- This device meets the government's requirements for exposure to radio waves. This device is designed and manufactured not to exceed the emission limits for exposure to radio frequency (RF) energy set by the Federal Communications Commission of the U.S. Government.
The exposure standard employs a unit of measurement known as the Specific Absorption Rate, or SAR. The SAR limit set by the FCC is 1.6 W/kg. Tests for SAR are conducted using standard operating positions accepted by the FCC with the EUT transmitting at the specified power level in different channels.
The highest SAR value for the device as reported to the FCC is 1.095 W/kg when placed next to the body.
Canada, Industry Canada (IC) Notices
This device complies with Industry Canada license-exempt RSS standard(s). Operation is subject to the following two conditions: (1) this device may not cause interference, and (2) this device must accept any interference, including interference that may cause undesired operation of the device.
Radio Frequency (RF) Exposure Information
The radiated output power of the Wireless Device is below the Industry Canada (IC) radio frequency exposure limits. The Wireless Device should be used in such a manner such that the potential for human contact during normal operation is minimized.
This device has been evaluated for and shown compliant with the IC Specific Absorption Rate (“SAR”) limits when products operated in portable exposure conditions.
Canada, avis d'Industry Canada (IC)
Email Border: e-mail in com.net Google account
- Selecteer of "Media device MTP" of "Camera (PTP)".
natural_image
3D rendering of a black USB connector with a handle and port (no text or symbols)- USB computer verbinding
natural_image
Black desktop computer tower with keyboard and mouse, no visible text or symbols on main body
natural_image
White ADJ Entertainment camera with visible sensor and antenna (no text or symbols on device body)
natural_image
Hand interacting with a black headboard displaying a 'LTA' button, displayed on a tablet screen (no text or symbols on the device itself)
- STYLE TAB 10.1
- RF exposure warning (SAR)
- Canada, Industry Canada (IC) Notices
- Radio Frequency (RF) Exposure Information
- Wireless networks e devices
- ADJ®
- FEDERAL COMMUNICATIONS COMMISSION INTERFERENCE STATEMENT
- CAUTION:
- Canada, avis d'Industry Canada (IC)
- Package contents
- Tablet layout
- ■ Front view
- ■ Left side view
- Initial Setup - Charge first then Turn on
- Basic Operations
- Power button operations
- ■ Locking your tablet to sleep
- ■ Waking your tablet
- ■ Turning off your tablet
- Touchscreen operations
- ■ Finger gestures
- ■ Onscreen keyboard
- - Typing text, numbers, symbols, and other characters
- Changing the input method when typing
- Using the onscreen keyboard in other languages
- - Editing text
- ■ Dictionary
- Home screens
- Customizing your Home screens
- ■ Adding an item to a Home screen
- ■ Creating an application folder on a Home screen
- ■ Moving a Home screen item
- ■ Removing an item from a Home screen
- ■ Changing the Home screen wallpaper
- Status area
- Searching the Internet
- ■ Google Search
- ■ Google Voice Search
- Creating Accounts
- Creating an account
- Removing an Account
- Synchronizing your Google Account
- Wireless networks and devices
- Wi-Fi networks
- ■ Connecting to a Wi-Fi network
- - For networks providing proxy service
- ■ Adding a Wi-Fi network
- ADD NETWORK
- ■ Disabling an automatic Wi-Fi connection
- Using Bluetooth devices
- ■ Enabling and disabling the Bluetooth function
- ■ Opening Bluetooth screen
- ■ Changing your Bluetooth name
- ■ Pairing with a Bluetooth device
- ■ Unpairing a Bluetooth device
- Battery and AC power
- Charging the battery
- Extending the battery life between charges
- Checking the battery status
- All Apps screen
- Opening the All Apps screen
- Icon Name Description
- Using the browser
- Taking pictures and videos
- Viewing pictures and watching videos
- Gallery.
- Listening to music
- Working with Email
- ■ Setting up your Email account
- ■ Reading an e-mail
- ■ Sending an e-mail
- ■ Managing accounts
- Managing your contacts
- Using the clock
- ■ Setting date and time
- ■ Setting an alarm
- Downloading applications
- ■ Downloading from Google Play
- ■ Downloading an app from non-Google sites
- USB and HDMI Connections
- Working with the USB connector
- ■ Share files with your Computer
- USB OTG (On-The-GO) connection
- Using HDMI devices
- 9.Locking and Security
- Screen lock mode
- Locking the tablet screen
- Settings
- Where to find Settings
- WIRELESS & NETWORKS
- ■ Wi-Fi
- Bluetooth
- Data Usage
- More...
- Airplane mode
- VPN
- Tethering
- DEVICE
- Sound
- Volumes
- Default notification
- Touch sounds
- Screen lock sound
- ■ Display
- Brightness
- Wallpaper
- Auto-rotate screen
- Sleep
- Font size
- ■ Storage
- INTERNAL STORAGE
- Micro SD CARD
- USB STORAGE
- - USB computer connection
- Battery
- ■ Apps
- PERSONAL
- ■ Accounts & sync
- ■ Location services
- ■ Security
- Screen lock
- Owner info
- Encrypt tablet
- Make passwords visible
- Device administrators
- Unknown sources
- Trusted credentials
- Install from SD card
- Clear credentials (Disabled by default)
- ■ Language & input
- Language
- Spelling checker
- Personal dictionary
- Default
- ■ Backup & reset
- BACKUP & RESTORE
- Factory data reset
- SYSTEM
- Date & time
- Automatic date & time
- Automatic time zone
- Use 24-hour format
- Select date format
- ■ Accessibility
- Services
- Large text
- Touch & hold delay
- Install web script
- ■ Developer options
- ■ About the tablet
- Troubleshooting
- Restoring your tablet
- ■ Using the Settings app
- ■ By pressing hardware buttons
- Specification
- Warranty
- LET'S DISCOVER
- ALL OUR PRODUCTS!
Brand : Adj
Model : 400-00009
Category : Tablet