
BTBOX - Bluetooth Receiver AFX - Free user manual and instructions
Find the device manual for free BTBOX AFX in PDF.

| Product type | Bluetooth DMX receiver |
| Brand | AFX |
| Model | BTBOX |
| Power supply | DC5V - 500mA |
| Battery | Lithium 3.7V 800mAh |
| Battery life | Approximately 5 hours |
| Charging time | Approximately 5 hours |
| Connector | 3-pin XLR female (DMX) |
| Wireless control | Bluetooth via AFX AIR app (iOS and Android) |
| Maximum number of connected devices | Up to 4 DMX devices |
| Main functions | Bluetooth reception, DMX control, compatibility with AFX projectors |
| Maintenance and cleaning | Disconnect before cleaning; use a dry cloth; do not expose to moisture |
| Safety | Do not open the casing; use only the supplied power supply; keep out of reach of children |
| Spare parts and repairability | No user-replaceable parts; contact a qualified technician in case of malfunction |
| General information | Compliant with LVD 2014/35/EU, EMC 2014/30/EU, RTTE 1999/5/EC directives |
Frequently Asked Questions - BTBOX AFX
User questions about BTBOX AFX
0 question about this device. Answer the ones you know or ask your own.
Ask a new question about this device
Download the instructions for your Bluetooth Receiver in PDF format for free! Find your manual BTBOX - AFX and take your electronic device back in hand. On this page are published all the documents necessary for the use of your device. BTBOX by AFX.
USER MANUAL BTBOX AFX
BLUETOOTH RECEIVER FOR DMX CONTROL
RECEPTEUR BLUETOOTH DE CONTROLE DMX
BTBOX (15-1824)
GB - INSTRUCTION MANUAL
F - MANUEL D'UTILISATION
CE


Thank you for having chosen our AFX BLUETOOTH DMX CONTROL. For your own safety, please read this user manual carefully before installing the device.
SAFETY INTRODUCTION
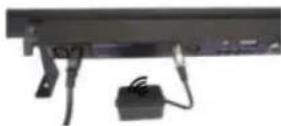
"AC INPUT" is the charging interface. When charging, the fixture must be "Turn OFF".
Lease do not work in the AC unless it's under emergency
If it works in the AC for a long time, the charger and battery of the fixture will overwork,
Bring out a lot of heat and cause a risk of explosion.
If the battery runs out, then connect to the AC. It needs 10mn to recover to the normal operation.
When in the outdoor, please not use AC to operate the fixture. The waterproof and dustproof rate of the fixture is IP44.
Please avoid the leakage of electricity and the danger of electric shock.
SAFETY INTRODUCTION
- If the device has been exposed to temperature changes due to environmental changes, do not switch it on immediately. The arising condensation could damage the device. Leave the device switched off until it has reached room temperature.
- It is essential that the device is earthed. A qualified person must carry out the electric connection.
- Make sure that the available voltage is not higher than stated at the end of this manual.
- Make sure the power cord is never crimped or damaged. If it is damaged, ask your dealer or authorized agent to replace the power cord.
- Always disconnect from the mains, when the device is not in use or before cleaning it. Only handle the power cord by plug. Never pull out the plug by tugging the power cord.
- DISCONNECT DEVICE: Where the MAINS plug or an appliance coupler is used as the disconnect device, the disconnect device shall remain readily operable.
- Shields, lenses or ultraviolet screens shall be changed if they have become visibly damaged to such an extent that their effectiveness is impaired, for example by cracks or deep scratches.
CAUTION:
- Be very careful during installation. Since you will be working with a dangerous voltage you can suffer a life-threatening electric shock when touching live wired.
- Never look directly into the light source, as sensitive persons may suffer an epileptic shock.
- Please be aware that damages caused by manual modifications to the device are not subject to warranty. Keep away from children and non-professionals.
- The light doesn't include any spare parts for repair, please check if all the parts are well installed and screws are fitted tightly before operating. Do not use the light when the cover is open.
GENERAL GUIDELINES
- This device is only allowed to be operated with an alternating current of max. 100-240VAC and was designed for indoor use only.
- Do not shake the device. Avoid brute force when installing or operating it.
- When choosing the installation spot, please make sure that the device is not exposed to extreme heat, moisture or dust. The minimum distance between light-output from the projector and the illuminated surface must be more than 1 meter. Keep a distance to any flammable objects of at least 5m.
- Operate the device only after having familiarized yourself with its functions. Do not permit operation by person not qualified for operating the device. Most damages are the result of unprofessional operation.
- Please use the original packaging if the device is to be transported.
- For safety reasons, please be aware that all modifications on the device are forbidden. Furthermore, any other operation may lead to short-circuit, burns, electric shock, lamp explosion, crash, etc. If this device will be operated in any way different to the one described in this manual, the product may suffer damages and the guarantee becomes void.
MOUNTING
Orientation
This fixture may be mounted in any position, provided there is adequate room for ventilation
When selecting installation location, take into consideration lamp replacement access and routine maintenance.
Safety cables must always be used.
Never mount in places where the fixture will be exposed to rain, high humidity, extreme temperature changes or restricted ventilation.
If the external flexible cable or cord of this light is damaged, it shall be exclusively replaced by the manufacturer or his service agent or a similar qualified person in order to avoid a hazard.
Make sure the installation position is stable before you fix the light. When the light is reverse hanging, make sure the light will not fall from the truss, use the safety cable go through the truss and bracket of the light as a supporting, to avoid the light to fall down. There is no entrance to the work area during mounting. Periodically check if the safety cable has fretted away or clamp is loosened. We will not take any responsibility for damages caused by a badly installed unit.
Power Supply and Signal Cable Connection
1. Mains Power connection
The exclusive plug should be used between the connection of unit and power. Please ensure that the rated voltage and frequency are accordance with the power supply. The required input voltage and frequency are: 100-240VAC
We suggest that every light has an independent switch so that you can turn on or turn off the light randomly.
Note: the ground wire (yellow/green double-color wire) must be safely connected; the electrical installation must be in accordance with the related standards
CAUTION: When installing the device, make sure there is no highly inflammable material within a distance of min.5m!
2. Connection of Signal Cable
You can use the 3-pin XLR cable to connect the output socket of the master and the input socket of the slave light. Connect the DIGITAL OUT socket of the master and the IN socket of the slave light, then, connect the OUT socket to the IN socket of the next light. Ordinal to connect all the lights as below:
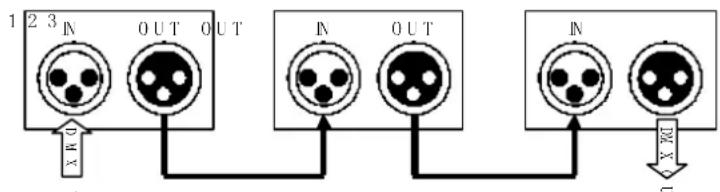
The connection between the output of master and input of product, it's available to use the 3 pins XLR cable which provided by the manufacturer. Signal cable from the DMX output of the controller to the input of the first master light, and connect to the DMX input of second slave light from the DMX output of the first master light, analogously, till connected all the slave lights, and insert the last connector to the output of the final light. (Notice: the diameter of core of every cable should be 0.5mm at least, double core shelter cable should be used). The signal connecting must use the attached 3 pins XLR cable. Notice, all the internal lead wire of the 3 pins XLR cable should not touch to each other or connect to the connector.
A DMX signal terminator is recommended on the last unit of the chain. DMX terminator is a XLR connector with a 120Ω resistor between the pin 2 and pin 3 of the XLR connector
FUNCTION
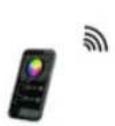
This product can be controlled by the free application AFX AIR, available on iTunes® & Google Play®, with mobile Phone or tablet computer. So mobile phone or tablet directly controls the light.
Receive the APP control signal of the mobile
Operation:
1) Connect DMX machine with BTBOX.
2) Set the product ID number which will be controlled on BTBOX.
3) Press the power switch, turn on the controller power.
4) Pair the mobile phone with BTBOX, it is successful when the Bluetooth indicator flashes rapidly
5) Select the function of the mobile to control the lighting.
Synchronous operation
BTBOX receiver connect the lighting is no more than 4 units, then machines fully be synchronized.
if connect different lighting, the maximum is 4 ways.
if the master and slave units is on the same way that will be synchronized.
Connect same lighting:

natural_image
Diagram showing wireless signal transmission from a device to a target box, with no text or symbols present.Connect 4 different lighting:
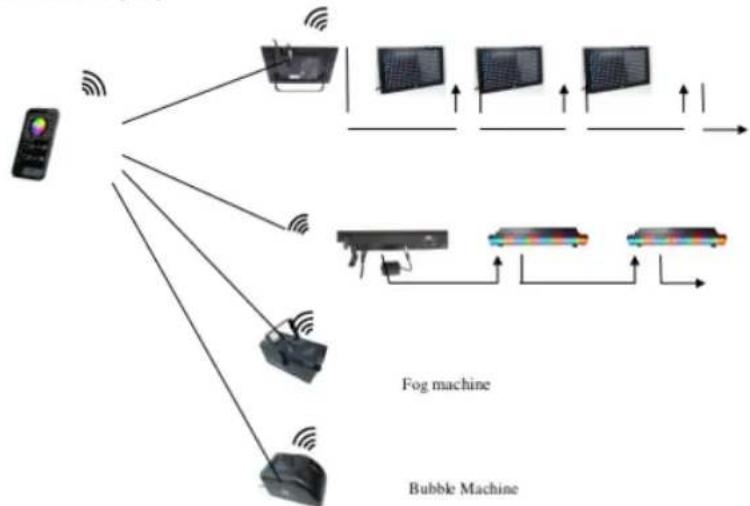
flowchart
graph TD
    A["Remote"] -->|Wireless Signal| B["Fog machine"]
    A -->|Wireless Signal| C["Bubble Machine"]
    B --> D["Computer"]
    C --> E["Computer"]
    D --> F["Computer"]
    E --> G["Computer"]
    style A fill:#f9f,stroke:#333
    style B fill:#ccf,stroke:#333
    style C fill:#ccf,stroke:#333
    style D fill:#dfd,stroke:#333
    style E fill:#dfd,stroke:#333
    style F fill:#dfd,stroke:#333
    style G fill:#dfd,stroke:#333
Applicable machine
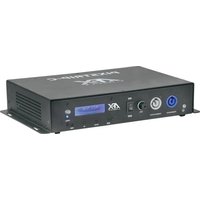
The design of BTBOX controller is independent. Use the standard XLR Female terminal.
Apply to the following AFX product with DMX input port.
Dip switch and Controlled machine:
| DIP switch | DIP Diagram | Controlled Unit(Dux channel mode) |
| 6 | 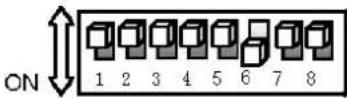 | PARCOB50-150WH(4 channel) |
| 7 | 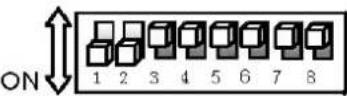 | PARCOB150MKII-100HEX(10 channel) |
| 8 | 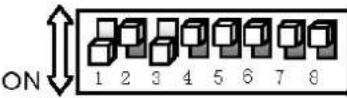 | BARCOB2(10 channel) |
| 9 | 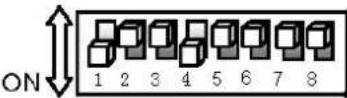 | BARCOB4(16 channel) |
| 10 | 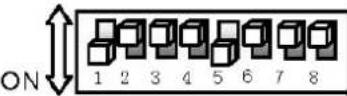 | BARLED1215(12 channel) |
| 11 | 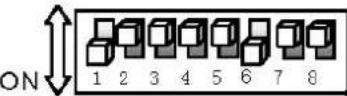 | FOG-COLOR-RGB(8channel) |
| 12 | 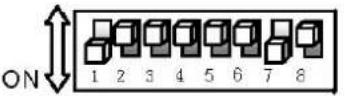 | FOG-COLOR-MINI(5 channel) |
| 13 | 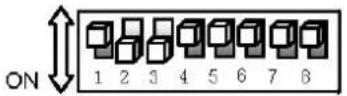 | COMBO-BAR(17 channel) |
| 14 | 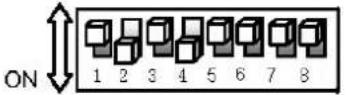 | IPAR507(12 channel) |
| 15 | 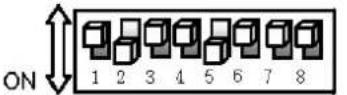 | IPAR518(12 channel) |
| 16 | 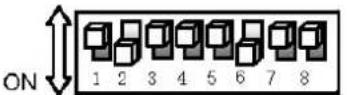 | IPAR520Z(13 channel) |
| 17 | 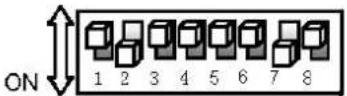 | IPAR123(8 channel) |
| 18 | 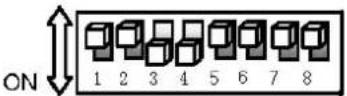 | IBAR1815(12 channel) |
| 19 | 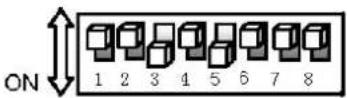 | IPAR318(10 channel) |
| 20 | 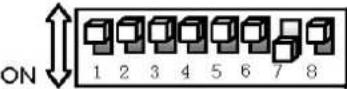 | Dmx channel mode(Suitable for any dmx unit) |
| 21 |  | Delete code |
| 22 | 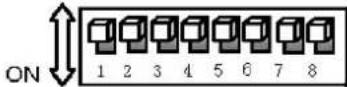 | Install new software |
BTBOX Controller
1) Pair the BTBOX with the mobile which installed AFX AIR App.
2) Open mobile AFX AIR App, select the color and function to operate.
The mobile will transmit the signal to the Bluetooth receiving module BTBOX of the XLR controller. When the Bluetooth receiving module receive the data, will transmit it to the receiving machine. Then the mobile will control the lighting.
The charge and discharge function of the BTBOX controller
BTBOX controller with the built-in lithium battery, supplies the power to the control board, no external power adapter when the battery runs out, use adapter to charge recycling.
The charging time of Lithium battery: 4-5 hours
The discharge time of Lithium battery: About 5 hours
6. AFX AIR Control Mode (Control by mobile APP & Bluetooth Transceiver)
This product can be controlled by the free application AFX AIR, available on iTunes® & Google Play®, with mobile Phone or tablet computer. So mobile phone or tablet directly controls the light. Operation method is as follows:
TECHNICAL SPECIFICATIONS
Power supply ...... DC5V – 500mA
Battery ....Lithium DC 3.7V 800mAh
Battery run time ....5 hours
Beam charging time....5 hours
Electric products must not be put into household waste. Please bring them to a recycling centre.
Ask your local authorities or your dealer about the way to proceed.
LOTRONIC CE
EC Declaration of Conformity
Hereby we,
LOTRONIC SA
Avenue Zénobe Gramme, 9
1480 SAINTES
Belgique
+32.2.390.91.91
Certify and declare under our sole responsibility that the following product:
Trade name:
AFX LIGHT
Product name:
LEDS BATTERY PAR LIGHT
Type or model:
FREEBARQUAD - FREEPARQUAD - FREEPARHEX
Conforms with the essential requirements of
LVD directive 2014/35/EU - EMC directive 2014/30/EU - RTTE 1999/5/EC
Based on the following specifications applied:
EN60598-2-17:1989+A2:1991
EN60598-1:2008+A11:2009
EN62031:2008
EN61347-2-13:2007
EN55015:2006+A1:2007+A2:2009
EN61547:2009
EN61000-3-2:2006+A1:2009+A2:2009
EN61000-3-3:2008
EN 300 440-1 V1.6.1
EN 300 440-2 V1.4.1
and therefore complies with the essentials requirements and provisions of the LVD, EMC, RTTE and ROHS Directive.
Place and date of issue: Saintes (Belgium), on 17 ^th June 2016
Guive AKBAR / Technical manager
LOTRONIC SA Av. Zenobe Gramme 9 1480 Saintes - Belgium Tel. +32.2.390.91.91 Fax +32.2.390.93.19 info@lotronic.net www.lotronic.com


Responsible technique
LOTRONIC SA Av. Zenobe Gramme 9 1480 Saintes - Belgium Tel. +32.2.390.91.91 Fax +32.2.390.93.19 info@lotronic.net www.lotronic.com
- BLUETOOTH RECEIVER FOR DMX CONTROL
- RECEPTEUR BLUETOOTH DE CONTROLE DMX
- SAFETY INTRODUCTION
- CAUTION:
- GENERAL GUIDELINES
- MOUNTING
- Orientation
- Power Supply and Signal Cable Connection
- Mains Power connection
- Connection of Signal Cable
- FUNCTION
- Receive the APP control signal of the mobile
- Synchronous operation
- Applicable machine
- BTBOX Controller
- The charge and discharge function of the BTBOX controller
- AFX AIR Control Mode (Control by mobile APP & Bluetooth Transceiver)
- TECHNICAL SPECIFICATIONS
- LOTRONIC CE
- EC Declaration of Conformity
Brand : AFX
Model : BTBOX
Category : Bluetooth Receiver