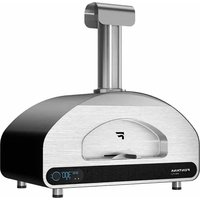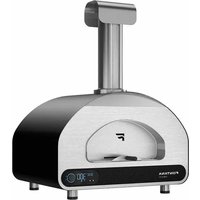
VOLTA 70 - Pizza oven Fontana - Free user manual and instructions
Find the device manual for free VOLTA 70 Fontana in PDF.


User questions about VOLTA 70 Fontana
0 question about this device. Answer the ones you know or ask your own.
Ask a new question about this device
Download the instructions for your Pizza oven in PDF format for free! Find your manual VOLTA 70 - Fontana and take your electronic device back in hand. On this page are published all the documents necessary for the use of your device. VOLTA 70 by Fontana.
USER MANUAL VOLTA 70 Fontana
natural_image
Illustration of a Fontana air purifier with digital display and flowing wave background (no text or symbols on main body)USER'S MANUAL
MANUEL DE L'UTILISATAEUR
OVENS FOR DOMESTIC USE VOLTA MODELS 70 / 90
FOURS À USAGE DOMESTIQUE MODÈLES VOLTA 70 / 90

ENGLISH P. 4 - 26
FRANÇAIS
P. 28 - 53
FOR USE WITH:
According to standard ANSI Z21.89:2023 · CSA 1.18:2023 Outdoor cooking specialty gas appliances
Certification for gas burner control intended to use in gas pizza oven:
According to standard ANSI Z21.20:22 · CSA C22.2 No. 60730-2-5:22 &
UL 60730-2-5 Edition 4 and CAN/CSA-E60730-1:15 & UL60730-1 Edition 5
DANGER
IF YOU SMELL GAS:
- SHUT OFF GAS TO THE APPLIANCE.
- EXTINGUISH ANY OPEN FLAME.
- IF ODOR CONTINUES, KEEP AWAY FROM THE APPLIANCE AND IMMEDIATELY CALL YOUR GAS SUPPLIER OR YOUR FIRE DEPARTMENT.
FAILURE TO FOLLOW THESE INSTRUCTIONS COULD RESULT IN FIRE OR EXPLOSION WHICH COULD CAUSE PROPERTY DAMAGE, PERSONALY INJURY OR DEATH.
DANGER
- NEVER OPERATE THIS APPLIANCE UNATTENDED.
- NEVER OPERATE THIS APPLIANCE WITHIN 25 FT (7.5M) OF ANY FLAMMABLE LIQUID.
- IF A FIRE SHOULD OCCUR, KEEP AWAY FROM THE APPLIANCE AND IMMEDIATELY CALL YOUR FIRE DEPARTMENT.
FAILURE TO FOLLOW THESE INSTRUCTIONS COULD RESULT IN FIRE, EXPLOSION, OR BURN HAZARD WHICH COULD CAUSE PROPERTY DAMAGE, PERSONALY INJURY OR DEATH.
PLEASE RECORD YOUR MODEL NUMBER, SERIAL NUMBER AND DATEOF PURCHASE HERE.
This information can be found on the black and silver caution sticker on the back or side of your gas appliance.
Model:
Serial No:
Date of Purchase: / /
dd mm yyyy
KEEP THIS MANUAL FOR FUTURE REFERENCE
Dear Customer,
we would like to thank you for the preference you have given to our products.
This manual will allow you to install and use the oven you purchased in the best possible way and safely. We advise you to carefully read the following manual before carrying out the first ignition, if you have any doubts or problems, please contact the dealer who will ensure the utmost collaboration and assistance.
INDEX
GENERAL WARNINGS....6
SAFETY 8
INSTALLATION 10
TROUBLESHOOTING....24
TROUBLESHOOTING ERROR CODE....25
WARRANTY 26

All work must be carried out under conditions of safety and with the gas line shut off and/or disconnected.
GENERAL WARNINGS
KEEP THIS MANUAL FOR FUTURE REFERENCE
WARNING: Improper connection as well as any alterations or improper maintenance can cause material damage to property or persons and even death in extreme cases. Read the instructions carefully before installing and using the appliance.
READ CAREFULLY THE FOLLOWING INFORMATION FOR A CORRECT INSTALLATION AND OPTIMAL OPERATION OF THE OVEN.
- The identification plate, including technical data, serial number and marking is visibly affixed to the appliance. The plate must never be removed.
- Before operating the appliance, it is mandatory to remove all protective films present.
- Absolutely avoid the use of steel sponges and sharp scrapers to avoid damaging the surfaces. Use normal, non-abrasive products, possibly using wooden or plastic tools. Rinse thoroughly and dry with a soft cloth or microfiber cloth.
- Do not use tableware or containers made of plastic material. The high temperatures reached inside the oven could melt this material, causing damage to the appliance.
- Use cutlery and tools that are resistant to high temperatures.
- Place the oven on a flat surface.
- Due to the temperature, the colour of the surfaces may vary.
- The installation of the product must ensure easy access for cleaning.
- Never put flammable objects in the oven: if it is accidentally switched on, a fire could start.
- Do not allow children or animals to approach the appliance during operation, DANGER OF BURNS or to play with it even when off.
- Do not insert sharp metal objects (cutlery or tools) into the slits of the appliance.
- The furnaces, although they have insulating material between the two layers of steel, may overheat outside.
- Make sure the oven is positioned away from objects and materials that may be damaged by heat. Do not place flammable materials in the area of the floor in front of the oven, protect the floor with fireproof material if it is made of flammable material.
- Do not store flammable material on the trolley shelf (if present) under the oven.
- Manoeuvre the door by holding the handle. Do not touch external surfaces or flue when in use.
- Do not use flammable liquids near the oven.
- Keep any electrical cables and fuel supply pipes away from hot surfaces.
-
Do not use the oven in case of abnormal operation or suspected breakage.
-
Do not move the oven during use or when it is hot.
- Do not lean or place objects in the oven, their stability may be compromised.
- Do not use naked flames near the oven.
- In case grease catches fire, stop the power supply and leave the oven door closed until the fire extinguishes.
- Wear heat-resistant kitchen gloves when using the oven.
- The parts sealed by the manufacturer must not be modified by the user.
- Do not leave the appliance unattended during cooking, which may release grease or oils. Fats and oils may catch fire.
- Do not obstruct the openings, ventilation and heat disposal slots where present.
- When in use, for ovens with integrated base (trolley), remember to lock the wheels using the brake.
SAFETY
Your new gas smoker oven is a safe, convenient appliance when assembled and used properly. As with all gas-fired products, however, certain safeguards must be observed. Failure to follow these safeguards may result in serious injury or damage. If you have questions concerning assembly or operation, consult your dealer, gas appliance specialist. This appliance is not intended for commercial use.
CAUTION
• FOR OUTDOOR USE ONLY.
- IF STORED INDOORS, DETACH AND LEAVE CYLINDER OUTDOORS.
• THIS APPLIANCE MUST NOT BE OPERATED UNATTENDED.
- SPECIAL CARE MUST BE TAKEN TO KEEP CHILDREN AND PETS AWAY FROM THE APPLIANCE AT ALL TIMES.
- THIS APPLIANCE WILL BE HOT DURING AND AFTER USE. USE INSULATED OVEN MITTS OR GLOVES FOR PROTECTION FROM HOT SURFACES.
- DO NOT MOVE THE APPLIANCE WHEN IN USE. ALLOW THE APPLIANCE TO COOL TO 115 oF (45 oC) BEFORE MOVING OR STORING.
- THIS APPLIANCE IS NOT INTENDED FOR AN SHOULD NEVER BE USED AS A HEATER.
Use caution when handling or transporting this product. Metal edges can be hazardous. Use appropriate gloves when lifting or handling. Before lifting, remove any side shelves, grids and grates.
ELECTRICAL CAUTION
- If any accessory is used on this appliance that requires an external electrical power source, the accessory when installed must be electrically grounded in accordance with local codes. In the absence of local codes, the following standards apply:
(U.S.A.) ANSI/NFPA No. 70-Latest Edition and
(Canada) CSA C22.1 Canadian Electrical Code
- Use only a UL, CSA or ETL rated extension cord designed for outdoor, all-weather use.
- Do not use an extension cord over 50ft (15m).
- Use the shortest possible extension cord to reach your oven.
- Do not cut or remove the grounding prong from the plug.
- Keep the electrical supply cord and fuel supply hose away from any heated surface.
- It is recommended to plug the oven and all and accessories into a properly installed GFCI (ground fault circuit interrupter) outlet.
- Do not touch the appliance or its plug with wet hands.
WARNING
This product can expose you to chemicals including lead, which is known to the State of California to cause cancer, birth defects or other reproductive harm. Wash your hands after handling this product.
The burning of gas cooking fuel can expose you to chemicals including Carbon Monoxide, which is known to the State of California to cause cancer, birth defects or other reproductive harm. To minimize exposure to these substances, always operate this unit according to the owner's manual, ensuring you provide good ventilation when cooking with gas.
For more information go to www.p65warnings.ca.gov
INSTALLATION
- In the U.S.A., this appliance must be installed in accordance with the local code and the relevant national code:
ANSI Z223.1/NFPA 54 - Latest Edition National Fuel Gas Code ANSI/NFPA 58 - Latest Edition Storage and Handling of Liquefied Petroleum Gases
- In Canada, this appliance must be installed in accordance with the local code and the relevant CSA standards:
CSA-B149.1 Natural Gas and Propane installation Code CSA-B149.2 Propane Storage and Handling
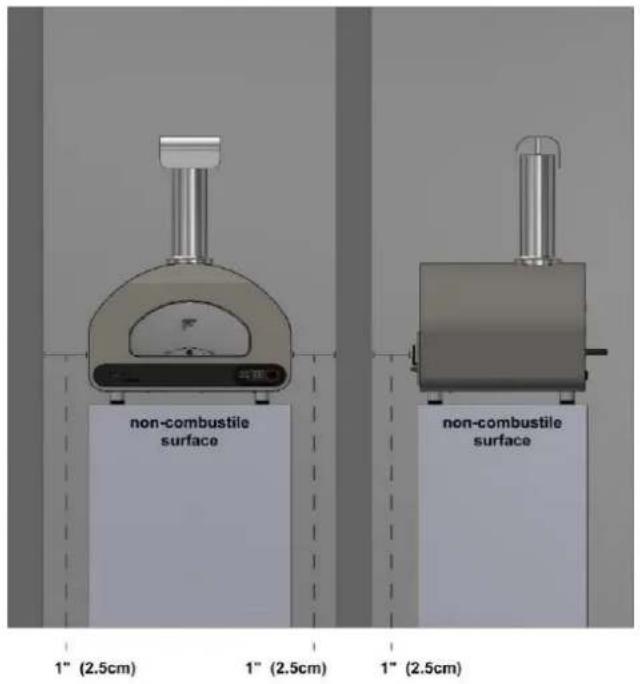
- The appliance must be located away from both noncombustible a nd combustible surfaces by at least 1" (2,5cm) from each side, and 1" (2,5cm) from the rear. If legs are not installed, the appliance must be placed on a non-combustible surface only.
text_image
non-combustile surface 1" (2.5cm) 1" (2.5cm) non-combustile surface 1" (2.5cm)- DO NOT operate this appliance under overhead combustible construction. DO NOT EXTEND THE FLUE.
- This appliance is for OUTDOOR USE ONLY, DO NOT operate in garage, shed, balcony or other such enclosed areas.
- DO NOT restrict the flow of air to the appliance.
- Keep the area surrounding the appliance free of combustible materials, gasoline, and all flammable liquids and vapors.
- This appliance is NOT intended to be installed in, or on, recreational vehicles and/or boats.
- Keep the ventilation opening(s) of the cylinder enclosure free and clear from debris.
- IMPORTANT: The free-standing version ovens must be positioned on tables or other fireproof surfaces with adequate load capacity (for weight, refer to the product technical data sheet), and it is essential to install the feet supplied with the oven.
The instructions below apply to LP models only. LP gas cylinders must be installed in safety according to local disposition. Keep always the cylinder in vertical position and do not store a spare cylinder under or near this appliance. Provide for retention means suitable for the size of the cylinders.
NATURAL GAS INSTALLATIONS:
Your new gas oven comes from the factory configured for use with LP gas. The unit can be converted to natural gas by using a natural gas conversion kit (not included with appliance). Please contact your dealer if you would like to order a conversion kit (see page "conversion kit").
LP GAS CYLINDER
QCC®-1 QUICK CLOSING COUPLING
- All models are designed to be used with an LP gas cylinder equipped with the QCC®-1 Quick Closing Coupling system.
-
The QCC®-1 system incorporates safety features required by the American National Standards Institute (ANSI) and the Canadian Standards Steering Committee.
-
Gas will not flow until a positive connection has been made.
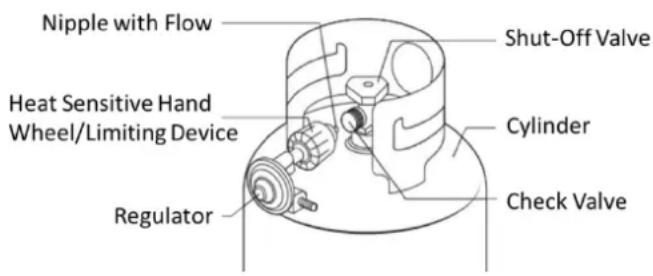
- A thermal element will shut off the flow of gas between 240^ and 300^ F.
- When activated, a Flow Limiting Device will limit the flow of gas to 10 cubic feet / hour.
text_image
Nipple with Flow Heat Sensitive Hand Wheel/Limiting Device Regulator Shut-Off Valve Cylinder Check Valve- The LP Gas Cylinder is not included with the Gas Oven. Be sure to purchase one with the QCC® valve. This valve is recognized by the external threads on the inlet port of the valve. QCC® equipped cylinders are available from your gas smoker dealer.
NOTE: Any attempt to connect the regulator, by use of adapters or any other means, to any other valve could result in damage, fire or injury and may negate the important safety features in the QCC®-1 system.
SPECIFICATION
-
All LP gas cylinders used with this appliance must be constructed and marked in accordance with the Specifications for LP Gas Cylinders of the U.S. Department of Transportation (D.O.T.) or the National Standard of Canada, CAN/CSA-B339, Cylinders, Spheres and Tubes for Transportation of Dangerous Goods; and Commission, as applicable.
-
The LP gas cylinder used for this appliance must not have a capacity exceeding 20 lb. (9 kg).
- Approximately 18" (46cm) high and 12" (31cm)
- All LP gas cylinders used with this appliance should be inspected at every filling and re-qualified by a licensed service outlet at the expiry date (10 years), in accordance with the DOT (USA) and Canadian Transport Commission (Canada) codes for LP Gas Cylinders.
- All LP gas cylinders used with this appliance must be provided with a shutoff valve terminating in a cylinder valve outlet No. 510, specified in the Standard for Compressed Gas Cylinder Valve Outlet and Inlet Connection (USA) ANSI/CGA-V-1-1977 (Canada) CSA B96.
- The cylinder supply system must be arranged for vapor withdrawal.
- The cylinder must include a collar to protect the valve if the propane capacity is in excess of 2.2 lb (1.0 kg).
- The cylinder must be installed as per assembly instructions.
- Never fill the cylinder beyond 80% full.
- The cylinder valve must include a safety relief device having direct communication with the vapor space of the cylinder.
HANDLING
- Government regulations prohibit shipping full LP gas cylinders. You must take your new cylinder to a LP gas dealer for filling.
- A filled LP gas cylinder is under very high pressure. Always handle carefully and transport in the upright position. Protect the valve from accidental damage.
- The LP Gas Cylinder is not included with the appliance. Be sure to purchase one with the QCC® valve. This valve is recognized by the external threads on the inlet port of the valve. QCC® equipped cylinders are available from your appliance dealer.
- If the cylinder is tipped after it is connected to the regulator, shut off the gas, disconnect the regulator and have it checked before using it again.
STORAGE
-
Do not store a spare LP gas cylinder under or near this appliance.
-
Store the LP gas cylinder outdoors in a well-ventilated place.
-
Do not store the LP gas cylinder in direct sunlight, near a source of heat or combustion.
-
If you intend to store the appliance indoors, disconnect and remove the LP gas cylinder first. Disconnected cylinders must have a dust cap installed and must not be stored in a building, garage or any enclosed area.
-
When the LP gas cylinder is connected to the gas appliance, the gas appliance and LP gas cylinder must be stored outside in a well-ventilated place.
-
Keep out of the reach of children.
OPERATION
-
Never connect your gas oven to an LP gas cylinder without the pressure regulator and hose assembly provided, and NEVER TO AN UNREGULATED LP GAS SUPPLY.
-
Always leak test the LP gas cylinder to regulator connection when connecting the LP gas cylinder to the appliance. See "Leak Testing." (page 16)
- Do not operate appliance if the smell of LP gas is present. Extinguish all flame and determine source of LP gas before proceeding. Do not ignite the appliance until the LP gas leak has been found and sealed.
- Always shut off LP gas cylinder valve when the appliance is not in use. If the precautions listed on this page are not taken, a fire causing death or serious injury may occur.
OPD EQUIPPED CYLINDER
OVERFILL PREVENTION DEVICE
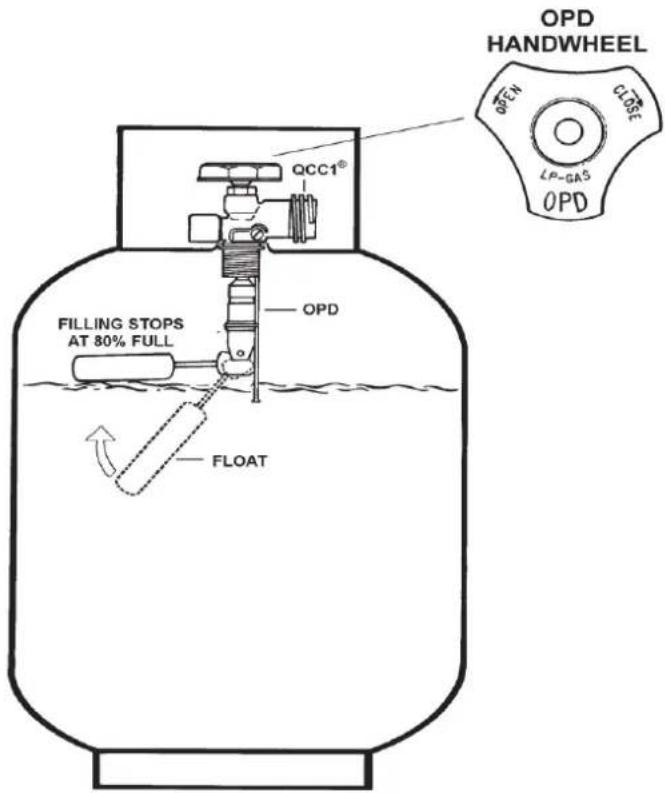
- The standard for outdoor gas appliances, ANSI Z21.58/ CAN/CGA-1.6, requires that appliances be used with cylinders equipped with an Overfill Prevention Device (OPD).
- The OPD is designed to reduce the potential for the overfilling of propane cylinders, thus reducing the possibility of relief valve discharges of raw propane. The OPD causes a slower purge/fill operation. Some consumers have been advised by filling stations that these cylinders are "defective." This is not a defect. Some propane filling stations may not be aware of this device and its effect on the purge/fill operation.
- New OPDs coming onto the market have technology that allows for much greater BTU outputs which will decrease the amount of time it takes to purge a cylinder.
IDENTIFICATION
To identify these cylinders, the OPD handwheel has been standardized to the shape shown.
text_image
OPD HANDWHEEL OPEN CLOSE LP-GAS OPD QCC1® FILLING STOPS AT 80% FULL OPD FLOATHOSE & REGULATOR
- All models are equipped with a hose and regulator with a QCC®-1 Quick Closing Coupling.
- The QCC® coupling contains a magnetic Flow Limiting Device which will limit the flow of gas should there be a leak between the regulator and the appliance valve. This device will activate if the cylinder valve is opened while the appliance valves are open. Be sure the appliance valves are off before the cylinder valve is opened to prevent accidental activation.
- The QCC® coupling incorporates a heat sensitive hand wheel that will cause the back check module in the QCC® cylinder valve to close when exposed to temperatures between 240° and 300°F. Should this occur, do not attempt to reconnect the hand wheel. Remove hose/regulator assembly and replace with a new one.
- The pressure regulator is set at 11 inches WC (water column) and is for use with LP gas only. The hose and hose couplings comply with CGA Standard CAN 1.83. No modifications or substitutions should be attempted.
- Protect the hose from dripping grease and keep the fuel supply hose away from any heated surface(s), including the base casting of the barbecue.
- Inspect the seal in the QCC® cylinder valve when replacing the LP gas cylinder or once per year whichever is more frequent. Replace the seal if there is any indication of cracks, creases, or abrasion.
- Inspect and clean the hose before each use. If the hose is cracked, cut, abraded or damaged in any way, the hose must be replaced prior to the appliance being put into operation.
- For repair or replacement of the hose/regulator assembly (see page "component list"), contact your appliance dealer.
CONNECTION
- Be sure cylinder valve and appliance valves are "OFF."
- Center the nipple in the cylinder valve and hold in place. Using other hand, turn the hand wheel clockwise until there is a positive stop. Do not use tools. Hand tighten only. When making the connection, hold the regulator in a parallel with the cylinder valve, so as not to cross thread the connection.
- Leak test connections. See "Leak Testing." (page 16)
- Refer to lighting instructions. To avoid activating the Flow Limiting Device when lighting, open cylinder valve slowly with the appliance valves off. If the Flow Limiting Device is accidentally activated, turn off cylinder valve and appliance valves, wait 10 seconds to allow the device to reset, open cylinder valve slowly, then open the appliance valve.
DISCONNECTION
Always close LP cylinder valve and remove coupling nuts before moving cylinder from specified operation position
LEAK TESTING
All factory-made connections have been rigorously tested for gas leaks. However, shipping and handling may have loosened a gas fitting.
AS A SAFETY PRECAUTION:
• Test all fittings for leaks before using your appliance.
• Test for leaks every time you connect a gas fitting.
- Do not smoke at any time while testing.
- Never test for leaks with a lit match or open flame.
• Test for leaks outdoors.
- Test LP cylinder valve for leaks each time the cylinder is filled.
- If a leak persists, contact your gas appliance dealer for assistance. Do not attempt to operate appliance if a leak is present.
LEAK TEST WITH AN LP CYCLINDER:
TO TEST FOR LEAKS BETWEEN THE LP CYCLINDER AND GAS VALVE:
- Extinguish any open flame or cigarettes in the area.
- Be sure that cylinder and appliance valves are "OFF."
- Connect LP gas cylinder. See "Hose and Regulator."
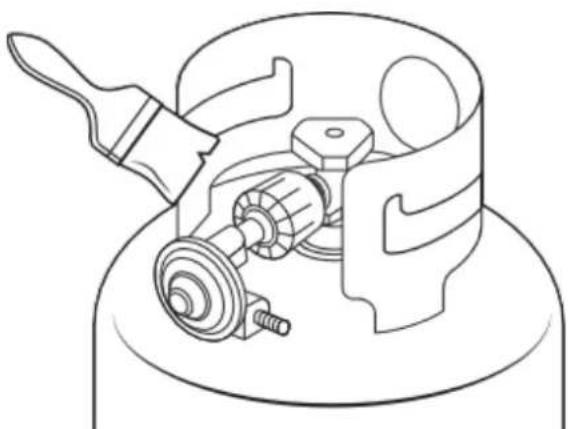
- Prepare a soap solution of one part water, one part liquid detergent.
- Brush the soap solution on each connection.
- With a full gas cylinder, open cylinder slowly.
- A leak is identified by a flow of bubbles from the area of the leak.
- If a leak is detected, close the gas cylinder "shut off" valve, tighten the connection and retest.
natural_image
Technical line drawing of a mechanical assembly with a tool and cylindrical component (no text or symbols)LEAK TESTING ON NATURAL GAS:
TO TEST FOR LEAKS BETWEEN THE NATURAL GAS SUPPLY AND GAS VALVE:
- Extinguish any open flame or cigarettes in the area.
- Be sure gas supply and appliance valves are "OFF."
- Prepare a soap solution of one part water, one part liquid detergent.
- Brush the soap solution on each connection.
- Slowly open the natural gas supply valve.
- A leak is identified by a flow of bubbles from the area of the leak.
- If a leak is detected, close the natural gas supply valve, tighten the connection and retest.
IF THE GAS SUPPLY SYSTEM IS PRESSURE TESTED:
- The appliance and its individual shutoff valve must be disconnected from the gas supply piping system during any pressure testing of that system at test pressures in excess of 12 psi (3.5 kPa).
- The appliance must be isolated from the gas supply piping system by closing its individual manual shutoff valve during any pressure testing of the gas supply piping system at test pressures equal to or less than 12 psi (3.5 kPa).
LIGHTING
BASIC GAS OVEN COMPONENTS:
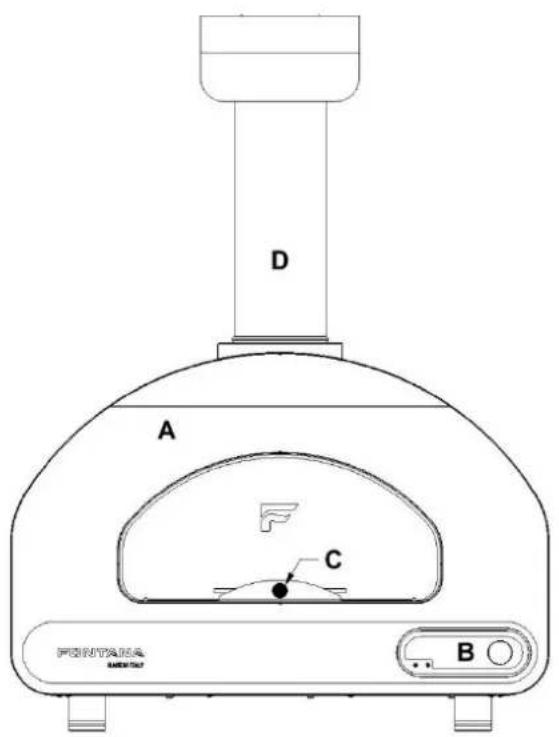
text_image
A D C BA. Gas oven
B. Display
C. Door with silicon handle
D. Flue
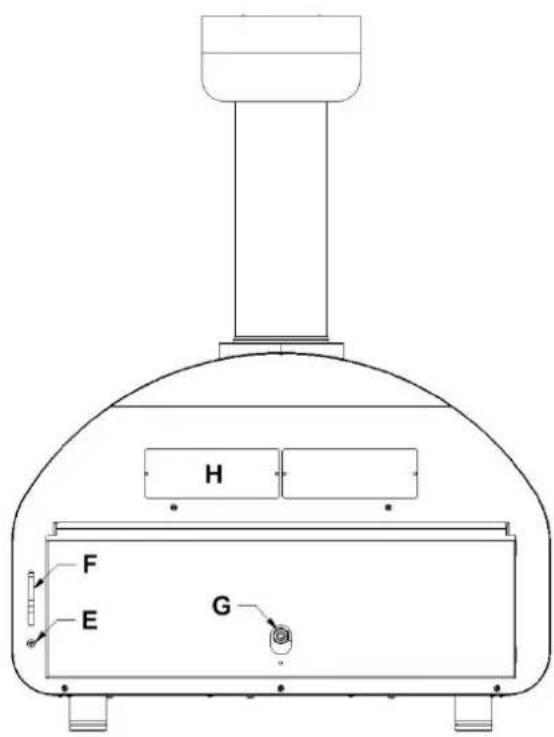
text_image
H F E GE. Power adapter connection
12VDC 5.0 A
F. Wi-Fi receiver antenna
G. Gas connection
H. Data label
LIGHTING INSTRUCTIONS
- The appliance must be assembled as per the assembly instructions.
- Ensure the gas supply is properly connected to the appliance. LP installations see: "Hose and Regulator." (page 11) NG installations see: "Natural Gas Conversion Kit" manual.
- Ensure there are no gas leaks in the gas supply system. See: "Leak Testing." (page 12-13).
- WARNING: Always open door before lighting.
- Turn on the gas supply.
CONTROL PANEL:
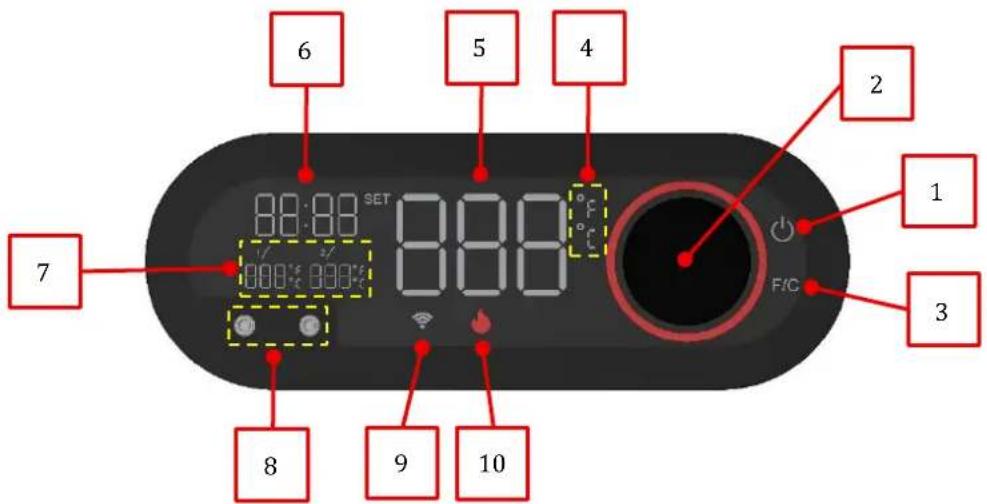
text_image
6 5 4 2 1 3 7 000:000' 000:000' F/C 8 9 101. POWER BUTTON
Press the POWER BUTTON to turn ON the display.
Press and hold the button for 3 seconds to turn OFF the display and the oven.
Press and hold the button for 3 seconds to reset an error message when it appears on the display.
2. CONTROL KNOB
- Press the knob once to set the desired cooking temperature. Adjustable in increments of 5^ (41°F). Turn the control knob clockwise or counterclockwise to select the temperature.
• After selecting the cooking temperature, confirm by pressing the knob to move on to the timer setting. Adjustable in one-minute increments. Turn the control knob clockwise or counterclockwise to select the desired cooking time. Press the knob to select. Note: Display will return to current temperature.
3. CHANGE TEMPERATURE UNITS °F /°C
Press the button to change the display to Fahrenheit or Celsius.
4. °F/°C INDICATOR
Display current set unit in Fahrenheit or Celsius.
5. MAIN TEMPERATURE INDICATOR
Displays current and set temperature in °F or °C.
6. TIMER
Indicates the set cooking time (hh:mm).
Note: When the time has expired, it alerts you with an acoustic signal.
7. MEAT PROBE TEMPERATURE INDICATOR #1 & 2
Display current temperature meat probe #1 & 2.
If the meat probes are not connected to the port, "noP" appears on the display.
8. MEAT PROBE PORT #1 & 2
Meat probe connection port.
9. WI-FI SIGNAL INDICATOR
It flashes when it is not connected to any Wi-Fi network.
It remains lit and steady when connected to a Wi-Fi network.
10. FLAME ON/OFF INDICATOR
Flashes for 10 seconds during burner ignition.
Remains lit and steady once the burner is operating and the oven is in the heating phase.
Open door (C) and leave open until lit.
STEP 2
Plug oven into a GFCI (Ground Fault Circuit Interrupter) enabled power supply. Note: Power Adapter supplied with the oven.
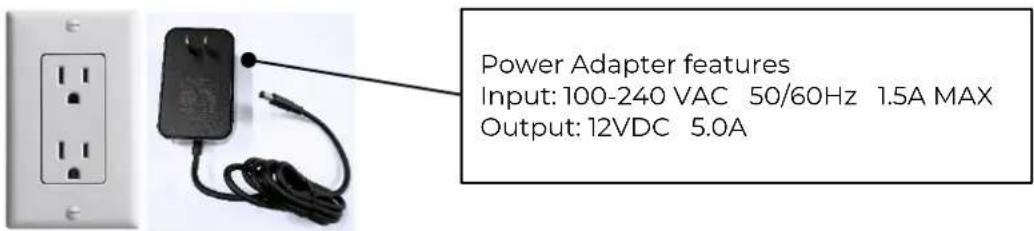
text_image
Power Adapter features Input: 100-240 VAC 50/60Hz 1.5A MAX Output: 12VDC 5.0ASTEP 3
Turn on the gas supply.
STEP 4

Press the POWER BUTTON to turn ON the display.
STEP 5
Press the knob once, the temperature indicator will flash, set the desired cooking temperature. Adjustable in increments of 5^ C ( 41^ F). Turn the knob clockwise or counterclockwise to select the temperature. Confirm by pressing the knob, at this point move on to setting the timer. The timer indicator will flash. Adjustable in one-minute increments. Turn the knob clockwise or counterclockwise to select the desired cooking time. Confirm by pressing the knob and the oven will start to heat up (flashing flame icon). The burner should ignite within 10 seconds. Once ignited, the flame icon will change from flashing to steady.
Note: The timer setting can be bypassed by simply pressing the knob after setting the cooking temperature.
CAUTION - Check your burner's flame after lighting. All burner holes should show upper to 2.5cm /1" flame on HIGH. The flames should be mostly blue and without lifting.
To turn off the oven, press and hold the POWER BUTTON for 3 seconds.
IF BURNER DOES NOT IGNITE:
If the burner does not ignite within 10 seconds, an error code will appear on the display; see "Troubleshooting" on page 24. If the problem persists, do not attempt to use the appliance; contact your dealer or an authorized service center.

OPERATION
WARNING: The use of alcohol, prescription or non-prescription drugs may impair the consumer's ability to properly assemble or safely operate the appliance.
TIPPING HAZARD:
Place the gas cylinder in the appropriate secure and fix position to avoid overturns and accidents.
First Time Use: Before cooking with the gas appliance for the first time, turn on the oven and set it to a temperature of 350^ C ( 660^ F) for at least one hour. Turn off the oven and wait for it to cool down. Your oven is now ready for use.
Door function: The door is essential for reaching the desired temperature as quickly as possible, maintaining it and cooking all dishes that do not require very high temperatures. WARNING FOR COOKING PIZZA: set the desired temperature with the door closed; once this temperature has been reached, wait at least 30/40 minutes before placing the pizza in the oven.
Wind or drafts:
Never use the oven in strong winds.
The position of the oven is very important: orient the oven mouth so that it faces away from the wind. Avoid using the oven in windy conditions; it is important that there are protective barriers around the oven to prevent the wind from blowing directly into the oven mouth and consequently onto the flame. If you see fire coming out of the base of the oven, turn off the oven immediately and stop the flow of gas by closing the cylinder or methane valve.
Protection of the display and oven: The oven display must not be exposed to sunlight and rain for prolonged periods.
When not in use, if the oven is not positioned under a gazebo or pergola, it must still be protected from the elements.
MAINTENACE
REGULAR MAINTENANCE
The following components should be inspected and cleaned (as necessary) before every usage of your gas appliance to ensure optimal performance, safety and efficiency.
GENERAL CLEANING
Perform a Burn-Off (see below). When appliance is cool, clean the interior of the appliance if necessary, by scraping the bottom of the cooking surface and vacuuming.
ANNUAL MAINTENENCE
The following components should be inspected and cleaned at least once a year or after any period of storage over 30 days to ensure optimal performance, safety and efficiency.
BURNER
Remove burner and inspect for cracks and deterioration. Clean venturi tubes using a pipe cleaner to eliminate any blockages. See "Venturi Tubes." While the burner is removed, clean the interior of appliance by scraping the bottom of the cooking surface and vacuuming.
HOSE
Inspect and replace if necessary. For propane see "Hose and Regulator" (Page 15).
ORIFICE
Inspect the orifice to make sure it is not blocked, misaligned, or loose.
STAINLESS STEEL, PAINT AND REFRACTORY
Wash with soap and water. Use stainless steel cleaner to polish and remove stains or marks.
Any discolorations of the stainless steel or the oven, or cracks in the refractory plates, are not considered defects but normal wear and tear that does not compromise the reliability and performance of the oven.
REPLACEMENT PARTS
If a problem is found with the regulator, hose, burner, or control valves, do not attempt repair. See your dealer, approved service center, or contact the factory for repairs or replacement parts. To ensure optimum performance, use only original replacement parts.
LEAK TEST
When reconnecting the appliance to a gas supply, be sure to check for leaks. See “Leak Testing” (Page 16).
VENTURI TUBE
Always keep venturi tube clean. Blockages in the venturi tube caused by spiders, insects and nests can cause a flashback fire. In fact, although the gas burner may still light, the backed-up gas can ignite and cause a fire or small flear. If a flashback fire occurs, turn off gas at the source immediately. Inspect and clean the venturi tubes if any of the following symptoms occur:
- You smell gas.
- Your appliance does not reach temperature.
- Your appliance heats unevenly.
- The burners make popping noises.
INSPECTING & CLEANING VENTURI TUBES
- Turn off gas by closing the propane cylinder valve.
- When appliance is cool, clean the venturi tube with a pipe cleaner.
- The burner is accessible only after remotion the support box in the back of oven.
TROUBLESHOOTING
| PROBLEM | POSSIBLE CAUSE | CORRECTIVE ACTION |
| SMELL OF GAS | SHUT OFF GAS SUPPLY VALVE AT ONCE.DO NOT USE THE APPLIANCE UNTIL LEAK IS SEALED. | |
| Leak detected at cylinder, regulator or other connection. | 1. Regulator fitting loose.2. Gas leak in hose/regulator or control valves. | 1. Tighten fitting and “Leak Test.” (page 16)2. See authorized service center. |
| Flames Beneath Control Panel (Flashback Fire) | 1. Venturi blocked. | 1. Remove burner and clean venturi. See “Venturi Tubes” (page 23) for assistance. |
| Flickering Burner Flame or Low temperatures on HIGH Setting | 1. Excess flow safety devices have been activated in connection between cylinder and oven. | 1. Turn LP cylinder valve off then turns all burners to OFFposition. Disconnect the regulator from the cylinder. Wait two minutes. Re-attach regulator to the cylinder. Open the cylinder valve slowly. Wait one minute. Light smoker oven as per “Lighting” (page 18-19) |
| Burner Not Lighting | 1. Out of LP Gas/Gas Supply Valve Off.2. Ignitr issue.3. Excess flow safety device has been activated.4. Regulator is not fully connected to the cylinder valve.5. A leak in the system causing the excess flow device to activate.6. Venturi blocked or misaligned with valve orifice.7. Orifice blocked.8. Hose is twisted.9. Burner ports blocked | 1. Refill LP Gas Cylinder/turn on main gas supply valve.2. It is an igniter issue. See “Igniter Not Working” below3. Follow “Flickering Flame or Low Temperatures on HIGH setting” solution above.4. Tighten the regulator hand wheel.5. Leak test connections to determine loose fitting. Tighten fitting. Leak test system.6. Clean venturi See page 5 for assistance.7. Clean orifice with a pin or fine wire. Do not drill orifices.8. Straighten hose.9. Remove burner & clean with soft bristle brush (e.g. toothbrush). |
| Decreasing Heat, “Popping Sound” | 1. Out of LP Gas.2. Venturi blocked. | 1. Refill LP Gas Cylinder.2. Remove burner and clean venturi. See “Venturi Tubes” (page 7) for assistance. |
| Hot spots on Cooking Surface | 1. Venturi blocked2. Burner ports partially blocked by debris | 1. Remove burner, clean venturi. See “Venturi Tubes” (page 7) for assistance.2. Remove burner & clean with soft bristle brush (e.g. toothbrush). |
| Regulator Humming Noise | 1. Cylinder valve opened too quickly. | 1. Open cylinder valve slowly. |
| Yellow Flame | 1. Some yellow flame is normal. If it is excessive, the venturi may be blocked.2. Burner ports partially blocked by debris. | 1. Clean venturi. See “Venturi Tubes” (page 23) for assistance.2. Remove burner & clean with soft bristle brush (e.g. toothbrush). |
| If troubleshooting fails to solve any of these or any other issues, please contact your dealer or approved service center. | ||
TROUBLESHOOTING ERROR CODE
| PROBLEM | POSSIBLE CAUSE | CORRECTIVE ACTION |
| ISSUES RELATED TO THE CONTROLLER | ||
| Controller not working | 1. Unit not connected to power.2. Loose or corroded connections.3. Faulty electrical extension cord. | 1. Connect GFCI power cord to appliance.Plug into a working power outlet.2. Clean connections and ensure all connectors are pushed together firmly.3. Inspect and switch the electrical extension cord. |
| Oven thermocouple fail.Er1 | The temperature sensor (K-type probe) is disconnected or broken. | Check the connection wire or replace the temperature sensor (K-type probe). |
| Ignition failed.Er2 | 1. When the oven is off, the spark ignition electrode is disconnected or broken.2. When the oven is off, the flame sensor electrode is disconnected or broken.3. When the oven is off, the valve power supply wire is disconnected or broken.4. When the oven is off, the LPG cylinder is closed. | 1. Check the connection wire or replace the spark ignition electrode.2. Check the connection wire or replace the flame sensor electrode.3. Check the valve power supply connection wire or replace the valve.4. Open the LPG cylinder tap and check if there is enough fuel. |
| Too high temp inside the oven, the temperature oven 500° (932°F).Er3 | The cause could be a malfunctioning of the valve that it is not modulating the flame correctly. | Check the connection wires of the valve or replace it. |
| Low temperature. The temperature inside the oven below 43°C (110°F) for more than five minutes.Er4 | The temperature sensor (K-type probe) is not positioned correctly inside the cooking oven chamber. | Reposition the temperature sensor (K-type probe) in its original place and secure it with the appropriate screws |
| Wrong voltage.Er 5 | The input power supply voltage is not correct. | Use the correct power supply voltage of 12 VDC 5A. |
| Flame outEr6 | 1. When the oven is on, the gas in the LPG cylinder runs out.2. When the oven is on, the flame sensor electrode is broken, or the wire is disconnected.3. When the oven is on, the valve is broken, or its power cable is disconnected.4. When the oven is on, exposure to strong wind or draughts could | 1. Replace the empty LPG cylinder with a full one.2. Check the connection wires or replace the flame sensor electrode.3. Check the power supply connection wires or replace the valve.4. Position the oven away from strong winds or draughts. |
| Valve failedEr7 | With the oven on, the solenoid valve connection wire becomes disconnected or broken. | Check the solenoid valve connection wires or replace it. |
| Spark igniter failedEr8 | The spark ignitor power wires are disconnected, or the device is not working properly. | Check the connection wires or replace the spark ignitor. |
| If troubleshooting fails to solve any of these or any other issues, please contact your dealer or approved service center. | ||
WARRANTY
This warranty is extended exclusively to the original purchaser named in the warranty registration and applies only to products sold at retail and only if used exclusively by the purchaser in the country where they were purchased. (Different types of gas used in different countries require appropriate valves, nozzles and regulators).
WHAT THE WARRANTY COVERS
The product is covered by a 24-month warranty on all its components except for refractory plates that wear out with normal use and unless otherwise specified. The following warranty extensions are also provided on structural and functional elements:
• Cooking chamber: 20-year warranty
• Gas burner: 10-year warranty
The validity of the warranty is subject to strict compliance with the installation, use and maintenance instructions contained in this manual. The warranty is valid from the date of purchase and covers only material and/or manufacturing defects found during use in accordance with the manufacturer's technical specifications.
WHAT THE WARRANTY DOES NOT COVER
Any failure or malfunction due to accident, abuse, misuse, alteration, misapplication, vandalism, improper installation or maintenance or service, or failure to perform routine maintenance, including, but not limited to, damage caused by insects inside the burner tubes, as indicated in the user manual.
Deterioration or damage due to adverse weather conditions such as hail, hurricanes, earthquakes or tornadoes, discoloration due to exposure to chemicals directly or in the atmosphere.
Furthermore, it does not cover shipping or transport costs. Removal or reinstallation costs. Labour costs for installation and repair. Cost of service calls.
Liability for indirect or consequential damages.
SPARE PARTS
Only 'original spare parts for gas ovens' may be used for replacement. The use of any other spare parts will automatically invalidate the above warranty.
WARRANTY CLAIM
All warranties are handled directly by FONTANA FORNI. Replacement parts must be returned, with shipping costs prepaid, accompanied by the model number, serial number and, if the appliance is not registered, proof of purchase (copy of receipt or invoice). If the inspection confirms the defect, we will repair or replace the part in accordance with the terms of the warranty.
Upon receipt of the letter or email (not by telephone), FONTANA FORNI, at its discretion, may not require the return of the part or parts.
| Name | Fax # | ||
| Address | Model # | ||
| City, State/Province | Serial # | ||
| Postal/Zip Code | Date of purchase | ||
| Phone # | Name of dealer | ||
| E-mail Address | Part # (see assembly manual) | ||
| Problem | |||
À UTILISER AVEC :
GAZ DE PÉTROLE LIQUÉFIÉ (GPL)
(AU CANADA, GAZ PROPANE)
GAZ NATUREL (GN)