
AHG560WH - Basket AIRLUX - Free user manual and instructions
Find the device manual for free AHG560WH AIRLUX in PDF.

| Brand | Airlux |
| Model | AHG560WH |
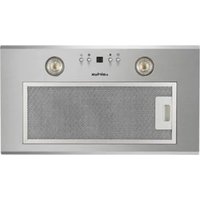
| Product type | Cooker hood |
| Dimensions (W x D) | 52 cm x 70 cm |
| Power supply | 230 V ~ 50 Hz |
| Number of speeds | 3 (model without intensive speed) or 4 (with intensive speed) |
| Lighting | 2 LED lamps (2 W each) |
| Timer function | Yes, adjustable 15 minutes |
| Evacuation mode | Extraction or recirculation (charcoal filter optional) |
| Minimum distance from hob | 65 cm (electric) / 75 cm (gas) |
| Grease filter | Aluminum, washable (every 3-4 weeks) |
| Charcoal filter | Active, replacement every 3 months (recirculation mode) |
| Diameter of exhaust duct | 150 mm (120 mm adapter possible) |
| Noise level | Variable depending on speed (not specified) |
| Energy consumption | Not specified |
| Material | Stainless steel (probably) |
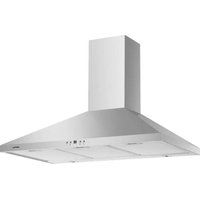
| Installation | Under cabinet or wall-mounted |
| Child safety | Use by children over 8 years under supervision |
| Spare parts | Filters, LED lamps (replacement by qualified technician) |
| Warranty | Not specified, contact customer service |
Frequently Asked Questions - AHG560WH AIRLUX
User questions about AHG560WH AIRLUX
0 question about this device. Answer the ones you know or ask your own.
Ask a new question about this device
Download the instructions for your Basket in PDF format for free! Find your manual AHG560WH - AIRLUX and take your electronic device back in hand. On this page are published all the documents necessary for the use of your device. AHG560WH by AIRLUX.
USER MANUAL AHG560WH AIRLUX
To promote an environmentally friendly and ecological approach, Airlux prints its user manuals only in French and English. The German and Dutch versions are available on our website..
RECOMMANDATIONS ET SUGGESTIONS
INSTALLATION
VERSION AVEC CONDUIT D'ÉVACUATION
REplacement DES LEDs
Thank you for choosing Airlux. Before using your new product, please read this manual thoroughly to ensure that you know how to operate the features and functions that your new appliance offers in a safe way.
Warning notices: Before using this product, please read this manual carefully and keep it for future reference. The design and specifications are subject to change without prior notice for product improvement. Consult with your dealer or manufacturer for details. The diagram above is just for reference. Please take the appearance of the actual product as the standard.
SOMMAIRE
WARNING 25
RECOMMENDATIONS AND SUGGESTIONS 27
CHARACTERISTICS 28
INSTALLATION 29
USE 31
MAINTENANCE 33
DISPOSAL AND RECYCLING 35
WARNING
WARNING
IN CERTAIN CIRCUMSTANCES ELECTRICAL APPLIANCES MAY BE A DANGER HAZARD.
DO NOT CHECK THE STATUS OF THE FILTERS WHILE THE RANGE HOOD IS OPERATING.
DO NOT TOUCH THE LIGHT BULBS AFTER APPLIANCE USE.
DO NOT DISCONNECT THE APPLIANCE WITH WET HANDS.
AVOID FREE FLAME, AS IT IS DAMAGING FOR THE FILTERS AND A FIRE HAZARD.
CONSTANTLY CHECK FOOD FRYING. OVERHEATED OIL MAY BECOME A FIRE HAZARD.
DISCONNECT THE ELECTRICAL PLUG PRIOR TO ANY MAINTENANCE.
DON'T USE THIS PRODUCT OUTDOORS.
THIS DEVICE MAY BE USED BY CHILDREN OF AT LEAST 8 YEARS OF AGE AND BY PERSONS WITH REDUCED PHYSICAL, SENSORY OR MENTAL CAPACITIES OR WITHOUT EXPERIENCE OR KNOWLEDGE, IF THEY ARE PROPERLY SUPERVISED OR IF THEY HAVE BEEN GIVEN INSTRUCTIONS RELATING TO THE SAFE USE OF THE DEVICE AND THE RISKS INVOLVED HAVE BEEN UNDERSTOOD. CHILDREN MUST NOT PLAY WITH THE DEVICE.
CLEANING AND USER MAINTENANCE SHALL NOT BE MADE BY CHILDREN WITHOUT SUPERVISION.
THERE SHOULD BE ADEQUATE VENTILATION OF THE ROOM WHERE THE RANGE HOOD IS USED AT THE SAME TIME AS APPLIANCES BURNING GAS OR OTHER FUELS (NOT APPLICABLE TO RECYCLING MODE).
THERE IS A FIRE RISK IF CLEANING IS NOT CARRIED OUT IN ACCORDANCE WITH INSTRUCTIONS.
DO NOT BLAZE UNDER THE RANGE HOOD.
THE EXHAUST AIR MUST NOT BE DISCHARGED INTO A FLUE WHICH IS USED FOR EXHAUSTING FUMES FROM APPLIANCES BURNING GAS OR OTHER FUELS.
USE OF THE APPLIANCE
DO NOT USE THIS APPLIANCE OUTDOORS.
THIS APPLIANCE MAY BE USED BY CHILDREN AGED 8 YEARS AND OLDER, PROVIDED THEY ARE PROPERLY SUPERVISED OR HAVE BEEN INSTRUCTED ON THE SAFE USE OF THE APPLIANCE AND UNDERSTAND THE ASSOCIATED RISKS.
CLEANING AND MAINTENANCE SHOULD NOT BE CARRIED OUT BY CHILDREN.
WHEN THE HOOD IS USED SIMULTANEOUSLY WITH APPLIANCES BURNING GAS OR OTHER FUELS (THIS DOES NOT APPLY TO RECIRCULATION MODE), IT IS IMPORTANT TO FOLLOW SAFETY REGULATIONS.
THERE IS A FIRE RISK IF CLEANING IS NOT CARRIED OUT PROPERLY.
DO NOT FLAMBÉ FOOD UNDER THE HOOD.
DO NOT USE THE HOOD TO EVACUATE FUMES FROM APPLIANCES BURNING GAS OR OTHER FUELS.
CAUTION
ACCESSIBLE PARTS OF THIS APPLIANCE MAY BECOME HOT WHEN USED WITH COOKING APPLIANCES.
IMPORTANT NOTE:
WHEN AN EXHAUST-TYPE RANGE HOOD IS OPERATED SIMULTANEOUSLY WITHFIRE PLACES IT S HALL BE ENSURED THAT NO DANGEROUS NEGATIVE PRESSUREGREATER THAN 4 PA ( 4 × 1 0 - 5 BAR) CAN ARISE IN THE INSTALLATION ROOM .
RECOMMENDATIONS AND SUGGESTIONS
DIRECTIONS FOR INSTALLATION
- The manufacturer will not be held liable for any damages resulting from incorrect or improper installation.
- Please read this instruction manual before installing and using this range hood.
- Please keep this instruction manual in a safe place for future reference.
- Only a qualified and trained service technician can undertake the work of installation and servicing.
- Check that the main voltage corresponds to the one indicated on the rating plate fixed inside the hood.
- Do not connect the hood to exhaust ducts carrying combustion fumes (boilers, fireplaces, etc.)
- If the hood is used in conjunction with non-electrical appliances (e.g. gas burning appliances), a sufficient degree of ventilation must be guaranteed in the room in order to prevent the backflow of exhaust gas.
- The kitchen must have an opening directly with the open air to guarantee the entry of clean air.
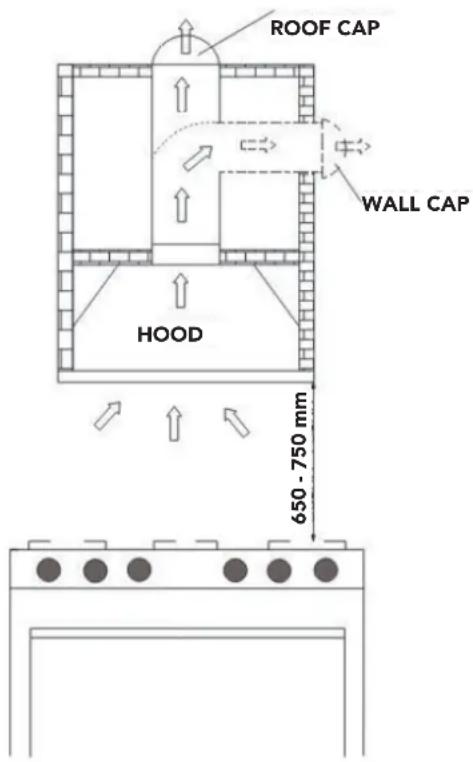
- The minimum distance is 700mm from the range hood to a gas hob and is 650mm to an electric hob. If the installation instructions for gas hobs specify a greater distance, this must be considered.
- NOTICE: Two or more people are required to install or move this appliance. Failure to do so can cause physical injuries.
DIRECTIONS FOR USE
The range hood has been designed only for domestic use to eliminate kitchen fumes.
- Never use the hood for purposes other than what it has been designed for.
- Never leave high naked flames under the hood when it is in operation.
- Adjust the flame intensity to direct it onto the bottom of the pan only; making sure that it does not engulf the pan sides.
- Deep fat fryer must be continuously monitored during use: overheated oil can burst into flame.
- The hood should not be used by children or persons not instructed in its correct use.
DIRECTIONS FOR MAINTENANCE
- Proper maintenance of the range hood will assure proper performance of the unit.
- Disconnect the hood from the main supply before carrying out any maintenance work.
- Clean and/or replace aluminum grease filters after specified period of time.
- Clean the hood using a damp cloth and a neutral liquid detergent.
- DISPOSAL: Do not dispose this product as unsorted municipal waste. Collection of such waste separately for special treatment is necessary.
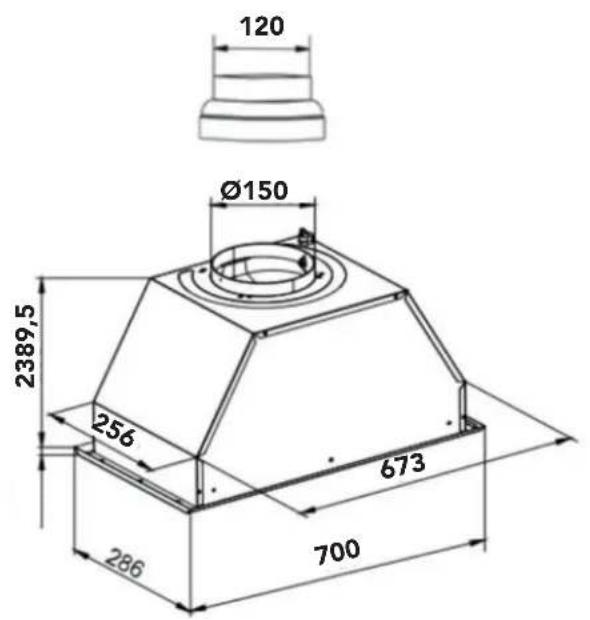
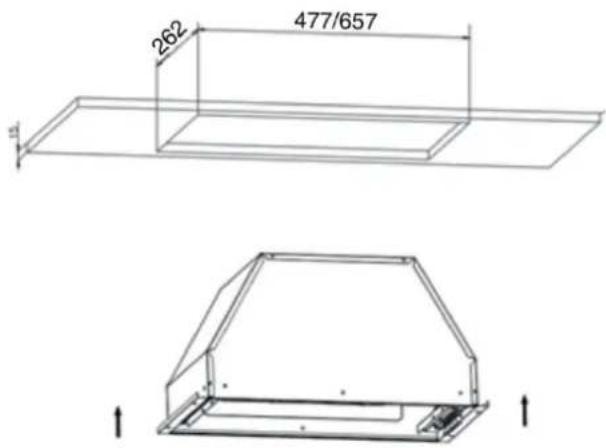
CHARACTERISTICS
DIMENSIONS
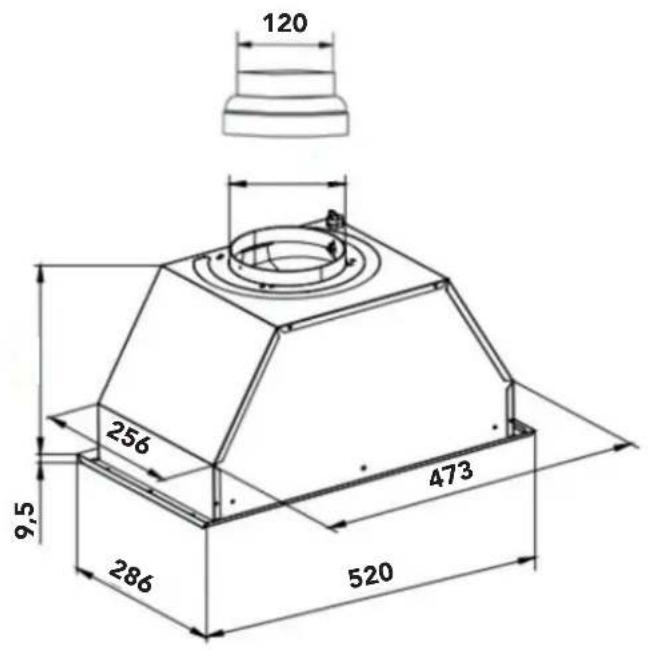
52cm70cm
INSTALLATION
Note 1: On stainless steel hoods, carefully remove the plastic protective film from all exterior surfaces of the hood prior to final installation.
Note 2: At least two people will be required to mount the hood.
DESCRIPTION / CONNECTIONS
The hood may be installed in the Ducting or the recalculation version.
DUCTING VERSION
The hood draws cooking fumes saturated with fumes and odour through the grease filters and expels it to the outside through an outlet pipe.
Caution: To reduce the risk of file, use of metal ductwork is preferred.
Do not use flammable material to convey exhaust air.
- Decide where the ductwork will run between the hood and the outside.
- A straight, short duct run will allow the hood to perform most efficiently.
- Long duct runs, elbows, and transitions will reduce the performance of the hood. Use as few of them as possible. Larger ducting may be required for best performance with longer duct runs.
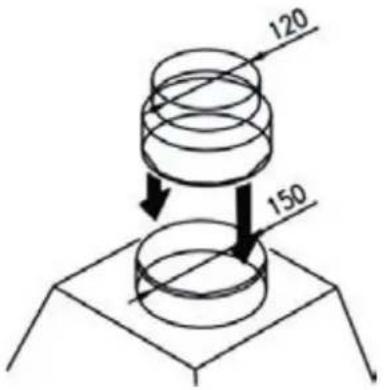
- It is recommended that 150mm round duct is to be used, however a reducer from 150mm to 120mm can be ordered supplied should 120mm be required.
- The air must not be discharged into a flue that is used for exhausting fume from appliance burning gas or other fuels. Regulations concerning the discharge of air have to be followed. Check with the local authority and building code for exhaust ducting requirements.
- Install a roof/wall cap. Connect round ductwork to cap and work back towards hood location.
RECIRCULATION MODE
The hood draws cooking fumes saturated with fumes and odor through the grease filters and charcoal filters and returns clean air into the room. For constant efficiency, the charcoal filters must be replaced periodically.
Decide from the outset on the type of installation(recirculation or ducting). For greater efficiency, we recommend you install the hood in the ducting version.
ELECTRICAL CONNECTION
- Electrical wiring must be performed by a qualified technician, in compliance with applicable standards and regulations
- Disconnect the power supply at the main circuit breaker before any intervention.
- If the power cord is damaged, it must be replaced by the manufacturer, their after-sales service, or a similarly qualified professional to avoid any danger.
- Use only the original plug and extension cord supplied with the hood.
INSTALLATION OF THE APPLIANCE
Before beginning installations, to better handle the hood, we advise removing the face plate.
- The range hood is designed to operate with 150mm exhaust ducting. If 120mm exhaust Ducting has to be used, the 120mm reducer is required.
RECIRCULATING & DUCTING VERSION INSTALLATION
Before fixing, the outlet exhaust duct for air evacuation to the outside must be installed. Use an outlet exhaust duct with: - minimum indispensable length;
-Minimum possible bends(maximum angle of bend:90°);
-certified material (according to local, building and fire regulations); and as smooth as possible inside.
It is also advisable to avoid any drastic changes in duct cross-section(recommended diameter:150mm).
For recirculation version, please consider some outlets for clean air returns into the room.
- Make the electrical connection.
Fitting under wall unit
- Before fixing the hood to the unit, drill a hole of 165mm diameter for 150mm exhaust ducting or 135mm for 120mm exhaust Ducting in the wall unit.
- In any case, check the position of the power outlet and consider we're the power cable will run, since a hole might have to be made in the wall unit to accommodate it.
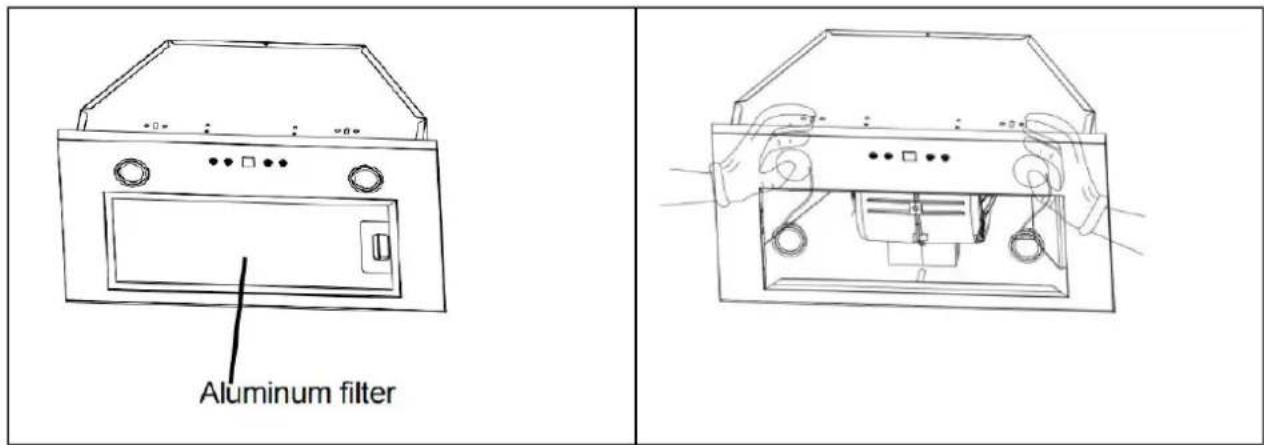
- Unscrew the 2 visible screws located on hood of both inner size of filter frame, find the lamp wire terminal along the lamp wire and disconnect the lamp wire with lamp wire terminal, then remove the face plate. The 4 mounting holes around the unit are then accessible.
- Lift the range hood and fit through the opening of the cabinet. Secure unit by using 4 long mounting screws.
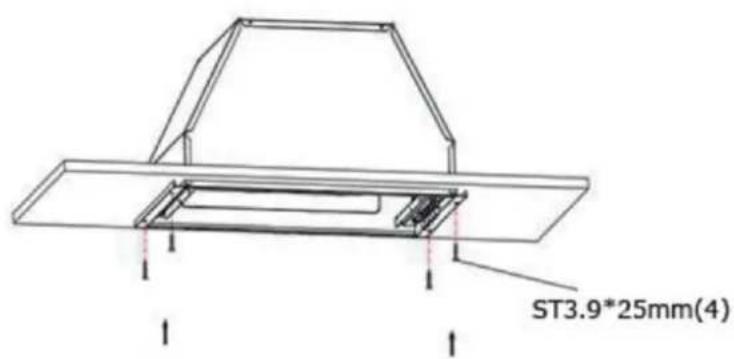
- Flit the face plate on the hood by screwing 2 screws.

-
Connect the lamp wire with wire terminal and install the aluminum filter.
-
Make the electrical connection.
Installation is now completed.
Notice:
- Exhaust air must not be discharged into a flue which is used for exhausting fumes from appliance burning gas or other fuels.
- If the instructions for installation for the gas hob specify a greater distance than 750mm , this has to be taken into account.
- The regulations concerning the discharge of exhaust air have to be followed. Check with the local authority for building codes for exhaust ducting requirement.
USE
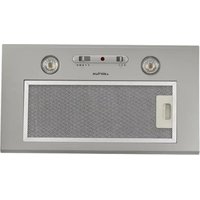
a) Model with Slide Switch
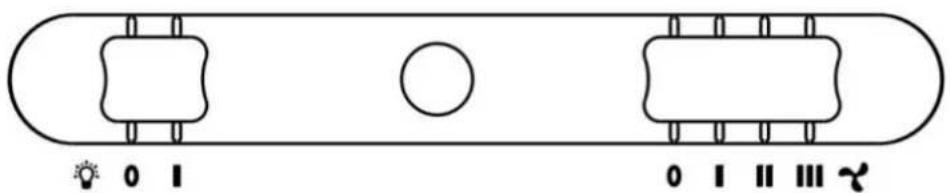
This hood can be operated using the slide switch located on the front panel.
- Light switch: turns the lights on and off.
- Fan switch - controls the fan motor with the following speed settings:
0: OFF
1: LOW SPEED
2: MEDIUM SPEED
3: HIGH SPEED
b) Model with Electronic Control Panel and without booster


The hood is operated using the electronic switch on the front panel.
The power switch turns the range hood on and off.
The light switch turns the lamps on and off.
The blower switch turns the blower onto three speed settings:
The timer delay switch decides how long the hood stay on after switching off.
Press the timer button when the motor is working, the range hood will be set with default timer as 15 minutes. Adjust the timer by press the speed button.
The motor will be stop working automatically when time is up.
c) Model with Electronic Control Panel and with booster


The hood is operated using the electronic switch on the front panel.
The power switch turns the range hood on and off.
The light switch turns the lamps on and off.
The blower switch turns the blower onto four speed settings.
The timer delay switch decides how long the hood stay on after switching off.
MAINTENANCE
Regular maintenance of your range hood is essential to ensure proper operation, extend the lifespan of the appliance, and maintain good air quality in your kitchen.
Grease filters collect cooking particles and must be cleaned frequently to prevent motor clogging and reduced extraction efficiency. Charcoal filters, used in recirculation mode, must be replaced periodically to ensure effective odor absorption. Neglecting maintenance can result in increased energy consumption, excessive noise, and a higher risk of fire due to the accumulation of flammable grease.
| Filter Type Frequency Maintenance Method | ||
| Grease filter (aluminum or stainless steel) | Every 3 to 4 weeks | - Remove the filters - Clean with hot water + dish soap or baking soda - Washable by hand or in a dishwasher (low temperature recommended) - Let dry completely before reinstalling |
| Activated charcoal filter (recirculation only) | Every 3 months (or more often depending on usage) | - Not washable (unless regenerable model) - Replace when saturated (reduced odor absorption, visible grease) |
For grease filters, soaking them in hot water with white vinegar and baking soda is a very effective and natural cleaning method.
GREASE FILTERS
Grease filter are washable. And if necessary in the dishwasher. After several washes, their color may change. This discoloration does not interfere with their proper functioning and does not give rise to complaints.
Tip: A saturated filter reduces extraction efficiency and increases the risk of ignition of accumulated grease.
CHARCOAL FILTERS
This filter is not washable and cannot be regenerated. It should be replaced approximately every 3 months, or more frequently in the case of heavy usage.
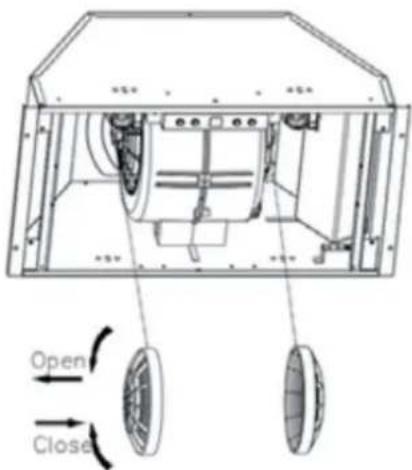
Installing the charcoal filter:
- Place the charcoal filter in its housing and turn it until you hear a "click" to lock it in place.
- Then reinstall the front panel.
Tip: To ensure optimal odor filtration, do not exceed the recommended usage period.
LED REPLACEMENT
This rangehood may require two round LED lamp(AC 230V, 2*2W MAX).
WARNING: Always switch off the electrical supply before carrying out any operation on te appliance.
IMPORTANT: The LED lamps must be replaced only by a qualified technician. Any improper replacement may void the product warranty.
To change LED lamp:
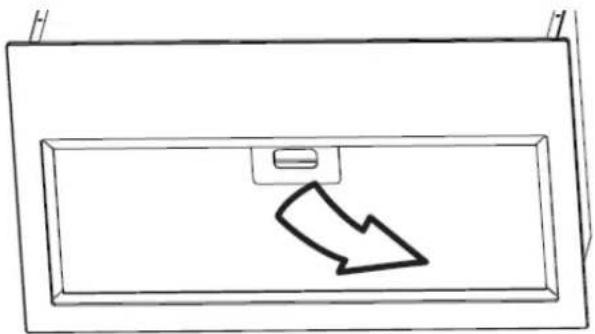
- Remove the aluminum filter.
- Find the lamp wire terminal along the lamp wire and disconnect the lamp wire with lamp wire terminal.
- Put your thumbs on the lamp and gently push the lamp out of the light board from behind the lamp.
- Take the new lamp and install it on the light board, reconnect the lamp wire with wire terminal, install the aluminum filter.
CAUTION:
- THE SURCACE, THE LIGHT COVER MAY BE HOT. TAKE CARE WHEN REPACING LED LAMPS.
- THE LED LAMPS MAY BE HOT. TAKE CARE WHEN REPLACING LED LAMPS.
We commend only using lamps of the same specification as the ones being replaced.
RISKS OF INADEQUATE MAINTENANCE
Failing to maintain your range hood properly can lead to several issues, including:
Grease buildup : Increased fire hazard
Reduced extraction efficiency
Higher energy consumption
Increased noise levels
Persistent unpleasant odors in the kitchen
TROUBLESHOOTING
The rangehood may not work or work improperly.
Before calling aftersales service off the appliance, unplug the power supply and refer to this guide to determine the problem.
If malfunction persist, contact our After sales service and specify the nature of the problem, appliance model no and serial number(on the rating plate inside the hood)
| Problem Possible causes What to do | ||
| No response of the lamps and the motor | 1. The plug is off from the power socket. 2. The power cord is damage. | 1. Ensure that the plug is put into the power socket properly. 2. Replace the power cord if the power cord is damaged. |
| The fuse on the PCB board is damage. | Replace the fuse on the PCB board. | |
| The switch is damaged. Repair | or replace the switch. | |
| The lamp doesn't work The lamp is damaged. Replace the damaged lamp. | ||
| The hood body gives out strong vibrations and a loud noise | 1. The hood has not been installed properly according to the installation process described in the instruction manual. 2. Check if the joint connection of each part is damaged. | Ensure the hood has been installed properly according to the instruction manual. |
| The air exhaust performance is bad. | Check if the distance between the hood and the cocker top is too big. | The ideal distance is 65-75cm. |
| Ensure there is adequate ventilation. | Open the door and windows properly. Improve the environment. | |
| The duct is damaged. Grease filters or charcoal filter clogged Exhaust air outlet clogged. | Repair or replace the damaged duct. Replace or clean the filters. Clear the air exhaust outlet. | |
DISPOSAL AND RECYCLING
IMPORTANT INSTRUCTIONS FOR ENVIRONMENTAL PROTECTION
This appliance complies with European Directive 2012/19/EU on Waste Electrical and Electronic Equipment (WEEE). To ensure proper disposal of this appliance, please return it to an appropriate collection point for WEEE recycling. By disposing of it correctly, you help prevent potential harm to the environment and human health that may result from improper disposal.
This symbol indicates that the product must not be disposed of with household waste. The used appliance must be returned to a designated collection point for the recycling of electrical and electronic devices. To locate these collection systems, please contact your local waste management authority or your retailer.
Each of us plays an important role in recovering and recycling old appliances. Proper disposal of used appliances helps prevent negative environmental and health impacts.
COMPLIANCE WITH ROHS STANDARD
This appliance requires specialized waste disposal and must not be disposed of with regular household waste. For detailed information on how to treat, recover, and recycle this product, please contact: Your local waste collection service, or the store where you purchased the appliance. They can provide specific instructions for proper and environmentally friendly disposal.
COLLECTION AND RECYCLING OF PACKAGING MATERIALS
The packaging materials of this product are made from recyclable materials, in accordance with environmental regulations. Do not dispose of packaging with household waste. Take the materials to designated packaging waste collection points, as specified by local authorities.
This appliance complies with Directive 2012/19/EU (WEEE).
▲airlux
SPECIAListe de I'encastrable
SIÈGE SOCIAL GLEMGAS FRANCE
ZAC du Val de Vence
10 rue du Relai
08000 Charleville Mézières
info@glemgas.com
Telephone:0324568040
SERVICE GARANTIE
garantie@airlux.com
PIÉCES DÉTACHÉES ET SAV
piecesdetaches@airlux.com
- RECOMMANDATIONS ET SUGGESTIONS
- INSTALLATION
- VERSION AVEC CONDUIT D'ÉVACUATION
- REplacement DES LEDs
- SOMMAIRE
- WARNING
- USE OF THE APPLIANCE
- CAUTION
- IMPORTANT NOTE:
- RECOMMENDATIONS AND SUGGESTIONS
- DIRECTIONS FOR INSTALLATION
- DIRECTIONS FOR USE
- DIRECTIONS FOR MAINTENANCE
- CHARACTERISTICS
- DIMENSIONS
- DESCRIPTION / CONNECTIONS
- DUCTING VERSION
- Caution: To reduce the risk of file, use of metal ductwork is preferred.
- RECIRCULATION MODE
- ELECTRICAL CONNECTION
- INSTALLATION OF THE APPLIANCE
- RECIRCULATING & DUCTING VERSION INSTALLATION
- Fitting under wall unit
- Installation is now completed.
- Notice:
- USE
- a) Model with Slide Switch
- b) Model with Electronic Control Panel and without booster
- c) Model with Electronic Control Panel and with booster
- MAINTENANCE
- GREASE FILTERS
- CHARCOAL FILTERS
- LED REPLACEMENT
- CAUTION:
- RISKS OF INADEQUATE MAINTENANCE
- TROUBLESHOOTING
- DISPOSAL AND RECYCLING
- IMPORTANT INSTRUCTIONS FOR ENVIRONMENTAL PROTECTION
- COMPLIANCE WITH ROHS STANDARD
- COLLECTION AND RECYCLING OF PACKAGING MATERIALS
Brand : AIRLUX
Model : AHG560WH
Category : Basket