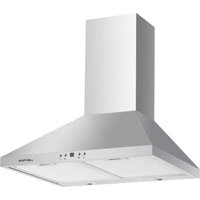
AHP760SS - Range hood AIRLUX - Free user manual and instructions
Find the device manual for free AHP760SS AIRLUX in PDF.

| Product type | Wall-mounted pyramid extractor hood |
| Brand | Airlux |
| Model | AHP760SS |
| Dimensions (W × D × H) | 600 × 500 × 400-780 mm (adjustable height) |
| Net weight | Not specified |
| Power supply | 220-240 V ~ 50 Hz |
| Motor power | 150-200 W (estimated) |
| Number of speeds | 3 + intensive mode (Booster) |
| Control type | Push buttons or electronic controls depending on version |
| Lighting | Integrated bulb (type not specified) |
| Grease filter | Washable aluminum (every 3-4 weeks) |
| Charcoal filter | Active, replace every 3 months (recirculation mode) |
| Exhaust duct diameter | 150 mm |
| Minimum distance from cooking surface | 650 mm (electric) / 750 mm (gas) |
| Operating mode | External evacuation or recirculation |
| Material | Stainless steel |
| Delayed shut-off function (Timer) | Yes (on electronic versions) |
| Filter maintenance | Grease filter dishwasher-safe; charcoal filter to replace |
| Safety | Observe safety distances; disconnect before maintenance |
Frequently Asked Questions - AHP760SS AIRLUX
User questions about AHP760SS AIRLUX
0 question about this device. Answer the ones you know or ask your own.
Ask a new question about this device
Download the instructions for your Range hood in PDF format for free! Find your manual AHP760SS - AIRLUX and take your electronic device back in hand. On this page are published all the documents necessary for the use of your device. AHP760SS by AIRLUX.
USER MANUAL AHP760SS AIRLUX
To promote an environmentally friendly and ecological approach, Airlux prints its user manuals only in French and English. The German and Dutch versions are available on our website..
natural_image
Line drawing of a 3D kitchen chimney with no text or symbolsAHP960BK - AHP960SS - DTHP950SS - DTHP950SS - AHP760SS - AHP660BK - AHP660SS - AHP650SS - DTHP650SS
RECOMMANDATIONS ET SUGGESTIONS 11
CARACTÉRISTIQUES TECHNIQUES 12
INSTALLATION 13
UTILISATION 14
ENTRETIEN DE L'APPAREIL 16
DÉPANNAGE 17
ELIMINATION ET RECYCLAGE 19
AVERTISSEMENTS
DANS CERTAINES CIRCONSTANCES, LES APPAREILS ÉLECTRIQUES PEUVENT PRÉSENTER UN DANGER.
NE VÉRIFIEZ PAS L'ÉTAT DES FILTRES PENDANT QUE LA HOTTE EST EN FONCTIONNEMENT.
NE TOUCHEZ PAS LES AMPOULES APRÈS UTILISATION DE L'APPAREIL.
NE DÉBRANCHEZ PAS L'APPAREIL AVEC LES MAINS MOUILLÉES.
POUR RÉDUIRE LES RISQUES D'INCENDIE OU D'ÉLECTROCUTION, N'UTILISEZ PAS CETTE HOTTE AVEC UN VARIATEUR ÉLECTRONIQUE DE VITESSE NON COMPATIBLE. ÉVITEZ D'UTILISER DES FLAMMES NUES SOUS LA HOTTE, CAR CELA PRÉSENTE UN RISQUE D'INCENDIE ET PEUT ENDOMMAGER LES FILTRES.
SURVEILLEZ ATTENTIVEMENT LES CUISSONS À L'HUILE, CAR UNE SURCHAUFFE PEUT ENTRAÎNER UN DÉPART DE FEU.
DÉBRANCHEZ IMPÉRATIVEMENT L'APPAREIL AVANT TOUTE OPÉRATION D'ENTRETIEN OU DE MAINTENANCE.
ATTENTION : CERTAINES PARTIES DE L'APPAREIL PEUVENT DEVENIR CHAUDES LORSQU'IL EST UTILISÉ EN COMBINAISON AVEC DES ÉQUIPEMENTS DE CUISSON.
AFIN DE PREVENIR DES RISQUES D'INCENDIE, DE CHOC ÉLECTRIQUE OU DE BLESSURES, VEUILLEZ RESPECTER LES CONSIGNES SUIVANTES :
A) L'INSTALLATION ET LE RACCORDEMENT ÉLECTRIQUE DOIVENT ÊTRE EFFECTUÉS EXCLUSIVEMENT PAR UN PERSONNEL QUALIFIÉ, CONFORMÉMENT AUX RÉGLEMENTATIONS LOCALES EN VIGUEUR, Y COMPRIS LES NORMES RELATIVES À LA SÉCURITÉ INCENDIE.
B) UNE VENTILATION ADÉQUATE EST INDISPENSABLE POUR GARANTIR UNE BONNE COMBUSTION ET UNE ÉVACUATION EFFICACE DES GAZ PAR LES CONDUITS (CHEMINÉE) DES APPAREILS À COMBUSTION, AFIN D'ÉVITER TOUT RETOUR DE FUMÉE.
C) LORS DE TRAVAUX DE PERÇAGE OU DE DÉCOUPE DANS LES MURS OU PLAFONDS, VEILLEZ À NE PAS ENDOMMAGER LES CÂBLES ÉLECTRIQUES OU AUTRES INSTALLATIONS DISSIMULÉES.
D) SI CET APPAREIL EST DESTINÉ À ÊTRE INSTALLÉ EN MODE EXTRACTION, IL DOIT OBLIGATOIREMENT ÊTRE RACCORDÉ VERS L'EXTÉRIEUR.
NE PAS UTILISER CET APPAREIL EN EXTÉRIEUR.
CET APPAREIL PEUT ÊTRE UTILISÉ PAR DES ENFANTS ÂGÉS DE 8 ANS OU PLUS, AINSI QUE PAR DES PERSONNES AYANT DES CAPACITÉS PHYSIQUES, SENSORIELLES OU MENTALES RÉDUITES, OU UN MANQUE D'EXPÉRIENCE, À CONDITION QU'ELLES SOIENT SURVEILLÉES OU CORRECTEMENT INFORMÉES DE SON UTILISATION SÉCURISÉE ET DES DANGERS POTENTIELS.
LES ENFANTS NE DOIVENT PAS JOUER AVEC L'APPAREIL.
LE NETTOYAGE ET L'ENTRETIEN NE DOIVENT PAS ÊTRE EFFECTUÉS SANS SURVEILLANCE PAR DES ENFANTS.
ASSUREZ UNE VENTILATION SUFFISANTE DE LA PIÈCE LORSQUE LA HOTTE EST UTILISÉE EN MÊME TEMPS QUE DES APPAREILS À GAZ OU À COMBUSTION (CETTE EXIGENCE NE S'APPLIQUE PAS EN MODE RECYCLAGE).
UN RISQUE D'INCENDIE EXISTE SI L'APPAREIL N'EST PAS NETTOYÉ CONFORMÉMENT AUX INSTRUCTIONS.
L'AIR EXTRAIT NE DOIT PAS ÊTRE REJETÉ DANS UN CONDUIT UTILISÉ POUR L'ÉVACUATION DE FUMÉES PROVENANT D'AUTRES APPAREILS À GAZ OU COMBUSTIBLES.
NE JAMAIS FLAMBER D'ALIMENTS SOUS LA HOTTE.
LE NON-RESPECT DES INSTRUCTIONS DE FIXATION (VIS ET SUPPORTS) PEUT ENTRAÎNER DES RISQUES ÉLECTRIQUES.
LORSQU'UNE HOTTE À EXTRACTION EST UTILISÉE SIMULTANÉMENT AVEC UNE CHEMINÉE OU UN AUTRE APPAREIL DE COMBUSTION, IL CONVIENT DE S'ASSURER QUE LA DÉPRESSION DANS LA PIÈCE NE DÉPASSE PAS 4 PA (4 × 10⁻⁵ BAR).
RECOMMANDATIONS ET CONSEILS
CONSIGNES D'INSTALLATION
natural_image
Line drawing of a kitchen interior with a large chimney, a cooking pot, and a cabinet (no text or symbols)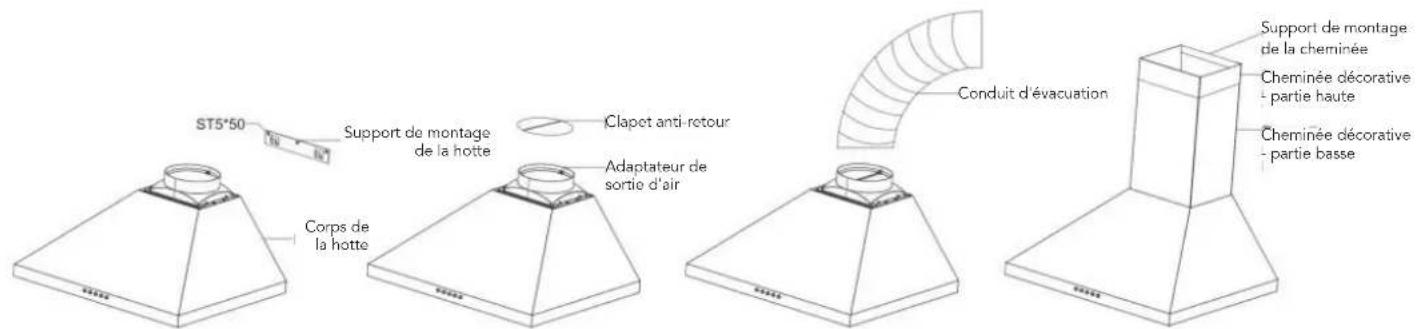
natural_image
Technical line drawing of a mechanical device with wheels and internal components (no text or symbols)natural_image
Technical line drawing of a mechanical device with wheels and a central frame (no text or symbols)UTILISATION
FONCTIONNEMENT DES COMMANDES
LUMIERE VITESSE 3 VITESSE 2
VITESSE 1 MARCHE / ARRET
natural_image
Pure electrical circuit symbols without any text or labelsREMPLACEMENT DES LAMPES LED
Type requis : LED AC 230V 50Hz, 2 × 2W MAX
Étapes :
natural_image
Two technical line drawings of a cabinet or enclosure, one with a handle and circular buttons, the other showing a mechanical component inside a frame (no text or symbols)CONFORMITÉ AVEC LA NORME ROHS
natural_image
Recycling symbol with four arrows forming a triangle (no text or labels)airlux
natural_image
Line drawing of a 3D kitchen smoke hood with conical top and flared base (no text or symbols)AHP960BK - AHP960SS - DTHP950SS - DTHP950SS - AHP760SS - AHP660BK - AHP660SS - AHP650SS - DTHP650SS
Thank you for choosing Airlux. Before using your new product, please read this manual thoroughly to ensure that you know how to operate the features and functions that your new appliance offers in a safe way.
Warning notices: Before using this product, please read this manual carefully and keep it for future reference. The design and specifications are subject to change without prior notice for product improvement. Consult with your dealer or manufacturer for details. The diagram above is just for reference. Please take the appearance of the actual product as the standard.
SOMMAIRE
WARNINGS 23
RECOMMENDATIONS AND SUGGESTIONS 25
CHARACTERISTICS 26
INSTALLATION 27
USE 31
MAINTENANCE 33
DISPOSAL AND RECYCLING 35
WARNINGS
IN CERTAIN CIRCUMSTANCES ELECTRICAL APPLIANCES MAY BE A DANGER HAZARD.
DO NOT CHECK THE STATUS OF THE FILTERS WHILE THE RANGE HOOD IS OPERATING.
DO NOT TOUCH THE LIGHT BULBS AFTER APPLIANCE USE.
DO NOT DISCONNECT THE APPLIANCE WITH WET HANDS.
TO REDUCE THE RISK OF FIRE OR ELECTRIC SHOCK, DO NOT USE THIS FAN WITH ANY SOLID- STATE
AVOID FREE FLAME, AS IT WOULD DO DAMAGE TO THE FILTERS FROM A FIRE HAZARD.
CONSTANTLY CHECK FOOD FRYING TO AVOID THAT THE OVERHEATED OIL MAY BECOME A FIRE HAZARD.
DISCONNECT THE ELECTRICAL PLUG PRIOR TO ANY MAINTENANCE OR SERVICING.
CAUTION: ACCESSIBLE PARTS OF THIS APPLIANCE MAY BECOME HOT WHEN USED WITH COOKING
APPLIANCES.
TO REDUCE THE RISK OF FIRE, ELECTRIC SHOCK, OR INJURY TO PERSONS, OBSERVE THE FOLLOWING:
A) INSTALLATION WORK AND ELECTRICAL WIRING MUST BE DONE BY QUALIFIED PERSON(S)
IN ACCORDANCE WITH ALL APPLICABLE CODES AND STANDARDS, INCLUDING FIRE-RATED CONSTRUCTION.
B) SUFFICIENT AIR IS NEEDED FOR PROPER COMBUSTION AND EXHAUSTING OF GASES. THROUGH THE FLUE (CHIMNEY) OF FUEL BURNING EQUIPMENT TO PREVENT BACK DRAFTING.
C) WHEN CUTTING OR DRILLING INTO WALL OR CEILING, DO NOT DAMAGE ELECTRICAL. WIRING AND OTHER HIDDEN UTILITIES.
D) DUCTED FANS MUST ALWAYS BE VENTED TO THE OUTDOORS.
DON'T USE THIS PRODUCT OUTDOORS.
THIS DEVICE MAY BE USED BY CHILDREN OF AT LEAST 8 YEARS OF AGE ANDBY PERSONS WITH REDUCED PHYSICAL, SENSORY OR MENTAL CAPACITIES OR
WITHOUT EXPERIENCE OR KNOWLEDGE, IF THEY ARE PROPERLY SUPERVISED OR IF THEY HAVE BEEN GIVEN INSTRUCTIONS RELATING TO THE SAFE USE OF THE DEVICE AND THE RISKS INVOLVED HAVE BEEN UNDERSTOOD. CHILDREN MUST NOT PLAY WITH THE DEVICE. CLEANING AND USER MAINTENANCE SHALL NOT BE MADE BY CHILDREN WITHOUT SUPERVISION.
THERE SHALL BE ADEQUATE VENTILATION OF THE ROOM WHEN THE RANGE HOOD IS USED AT THE SAME TIME AS APPLIANCES BURNING GAS OR OTHER FUELS (NOT APPLICABLE TO RECYCLING MODE).
THERE IS A FIRE RISK IF CLEANING IS NOT CARRIED OUT IN ACCORDANCE WITH INSTRUCTIONS.
THE EXHAUST AIR MUST NOT BE DISCHARGED INTO A FLUE WHICH IS USED FOR EXHAUSTING FUMES FROM APPLIANCES BURNING GAS OR OTHER FUELS.
DO NOT FLAMBE UNDER THE RANGE HOOD.
FAILURE TO INSTALL THE SCREWS OR FIXING DEVICE IN ACCORDANCE WITH THESE INSTRUCTIONS MAY RESULT IN ELECTRICAL HAZARDS.
WHEN AN EXHAUST-TYPE RANGE HOOD IS OPERATED SIMULTANEOUSLY WITH FIRE PLACES IT SHALL BE ENSURED THAT NO DANGEROUS NEGATIVE PRESSURE GREATER THAN 4 PA (4 × 10 - 5 BAR) CAN ARISE IN THE INSTALLATION ROOM.
RECOMMENDATIONS AND SUGGESTIONS
DIRECTIONS FOR INSTALLATION
- The manufacturer will not be held liable for any damages resulting from incorrect or improper installation.
- Please read this instruction manual before installing and using this range hood.
- Please keep this instruction manual in a safe place for future reference.
- Only a qualified and trained service technician can undertake the work of installation and servicing.
- Check that the main voltage corresponds to the one indicated on the rating plate fixed inside the hood.
- Do not connect the hood to exhaust ducts carrying combustion fumes (boilers, fireplaces, etc.)
- If the hood is used in conjunction with non-electrical appliances (e.g. gas burning appliances), a sufficient degree of ventilation must be guaranteed in the room in order to prevent the backflow of exhaust gas.
- The kitchen must have an opening directly with the open air to guarantee the entry of clean air.
- The minimum distance is 750 mm from the range hood to a gas hob and is 650 mm to an electric hob. If the installation instructions for gas hobs specify a greater distance, this must be considered.
- NOTICE: Two or more people are required to install or move this appliance. Failure to do so can cause physical injuries.
DIRECTIONS FOR USE
- The range hood has been designed only for domestic use to eliminate kitchen fumes.
- Never use the hood for purposes other than what it has been designed for.
- Never leave high naked flames under the hood when it is in operation.
- Adjust the flame intensity to direct it onto the bottom of the pan only; making sure that it does not engulf the pan sides.
- Deep fat fryer must be continuously monitored during use: overheated oil can burst into flame.
- The hood should not be used by children or persons not instructed in its correct use.
DIRECTIONS FOR MAINTENANCE
- Proper maintenance of the range hood will assure proper performance of the unit.
- Disconnect the hood from the main supply before carrying out any maintenance work.
- Clean and/or replace aluminum grease filters after specified period of time.
- Clean the hood using a damp cloth and a neutral liquid detergent.
- DISPOSAL: Do not dispose this product as unsorted municipal waste. Collection of such waste separately for special treatment is necessary.
CHARACTERISTICS
DIMENSIONS

INSTALLATION
BEFORE INSTALLING THE HOOD
The hood may be installed in the Ducting or the recalculation version.
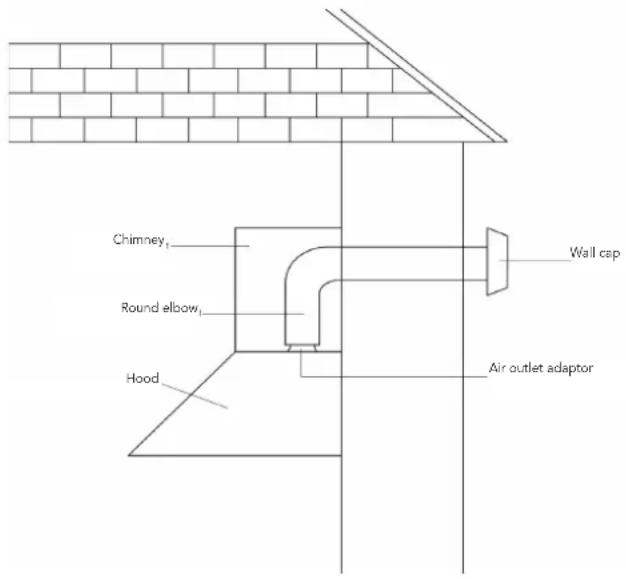
DUCTING VERSION
The hood draws cooking fumes saturated with fumes and odour through the grease filters and expels it to the outside through an outlet pipe.
Caution: To reduce the risk of file, use of metal ductwork is preferred.
Do not use flammable material to convey exhaust air.
- Decide where the ductwork will run between the hood and the outside.
- A straight, short duct run will allow the hood to perform most efficiently.
- Long duct runs, elbows, and transitions will reduce the performance of the hood. Use as few of them as possible. Larger ducting may be required for best performance with longer duct runs.
- The air must not be discharge into a flue that is used for exhausting fumes from appliances burning gas or other fuels regulations concern the discharge of air have to fulfilled.
- Install wall cap. Connect round metal ductwork to cap and work back towards hood location. Use duct tape to seal the joints between ductwork sections.
RECIRCULATION MODE
The hood draws cooking fumes saturated with fumes and odor through the grease filters and charcoal filters and returns clean air into the room. For constant efficiency, the charcoal filters must be replaced periodically.
Decide from the outset on the type of installation(recirculation or ducting). For greater efficiency, we recommend you install the hood in the ducting version.
ELECTRICAL CONNECTION
- Electrical wiring must be performed by a qualified technician, in compliance with applicable standards and regulations
- Disconnect the power supply at the main circuit breaker before any intervention.
- If the power cord is damaged, it must be replaced by the manufacturer, their after-sales service, or a similarly qualified professional to avoid any danger.
- Use only the original plug and extension cord supplied with the hood.
INSTALLATION OF THE APPLIANCE
Note 1: On stainless steel hoods, carefully remove the plastic protective film from all exterior surfaces of the hood prior to final installation.
Note 2: At least two people will be required to mount the hood.
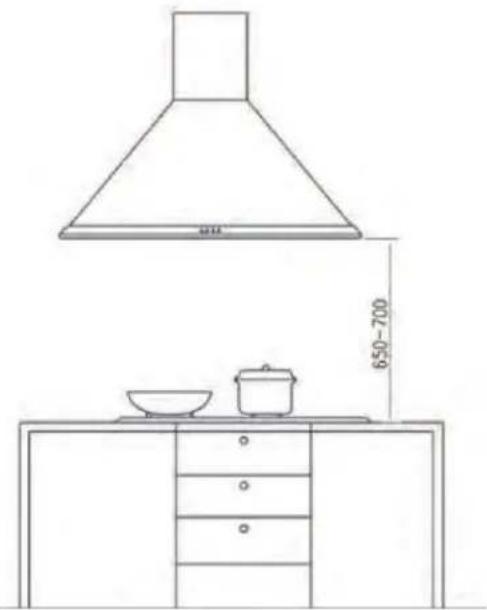
- Minimum hood distance above the cooker must not be less than 650mm.
- A maximum of 750mm above the cooker is highly recommended for best capture of cooking impurities.
- Distance cover 750mm above the cooker are at the installer's and user's discretion providing that ceiling height and flue length permit.
- Secure the hood mounting bracket to the wall using(3)ST5x50 mounting screws and dry wall anchors. Align the hood body with the hood mounting bracket, Gently lower the hood until it securely engages the bracket.
- Fix the discharge collar into the air outlet adapter.
- Attach an adequate length of 150mm round duct to the air outlet adapter.(please note the duct not included in the package).
- Carefully slide the decorative chimney top down inside the decorative chimney bottom. Carefully place the decorative chimney bottom into the recessed area of the hood body top.
- Secure the chimney mounting bracket to the wall using (2) ST4.2x 30mm mounting screws and dry wall anchors.
- Raise the decorative chimney top until its holes align with holes in the chimney mounting bracket(located on the wall).
- Level the hood and secure the chimney with 2 chimney bracket screws.
- Fix the hood body with two screws from inside of body.
natural_image
Line drawing of a kitchen interior with a large chimney, a side table with a pot and three drawers, and a dimension label (650-700) for scale.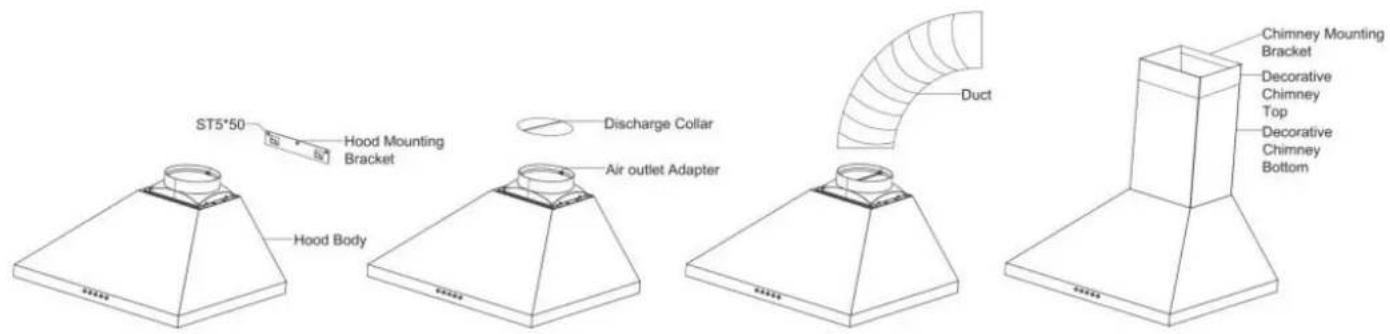
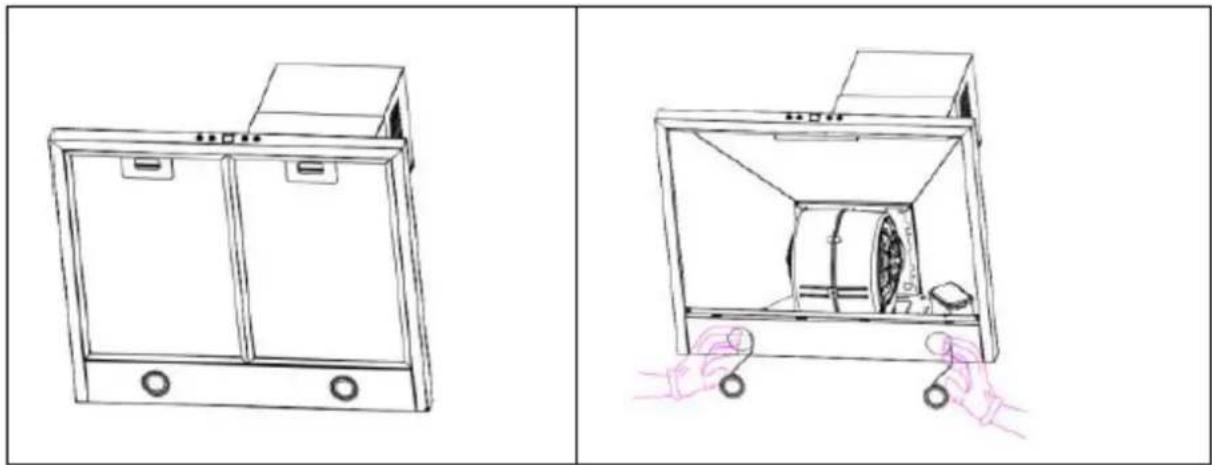
INSTALL FILTERS
- To remove the grease filter, push in on the metal latch tab. This will disengage the filer from the hood. Tit the filter downward and remove.
- To install the grease filter, align rear filter tabs with slots in the hood. Push in the metal latch tab, push filter into position and release.
Make sure the filter is securely engaged after assembly.
natural_image
Technical line drawing of a mechanical device with wheels and a door (no text or symbols)- To install the charcoal filter, and lock it until the stop click is heard.
- Install grease filter after charcoal filter is installed.
natural_image
Technical line drawing of a container or storage unit with two wheels and a central box (no text or symbols)USE
Model with push-button controls
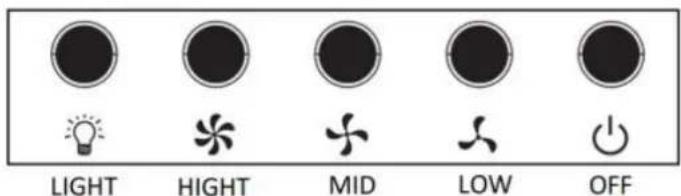
The hood is operated using the push button on the front panel.
The light switch turns the lamp s on and off. The power switch turns the range hood off.
The blower switch turns the blower on to three speed settings:
1 - LOW SPEED
2 - MEDIUM SPEED
3 - HIGH SPEED
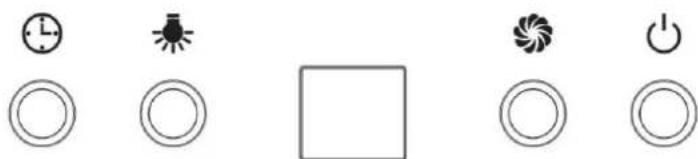
Model with electronics controls
natural_image
Pure electrical circuit symbols without any text or labelsThe hood is operated using the electronic switch on the front panel.
The power switch turns the range hood on and off.
The light switch turns the lamps on and off.
The blower switch turns the blower on to four speed settings.
LOW SPEED SHOW F1
The timer delay switch decides how long the hood stays on after switching off.
MAINTENANCE
Regular maintenance of your range hood is essential to ensure proper operation, extend the lifespan of the appliance, and maintain good air quality in your kitchen.
Grease filters collect cooking particles and must be cleaned frequently to prevent motor clogging and reduced extraction efficiency. Charcoal filters, used in recirculation mode, must be replaced periodically to ensure effective odor absorption.
Neglecting maintenance can result in increased energy consumption, excessive noise, and a higher risk of fire due to the accumulation of flammable grease.
| Filter Type Frequency Maintenance Method | ||
| Grease filter (aluminum or stainless steel) | Every 3 to 4 weeks | - Remove the filters- Clean with hot water + dish soap or baking soda- Washable by hand or in a dishwasher (low temperature recommended)- Let dry completely before reinstalling |
| Activated charcoal filter (recirculation only) | Every 3 months (or more often depending on usage) | - Not washable (unless regenerable model)- Replace when saturated (reduced odor absorption, visible grease) |
For grease filters, soaking them in hot water with white vinegar and baking soda is a very effective and natural cleaning method.
GREASE FILTERS
Grease filter are washable. And if necessary in the dishwasher. After several washes, their color may change. This discoloration does not interfere with their proper functioning and does not give rise to complaints.
Tip: A saturated filter reduces extraction efficiency and increases the risk of ignition of accumulated grease.
CHARCOAL FILTERS
This filter is not washable and cannot be regenerated. It should be replaced approximately every 3 months, or more frequently in the case of heavy usage.
Installing the charcoal filter:
- Place the charcoal filter in its housing and turn it until you hear a "click" to lock it in place.
- Then reinstall the front panel.
Tip: To ensure optimal odor filtration, do not exceed the recommended usage period.
LED REPLACEMENT
The range hood requires led lamp(AC 230V 50Hz, 2x2W MAX).
Replacement step as below:
WARNING:
Always switch off the electrical supply before carrying out any operation on the appliance.
- Remove the aluminum filter.
- Find the lamp wire terminal along the lamp wire and disconnect the lamp wire with lamp wire terminal.
- Put your thumbs on the lamp and gently push the lamp out of the light board from behind the lamp.
- Take the new lamp and install it on the light board, reconnect the lamp wire with wire terminal, install the aluminum filter.
natural_image
Two technical line drawings of a device with internal components, shown from different angles (no text or symbols)RISKS OF INADEQUATE MAINTENANCE
Failing to maintain your range hood properly can lead to several issues, including:
Grease buildup : Increased fire hazard
Reduced extraction efficiency
Higher energy consumption
Increased noise levels
Persistent unpleasant odors in the kitchen
DISPOSAL AND RECYCLING
IMPORTANT INSTRUCTIONS FOR ENVIRONMENTAL PROTECTION
This appliance complies with European Directive 2012/19/EU on Waste Electrical and Electronic Equipment (WEEE). To ensure proper disposal of this appliance, please return it to an appropriate collection point for WEEE recycling. By disposing of it correctly, you help prevent potential harm to the environment and human health that may result from improper disposal.
This symbol indicates that the product must not be disposed of with household waste. The used appliance must be returned to a designated collection point for the recycling of electrical and electronic devices. To locate these collection systems, please contact your local waste management authority or your retailer.
Each of us plays an important role in recovering and recycling old appliances. Proper disposal of used appliances helps prevent negative environmental and health impacts.

COMPLIANCE WITH ROHS STANDARD
This appliance requires specialized waste disposal and must not be disposed of with regular household waste. For detailed information on how to treat, recover, and recycle this product, please contact: Your local waste collection service, or the store where you purchased the appliance.
They can provide specific instructions for proper and environmentally friendly disposal.
COLLECTION AND RECYCLING OF PACKAGING MATERIALS
The packaging materials of this product are made from recyclable materials, in accordance with environmental regulations. Do not dispose of packaging with household waste. Take the materials to designated packaging waste collection points, as specified by local authorities.

natural_image
Recycling symbol with three chasing arrows forming a triangle (no text or labels)This appliance complies with Directive 2012/19/EU (WEEE).