
AHGG55BK - Range hood AIRLUX - Free user manual and instructions
Find the device manual for free AHGG55BK AIRLUX in PDF.


| Product type | Kitchen hood |
| Brand | Airlux |
| Model | AHGG55BK |
| Dimensions (W x D x H) | 55 x 50 x 30 cm |
| Weight | 12 kg |
| Power supply | 220-240 V, 50 Hz |
| Maximum extraction power | 650 m³/h |
| Number of speeds | 3 speeds + intensive |
| Lighting | Integrated LED |
| Control type | Touch panel |
| Recirculation function | Yes (requires charcoal filter) |
| Maximum noise level | 65 dB(A) |
| Material | Black stainless steel |
| Grease filter | Dishwasher safe |
| Charcoal filter | Replace every 3-6 months |
| Energy class | A+ |
| Warranty | 2 years |
| Repairability | Spare parts available |
Frequently Asked Questions - AHGG55BK AIRLUX
User questions about AHGG55BK AIRLUX
0 question about this device. Answer the ones you know or ask your own.
Ask a new question about this device
Download the instructions for your Range hood in PDF format for free! Find your manual AHGG55BK - AIRLUX and take your electronic device back in hand. On this page are published all the documents necessary for the use of your device. AHGG55BK by AIRLUX.
USER MANUAL AHGG55BK AIRLUX
MANUEL D'INSTRUCTION
GROUPE FILTRANT A COMMANDES GESTUELLES
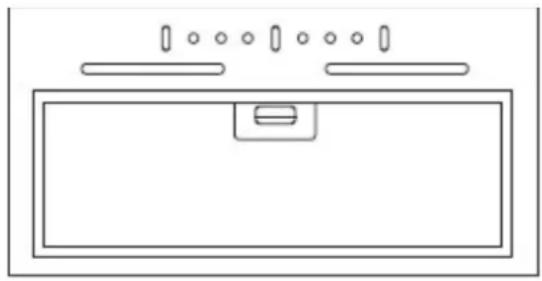
Modele AHGG55BK
ÉLIMINATION DES VIEUX APPAREILS
CONFORMÉMENT À LA DIRECTIVE EUROPÉENNE 2012/19/UE ET À LA LÉGISLATION LOCALE CONCERNANT LES PRODUITS ÉLECTRIQUES ET ÉLECTRONIQUES USAGÉS.
CET APPAREIL PORTE LE SYMBOLE DU CONTENEUR À DÉCHETS BARRÉ. CE MARQUAGE INDIQUE QUE L'APPAREIL NE DOIT PAS ÊTRE ÉLIMINÉ AVEC D'AUTRES DÉCHETS MÉNAGERS APRÈS SON UTILISATION. L'UTILISATEUR EST TENU DE LE REMETTRE AU CENTRE DE COLLECTE DES DÉCHETS QUI RECUEILLE LES PRODUITS ÉLECTRIQUES ET ÉLECTRONIQUES USAGÉS. LES COLLECTEURS, Y COMPRIS LES POINTS DE COLLECTE LOCAUX, LES MAGASINS ET LES SERVICES DES AUTORITÉS LOCALES PROPOSENT DES SYSTÈMES DE RECYCLAGE.
FILTRE À CHARBON
LAMPES
BUILT-IN HOOD WITH GESTURES CONTROL

MODEL AHGG55BK
Thanks for choosing our product, please carefully read the following important information regarding installation safety and maintenance.
Keep this information booklet accessible for further consultations.
Dear Customer,
If you follow the recommendations contained in this Instruction Manual, our appliance will give you constant high performance and will remain efficient for many years to come.
WARNING
IN CERTAIN CIRCUMSTANCES ELECTRICAL APPLIANCES MAY BE A DANGER HAZARD.
- DO NOT CHECK THE STATUS OF THE FILTERS WHILE THE RANGE HOOD IS OPERATING.
- DO NOT TOUCH THE LIGHT BULBS AFTER APPLIANCE USE.
- DO NOT DISCONNECT THE APPLIANCE WITH WET HANDS.
- AVOID FREE FLAME, AS IT IS DAMAGING FOR THE FILTERS AND A FIRE HAZARD.
- CONSTANTLY CHECK FOOD FRYING. OVERHEATED OIL MAY BECOME A FIRE HAZARD.
- DISCONNECT THE ELECTRICAL PLUG PRIOR TO ANY MAINTENANCE.
- DON'T USE THIS PRODUCT OUTDOORS.
- THIS DEVICE MAY BE USED BY CHILDREN OF AT LEAST 8 YEARS OF AGE AND BY PERSONS WITH REDUCED PHYSICAL, SENSORY OR MENTAL CAPACITIES OR WITHOUT EXPERIENCE OR KNOWLEDGE, IF THEY ARE PROPERLY SUPERVISED OR IF THEY HAVE BEEN GIVEN INSTRUCTIONS RELATING TO THE SAFE USE OF THE DEVICE AND THE RISKS INVOLVED HAVE BEEN UNDERSTOOD. CHILDREN MUST NOT PLAY WITH THE DEVICE.
- CLEANING AND USER MAINTENANCE SHALL NOT BE MADE BY CHILDREN WITHOUT SUPERVISION.
- THERE SHOULD BE ADEQUATE VENTILATION OF THE ROOM WHERE THE RANGE HOOD IS USED AT THE SAME TIME AS APPLIANCES BURNING GAS OR OTHER FUELS (NOT APPLICABLE TO RECYCLING MODE).
- THERE IS A FIRE RISK IF CLEANING IS NOT CARRIED OUT IN ACCORDANCE WITH INSTRUCTIONS.
- DO NOT BLAZE UNDER THE RANGE HOOD.
- THE EXHAUST AIR MUST NOT BE DISCHARGED INTO A FLUE WHICH IS USED FOR EXHAUSTING FUMES FROM APPLIANCES BURNING GAS OR OTHER FUELS.
CAUTION: ACCESSIBLE PARTS OF THIS APPLIANCE MAY BECOME HOT WHEN USED WITH COOKING APPLIANCES.
DISPOSAL OF OLD APPLIANCE
IN ACCORDANCE WITH EUROPEAN DIRECTIVE 2012/19/EU AND LOCAL LEGISLATION REGARDING USED ELECTRICAL AND ELECTRONIC GOODS.
THIS APPLIANCE IS MARKED WITH THE SYMBOL OF THE CROSSED-OUT WASTE CONTAINER. THIS MARKING INDICATES THAT THE APPLIANCE MUST NOT BE DISPOSED OF TOGETHER WITH OTHER HOUSEHOLD WASTE AFTER IT HAS BEEN USED.
THE USER IS OBLIGED TO HAND IT OVER TO WASTE COLLECTION CENTER COLLECTING USED ELECTRICAL AND ELECTRONIC GOODS. THE COLLECTORS,
INCLUDING LOCAL COLLECTION POINTS, SHOPS AND LOCAL AUTHORITY DEPARTMENTS PROVIDE RECYCLING SCHEMES.
PROPER HANDLING OF USED ELECTRICAL AND ELECTRONIC GOODS HELPS AVOID ENVIRONMENTAL AND HEALTH HAZARDS RESULTING FROM THE PRESENCE OF DANGEROUS COMPONENTS AND THE INAPPROPRIATE STORAGE AND PROCESSING OF SUCH GOODS.
DIRECTION FOR INSTALLATION
- The manufacturer will not be held liable for any damages resulting from incorrect or improper installation.
- Please read this instruction manual before installing and using this range hood.
- Please keep this instruction manual in a safe place for future reference.
- Only a qualified and trained service technician can undertake the work of installation and servicing.
- Check that the main voltage corresponds to the one indicated on the rating plate fixed inside the hood.
- Do not connect the hood to exhaust ducts carrying combustion fumes (boilers, fireplaces, etc.)
- If the hood is used in conjunction with non-electrical appliances (e. g. gas burning appliances), a sufficient degree of ventilation must be guaranteed in the room in order to prevent the backflow of exhaust gas.
- The kitchen must have an opening directly with the open air to guarantee the entry of clean air.
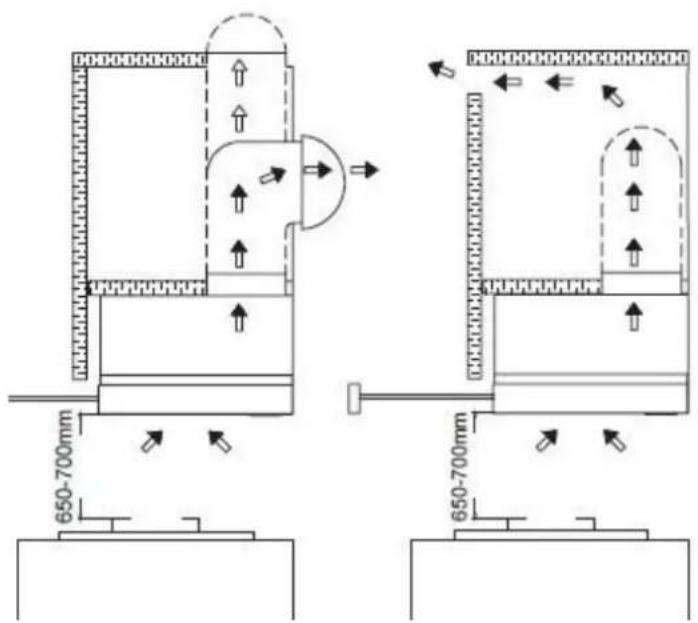
- The minimum distance is 700mm from the range hood to a gas hob and is 650mm to an electric hob. If the installation instructions for gas hobs specify a greater distance, this must be considered.
NOTICE: Two or more people are required to install or move this appliance. Failure to do so can cause physical injuries.
DIRECTIONS FOR USE
- The range hood has been designed only for domestic use to eliminate kitchen fumes.
- Never use the hood for purposes other than what it has been designed for.
- Never leave high naked flames under the hood when it is in operation.
- Adjust the flame intensity to direct it onto the bottom of the pan only; making sure that it does not engulf the pan sides.
- Deep fat fryer must be continuously monitored during use: overheated oil can burst into flame.
- The hood should not be used by children or persons not instructed in its correct use.
DIRECTIONS FOR MAINTENANCE
- Proper maintenance of the range hood will assure proper performance of the unit.
- Disconnect the hood from the main supply before carrying out any maintenance work.
- Clean and/or replace aluminum grease filters after specified period of time.
- Clean the hood using a damp cloth and a neutral liquid detergent.
DISPOSAL: Do not dispose this product as unsorted municipal waste. Collection of such waste separately for special treatment is necessary.
CHARACTERISTICS
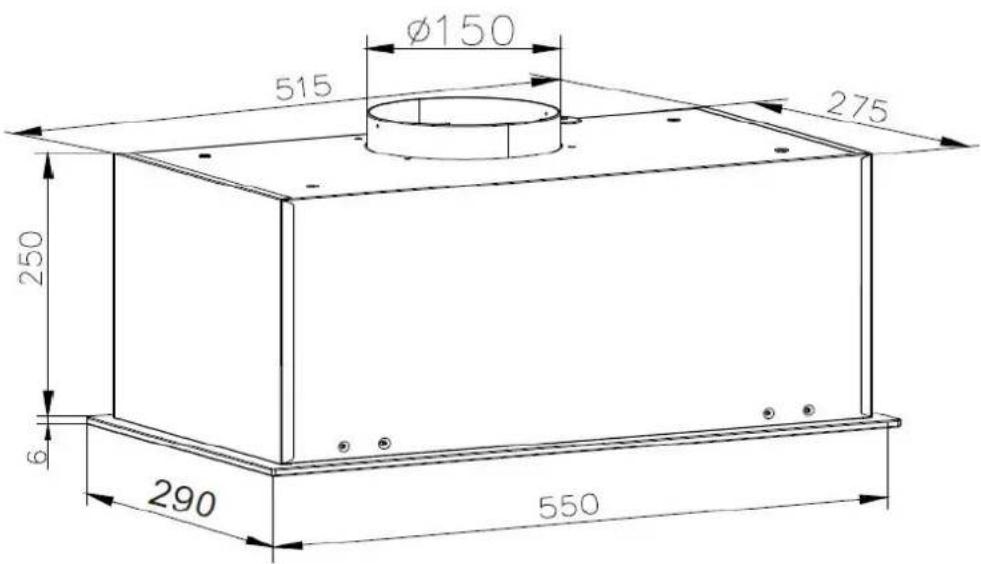
Dimensions (mm)
Ducting or circulation
The hood draws the cooking fumes saturated with fumes and odor, through the grease filters and expels it to the outside through an outlet pipe, or circulates it back into the kitchen through carbon filters.
Caution: To reduce the risk of fire, the use of metal ductwork is preferred. Do not use flammable material to convey exhaust air.
1 - Decide where the ductwork will run between the hood and the outside.
2 - A straight, short duct run will allow the hood to perform most efficiently.
3 - Long duct runs, elbows, and transitions will reduce the performance of the hood.
Use as few of them as possible. Larger ducting may be required for best performance with longer duct runs.
4 - The air must not be discharged into a flue that is used for exhausting fumes from appliances burning gas or other fuels Regulations concerning the discharge of air must be followed.
Check with the local authority and building codes for exhaust ducting requirements.
5 - Install wall ventilation cap. Connect round ducting pipe to ventilation cap and work back towards. hood location.
Electrical Connection
Electrical wiring must be done by a qualified person(s) in accordance with all applicable codes and standards.
Turn off electrical power at service entrance before wiring.
If the supply cord is damaged, it must be replaced by the manufacturer, its service agent or similarly qualified persons in order to avoid a hazard.
Do not use the plug and an extension cord other than the ones initially supplied with the hood.
INSTALLATION
Before beginning installation, to better handle the hood, we advise removing the aluminum filter.
Before fixing, the outlet exhaust duct for air evacuation to the outside must be installed.
Use an outlet exhaust duct with:
- Minimum indispensable length;
- Minimum possible bends (maximum angle of bend: 90° );
- Certified material (according to local, building & fire regulations); and as smooth as possible inside.
It is also advisable to avoid any drastic changes in duct cross-section (recommended diameter:
150mm).
Drill the hole in the wall for the air outlet (160 mm diameter) referring to drawings here on the right where the measurements for the various possibilities are indicated.
Decide on the position of the hole for the air outlet:
The hole must be in the ceiling, according to your requirements, but must be in vertical line with your
hood. Bear in mind that the hood can expel air through the top air outlet only.
Fitting under cabinet
- Before fixing the hood to cabinet, drill a hole of 160mm diameter in the wall unit.
- In any case, check the position of the power outlet considers where the power cable will run, since a hole might have to be made in the cabinet to accommodate it.
- Drill 4 mounting holes with 4 in cabinet board, respecting the distance indicated..
- Lift the hood up and tighten with four M4x35mm screws from the top of the cabinet board.
- Make the electrical connection.

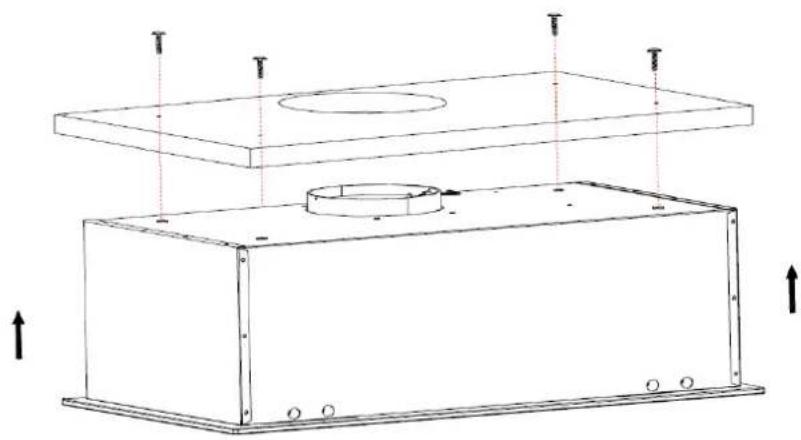
Installation is now complete.
Notice:
- Exhaust air must not be discharged into a flue which is used for exhausting fumes from appliance burning gas or other fuels.
- If the instructions for installation for the gas hob specify a greater distance than 650mm, this must be considered.
- The regulations concerning the discharge of exhaust air must be followed.
USE
Opérations
The hood is operated using the touch control switch and gesture control switch.
![graph TD A["2"] --> B["1"] B --> C["4"] B --> D["5"] B --> E["6"] F["1"] --> G["3"] G --> H["8"] G --> I["7"] J["2"] --> K["1"] K --> L["7"]](/content/2026/07/1448712/images/49ce7351b5363324542446c05b895bb47c222e695a19001460ca215ef828bb72.jpg)
This appliance features gesture control:
1- Light on/off gesture control sensor
2- Fan speed gesture control sensors
The control panel is equipped with touch controls.
Control functions are described below:
3- Off-Timer sensor
4- Low speed - Use this speed when cooking a little food with hardly any fumes.
5- Medium speed - Use this speed when cooking multiple dishes at the same time with moderate number of fumes.
6- High speed- Use this speed when frying or grilling, with large number of fumes.
7- Gesture control on/off
8- Light control sensor
When you plug in the appliance to power, it will emit a short beep and all sensors will light for a moment.
Touch sensor 1, 2 or 3 to start the fan.
Touch the sensor corresponding to current fan speed to turn off the fan. When you plug in the appliance to power, it will emit a short beep and all sensors will light for a moment.
Touch sensor 1, 2 or 3 to start the fan. Touch the sensor corresponding to current fan speed to turn off the fan.
Touch to turn the lighting on.
Touch 🙏 again to turn the lighting off. The lighting operates independently of fan.
Off-timer
Use Off-Timer to turn off the hood after a specified time.
Use Off-Timer to filter the fumes out of the air after cooking.
The fan will turn off after 15 minutes. Touch 🔒 to activate the Off-Timer at any time.
Sensor flashes. Touch 🔒 to deactivate the Off-Timer at any time and ⏰ will stop flashing. This function does not turn off lighting.
Gesture control
Touch 📋 to turn gesture control on/off.
You can use gestures to control the fan speed and lighting. When gesture control is active, you can also control the appliance using the touch sensors.
Gesture control works correctly when you move your open hand about 3 to 10 cm from the surface of the control panel.
Note: When controlling the fan speed, the hand motion must cover both motion sensors (Figure 4, item 2, or the hand must be stationary within the light control sensor (Figure 4, item 1).
If activating a certain function (such as fan speed 3) requires multiple hand gestures, reposition your hand for another gesture away from the control panel to avoid triggering the motion sensors).
Hand movements must not be too fast.
Preferably, a single gesture should take about 1 second.

To turn on the fan or increase fan speed, move your hand from left to right several times.
With hand movement, current fan speed sensor will light up.
To turn off the fan or reduce fan speed, move your hand from right to left several times until sensor 1 lights up.
Move your hand one more time and the fan will turn off (gesture control will still be active).
To turn the lighting on or off, position your hand near the centre of the control panel (under the sensor labelled 1) for about 2 seconds. The symbol 🙏 will light up.
GREASE FILTERS
The grease filters should be cleaned frequently (every two months of operation, or more frequently for heavy use). Use a warm detergent solution. Grease filters are washable.
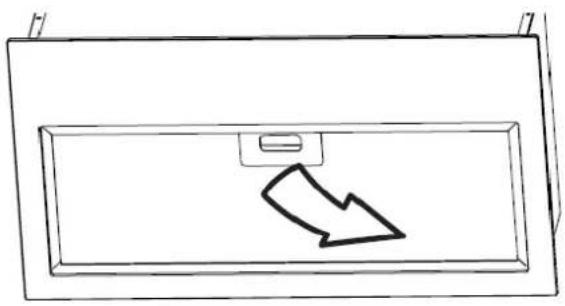
CHARCOAL FILTER
This filter is not washable, cannot be regenerated, and should be replaced approximately every 3 months of operation, or more frequently in the case of heavy usage. To install the charcoal filter, lock it until the stop slick is heard. Install the face plate after charcoal filter is installed.

LAMPS
This range hood requires 1 LED strip (AC 230V, 5W Max).
BEDIENUNGSANLEITUNG
DER DUNSTABZUGSHAUBE

MODELL-Nr AHGG55BK
AKTIVKOHLEFILTER
LAMPEN
Modelnummer AHGG55BK

De installatie is nu voltooid.
Notitie:
HOUTSKOOLFILTER
LAMPEN
Deze afzuigkap vereist 1 LED-strip (AC 230V, 5W Max).
airlux


- MANUEL D'INSTRUCTION
- GROUPE FILTRANT A COMMANDES GESTUELLES
- ÉLIMINATION DES VIEUX APPAREILS
- FILTRE À CHARBON
- LAMPES
- BUILT-IN HOOD WITH GESTURES CONTROL
- MODEL AHGG55BK
- WARNING
- DISPOSAL OF OLD APPLIANCE
- DIRECTION FOR INSTALLATION
- DIRECTIONS FOR USE
- DIRECTIONS FOR MAINTENANCE
- CHARACTERISTICS
- DUCTING OR CIRCULATION
- ELECTRICAL CONNECTION
- TURN OFF ELECTRICAL POWER AT SERVICE ENTRANCE BEFORE WIRING
- INSTALLATION
- 150MM)
- FITTING UNDER CABINET
- INSTALLATION IS NOW COMPLETE
- NOTICE
- USE
- OPÉRATIONS
- OFF-TIMER
- GESTURE CONTROL
- GREASE FILTERS
- CHARCOAL FILTER
- LAMPS
- BEDIENUNGSANLEITUNG
- DER DUNSTABZUGSHAUBE
- AKTIVKOHLEFILTER
- LAMPEN
- DE INSTALLATIE IS NU VOLTOOID
- NOTITIE
- HOUTSKOOLFILTER
Brand : AIRLUX
Model : AHGG55BK
Category : Range hood