TSA6003 - Refrigerator Teesa - Free user manual and instructions
Find the device manual for free TSA6003 Teesa in PDF.

| Brand | Teesa |
| Model | TSA6003 |
| Type | Compressor refrigerator / freezer |
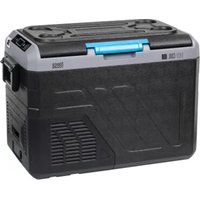
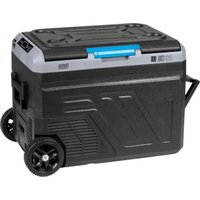
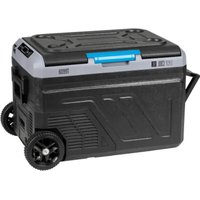
| Capacity | 40 litres |
| Temperature range | +24°C to -22°C |
| Climate class | 10°C to 43°C (5N/N/5T/T) |
| Refrigerant | R1234yf (25 g) |
| Noise level | 40 dB |
| Power supply | DC 12/24V (4.2/2.1 A) or AC 100-240V via AC adapter |
| Power consumption | 60 W |
| Weight | 17 kg |
| Dimensions (W x D x H) | 679 x 406 x 440 mm |
| Internal dimensions (W x D x H) | 509 x 322 x 329 mm |
| Charging ports | USB-A and USB-C (5V / 2.1 A / 10 W) |
| Main features | LED screen, touch panel, auto-lock, ECO mode, battery protection, LED interior light, cup holders, integrated bottle opener, carrying handles |
| Maintenance and cleaning | Regular manual defrosting; cleaning with a soft cloth and baking soda; do not use abrasive detergents |
| Safety | 3-level battery protection (L/M/H); automatic cut-off; fuse integrated in cigarette lighter plug |
| Included accessories | AC adapter, DC power cable |
Frequently Asked Questions - TSA6003 Teesa
User questions about TSA6003 Teesa
0 question about this device. Answer the ones you know or ask your own.
Ask a new question about this device
Download the instructions for your Refrigerator in PDF format for free! Find your manual TSA6003 - Teesa and take your electronic device back in hand. On this page are published all the documents necessary for the use of your device. TSA6003 by Teesa.
USER MANUAL TSA6003 Teesa
| CS | DE | EN | FR | GR |
| Držáky nápojů | Getränkehalterung | Drink holders | Porte-gobelets | Θήκες ποτηριών |
| Odnímatelný kryt | Abnehmbarer Deckel | Removable lid | Couvercle amovíble | Αραίρούμενο καπάκι |
| Ovládací panel | Bedienfeld | Control panel | Panneau de commande | Πίνακας ελέγχου |
| Otvírák na lahve | Flaschenoffner | Bottle opener | Décapsuleur | Ανοιχτήρι μπουκαλίων |
| Držák | Handgriff | Handle | Poignée | Λαβή |
| Kryt prostoru pio baterie (baterie se prodává samostatiné) | Batteriefachabdeckung (Batterie sepant erhältlich) | Battery compartment cover ibattery sold separately) | Couvercle de la batterie (batterie vendue séparément) | Καλυμμα μπαταρίας (η μπαταρία πωλείται ξχυμικταί) |
| DC napájeci zásuvka | DC-Buchse | DC socket | Prise d'alimentation CC | Πριζα ρεύματος DC |
| Větraci otvery | Luftungsschlitze | Ventilation slots | Trous de ventilation | Οπές εξαρισμού |
| HU NL PL RO SK | ||||
| Pohártartók | Bekerhouders | Uchwyty na napoje | Suport pentru bătuturi Držiaky na nápoje | |
| Levehető fedél Afneembaar deksel | Zdejmowana pokrywa | Capac detașabili Odnímatelný kryt | ||
| Vezerlőpanel | Bedicningspancel | Panel sterowania Panu | u de control Ovládací panel | |
| Palacknyitó Flesopener | Otvieracz do butelek | Deschizátor de sticle Otvárač na flaše | ||
| Fogantyú Henel Uchwyt Mäner Rukovat' | ||||
| Akkumulátortartó fedél (az akkumulátor külön kapható) | Batterijklepje (batterij apart verkrijgbaar) | Pokrywa gniazda baterii (bateria sprzedawana oddzielnie) | Capac compartiment baterie (bateria se vinde separat) | Kryt priehradky na batériu (bateria sa predava samostatne) |
| Egyenáramú tápcsatlakozó | DC-aansluiting | Gniazdo zasilania DC | Mufá DC | Zásuvka jednosmemého prúdu |
| Szelőzőnyllások | Ventilatiegaten | Otvory wentylacyjne | Fanta de ventilatie | Vetracle otvory |
| CS | DE | EN | FR | GR | |
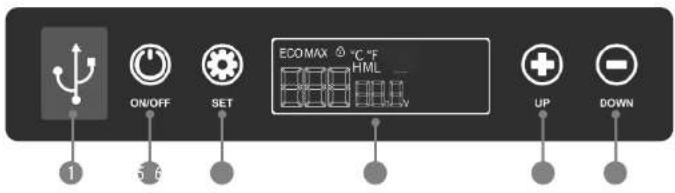
| 1 | Nabijeci porty USB-Aa USB-C (pod krytkou) | USB-A-, USB-CLadebuchsen (unter dem Stecker) | USB-A, USB-Charging sockets(under the plug) | Ports de charge USB-A et USB-C (sous le capuchon) | θύρες φόρτιας USB-A και USB-C (κάτω από το κοπάκ) |
| 2 | Tlačitko ON/OFF | Taste EIN/AUS (ON/OFF) | ON/OFF button | Bouton marche/arrêt | Koujuni ON/OFF |
| 3 | Tlačitko SET | Taste EINSTELLEN [SET] | SET button | Bouton de réglage | Koujuni SET |
| 4 | Dispiej | Anzeige | Display | Amchage | Ošovn |
| 5 | Zvýšení teploty | Temperatur erhöhen | Increase temperature | Augmentation de la température | AóÉrgnø θερμοκρασίας |
| 6 | Snížení teploty | Temperaturen verringern | Decrease temperatures | Diminution de la température | Meiwanø θερμοκρασίας |
| HU NL PL RO SK | ||||
| USB-A és USB-C tõlkõportok (a kupak alatt) | USB-A- en USB-C- oplaadpoorten (under de dop) | Gniazda ladowania USB-A, USB-C (pod zatyczka) | Muña de Incárcare USB-A, USB-C (sub mufa) | Nabijacie porty USB-A, USB-C (pod krytkou) |
| BE/KI gomb AAN/UIT-knop Przyclisk ON/OFF Buton ON/OFF Tlažidlo ZAP/VYP | ||||
| BEÁLLÍTÁS gomb SET-knop Przyclisk SET | Buton SET Tlažidlo NASTAVIT | |||
| Kijelző | Display | Wyswietlacz | Afńaj | Displej |
| Hőmérséklet-növelés | Temperatuurverhoging | Zwiększenie temperatury | Creşterea temperaturi | Zvýšenie teploty |
| Hőmérséklet-czökkentés | Temperatuurverlaging | Zmniejszenie temperatury | Reducerea temperaturi | Zniżenie teploty |

| CS | DE | EN | FR | GR | |
| 1 | Provozni rezim | Betriebsart | Operation mode | Mode de fonctionnement | Тропос Литору西亚с |
| 2 | Zámek ovládachho panelu | Bedienfeldsparre | Control panel lock | Verrouillage du panneau de commande | Клелёйма Півока Екёгюсу |
| 3 | Jednotka teploty | Temperatur-Einheit | Temperature unit | Unité de température | Мовáša Фермукрахіас |
| 4 | Vnitřníteplota levé komory | Temperatur der Kammer | Chamber temperature | Température intérieure de la chambrà gauche | Еолутрікн Фермукрахіа Адостероу Голáрусу |
| 5 | Nastavení úrovně ochrany baterie | Einstellung des Spannungswachters | Voltage monitor setting | Régage du niveau de protection de la batterie | Рόθμοη Εμπεδου Пьострахіас Мгигатаріос |
| 6 | Napětí | Aktuelle Spannung | Current voltage | Tension actuelle | Тасян Прůмус |
| HU | NL | PL | RO | SK | |
| 1 | Uzemmód | Bedrijfsmodus | Tryb pracy | Mod de functionare | Prevádzkevý ržim |
| 2 | Vezérlópult zárolása | Vergrendeling bedieningspaneel | Blokada panelu sterowania | Blocarea panoului de control | Zámok ovládacieho panela |
| 3 | Hőmérséklet mértékegysége | Temperatuureenheid | Jednostka temperature | Unitate de temperatura | Jednotka teploty |
| 4 | Bal kamra belső hőmérséklete | Binnentemperatuur linker kamer | Temperatura wewnątrz komory | Temperatura camere | Teplota ve vnútri komory |
| 5 | Akkumulátor védelmi szintjének beáilitása | Instelling batterijbeschermings niveau | Ustawenie poziomu ochrony akumulatora | Setarea monitorului de tensiune | Nastavenie úrovne ochrany batérie |
| 6 | Aktuális feszultség | Huidige spanning | Aktualne napięcie | Tensiune cuientă | Průdové napatie |
natural_image
Line drawing of a printer front panel with control buttons and a small icon (no text or symbols)TIPY
natural_image
Line drawing of a washing machine control panel with buttons and a central touchscreen display (no text or symbols)Thank you for purchasing TEESA appliance. Please read this operation instruction carefully before use, and keep it for future use.
Distributor does not take responsibility for damages caused by inappropriate handling and use of the product.
Read the instruction manual carefully before first use and keep it for future reference.
Producer disclaims liability for:
- faulty installation or connection
- mechanical damages
- damages caused by inappropriate use and handling, disregarding this instruction manual
SAFETY INSTRUCTIONSSAFETY INSTRUCTIONS
In order to reduce the injuries or damages, follow basic safety precautions applied when using any electrical device, including the following:
- Warning: Do not touch exposed cables.
- Warning: Do not use fridge if you suspect any connections could be wet.
- When using the fridge in the vehicle or boat, please make sure the circuit being used is fused.
• Make sure the source voltage is correct with the voltage data on the technical data label. - Do not place any electrical devices inside the refrigerator as moisture could harm these devices!
- Prevent the fans from being stuck. The fans being stuck will heat the engine and cause fire.
- Don't disassemble nor attempt to repair the appliance yourself.
- Turn off and disconnect the device from power supply before cleaning and maintenance.
- This appliance is not intended for use by persons (including children) with reduced physical, sensory or mental capabilities, or lack of experience and knowledge, unless they have been given supervision or instruction concerning use of the appliance by a person responsible for their safety. Children should be supervised to ensure that they do not play with the appliance.
NOTES ON USING THE PRODUCT
- Your refrigerator requires good ventilation, especially around the vents of the refrigerator; allow a gap of at least 200 mm around the vents and 100 mm around the rest of the unit.
- Avoid humidity: Humidity inside the appliance can form frost and impair cooling.
- Do not allow frost to build up. Never submerge the unit in any liquid.
- Avoid placing your refrigerator near heat sources or in direct sunlight. This helps the refrigerator to work more efficiently and keep the contents cool.
- Place the refrigerator on a flat and stable surface. When using the fridge in a vehicle, please use a fastening device to secure it.
- Clean the interior of the device with a soft, slightly damp cloth before first use.
• To obtain optimized cooling effect, we suggest putting in pre-chilled foods and drinks. - The device has a setup memory, i.e. the settings are retained even after power off.
- During transport, the slope must be less than 45^ . Handle the device with care.
• The freezer must be stationary for more than 24 hours before use.
ENERGY SAVING TIPS
- Select a well-ventilated place and keep the fridge away from heat or direct sunlight;
- Cool the hot food before putting into the fridge;
- Reduce the times and duration of opening the fridge cover;
• Defrost regularly; - Set optimum temperature.
POWER: The electronic control module controls the compressor motor and has the function of a three stage battery protection. When the input voltage drops below the minimum, the compressor will cut out; when the voltage comes back up to the cut-in value, the compressor will restart automatically.
BATTERY PROTECTION: The compressor requires over 10.4 V (12 V System) or 23.0 V (24 V System) to operate. If the voltage drops below this, the fridge will stop running.
24 25 Owner's manual
Owner's manual
reesa
CONNECTION
1. Using the DC cable
NOTICE! Danger of damage!
- For protection of the device, the DC cable supplied includes a fuse inside the plug. Do not remove the fuse from the DC plug.
-
Only use the DC cable supplied.
-
Plug the DC cable into the device's DC socket.
- Connect the DC cable to the vehicle power outlet.
2. Using the AC adapter
NOTICE! Danger of damage!
- Only use the AC adapter supplied.
- Plug the AC adapter into the device's DC socket.
- Connect the AC adapter to the AC power outlet.
OPERATION
- Make sure the appliance is plugged in. Press and hold the ON/OFF button for about 2 seconds to turn on the fridge. The LED display will light up.
- CONTROL PANEL LOCK: After 30 seconds of no operation, the control panel locks automatically (the 📋 icon appears on the display). Press and hold the ⚙ button for about 2 seconds to unlock the control panel (the 📋 icon disappears from the display).
- TEMPERATURE SETTING: press the ⚠ button to increase temperature and ⏱ button to decrease temperature.
Note: The temperature range is -22^ to +24^ . When the temperature inside the chamber reaches the set temperature, the compressor will stop working.
- TEMPERATURE UNIT SELECTION: Press the 📊 button three times until temperature unit starts to flash on the display; then use the + or - button to change between the temperature units: °C / °F.
- OPERATION MODE SELECTION: Press the 🎨 button once until the mode starts to flash on the display; then use the + or - button to change between the modes: MAX / ECO. CAUTION! In ECO mode power consumption is reduced, but it takes longer to reach the set temperature.
- VOLTAGE MONITOR SETTING: Press the 📧 button twice until the voltage monitor setting starts to flash; then use the ✕ or — button to change the setting: H/M/L. The three voltage monitor setting are as follows:
| Power supply | Status of battery protection | L (LOW MODE) | M (MIDDLE MODE) | H (HIGH MODE) |
| DC 12 V | Cutting off voltage | 9.6 V | 10.4 V | 11.1 V |
| Restarting voltage | 11.2 V | 11.7 V | 12.4 V | |
| DC 24 V | Cutting off voltage | 21.4 V | 22.8 V | 24.3 V |
| Restarting voltage | 23.0 V | 24.2 V | 25.7 V |
It is recommended to set M setting (default setting) for the vehicle, whereas L mode is suitable to be used with an external battery.
- Press and hold the ON/OFF button for about 2 seconds to turn off the fridge.
CHARGING DEVICES
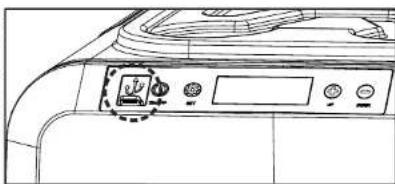
The appliance is equipped with USB-A and USB-C sockets which can be used to charge external devices. To access the sockets, lift the rubber plug. Remember to close the plug after using the sockets. For charging use the cable that comes with the external device you want to charge.
natural_image
Line drawing of a car front panel with control buttons and a circular icon on the door (no text or symbols)TIPS AND SUGGESTIONS
- Fresh and frozen foods should not be stored right beside each other in the cabinet. Doing so may cause fresh food to freeze or spoil.
- When the appliance is being set at 0°C or lower temperatures, do not store glass bottles or liquids such as milk, juices or soft drink in the unit as there may freeze and shatter, leak or burst.
- Items such as fruit and vegetables should be stored closer to the top of the cabinet as this area is normally slightly warmer. This will reduce the risk of spoiling and ensures that damage is not caused by being crushed by heavier items.
- Frequent door opening will allow warm air to enter the cabinet. Keep the number of times you open the door to a minimum where possible.
- When located in the rear of a car or trailer, it is recommended that the appliance be kept away from direct sunlight to reduce the risk of increased heat it should also be provided with suitable ventilation to guarantee efficient power consumption and performance. You must remember that when a vehicle is parked in the sun that on a day where the ambient temperature is +30°C, the interior of the vehicle can reach +55°C.
DEFROSTING
After the freezer has been operating for a certain period of time, frost may form on the surface, which reduces the cooling effect and increases energy consumption. In this case, defrosting is necessary.
NOTICE! Danger of damage! Never use hard or pointed tools to remove ice or to loosen objects which have frozen in the freezer.
Follow the below steps to defrost the freezer:
- Disconnect the power.
- Open the door.
- Remove the food from the freezer.
- Carefully remove the ice and frost. Wipe off the remaining ice and water or drain excess water through the drain located at the bottom of the chamber.
- Place the food back in the freezer and plug the power supply back in.
CLEANING AND MAINTENANCE
• Turn off and unplug the appliance before cleaning.
- Clean the appliance inside and outside with a soft, damp cloth regularly. In case of stubborn stains, use sodium bicarbonate dissolved in lukewarm water to clean the unit.
- Never use abrasive products, detergents or soap. Do not use abrasive cleaning agents or hard objects during cleaning as these can damage the refrigerator.
• After washing, rinse with clean water and dry carefully. Do not leave the refrigerator off with food inside or lid closed.
- Never clean the appliance under running water.
- When storing your fridge for a long period of time, do not fully close the lid. This will prevent mildew and odors.
TROUBLESHOOTING
1. Refrigerator doesn't work:
- Check the power source (maybe the voltage is too high or low).
- Check the power cables and all connections from the power source to fridge.
- Check the power source and the fridge is on or not.
- Ensure the battery is on or not (when with the external battery).
2. Poor refrigeration performance:
- Ensure the lids are closed properly.
- Ensure the power source has sufficient voltage.
• There is poor ventilation around the fridge. - Put too much food inside the fridge.
• Temperature of the food put inside the fridge is too high. - Incorrect temperature setting.
• The ambient temperature is too high.
| Error code Problem | Solution | |
| E1 | Low voltage to fridge | DC - increase the voltage of DC power source/check the connection/check the voltage monitor setting |
| AC - replace the defective 240 V AC adapter | ||
| E2 | Condenser fan fault | Contact the authorized service point for repair |
| E3 | Compressor over pressure | Disconnect the fridge for 20 minutes then restart |
| E4 | Compressor minimum speed fault | Contact the authorized service point for repair |
| E5 | Over temperature for compressor and control unit | Disconnect the fridge for 20 minutes then restart |
| E6 | NTC/ temperature sensor failure | Contact the authorized service point for repair |
ERRORS
CAUTION! The voltage is different of different vehicles output, if E1 is displayed, the stage of the voltage can be lowered by one stage, for example, H to M, L / M to L.
SPECIFICATION
| TSA6001 TSA6003 | |||
| LED display Yes | |||
| Touch control panel Yes | |||
| Control panel auto lock Yes | |||
| Eco mode Yes | |||
| Car battery protection Yes | |||
| One cooling chamber Yes | |||
| LED interior lights Yes | |||
| Drink holders at the top of the lid Yes | |||
| Two side lid opening Yes | |||
| Removable lid | Yes | ||
| Carrying handles on both sides | Yes | ||
| Built-in bottle opener | Yes | ||
| Bottom drain hole | Yes | ||
| TECHNICAL DATA | |||
| Capacity | 32 l | 40 l | |
| Type | compressor freezer | ||
| Cooling performance | +24°C ~ -22°C | ||
| Climate class 10°C ~ 43°C (5N/N/ST/T) | |||
| Insulation | C5H10 (Cyclopentane) | ||
| Refrigerant | R1234yf (23 g) | R1234yf (25 g) | |
| Noise 36 dB | 40 dB | ||
| Protection class | II | ||
| Ports | USB-A, USB-C (charging external devices) | ||
| Charging voltage | 5 V / 2.1 A (10 W) | ||
| In set | AC adapter, DC power cord | ||
| POWER SUPPLY | |||
| Power consumption | 55 W | 60 W | |
| Voltage | DC 12/24V | 4,2/2,1 A | ||
| AC/DC adapter | Input | 100 ~ 240 V; 50/60 Hz | |
| Output | 14,5 V / 4,1 A | ||
| Output power | 60 W | 87 W | |
| Average efficiency during operation | 75% | ||
| Efficiency at light load (10%) | 80% | ||
| No-load power consumption | 55 W | 60 W | |
| PHYSICAL PARAMETERS | |||
| Weight | 13,6 kg | 17 kg | |
| Product dimensions (length x width x height) | 664 x 346 x 455 mm | 679 x 406 x 440 mm | |
| Chamber dimensions (length x width x height) | 485 x 260 x 348 mm | 509 x 322 x 329 mm | |
| AC cord length | 243 cm | ||
| DC cord length | 200 cm | ||

English
Correct Disposal of This Product
(Waste Electrical & Electronic Equipment)

(Aplicable in the European Union and other European countries with separate collection systems) This marking shown on the product or its literature, indicates that it should not be disposed with other household wastes at the end of its working life. To prevent possible harm to the environment or human health from uncontrolled waste disposal, please separate this from other types of wastes and recycle it responsibly to promote the sustainable reuse of material resources. Household users should contact either the retailer where they purchased this product, or their local government office, for details of where and how they can take this item for environmentally safe recycling. Business users should contact their supplier and check the terms and conditions of the purchase contract. This product should not be mixed with other commercial wastes for disposal