
VX1 - Blender Vitamix - Free user manual and instructions
Find the device manual for free VX1 Vitamix in PDF.

| Product Type | Blender |
| Brand | Vitamix |
| Model | VX1 |
| Voltage | 120 V |
| Frequency | 50-60 Hz |
| Current | 12 A |
| Power | 1440 W |
| Height (with 2.0 L container) | 50.0 cm |
| Width | 19.7 cm |
| Depth | 24.1 cm |
| Main container capacity | 2.0 L (64 oz) |
| Compatible containers | Classic 2.0 L (VM0135), Compact 2.0 L (VM0161, VM0184), 1.4 L (VM0148, VM0190), 0.9 L (VM0137), and dry grains and stainless steel versions |
| Functions | Variable speed (1-10), Pulse, Self-cleaning, On/Off, Auto shut-off |
| Control type | Control panel with variable speed dial and buttons |
| Safety | Lid lock, motor stop, overheat protection, status indicator |
| Motor base maintenance | Wipe with a damp cloth, never immerse |
| Container maintenance | Self-cleaning or variable speed (hot water + soap), not dishwasher safe |
| Warranty | 5 years for material and workmanship defects |
| Usage | Household use only |
Frequently Asked Questions - VX1 Vitamix
User questions about VX1 Vitamix
0 question about this device. Answer the ones you know or ask your own.
Ask a new question about this device
Download the instructions for your Blender in PDF format for free! Find your manual VX1 - Vitamix and take your electronic device back in hand. On this page are published all the documents necessary for the use of your device. VX1 by Vitamix.
USER MANUAL VX1 Vitamix
| Warning and Caution | |
| NEVER touch moving parts.Keep hands and utensils out of the container. | |
| Electric Shock Hazard | |
| High temperatures exist when blending hot liquids; spray or escaping steam may cause burns. | |
| Unplug while not in use, before cleaning the motor base or centering pad, or touching parts that move | |
| ALWAYS operate with the lid and lid plug in place. | |
| Read and understand the owner's manual. | |
| NEVER immerse the power cord, power plug, or motor base in water or any other liquid. | |
| Parts will become hot with extended use.NEVER touch surfaces that may be hot, including the motor base socket or the drive spline after use. | |
| | | O | On / Off |
| ▷ | □ | Start / Stop |
| Pulse | |
| Self-Cleaning |
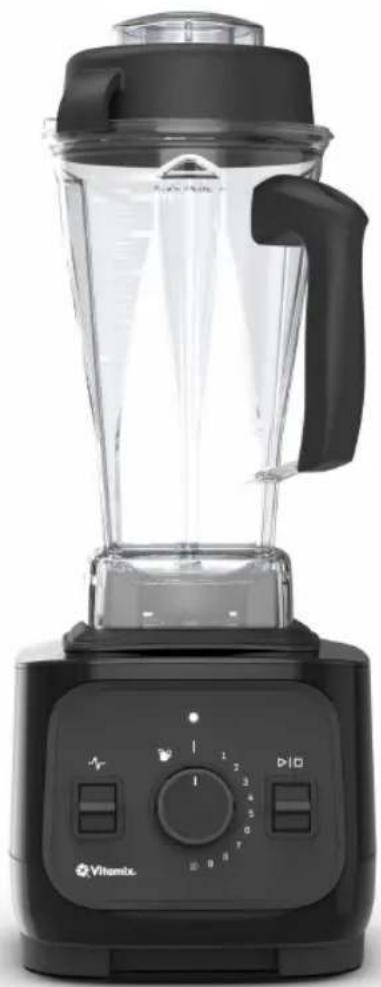
natural_image
Black and white photo of a Vitamin� blender with clear glass interior and control panel (no visible text or symbols)©2025 Vita-Mix Corporation. No part of this publication may be reproduced or transmitted in any form or by any means, or stored in a database or retrieval system, without the written permission of Vita-Mix Corporation.
SPECIFICATIONS
Voltage: 120 V Height: with 64 oz / 2.0 L container on base:
19.6 in / 50.0 cm
Frequency: 50 Hz - 60 Hz Depth: 9.5 in / 24.1 cm
Current: 12 A, 1440 W Width: 7.75 in / 19.7 cm

Vitamix
vitamix.com
U.S. Patent: vitamix.com/patents

WARNING - READ ALL INSTRUCTIONS

Carefully read all instructions before operating the appliance for the first time.
ALWAYS use grounded outlets.
NEVER remove the ground.
NEVER use an adapter.
NEVER use an extension cord.
NEVER plug the appliance into a timer or an outlet controlled by a switch.


ALWAYS turn off AND unplug the appliance when not in use and before assembling, disassembling, moving, cleaning, and storing.
NEVER immerse the power cord, power plug, or motor base in water or any other liquid.
If the appliance becomes submerged, unplug immediately.
Failure to follow instructions can cause death or electrical shock.
This product is intended for HOUSEHOLD USE ONLY and is not intended to be used for commercial purposes.
- THE FAILURE TO FOLLOW ANY OF THE IMPORTANT SAFEGUARDS AND IMPORTANT INSTRUCTIONS FOR SAFE USE IS A MISUSE OF YOUR VITAMIX APPLIANCE THAT CAN VOID YOUR WARRANTY AND CREATE THE RISK OF SERIOUS INJURY.
- The instructions appearing in this manual cannot cover every possible condition and situation that may occur. Common sense and caution must be practiced when operating and maintaining any appliance.
- Strictly follow the care and cleaning instructions provided in this manual.
- NEVER use the appliance for anything other than its intended use.
- This appliance is not intended for use by persons (including children) with reduced physical, sensory or mental capabilities, or lack of experience or knowledge, unless they have been given supervision or instruction concerning use of the appliance by a person responsible for their safety.
- Children should be supervised to ensure that they do not play with the appliance. Keep the cord out of reach from children.
- Remove and discard packaging materials, the power plug cover, and promotional labels before using the appliance for the first time.
- NEVER unplug the appliance by pulling on the cord. To unplug the appliance, grasp the power plug and pull from the outlet.
-
NEVER come in contact with moving parts, especially the blending blades. The blending blades are very sharp. Handle carefully and keep out of reach of children.
-
NEVER operate the appliance with loose, nicked, or damaged blending blades. Check the blending blades prior to each use and replace if damaged.
- NEVER tighten the acorn nut (on the top of the blade assembly). If loose, replace the blade assembly immediately.
- NEVER place the appliance on or near a hot gas or electric burner, or where it could touch any other source of heat.
- NEVER modify the plug in any way. If the appliance will not operate, unplug the appliance and reset the household electrical system circuit protector. If the circuit protector continues to trip, unplug the appliance from the outlet and contact a qualified electrician.
- NEVER allow the power cord to hang over the edge of a table or counter, touch hot surfaces, or become knotted.
- ALWAYS ensure the appliance is completely and properly assembled before operation.
- NEVER use attachments other than those provided with the appliance or offered separately from Vitamix. The use of attachments, including preserving jars, not sold or recommended by Vitamix may cause fire, electric shock, or injury and will void the warranty.
- Alteration or modification of any part of the appliance, including the use of any part or parts that are not genuine authorized Vitamix parts, may cause fire, electric shock, or injury and will void your warranty.
IMPORTANT SAFEGUARDS
- ALWAYS ensure the appliance is unplugged from the power outlet before cleaning the motor base or centering pad, or touching parts that move.
- NEVER fill the container above the marked "MAXIMUM CAPACITY" line to avoid risk of injury caused by damage to the lid and container.
- When blending hot liquids or ingredients in the container, use caution; spray or escaping steam may cause burns.
- ALWAYS begin processing on the lowest speed setting, Variable Speed 1. Keep hands and other exposed skin away from the lid opening to prevent possible burns.
- Extreme caution must be used when moving an appliance or container filled with hot oil or other hot liquids; spray or escaping steam may cause burns.
- NEVER touch surfaces that may be hot.
- NEVER remove ingredients from the appliance during operation. Ensure the motor has completely stopped and the container removed from the motor base before removing any ingredients.
- If food becomes lodged around the blending blade, remove the container from the motor base, and use a spatula to dislodge the food. NEVER use fingers as the blending blade is sharp.
- Keep hands, hair, clothing, and utensils away from all moving parts during operation to reduce the risk of severe injury to persons and/or damage to the appliance. A spatula may be used, but only when the container has been removed from the motor base.
- If the blend is not processing when blending dry, thick, or heavy mixtures, stop operation, remove the container from the motor base, and use a spatula to dislodge the food. NEVER use fingers as the blending blade is sharp. Allow the motor to cool for 1 minute before turning the appliance back on.
- NEVER allow the blending blade to soak in water.
- NEVER use outdoors or on moving vehicles or boats.
- NEVER leave the working area when the appliance is in use.
-
NEVER leave any foreign object, such as spoons, forks, knives, or the lid plug in the container as this will damage the blades and other components when starting the appliance and may cause injury.
-
If during use, the sound of the appliance changes or if a hard or foreign object comes into contact with the blades, NEVER serve the food being made with the appliance.
- NEVER expose the container to temperatures or ingredients over 210^ F ( 99^ C).
- ALWAYS operate the appliance with the lid and lid plug firmly in place. NEVER remove the 2-part lid while the blades are rotating. Only remove the lid plug to add ingredients and to use the tamper.
- NEVER operate the appliance without the centering pad installed properly underneath the container.
- Ensure the container is flush with the centering pad to ensure the drive spline is engaged with the drive socket before operating.
- NEVER place a blade assembly on the motor base unless assembled to the Vitamix container to reduce the risk of injury.
- NEVER attempt to place a container on an operating motor base or operate a motor base without a container properly in place.
- When making nut butters or oil-based foods, do not process for more than one minute after the mixture starts to circulate in the container. Processing for longer periods can cause overheating.
- Regularly inspect the power cord, power plug, and the appliance for any damage. NEVER operate if damaged in any way or after the appliance malfunctions. Immediately cease use of the appliance and visit www.vitamix.com or call Vitamix Household Technical Support at 1.800.848.2649 or 1.440.235.4840 or email service@vitamix.com at once for examination, repair, replacement, or adjustment. If purchased outside the U.S.A. or Canada, contact your local Vitamix dealer.
- Any repair, servicing, or replacement of parts must be performed by Vitamix or a Vitamix authorized service representative.
SAVE THESE INSTRUCTIONS
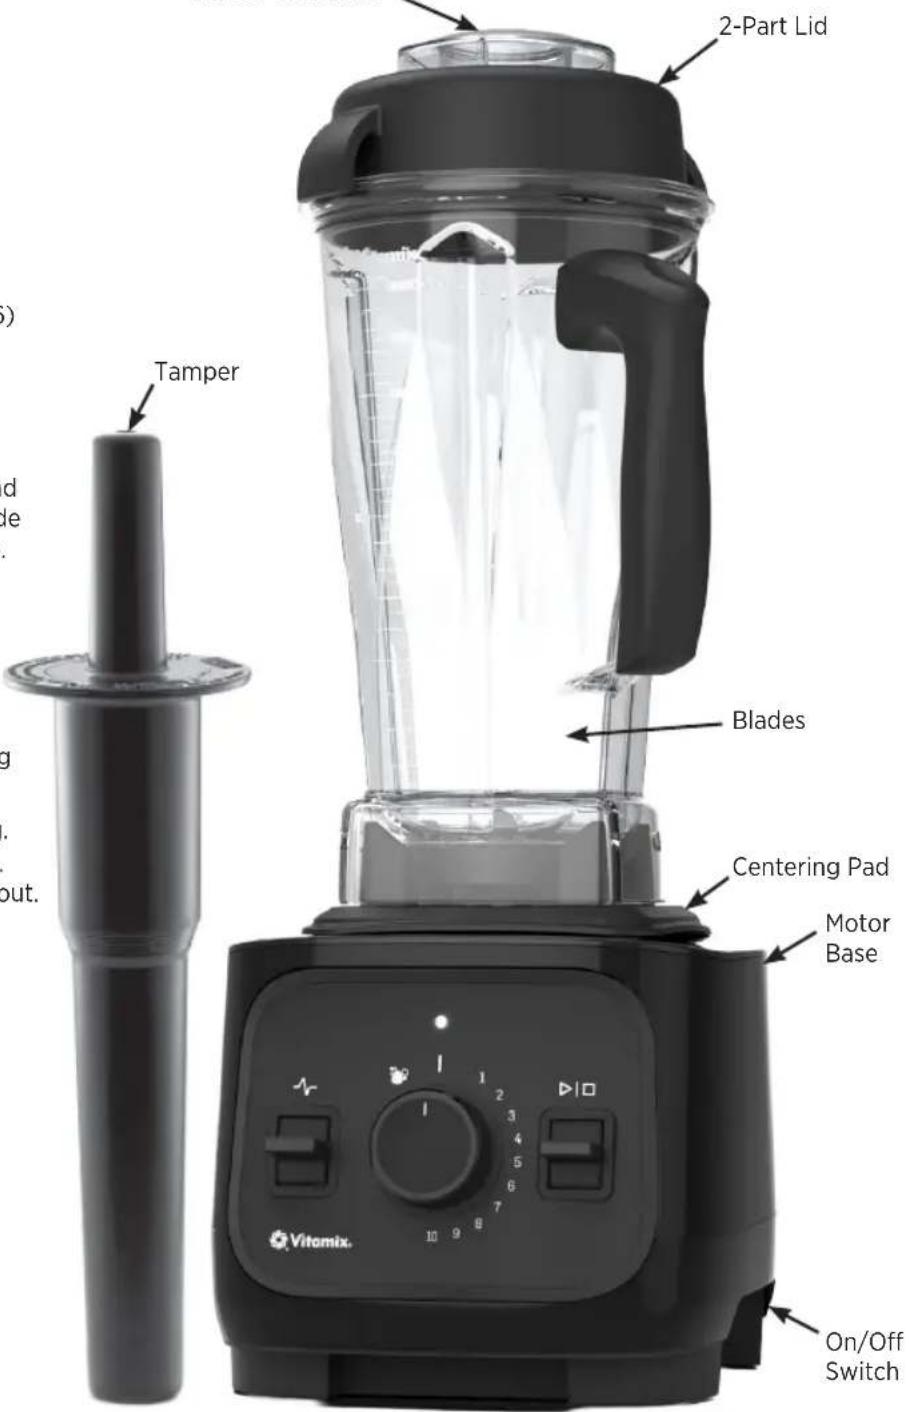
PARTS AND FEATURES
Container, Lid, Lid Plug, and Tamper
The following Vitamix containers will work with the VX1 motor base:
• 64 oz (2.0 L) Classic Container (VM0135)
- 64 oz (2.0 L) Low Profile Containers (VM0161, VM0184)
• 48 oz (1.4 L) Containers (VM0148, VM0190)
• 48 oz (1.4 L) Aer™ Disc Container (VM0190)
• 48 oz (1.4 L) Dry Grains Container (VM0190)
• 48 oz (1.4 L) Stainless Steel Container (VM0216)
• 32 oz (0.9 L) Container (VM0137)
• 32 oz (0.9 L) Dry Grains Container (VM0137)
• Personal Cup Adapter (VM0223)
- Vitamix 12-Cup Food Processor Attachment and SELF-DETECT® Blending Cup and Bowl Blade Base will not work with the VX1 motor base. Visit vitamix.com for details.
- NEVER operate the appliance without checking to ensure the lid is securely locked in place.
• ALWAYS leave the lid on when operating the appliance and remove ONLY the lid plug to use the tamper or to add ingredients.
- Insert the lid plug through the lid plug opening. Lock the plug in place by turning clockwise. To remove, turn counter-clockwise and lift out.
Motor Base
- On/Off Switch – The On/Off Switch controls power to the appliance.
- If the blender will not start, check to ensure the appliance is plugged in and the On/Off Switch is ON.
64 oz (2.0 L)
Classic Container

CAUTION
Rotating Blades Can Cause Damage. Lids and tampers are NOT interchangeable between different container styles, types, and sizes. Use the tamper that was supplied with your appliance.
Lids and tampers are NOT interchangeable between different container styles, types, and sizes. Use the tamper and lid supplied with the appliance.
Verifying a Tamper Can be Used with Your Container
ALWAYS leave the lid on when operating the appliance and remove ONLY the lid plug to use the tamper or to add ingredients. If a tamper came with your appliance at purchase, it is the correct tamper to use. Before using a tamper during blending, verify the tamper can be used with the container, using these steps:
The 64 oz (2.0 L) Classic Container uses a tamper which is approximately 12.5 in (32 cm) long.
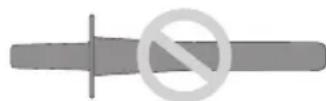
A non-step tamper MUST NOT be used with any Vitamix container.
- Place the lid on an empty container.
- Remove the lid plug and insert the tamper through the lid plug opening. The tamper should fit easily into the opening. It should NEVER come into contact with the blade assembly no matter where you move the tamper inside the container.
- Visually inspect: IF THE TAMPER TOUCHES THE BLADES AT ANY ANGLE, NEVER USE THE TAMPER WITH YOUR CONTAINER.
- If you do not have the correct tamper for your container, contact Vitamix Household Customer Service at 1.800.848.2649 or 1.440.235.4840.
OTHER VITAMIX CONTAINERS AND TAMPERS
The 64 oz (2.0 L) Short (or Low Profile) Container uses a tamper which is approximately 11 in (28 cm) long.
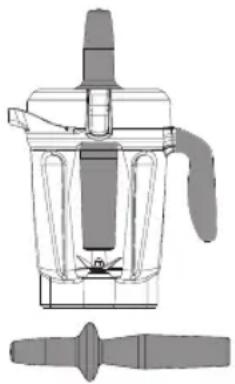
natural_image
Technical line drawing of a mechanical device with handle and base (no text or symbols)The 48 oz (1.4 L) and 32 oz (0.9 L) containers use a tamper which is approximately 9.8 in (25 cm) long.
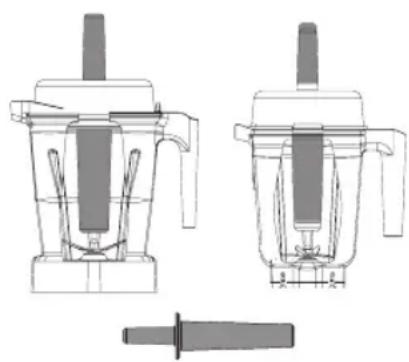
natural_image
Technical line drawing of a blender with two views and a handle, no text or symbols presentPARTS AND FEATURES
Control Panel - Provides multiple user features:
- Status Indicator
- Illuminates when power is on.
- Dims in Standby mode after 30 seconds of inactivity indicating the motor base is ready to blend.
- Flashes continuously if the motor is overheated. Unplug and allow to cool for 20-45 minutes.
- Pulse Switch ( ) - Rotates the blade at the speed selected on the Variable Speed Dial and is located on the left side of the control panel.
- Start/Stop Switch ( ) - Stops the blender at any time by pressing the switch and is located on the right side of the control panel.
- Variable Speed Dial
- Variable Speed – Provides manual speed control from Variable 1 (slowest) to 10 (highest) and is located in the center of the control panel.
- Standby | - Pauses the appliance and has it ready to start the next recipe. Standby is located at the top position on the Variable Speed Dial.
- Self-Cleaning Runs the cleaning cycle after water and dish soap have been added to the container and the lid and lid plug are in place. See page 8 for cleaning procedures.
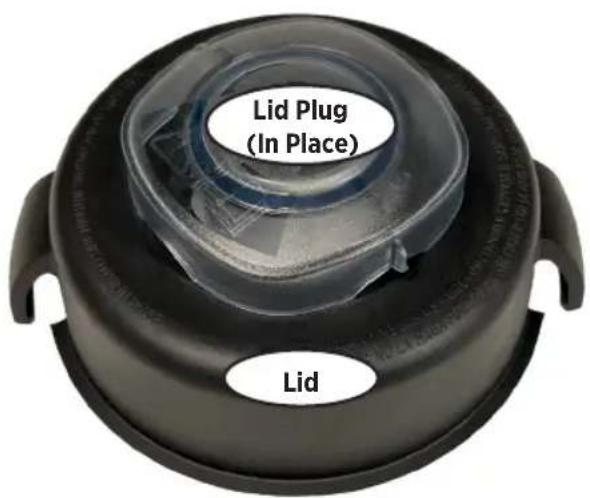
- Lid with Lid Plug – Keeps the ingredients inside the container during blending. ALWAYS leave the lid on when operating the appliance and remove ONLY the lid plug to use the tamper or to add ingredients.

WARNING

When blending hot liquids or ingredients in the container, use caution; spray or escaping steam may cause burns. NEVER fill the container above the marked “MAXIMUM CAPACITY” line to avoid risk of injury caused by damage to the lid and container.
ALWAYS begin processing on the lowest speed setting, Variable Speed 1. Keep hands and other exposed skin away from the lid opening to prevent possible burns.
Parts will become hot with extended use. NEVER touch surfaces that may be hot, including the motor base socket or the drive spline after use.
- Press the On/Off Switch (see page 4 for location) to the ON (I) position.
-
Load the container according to the recipe or the Ingredient Load Order.
-
Place liquids and soft foods in the container first and solid items last.
- The use of thawed or partially thawed ingredients for optimal processing is recommended.
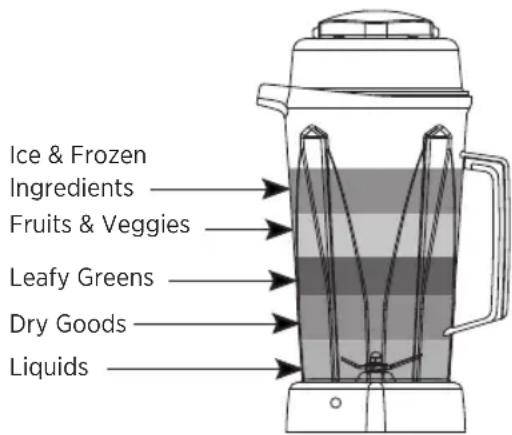
Ingredient Load Order
IMPORTANT! ALWAYS leave the lid on when operating the appliance and remove ONLY the lid plug to use the tamper or to add ingredients.
-
Place the lid onto the container:
-
Push down on the lid until the two tabs snap onto the lip of the container.
-
Insert the lid plug and turn clockwise to lock it into the lid.
-
Place the container with lid onto the motor base.
NOTE: The appliance will run without a lid on the container, but a lid MUST be attached to contain the ingredients during processing.
- TO USE VARIABLE SPEED:
a. Turn the dial clockwise to Variable Speed 1.
b. Press the Start/Stop Switch. The blades will begin to turn and the timer will count the minutes and seconds the blend has been processing.
c. Rotate the dial between Variable Speed 1 and 10 during the blending cycle to increase or decrease the speed of the blades.
d. At the end of the blend, rotate the dial counterclockwise to Standby | or press the Start/Stop Switch ▶|□ to stop the appliance.
- If the mixture stops circulating:
a. Remove the lid plug by turning it counter-clockwise, insert the tamper through the lid plug opening, and stir until the mixture 'burps'.
b. If this does not work, press the On/Off Switch to stop the motor.
c. Remove the container from the motor base, remove the lid, and use a rubber spatula to press the air bubble away from the blades.
d. Consider adding more liquid if your recipes are too thick or reduce the recipe volume to improve processing.
e. Replace the lid and lid plug and return the container to the motor base and continue blending.
- After blending, wait until the blades stop completely before removing the lid or removing the container from the motor base.
- Use a Vitamix Under Blade Scraper (sold separately) or spatula to remove salsa, jelly, jam, peanut butter, and other ingredients from the container.
BLENDING
Tips to prevent 'overheating' the appliance:
- Process only Vitamix recipes when learning to use the appliance.
- NEVER process recipes at lower or higher speeds than recommended.
- NEVER process recipes for longer than recommended. Over-processed blends can result in the incorrect recipe texture
- NEVER use the tamper for more than 30 consecutive seconds during blending.
- Use the tamper to process thicker mixtures and keep ingredients moving around and through the blades.
- Consider adding more liquid if your recipes are too thick or reduce the recipe volume to improve processing.
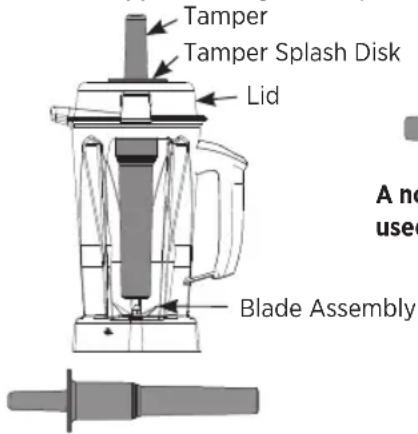
USING THE TAMPER
IMPORTANT! The splash disk (near the top of the tamper) and lid prevent the tamper from hitting the blades when the lid is secured properly in the locked position.
- The container should not be more than two-thirds full when the tamper is used during blending.
- If the food does not circulate, the blender may have trapped an air bubble. Carefully remove the lid plug, while making sure the lid stays firmly in place. Release the air bubble by inserting the tamper through the lid plug opening.
- Holding the tamper straight down may not help the ingredients circulate. If necessary, point the tamper towards the sides or corners of the container. NEVER try to force the tamper deeper into the container.
CARE AND CLEANING

WARNING


To Avoid Injury and Damage
Turn off and unplug the appliance before cleaning to avoid inadvertent activation.
To avoid product damage, NEVER use unapproved cleaning methods inconsistent with these instructions.
NEVER tighten the acorn nut (on the top of the blade assembly). If loose, replace the blade assembly immediately.
The container is not dishwasher safe.
Electrical Shock Hazard
ALWAYS unplug before cleaning the motor base or when not in use.
NEVER immerse the power cord, power plug, or motor base in water or any other liquid.
Failure to follow instructions can cause death or electrical shock.
BEFORE FIRST USE
- NEVER attempt to remove the retainer nut or blade assembly from the container. The container is designed to be completely cleanable without removing the retainer nut and blade assembly. The cleaning and sanitizing procedures will ensure a complete and thorough cleaning of the container and components.
-
If the container is damaged, DO NOT USE IT. Contact Vitamix Household Technical Support IMMEDIATELY for assistance.
-
Wipe the motor base with a damp, soft cloth or sponge rinsed in a mild solution of liquid dish soap and warm water and dry with a soft cloth.
- Wash the container, lid, lid plug, and tamper with warm, soapy water. Rinse all parts and wipe dry with a dry, soft cloth.
- Place the appliance on a counter that is level, dry, and clean.
- Plug the appliance into a grounded, 3-prong outlet.
CARE AND CLEANING
MOTOR BASE CLEANING
- Turn off and unplug the appliance and remove the container from the motor base.
- Wash the outside surface with a damp, soft cloth or sponge rinsed in a mild solution of liquid dish soap and warm water.
NOTE: NEVER immerse the power cord, power plug, or motor base in water or any other liquid.
- The centering pad can be removed for more thorough cleaning and is dishwasher safe or can be hand-washed in warm, soapy water.
- Immediately dry all surfaces and polish with a soft cloth.
TAMPER CLEANING
The tamper is dishwasher safe or can be hand-washed in warm, soapy water. Rinse clean under running water and then dry.
CONTAINER CLEANING - SELF-CLEANING
NOTE: The container is not dishwasher safe.
- Fill the container half full with warm water and add a couple of drops of dish soap.
- Snap or push the complete 2-part lid into the locked position.
- Rotate the knob counter-clockwise to the Self-Cleaning icon.
- The processing time will display for the Self-Cleaning program.
- Press the Start/Stop Switch.
- The program will stop automatically when complete.
- Rinse and drain all pieces.

CONTAINER CLEANING - VARIABLE SPEED
- Fill the container half full with warm water and add a couple of drops of dish soap.
- Snap or push the complete 2-part lid into the locked position.
- Press the Start/Stop Switch to turn on the appliance and slowly increase to Variable Speed 10.
- Run the appliance for 30 to 60 seconds.
- Rotate the Variable Speed Dial to Standby dr to Variable Speed 1 and press the Start/Stop Switch to turn off the appliance.
- Rinse and drain all pieces.
CONTAINER SANITIZING - BLEACH
- First perform the "Container Cleaning" instructions.
- Then repeat the "Container Cleaning" instructions but add 1.5 tsp (7.4 mL) of liquid bleach to 16 oz (473 mL) of water.
- Allow the mixture to stand in the container for an additional 1.5 minutes.
- Pour the bleach mixture out. Allow container to air dry. DO NOT rinse after sanitizing. If desired, rinse immediately before next use.
CONTAINER SANITIZING - VINEGAR
- First perform the "Container Cleaning" instructions.
- Then repeat the "Container Cleaning" instructions but use 16 oz (473 mL) of vinegar for every 16 oz (473 mL) of water.
- Allow the mixture to stand in the container for an additional 3 full minutes. Total contact time of the vinegar solution in the container should equal 5 minutes.
- Pour the vinegar solution out of the container over the inside surface of the 2-part lid.
- Repeat the sanitizing procedure a second time (Steps 2 through 4).
- Allow the container and lid to air dry. DO NOT rinse after sanitizing. If desired, rinse immediately before next use.
WARRANTY AND SERVICE
5-Year Limited Warranty
1. Product Registration.
Vita-Mix Corporation ("Vitamix") strongly encourages you to register your purchase by completing and returning the product registration card that came with this product if one was included. You can register at vitamix.com/warranty; or by calling Vitamix at 1.800.848.2649 or 1.440.235.4840.
2. Who Can Seek Warranty Coverage.
This Warranty is extended by Vitamix to the original owner of this product when purchased from Vitamix or its authorized retailers who are subject to Vitamix's quality controls. Please note that because Vitamix is unable to oversee or control the quality of its products sold by unauthorized sellers, this Warranty is not available in the United States of America or Canada for products purchased from unauthorized sellers. This Warranty is not transferable.
3. What is Covered.
Vitamix warrants that this product will be free from defective materials or workmanship when this product is used and maintained in accordance with the owner's manual. If in Vitamix's sole discretion it deems a product defective in materials or workmanship, Vitamix will at no charge to you and in Vitamix's sole discretion (1) repair the product, using new or refurbished replacement parts, or (2) exchange the product with the same or similar product that is new or refurbished from new or serviceable used parts, and is at least functionally equivalent to the original product.
A replacement or repaired product assumes the remaining warranty period of the original product. When a product or part is replaced or repaired, any replacement product or part becomes your property and any parts that are replaced or repaired become Vitamix's property. Any incorrect or non-Vitamix product sent to Vitamix will, at Vitamix's sole discretion, be destroyed or return to you at your cost.
This Warranty extends for a period of 5 years measured from the early of the date of purchase or date of delivery, as permitted by law.
4. What is Not Covered.
This Warranty does not apply to: products used commercially, rental, or in non-household applications; products with altered or missing serial numbers. This Warranty does not cover cosmetic changes that do not affect performance, such as discoloration, food build up, or scratches. This Warranty does not cover damage or product failure caused by misuse, negligent handling, failure to follow the instructions in the owner's manual, which includes failing to perform maintenance and cleaning of your product. This Warranty does not cover damage to property due to spills, improper installation, inadequate operating environments, or other factors beyond Vitamix's control. Removal of the data label containing serial number information will void your warranty.
Using third party parts will not void this Warranty. However, any parts that are used and/or installed on your product that are not genuine Vitamix parts are not covered by this Warranty. This Warranty does not cover damage or failure that results from the use and/or installation of parts on your product that are not genuine Vitamix parts or parts authorized by Vitamix. This Warranty does not cover damage or defect caused by service or repair performed by any person or entity other than Vitamix or an authorized Vitamix service provider. Vitamix will not be responsible for the cost of any unauthorized warranty repairs. This Warranty does not cover damage resulting from use of the product outside of the country where it was sold and built to be used, and Warranty service may be restricted to the country where Vitamix or its authorized distributors originally sold the Vitamix product. This warranty does not cover parts which require regular replacement to ensure the proper functioning of your product or products offered as special promotions with purchase, which include filters, seals, etc.
THIS WARRANTY GIVES YOU SPECIFIC LEGAL RIGHTS, AND YOU MAY ALSO HAVE OTHER RIGHTS WHICH VARY FROM STATE TO STATE, JURISDICTION TO JURISDICTION OR COUNTRY TO COUNTRY. ALL EXPRESS AND IMPLIED WARRANTIES FOR THE PRODUCT, INCLUDING BUT NOT LIMITED TO ANY IMPLIED WARRANTIES OF MERCHANTABILITY AND FITNESS FOR A PARTICULAR PURPOSE, ARE LIMITED IN TIME TO THE WARRANTY PERIOD OF THIS WARRANTY. SOME STATES, JURISDICTIONS OR COUNTRIES DO NOT ALLOW THE EXCLUSION OF CERTAIN IMPLIED WARRANTIES OR CONDITIONS, OR LIMITATIONS ON HOW LONG AN IMPLIED WARRANTY OR CONDITION LASTS, SO THIS LIMITATION MAY NOT APPLY TO YOU. VITAMIX'S RESPONSIBILITY FOR MALFUNCTION AND DEFECTS ARE LIMITED TO REPAIR OR REPLACEMENT AS SET FORTH IN THIS WARRANTY STATEMENT. THE MAXIMUM LIABILITY FOR WHICH VITAMIX MAY BE RESPONSIBLE WILL BE NO MORE THAN THE AMOUNT YOU PAID FOR THE PRODUCT THAT IS THE SUBJECT OF THE CLAIM.
NO EMPLOYEE OR REPRESENTATIVE OF VITAMIX OR ANY THIRD PARTY IS AUTHORIZED TO MODIFY OR MAKE ANY ADDITIONS TO THIS WARRANTY. NO OTHER WARRANTIES GIVEN BY ANY PERSON, INCLUDING A DEALER OR RETAILER, WITH RESPECT TO ANY PRODUCT SHALL BIND VITAMIX. IN NO EVENT, WHETHER BASED ON CONTRACT, INDEMNITY, WARRANTY, TORT (INCLUDING NEGLIGENCE), STRICT LIABILITY OR OTHERWISE, SHALL VITAMIX BE LIABLE FOR ANY SPECIAL, INDIRECT, INCIDENTAL OR CONSEQUENTIAL DAMAGES, INCLUDING, WITHOUT LIMITATION, LOSS OF PROFIT OR REVENUE. SOME STATES, JURISDICTIONS OR COUNTRIES DO NOT ALLOW THE EXCLUSION OR LIMITATION OF SPECIAL, INDIRECT, INCIDENTAL OR CONSEQUENTIAL DAMAGES, SO THE ABOVE LIMITATION OR EXCLUSION MAY NOT APPLY TO YOU.
5. How to Obtain Return Authorization Under This Warranty.
In the event that you need service or repair, please contact Vitamix Customer Service at service@vitamix.com, 1.800.848.2649 or 1.440.235.4840. You will only be asked to provide a date of purchase and proof of purchase for any blender that has not been registered with Vitamix. Any other requirements beyond this submission shall not apply. For products subject to this Warranty, you will be provided with a return authorization number and shipping instructions. Vitamix will pay standard shipping costs on the return of a product for warranty service and for return shipment o to you after the warranty service. Vitamix is not responsible for items lost in transit. For this reason, Vitamix highly recommends getting a tracking number or delivery confirmation when shipping your package. You are responsible for the costs of special shipping requests.
Within the U.S.A. and Canada, this Warranty is honored directly through the Vita-Mix Corporation. If you need to use the Warranty in Mexico for service, components, consumables or repairs, contact Vita-Mix Electrodomésticos, S. de R.L. de C.V. whose information is described below:
United States México
Vita-Mix® Corporation Vita-Mix Electrodomésticos, S. de R.L. de C.V.
8615 Usher Road Calle Artemio del Valle Arizpe No. Ext. 16 No. Int. 2DO Piso,
You will be deemed to have accepted the returned product "as is" upon delivery unless you notify Vitamix of any problem, including shipment damage, within 48 hours of delivery.
Date of Purchase ____ Purchased From ____ Brand ____ Model ____
MÉLANGEUR À HAUTE PERFORMANCE
VM0252
SYMBOLES
natural_image
Black and white photo of a Vitaminizer blender with clear glass interior and control panel (no visible text or symbols)natural_image
Technical line drawing of a mechanical device with handle and base (no text or symbols)natural_image
Technical line drawing of a mechanical component with two views and a small inset showing a cylindrical part (no text or symbols)PIÈCES ET CARACTÉRISTIQUES
natural_image
Black and white photo of a Vitamin� blender with control panel and side buttons (no visible text or symbols on device body)
natural_image
Technical line drawing of a mechanical device with handle and base (no text or symbols)natural_image
Technical line drawing of a mechanical component with two views (top and side), no text or symbols present.PIEZAS Y CARACTERÍSTICAS

- SPECIFICATIONS
- WARNING - READ ALL INSTRUCTIONS
- Failure to follow instructions can cause death or electrical shock.
- IMPORTANT SAFEGUARDS
- SAVE THESE INSTRUCTIONS
- PARTS AND FEATURES
- Container, Lid, Lid Plug, and Tamper
- Motor Base
- CAUTION
- Verifying a Tamper Can be Used with Your Container
- OTHER VITAMIX CONTAINERS AND TAMPERS
- - Status Indicator
- - Variable Speed Dial
- WARNING
- IMPORTANT! ALWAYS leave the lid on when operating the appliance and remove ONLY the lid plug to use the tamper or to add ingredients.
- BLENDING
- Tips to prevent 'overheating' the appliance:
- USING THE TAMPER
- IMPORTANT! The splash disk (near the top of the tamper) and lid prevent the tamper from hitting the blades when the lid is secured properly in the locked position.
- CARE AND CLEANING
- To Avoid Injury and Damage
- Electrical Shock Hazard
- BEFORE FIRST USE
- MOTOR BASE CLEANING
- TAMPER CLEANING
- CONTAINER CLEANING - SELF-CLEANING
- CONTAINER CLEANING - VARIABLE SPEED
- CONTAINER SANITIZING - BLEACH
- CONTAINER SANITIZING - VINEGAR
- WARRANTY AND SERVICE
- 5-Year Limited Warranty
- Product Registration.
- Who Can Seek Warranty Coverage.
- What is Covered.
- What is Not Covered.
- How to Obtain Return Authorization Under This Warranty.
- MÉLANGEUR À HAUTE PERFORMANCE
- PIÈCES ET CARACTÉRISTIQUES
- PIEZAS Y CARACTERÍSTICAS
Brand : Vitamix
Model : VX1
Category : Blender