
CWH3.5EA1W - Boiler COMFEE - Free user manual and instructions
Find the device manual for free CWH3.5EA1W COMFEE in PDF.

| Product Type | Instantaneous Electric Water Heater |
| Brand | Comfee |
| Model | CWH3.5EA1W |
| Dimensions (W × H × D) | 220 × 185 × 70 mm |
| Net Weight | 1.7 kg |
| Power Supply | 220‑240 V~, 50 Hz |
| Rated Power | 3600 W |
| Rated Current | 15.6 A |
| Leakage Protection | 15 mA |
| Recommended Air Switch | ≥ 25 A |
| Cable Cross-Section | 1.5 mm² minimum |
| Maximum Water Pressure | 0.8 MPa |
| Start-Up Flow Rate | 1.5 L/min |
| Shut-Off Flow Rate | 0.8 L/min |
| Hot Water Flow Rate (Δt ≥ 30 K) | 2.7 L/min |
| Temperature Adjustment Range | 30 °C to 48 °C |
| Protection Class | I |
| Waterproof Rating | IPX4 |
| Water Connection | G1/2 |
Frequently Asked Questions - CWH3.5EA1W COMFEE
User questions about CWH3.5EA1W COMFEE
0 question about this device. Answer the ones you know or ask your own.
Ask a new question about this device
Download the instructions for your Boiler in PDF format for free! Find your manual CWH3.5EA1W - COMFEE and take your electronic device back in hand. On this page are published all the documents necessary for the use of your device. CWH3.5EA1W by COMFEE.
USER MANUAL CWH3.5EA1W COMFEE
natural_image
Simple line drawing of a faucet with a handle and arrow indicating direction (no text or symbols)Instant Electric Water Heater
Instruction Manual
CWH3.5EA1W
Thank you for choosing comfee! Please read this user manual be carefully before using this new appliance to ensure that you have a better understanding of the product features, and know how to operate this product in a safe way.
CONTENTS
INDEX 01
SAFETY INSTRUCTIONS 02
SPECIFICATIONS 04
PRODUCT OVERVIEW 05
QUICK START GUIDE 07
PRODUCT INSTALLATION 08
OPERATION INSTRUCTIONS 10
CLEANING AND MAINTENANCE 13
TROUBLESHOOTING 14
SAFETY INSTRUCTIONS
Intended Use
The following safety guidelines are intended to prevent unforeseen risks or damage from unsafe or incorrect operation of the appliance. Please check the packaging and appliance upon arrival to make sure everything is intact and ensure a safe operation. If you find any damage within 7 days after purchase, please contact the retailer or dealer. Please note that modifications or alterations to the appliance are not allowed due to the safety concern. Unintended use may cause hazards and loss of warranty claims.
Explanation of Symbols

Warning
This signal indicates a hazard with a medium level of risk which, if not avoided, may result in death or serious injury.

Note
This signal indicates important information (e.g. damage to property), but no danger involved.

Caution
This signal indicates a hazard with a low level of risk which, if not avoided, may result in minor or moderate injury.
Read these operating instructions carefully and attentively before using/commissioning the unit and keep them in the immediate vicinity of the installation site or unit for later use!

CAUTION
To prevent personal injury, injury to others and property damage, the instructions below must be followed. Incorrect operation due to failure to follow instructions will cause harm or damage.
Special Cautions
- This water heater is for household, and it can be installed wherever place that need hot water.
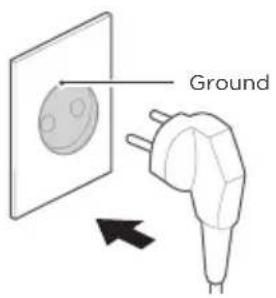
- Plug is not used for this water heater; this water heater must be connected directly with power switch that comes with leakage-protection. Please distinguish live line (red/brown), neutral line (blue) and earth line (green/yellow) during installation.
- Please check whether the amperes of the household wiring is enough before installation. Dedicated circuit must be used for such installation.
- Before installing this water heater, check and confirm that the earth electrode on the socket is reliably earthed without electricity pass through.
- The hot water from the water heater may cause scald, please test the temperature of the hot water before use.
- The distance between where the water heater installed and the water output should be as nearby as possible in order to avoid heat loss.

CAUTION
- The electric water heater may be damaged if the water hardness is too high. To ensure longer product lifespan, please install and use under the condition that local water hardness is less than 450mg/L (CaCO3)
- In time of lightning/thunder, switch “Off” the Miniature Circuit Breaker (MCB) in advance to protect the water heater against possible damage.
- Cut-off power supply before any maintenance. Any maintenance or alteration towards this product by non-professional is highly prohibited.
- If the power cord is damaged, please stop use the appliance immediately and contact Midea customer service center for product maintenance.
- In order to avoid a hazard due to inadvertent resetting of the Earth Leakage Circuit Breaker (ELCB), this appliance must not be able to have electricity supplied through an external switching device, such as timer or connected to a circuit that is regularly switched “On” and “Off” by the utility.
- For any improper installation and incorrect operation of this product, our company will not be liable for any responsibility.
- This water heater can be used for different purpose, eg. Washing hands, dishes or foods, and so on. (Multi directional water supply is not available).
- We declare that CWH3.5EA1W unit be connected only to a supply with the relevant system impedance no more than 0.161 ohm. Restrictions to connection may be imposed by the supply authority on the use of equipment in the actual relevant system impedance at the interface point on the user's premise exceeds 0.161 ohm.

Warning
- The water heater should be earthed before use. Please ensure that the resistance of household earth wire is < 4 . Installing device without earthed is highly prohibited.
- The means for disconnection from the supply mains having a contact separation in all poles that provide full disconnection under overvoltage category III conditions must be incorporated in the fixed wiring in accordance with the wiring rules.
- The way of fixation described do not involve the use of adhesives as they are not considered as one of the reliable fixation methods.
- The water inlet of this appliance shall not be connected to inlet water obtained from any other water heating system.
- This device is not intended for the use of drinking water supply.
- This appliance can be used by children aged 3 and above and persons with reduced physical, sensory or mental capabilities or lack of experience and knowledge if they have been given supervision or instruction concerning the use of the appliance in a safe way and understand the hazards involved.
- Cut off power supply before maintenance, to avoid danger like electric shock. Children shall not play with the appliance. Cleaning and maintenance shall not be made by children without supervision.
-
The water inlet pressure shall not exceed the value marked on the rating label. If it does, a pressure reducing valve must be installed.
-
Extension sockets are forbidden.
- Please cut off the power before maintenance.
- This appliance has been designed for home use only, and may cause danger if used in special occasions.
SPECIFICATIONS
| Product Model CWH3.5EA1W | |
| Rated Voltage | 220-240V~ |
| Rated Frequency | 50Hz |
| Rated Power | 3600W |
| Rated Current | 15.6A |
| Wire Specification | 1.5mm^2 |
| Air Switch Specification | ≥slant 25A |
| Leakage protection action current | 15mA |
| Maximum Water Pressure | 0.8MPa |
| Starting Water Flow | 1.5Liters/minute |
| Ending Water Flow | 0.8Liters/minute |
| Protection Class | I |
| Water Proof Class | IPX4 |
| Products Size | 220×185×70 mm |
| 1.7kgNet Weight | |
| Water pipe size | G1/2 |
| Hot water flow rate at t=30K | 2.7Liters/minute |
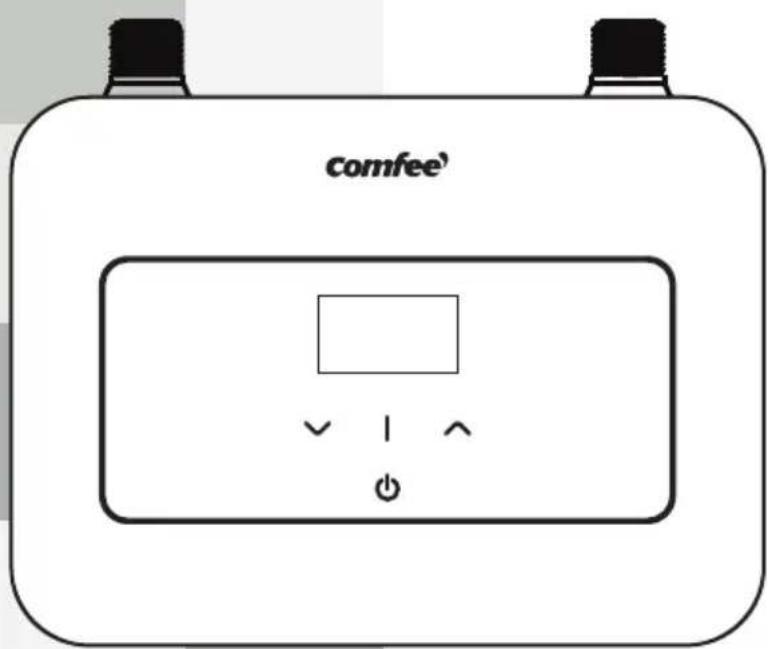
PRODUCT OVERVIEW
Product introduction
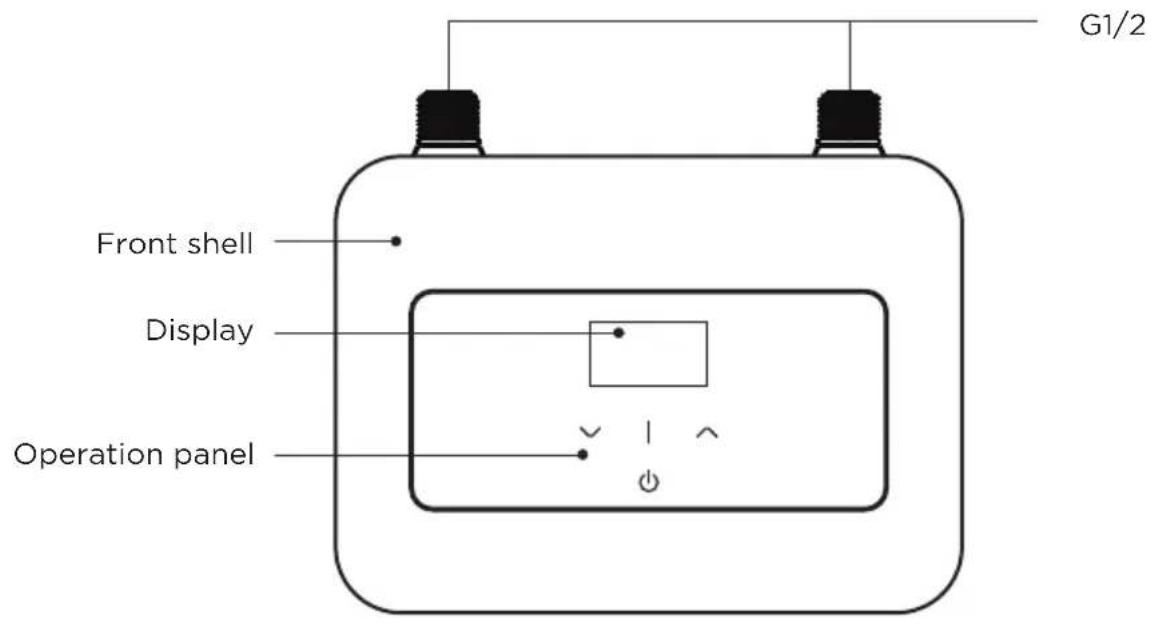
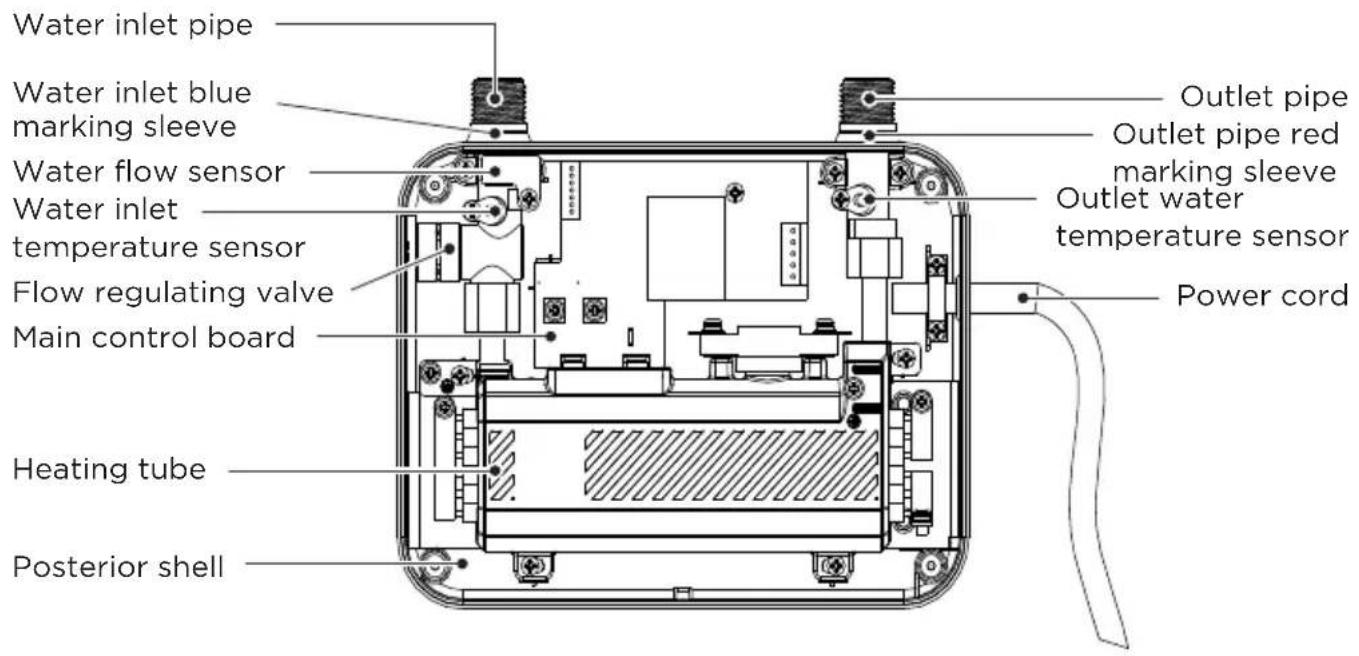
Pruduct structure

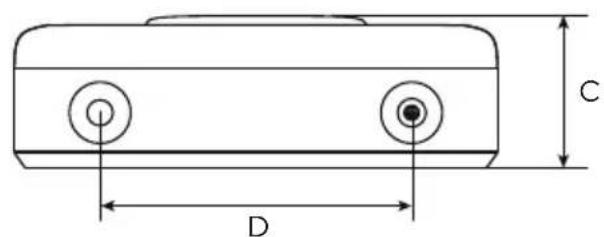
| CWH3.5EA1W | |
| A | 220 |
| B | 185 |
| C | 70 |
| D | 142 |
(Note: All dimensions are in mm)
Internal Wire Diagram
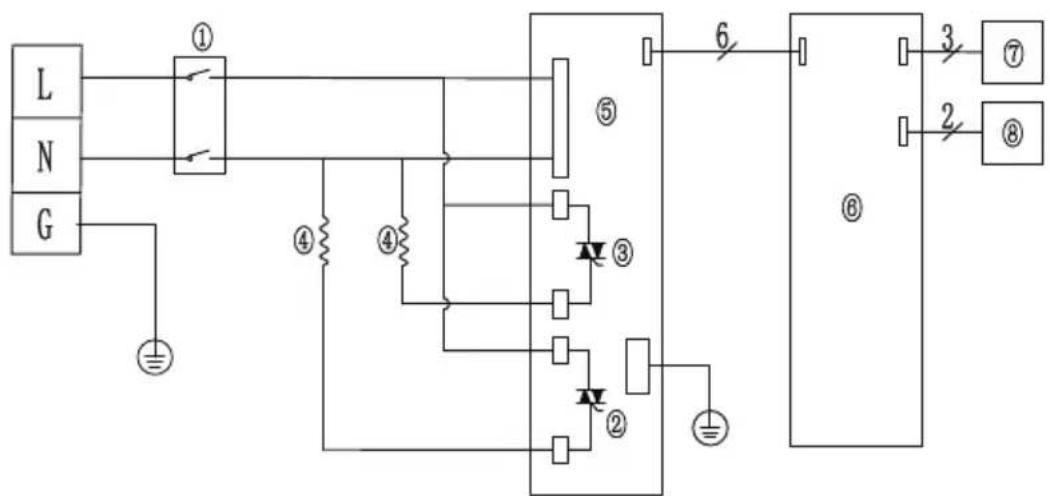
① Thermostat / ② Thyristor board/ Thyristor / ④ Heater /
⑤ Power supply board/ ⑥ Display panel /⑦ Flow sensor /
⑧ Temperature sensor
INSTALLATION OF ELECTRICAL SCHEMATICS
Accessories
Plastic expansion tube Mounting screws
Seal ring

QUICK START GUIDE
Before First Use

Note
- The water heater is correctly installed as required
-
For the first time, water shall be supplied before power supply
-
Connecting the power cord 2. Turn on the tap
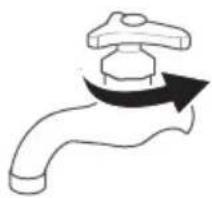
natural_image
Simple line drawing of a faucet with a handle and arrow indicating direction (no text or symbols)- Start up 4. Temperature adjustment
- If necessary, the water flow can be adjusted, for example, when the temperature cannot reach the preset setting
PRODUCT INSTALLATION
Installation Instruction
- Check the capacity of power circuit;
- Water heater installation;
- Plumbing connection;
- Power cord installation;
- Water Supply.
Check the capacity of power circuit
- To install CWH3.5EA1W, the copper wire core of the wire must be greater than 2.5mm ^4 . The air switch with leakage protection should be greater than 25A.
- The meter specification is greater than 40A.
- The ground wire must be reliably grounded.
Water Heater Installation
- The water heater should be installed in an unobstructed position under the basin to facilitate user operation.
- The distance between the water heater and the surrounding walls should be more than 20cm, which is convenient for future maintenance.
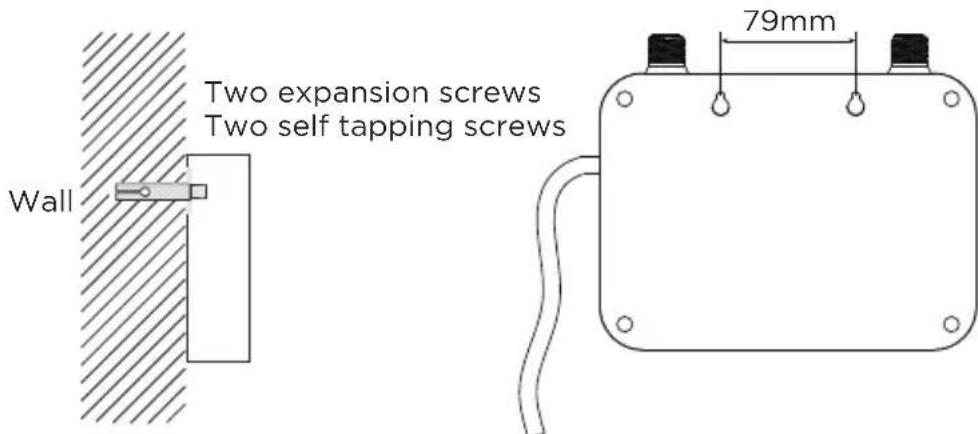
- According to the installation hole position of the rear shell of the machine, draw lines on the wall to mark the position, then drill holes on the solid wall with an electric drill.
- Put a plastic expansion pipe into the hole and fix the water heater to the wall with screws.
- The distance between the hot water outlet of the water heater and the hot water use point should be as short as possible to reduce heat loss and for water saving.
- The installation position of air switch must be higher than the valve and the product inlet / outlet pipe.
Plumbing Connection
- Put a gasket on the water inlet joint of the water heater.
- Put a gasket on the water outlet connector of the water heater and connect the hose assembly of the faucet as shown in the figure.
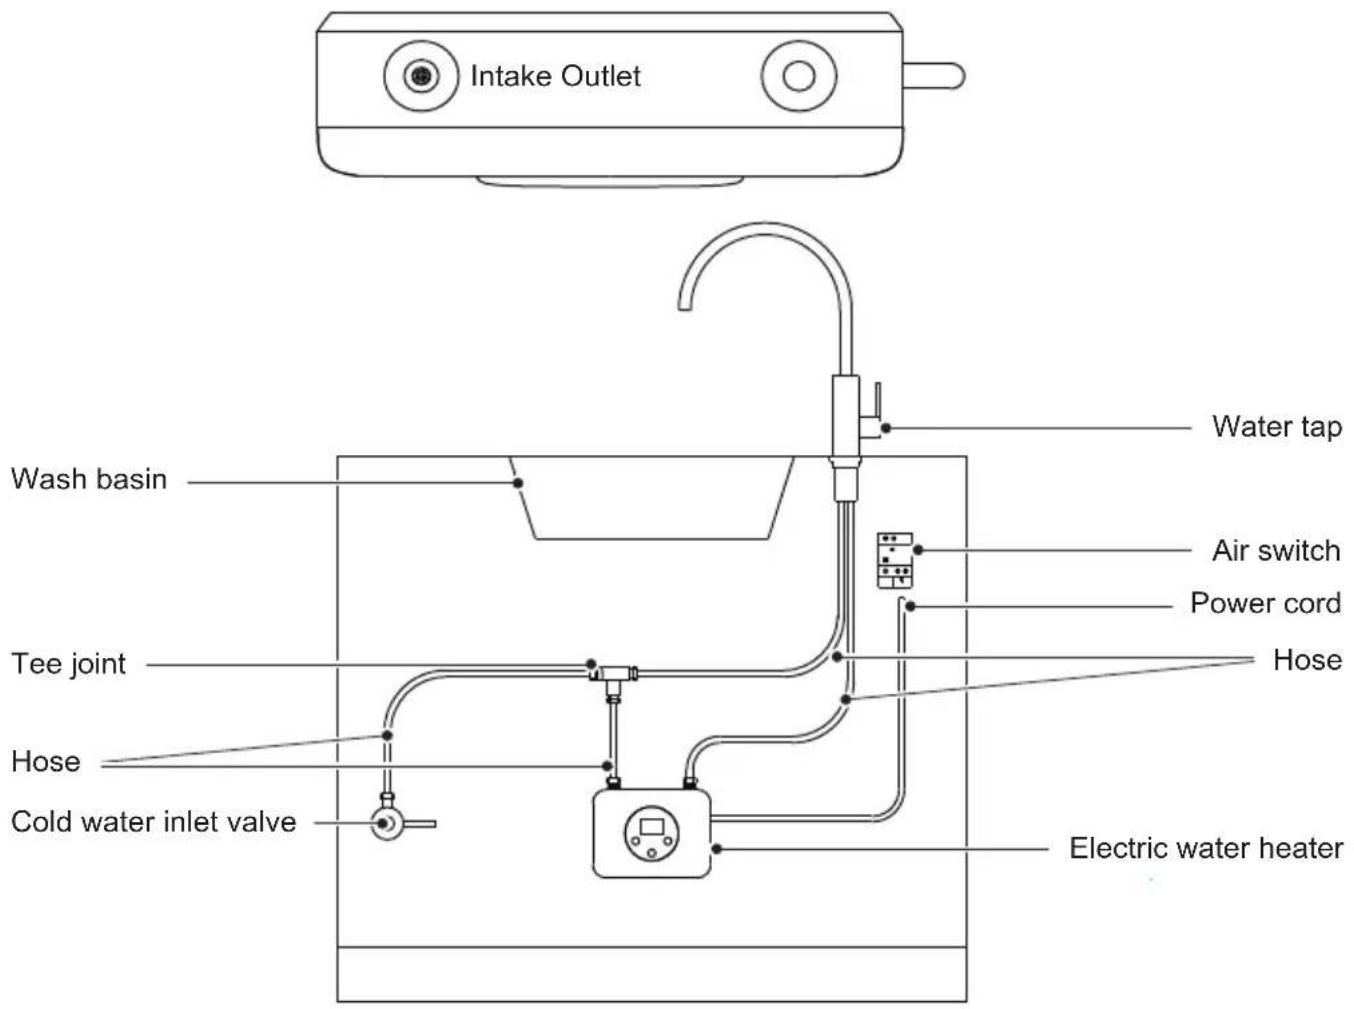

Note
Blue marker stands for water inlet, red marker stands for water outlet. Do not overexert to avoid damaging the water heater.
Power Cord Installation
- Cut off the power supply.
- Connect the power line to the air switch with leakage protection, and pay attention to the screw that it must be tighten but not loosened. otherwise it will cause fire (red or brown is the live line L, blue is the zero line N, and yellow or green is the ground line E.)
Water Supply
After all the plumbing connection is completed, open water inlet valve of the product and supply water to the unit to drain away air inside until there is stable water flow comes out from watertap. Check whether there is leakage at joints. If so, check whether the connecting parts are fastened, then re-supply water.
OPERATION INSTRUCTIONS
Methods of using
- To make the water heater work automatically, the water pressure at inlet should be no less than 0.03MPa and water flux should be no less than 1.5L/min.
- The water heater begins to work after the outlet valve and the power switch being switched on, Whereas, the water heater stop working after the valve and the power switch being switched off. We can change the water temperature at outlet by adjusting the valve.
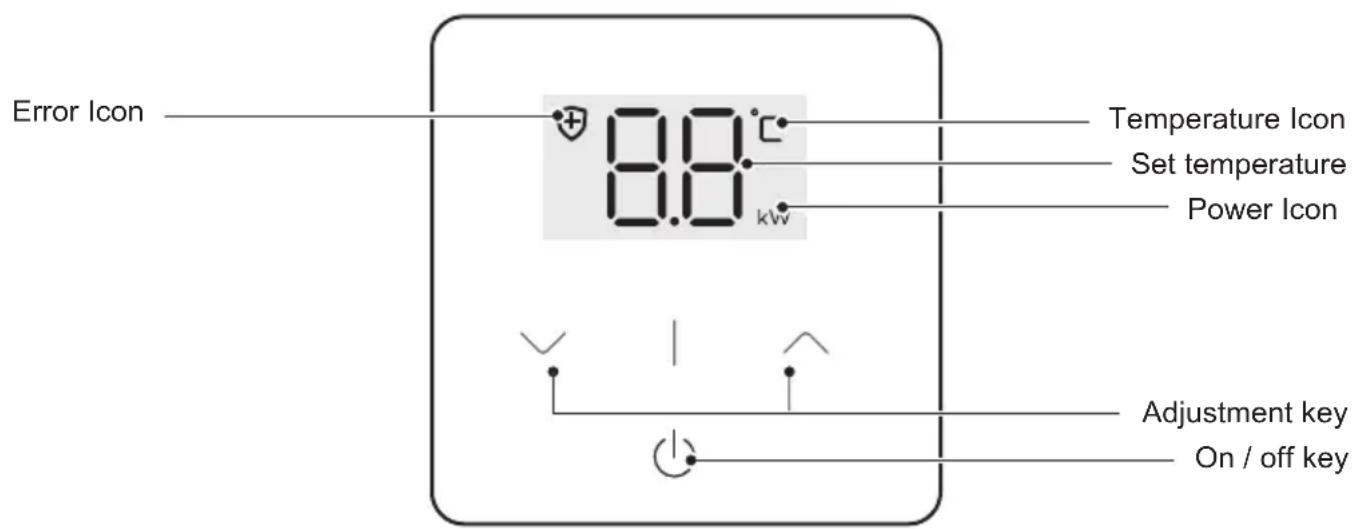
Operation interface
Operation instructions
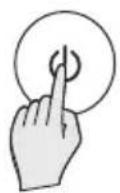
1. On / off:
After the power is turned on, press the on / off key to start and shut down the machine.

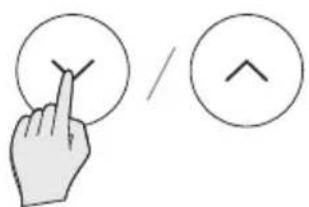
2. Set temperature
When the machine is turned on, press the adjustment key to adjust the temperature, With each click, set the temperature to increase or decrease by 1 °C, and set the temperature adjustment range: 30-48 °C; If there is no operation for 5 seconds, the setting result is automatically confirmed, and the system enters the working state.
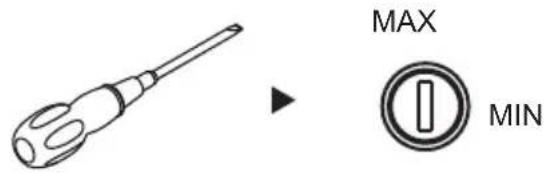
3. Flow settling
Adjust the flow regulating valve on the left side of the machine to regulate the inlet water flow, so as to limit the flow and make the outlet water temperature can meet the set temperature requirements. Operation method: Insert a slotted screwdriver into the hole of the regulating valve on the left side of the machine and rotate in an anti-clockwise direction. The larger the rotation angle is, the smaller the flow is. (the maximum rotation angle is 90°.)
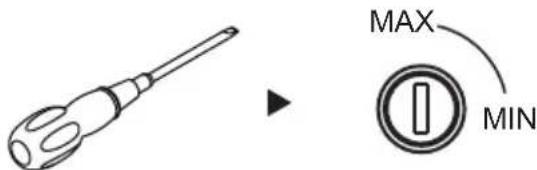

Note
The factory default adjustment is at the maximum position
4. Grounding indication
When the icon is on, it means that the machine has no potential safety hazards and can be used safely;
When the icon flashes once a second, it indicates that the ground wire is not connected or in a poor connection.
5. Error indication
When the error icon is on, it means that the machine has no fault and can be used normally. When the icon flashes once a second, it means that the machine has an error, and the machine will not be able to use, so it is necessary to be repaired.

Other functions
- Swtich on and off the heating function: In standby mode, the "safety sign" is on, which can turn on and off the heating and adjust the water temperature. If the heating is not started within 5 minutes, the display screen will only display the "safety sign" and the "grounding sign".
(1) Start the heating function: using the flow sensor to detect only. When the detected flow is greater than 1.5L/min, the water heater starts to work and enters the heating state. At this time, the "°C" icon is on
(2) Turn off the heating function: using the flow sensor to detect only. When the detected water flow is less than 0.8L/min, the water heater will stop heating and the icon of "°C" will be gone. The water heater will be in standby state. If the heating is not restarted after 5 minutes, the display screen is off and only 'safety sign' and 'grounding sign' are left.
- Grounding prompt function: In standby mode, prompt whether the water heater is connected to the ground
(1) Normal connection: when the water heater is connected with the ground wire, the "grounding identification" icon is on
(2) Not normally connected: when the ground wire of the water heater and the home ground wire are not normally connected, the "grounding identification" icon flashes every second
- Temperature adjustment function: The default initial setting temperature of the water heater is 38 °C , which can be adjusted by pressing the key to set the target temperature of the outlet water. The allowable temperature adjustment range is 30 °C - 48 °C .

Note
Under the full power heating, when the difference between the outlet water temperature and the set temperature is more than 2 °C, the "°C" icon and the set temperature flash once a second to remind the user to reduce the flow.
-
Constant temperature function: The water heater tracks the inlet temperature and inlet flow, and automatically calculates the output power to ensure that the outlet temperature is stable within the range near the set temperature
-
Error protection function: In the standby state, check the quality of hardware such as inlet and outlet temperature sensors
(1) Function of detecting the outlet water temperature sensor: when the outlet water temperature sensor is detected to be open circuited or short circuited, the "set temperature" icon on the display screen will flash (once a second) to display E1, which cannot be heated and maintenance is needed.
(2) Function of detecting the water inlet temperature sensor: when the water inlet temperature sensor is detected to be short circuited or open circuited, the "set temperature" icon on the display screen will flash (once a second) to display E2, which cannot be heated and maintenance is needed.
(3) Overtemperature protection function: when the outlet water temperature exceeds 85 °C, disconnect the relay and stop working. The display screen displays E3 (flashing once a second). After the error is fix, it can be recovered after power off
CLEANING AND MAINTENANCE
- This electric water heater should be installed at a place without sunshine or rain spray. Please cut off power supply it is not used for a long time.
- If the device hasn't been used for a long time, please double-check the water heater before using again. Make sure no filth in water inlet hose, water outlet hose and sprayer. Electrify only after the water flow become stable.
- Do not spray water to switch or heater body directly, to avoid humidity.
- Please cut off the power under thunder and rain to avoid damaging the water heater.
- Check the power cord connection terminals frequently to make sure that they are in good condition and reliably connected, no overheating, and grounding is good.
- It is suggested to clean the water heater and sprayer frequently. After closing the valve and switching off the power, wipe off all the dirt with a clean cloth. If necessary, the outer shell can be washed as well. However, you must dry up the housing after cleaning. If the water flow is not smooth, please loosen the screws to clean up the sprayer and the filter in the water heater.
DECLARATION:
This water heater can only be maintained by authorized technicians. Incorrect installation and using method may cause serious injury or loss of property.
TROUBLESHOOTING
| REASONS SUGGESTIONSSYMPTOMS | ||
| Plug in the power supply but there is no display on the screen | Power failure | Check whether there is power failure |
| Action of high temperature protection | Inform professionals to repair | |
| Power board failure | Inform professionals to repair | |
| Display E1 | Water outlet temperature sensor short circuit or open circuit fault | Replace the outlet water temperature sensor |
| Display E2 | Water inlet temperature sensor short circuit or open circuit fault | Replace the water inlet temperature sensor |
| Display E3 | If the outlet water temperature exceeds 85 °C, it is defined as dry burning error | Inform professionals to repair |
| Low temperature or low water output | The current set temperature is low | Set the temperature higher |
| Not powered on | Press the start button to start the machine | |
| No hot water from hot water outlet | Water cut off | Waiting for normal water supply |
| Water pressure too low | Use when the water pressure rises | |
| Inlet valve not opened | Open the water inlet valve | |
| The security icon flashes | Poor contact of ground wire | Stop using it immediately and inform the professional maintenance personnel |
| Electric water heater is not reliably grounded | ||
| The outlet water temperature is unstable, sometimes cold and sometimes hot | The water pressure is unstable, and the water flow is varying | Use after the water flow is stable |
| Main control board fault | Notify professional maintenance personnel to repair | |
| Water heater does not start heating | Inlet water flow is less than starting flow (1.5l/min) | Increase inflow flow |
| Blocked flow sensor | Backwash from the water outlet for several minutes before use;Inform the professional maintenance personnel to clean the impurities in the flow sensor | |
APERÇU DU PRODUIT 05
GUIDE DE DÉMARRAGE RAPIDE 07
INSTALLATION DU PRODUIT 08
INSTRUCTIONS D'OPÉRATION 10
NETTOYAGE ET ENTRETIEN 13
DÉPANNAGE 14
CONSIGNES DE SÉCURITÉ
Utilisation prévue
natural_image
Simple line drawing of a faucet with a handle and arrow indicating direction (no text or symbols)INSTALLATION DU PRODUIT
- Instant Electric Water Heater
- CONTENTS
- SAFETY INSTRUCTIONS
- Intended Use
- Explanation of Symbols
- Warning
- Note
- Caution
- Special Cautions
- SPECIFICATIONS
- PRODUCT OVERVIEW
- Pruduct structure
- Internal Wire Diagram
- INSTALLATION OF ELECTRICAL SCHEMATICS
- Accessories
- QUICK START GUIDE
- Before First Use
- PRODUCT INSTALLATION
- Installation Instruction
- Check the capacity of power circuit
- Water Heater Installation
- Plumbing Connection
- Power Cord Installation
- Water Supply
- OPERATION INSTRUCTIONS
- Methods of using
- Operation interface
- On / off:
- Set temperature
- Flow settling
- Grounding indication
- Error indication
- Other functions
- CLEANING AND MAINTENANCE
- DECLARATION:
- TROUBLESHOOTING
- CONSIGNES DE SÉCURITÉ
- Utilisation prévue
- INSTALLATION DU PRODUIT
Brand : COMFEE
Model : CWH3.5EA1W
Category : Boiler