US07AB2BEA - Air-conditioner HAIER - Free user manual and instructions
Find the device manual for free US07AB2BEA HAIER in PDF.

| Brand | Haier |
| Model | US07AB2BEA |
| Product Type | Air Conditioner |
| System Type | Single-way ductless cassette system |
| Operating Modes | Cool (cooling), Heat (heating), Dry (dehumidification), Fan (ventilation), Auto |
| Special Functions | Turbo, Quiet, Sleep, Timer (on/off), Swing (up/down and left/right), Louver lock, 48°F mode (anti-freeze) |
| Indoor temperature range (Cool mode) | 60°F - 86°F (16°C - 30°C) |
| Outdoor temperature range (Cool mode) | 23°F - 115°F (-5°C - 46°C) |
| Outdoor temperature range (Heat mode) | -15°F - 75°F (-26°C - 24°C) |
| Refrigerant | R454B (flammable, class A2L) |
| Remote control | Included, with AAA batteries (2) |
| Remote control range | Up to 7 m (23 feet) without obstructions |
| Connectivity | Wi-Fi via SmartHQ app |
| Air filter | Washable; cleaning recommended every month |
| Maintenance | Clean the filter with water or vacuum; do not use chemicals |
| Safety | Refrigerant leak detection (codes AA, Ab, etc.); 3-minute protection stop on restart |
Frequently Asked Questions - US07AB2BEA HAIER
User questions about US07AB2BEA HAIER
0 question about this device. Answer the ones you know or ask your own.
Ask a new question about this device
Download the instructions for your Air-conditioner in PDF format for free! Find your manual US07AB2BEA - HAIER and take your electronic device back in hand. On this page are published all the documents necessary for the use of your device. US07AB2BEA by HAIER.
USER MANUAL US07AB2BEA HAIER
One-Way Cassette Duct-Free System
Design may vary by model number.
This owner's manual is only printed in English and French. For Spanish version, please visit
GEAppliancesairandwater.com
Thank you for purchasing this Haier product. This owner's manual will help you get the best performance from your new heat pump.
For future reference, record the model and serial number located on the label on the side of your air conditioner/heat pump, and the date of purchase.
Staple your proof of purchase to this manual to aid in obtaining warranty service if needed.
To register your new Haier Duct Free System go to
Haierductless.com/product-registration and input the model/ serial number information on this page. To receive a 10-year compressor and parts warranty, registration is required within 60 days of installation.
Model number
Serial number
Date of purchase

IMPORTANT SAFETY INFORMATION
WARNING
For your safety, the information in this manual must be followed to minimize the risk of fire, electric shock or personal injury.
- Use this appliance only for its intended purpose as described in this Owner's Manual.
- This heat pump must be properly installed in accordance with the Installation Instructions before it is used.
- Turn the unit OFF and unplug your heat pump before cleaning the air filter.
-
GE Appliances does not support any servicing of the heat pump. We strongly recommend that you do not attempt to service the heat pump yourself.
-
For your safety...do not store or use combustible materials, gasoline or other flammable vapors or liquids in the vicinity of this or any other appliance. If you are getting rid of an old product with refrigerants, check with the company handling disposal about what to do.
- These R454B heat pump systems require contractors and technicians use tools, equipment and safety standards approved for use with this refrigerant. DO NOT use equipment certified for R22, R32 or R410A refrigerant only.
WARNING
Keep batteries away from children.
-
This remote controller contains batteries. If a new or used battery is swallowed or enters the body, it can cause severe internal burns and can lead to death in as little as 2 hours. Always completely secure the battery compartment. If the battery compartment does not close securely, stop using the product, remove the batteries, and keep it away from children.
-
If you think batteries might have been swallowed or placed inside any part of the body, seek immediate medical attention.
- The cells shall be disposed of properly, including keeping them away from children.
Even used cells may cause injury.
WARNING
-
This product is not intended for use by persons (including children) with reduced physical, sensory or mental capabilities, or lack of experience and knowledge, unless they have been given supervision or instruction concerning use of the appliance by a person responsible for their safety.
-
Children should be supervised to ensure that they do not play with the product.
- Any damage of electrical supply must be replaced by the manufacturer, its service agent or similarly qualified persons in order to avoid a hazard.
ATTENTION
If the unit installed the leak detection system, it will alarm or show error code on the unit when detected refrigerant leakage. Please contact its service agent or similarly qualified person. Please refer to Page 8 for detailed information.
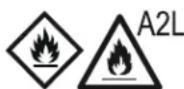
Warning; Flammable Materials, Refrigerant class per ISO 817

Owner's Manual; Operating Instructions

Read Owner's Manual

Service Indicator; Read Technical Manual
CAUTION
- Do not use means to accelerate the defrosting process or to clean, other than those recommended by the manufacturer.
- The appliance shall be stored in a room without continuously operating ignition sources (for example: open flames, an operating gas appliance or an operating electric heater.
- Do not pierce or burn.
- Be aware that refrigerants may not contain an odor.
READ AND SAVE THESE INSTRUCTIONS
REMOTE CONTROL FEATURES AND SETTINGS
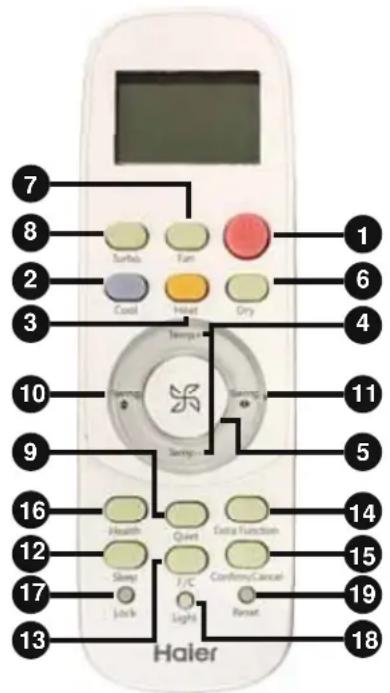
Remote Control
1. POWER Button
Press the POWER button on the remote control to start or stop the unit.
2.COOL Button
In COOL mode, the heat pump will blow cool air. When FAN is set to AUTO, the heat pump automatically adjusts the fan speed according to the room temperature. The 喜 will be displayed during COOL mode.
3. HEAT Button
In HEAT mode, warm air will blow out after a short period of time due to the cold-air prevention function. When FAN is set to AUTO mode, the heat pump automatically adjusts the fan speed according to room temperature. The will be displayed during HEAT mode.
4. TEMP+/-Button
TEMP +: Every time the button is pressed, the temperature setting increases. TEM -: Every time the button is pressed, the temperature setting decreases. The operating temperature range is 60^ - 86^ (16°C-30°C).
5. Fan Speed Button
Fan Speed: For each press, the Fan Speed changes as follows:
Auto Mode: Low-Medium-High-Auto-Low
Heat Mode: Low-Medium-High-Turbo-Auto-Low
Cool Mode: Low-Medium-High-Turbo-Auto-Low
Other Mode: Low-Medium-High-Low
6. Dry Button
Dry mode is used to reduce humidity. In Dry mode, when room temperature becomes lower than temp. setting +2^ , the unit will run intermittently at Low speed regardless of Fan setting. The will be displayed during DRY mode.
7. Fan Mode Button
Fan mode circulates air only; there is no temperature adjustment available. Use the fan speed button (5) to adjust fan speed from low, medium to high. Auto, Turbo and Quiet are not available.
8. Turbo Button
The TURBO function is used for fastest air flow in Heating and Cooling mode. Control will display the TURBO icon [UP ARROW] on the bottom right side of the remote display. Pressing the TURBO button again or Fan Speed button will turn Turbo off.
9. Quiet Button
The Quiet function switches the fan to the lowest speed. The control will display the Quiet icon [DOWN ARROW] on the bottom left side of the remote display. Pressing the Quiet button again or the Fan Speed button will turn quiet off.
10. Swing UP/DOWN Button
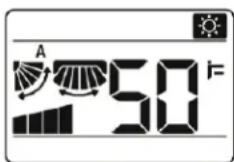
Press the Swing UP/DOWN button to choose the position of the horizontal airflow louvers. Status display of air flow:
COOL/DRY:

HEAT:

NOTE:
- It is advisable not to keep the vertical louver in the downward position for an extended period of time in Cool or Dry mode. otherwise condensate water may form on the louver.
- When turning the unit on, the remote control will automatically return the louver to the previous set swing position. When turning the unit off, the louver will rotate to the full open position prior to closing.
11. Swing SIDE/SIDE Button
Press the Swing SIDE/ SIDE button to choose the position of the vertical airflow louvers. Status display of air flow:
COOL/ DRY/ HEAT/FAN:

NOTE:
- When humidity levels are high, condensate water may occur at the air outlet if all vertical louvers are adjusted to far left or right.
- When turning the unit on, the remote control will automatically return the louver to the previous set position.
REMOTE CONTROL FEATURES AND SETTINGS
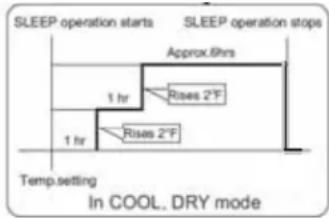
12. Sleep Button
- Operation in Cool or Dry modes: One (1) hour after Sleep mode starts, the temperature will rise 2^ above set temperature. After another (1) hour, the temperature rises additional 2^ . The unit will run for additional six (6) hours before it turns off. The final temperature is 4^ higher than initial set temperature. Using this feature helps with achieving maximum efficiency and comfort from your unit while you sleep.
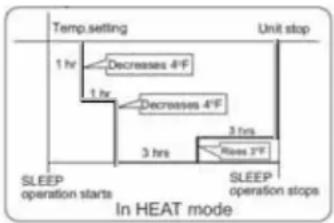
- Operation in Heat Mode: One (1) hour after Sleep mode starts, the temperature will decrease 4^ below set temperature. After another (1) hour, the temperature will decrease an additional 4^ . After an additional three (3) hours, the temperature will rise by 2^ . The unit will run for an additional three (3) hours before it turns off. The final temperature is 6^ lower than the initial set temperature. Using this feature helps with achieving maximum efficiency and comfort from your unit while you sleep.
-
In Auto mode, the unit operates in corresponding Sleep mode adapted to the automatically selected operation mode. NOTE:
-
When the unit is set to sleep mode, the fan speed will be set to low speed and cannot be changed.
- When the Timer function is set the sleeping function cannot be set. If the sleeping function has been set and the user sets the Timer function, the Sleep function will be canceled and the unit will be set to the Timer function.
13. F/C - Fahrenheit/Celcius Button
Press F/C to toggle remote and unit display temperature between Fahrenheit and Celsius.
14. Extra Functions Button
Press the Extra Function button to view all other operations. Press Confirm/Cancel to select and save the chosen operation. If no button is pressed for 10 seconds, the remote will exit Extra Function mode.
A) Refresh air feature not available on this series.
B) A-B selection - This will allow you to control two separate units with a single remote control.
NOTE: This feature would be setup at the time of installation by the contractor.
C) Auto mode - The heat pump will automatically select Cool, Heat, or Fan operation according to set temperature. When Fan Mode is set to Auto, the heat pump automatically adjusts the fan speed according to room temperature.
D) Upper and Lower louver lock.
- Upper louver lock will lock the horizontal louver in the top position. Commonly used during cooling.
- Lower louver lock will lock the horizontal louver in the lower position. Commonly used during heating.
- To unlock the louver, press Extra Function button until either a single louver icon or oscillate icon
NOTE: When the Louver is locked, the position cannot be changed with the Swing UP/ DOWN button.
E) Timer ON/OFF: Sets a countdown timer until the unit is turned ON/OFF. TEMP+/TEMP- button is pressed with the length of time increment/decrement in 0.5 hour between 0-12 hours, and one (1) hour increment/decrement between 12-24 hours.
- When the remote is set to ON, the system will turn off until the countdown timer ends. Then the indoor unit will turn on and operate in mode, temperature setting and fan speed that was displayed when timer was set.
- When the remote is set to OFF, the system will remain ON until the countdown timer ends.
F) 48^ Heating. This sets the system to maintain 48^ . This is used to prevent freezing during long unoccupied periods of time.
15. Confirm/ Cancel Button
Saves and exits the EXTRA FUNCTION selection.
16. Health Button
Feature is not available.
17. Lock Button
Used to lock buttons and LCD display.
18.Light Button
The indoor display panel will show indoor set temperature by default. Press this button once, it will display the room temperature. Press this button twice within 3 seconds, it will turn off the indoor display panel. Press again to go back to display indoor set temperature.
19. Reset Button
If the remote control is not functioning properly, use a pen point or a similar object to depress this button to reset the remote.
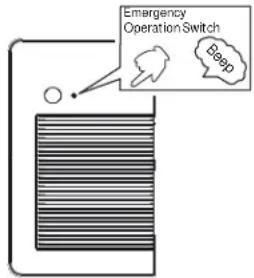
- Use the POWER button only when the remote control is lost or damaged.
- Press the POWER button and the unit will beep once, indicating start of operation.
The unit will run automatically in the following modes:
| Room Temperature | Set Temperature | Timer Mode | Fan Speed | Operation Mode |
| Above 73°F | F No AUTO COOL | |||
| Below 73°F | F No AUTO HEAT |
NOTE: While in Manual Operation, temperature and fan speed cannot be changed, nor will it operate in timer or DRY mode.
Inserting the Batteries
- Remove the battery cover.
- Insert 2 AAA batteries as illustrated noting battery polarity.
- Reinstall the battery cover.
NOTE:
-
The distance from the remote control to the receiver should be less than 23 feet with no obstructions.
-
If the remote control display is weak or the operating distance has diminished, the batteries may need to be replaced.
- Remote control malfunctions can sometimes be corrected by removing the batteries from the remote for a few minutes and then reinstalling them.
- Remove the batteries from the remote control if the unit will not be in use for an extended period of time. If any segments of the display remain active after battery removal, press the reset button.
Optimizing Performance
- Close doors and windows during operation.
-
Do not block the air inlet or outlet.
-
Wipe the cabinet using a soft and dry cloth. For serious stains, use a neutral detergent diluted with water. Wring the water out of the cloth before wiping down the unit. Then wipe off the detergent completely.
Cleaning the Front Cover
- Do not use chemicals or chemically treated cloths the unit.
- Do not use benzene, paint thinner, polishing powder or other solvents to clean the unit. They can cause the plastic surface to crack or deform.
- Do not use water hotter than 104^(40^) to clean the front panel. This can cause the panel to deform or become discolored.
CAUTION
- Before changing the filter or cleaning, turn off the unit and disconnect its power supply.
- When removing the filter, do not touch the metal parts in the unit. The sharp metal edges can cut you.
- Do not use water to clean the inside of the indoor unit. This can destroy insulation and cause electrical shock.
- Do not expose filter to direct sunlight when drying. This can shrink the filter.
Cleaning the Air Filter
A dirty air filter can reduce the cooling efficiency of your unit, and can also be bad for your health. Be sure to clean the filter every month, if you use the unit regularly.
To clean the air filter, do the following:
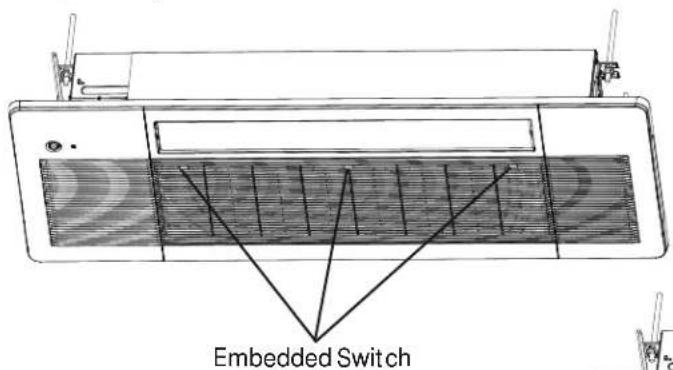
- Press the three (3) embedded switches to open the grill.
- Hold open the grille and remove the air filter.
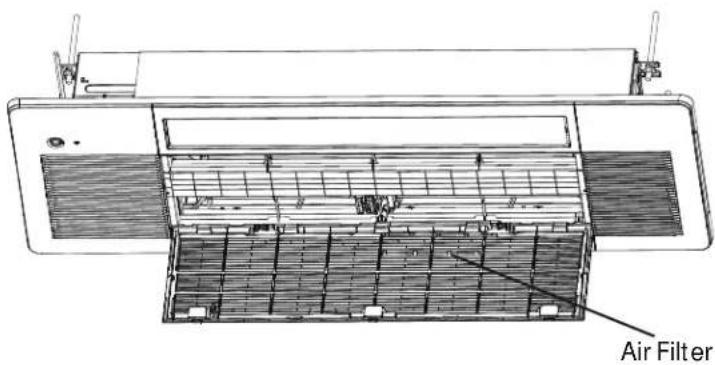
- Clean the air filter with water or a vacuum cleaner.
If using water, the inlet side of the filter should face down and away from the water stream.
If using a vacuum cleaner, the filter inlet should face the vacuum. - Reinstall all the filter.
Maintenance - Long Periods Of Non-Use
If you do not plan to use your air conditioner for an extended period of time, do the following:
- Clean all filters.
- Turn on the FAN until the unit dries out completely.
- Turn off the unit and disconnect the power.
- Remove batteries from remote control.
Maintenance - Pre-Season Inspection
After long periods of non-use, or before periods of frequent use, do the following:
- Inspect for damaged wires.
- Clean all filters.
- Check for leaks.
- Replace batteries.
- Make sure nothing is blocking the air inlets and outlets.
Your air conditioner is designed to operate in the following indoor and outdoor temperatures. When your air conditioner is used outside of the following temperature ranges, certain safety features may activate and turn off the unit to protect it from damage.
Temperature Ranges
| Cool Mode Heat Mode | Dry Mode | ||
| Indoor Air Temperature | 60°F - 86°F (16°C - 30°C) | 60°F - 86°F (16°C - 30°C) | 60°F - 86°F (16°C - 30°C) |
| Outdoor Air Temperature | 23°F - 115°F (-5°C - 46°C) | -15°F - 75°F (-26°C - 24°C) | 60°F - 86°F (16°C - 30°C) |
To further optimize the performance of your unit, do the following:
- Keep doors and windows closed.
- Limit energy usage by using TIMER ON and TIMER OFF features
- Do not block air inlets or outlets.
- Regularly inspect and clean air filters.
NOTE: Your one-way cassette air conditioner's outdoor unit is equipped with a base pan heater, allowing it to continue to operate at freezing temperatures as low as -15^(-26^) . When outdoor air temperatures are at or below 32^(0^) , we strongly recommend keeping the unit plugged in at all times to ensure smooth ongoing performance.
NOTE: Keep the room's relative humidity below 80% . If the air conditioner operates in excess of this, the surface of the air conditioner may attract condensation. To help prevent condensation from forming and dripping, set the vertical airflow louver to its maximum angle (vertically to the floor) and set the fan to HIGH.
WI-FI PAIRING INSTRUCTIONS

Configuration Method
Download the App:
Download the SmartHQ app from
Google Play (Android) or the Apple app store (ios).
After downloading the App:

- Please have wireless router information on hand (including password).
- Open the app.
- Select "Sign In".
- Sign into your account and register as new user.
- Turn your air conditioner on.
- Select the "+" icon to add a new device and follow the directions to add your air conditioner to your account.
- Follow the on-screen prompts.
Maintenance
If you experience difficulty connecting to your WiFi network or have another technical issue with this module please contact 1-800-220-6899 for assistance.
KEEP THIS DOCUMENT FOR FUTURE REFERENCE
REGULATORY INFORMATION
FCC/IC Compliance Statement:
This device complies with Part 15 of the FCC Rules. Operation is subject to the following two conditions:
- This device may not cause harmful interference.
- This device must accept any interference received, including interference that may cause undesired operation.
This equipment has been tested and found to comply with the limits for a Class B digital device, pursuant to Part 15 of the FCC Rules. These limits are designed to provide reasonable protection against harmful interference in a residential installation. This equipment generates uses and can radiate radio frequency energy and, if not installed and used in accordance with the instructions, may cause harmful interference to radio communications. However, there is no guarantee that interference will not occur in a particular installation. If this equipment does cause harmful interference to radio or television reception, which can be determined by turning the equipment off and on, the user is encouraged to try to correct the interference by one or more of the following measures:
-
Reorient or relocate the receiving antenna.
-
Increase the separation between the equipment and receiver.
- Connect the equipment into an outlet on a circuit different from that to which the receiver is connected.
- Consult the dealer or an experienced radio/television technician for help.
Labeling: Changes or modifications to this unit not expressly approved by the manufacturer could void the user's authority to operate the equipment.
*Select Models Only
READ AND SAVE THESE INSTRUCTIONS
TROUBLESHOOTING TIPS
For additional troubleshooting tips, see the full owner's manual at GEAppliances.com.
| Problem Cause and Solution | ||
| Normal Performance Inspection | The system does not restart immediately | When the unit is stopped, it will not restart again for 3 minutes to protect the system. When electricity is disconnected then reconnected, the protection circuit will be active for 3 minutes to protect the heat pump. |
| Noise is heard During unit operation | ation or a sudden stop, a swishing or gurgling noise may be heard. The first 2-3 minutes after the unit has started is when the noise could be noticeable. This noise is generated by refrigerant flowing in the system. During unit operation, a cracking noise may be heard. This noise is sometimes generated by the casing expanding or shrinking due to temperature changes. If the airflow is creating a loud noise during unit operation, the air filter may be too dirty. | |
| Odors The system circulates | dors lingering in the airstream, such as the smell of furniture, paint, and/or cigarettes. | |
| Mist or steam is blowing out | During COOL or DRY mode, the indoor unit may blow out mist or steam. This is due to the sudden cooling of the indoor air. | |
| In DRY mode, fan speed cannot be changed | In DRY mode, when the room temperature becomes lower than the set temperature by 2°F, the unit will run intermittently at LOW speed regardless of SPEED setting. | |
| Items to look for | Nonresponsive unit | Is there a power failure? Is the circuit breaker off? Is the fuse blown? |
| Poor Cooling Is the air filter dirty | y? Is there anything blocking the inlet and/ or outlet? Is the temperature set correctly? Are there any doors or windows open? Is there any direct sunlight shining through the window during the cooling operation? Are there too many heat sources or too many people in the room during cooling operation? |
| Error Code | |
| AA | Refrigerant leak detected and mitigation in progress. Indoor fan will remain on until refrigerant is dispersed. |
| Ab | The refrigerant leakage concentration is reduced. For all systems, the error code will be cleared after 2 hours by a service technician manually. If the AA is activated repeatedly, contact technical support. |
| Ac Refrigerant leak sensor communication error. | |
| Ad Refrigerant leak sensor self inspection error. | |
| AE | Refrigerant leak sensor is reaching End-of-Life. Please call a service technician for replacement. |
| AF Refrigerant leak sensor has reached End-of-Life. Replace sensor to restore functionality. | |
LIMITED WARRANTY
For warranty detail please refer to installation manual.
NOTES
TABLE DES MATIÈRES
CONSIGNES DE SECURITE IMPORTANTES 14
RéGLAGES ET FONCTIONS DE LA TÉLÉCOMMANDE 15
FONCTIONNEMENT MANUEL ET ENTRETIEN 17
TEMPERATURES DE FONCTIONNEMENT 19
INSTRUCTIONS D'APPAIRAGE WI- FI 21
CONSEILS DE DÉPANNAGE 22
GARANTIE LIMITEE 23
CONSERVER DANS VOS DOSSIERS
3. Bouton Heat (chauffage)
8. Bouton Turbo (acceleration)
49-5001166 Rev. 0 10-25