
DO-455FR - Deep fryer DOMO - Free user manual and instructions
Find the device manual for free DO-455FR DOMO in PDF.

| Product type | Electric deep fryer |
| Brand | DOMO |
| Model | DO-455FR |
| Oil capacity | 0.8 L (min) - 1.0 L (max) |
| Temperature range | 70 °C - 190 °C |
| Thermostat setting | Rotary knob with Off position and temperature settings |
| Indicator lights | Heating (red) and Ready (green) |
| Dimensions (approx.) | Approximately 30 x 25 x 25 cm (estimated) |
| Weight (approx.) | Approximately 2.5 kg (estimated) |
| Main material | Stainless steel and heat-resistant plastic |
| Fondue function | Yes, with ring and forks included |
| Lid | Removable with glass window |
| Basket | With handle, removable, suitable capacity |
| Usage | Domestic only |
| Safety | Automatic shut-off in case of overheating (built-in) |
| Maintenance | Manual cleaning, do not immerse control unit |
| Tank cleaning | By hand with soapy water, not dishwasher safe |
| Warranty | 2 years |
| Included accessories | Basket, fondue ring, 4 forks |
| Repairability | Spare parts available via after-sales service |
Frequently Asked Questions - DO-455FR DOMO
User questions about DO-455FR DOMO
0 question about this device. Answer the ones you know or ask your own.
Ask a new question about this device
Download the instructions for your Deep fryer in PDF format for free! Find your manual DO-455FR - DOMO and take your electronic device back in hand. On this page are published all the documents necessary for the use of your device. DO-455FR by DOMO.
USER MANUAL DO-455FR DOMO
natural_image
Exterior view of a modern kitchen grater with cutlery and a meshed dish (no text or symbols visible)GARANTIEVOORWAARDEN
CONDITIONS DE GARANTIE
This appliance has a two year warranty period. During this period the manufacturer is responsible for any failures which are the direct result of construction failure. When these failures occur the appliance will be repaired or replaced if necessary. The warranty will not be valid when the damage to the appliance is caused by wrong use, not following the instructions or repairs executed by a third party. The warranty will only be valid if the warranty application has been completed by the dealer at the time of purchase.
Type nr. Apparaat
natural_image
Symbol of a trash bin crossed with two diagonal lines, representing no waste or discharge (no text or labels)
RECYCLING INFORMATIONEN
natural_image
Recycling symbol composed of three chasing arrows forming a triangle (no text or labels)RECYCLING INFORMATION
This symbol on the product or on its packaging indicates that this product may not be treated as household waste. Instead it shall be brought to the applicable collection
point for recycling of electrical and electronic equipment. By ensuring this product is disposed of correctly, you will help prevent potential negative consequences for the environment and human health, which could otherwise be caused by inappropriate waste handling of this product. For more detailed information about recycling of this product, please contact your local city office, your household waste disposal service or the shop where you purchased the product.
The packaging is recyclable. Please treat package ecologically
INFORMACE O RECYKLACI ODPADU
If the supply cord is damaged, it must be replaced by manufacturer of its service agent or a similarly qualified person in order to avoid a hazard.
natural_image
Illustration of two kitchen electric cookers with different sizes and internal compartments, showing front and side views (no text or symbols)PREMIÈRE UTILISATION
natural_image
Illustration of two kitchen electric cookers with one moving and the other holding a digital display (no text or symbols)GERÄTETEILE
natural_image
Illustration of two kitchen electric cookers with one moving and the other holding a digital display (no text or symbols)- Carefully read the instructions before using the device and store it so that you can use it later
- The device is suitable for household use and not for commercial purposes.
- Do not use outside your home or for other purposes.
- Do not use the device if the device or plug is damaged, if the device does not function properly, if you dropped or damaged it, or if it has fallen into the water.
- After each use, turn the device off and disconnect the plug from the socket. Do this before you clean the unit or when emptying or filling the tub.
- Make sure that the cable is not hanging over the edge of the table or comes into contact with hot surfaces.
- If the cord is damaged, it must be replaced only by an authorized dealer with special tools.
- Do not dip the heating block, the cable or the plug under water or in another liquid because of the risk of electric shock.
- Hot oil can cause serious burns. If the unit is operating, it will be hot and this condition will persist for some time after power off. Do not touch hot surfaces like the inside of pan. Place the unit in a different place if it is in operation, or if the oil is still hot. Use the handles to move the device to a different place.
- Ensure that the unit is dry. Remove ice from ingredients
• Always close the lid when the device is in operation. -
Lower the basket with food slowly into the oil. Be careful not to spray the oil. Take the basket always with the handles of the oil pan and drain the fried food for 10-20 seconds.
-
Do not use the appliance if there is still water in the lid or in the pot.
- Place the fry pot on a heat resistant, level surface.
- Make sure that the vent grille in the cover is always free. Note: The vapor that escapes through the grid can be very hot.
- The amount of oil in the pan must always be up above the minimum specification. Never use the unit when there is no or too little or too much oil in the pan.
- Do not place flammable objects on or near the appliance. If the oil catches fire, close the lid and remove the plug from the socket. Never try to extinguish the fire with water.
- Never leave this appliance unattended.
This appliance can be used by children, starting from the age of 8 and up. And by persons with a physical or sensory limitation as well as, mentally limited persons or persons with a lack of experience and knowledge. On the condition that these persons have received the necessary instruction on how to use this appliance in a safe way and they must also know the dangers that can occur in using this appliance.
Children cannot be allowed to play with the appliance.
Maintenance and cleaning of the appliance, cannot be done by children younger than 8 year old.
This appliance is suitable to be in an household environment and in similar surroundings such as :
- Kitchen for personnel of shops, offices or other similar professional surrounding.
- Farms
- Hotel or motel rooms and other surroundings with a
residential character
• Guest rooms or similar
Attention : This appliance can not be used with external timer or separate remote control.
PARTS

-
Oil reservoir 7. Temperature control dial
-
Handles 8. Outside casing
-
Lid
-
Viewing window
-
Heating indicator
-
Ready indicator
9.
Wire
basket
THERMOSTAT
The thermostat is adjustable between 70^ and 190^ C. The green “ready indicator” lights up automatically when the appliance is switched on and the temperature control dial is in the OFF position. The indicator light will go out when the temperature increases and will
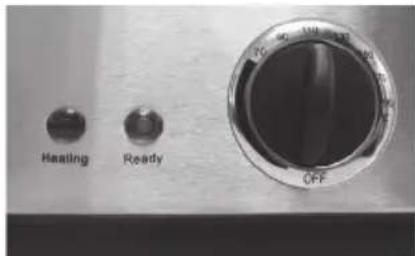
switch back on once the desired temperature has been reached.
The red “heating indicator” will light up when the oil is busy heating up. The indicator light will go out again when the desired temperature has been reached.
INSTRUCTIONS FOR FIRST TIME
Carefully remove the appliance from its packaging. Remove the wire basket from the oil reservoir. Clean the oil reservoir, the inside of the appliance and the bottom of the lid with a dry cloth. Do not submerge the outside casing in water. Carefully dry the appliance and its components.
PREPARING FOOD
- Clean and cut the food products into equal sizes ready for frying.
- Do not put too much food into the basket in one go (temperature is lowered). It is better to divide the amount to be fried into two loads and to fry in two rounds.
- Make sure that the food is as dry as possible. Be very careful with water, never allowing any to come into contact with the hot frying oil, mixing hot oil with water leads to spitting oil and is dangerous.
- The best fries are obtained when the potatoes are cut into equal shapes and sizes, then washed and thoroughly dried and finally fried during two frying sessions.
- Remove any possible ice from any frozen food products.
FRYING
- Make sure that the temperature control dial is set to the OFF position.
- Open the lid.
- Carefully pour oil into the oil reservoir, minimum 0,8 litre, maximum 1,0 litre depending on the type of food product.
- Rub a small amount of cold oil into the bottom of the lid's viewing window to prevent condensation.
- Carefully close the lid.
- When you plug the appliance into the electric socket the red (heating) light will switch on.
- Adjust the temperature control dial to the desired temperature (see table).
- When the oil has reached the desired temperature the green (ready) light will switch and the red light will switch off.
- Gently lower the wire basket containing the food into the oil placing the lid on top.
- Let the food fry for the necessary desired length of time (see table).
- When the food is fried, open the lid (be careful with hot steam) and hang the basket on the edge of the oil reservoir. Leave the basket containing the fried food to drain for 10 to 30 seconds.
- Empty the basket carefully into a dish. Put the lid back into the oil, adjust the temperature control dial to “OFF” and remove the plug from the electric socket. Do not move the fryer until the oil has completely cooled off.
- Refresh the oil after approximately 10 frying sessions, depending on the type of food products fried.
COOKING TIPS
- If you want to fry different types of food, begin with the food needing the lowest temperature (see table).
- If you wish to fry the food twice (for example with fries), allow 2 to 4 minutes between frying sessions. The green “Ready” light may go on and off during frying. Lower the basket slowly and gently into the hot oil, especially in the case of fries, as they contain more water than other products and may cause the oil to sputter.
- Pre-fried food needs to be fried at a higher temperature than completely raw food.
- Never fill the basket up more than 2 thirds of its capacity. If you do fill it all the way up the temperature the temperature of the oil will possibly decrease leading to a less pleasing fried product.
- Be sure to refresh the oil if it begins to smell, becomes dark, has a strange taste, becomes thick or begins to foam. Refresh the oil completely, in one go; never mix fresh oil with old. Some preparations, such as products coated in fine breadcrumbs or strongly seasoned/flavoured products and meat preparations may cause the oil to become old faster than expected. Take this into account; keep the oil clean.
- Regular changes of oil will make cleaning the frying basin and basket easier.
- Heating the oil for long periods will reduce its quality. Switch your fryer off immediately after each session.
TABLE
| Food Temperature | °C Weight (gr) Time | (min) | |
| Fish 160 200 6-8 | |||
| Shrimp 180 220 4-5 | |||
| Chicken slices 170 2 | 50 12-18 | ||
| Fries | See below | ||
| Meat 180 250 7-10 | |||
| Party snacks 180 200 | 3-4 |
FRIES
Preferably use thick, not too new potatoes. Cut them into thin slices. Rinse the slices under running water then thoroughly dry them.
Fry your fries twice:
- First round of frying: 150-160°C: 5 to 10 minutes (depending on the amount placed in the basket)
- Second round: 175 - 180^ : 2 to 4 minutes.
Make sure that the fries are well drained before serving.
FONDUE
It is best to use new oil for fondue. Do not mix different types of oil.
Never add water to the oil. Do not add herbs/spices to the oil and do not use oil infused or flavoured with herbs. Make sure that the appliance is completely dry before starting.
- Remove the lid from the appliance (fig.)
- Fill the oil reservoir to above the minimum and under the maximum mark.
- Set the fondue unit on the oil reservoir and place the little forks.
Be careful not to damage the oil reservoir with the metal forks.
The temperature and the frying time depends greatly on the type of fondue: Meat, cheese or Chinese fondue.
CLEANING
Make sure that the temperature control dial is set to the OFF position, the plug is removed from the electric socket and the appliance and oil have completely cooled off. Open the lid to 90^ (oil drips) and remove it from the appliance.
Remove the basket from the oil reservoir.
Clean the outside of the appliance with a dry cloth. Never use abrasive or aggressive scouring pads, brushes or cleaning agents.
Wash the basket with warm soapy water. Then rinse with clean water and dry thoroughly.
Pour the cold oil out of the reservoir and deposit it at a recycling plant.
Rub the remaining oil away with absorbent paper. Further clean the oil reservoir with a dry cloth and a very small amount of washing up liquid. The oil reservoir and the fondue unit are not dishwasher resistant.
Rinse the reservoir with water and dry carefully with a clean dry cloth.
SOLUTIONS
| ProblemCauseSolution | ||
| Steam is coming from under the lid | The lid has not been placed correctly. | Close the lid |
| Steam is coming from under the lid and the oil is in danger of cooking over. | The quantity of oil exceeds the MAX-marker.The basket contains too much food.The food contains too much moisture. | Carefully remove the excess oil, after it has completely cooled off.Follow the instructions in the table.Always dry the food before frying it. |
| The fried food is not crispy (enough) | The temperature is too low.The basket contains too much food. | Increase the temperature.Follow the instructions in the table. |
POPIS FRITÉZY
natural_image
Illustration of two kitchen electric cookers with one moving and the other holding a digital display (no text or symbols)FONDUE


Brand : DOMO
Model : DO-455FR
Category : Deep fryer