
DO530FR - Deep fryer DOMO - Free user manual and instructions
Find the device manual for free DO530FR DOMO in PDF.


| Brand | DOMO |
| Model | DO530FR |
| Product type | Oil-free air fryer |
| Temperature range | 80 - 200 °C |
| Timer | 1 - 60 minutes |
| Automatic programs | 8 preset programs |
| Display | LED display with temperature, timer, symbols |
| Power on | Function button (hold 3s) and start/pause button |
| Preheating | Automatic, symbol disappears when temperature reached |
| Auto shut-off | Yes, at end of cooking or when removing the basket |
| Materials | Removable basket and grid |
| Cleaning | Basket and grid dishwasher safe or wash with hot water and mild detergent; heating element with small brush |
| Safety | Do not immerse, stable surface, minimum 30 cm clearance around, hot steam |
| Warranty | 2 years (accessories 6 months) |
| Customer service | Linea 2000 - +32 14 21 71 91, info@linea2000.be |
| Included accessories | Fryer grid, basket, handle |
Frequently Asked Questions - DO530FR DOMO
User questions about DO530FR DOMO
0 question about this device. Answer the ones you know or ask your own.
Ask a new question about this device
Download the instructions for your Deep fryer in PDF format for free! Find your manual DO530FR - DOMO and take your electronic device back in hand. On this page are published all the documents necessary for the use of your device. DO530FR by DOMO.
USER MANUAL DO530FR DOMO
natural_image
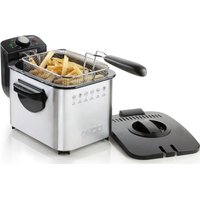
Modern stainless steel Domo air fryer with digital display and control buttons (no visible text or symbols on the device itself)DO530FR
| Handleiding Deli-fryer | |
| Mode d'emploi Deli-fryer | |
| Gebrauchsanleitung Deli-fryer | |
| Instruction booklet Deli-fryer | |
| Manual de instrucciones Deli-fryer | |
| Istruzioni per l'uso Deli-fryer | |
| Návod k použití Horkovzdušná fritéza Deli-Fryer | |
| Návod na použitie Teplovzdušná fritéza Deli-Fryer |

natural_image
Two black-and-white icons: a triangular warning symbol with an exclamation mark and an open book with stacked pages (no text or symbols)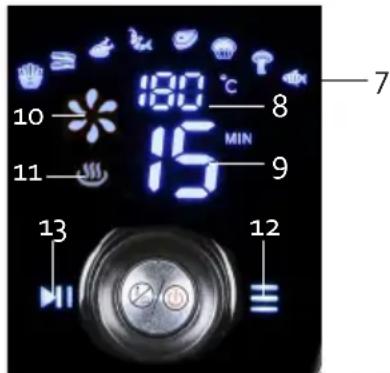
natural_image
Recycling symbol icon with three chasing arrows forming a triangle (no text or labels)
AVANT LA PREMIÈRE UTILISATION
natural_image
Recycling symbol icon with three chasing arrows forming a triangle (no text or labels)
natural_image
Recycling symbol icon with three chasing arrows forming a triangle (no text or labels)All of our products are always submitted to a strict quality control before they are sold to you.
Should you nevertheless experience problems with your device, we sincerely regret this. In that case, we kindly request you to contact our customer service.
Our staff will gladly assist you.

+32 14 21 71 91

info@linea2000.be
Monday – Thursday: 8.30 – 12.00 and 13.00 – 17.00
Friday: 8.30 - 12.00 and 13.00 - 16.30
This appliance has a two year warranty period. During this period the manufacturer is responsible for any failures that are the direct result of construction failure. When these failures occur the appliance will be repaired or replaced if necessary. The warranty will not be valid when the damage to the appliance is caused by wrong use, not following the instructions or repairs executed by a third party. The guarantee is issued with the original till receipt. All parts, which are subject to wear, are excluded from the warranty. If your device breaks down within the 2-year warranty period, you can return the device together with your receipt to the shop where you purchased it.
The guarantee on accessories and components that are liable to wear-and-tear is only 6 months.
The guarantee and responsibility of the supplier and manufacturer lapse automatically in the following cases:
- If the instructions in this manual have not been followed.
· In case of incorrect connection, e.g., electrical voltage that is too high.
· In case of incorrect, rough or abnormal use.
· In case of insufficient or incorrect maintenance.
· In case of repairs or alterations to the device by the consumer or non-authorised third parties. - If the customer used parts or accessories that are not recommended or provided by the supplier / manufacturer.
SAFETY INSTRUCTIONS
When using electrical appliances, basic safety precautions should always be taken, including the following:
- Read all instructions carefully. Keep this manual for future reference.
- Make sure all packaging materials and promotional stickers have been removed before using the appliance for the first time. Make sure children cannot play with the packaging materials.
· This appliance is intended to be used in household and similar applications such as:
· staff kitchen areas in shops, offices and other working environments;
- farm houses;
· by clients in hotels, motels and other residential type environments;
- bed and breakfast type environments.
· Children should be supervised to ensure that they do not play with the appliance.
This appliance can be used by children aged from 16 years and above and persons with reduced physical, sensory or mental capabilities or lack of experience and knowledge if they have been given
supervision or instruction concerning use of the appliance in a safe way and understand the hazards involved. Children shall not play with the appliance. Cleaning and user maintenance shall not be made by children unless they are older than 16 and supervised.
- Keep the appliance and its cord out of reach of children younger than 16 years.
- Attention: This appliance cannot be used with an external timer or a separate remote control.
- Read all instructions before use.
- Before use, check if the voltage stated on the appliance corresponds with the voltage of the power net at your home.
- Do not let the cord hang on a hot surface or on the edge of a table or counter top.
- Never use the appliance when the cord or plug is damaged, after malfunction or when the appliance itself is damaged. In that case, take the appliance to the nearest qualified service center for check-up and repair.
- Close supervision is necessary when the appliance is used near or by children.
- The use of accessories that are not recommended or sold by the manufacturer can cause fire, electrical shock or injuries.
- Unplug the appliance when it is not in use, before assembling or disassembling any parts and before cleaning the appliance. Put all buttons and knobs into the 'off' position and unplug the appliance by grasping the plug. Never unplug by pulling the cord.
· Do not leave a working appliance unattended. - Never place this appliance near a gas stove or electrical stove or in a place where it may come into contact with a warm appliance.
- Do not use the appliance outdoors.
- Only use the appliance for its intended use.
· Always use the appliance on a steady, dry and level surface. - Only use the appliance for domestic use. The manufacturer can not be held responsible for accidents that result from improper use of the appliance or not following the instructions described in this manual.
· All repairs should be carried out by the manufacturer or its aftersales service.
· Never immerse the appliance, the cord or the plug in water or any other liquid. - Make sure that children do not touch the cord or appliance.
- Keep the cord away from sharp edges and hot parts or other heat sources.
- Before use, remove all packaging materials and any promotional stickers.
The appliance can become hot during use. Keep the power cord away from hot parts and don't cover the appliance.
- Connect the appliance to an earthed socket.
· Make sure that it is not possible for any liquid to enter the appliance. - Make sure that all ingredients stay in the basket, so that they do not come into contact with the heating elements.
- Do not cover the air inlet or outlet when the appliance is switched on.
· Never fill the frying pan with oil. - Do not touch the inside of the appliance when it is in use.
- Do not place the appliance against a wall or other appliances. Always leave a free space of at least 10 cm around the appliance.
· Do not place anything on top of the appliance.
- When the appliance is operating, hot steam may escape from the air inlet and/or outlet. Keep your hands and face at a safe distance. Also be careful when taking the frying pan out of the fryer. Hot steam or air may escape.
- When you see dark smoke coming from the appliance, immediately pull the plug out of the socket. Wait until the smoke development has stopped before removint the frying pan from the fryer.
- Place the appliance on a flat, stable and heat-resistant surface.
· Let the appliance cool down for at least 30 minutes before moving or cleaning it.
SAVE THESE INSTRUCTIONS FOR FUTURE REFERENCE
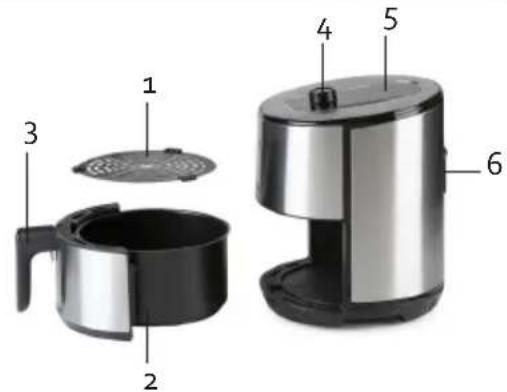
PARTS
-
Fryer grille
-
Frying pan
-
Handle
-
Mode dial
-
Display
-
Air inlet and outlet
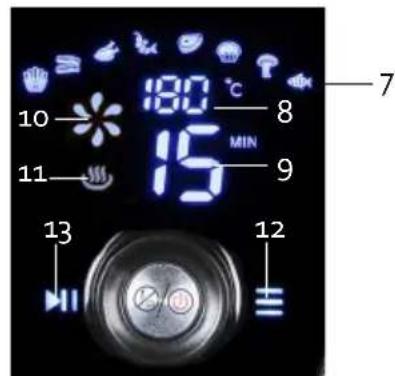
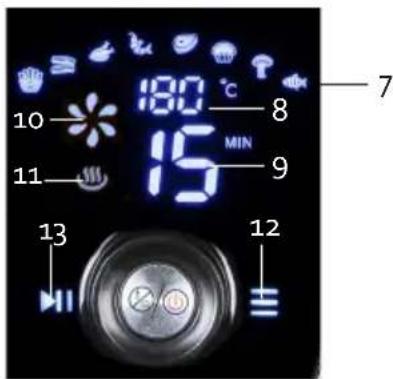
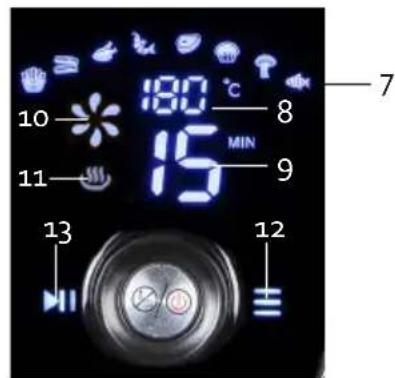
DISPLAY
-
Automatically set programs
-
Temperature
-
Timer
-
Motor in operation symbol
-
Preheating symbol
-
Menu dial
-
Start/Pause button
BEFORE THE FIRST USE
- Remove all packaging materials and any promotional stickers.
· Clean the fryer and the grille with warm water, washing up liquid and a non-abrasive sponge.
· Wipe the inside and outside of the fryer clean with a soft cloth. - Caution: you may not add any frying oil or fat in the frying pan.
USE
- Place the appliance on a flat, stable and heat-resistant surface. Make sure that there is at least 30 cm of free space around the appliance.
- Check that the grille is inserted in the fryer. Push the grille into place so that it sits level on the bottom. Do not place any oil or fat in the fryer.
- Slide the frying pan with the empty grille inside the fryer.
Caution: Never use the frying pan without the grille inside.
-
Plug the power cord into a socket. A beep indicates that the device is in standby mode. Turn the power on by holding down the mode dial for 3 seconds.
-
Set the desired temperature (80-200°C) by pushing the mode dial again. The temperature will blink on and off on the display to indicate that you can now set it. Turn the mode dial until you reach the desired temperature.
- Press the mode dial again to set the timer (1-60 minutes). The time will blink on and off on the display to indicate that you can now set it. Turn the mode dial until you reach the desired time.
- Press the start/pause button to confirm. The preheating symbol and the motor in operation symbol will appear on the display. The unit automatically preheats. The preheating time depends on the selected temperature and the ambient temperature, with a minimum of 3 minutes.
- The unit has reached the desired temperature when the preheating symbol disappears. The motor in operation symbol remains visible on the display as long as the unit is switched on. Remove the deep fryer from the device. The unit will automatically stop working.
- Place the ingredients in the deep fryer with the roaster. Do not put too many ingredients in the appliance so that the ingredients do not touch the heating elements. Pay attention to the MAX indication in the deep fryer here.
- Put the deep fryer with the filled roaster back in the device. The deep fryer will automatically start working again (if the set time has not yet expired).
- At the end, a bell will ring to indicate that your food is ready. The unit then switches off automatically. You can also turn the unit off sooner by holding down the mode dial for a few seconds.
- Remove the deep fryer from the appliance and place it on a heat-resistant holder. You can put the food in a bowl or take it out of the deep fryer with heat-resistant tongs that do not scratch the non-stick coating of the deep fryer.
COMMENTS
- An acoustic signal is emitted for each setting you set on the device.
- You can adjust the set temperature or time at any time while the unit is in operation.
- Excess oil is collected in the deep fryer.
- If your food is not ready after the set time has elapsed, you can always switch the appliance back on for a few minutes.
- You can also fill the roaster at the beginning and place the filled roaster in the deep fryer from the beginning, instead of waiting for the appliance to preheat. In this case, add 3 minutes to the normal frying time.
AUTOMATIC PROGRAMS
The device has 8 automatically set programs. To set one of these, press the menu button until you have selected the desired program. Press the start/pause button to activate this program. At the end, a bell will ring to indicate that your food is ready. The unit then switches off automatically.

200°C
25-30min

180°C
6-10min

180°C
25-30min

180°C
12-18min

180°C
12-18min

180°C
8-15min

160°C
15-20min

200°C
15-20min
These programmes are only given as an indication. The results depend on the size, shape and amount of the food.
IMPORTANT FRYING TIPS
- It is recommended to shake the fries every 5 minutes, so that they are baked evenly. This also applies to other, smaller snacks that cover each other when they are inserted in the grille.
- You can add a table spoon of oil for a crunchier result, for instance olive oil, sunflower oil or groundnut oil. Mix this oil well with the raw fries before placing the fries in the grille. Other ingredients can be sprayed with oil or coated with oil with a brush. Always make sure that there is no excessive oil added in the grille or frying pan. Do not use too much oil. Then the fries will become less crisp and greasy.
- Put fresh, raw fries in water for 30 minutes before frying them, so that the starch of the potatoes is washed away. Dry them thoroughly afterwards.
· Do not cook very greasy foods in this fryer.
- When you are preparing greasy ingredients, white smoke might come out of the appliance. However, this does not affect the operation of the appliance or the end result. Also when the fryer is not properly cleaned, or if any oil is left behind in the frying pan, white smoke might develop.
- Snacks that can be cooked inside an oven can also be cooked inside this fryer.
- Smaller quantities are fried more evenly than larger quantities.
- Thinner fries will be crispier than thicker fries.
- Place a baking tin or oven tray on the grille if you want to make a cake or quiche, or fragile or stuffed ingredients.
- You can also use this fryer to reheat ingredients. Set the fryer to 150^ C , for 10 minutes.
- Ingredients that need to be cooked at the same temperature can be placed inside the basket together and cooked together.
- Frozen products do not need to be thawed beforehand.
- You can use baking paper or aluminum foil or trays in the grille of the fryer, but do be very careful when you do this. Do not cover the whole bottom of the grille. The air should be able to circulate well through the appliance, the grille and the ingredients. Also, there should be enough food on the paper or foil, so that it stays in place. Otherwise, the strong air flow will cause the paper or foil to be sucked into the heating elements, which could cause fire. Make sure that the baking paper or aluminum foil is larger than the food itself. However, the paper or foil should not come out of the grille.
- Oven snacks always give the best, crispiest result. But also frozen snacks suitable for a regular fryer can be fried in this appliance.
BAKING TIMES AND TEMPERATURES
The table below holds a few guidelines for cooking and frying different ingredients. Caution: these are merely guidelines. The times also depend on the quantity and thickness of the food. Also always take into account the above mentioned frying tips.
| Fries, fresh first 18 min. 140°C | ||
| then 12 min. 180°C | ||
| Fries, frozen 12-20 min. 200°C | ||
| Potato wedges 18-22 min. 180°C | ||
| Croquettes 15 min. 185°C | ||
| Cheese croquettes, frozen 12 min. 180°C | ||
| Chicken nuggets, fish sticks and other snacks 6-10 min. | 200°C | |
| Chicken fillet | 15 min. 200°C | |
| Chicken schnitzel, frozen | 12 min. 180°C | |
| Steak 8-12 min. 180°C | ||
| Fish 10-15 min. 180°C | ||
| Mushrooms 3-4 min. 180°C | ||
| Spring rolls 8-13 min. 200°C | ||
| Drumsticks 15-20 min. 180°C | ||
| Meatballs 6 min. 180°C | ||
| Hamburger 6-10 min. 180°C | ||
| Satay 10 min. 190°C | ||
| Prawns 6 min. 180°C | ||
| Egg, boiled hard 12 min. 160°C | ||
| Egg, boiled soft | 6-7 min. 160°C | |
| Vegetables | 15 min. 200°C | |
| Vegetable fries - hard | 10-13 min. 200°C | |
| Vegetable fries - soft | 7 min. | 200°C |
| Apples | 7 min. | 180°C |
| Banana | 7 min. | 200°C |
| Puff pastry snacks | 10 min. 180°C | |
| Ready to bake bread rolls | 7 min. | 200°C |
| Cake | 20 min. | 165°C |
| Muffins | 15-20 min. 160°C |
CLEANING AND MAINTENANCE
- Clean the appliance after each use.
Do not use any metal or abrasive cleaning products. These could damage the appliance. - Unplug the appliance.
- Let the appliance cool down for at least 30 minutes before moving or cleaning it.
- Wipe the outside of the appliance clean with a damp cloth.
- Clean the frying pan and grille with warm water, some washing-up liquid and a non-abrasive sponge.
- Clean the inside of the appliance with warm water and a soft sponge.
- Clean the heating element with a brush to remove any food residues.
• Dry all parts thoroughly.
ENVIRONMENTAL GUIDELINES
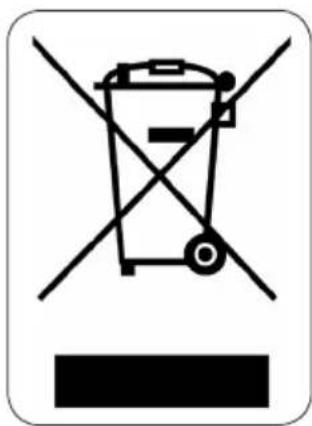
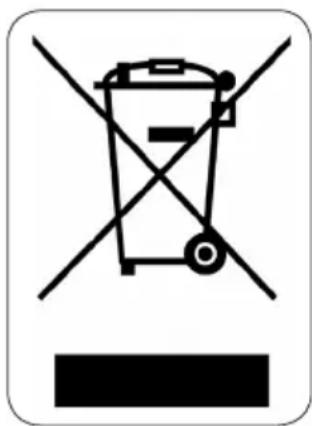
This symbol on the product or on its packaging indicates that this product may not be treated as household waste. Instead it must be brought to the applicable collection point for recycling of electrical and electronic equipment. By ensuring this product is disposed of correctly, you will help prevent potential negative consequences for the environment and human health, which could otherwise be caused by inappropriate waste handling of this product. For more detailed information about recycling of this product, please contact your local city office, your household waste disposal service or the shop where you purchased the product.
natural_image
Recycling symbol icon with three chasing arrows forming a triangle (no text or labels)The packaging is recyclable. Please treat the packaging ecologically.
GARANTIA
natural_image
Recycling symbol icon with three chasing arrows forming a triangle (no text or labels)
PRIMA DELL'USO
natural_image
Recycling symbol icon with three chasing arrows forming a triangle (no text or labels)
PŘED PRVNÍM POUŽITÍM
OHLED NA ŽÍVOTNÍ PROSTŘEDÍ
natural_image
Recycling symbol icon with three chasing arrows forming a triangle (no text or labels)TENTO MANUÁL SI UCHOVAJTE AJ K NEJSKOŠIEMU NAHLIADNUTIU
ČASTI
PRED PRVÝM POUŽITÍM
natural_image
Recycling symbol icon with three chasing arrows forming a triangle (no text or labels)
- AVANT LA PREMIÈRE UTILISATION
- SAFETY INSTRUCTIONS
- PARTS
- DISPLAY
- BEFORE THE FIRST USE
- USE
- COMMENTS
- AUTOMATIC PROGRAMS
- IMPORTANT FRYING TIPS
- BAKING TIMES AND TEMPERATURES
- CLEANING AND MAINTENANCE
- ENVIRONMENTAL GUIDELINES
- GARANTIA
- PRIMA DELL'USO
- PŘED PRVNÍM POUŽITÍM
- OHLED NA ŽÍVOTNÍ PROSTŘEDÍ
- ČASTI
- PRED PRVÝM POUŽITÍM
Brand : DOMO
Model : DO530FR
Category : Deep fryer