
YUFE50M4SS - Stapler WHIRLPOOL - Free user manual and instructions
Find the device manual for free YUFE50M4SS WHIRLPOOL in PDF.

| Product type | Electric range |
| Brand | Whirlpool |
| Model | YUFE50M4SS |
| Dimensions (H x W x D) | 35 7/16 x 23 5/8 x 23 5/8 inches |
| Power supply | 120/240 V ~ 60 Hz or 120/208 V ~ 60 Hz |
| Total electrical power | 9.6 kW (120/240 V) / 7.2 kW (120/208 V) |
| Minimum fuse protection | 40 A |
| Cable type and section | DTR 4x10 AWG |
| Burners / cooking zones | 4 cooking zones: Left rear 6.3" 1500 W (single), Left front 4.7-8.3" 750-2200 W (double), Right front 5.5" 1200 W (single), Right rear 7" 1800 W (single) |
| Oven | Traditional electric oven with functions: Bake, Steam Clean, Convection, Defrost, Air Fry, Broil |
| Oven bulb | 15-25 W (incandescent or halogen G9, max 60 W) |
| Broiler consumption | 2.2 kW |
| Safety | Anti-tip device provided, key lock, child safety |
| Warranty | 1 year parts and labor, 2 to 5 years for certain components |
| Package contents | User manual, metal rack, anti-tip kit |
Frequently Asked Questions - YUFE50M4SS WHIRLPOOL
User questions about YUFE50M4SS WHIRLPOOL
0 question about this device. Answer the ones you know or ask your own.
Ask a new question about this device
Download the instructions for your Stapler in PDF format for free! Find your manual YUFE50M4SS - WHIRLPOOL and take your electronic device back in hand. On this page are published all the documents necessary for the use of your device. YUFE50M4SS by WHIRLPOOL.
USER MANUAL YUFE50M4SS WHIRLPOOL
Installer should leave these instructions with appliance. Consumer should read these instructions before using the appliance and should retain them for future reference.
natural_image
Simple line drawing of a steaming cupcake (no text or symbols)YUFE50M4SS
EN
285.3062.24/R.AB/31.10.2025/3-1
7732187997

LISTED
UL-US-L322635-11-
52801102-5

Important Safety Instructions Read and save these instructions
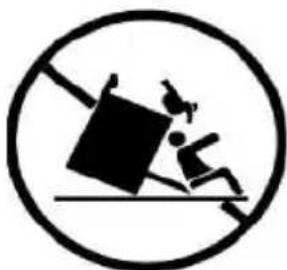
TO PREVENT TIPPING: If the information in this manual is not followed exactly, a fire or explosion may result causing property damage, personal injury or death.
natural_image
Symbolic icon of a person using a lever to lift a block, enclosed in a circle (no text or numbers present)
WARNING:

natural_image
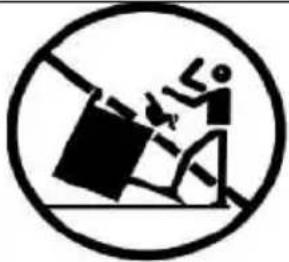
Prohibition sign depicting a person falling off a large block, enclosed in a circle (no text or symbols)"A child or adult can tip the range and be killed."
Install the anti-tip device packed with range to the structure wall or floor."
"Engage the range to the anti-tip device by sliding range so that rear foot of the range slides in to the bracket as shown in Figure.2 and 3."
"Re-engage the anti-tip device if the range is moved."
See installation instructions.
"Failure to follow these instructions can result in in death or serious burns to children or adults."

natural_image
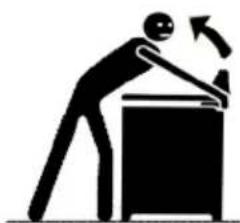
Silhouette of a person bending over a table with an arrow indicating motion (no text or symbols)
WARNING:
DO NOT OPERATE THE RANGE WITHOUT ANTI- TIP DEVICE IN PLACE AND ENGAGED
"After installation cautiously grip the rear of the range to ensure the anti-tip bracket is engaging the rear foot of range."
Check for proper installation and use of the anti-tip bracket. Carefully tip the range forward pulling from the back to ensure that the anti-tip bracket engages the range leg and prevents tip-over. Range should not move more than 1" (25 mm).

IMPORTANT:
This appliance is intended for normal household use only. It is not approved for outdoor or other non-household uses (including sea or air-going vessels). See the Statement of Limited Warranty. If you have any questions, contact the manufacturer.
Do not repair or replace any part of the appliance unless specifically recommended in this manual. Refer all servicing to a factory authorized service center.
Explanation of symbols
Throughout this User Manual the following symbols are used:
i Important information or useful hints about usage.
Warning for hazardous situations with regard to life and property.
Warning for electric shock.
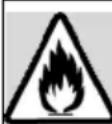
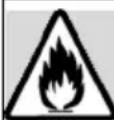
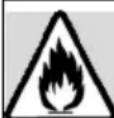
Warning for risk of fire.
Warning for hot surfaces.
DANGER indicates a hazardous situation which, if not avoided, will result in death or serious injury.
WARNING indicates a hazardous situation which, if not avoided, could result in death or serious injury.
CAUTION indicates a hazardous situation which, if not avoided, could result in minor or moderate injury.
NOTICE is used to address practices not related to physical injury.
Dear Customer,
Your product has been manufactured in modern facilities and has passed strict quality control procedures.
To obtain the best performance, we request that you read through this user manual carefully, especially the safety instructions, before using your product and that you keep it for future reference. If this product is given to another consumer, please give them this manual for their reference.

IMPORTANT:
Save these instructions for the local electrical inspectors use.
The instructions will help you to operate the appliance properly and safely.
- Upon delivery, please check that the appliance is not damaged. If you note any transport damage, please contact the shipping company or company where you purchased the appliance immediately and do not connect and operate the appliance!
- When you pass on the appliance to another person, please provide all documents including original sales receipt which should show the date of purchasing. Warranty is not valid if the product is sold second hand.
- If you should decide not to use this appliance any longer (or decide to substitute an older model), before disposing of it, it is recommended that it be made inoperative in an appropriate manner in accordance with health and environmental protection regulations, ensuring in particular that all potentially hazardous parts be made harmless, especially in relation to children who could play with old appliances. Remove the door and the warming drawer before disposal to prevent entrapment.
1 Safety Instructions - Read before use 6
Safety for children 9
Safety when working with electricity .....9
Intended use 10
Disposal 10
Packaging material 10
Future transportation ....11
2 Installation 12
Installation and connection....12
3 Preparation 18
Tips for saving energy 18
Initial use ....18
Time setting 18
First cleaning of the appliance....19
Initial heating ....19
4 How to use the cooktop 20
General information about cooking .....20
Using the burners/plates .....21
5 How to operate the oven 23
General information on baking, roasting and broiling 23
How to use the electric oven 23
Operating modes....24
Using the oven clock 25
Cooking times table 28
How to operate the broil....29
6 Maintenance and care 30
General information 30
Cleaning the burner/plate 30
Cleaning the control panel 30
Cleaning the oven 30
Steam Cleaning 31
Removing the oven door 31
Replacing the oven lamp 32
General Warnings 32
7 General information 33
Overview.... 33
Technical specifications 34
Package contents 35
8 Troubleshooting 36
9 WARRANTY STATEMENT FOR WHIRLPOOL ELECTRIC AND GAS RANGES 37
1 Safety Instructions - Read before use

Basic safety instructions
- This appliance is not intended for use by persons (including children) with reduced physical, sensory or mental capabilities, or lack of experience and knowledge, unless they have been given supervision or instruction concerning use of appliance by a person responsible for their safety.
- Children should be supervised to ensure that they do not play with the appliance.
- Proper installation - Be sure your appliance is properly installed and grounded by a qualified technician
- Never use your appliance for warming or heating the room.
- Wear proper apparel - loose-fitting or hanging garments should never be worn while using the appliance.
- User servicing - Do not repair or replace any part of the appliance unless specifically recommended in the manual. All other servicing should be referred to a qualified technician.
- Use proper pan size - this appliance is equipped with one or more surface units of different size. Select utensils having flat bottoms large enough to cover
the surface unit heating element. The use of undersized utensils will expose a portion of the heating element to direct contact and may result in ignition of clothing. Proper relationship of utensil to burner will also improve efficiency.
- Never leave surface units unattended at high heat settings - boilover causes smoking and greasy spillovers that may ignite.
- Protective liners- do not use aluminum foil to line oven bottoms, except as suggested in the manual. Improper installation of these liners may result in a risk of electric shock, or fire.
- Glazed cooking utensils - only certain types of glass, glass/ceramic, ceramic, earthenware, or other glazed utensils are suitable for range-top service without breaking due to the sudden change in temperature.
- Utensil handles should be turned inward and not extend over adjacent surface units - to reduce the risk of burns, ignition of flammable materials, and spillage due to unintentional contact with the utensil, the handle of a utensil should be positioned so that it is turned inward, and does
not extend over adjacent surface units.
- Use care when opening door- let hot air or steam escape before removing or replacing food.
- Placement of oven racks -always place oven racks in desired location while oven is cool. If rack must be moved while oven is hot, do not let potholder contact hot heating element in oven.
- Use only dry potholders- moist or damp potholders on hot surfaces may result in burns from steam. Do not let potholder touch hot heating elements. Do not use a towel or other bulky clothes.
- Do not cook on broken cook-top - if cook-top should break, cleaning solutions and spillovers may penetrate the broken cook-top and create a risk of electric shock. Contact a qualified technician immediately.
- Clean cook-top with caution - if a wet sponge or cloth is used to wipe spills on a hot cooking area, be careful to avoid steam burn. Some cleaners can produce noxious fumes if applied to a hot surface.
- "Do not touch surface units or areas near units - Surface units may be hot even though they are dark in color. Areas near surface units may become hot enough to
cause burns. During and after use, do not touch, or let clothing or other flammable materials contact surface units or areas near units until they have had sufficient time to cool. Among these areas are the cook-top and surfaces facing the cook-top."
- "Do not touch heating elements or interior surfaces of oven - Heating elements may be hot even though they are dark in color. Interior surfaces of an oven become hot enough to cause burns. During and after use, do not touch, or let clothing or other flammable materials contact heating elements or interior surfaces of oven until they have had sufficient time to cool. Other surfaces of the appliance may become hot enough to cause burns - among these surfaces are oven vent openings and surfaces near these openings, interior surfaces of the oven cavity, oven doors, and window"
- Never use when judgment or coordination is impaired by the use of alcohol and/or drugs.
- Do not operate the appliance if it is defective or shows any visible damage.
- Be careful when using alcoholic drinks in your dishes. Alcohol
evaporates in high temperatures and may cause fire since it will catch fire when it gets in contact with hot surfaces.
- Do not heat closed food containers and glass jars. Pressure that may build-up in the jar can cause it to burst.
- Do not use the oven for a storage area. Items stored in an oven can ignite.
- Storage in or on Appliance-Flammable materials should not be stored in an oven or near surface units.
- Fire risk! Do not store flammable material in the oven and/or in the warming drawer.
- Keep appliance area clear and free from combustible materials, gasoline, and other flammable vapors.
- Do not use water on grease fires. Smother fire or flame or use dry chemical or foam type extinguisher.
- Do not use the oven to dry newspapers. If overheated, they can cath on fire.
- Do not leave paper products, cooking utensils or food in the oven when not in use.
-
Do not leave empty pots or pans on plates that are switched on. They might get damaged.
-
Since it may be hot, do not leave plastic or aluminum dishes on the surface of appliance. These kind of dishes should not be used to keep food either.
- Do not place baking trays, dishes or aluminium foil directly on-to the bottom of the oven. The heat accumulation might damage the bottom of the oven.
- Keep all ventilation slots clear of obstructions.
- The manufacturer declines all liability for injury to persons or damage to property caused by incorrect or improper use of the appliance.
- Do not use the oven with front door glass removed or broken.
- Check that all controls on the appliance are switched off after use.
- IMPORTANT: Call the authorized service for installation of the appliance to be used. After this procedure, guarantee period will be started.
Safety for children
- WARNING: Stepping, leaning or sitting on the door or drawers of this range can result in serious injuries and also cause damage to the range. Do not allow children to climb or play around the range. The weight of a child on an open door may cause the range to tip, resulting in serious burns or other injury.
- Accessible parts may be hot when the broil is in use. Young children should be kept away.
- Do not leave children alone - children should not be left alone or unattended in area where appliance is in use. They should never be allowed to sit or stand on any part of the appliance.
- Surface units may be hot even though they are dark in color. Areas near surface units may become hot enough to cause burns. During and after use, do not touch or let clothing or other flammable materials contact surface units until they have had sufficient time to cool. Among these areas are (identification of areas) for example, the cook-top and surfaces facing the cook-top.
- WARNING: Do not store items of interest to children in the cabinets above the range or on back guard of a range. Children
climbing on the range to reach items could be seriously injured.
- The packaging materials will be dangerous for children. Keep the packaging materials away from children. Please dispose of all parts of the packaging according to environmental standards.
- WARNING: A child or adult can tip the range and be killed. Verify the anti-tip device has been properly installed to the floor or wall and that the rear foot of the range is engaged to bracket as shown in illustration instructions.
Ensure the anti-tip device is re-engaged when the range is moved by ensuring the foot of the is engaged into the anti-tip device.
Do not operate the range without the anti-tip device in place and engaged.
Safety when working with electricity
- Any work on electric equipment and systems may only be carried out by authorized qualified persons.
-
WARNING: Before installing, turn power OFF at the service panel. Lock service panel to prevent power from being turned ON accidentally.
-
WARNING: Personal injury or death from electrical shock may occur if the range is not installed by a qualified installer or electrician.
- Any additions, changes or conversions required in order for this appliance to satisfactorily meet the application needs must be made by a qualified technician.
- In case of any damage, switch off the appliance and disconnect it from the main supply by removing the fuse or switching off the circuit breaker.
- Ensure that the fuse rating is correct.
- Do not operate the appliance barefooted.
- Never touch the appliance with wet hands or feet.
- Do not soak removable heating elements. Heating elements should never be immersed in water.
Intended use
- The appliance is designed for domestic use only. Commercial use is not admissible.
-
This appliance should not be used for warming the plates under the broil, hanging towels and dish cloths on the handles, for drying and the space heating purposes.
-
All openings in the wall behind the appliance and in the floor under the appliance shall be sealed.
- This appliance is not intended to be used in mobile homes or in recreational vehicles.
- The manufacturer shall not be held liable for any damage caused by improper use or handling errors.
- The appliance can be used for defrosting, baking, roasting and broiling food.
Disposal
Packaging material

DANGER:
Risk of suffocation by the packaging materials!
Packing elements (i.e. plastic bags, polystyrene foam, nails, packing straps, etc.) should not be left around within easy reach of children, as these may cause serious injuries.
The packaging material and transport locks are made from materials that are not harmful to the environment. Please dispose of all parts of the packaging according to environmental standards. This is beneficial to the environment.

CAUTION:
If product will be given to someone for personal use or given to someone for second hand use, User manual, product labels, other related documents, mounting parts etc. should be given with product.
Electrical connection should be done according to User Manual.
Future transportation
Do not carry out cleaning or maintenance operations on the appliance without having previously disconnected it from the electric power supply.

NOTICE:
Do not place other items on the top of the appliance. The appliance must be transported upright.
Store the appliance's original box and transport the appliance in its original carton. Follow the guidance marks that are printed on the carton.

IMPORTANT:
Verify the general appearance of your equipment by identifying possible damage during the transportation.
To prevent the wire shelf and tray inside the oven from damaging the oven door, place a strip of cardboard onto the inside of the oven door that lines up with the position of the trays.
Tape the oven door to the side walls.
If you do not have the original carton
Pack the appliance in bubble wrap or thick cardboard and tape it securely in order to prevent damage during transportation.
2 Installation
To ensure that critical air gaps are maintained under the appliance, we recommend that this appliance is mounted on a solid base and that the feet do not sink into any carpet or soft flooring.
The kitchen floor must be able to carry the weight of the appliance plus the additional weight of cookware and bake ware and food.
- If an appliance hood is to befitted, refer to the manufacturer's instructions regarding fixing height.
- The appliance corresponds to device class 1, i.e. it may be placed with the rear and one side to kitchen walls, kitchen furniture or equipment of any size. The kitchen furniture or equipment on the other side may only be of the same size or smaller.
- Any kitchen furniture next to the appliance must be heat-resistant (212 °F min.).

Important notes to the consumer
Keep this manual for future reference.
- As when using any range generating heat, there are certain safety precautions you should follow. These are listed in the front of this manual. Read and follow carefully.
- Be sure your range is installed and grounded properly by a qualified installer or service technician.
- To eliminate the need to reach over the cooktop, cabinet storage space above the cooktop should be avoided.

Important notes to the installer
Read manual before installing the cooker. Observe all governing codes and ordinances. Be sure to leave these instructions with the consumer.
Be sure your range is installed and grounded properly by a qualified installer or service technician.

IMPORTANT:
Before installing the range in an area covered with linoleum or any other synthetic floor covering, make sure the floor covering can withstand heat at least 90^ F ( 32.2^ C) above room temperature without shrinking, warping or discoloring.
Do not install the range over carpeting unless you place an insulating pad or sheet of 1/44 inch (0.64cm) thick plywood between the unit and carpeting.
Installation and connection

IMPORTANT:
Do not install the appliance next to refrigerators or freezers. The heat emitted by the appliance will lead to an increased energy consumption of cooling appliances.
- For installation the appliance must be connected in accordance with all local electrical regulations.

CAUTION:
Unit is heavy and requires a least two persons or proper equipment to move.

NOTICE: Material damage!
Do not place other items on the top of the appliance. The appliance must be transported upright. The door and/or handle must not be used for lifting or moving the appliance. Take care not to touch the oven heating element also located at the top of the oven cavity, just behind the ridged area. It is recommended to wear gloves and long sleeves to protect hands and forearms from abrasion and potential scratches during the lifting process. It is also recommended to take off watches and jewelry and to wear work shoes during installation for foot protection. Remove the oven door for easier handling and installation.
- The appliance must be placed directly on the floor. It must not be placed onto a base or a pedestal.
Clearances & Dimensions
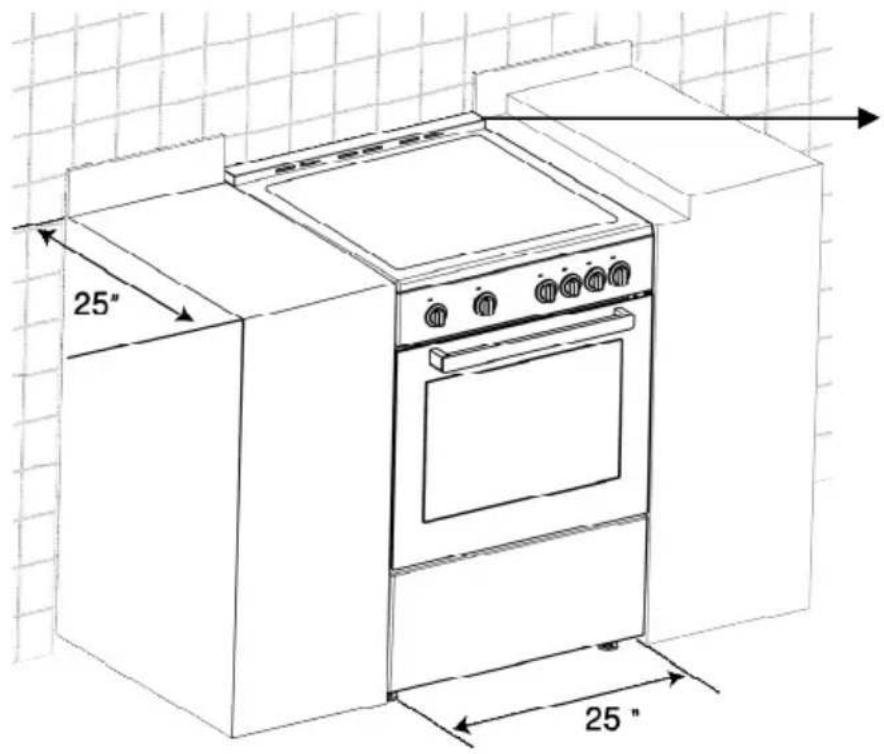
Dimensions that are shown in figures 1 and 1A must be used. Given dimensions provide minimum clearance. There needs to be a 30-inch minimum clearance between the top of the cooking surface and the bottom of unprotected wood or metal cabinets or a 24-inch minimum when bottom of wood or metal cabinets are protected by not less than a 1/4-inch flame retardant millboard covered with not less than no. 29 msg sheet-steel, 0.015-inch stainless steel, 0.024-inch aluminum or 0.020-inch copper.
To eliminate the risk of burns or fire by reaching over heated surface units, cabinet storage space located above the surface units should be avoided. If cabinet storage is to be provided, the risk can be reduced by installing a range hood that projects horizontally a minimum of 5 inches beyond the bottom of the cabinets.
Figure 1
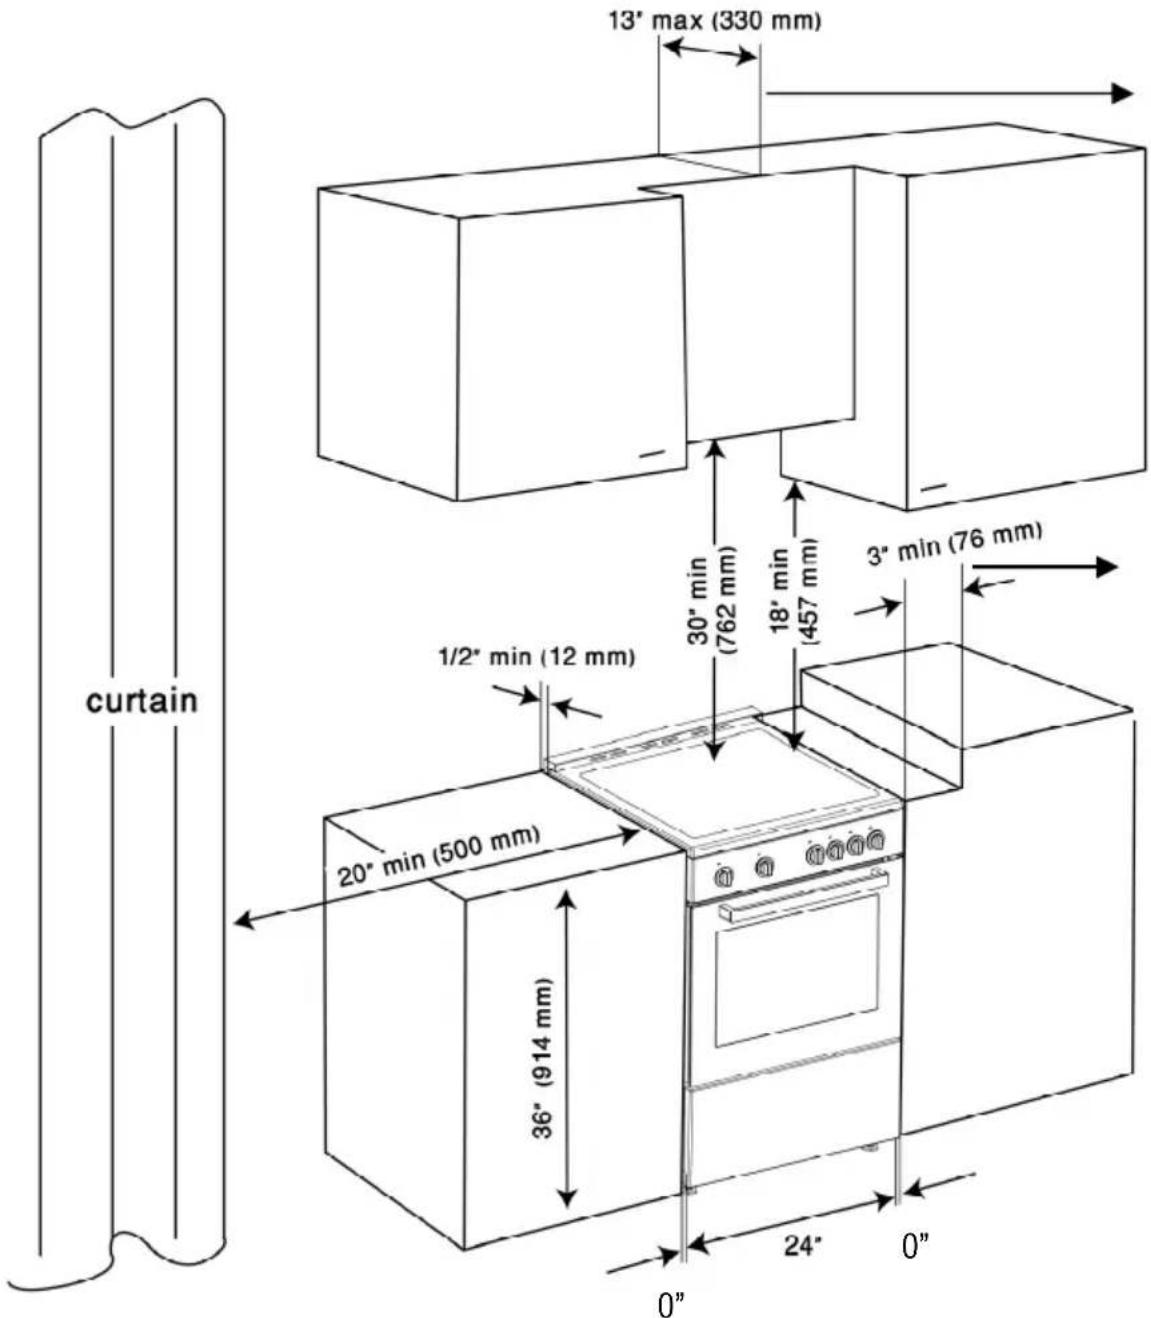
The maximum depth of cabinets installed above top surface cooking section shall be 13 inch(330mm)
Obstruction should be min 3" away from the edge of the range surface.
Figure 1A
Proper positioning of outlet must be flush. Nothing located in shaded area can extend more than 2" (5,1cm) from wall or range will not slide all the way
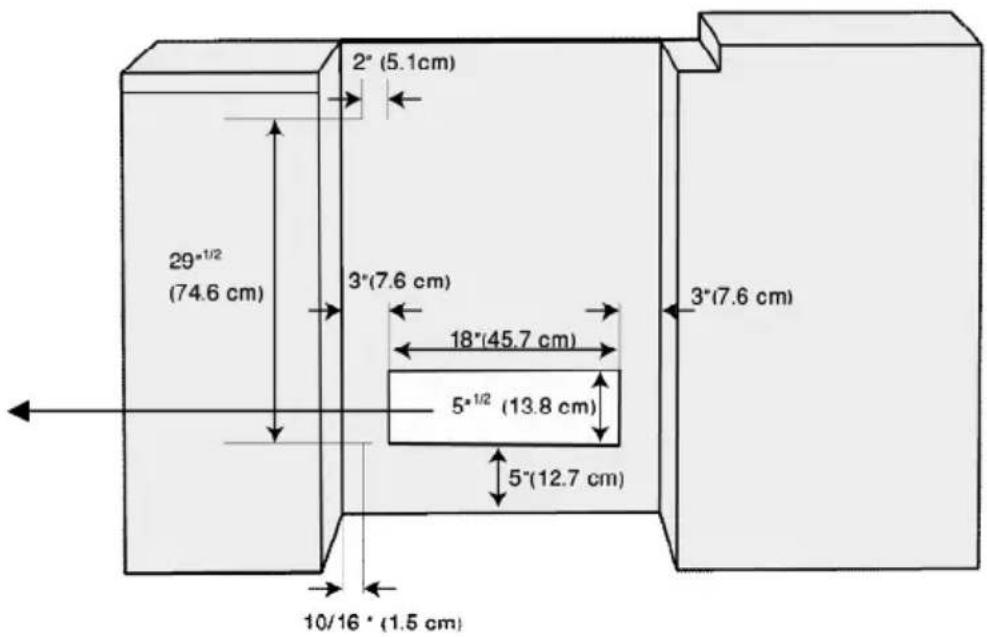
Figure 1B
The island trim is supplied with your range. For the installation, please see "Package content" section on page 37.
Foot Adjustment
The product has adjustable foots. Adjust the height of your product according to worktop height by tightening or loosening the foot then tighten the nut to lock it.
natural_image
Technical illustration of a mechanical assembly with two screws and a cabinet, showing close-ups of each component (no text or symbols present)1 Nut
2 Foot

CAUTION: The height of the product cannot exceed 36 1/32" (915mm) when making foot adjustments.
Anti-Tip stability device installation instructions

WARNING:
All ranges can tip and injury to persons could result.
- A child or adult can tip the range and be killed.
• Install the anti-tip device packed with range to the structure wall of floor. - Engage the range to the anti-tip bracket by sliding range so that the rear foot of range into the bracket as shown in figures.
- Re-Engage the anti-tip device if the range is moved.
• See installation instructions below. - Failure to follow these instructions can result in death or serious burns to children or adults.
A package of anti-tip device is supplied with product. Anti-tip devices, screws, fixing plugs and anti-tip installation template is provided in this package.
Anti-tip brackets must be secured to or / both both wall and floor and must be used for the both rear feet.
- Place the back edge of the template against the wall behind the range.
- Center the template in the gap in where the range will be installed.
- Place anti-tip brackets on the template and mark locations of the screw holes on the floor and wall (4 marks for 4 screws).
- Remove the brackets and templates. Drill to 1/8" (3,0 mm) hols on the marks. See the following illustrations.
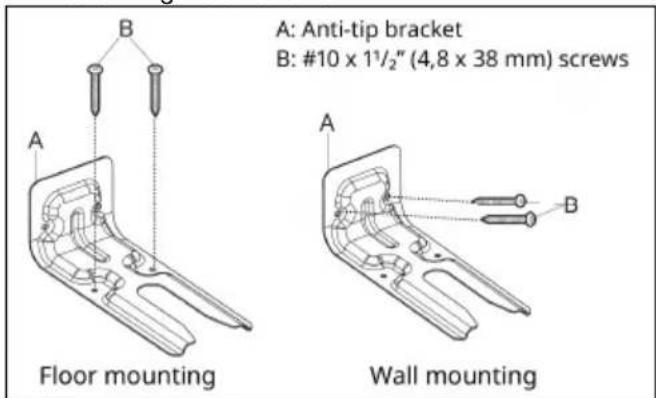
- Screw and secure anti-tip brackets on the floor with screws.
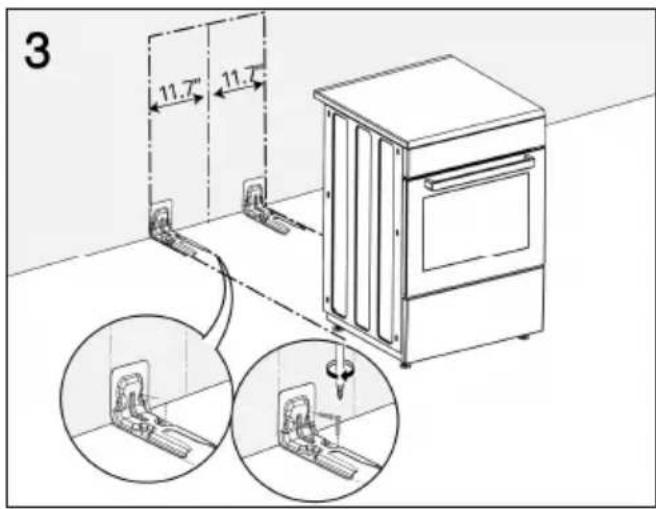
- Please ensure the product is level by adjusting the four feet at the bottom by turning left or right and align level with the work top.
- Slide range into place making sure the anti-tip device engages the foot at rear of range.
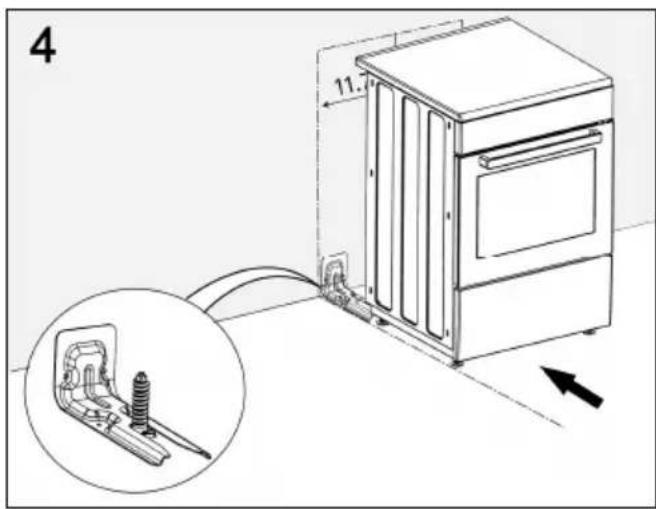
- After installation cautiously grip the rear of the range to ensure the anti-tip bracket is engaging the rear foot of range.
natural_image
Silhouette of a person pushing a box with an arrow, no text or symbols present
WARNING: Tip Over Hazard
A child or adult can tip the range and be killed. Connect anti-tip bracket to anti-tip hole at the back of the range. Reconnect the anti-tip bracket, if the range is moved. Failure to follow these instructions can result in death or serious burns to children and adults.
WARNING: Electrical shock hazard!
- Use extreme caution when drilling holes into the wall or floor. There may be concealed electrical wires located behind the wall or under the floor.
- Identify the electrical circuits that could be affected by the installation of the Anti Tip Device, then turn off power to these circuits.
Failure to follow these instructions may result in electrical shock or other personal injury.
Connection to the main supply

WARNING
Risk of electric shock! Before starting any work on the electrical installation, the electrical power to the range must be shut off while line connections are being made. Failure to follow these instructions can result in death, fire, or electrical shock

IMPORTANT:
Electrical installation should comply with national and local codes.

IMPORTANT:
This appliance must be properly grounded to avoid shock hazard!
Our company shall not hold responsible for any damage caused by using the appliance without grounded receptacle.
This range must be electrically grounded in accordance with local codes, or in their absence, with the National Electrical Code, ANSI/NFPA No. 70-latest edition, in Canada Canadian Electrical Code. Installation should be made by a Licensed electrician.
Disconnect power before servicing. Use 8 gauge copper for 6 gauge aluminium wire. Electrically ground range.
Failure to follow these instructions can result in death, fire, or electrical shock.

WARNING
Risk of electric shock, short circuit or fire by damage of the main power supply! The main power supply lead must not be clamped, bent or trapped or come into contact with hot parts of the appliance. If the main power cable is damaged, it must be replaced by a qualified electrician.

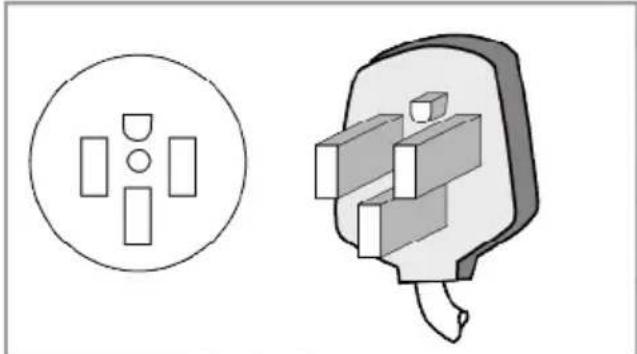
Be sure that electrical connection and wire size adequate and in conformance with CSA standard C22.1, Canadian electrical code part.1-latest edition and all local codes and ordinances a time delay min 40 A fuse or circuit breaker is recommended.
The range is equipped with a CSA International Certified Power Cord intended to be plugged into a standard 14-50 R wall receptacle. Be sure the wall receptacle is within reach of range's final location.
natural_image
Diagram showing a circular component with four rectangular blocks and a 3D schematic of a plug or connector (no text or symbols)- Do not use an extension cord.
- To align the appliance with the worktop, adjust the feet turning right or left hand as required.
For products with cooling fan
The cooling fan cools both the built-in cabinet and the front of the product.

IMPORTANT:
Cooling fan continues to operate for about 20-30 minutes after the oven is switched off.
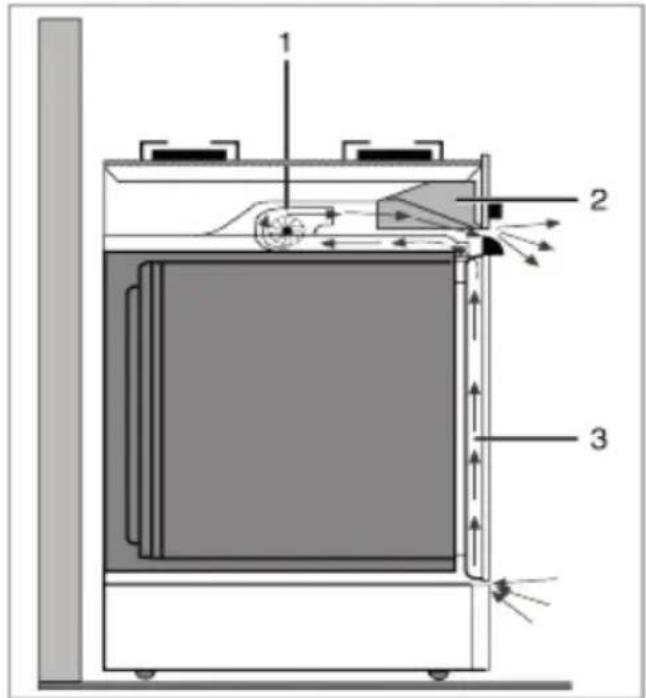
1 Cooling fan
2 Control panel
3 Door
3 Preparation
Tips for saving energy
The following information will help you to use your appliance in an ecological way, and to save energy:
- Use dark colored or enamel coated cookware in the oven since the heat transmission will be better.
- While cooking your dishes, perform a pre-heating operation if it is advised in the user manual or cooking instructions.
- Do not open the door of the oven frequently during cooking.
- Try to cook more than one dish in the oven at the same time whenever possible. You can cook by placing two cooking vessels onto the wire shelf.
- Defrost frozen dishes before cooking them.
- You can save energy by switching off your oven a few minutes before the end of the cooking time (The oven door should not be opened).
- Use pots/pans with cover for cooking. If there is no cover, energy consumption may increase 4 times.
- Select the burner which is suitable for the bottom size of the pot to be used. Always select the correct pot size for your dishes. Larger pots require more energy.
- Take care to use flat base saucepans while cooking on electrical cookers.
- Pots with an even and thick bottom provide better thermal conduction. You can save up to 1/3 of electricity.
- Pots and pans should match the size of plates. The bottom of the pot or pan should not be smaller than the plate.
- Keep plates and pan bottoms clean. Dirt will reduce the heat transmission between plate and pan bottoms.
- In case of longer cooking times, switch off the plate 5 to 10 minutes before the end of the cooking time. When you use the residual heat, you can save up to 20 % of electricity.
Initial use
Time setting

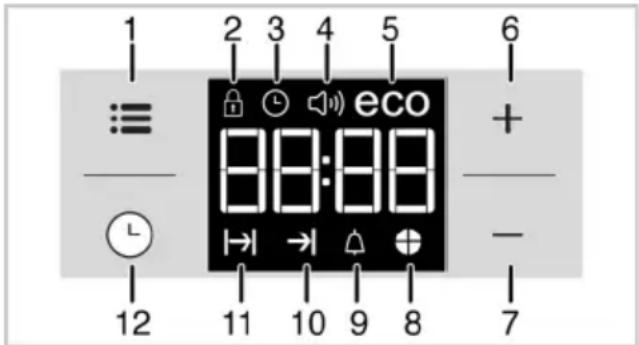
While making any adjustment, related symbols will flash on the display.
Press + keys to set the time of the day after the oven is energized for the first time.

For touch control models, touch first and then use + to set the time of the day.
Confirm the setting by touching Ⓧ symbol and wait for 4 seconds without touching any keys to confirm.
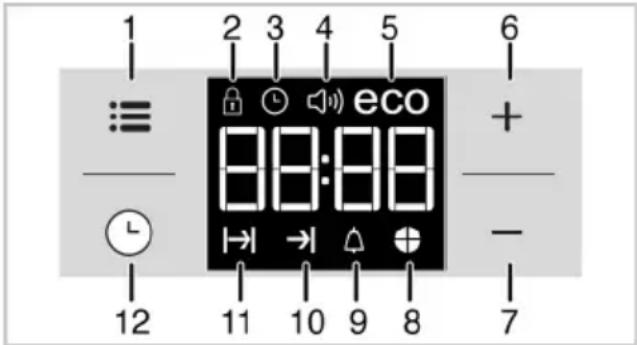
1 Adjustment key
2 Keylock symbol
3 Clock symbol
4 Alarm volume symbol
5 Eco mode symbol
6 Plus key
7 Minus key
8 Time pie symbol
9 Alarm symbol
10 End of Cooking Time symbol
11 Cooking Time symbol
12 Program key

If the initial time is not set, clock will run starting from 12:00 and symbol will be displayed. The symbol will disappear once the time is set.

Current time settings are canceled in case of power failure. It needs to be readjusted.
First cleaning of the appliance

When removing appliance for cleaning and/or service;
Disconnect AC power supply.
Carefully remove the range by pulling outward.
Range is heavy, use care in handling.

The surface might get damaged by some detergents or cleaning materials.
Do not use aggressive detergents, cleaning powders/creams or any sharp objects during cleaning.
Do not use harsh abrasive cleaners or sharp metal scrapers to clean the oven door glass since they can scratch the surface, which may result in shattering of the glass.
- Remove all packaging materials.
- Wipe the surfaces of the appliance with a damp cloth or sponge and dry with a cloth. Initial heating

IMPORTANT:
Smoke and smell may emit for a couple of hours during the initial operation. This is quite normal. Ensure that the room is well ventilated
to remove the smoke and smell. Avoid directly inhaling the smoke and the smell that emits.
Heat up the product for about 30 minutes and then switch it off. Thus, any production residues or layers will be burnt off and removed.

WARNING
Hot surfaces cause burns!
Product may be hot when it is in use. Never touch the hot burners, inner sections of the oven, heaters and etc. Keep children away.
Always use heat resistant oven gloves when putting in or removing dishes into/from the hot oven.
Electric oven
- Take all baking trays and racks from the oven.
- Close the oven door.
- Select Bake with the function knob.
- Select the highest temperature with the thermostat knob; see How to use the electric oven.
- Heat approximately 30 minutes.
- Switch off oven.
Broil
- Take all baking trays and wire shelf from the oven.
- Close oven door.
- Select highest power of the broil.
- Heat approximately 30 minutes.
- Switch off broil.

Smoke and smell may emit for a couple of hours during the initial operation. This is quite normal. Ensure that the room is well ventilated to remove the smoke and smell. Avoid directly inhaling the smoke and the smell that emits.
4 How to use the cooktop
General information about cooking
DANGER
Risk of fire over by overheated oil! When you heat oil, do not leave it unattended.
WARNING
Never try to extinguish the fire with water! When oil has caught fire, immediately cover the pot or pan with a lid. Switch off the burner/plate if safe to do so and phone the fire service.
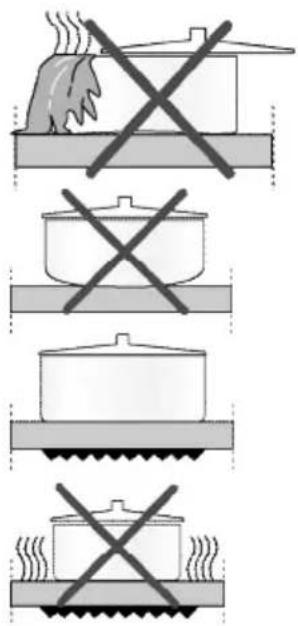
- Only use flat bottomed pots or pans.
- Use pans which have sufficient capacity for the amount of food being cooked so they don't boil over and cause unnecessary cleaning.
- Do not place lids on the burners.
- Always position pans centrally over the burners. When transferring pans from one burner to another always lift the pans do not slide them.
- This appliance is equipped with one or more surface units of different size. Select utensils having flat bottoms large enough to cover the surface unit heating element. The use of undersized utensils will expose a portion of the heating element to direct contact and may result in ignition of clothing. Proper relationship of utensil to heating element will also improve efficiency.
- Never leave surface units unattended at high heat settings. Boilover causes smoking and greasy spillovers that may ignite.
- Make sure reflector pans or drip bowls are in place. Absence of these pans or bowls during cooking may subject wiring or components underneath to damage.
WARNING
Never leave surface units unattended at high heat settings. Boil over causes smoking and greasy spillovers that may ignite.
- Make sure reflector pans or drip bowls are in place. Absence of these pans or bowls
during cooking may subject wiring or com- ponents underneath to damage.
Tips for glass ceramic plate
- The glass ceramic surface is heat-resistant and insensitive to large temperature deviations.
- Do not use the glass ceramic plate for keeping objects or as cutting surface.

WARNING
Do not cook popcorn in prepackaged aluminum containers on the cook top. They could leave aluminum marks that cannot be removed completely.
- Use pot and pans with ground bottoms. Sharp edges cause scratches on the surface.
- Do not use aluminum pots and pans. Aluminum damages the glass ceramic surface.

WARNING
Glazed cooking utensils - only certain types of glass, glass/ceramic, ceramic, earthenware, or other glazed utensils are suitable for range-top service without breaking due to the sudden change in temperature.
- Do not cook foods directly on the cook-top.
- For foods containing sugar in any form, clean up all spills and soils as soon as possible. Allow the cook-top to cool down slightly. Then, while wearing oven mitts, remove the spills while the surface is still warm. If sugary spills are allowed to cool down, they can adhere to the cook-top and can cause pitting and permanent marks.

WARNING
Use pot and pans with ground bottoms. Sharp edges cause scratches on the surface.

WARNING
Avoid scratching the glass cook top. The cook top can be scratched with items such as knives, sharp instruments, rings or other jewelry and rivets on clothing.

WARNING
If a wet sponge or cloth is used to wipe spills on a hot cooking area, be careful to avoid steam burn. Some cleaners can produce noxious fumes if applied to a hot surface. Utensil handles should be turned inward and not extend over adjacent Face units. To reduce the risk of burns, ignition of flammable materials, and spillage due to unintentional contact with the utensil, the handle of a utensil should be positioned so that it is turned inward, and does not extend over adjacent surface units.
Splashes may damage the ceramic surface and can cause fire.
Do not use pots that have concave or convex bottoms.
Use pot and pans with smooth bottoms. They ensure a good heat transfer If the pan is too small energy is wasted
Tipping of pan
Make sure that the handles of cookware do not stick out over the edge of the appliance, to avoid them being knocked over by accident. This also makes it more difficult for children to reach the cooking pans.
- Ensure handles of pans cannot accidentally be caught or knocked and do not get hot by adjacent heating zones. Avoid pans that are unstable and easily tipped. Pans that are too heavy to move easily when filled can also be a hazard.

WARNING
Do not store items of interest to children in cabinets above a range or on the back guard of a range – children climbing on the range to reach items could be seriously injured.
Using the burners/plates
1 Single-circuit cooking plate 6,3-7
2 Dual-circuit cooking plate 4,7 - 8,3
3 Single-circuit cooking plate 5,5-6,3
4 Single-circuit cooking plate 7-8 inches is list of advised diameter of pots to be used on related burners.
DANGER:
Avoid scratching or impacting glass doors, cook tops or control panels. Doing so may lead to glass breakage. Do not cook on a product with broken glass. Shock, fire or cuts may occur.
Do not let any objects fall onto the plate. Even small objects (e.g. salt shaker) may damage the burner/plate.

DANGER:
Do not use glass ceramic plates with cracks. Water may enter into the cracks and cause a short circuit.

DANGER:
If the surface is damaged in any way (e. g. visible cracks), switch off the device immediately to reduce the risk of an electric shock. If cooktop should break, cleaning solutions and spillovers may penetrate the broken cook-top and create a risk of electric shock. Contact a qualified technician immediately.

WARNING
The glass ceramic burner/plate is equipped with an operating lamp and a residual heat indicator. The residual heat indicator indicates the position of the switched on plate and remains illuminated after switching off. (When the temperature of the plate falls below touchable temperature the indicator light will go off).

NOTICE:
Quick heating glass-ceramic plates emit a bright light when they are switched on. Do not stare to bright light.
Switching the plate on
The burner/plate control knobs are used for operating the plates. To obtain the desired coo-king power, turn the burner/ plate control knobs to the corresponding level.
| Cooking level | 1 2 3 | ||
| warming | stewing, simmering | cooking, roasting |
Switching the plate off
Turn plate control knob to off position (top).
Using multi-segmented cooking plates
Multi-segmented cooking plates allows to cook with different size of saucepans on the same cooking plate.
It can be used with two different ways:
- Turn the related cooking plate's knob to counter-clockwise to operate only inner segment of the multi-segmented cooking plate.
- Turn the related cooking plate's knob to clockwise to operate the both segments of the multi-segmented cooking plate.
5 How to operate the oven
General information on baking, roasting and broiling

WARNING
Hot surfaces cause burns!
Product may be hot when it is in use. Never touch the hot burners, inner sections of the oven, heaters and etc. Keep children away. Always use heat resistant oven gloves when putting in or removing dishes into/from the hot oven.

DANGER:
Be careful when opening the oven door as steam may escape.
Exiting steam can scald your hands, face and/or eyes.
Tips for baking
- Use non-sticky coated appropriate metal plates or aluminum vessels or heat-resistant silicone moulds.
- Make best use of the space on the rack.
- Place the baking mould in the middle of the shelf.
- Select the correct rack position before turning the oven or Broil on. Do not change the rack position when the oven is hot.
- Always place oven racks in desired location while oven is cool. If rack must be moved while oven is hot, do not let potholder contact hot heating element in oven.
- Keep the oven door closed.
Tips for roasting
- Seasoning with lemon juice and black pepper will improve the cooking performance when cooking a whole chicken, turkey or a large piece of meat.
- Meat with bones takes about 15 to 30 minutes longer before it is cooked than a roast of the same size without bones.
- You should calculate about 4 to 5 minutes cooking time per centimeter height of the meat.
- Let meat rest in the oven for about 10 minutes after the cooking time. The juice is better distributed all over the roast and does not run out when the meat is cut.
- Fish in a fire-resistant dish should be placed on the rack at the medium or lower level.
Tips for broiling
Broiling is ideal for cooking meat, fish and poultry and will achieve a nice brown surface without it drying out to much. Flat pieces, meat skewers and sausages are particularly suited for broiling as are vegetables with a high water content such as tomatoes and onions.
- Distribute the pieces to be broiled on the wire shelf.
- If the broiling is on the wire shelf, locate a dripping pan under it in order to collect the fat.
- Add some water in dripping pan for easy cleaning.
How to use the electric oven

IMPORTANT:
Do not let food sit in oven more than one hour before or after cooking.
Doing so can result in food poisoning or sickness.

WARNING
Never cover any slots, holes or passages in the oven bottom or cover an entire rack with materials such as aluminium foil. Doing so blocks airflow through the oven and may cause carbon monoxide poisoning. Aluminium foil linings may also trap heat, causing a fire hazard.
Select temperature and operating mode
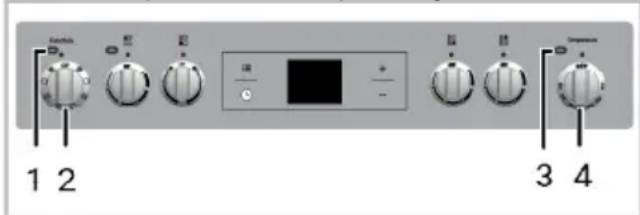
1 Function lamp
2 Function knob
3 Thermostat lamp
4 Thermostat knob
The operating modes of the electric oven are selected with the function knob. The temperature is adjusted with the thermostat knob.
All oven functions are turned off by turning the relevant knob to off (upper) position.
-
Set thermostat knob to the desired temperature.
-
Set function knob to the required operating mode.
» The oven heats up to the adjusted temperature and maintains it. During heating, temperature lamp stays on.
Switch off electric oven
Turn function knob and thermostat knob to off position (top).
Rack positions (For models with wire shelf) It is important to place the wire shelf onto the side rack correctly. Wire shelf must be inserted between the side racks as illustrated in the figure. Do not let the wire shelf stand against the rear wall of the oven. Slide your wire shelf to the front section of the rack and settle it with the help of the door in order to obtain a good broil performance.

Operating modes
The order of operating modes shown here may be different from the arrangement on your product.
Bake
Top and bottom heating are in operation. Food is heated simultaneously from the top and bottom. For example, it is suitable for cakes, pastries, or cakes and casseroles in baking moulds. Cook with one tray only.
Steam Clean

This function should be used for Steam Clean. Only lower heating is on. It is also suitable for foods that need browning on the bottom.
Convect Bake

Top heating, bottom heating plus fan (in the rear wall) are in operation. Hot air is evenly distributed throughout the oven rapidly by means of the fan. Cook with one tray only.
Defrost
The oven is not heated. Only the fan (in the rear wall) is in operation. Suitable for thawing frozen granular food slowly at room temperature and cooling down the cooked food.
Air Fry

Warm air heated by the rear heater is evenly distributed throughout the oven rapidly by means of the fan. It is suitable for cooking your meals in different rack levels and preheating is not required in most cases. Suitable for cooking with multi trays.
True Convect

Top heating, bottom heating and fan assisted heating (in the rear wall) are in operation. Food is cooked evenly and quickly all around. Cook with one tray only.
Broil
Large broil at the ceiling of the oven is in operation. It is suitable for broiling large amount of meat.
- Put big or medium-sized portions in correct rack position under the broil heater for broiling.
- Set the temperature to maximum level.
- Turn the food after half of the broiling time.
Convect Broil

Broiling effect is not as strong as in Full Broil
- Put small or medium-sized portions in correct shelf position under the broil heater for broiling.
- Set the desired temperature.
- Turn the food after half of the broiling time.
Using the oven clock
1 Adjustment key
2 Keylock symbol
3 Clock symbol
4 Alarm volume symbol
5 Eco mode symbol
6 Plus key
7 Minus key
8 Time pie symbol
9 Alarm symbol
10 End of Cooking Time symbol
11 Cooking Time symbol
12 Program key
| i | Maximum time that can be set for end of cooking is 5 hours 59 minutes. Program will be cancelled in case of power failure. You must reprogram the oven. |
| i | While making any setting, related symbols will flash on the display. You must wait for a short time for the settings to take effect. |
| i | If no cooking setting is made, time of the day cannot be set. |
| i | Remaining time will be displayed if cooking time is set when the cooking starts. |
Cooking by setting the cooking time;
You can set the oven so that it will stop at the end of the specified time by setting the cooking time on the timer.
- Select the function for cooking.
- Touch until symbol appears on display for cooking time.
- Set the cooking time with + keys.
» » After the cooking time is set, I→ symbol and the time slice will appear on display continuously.
4. Place the dish into the oven and set the temperature with temperature knob. Cooking will start.
» Cooking time starts to count down on display when cooking starts and all parts of time slice symbol is lit. The set cooking time is divided into 4 equal parts and when the time of each parts ends, the symbol of that parts turns off. So you can understand the ratio of remaining cooking time to total cooking time easily.
Setting the the end of cooking time to a later time;
After setting the cooking time on the timer, you can set the end of cooking time to a later time.
- Select the function for cooking.
- Touch until symbol appears on display for cooking time.
- Set the cooking time with + keys.
» » Once the Cooking Time is set, I→ symbol will appear on display continuously. -
Touch until symbol appears on display for the end of cooking time.
-
Press + keys to set the end of cooking time.
» After the cooking time is set, |→| symbol plus →| symbol and the time slice will appear on display continuously. Once the cooking starts, →| symbol disappears. - Place the dish into the oven and set the temperature with temperature knob. Cooking will start.
» Oven timer calculates the startup time by deducting the cooking time from the end of cooking time you have set. Selected operating mode is activated when the startup time of cooking has come and the oven is heated up to the set temperature. It maintains this temperature until the end of cooking time.
» Cooking time starts to count down on display when cooking starts and all parts of time slice symbol is lit. The set cooking time is divided into 4 equal parts and when the time of each parts ends, the symbol of that parts turns off. So you can understand the ratio of remaining cooking time to total cooking time easily. - After the cooking process is completed, "End" appears on the displayed and the timer gives an audio warning.
- Audio warning sounds for 2 minutes. To stop the audio warning, just press any key. Audio warning will be silenced and current time will be displayed.

If you press any key at the end of the audio warning, the oven will restart operating. Turn the temperature knob and function knob to "0" (off) position to switch off the oven in order to prevent re-operation of the oven at the end of warning.
Activating the keylock
You can prevent oven from being intervened with by activating the key lock function.
- Touch :until symbol appears on display.
» "OFF" will appear on the display. - Press + activate the key lock.
» Once the key lock is activated, "On" appears on the display and the 🔒 symbol remains lit.

Oven keys are not functional when the key lock is activated. Key lock will not be cancelled in case of power failure.
To deactivate the keylock
- Touch :until symbol appears on display.
» "On" will appear on the display. - Disable the key lock by pressing the key.
» "OFF" will be displayed once the keylock is deactivated.
Setting the alarm clock
You can use the timer of the product for any warning or reminder apart from the cooking program.
The alarm clock has no influence on the functions of the oven. It is only used as a warning. For example, this is useful when you want to turn food in the oven at a certain point of time. Timer will give an audio warning at the end of the set time.
- Touch until symbol appears on display.

Maximum alarm time can be 23 hours and 59 minutes.
- Set the alarm duration by using + keys.

Function keys for alarm tone, time of day, display brightness and temperature keys should be at 0 (OFF) position.
» △ symbol will remain lit and the alarm time will appear on the display once the alarm time is set.
3. At the end of the alarm time, symbol starts flashing and the audio warning is heard.
Turning off the alarm
- Audio warning sounds for 2 minutes. To stop the audio warning, just press any key.
» Audio warning will be silenced and current time will be displayed.
Cancelling the alarm;
-
Touch until symbol appears on display in order to cancel the alarm.
-
Press and hold -key until "00:00" is displayed.

Alarm time will be displayed. If the alarm time and cooking time are set concurrently, shortest time will be displayed.
Changing alarm tone
- Touch :until symbol appears on display.
-
Adjust the desired alarm tone with + - keys.
-
The tone you have set will be activated in a short time.
» Selected alarm tone will appear as "b-01", "b-02" or "b-03" on the display.
Changing the time of the day
To change the time of the day you have previously set:
- Touch :until symbol appears on display.
- Set the time of the day with + keys.
- The time you have set will be activated in a short time.
Economy mode
You can save energy with economy mode while cooking by setting cooking time in the oven.
This mode completes the cooking with the inner temperature of the oven by switching off the heaters before the end of cooking time.
Setting the economy mode
- Touch :symbol until eco symbol appears on display.
» "OFF" will appear on the display.
- Enable economy mode by touching +key.
» Once the economy mode is activated, "On" appears on the display and the eco symbol remains lit.
Disabling economy mode
- Touch :symbol until eco symbol appears on display.
» "On" will appear on the display. - Disable economy mode by touching key.
» "Off" will be displayed once the eco mode is deactivated.
Setting the screen brightness
- Touch ≡ until d-01 or d-02 or d-03 appears on display for display brightness.
- Set the desired brightness with + keys.
» The time you have set will be activated in a short time.
Cooking times table
| i | 1st rack of the oven is the bottom rack. |
| i | Maximum load capacity of oven tray: 4 kg (8.8 lb). |
| i | The timings in this chart are meant as a guide. Timings may vary due to temperature of food, thickness, type and your own preference of cooking. |
Baking and roasting
| Dish Cooking level number Operating | Mode (see p.21) | Rack position Temperature (°F) Cooking time | (approx. in min.) | ||
| Cakes in tray* One level | 4 350 25... | 30 | |||
| Cakes in mould* One level | 2 355 40 ... | 50 | |||
| Cakes in cooking paper* | One level | 3 350 25 ... | 30 | ||
| 2 levels | 1 - 5 350 30 ... | 40 | |||
| 3 levels | 1 - 3 - 5 360 45 ... | 55 | |||
| Sponge cake* One level | 3 390 5 ... | 10 | |||
| 2 levels | 1 - 5 350 20 ... | 30 | |||
| Cookies* | One level | 3 350 25 ... | 30 | ||
| 2 levels | 1 - 5 | 350 ... 375 | 30 ... 40 | ||
| 3 levels | 1 - 3 - 5 350 35 ... | 45 | |||
| Dough pastry* | One level | 2 390 30 ... | 40 | ||
| 2 levels | 1 - 5 390 45 ... | 55 | |||
| 3 levels | 1 - 3 - 5 390 55 ... | 65 | |||
| Filled savory pastry* | One level | 2 390 25 ... | 35 | ||
| 2 levels | 1 - 5 390 35 ... | 45 | |||
| 3 levels | 1 - 3 - 5 375 45 ... | 55 | |||
| Leaven* | One level | 2 390 35 ... | 45 | ||
| 2 levels | 1 - 3 375 35 ... | 45 | |||
| Lasagna* | One level | 2 - 3 390 30 ... | 40 | ||
| Pizza* One level | 2 | 390... 430 | 15 ... 20 | ||
| Beef steak (whole) / Roast | One level | 3 | 25 min. max, then 355 ... 375 | 100 ... 120 | |
| Leg of Lamb (casserole) | One level | 3 | 25 min. max, then 355 ... 375 | 70 ... 90 | |
| Roasted chicken One level | 3 | 15 min. max, then 355 ... 375 | 55 ... 65 | ||
| One level | 2 | 15 min. max, then 355 ... 375 | 55 ... 65 | ||
| Turkey (5.5 kg) | One level | 2 | 25 min. max, then 355 ... 375 | 150 ... 210 | |
| One level | 2 | 25 min. max, then 355 ... 375 | 150 ... 210 | ||
| Fish | One level | 2 390 20 ... | 30 | ||
| One level | 3 390 20 ... | 30 | |||
| When cooking with 2 trays at the same time, place the deeper tray on the upper rack and the other one on the lower rack.* It is suggested to perform preheating for all foods. | |||||
(**) In a cooking that requires preheating, preheat at the beginning of cooking until the thermostat lamp turns off.
Tips for baking cake
- If the cake is too dry, increase the temperature by 50^ F ( 10^ C) and decrease the cooking time.
- If the cake is wet, use less liquid or lower the temperature by 50^ F ( 10^ C).
- If the cake is too dark on top, place it on a lower rack, lower the temperature and increase the cooking time.
- If cooked well on the inside but sticky on the outside, use less liquid, lower the temperature and increase the cooking time.
Tips for baking pastry
- If the pastry is too dry, increase the temperature by 50^ F ( 10^ C) and decrease the cooking time. Dampen the layers of dough with a sauce composed of milk, oil, egg and yoghurt.
- If the pastry takes too long to bake, pay care that the thickness of the pastry you have prepared does not exceed the depth of the tray.
- If the upper side of the pastry gets browned, but the lower part is not cooked, make sure that the amount of sauce you have used for the pastry is not too much at the bottom of the pastry. Try to scatter the sauce equally between the dough layers and on the top of pastry for an even browning.

Cook the pastry in accordance with the mode and temperature given in the cooking table. If the bottom part is still not browned enough, place it on one lower rack next time.
Tips for cooking vegetables
- If the vegetable dish runs out of juice and gets too dry, cook it in a pan with a lid instead of a tray. Closed vessels will preserve the juice of the dish.
- If a vegetable dish does not get cooked, boil the vegetables beforehand or prepare them like canned food and put in the oven.
How to operate the broil

Before using the oven the clock time must be set. If the clock time is not set, the main oven will not work.

WARNING
Hot surfaces may cause burns! Keep children away from the product. Close oven door during broiling.
Switching on Broil
- Set the function knob onto the broil symbol.
- Set broil temperature.
- Preheat for approximately 5 minutes, if it is necessary.
» The thermostat lamp is switched on.
Switch off broil
- Turn the function and thermostat knobs to off (upper) position.
| Food | Rack position | Broiling time (approx.) |
| Fish 4...5 20...25 min. | # | |
| Sliced chicken 4...5 25...35 min. | ||
| Lamb chops 4...5 20...25 min. | ||
| Roast beef 4...5 25...30 min. | # | |
| Veal chops 4...5 25...30 min. | # | |
| Toast bread 4 1...2 min. | ||
| # depending on thickness | ||
6 Maintenance and care
General information
Service life of the product will extend and the possibility of problems will decrease if the product is cleaned at regular intervals.

DANGER:
Disconnect the product from mains supply before starting maintenance and cleaning works.
There is the risk of electric shock!

DANGER:
Allow the product to cool down before you clean it.
Hot surfaces may cause burns!
- Clean the product thoroughly after each use. In this way it will be possible to remove cooking residues more easily, thus avoiding these from burning the next time the appliance is used.
- No special cleaning agents are required for cleaning the product. Use warm water with washing liquid, a soft cloth or sponge to clean the product and wipe it with a dry cloth.
- Do not use any abrasive cleaning materials!
- Do not use cleaning agents that contain acid or chloride to clean the stainless or inox surfaces and the handle. Use a soft cloth with a liquid detergent (not abrasive) to wipe those parts clean, paying attention to sweep in one direction.

The surface might get damaged by some detergents or cleaning materials.
Do not use aggressive detergents, cleaning powders/creams or any sharp objects during cleaning.
Do not use harsh abrasive cleaners or sharp metal scrapers to clean the oven door glass since they can scratch the surface, which may result in shattering of the glass.

Do not use steam cleaners to clean the appliance as this may cause an electric shock.
Cleaning the burner/plate
Ceramic cooktop
Always rinse off fully with a clean cloth wrung out in clean water (as residue could damage the ceramic glass surface next time the cooktop is used).
In no case should crusts be scratched off with serrated edge knives, steel wool or the like.
Remove calcium stains (yellow staining) with small amounts of decalcifying agents such as Durgol, vinegar or lemon juice.
Do not allow vinegar, coffee, milk, saltwater, lemon or tomato juice to remain in contact with enamel parts (i.e. inside the oven).
Apply agent with a sponge and, in the event of heavier soiling, let it work in for a longer period of time. Afterwards, wash off cooktop with water.

WARNING:
Sugar-based food such as custard and syrup should immediately be scraped off without waiting for the surface to cool down. Otherwise the burner/plate may be permanently damaged
Cleaning the control panel
Clean the control panel and knobs with a damp cloth and wipe them dry.

IMPORTANT:
Damage of the control panel!
Do not remove the control knobs for control panel cleaning.
Cleaning the oven
No oven cleaner or any other special cleaning agent is required for cleaning the oven. It is recommended to wipe the oven with a damp cloth while it is still warm.
Do not allow fat or oils to build up in the oven base, or oven accessories.
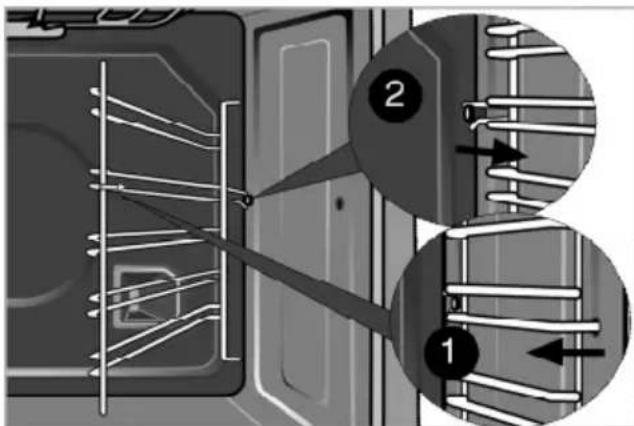
To clean the side wall
- Remove the front section of the side rack by pulling it in the opposite direction of the side wall.
- Remove the side rack completely by pulling it towards you.
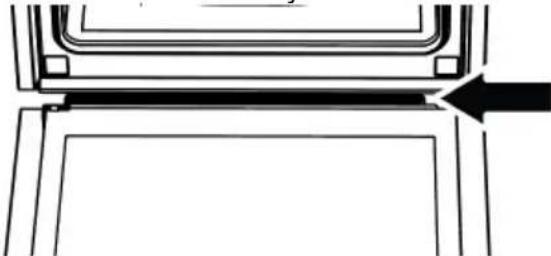
Clean oven door
To clean the oven door, use warm water with washing liquid, a soft cloth or sponge to clean the product and wipe it with a dry cloth.

Don't use any harsh abrasive cleaners or sharp metal scrapers for cleaning the oven door. They could scratch the surface and destroy the glass.
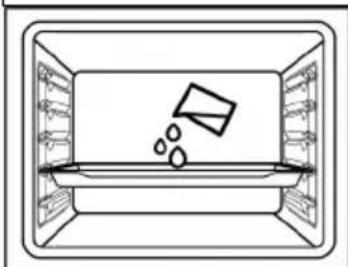
Steam Cleaning
This allows cleaning of the dirt (not remaining for a long time) that is softened by the steam inside the oven and by the water droplets condensed in the internal surfaces of the oven easily.
- Remove all accessories inside the oven.
- Add 2 cups water into the tray (This accessory may not be included with your product) and place it on the 2nd shelf of the oven.

Do not use distilled or filtered water. Use ready-made waters only. Do not use flammable, alcoholic or solid particulate solutions instead of water.
natural_image
Simple line drawing of a tray with liquid and a container, no text or symbols present- Set the oven to the steam cleaning operating mode and operate it at 212^ F for 25 minutes.
Immediately open the door and wipe the oven interiors with a wet sponge or cloth. Steam will be released when opening the door. This may pose a risk of burns. Be careful when opening the door.
For stubborn dirt, clean the product using dish-washing detergent, warm water and a soft cloth or sponge and dry it with a dry cloth.

In the steam clean function, it is expected that the added water evaporates and condenses on the inside of the oven and the oven door in order to soften the light dirt formed in your oven. Condensation formed on the oven door may drip around when the oven door is opened. As soon as you open the oven door, wipe off the condensation.
After the condensation inside the oven, puddle or moisture may occur in the pool channel under the oven. Wipe this pool channel with a damp cloth after use and dry it.
natural_image
Pure technical line drawing of a mechanical component with no text or symbolsRemoving the oven door
- Open the front door (1).
- Open the clips at the hinge housing (2) on the right and left hand sides of the front door by pressing them down as illustrated in the figure.
natural_image
Mechanical component diagram showing a folded metal bracket with an arrow indicating rotation (no text or symbols)
-
Move the front door to half-way.
-
Remove the front door by pulling it upwards to release it from the right and left hinges.

Steps carried out during removing process should be performed in reverse order to install the door. Do not forget to close the clips at the hinge housing when reinstalling the door.
Replacing the oven lamp General Warnings
- To avoid the risk of electric shock before replacing the oven lamp, disconnect the product and wait for the oven to cool. Hot surfaces may cause burns!
- This oven is powered by an incandescent lamp with less than 40 W, less than 60 mm in height, less than 30 mm in diameter, or a halogen lamp with G9 sockets with less than 60 W power. Lamps are suitable for operation at temperatures above 572 °F. Oven lamps are available from Authorised Services or licensed technicians. This product contains a G energy class lamp.
- The position of the lamp may differ from that is shown in the figure.
- The lamp used in this product is not suitable for use in the lighting of home rooms. The purpose of this lamp is to help the user see food products.
- The lamps used in this product must withstand extreme physical conditions such as temperatures above 122 °F.
- To increase the life of the bulb, avoid handling it with bare hands. Use cloth gloves.
If your oven has a round lamp,
- Disconnect the product from the electricity.
- Remove the glass cover by turning it counter clockwise.
natural_image
Abstract circular diagram with three curved arrows indicating rotational or cyclical motion (no text or symbols)- If your oven lamp is type (A) shown in the figure below, rotate the oven lamp as shown in the figure and replace it with a new one. If it is type (B) model, pull it out as shown in the figure and replace it with a new one.
- Refit the glass cover.
7 General information
Overview
1 Ceramic plate
2 Wire shelf
3 Handle
4 Front door
5 Bottom part
6 Foot
7 Shelf positions
8 Control panel
9 Vitroceramic surface
1 Function lamp
2 Function knob
3 Hotplate warning lamp
4 Single-circuit cooking plate rear left
5 Dual-circuit cooking plate front left
6 Digital timer
7 Single-circuit cooking plate front right
8 Single-circuit cooking plate rear right
9 Thermostat lamp
10 Thermostat knob
Technical specifications
| GENERAL | |
| External dimensions (height / width / depth) | 35 7/16 x 23 5/8 x 23 5/8 inches |
| Voltage / frequency 120/240 V ~ 60 Hz | 120/208 V ~ 60 Hz |
| Total electric power 9.6 kW (120/240 V ~ 60 Hz) | 7.2 kW (120/208 V ~ 60 Hz) |
| Fuse protection Min. 40 A | |
| Cable type / section DTR 4x10 AWG | |
| Cable length | max. 6 ft |
| Burners | |
| Rear left | Single -circuit cooking plate |
| Size | 6,3 inches |
| Power | 1500 W |
| Front left | Dual -circuit cooking plate |
| Size | 4, 7 - 8,3 inches |
| Power | 750- 2200 W |
| Front right Single -circuit cooking plate | |
| Size | 5,5 inches |
| Power | 1200 W |
| Rear right | Single -circuit cooking plate |
| Size | 7 inches |
| Power 1800 W | |
| OVEN/ BROIL | |
| Main oven | Multifunction oven |
| Inner lamp | 15–25 W |
| Broil power consumption 2,2 kW | |

Technical specifications may be changed without prior notice to improve the quality of the product.

Figures in this manual are schematic and may not exactly match your product.

Values stated on the product labels or in the documentation accompanying it are obtained in laboratory conditions in accordance with relevant standards. Depending on operational and environmental conditions of the product, these values may vary.
Package contents

Accessories supplied can vary depending on the product model. Not every accessory described in the user manual may exist on your product.
1. User manual
2. Wire Shelf
Used for roasting and for placing the food to be baked, roasted or cooked in casserole dishes to the desired rack.

natural_image
Line drawing of a rectangular grid structure with horizontal lines and curved edges (no text or symbols)3. Proper positioning of the wire shelf on sliding shelves
It is important to position the broil and/or dripping pan on the wire shelves correctly. Slide the broil or the dripping pan completely between the 2 rails and make sure it is stable before putting a dish on it (Please see the following figure).
natural_image
3D rendering of a metal rack system inside a room with red and teal vertical walls (no text or symbols visible)
natural_image
Illustration of an oven with a metal rack inside, showing internal structure and exterior panel (no text or symbols)4. Island trim

If you use island trim, remove the plastic protection part (if supplied) from the back side of burner plate. Keep the plastic protection part after removing so that you could remove the island trim in the future.
Remove the island trim assembly from the packaging taking care to retain the screws required for fixing the island trim to the product. Remove the protective films (if supplied) from the island trim before assembly.
Position the island trim assembly as indicated. Secure the island trim assembly to the appliance with the screws provided. Do not over tighten in order to avoid any damages to the product or island trim.
natural_image
Technical line drawing of a vehicle chassis frame with mounting brackets and structural details (no text or symbols)8 Troubleshooting
Oven emits steam when it is in use
- It is normal that steam escapes during operation. >>> This is not a fault.
Product emits metal noises while heating and cooling.
- When the metal parts are heated, they may expand and cause noise. >>> This is not a fault.
Product does not operate.
- The mains fuse is defective or has tripped. >>> Check fuses in the fuse box. If necessary, replace or reset them.
• Product is not plugged into the (grounded) socket. >>> Check the plug connection.
Oven light does not work.
- Oven lamp is defective. >>> Replace oven lamp.
- Power is cut. >>> Check if there is power. Check the fuses in the fuse box. If necessary, replace or reset the fuses.
Oven does not heat.
- Function and/or Temperature are not set. >>> Set the function and the temperature with the Function and/or Temperature knob/key.
- In models equipped with a timer, the timer is not adjusted. >>> Adjust the time. (In products with microwave oven, timer controls only microwave oven.)
- Power is cut. >>> Check if there is power. Check the fuses in the fuse box. If necessary, replace or reset the fuses.
(In models with timer) Clock display is blinking or clock symbol is on.
- A previous power outage has occurred. >>> Adjust the time / Switch of the product and switch it on again.

Consult the Authorised Service Agent or technician with licence or the dealer where you have purchased the product if you can not remedy the trouble although you have implemented the instructions in this section. Never attempt to repair a defective product yourself.
9 WARRANTY STATEMENT FOR WHIRLPOOL ELECTRIC AND GAS RANGES
ATTACH YOUR RECEIPT HERE. PROOF OF PURCHASE IS REQUIRED TO OBTAIN WARRANTY SERVICE.
Please have the following information available when you call the Customer eXperience Center:
- Name, address and telephone number
- Model number and serial number
- A clear, detailed description of the problem
- Proof of purchase including dealer or retailer name and address
Major Appliance Limited Warranty
Before contacting us to arrange service, some questions can be addressed without service. Please visit the "Troubleshooting" section at https://www.whirlpool.com/owners for Troubleshooting help. In Canada, visit https://www.whirlpool.ca/owners.
HOW TO MAKE A CLAIM
All warranty service is provided exclusively by our authorized Whirlpool Service Providers. For service, contact the Whirlpool Customer eXperience Center. In the U.S.A., call 1-866-698-2538. In Canada, call 1-800-807-6777. If outside the 50 United States or Canada, contact your authorized Whirlpool dealer to determine whether another warranty applies.
WHAT IS COVERED
YOUR SOLE AND EXCLUSIVE REMEDY UNDER THIS LIMITED WARRANTY SHALL BE PRODUCT REPAIR AS PROVIDED HEREIN. This limited warranty is valid only in the United States or Canada and applies only when the major appliance is used in the country in which it was purchased:
ONE (1) YEAR FROM THE DATE OF DELIVERY OF THE ORIGINAL PURCHASE (PARTS AND LABOR INCLUDED): Whirlpool brand of Whirlpool Corporation or Whirlpool Canada, LP (hereafter "Whirlpool") will pay for factory-specified replacement parts and labor to correct defects in materials or workmanship that existed when this major appliance was purchased, or at its sole discretion, replace the product. In the event of product replacement, your appliance will be warranted for remaining term of the original unit's warranty period.
YEARS TWO (2) THROUGH FIVE (5) FROM THE DATE OF DELIVERY OF THE ORIGINAL PURCHASE (CERTAIN COMPONENT PARTS AND LABOR INCLUDED): Whirlpool will pay for factory-specified replacement parts and labor for the component parts listed below to correct non-cosmetic defects in materials or workmanship in these parts that prevent function of this major appliance and that existed when this major appliance was purchased:
| French Door Bottom Mount Refrigerator | Side by Side Refrigerator |
| Sealed Refrigeration system (includes compressor, evaporator, condenser, dryer, and connecting tubing) | |
See next page for What is Not Covered by this Limited Warranty.
WHAT IS NOT COVERED
- Commercial, non-residential or multiple family use or use inconsistent with the product instructions and manuals.
- In-home instruction on how to use your product.
- Repair to correct improper maintenance, installation not in accordance with installation instructions or electrical or plumbing codes, or repair of household electrical or plumbing systems.
- Consumable parts (e.g., light bulbs, batteries, air or water filters, preservation solutions, etc).
- Defects or damage resulting from accident, misuse, abuse, alteration, fire, floods, acts of God or improper installation.
- Damages, defects, or repairs caused by unauthorized servicers or use of non-genuine or third-party parts; however, use of unauthorized service providers or non-genuine or third-party parts will not void this warranty.
-
Cosmetic damage (e.g., scratches, dents, chips, and other damage to appliance finishes), unless such damage results from defects in materials and workmanship and is reported to Whirlpool within 30 days from date of delivery.
-
Discoloration, rust or oxidation of surfaces resulting from caustic or corrosive environments (e.g., high salt concentrations, high moisture or humidity or exposure to chemicals).
- Product pick-up or delivery. This product is intended for in-home repair (excludes countertop microwaves which must be packaged and shipped to a Whirlpool designated service company, at consumer's expense).
- Travel or transportation expenses for service in remote locations where an authorized Whirlpool servicer is not available.
- Repair, removal or reinstallation of inaccessible appliances or built-in fixtures (e.g., trim, decorative panels, flooring, cabinetry, islands, countertops, drywall) that interfere with servicing, removal or replacement of the product.
- Appliances with original, factory installed model/serial numbers removed, altered or not easily determined.
- Conversion of your product from natural gas or propane gas or reversal of appliance doors.
- Incidental or consequential damages (e.g., loss of food or medicine) resulting from appliance breakdown.
DISCLAIMER OF IMPLIED WARRANTIES
Implied warranties, including any implied warranty of merchantability or implied warranty of fitness for a particular purpose, are limited to ten years or the shortest period allowed by law. Some states and provinces do not allow limitations on the duration of implied warranties of merchantability or fitness, so this limitation may not apply to you.
HOW STATE LAW APPLIES
This warranty gives you specific legal rights, and you may also have other rights that vary from state to state or province to province. Some states and provinces, such as California, do not allow for limitations on the date your warranty coverage begins, so this limitation may not apply to you.
Whirlpool®
natural_image
Simple line drawing of a steaming cupcake (no text or symbols)YUFE50M4SS
FR
285.3062.24/R.AB/31.10.2025/3-2
7732187997

LISTED
UL-US-L322635-11-
52801102-5

natural_image
Symbolic illustration of a person falling off a trash can inside a circle (no text or numbers present)
AVERTISSEMENT :
natural_image
Symbolic illustration of a person falling off a large block, enclosed in a circle (no text or numbers present)natural_image
Silhouette of a person bending over a table with an arrow indicating motion (no text or symbols)
AVERTISSEMENT :
- NE FAITES PAS FONCTIONNER VOTRE APPAREIL SANS LE DISPOSITIF ANTI-BASCULEMENT MIS EN PLACE ET ENCLENCHÉ.
Figure 1B
1 Noix
2 Pied

natural_image
Silhouette of a person using a tool on a counter, no text or symbols present
natural_image
Pure electrical circuit lines without any symbolsnatural_image
Two identical diagrams showing a steaming pot and a cooking pot with crossed-out black X marks, no text or symbols present.natural_image
Close-up of a metallic rotary dial with 'OFF' and 'Lot' buttons, no visible text or symbols beyond the labelsConvection véritable (True Convect)

Grillage à convection (Convect Broil)
natural_image
Simple line drawing of a rectangular container with liquid and bubbles inside, no text or symbols present.natural_image
Pure technical line drawing of a mechanical component with an arrow indicating direction (no text or symbols)natural_image
Mechanical assembly diagram showing a bracket with mounting holes and a curved arrow indicating rotation (no text or symbols)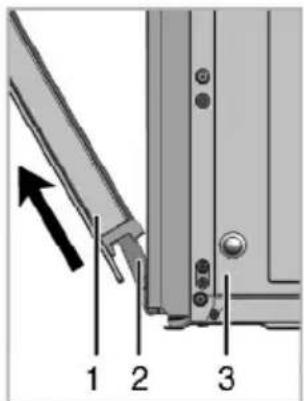
natural_image
Abstract circular diagram with three curved arrows forming a ring-like pattern (no text or symbols)natural_image
Line drawing of a rectangular metal grate or rack structure (no text or symbols)natural_image
Two-panel illustration of a kitchen oven with metal grilles and a flat shelf, showing exterior and interior views (no text or symbols)4. Îlot de cuisine

natural_image
Technical line drawing of a vehicle chassis frame with structural components and mounting brackets (no text or symbols)8 Dépannage
natural_image
Simple line drawing of a steaming cupcake (no text or symbols)YUFE50M4SS
ES
285.3062.24/R.AB/31.10.2025/3-3
7732187997

UL-US-L322635-11- 52801102-5

natural_image
Symbolic icon of a person falling off a trash can inside a circle (no text or numbers)
ADVERTENCIA:
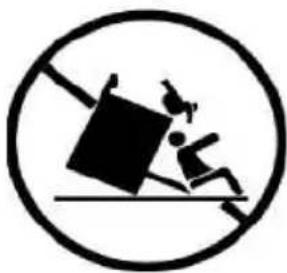
natural_image
Symbolic illustration of a person falling off a heavy block, enclosed in a circle (no text or numbers present)natural_image
Silhouette of a person using a device to lift or rotate (no text or symbols)
ADVERTENCIA:
Figura 1B
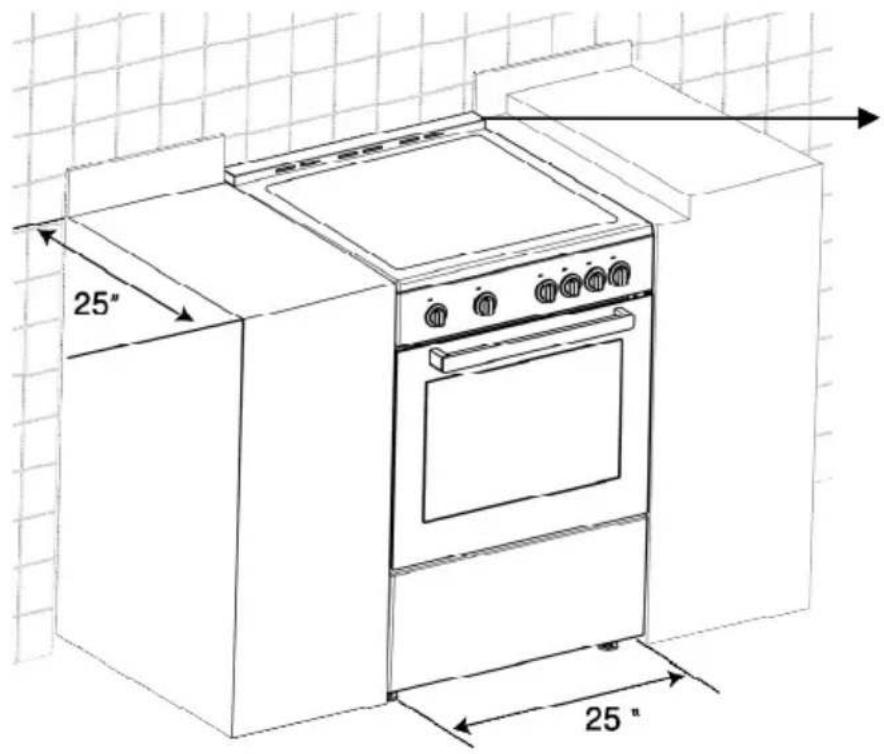
natural_image
Technical illustration of a mechanical assembly with two screws and a cabinet, showing close-up views of the component (no text or symbols present)1 Tuerca
2 Pie

natural_image
Silhouette of a person using a tool on a podium, no text or symbols present
natural_image
Diagram showing a circular component with four rectangular blocks and a 3D schematic of a plug or connector (no text or symbols)natural_image
Illustration of a person using a fire extinguisher to clean the oven (no text or symbols visible)natural_image
Simple line drawing of a refrigerator with a glass pouring liquid into the pan (no text or symbols)natural_image
Pure technical line drawing of a mechanical component with no text or symbolsnatural_image
Mechanical assembly diagram showing a bracket with mounting holes and a curved arrow indicating rotation (no text or symbols)
natural_image
Abstract circular diagram with three curved arrows forming a ring (no text or symbols)natural_image
Simple line drawing of a rectangular grid structure with no text or symbolsnatural_image
3D rendering of a kitchen oven with metal grilles and insulation rack (no text or symbols)natural_image
Technical line drawing of a vehicle chassis frame with structural components and mounting brackets (no text or symbols)


- Important Safety Instructions Read and save these instructions
- WARNING:
- DO NOT OPERATE THE RANGE WITHOUT ANTI- TIP DEVICE IN PLACE AND ENGAGED
- IMPORTANT:
- Explanation of symbols
- The instructions will help you to operate the appliance properly and safely.
- Safety Instructions - Read before use 6
- Installation 12
- Preparation 18
- How to use the cooktop 20
- How to operate the oven 23
- Maintenance and care 30
- General information 33
- Troubleshooting 36
- WARRANTY STATEMENT FOR WHIRLPOOL ELECTRIC AND GAS RANGES 37
- Safety Instructions - Read before use
- Basic safety instructions
- Safety for children
- Safety when working with electricity
- Intended use
- Disposal
- Packaging material
- DANGER:
- CAUTION:
- Future transportation
- NOTICE:
- Installation
- Important notes to the consumer
- Important notes to the installer
- Installation and connection
- NOTICE: Material damage!
- Clearances & Dimensions
- Foot Adjustment
- Anti-Tip stability device installation instructions
- WARNING: Tip Over Hazard
- WARNING: Electrical shock hazard!
- Connection to the main supply
- WARNING
- Preparation
- Tips for saving energy
- Initial use
- Time setting
- First cleaning of the appliance
- Electric oven
- Broil
- How to use the cooktop
- General information about cooking
- DANGER
- Tips for glass ceramic plate
- Tipping of pan
- Using the burners/plates
- Switching the plate on
- Switching the plate off
- How to operate the oven
- General information on baking, roasting and broiling
- Tips for baking
- Tips for roasting
- Tips for broiling
- How to use the electric oven
- Select temperature and operating mode
- Operating modes
- Bake
- Steam Clean
- Convect Bake
- Defrost
- Air Fry
- True Convect
- Convect Broil
- Using the oven clock
- Activating the keylock
- To deactivate the keylock
- Setting the alarm clock
- Turning off the alarm
- Cancelling the alarm;
- Changing alarm tone
- Changing the time of the day
- Economy mode
- Setting the economy mode
- Disabling economy mode
- Setting the screen brightness
- Tips for baking cake
- Tips for baking pastry
- Tips for cooking vegetables
- How to operate the broil
- Switching on Broil
- Switch off broil
- Maintenance and care
- General information
- Cleaning the burner/plate
- Ceramic cooktop
- Cleaning the control panel
- Cleaning the oven
- To clean the side wall
- Clean oven door
- Steam Cleaning
- Removing the oven door
- Replacing the oven lamp General Warnings
- If your oven has a round lamp,
- General information
- Overview
- Package contents
- User manual
- Wire Shelf
- Proper positioning of the wire shelf on sliding shelves
- Island trim
- Troubleshooting
- Oven emits steam when it is in use
- Product does not operate.
- Oven light does not work.
- Oven does not heat.
- (In models with timer) Clock display is blinking or clock symbol is on.
- WARRANTY STATEMENT FOR WHIRLPOOL ELECTRIC AND GAS RANGES
- Major Appliance Limited Warranty
- HOW TO MAKE A CLAIM
- WHAT IS COVERED
- WHAT IS NOT COVERED
- DISCLAIMER OF IMPLIED WARRANTIES
- HOW STATE LAW APPLIES
- Whirlpool®
- AVERTISSEMENT :
- - NE FAITES PAS FONCTIONNER VOTRE APPAREIL SANS LE DISPOSITIF ANTI-BASCULEMENT MIS EN PLACE ET ENCLENCHÉ.
- Convection véritable (True Convect)
- Grillage à convection (Convect Broil)
- Îlot de cuisine
- Dépannage
- ADVERTENCIA:
Brand : WHIRLPOOL
Model : YUFE50M4SS
Category : Stapler