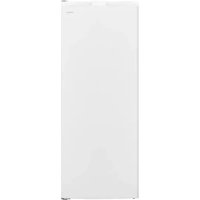
FFUE0726AW - Freezer FRIGIDAIRE - Free user manual and instructions
Find the device manual for free FFUE0726AW FRIGIDAIRE in PDF.


| Product Type | Freezer |
| Brand | Frigidaire |
| Model | FFUE0726AW |
| Power Supply | 115 V, 60 Hz, 15 A (dedicated grounded outlet) |
| Capacity | Approximately 7.2 cu ft (203 L) |
| Adjustable Temperature | From -12 °C (10 °F) to -23 °C (-9 °F) depending on mode |
| Freezing Modes | Cold Plus, Coldest, Cold, Freezer |
| Refrigerant | Flammable (type not specified) |
| Defrosting | Manual (do not use metal tools) |
| Door Reversal | Possible with provided tools (screwdriver, hex key) |
| Leveling Feet | Yes, adjustable at front |
| Child Safety | Safety instructions included (risk of entrapment) |
| Cleaning | Unplug before cleaning; do not use steam cleaner or organic solvents |
| Warranty | Limited one-year (parts and labor) |
| Installation Clearance | Minimum 75 mm on sides, top, and back |
Frequently Asked Questions - FFUE0726AW FRIGIDAIRE
User questions about FFUE0726AW FRIGIDAIRE
0 question about this device. Answer the ones you know or ask your own.
Ask a new question about this device
Download the instructions for your Freezer in PDF format for free! Find your manual FFUE0726AW - FRIGIDAIRE and take your electronic device back in hand. On this page are published all the documents necessary for the use of your device. FFUE0726AW by FRIGIDAIRE.
USER MANUAL FFUE0726AW FRIGIDAIRE
EN User Manual | Freezer 2
For additional feature information, care instructions and troubleshooting solutions, scan the QR code, or visit Frigidaire.com and search for your model to find the complete User Manual.
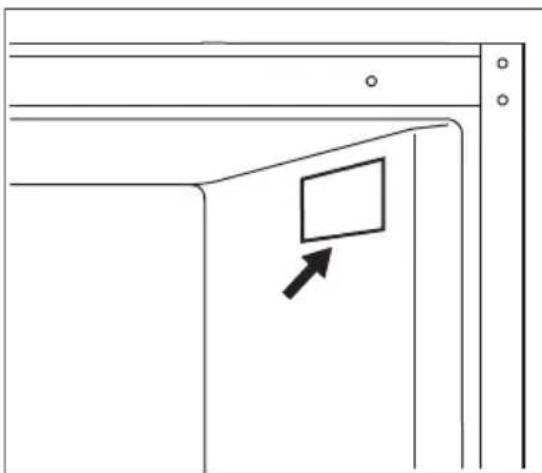
1.1 Serial number location
WARNING!
You must follow these guidelines to ensure that your appliance's safety mechanisms are operating correctly.
1.2 Safety definitions
#
This is the safety alert symbol. It is used to alert of potential personal injury hazards. Obey all safety messages that follow this symbol to avoid possible injury or death.
DANGER
DANGER indicates an imminently hazardous situation which, if not avoided, will result in death or serious injury.
WARNING!
WARNING indicates a potentially hazardous situation which, if not avoided, could result in death or serious injury.

CAUTION!
CAUTION indicates a potentially hazardous situation which, if not avoided, may result in minor or moderate injury.

IMPORTANT
IMPORTANT indicates installation, operation or maintenance information which is important but not hazard-related.
1.3 Child safety
This appliance is not intended for use by persons (including children) with reduced physical, sensory or mental capabilities, or lack of experience and knowledge, unless they have been given supervision or instruction concerning use of the appliance by a person responsible for their safety.
Destroy or recycle the carton, plastic bags, and any exterior wrapping material immediately after the refrigerator is unpacked. Children should never use these items to play. Cartons covered with rugs, bedspreads, plastic sheets or stretch wrap may become airtight chambers, and can quickly cause suffocation.
1.4 Important safety instructions

DANGER

DANGER Risk of fire or explosion. Flammable refrigerant used. Do not use mechanical devices to defrost the appliance. Do not puncture refrigerant tubing. DANGER Risk of fire or explosion. Flammable refrigerant used. To be repaired only by trained service personnel. Use only manufacturer-authorized service parts. Any repair equipment used must be designed for flammable refrigerants. Follow all manufacturer repair instructions. Do not puncture refrigerant tubing.

CAUTION!

CAUTION Risk of fire or explosion due to puncture of refrigerant tubing. Follow handling instructions carefully. Flammable refrigerant used.
This appliance is for storage only and should not be used for any other purpose. Do not store or use gasoline or other flammable vapors and liquids in the vicinity of this or any other appliance. Do not store explosive substances such as aerosol cans with a flammable propellant in this appliance. Do not operate the appliance in the presence of explosive fumes Avoid contact with any moving parts of automatic ice maker. Remove all staples from the carton. Staples can cause severe cuts, and also destroy finishes if they come in contact with other appliances or furniture.

WARNING!
Do not use electrical appliances inside the food storage compartments of the appliance unless they are of the type recommended by the manufacturer.

WARNING!
CALIFORNIA RESIDENTS ONLY
WARNING! Cancer and Reproductive
Harm http://www.P65Warnings.ca.gov
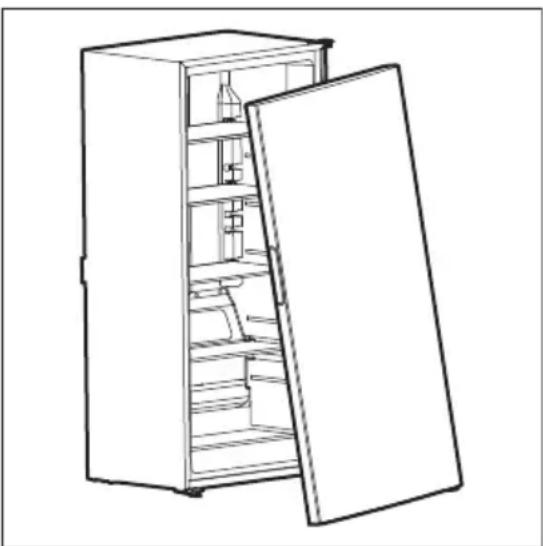
1.5 Proper disposal of your refrigerator or freezer
Risk of child entrapment
Child entrapment and suffocation are not problems of the past. Junked or abandoned refrigerators or freezers are still dangerous - even if they will sit for "just a few days". If you are getting rid of your old refrigerator or freezer, follow the instructions below to help prevent accidents.
We strongly encourage responsible appliance recycling/disposal methods. Check with your utility company or visit http://www.energystar.gov/recycle for more information on recycling your old refrigerator.
Before you throw away your old refrigerator/freezer:
- Remove doors.
- Leave shelves in place so children may not easily climb inside.
- Have it removed by a qualified service technician.
1.6 Electrical information

IMPORTANT
Turning on the appliance controls to OFF will disable the appliance cooling system but does not disconnect the power to the light bulb and other electrical components. To turn off power to the appliance you must unplug the power cord from the electrical outlet.
- The appliance must be plugged into its own dedicated 115 Volt, 60Hz , 15 Amp, AC only electrical outlet. The power cord of the appliance is equipped with a three-prong grounding plug for your protection against electrical shock hazards. It must be plugged directly into a properly grounded three-prong receptacle. The receptacle must be installed in accordance with local codes and ordinances. Consult a qualified electrician. Do not use an extension cord or adapter plug.

WARNING!
Avoid fire hazard or electric shock.
- If the power cord is damaged, it should be replaced by an authorized service technician to prevent any risk.
- Never unplug the appliance by pulling on the power cord. Always grip the plug firmly, and pull straight out from the receptacle to prevent damaging the power cord.
-
Unplug the appliance before cleaning and before replacing the light bulb to avoid electrical shock.
-
Performance may be affected if the voltage varies by 10% or more. Operating the appliance with insufficient power can damage the compressor. Such damage is not covered under your warranty.
- Do not plug the unit into an electrical outlet controlled by a wall switch or pull cord to prevent the appliance from being turned off accidentally.
- Do not pinch, knot, or bend the power cord in any manner.

WARNING!
When positioning the appliance, ensure the supply cord is not trapped or damaged.
Do not locate multiple portable socketoutlets or portable power supplies at the rear of the appliance.

WARNING!
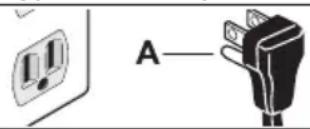
Do not, under any circumstances, cut, remove, or bypass the grounding prong (A). Always use the power cord with a three-prong grounded plug and grounding type wall receptacle.
2. APPLIANCE FEATURES AND CARE

IMPORTANT
Features may vary by model. Accessories are available for your appliance and may be purchased at Frigidaire.com or by calling toll-free 1-800-374-4432.
2.1 Care and Cleaning
Cleaning

CAUTION!
Unplug the appliance from the power source before cleaning to avoid electrical hazard. Never clean the appliance with a steam cleaner. Allow the appliance to dry before using it.

Do not use organic solvents, such as lemon juice, juice from an orange peel, butyric acid, or cleaners containing acetic acid.
Defrosting

Do not use metal instruments to remove the frost.
3. INSTALLATION
This User Manual provides general installation and operating instructions for your model. We recommend using a service or kitchen contracting professional to install your appliance. Use the appliance only as instructed in this User Manual. Before starting the appliance, follow these important first steps.
3.1 Location
- Choose a place that is near a grounded, non-GFCI, electrical outlet. Do not use an extension cord or an adapter plug.
If possible, place the appliance out of direct sunlight and away from the range, dishwasher, or other heat sources. - The appliance must be installed on a floor that is level and strong enough to support a fully loaded appliance.

WARNING!
This appliance is intended for use in residential household and similar interior applications such as:
- Kitchen / kitchenette
- Pantry room
- Basement
- Enclosed garage
- Other interior residential type environments

CAUTION!
Do not install the appliance where the temperature will exceed 110^ (43^) . Temperatures of 0^ (-18^) (Freezer mode) / 45^ (7^) (Fridge mode) and below will affect operation. Additional compressor heaters are not recommended.

NOTE
Sufficient air circulation is essential for the proper operation of the appliance.

WARNING!
Allow the following clearances for ease of installation, proper air circulation, and plumbing and electrical connections:
- Sides and top 3" (75 mm)
- Back 3" (75 mm)

NOTE
The exterior walls of the appliance may become warm as the compressor transfers heat from the inside. The temperatures may be even 30^ higher than the room temperature. In hotter climates it is important to allow enough space for air circulation around the appliance.

NOTE
If you place the appliance with the door hinge side against a wall, you may have to allow additional space so the door can be open wider.
3.2 Leveling
When positioning the appliance, ensure that it is level, with all bottom corners resting firmly on a solid floor. You can adjust this using the two leveling feet located at the front bottom of the appliance.
4. DOOR REMOVAL AND REVERSAL
4.1 Door removal/reversal
Tools required: PhillipsTM and flat head screwdrivers, hexagonal spanner.
Two people should assemble the appliance.
- Ensure the appliance is unplugged and empty.
- To take the door off, tilt the appliance backwards. Rest it on something solid so it will not slip during the door reversing process.
- Save all parts to reinstall the door.
-
To prevent damaging the coolant system, do not lay the appliance flat.
-
Remove the top hinge cover from the top right side of your freezer.
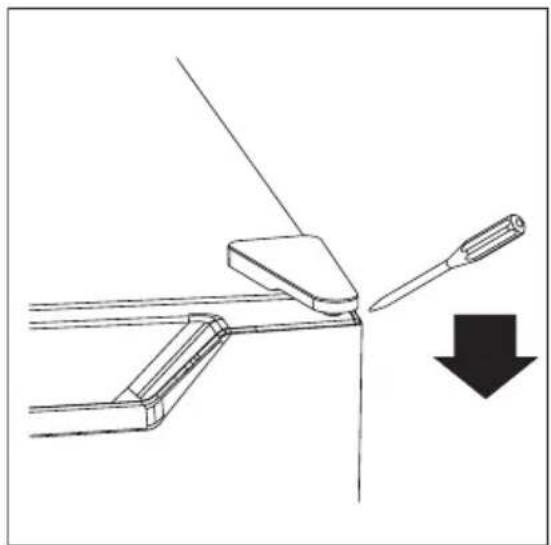
- Remove the screws that secure the top right hinge to the door, then remove the hinge.
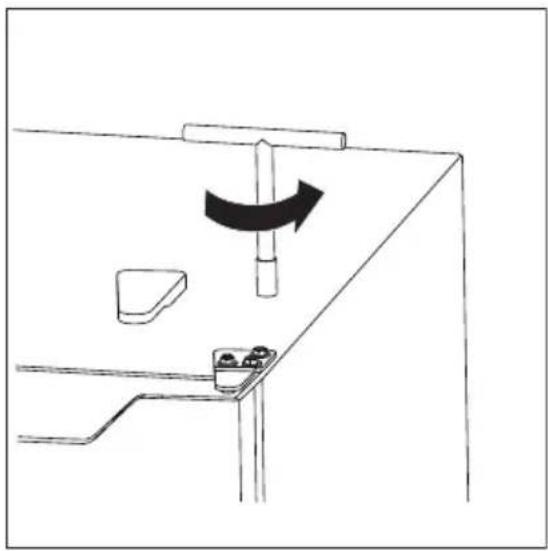
- Remove the top left hinge cover.
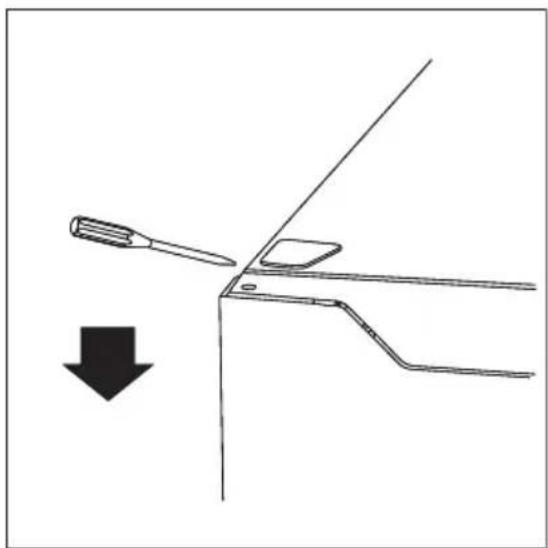
-
Move the hole cover from the top left side of the door to the top right side.
-
Remove both leveling feet and the bottom hinge bracket from the bottom of your freezer.
-
Remove the freezer door from the freezer by lifting it off the bottom hinge pin, then rest it on a pad to prevent scratching or damage.
-
Use a Phillips head screwdriver to remove the right side hinge component from the bottom right side of the door.
-
Remove the bottom hinge pin from the bottom hinge bracket, rotate the hinge bracket 180 degrees clockwise, and replace the bottom hinge pin into the bottom hinge bracket.
-
Take the left-side hinge component out of the accessory bag, then use a Phillips head screwdriver to install it on the bottom left side of the door.
-
Install the bottom hinge bracket on the left bottom of your freezer, then replace both leveling feet. Do not fully tighten the bottom hinge bracket at this time.
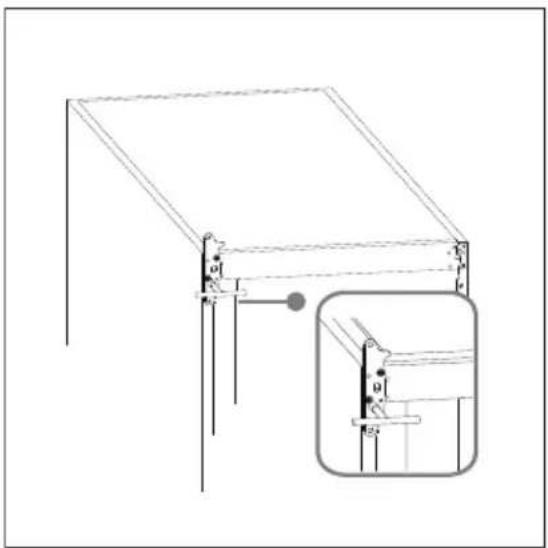
- Replace the freezer door onto the bottom hinge pin and align it vertically and horizontally so that the gaskets make a good seal all around the door.
- Install the upper hinge bracket with the upper hinge pin inserted into the hole in the top of the door. Tighten the screws so that the door is secure.
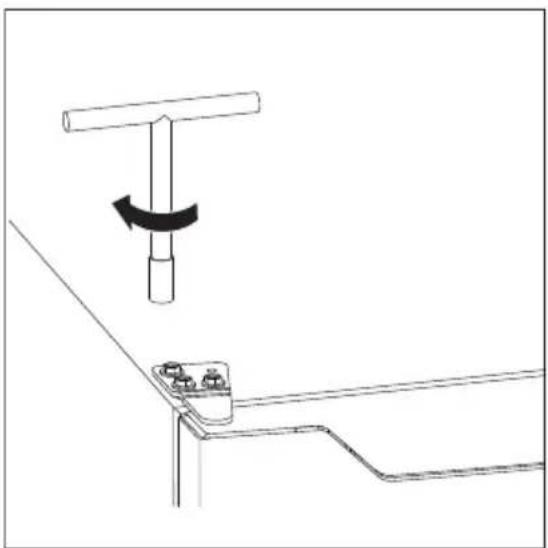
- Replace the top hinge cover onto the left side of your freezer, then replace the top screw hole cover onto the top right side.
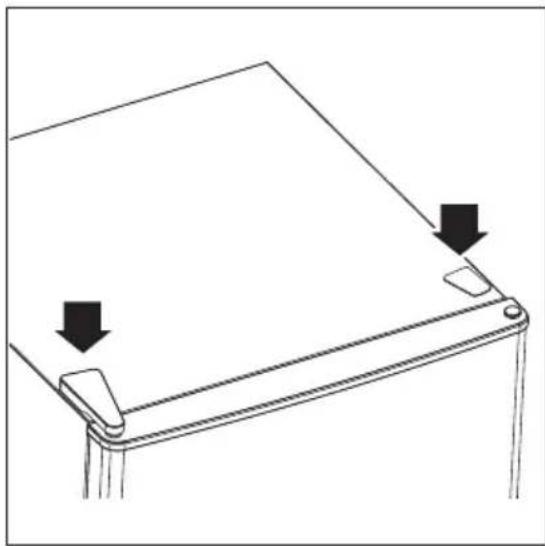
- With the door closed, make sure that door is aligned horizontally and vertically with the freezer cabinet and that the gasket makes a good seal. When everything is in proper alignment, tighten the bottom hinge bracket.
- Readjust the leveling feet as necessary.
5. CONTROL LOGIC
Using your freezer

CAUTION!
- If you run your freezer in an ambient temperature below 50^ F, it may not operate consistently. For example, the freezer temperature may become too warm and the contents may defrost.
- Internal temperatures can vary based on the location of your freezer, the ambient room temperature, and how often you open the doors.
- Do not store carbonated drinks in the freezer compartment. They may break and damage your freezer.
- Do not exceed the storage times recommended by the food manufacturers for any kind of food.
Before storing foods in your freezer, turn on the freezer and freezer compartments, then wait for 24 hours to make sure that they are working correctly and to let both compartments reach the correct temperatures.
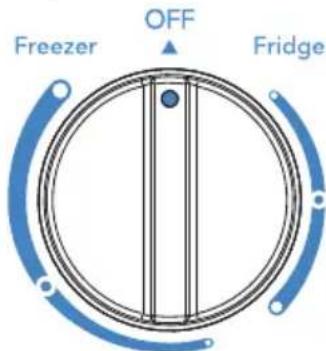
Recommended
Plug your freezer into a power outlet, then adjust the interior temperature with the temperature control knob. The following should be considered when you are making adjustments:

CAUTION!
The temperature control knob should not be turned clockwise past the Freezer setting, or damage could result.
The temperature control is located inside the freezer on the back wall. The temperature is factory preset to the medium setting of Freezer mode to provide satisfactory food storage temperatures. However, the temperature control is adjustable to provide a range of temperatures for your personal satisfaction.
To adjust temperature settings, turn the control clockwise. Allow several hours for temperatures to stabilize between adjustments. Approximate temperature ranges for each mode are listed below.
| Mode | ColderCold | Coldest | |||
| Fridge | 7°C 46°F | 4°C | 39°F | 1°C | 34°F |
| Freezer | -12°C 10°F | -18°C | 0°F | -23°C | -9°F |
6. LIMITED WARRANTY
Your appliance is covered by a one year limited warranty. For one year from your date of delivery, Electrolux will pay all costs for repairing or replacing any parts of this appliance that prove to be defective in materials or workmanship when such appliance is installed, used and maintained in accordance with the provided instructions.
Exclusions
This warranty does not cover the following:
- Products with original serial numbers that have been removed, altered or cannot be readily determined.
- Product that has been transferred from its original owner to another party or removed outside the USA or Canada.
- Rust on the interior or exterior of the unit.
- Products purchased "as-is" are not covered by this warranty.
- Food loss due to any refrigerator or freezer failures.
- Products used in a commercial setting.
- Service calls which do not involve malfunction or defects in materials or workmanship, or for appliances not in ordinary household use or used other than in accordance with the provided instructions.
- Service calls to correct the installation of your appliance or to instruct you how to use your appliance.
- Expenses for making the appliance accessible for servicing, such as removal of trim, cupboards, shelves, etc., which are not a part of the appliance when it is shipped from the factory.
- Service calls to repair or replace appliance light bulbs, air filters, water filters, other consumables, or knobs, handles, or other cosmetic parts.
- Surcharges including, but not limited to, any after hour, weekend, or holiday service calls, tolls, ferry trip charges, or mileage expense for service calls to remote areas, including the state of Alaska.
- Damages to the finish of appliance or home incurred during transportation or
installation, including but not limited to floors, cabinets, walls, etc.
- Damages caused by: services performed by unauthorized service companies; use of parts other than genuine Electrolux parts or parts obtained from persons other than authorized service companies; or external causes such as abuse, misuse, inadequate power supply, accidents, fires, or acts of God.
DISCLAIMER OF IMPLIED WARRANTY; LIMITATION OF REMEDIES
CUSTOMER'S SOLE AND EXCLUSIVE REMEDY UNDER THIS LIMITED WARRANTY SHALL BE PRODUCT REPAIR OR REPLACEMENT AS PROVIDED HEREIN. CLAIMS BASED ON IMPLIED WARRANTYES, INCLUDING WARRANTYES OF MERCHANTABILITY OR FITNESS FOR A PARTICULAR PURPOSE, ARE LIMITED TO ONE YEAR OR THE SHORTEST PERIOD ALLOWED BY LAW, BUT NOT LESS THAN ONE YEAR. ELECTROLUX SHALL NOT BE LIABLE FOR CONSEQUENTIAL OR INCIDENTAL DAMAGES SUCH AS PROPERTY DAMAGE AND INCIDENTAL EXPENSES RESULTING FROM ANY BREACH OF THIS WRITTEN LIMITED WARRANTY OR ANY IMPLIED WARRANTY. SOME STATES AND PROVINCES DO NOT ALLOW THE EXCLUSION OR LIMITATION OF INCIDENTAL OR CONSEQUENTIAL DAMAGES, OR LIMITATIONS ON THE DURATION OF IMPLIED WARRANTYES, SO THESE LIMITATIONS OR EXCLUSIONS MAY NOT APPLY TO YOU. THIS WRITTEN WARRANTY GIVES YOU SPECIFIC LEGAL RIGHTS. YOU MAY ALSO HAVE OTHER RIGHTS THAT VARY FROM STATE TO STATE.
If You Need Service
Keep your receipt, delivery slip, or some other appropriate payment record to establish the warranty period should service be required. If service is performed, it is in your best interest to obtain and keep all receipts. Service under this warranty must be obtained by
contacting Electrolux at the addresses or phone numbers below.
This warranty only applies in the USA and Canada. In the USA, your appliance is warranted by Electrolux Major Appliances North America, a division of Electrolux Home Products, Inc. In Canada, your appliance is warranted by Electrolux Canada Corp. Electrolux authorizes no person to change or add to any obligations under this warranty. Obligations for service and parts under this warranty must be performed by Electrolux or an authorized service company. Product features or specifications as described or illustrated are subject to change without notice.
USA
1-800-374-4432
Frigidaire
10200 David Taylor Drive
Charlotte, NC 28262
Canada
1-800-265-8352
Electrolux Canada Corp.
5855 Terry Fox Way
Mississauga, Ontario, Canada L5V 3E4
For additional feature information, care instructions and troubleshooting solutions, scan the QR code, or visit Frigidaire.com and search for your model to find the complete User Manual.
- Serial number location
- WARNING!
- Safety definitions
- #
- DANGER
- WARNING!
- CAUTION!
- IMPORTANT
- Child safety
- Important safety instructions
- Proper disposal of your refrigerator or freezer
- Risk of child entrapment
- Before you throw away your old refrigerator/freezer:
- Electrical information
- APPLIANCE FEATURES AND CARE
- Care and Cleaning
- Cleaning
- Defrosting
- INSTALLATION
- Location
- NOTE
- Leveling
- DOOR REMOVAL AND REVERSAL
- Door removal/reversal
- CONTROL LOGIC
- Using your freezer
- LIMITED WARRANTY
- Exclusions
- DISCLAIMER OF IMPLIED WARRANTY; LIMITATION OF REMEDIES
- If You Need Service
- USA
- Canada
Brand : FRIGIDAIRE
Model : FFUE0726AW
Category : Freezer