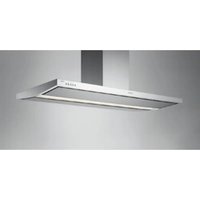
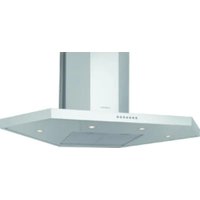
DVL6000 - Range hood ELECTROLUX - Free user manual and instructions
Find the device manual for free DVL6000 ELECTROLUX in PDF.

User questions about DVL6000 ELECTROLUX
0 question about this device. Answer the ones you know or ask your own.
Ask a new question about this device
Download the instructions for your Range hood in PDF format for free! Find your manual DVL6000 - ELECTROLUX and take your electronic device back in hand. On this page are published all the documents necessary for the use of your device. DVL6000 by ELECTROLUX.
USER MANUAL DVL6000 ELECTROLUX
WE'RE THINKING OF YOU
Thank you for purchasing an Electrolux appliance. You've chosen a product that brings with it decades of professional experience and innovation. Ingenious and stylish, it has been designed with you in mind. So whenever you use it, you can be safe in the knowledge that you'll get great results every time. Welcome to Electrolux.
Visit our website to:

Get usage advice, brochures, trouble shooter, service information: www.electrolux.com

Register your product for better service: www.electrolux.com/productregistration

Buy Accessories, Consumables and Original spare parts for your appliance: www.electrolux.com/shop
ENVIRONMENT CONCERNS
Recycle the materials with the symbol .Put the packaging in applicable containers to recycle it. Help protect the environment and human health and to recycle waste of electrical and electronic appliances. Do not dispose appliances marked with the symbol with the household waste. Return the product to your local recycling facility or contact your municipal office department for household waste or the shop where you purchased this product.
CUSTOMER CARE AND SERVICE
We recommend the use of original spare parts.
When contacting Service, ensure that you have the following data available.
The information can be found on the rating plate. Model, PNC, Serial Number.
⚠ Warning / Caution-Safety information.
i General information and tips
Environmental information.
Subject to change without notice.
1. ⚠️ SAFETY INSTRUCTIONS
Caution! Closely follow the instructions set out in this manual. All responsibility, for any eventual inconveniences, damages or fires caused by not complying with the instructions in this manual, is declined. The extractor hood has been designed exclusively for domestic use.
Warning! Do not connect the appliance to the mains until the installation is fully complete.
Before any cleaning or maintenance operation, disconnect hood from the mains by removing the plug or disconnecting the mains electrical supply.
Always wear work gloves for all installation and maintenance operations.
The appliance is not intended for use by children or persons with impaired physical, sensorial or mental faculties, or if lacking in experience or knowledge, unless they are under supervision or have been trained in the use of the appliance by a person responsible for their safety.
This appliance is designed to be operated by adults, children should be monitored to ensure that they do not play with the appliance. This appliance is designed to be operated by adults. Children should not be allowed to tamper with the controls or play with the appliance.
Never use the hood without effectively mounted grating!
The hood must NEVER be used as a support surface unless specifically indicated.
The premises where the appliance is installed must be sufficiently ventilated, when the kitchen hood is used together with other gas combustion devices or other fuels. The ducting system for this appliance must not be connected to any existing ventilation system which is being used for any other purpose such as discharging exhaust fumes from appliances burning gas or other fuels.
The flaming of foods beneath the hood itself is severely prohibited.
The use of exposed flames is detrimental to the fl iters and may cause a fire risk, and must therefore be avoided in all circumstances.
Any frying must be done with care in order to make sure that the oil does not overheat and ignite.
Caution! Accessible parts of the hood may become hot when used with cooking appliance.
With regards to the technical and safety measures to be adopted for fume discharging it is important to closely follow the regulations provided by the local authorities. The hood must be regularly cleaned on both the inside and outside (AT LEAST ONCE A MONTH).
This must be completed in accordance with the maintenance instructions provided in this manual). Failure to follow the instructions provided in this user guide regarding the cleaning of the hood and fi Iters will lead to the risk of fi res.
Do not use or leave the hood without the lamp correctly mounted due to the possible risk of electric shocks.
We will not accept any responsibility for any faults, damage or fires caused to the appliance as a result of the non-observance of the instructions included in this manual.
2. USE
The hood serves to aspirate the fumes and vapors resulting from cooking.
The attached installation manual indicates the version to be used depending on the model you have, the suction version with
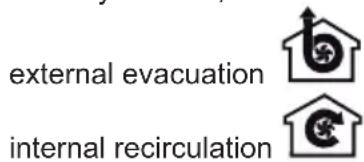
external evacuation
or fi ltering with
internal recirculation
3. INSTALLATION
The mains power supply must correspond to the rating indicated on the plate situated inside the hood. If provided with a plug connect the hood to a socket in compliance with current regulations and positioned in an accessible area, after installation. If it not fitted with a plug (direct mains connection) or if the plug is not located in an accessible area, after installation, apply a double pole switch in accordance with standards which assures the complete disconnection of the mains under conditions relating to over-current category III, in accordance with installation instructions.
Warning! Before re-connecting the hood circuit to the mains supply and checking the efficient function, always check that the mains cable is correctly assembled.
The minimum distance between the supporting surface for the cooking equipment on the hob and the lowest part of the range hood must be not less than 50cm from electric cookers and 65cm from gas or mixed cookers. If the instructions for installation for the gas hob specify a greater distance, this must be adhered to.
4. MAINTENANCE
ATTENTION! Before performing any maintenance operation, isolate the hood from the electrical supply by switching off at the connector and removing the connector fuse.
Or if the appliance has been connected through a plug and socket, then the plug must be removed from the socket. The cooker hood should be cleaned regularly (at least with the same frequency with which you carry out maintenance of the fat filters) internally and externally. Clean using the cloth dampened with neutral liquid detergent. Do not use abrasive products. DO NOT USE ALCOHOL!
Warning! Failure to carry out the basic cleaning recommendations of the cooker hood and replacement of the filters may cause fire risks. Therefore, we recommend observing these instructions.
The manufacturer declines all responsibility for any damage to the motor or any fi re damage linked to inappropriate maintenance or failure to observe the above safety recommendations.
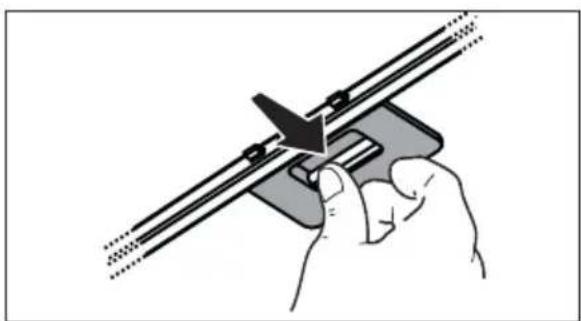
4.1 Grease fi Iter - The grease fi Iter must be cleaned once a month using non aggressive detergents, either by hand or in the dishwasher, which must be set to a low temperature and a short cycle. When washed in a dishwasher, the grease fi Iter may discolour slightly, but this does not affect its fi Itering capacity.
natural_image
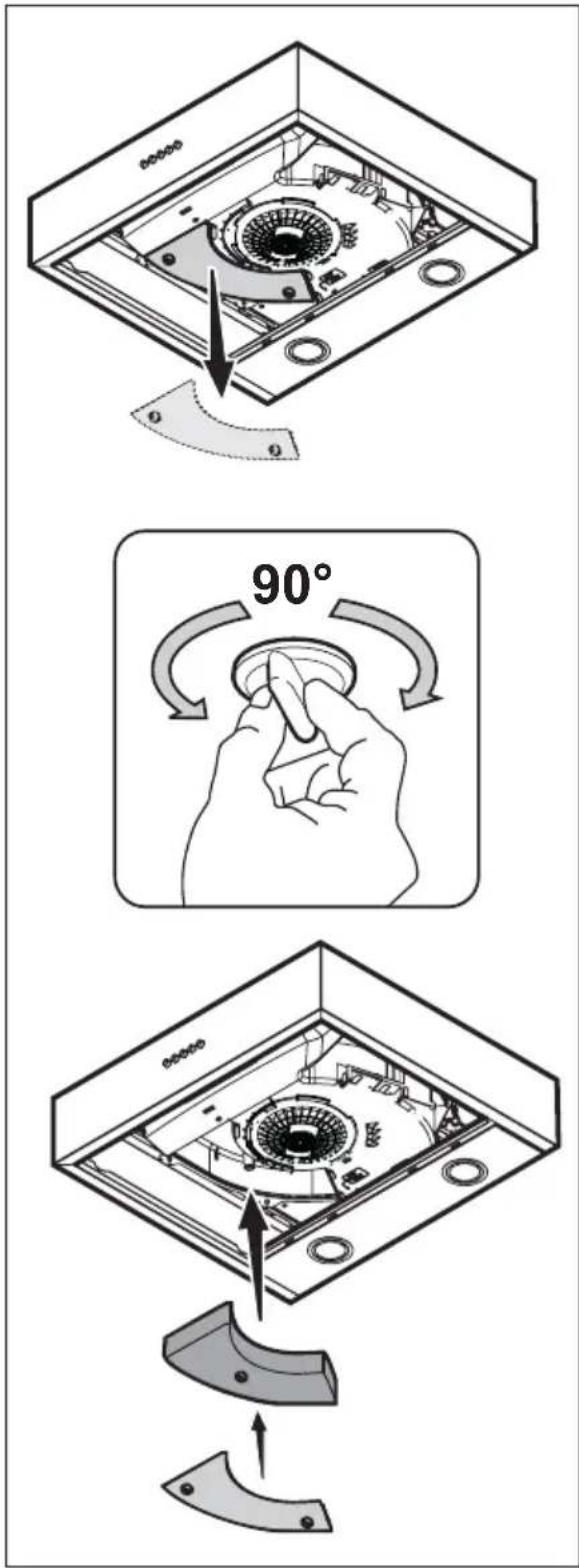
Illustration of a hand using a tool to cut or adjust a mechanical component (no text or symbols visible)4.2 NON-washable activated charcoal filter - The saturation of the charcoal filter occurs after more or less prolonged use, depending on the type of cooking and the regularity of cleaning of the grease fi Iter. In any case it is necessary to replace the cartridge at least every four mounths. The charcoal fi Iter may NOT be washed or regenerated.
text_image
80000 90°5. CONTROLS
The hood is fitted with a control panel with aspiration speed selection control and a light switch to control cooking area lights.

text_image
12 ① 0 1 2 31 ON/OFF lights
2 OFF motors
3 Minimum suction power
4 Medium suction power
5 Maximum suction power
Use the high suction speed in cases of concentrated kitchen vapours. It is recommended that the cooker hood suction is switched on for 5 minutes prior to cooking and to leave in operation during cooking and for another 15 minutes approximately after terminating cooking.
6. LIGHTING
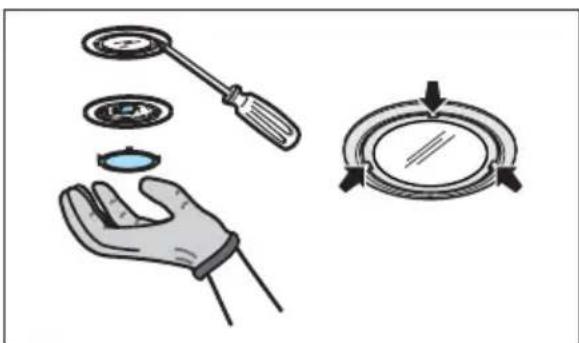
Disconnect the hood from the electricity. Warning! Prior to touching the light bulbs ensure they are cooled down. Replace with a new 12 Volt, 20 Watt (Maximum) halogen light made for a G-4 base SUITABLE FOR USE IN OPEN LUMINAIRES. Follow package directions and do not touch new light with bare hands.
natural_image
Illustration of a hand holding a circular component with a screwdriver, and a circular dial with arrows indicating rotation (no text or symbols)WIR DENKEN AN SIE
www.electrolux.com/productregistration

natural_image
Illustration of a hand holding a tool with a bracket and alignment tools (no text or symbols)text_image
Diagram illustrating three steps of device rotation, showing 90° angle and mechanical assembly with labeled components.5. BEDIENELEMENTE
natural_image
Illustration of a hand holding a magnifying glass with a screwdriver and a circular dial indicator (no text or symbols)NOUS PENSONS À VOUS
natural_image
Illustration of a hand using a tool to cut or adjust a mechanical component (no text or symbols visible)natural_image
Illustration of a hand holding a circular component with a screwdriver and a compass-like dial (no text or symbols)WE DENKEN AAN U
natural_image
Illustration of a hand using a tool to adjust or install a mechanical component (no text or symbols visible)4.2 NIET wasbaar koolstoffi Iter
natural_image
Illustration of a hand holding a small object, with a screwdriver and a circular dial indicator (no text or symbols)PENSAMOS EN USTED
natural_image
Illustration of a hand using a tool to adjust or install a mechanical component (no text or symbols visible)natural_image
Illustration of three hand tools: a screwdriver, a circular dial with a magnified view, and a circular dial with arrows (no text or symbols)ESTAMOS A PENSAR EM SI
www.electrolux.com/productregistration

natural_image
Illustration of a hand using a tool to cut or adjust a mechanical component (no text or symbols visible)natural_image
Illustration of a hand holding a circular component with a screwdriver, and a circular dial indicator (no text or symbols)PENSATI PER VOI
natural_image
Illustration of a hand using a tool to adjust or install a mechanical component (no text or symbols visible)natural_image
Illustration of a hand holding a screwdriver, with a magnifying glass inspecting the interior (no text or symbols)WE'RE THINKING OF YOU
natural_image
Illustration of a hand using a tool to adjust or install a mechanical component (no text or symbols visible)text_image
Diagram illustrating three steps of a device's rotation, showing the process from external casing to internal components with 90° angle adjustment.5. KOMMANDON
natural_image
Illustration of a hand holding a small object, with a tool and a circular dial on the right (no text or symbols)VI TENKER PÅ DEG
www.electrolux.com/productregistration

natural_image
Illustration of a hand using a tool to adjust or install a mechanical component (no text or symbols visible)4.2 KKE vaskbart aktivt kullfi Iter
natural_image
Illustration of a hand holding a small object, with a screwdriver and a circular dial indicator (no text or symbols)WE'RE THINKING OF YOU
www.electrolux.com/productregistration

natural_image
Illustration of a hand using a tool to adjust or install a mechanical component (no text or symbols visible)natural_image
Illustration of a hand holding a circular object with a screwdriver and a compass-like dial (no text or symbols)VI TÄENKER PÅ DIG
www.electrolux.com/productregistration

natural_image
Illustration of a hand using a tool to adjust or install a mechanical component (no text or symbols visible)natural_image
Illustration of a hand holding a circular object with a screwdriver, alongside a circular dial indicator (no text or symbols)МЫ ДУМАЕМ О ВАС
natural_image
Illustration of a hand using a tool to cut or adjust a mechanical component (no text or symbols visible)natural_image
Illustration of a hand holding a small object, with a screwdriver and a circular dial on top (no text or symbols)SULLE MÕELDES
www.electrolux.com/productregistration

natural_image
Illustration of a hand using a tool to cut or adjust a mechanical component (no text or symbols visible)4.2 MITTEPESTAV aktiivsöefi Iter
natural_image
Illustration of a hand holding a circular object with a screwdriver and a compass-like dial (no text or symbols)MĒS DOMĀJAM PAR JUMS
www.electrolux.com/productregistration

natural_image
Illustration of a hand using a tool to adjust or install a mechanical component (no text or symbols visible)natural_image
Illustration of a hand holding a small object, with a magnifying glass and a tool nearby (no text or symbols)PUIKIEMS REZULTATAMS PASIEKTI
natural_image
Illustration of a hand using a tool to adjust or install a mechanical component (no text or symbols visible)4.2 Neplaunamas aktyviosios anglies fi Itras
natural_image
Illustration of a hand holding a small object, with a tool and a circular dial on the right (no text or symbols)МИ ДУМАЄМО ПРО ВАС
natural_image
Illustration of a hand using a tool to adjust or install a mechanical component (no text or symbols visible)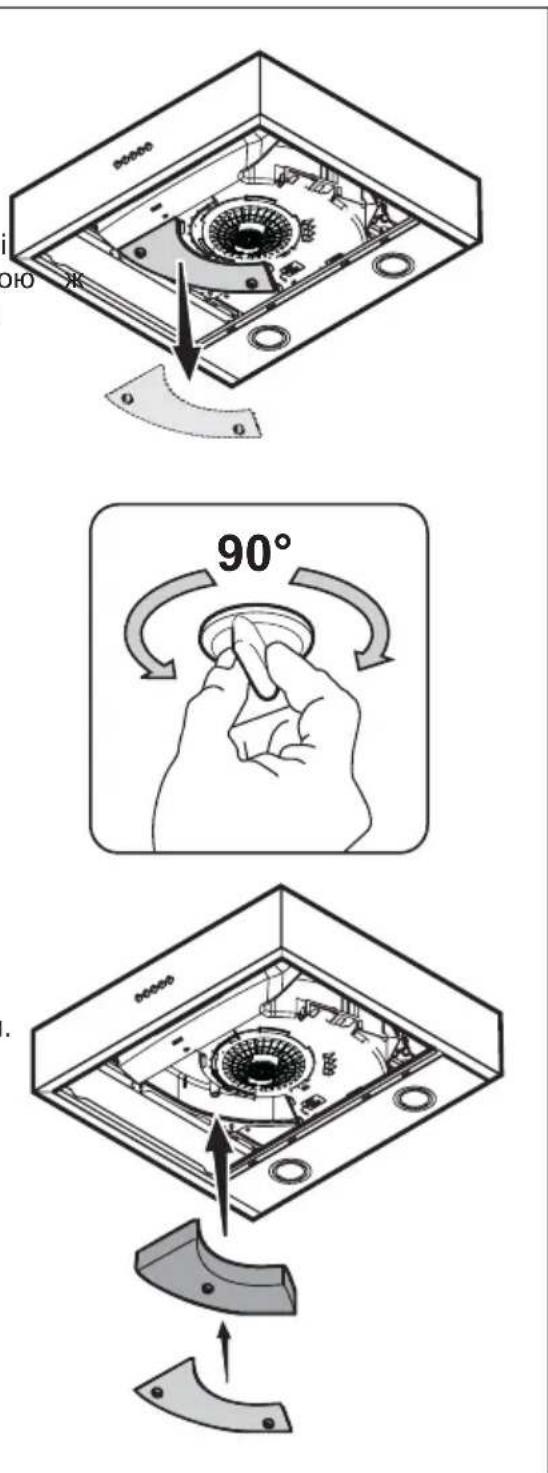
text_image
90° 90°natural_image
Illustration of a hand holding a small object, a screwdriver, and a compass-like device with arrows indicating motion (no text or symbols)TÖRÖDÜNK ÖNNEL
natural_image
Illustration of a hand using a tool to adjust or install a mechanical component (no text or symbols visible)natural_image
Illustration of a hand holding a circular component with a screwdriver, and a circular dial with arrows indicating rotation (no text or symbols)MYSLÍME NA VÁS
natural_image
Illustration of a hand using a tool to cut or adjust a mechanical component (no text or symbols visible)natural_image
Illustration of a hand holding a small object, with a screwdriver and a circular dial indicator (no text or symbols)MYSLÍME NA VÁS
natural_image
Illustration of a hand using a tool to adjust or install a mechanical component (no text or symbols visible)natural_image
Illustration of a hand holding a magnifying glass with a tool, and a circular dial indicator (no text or symbols)NE GÂNDIM LA DUMNEAVOASTRĂ
www.electrolux.com/productregistration

natural_image
Illustration of a hand using a tool to cut or adjust a mechanical component (no text or symbols visible)4.2 Filtru cu carbon activ NElavabil
natural_image
Illustration of three hand tools: a screwdriver, a magnifying glass with a circular dial, and a hand holding a small blue object (no text or symbols present)Z MYŚLĄ O TOBIE
www.electrolux.com/productregistration

natural_image
Illustration of a hand using a tool to adjust or install a mechanical component (no text or symbols visible)natural_image
Illustration of a hand holding a circular object with a screwdriver, alongside a circular dial indicator (no text or symbols)MISLIMO NA VAS
www.electrolux.com/productregistration

Kupovinu dodatne opreme, potrošnog materijala i originalnih rezervnih dijelova za vaš uređaj:
www.electrolux.com/shop
BRIGA ZA OKOLIŠ
Reciklirajte materijale sa simbolom . Ambalažu za recikliranje odložite u prikladne spremnike.
Pomozite u zaštiti okoliša i ljudskog zdravlja, kao i u recikliranju otpada od električnih i elektroničkih uređaja. Uređaje označene simbolom ne bacajte zajedno s kućnim otpadom. Proizvod odnesite na lokalno reciklažno mjesto ili kontaktiraje nadležnu službu.
BRIGA O KUPCIMA I SERVIS
1. \$IGURNOSNE UPUTE
⚠ Pozor! Strogo se pridržavajte uputstava koje donosi ovaj priručnik. Otklanjamo bilo kakvu odgovornost za eventualne nezgode, smetnje ili požar na aparatu koji proizlaze iz nepoštivanja uputstava koje donosi ovaj priručnik. Kuhinjska napa je projektirana isključivo za kućansku uporabu.
! Upozorenje! Ne priključujte aparat na električnu mrežu sve dok niste kompletno završili sa instaliranjem.
natural_image
Illustration of a hand using a tool to adjust or install a mechanical component (no text or symbols visible)natural_image
Illustration of a hand holding a small object, with a screwdriver and a circular dial indicator (no text or symbols)MISLIMO NA VAS
natural_image
Illustration of a hand using a tool to adjust or install a mechanical component (no text or symbols visible)natural_image
Illustration of a hand holding a circular component with a screwdriver and a compass-like dial (no text or symbols)text_image
Technical diagram of an electronic device with labeled components and a directional arrow indicating movement or change.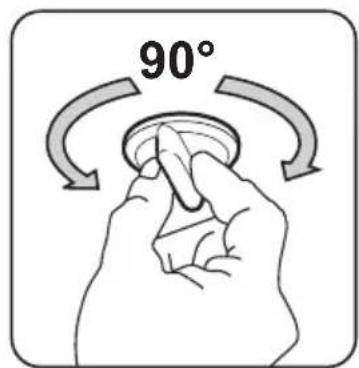
text_image
90°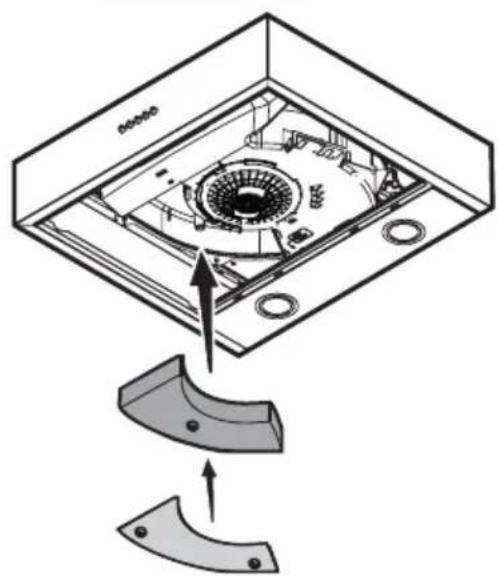
natural_image
Diagram of a device interior with a central fan and surrounding components, showing a downward trend from top to bottom (no text or symbols)natural_image
Illustration of a hand holding a small object, a tool, and a circular dial with arrows indicating direction (no text or symbols)SIZI DÜŞÜNÜR
natural_image
Illustration of a hand using a tool to adjust or install a mechanical component (no text or symbols visible)natural_image
Illustration of a hand holding a small object, a screwdriver, and a circular dial with arrows indicating direction (no text or symbols)НИЕ МИСЛИМ ЗА ВАС
natural_image
Illustration of a hand using a tool to cut or adjust a mechanical component (no text or symbols visible)natural_image
Isometric technical diagram of a mechanical assembly with no visible text or symbols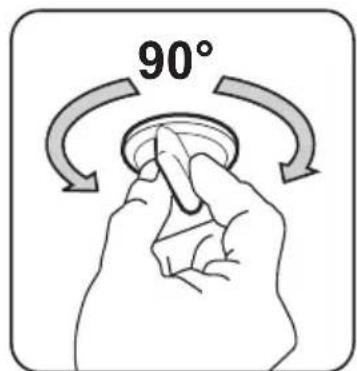
text_image
90°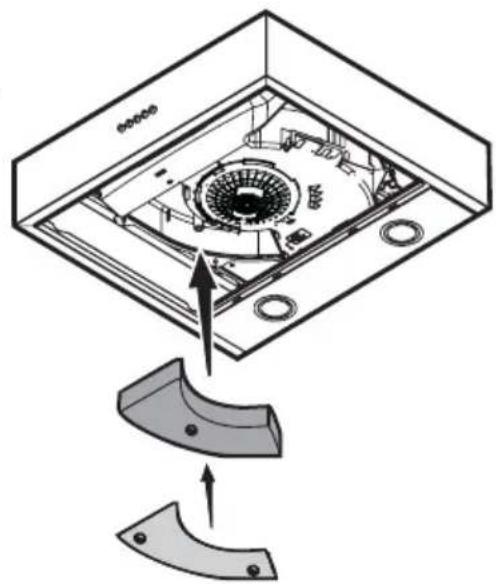
text_image
Technical diagram showing a device interior with labeled components and a downward trend arrow indicating movement or assembly.5. УПРАВЛЕНИЯ
natural_image
Illustration of a hand holding a circular component with a screwdriver, and a circular dial with arrows indicating direction (no text or symbols)natural_image
Illustration of a hand using a tool to adjust or install a mechanical component (no text or symbols visible)natural_image
Illustration of a hand holding a magnifying glass with a tool, and a circular dial indicator (no text or symbols)НИЕ МИСЛИМЕ НА ВАС
natural_image
Illustration of a hand using a tool to cut or adjust a mechanical component (no text or symbols visible)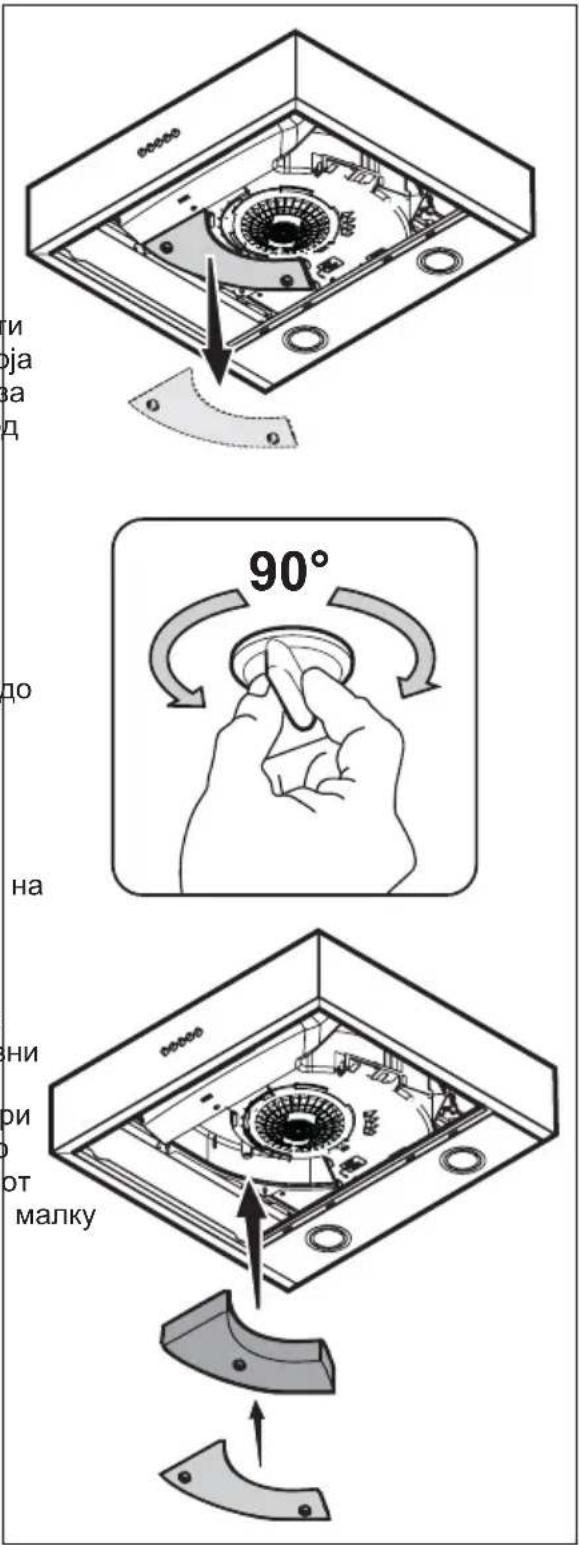
natural_image
Illustration of a hand holding a circular object with a screwdriver and a magnifying glass, no text or symbols present.ME JU NË MENDJE
www.electrolux.com/productregistration

natural_image
Illustration of a hand using a tool to cut or adjust a mechanical component (no text or symbols visible)natural_image
Illustration of a hand holding a circular component with a screwdriver, and a circular dial with arrows indicating direction (no text or symbols)МИ МИСЛИМО НА ВАС
www.electrolux.com/productregistration

natural_image
Illustration of a hand using a tool to cut or adjust a mechanical component (no text or symbols visible)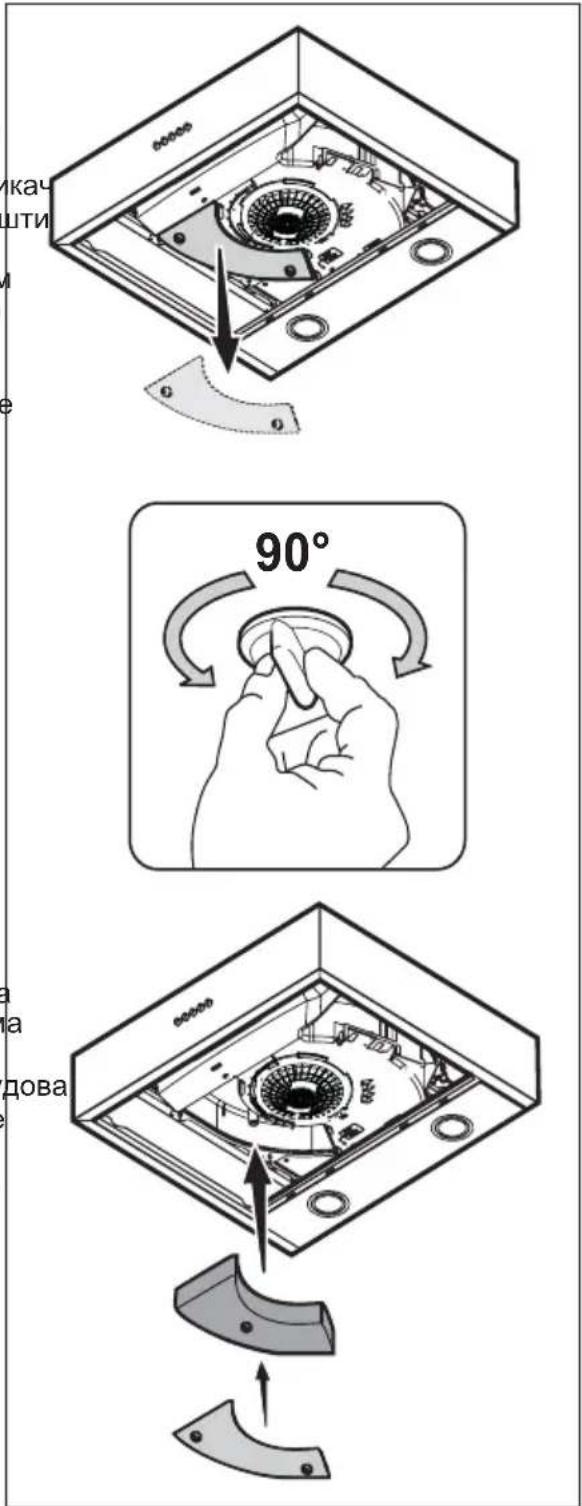
text_image
кач шти 90° а дова5. КОМАНДЕ
natural_image
Illustration of a hand holding a small object, a tool, and a circular dial with arrows indicating direction (no text or symbols)الأزرار 5.
التحكّم أزرار
natural_image
Illustration of a hand holding a screwdriver, a close-up of a circular component with arrows indicating motion (no text or symbols)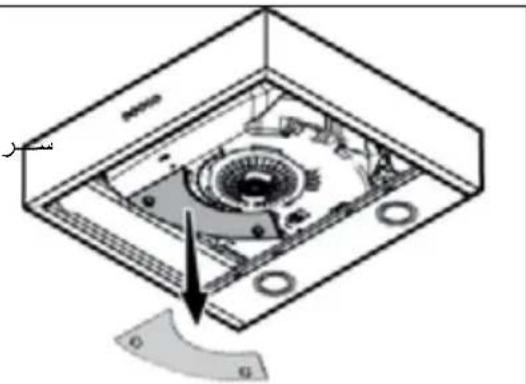
text_image
Technical diagram of a device interior with labeled components and directional arrow indicating rotation or movement.
text_image
90°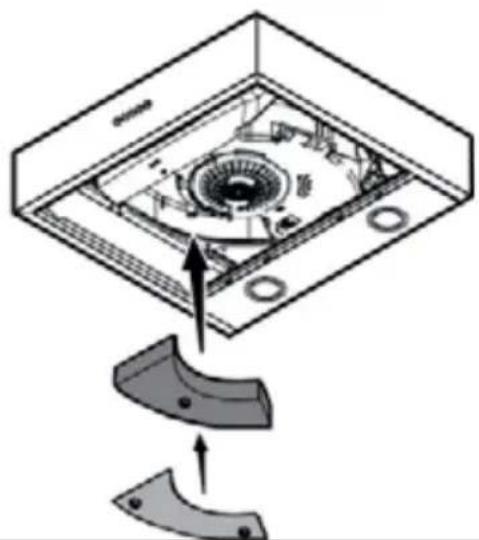
natural_image
Exploded view diagram of a device showing internal components and a curved base (no text or symbols)natural_image
Illustration of a hand using a cutting tool to cut a metal sheet (no text or symbols visible)www.electrolux.com/productregistration