
Victoria Downdraft - Basket Klarstein - Free user manual and instructions
Find the device manual for free Victoria Downdraft Klarstein in PDF.

| Product type | Built-in extractor hood |
| Brand | Klarstein |
| Model | Victoria Downdraft |
| Article numbers | 10046292, 10046293, 10046598, 10046599 |
| Power supply | 220-240 V ~ 50 Hz |
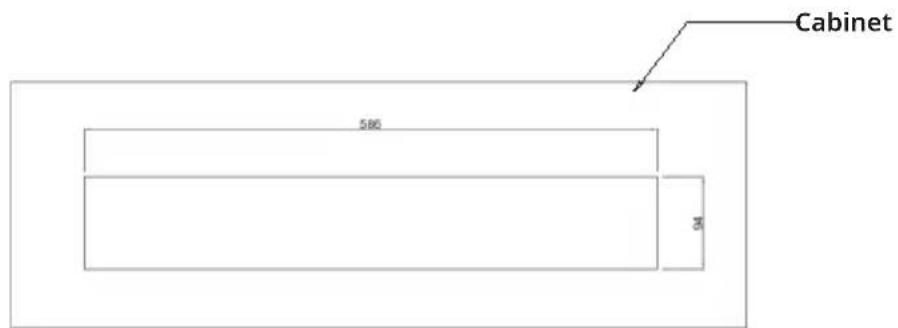
| Cut-out dimensions (models 10046292/93) | 586 x 94 mm |
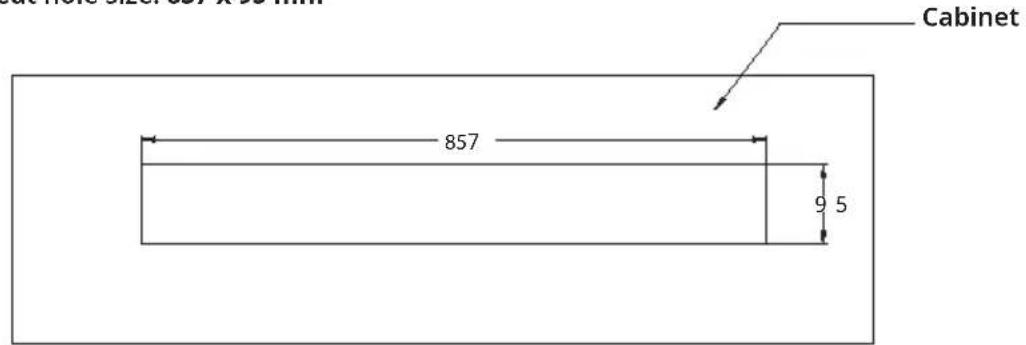
| Cut-out dimensions (models 10046598/99) | 857 x 95 mm |
| Energy efficiency class | A (10046292/93) / A++ (10046598/99) |
| Annual energy consumption | 19.6 kWh (10046292/93) / 20.3 kWh (10046598/99) |
| Airflow (min/max/boost) | 263/640/714 m³/h (10046292/93) ; 323/604/714 m³/h (10046598/99) |
| Noise emissions (min/max/boost) | 52/68/72 dB |
| Lighting efficiency | 69.3 Lux/W (10046292/93) / 47.3 Lux/W (10046598/99) |
| Lighting | Non-replaceable integrated LED strip |
| Grease filter type | Washable metal filter |
| Activated carbon filter | Optional, washable or not depending on model |
| Number of speeds | 8 levels + intensive mode (boost) |
| Special functions | Motorized up/down, timer delay, touch slider control |
| Exhaust duct diameter | 150 mm |
| Operating modes | Extraction or recirculation |
| Minimum distance from hob | 65-75 cm (recommended) |
| Consumption in off/standby mode | 0.49 W / 0.93 W (10046292/93) ; 0.43 W / not specified (10046598/99) |
| Protection rating | Domestic, not waterproof |
| Repairability | Replaceable filters, non-replaceable LED lighting, accessible motor |
| Delivery contents | Hood, grease filter(s), manual, activated carbon filter (depending on model) |
Frequently Asked Questions - Victoria Downdraft Klarstein
User questions about Victoria Downdraft Klarstein
0 question about this device. Answer the ones you know or ask your own.
Ask a new question about this device
Download the instructions for your Basket in PDF format for free! Find your manual Victoria Downdraft - Klarstein and take your electronic device back in hand. On this page are published all the documents necessary for the use of your device. Victoria Downdraft by Klarstein.
USER MANUAL Victoria Downdraft Klarstein
KLARSTEIN
www.klarstein.com

area
| Category | Value | | -------- | ----- | | 1 | 100 | | 2 | 100 | | 3 | 100 | | 4 | 100 | | 5 | 100 | | 6 | 100 | | 7 | 100 | | 8 | 100 | | 9 | 100 | | 10 | 100 | | 11 | 100 | | 12 | 100 | | 13 | 100 | | 14 | 100 | | 15 | 100 | | 16 | 100 | | 17 | 100 | | 18 | 100 | | 19 | 100 | | 20 | 100 | | 21 | 100 | | 22 | 100 | | 23 | 100 | | 24 | 100 | | 25 | 100 | | 26 | 100 | | 27 | 100 | | 28 | 100 | | 29 | 100 | | 30 | 100 | | 31 | 100 | | 32 | 100 | | 33 | 100 | | 34 | 100 | | 35 | 100 | | 36 | 100 | | 37 | 100 | | 38 | 100 | | 39 | 100 | | 40 | 100 | | 41 | 100 | | 42 | 100 | | 43 | 100 | | 44 | 100 | | 45 | 100 | | 46 | 100 | | 47 | 100 | | 48 | 100 | | 49 | 100 | | 50 | 100 | | 51 | 100 | | 52 | 100 | | 53 | 100 | | 54 | 100 | | 55 | 100 | | 56 | 100 | | 57 | 100 | | 58 | 100 | | 59 | 100 | | 60 | 100 | | 61 | 100 | | 62 | 100 | | 63 | 100 | | 64 | 100 | | 65 | 100 | | 66 | 100 | | 67 | 100 | | 68 | 100 | | 69 | 100 | | 70 | 100 | | 71 | 100 | | 72 | 100 | | 73 | 100 | | 74 | 100 | | 75 | 100 | | 76 | 100 | | 77 | 100 | | 78 | 100 | | 79 | 100 | | 80 | 100 | | Note: The actual values are not provided in the code. The code generates random data for the first three categories (categories) and is not included in the output. |INHALTSVERZEICHNIS
Technische Daten 3
natural_image
Simple line drawing of a rectangular box with a slot, labeled with dimensions (no text or symbols beyond basic geometry)natural_image
Isometric line drawing of a rectangular block with a smaller rectangular block on top, no text or symbols presentnatural_image
Technical line drawing of a structural frame with an inset close-up showing detail (no text or symbols)
natural_image
Technical line drawing of a mechanical device with rotating components and a rectangular housing (no text or symbols)
natural_image
Technical line drawing of a mechanical assembly with a rectangular frame and a smaller housing (no text or symbols)

natural_image
Isometric line drawing of a rectangular box with a central internal component and a vertical rod, no text or symbols present.natural_image
Simple line drawing of a rectangular box with a slot, no text or symbols presentInstallation:
natural_image
Technical line drawing of a mechanical component with a circular housing and rectangular base (no text or symbols)natural_image
Technical line drawing of a pipe elbow joint with a grid-patterned base (no text or symbols)BEDIENUNG
Bedienfeld
natural_image
Symbol of a trash bin crossed with a diagonal line, no text or numbers presentBerlin Brands Group UK Limited
PO Box 42
272 Kensington High Street
London, W8 6ND
United Kingdom
Produktdatenblatt
Name: Customer service
Website: https://www.elektronik-star.de/Info/Impressum/
E-Mail-Adresse: info@electronic-star.de
Telefonnummer: +49303001385500
Anschrift:
Wallstraße 16
10179 berlin
Deutschland
Produktdatenblatt
Name: Customer service
Website: https://www.elektronik-star.de/Info/Impressum/
E-Mail-Adresse: info@electronic-star.de
Telefonnummer: +49303001385500
Anschrift:
Wallstraße 16
10179 berlin
Deutschland
Dear Customer,
Congratulations on purchasing this device. Please read the following instructions carefully and follow them to prevent possible damages. We assume no liability for damage caused by disregard of the instructions and improper use. Scan the QR code to get access to the latest user manual and more product information.

CONTENTS
Technical data 23
Safety Instructions 24
Installation 26
Operation 33
Cleaning and Care 34
Troubleshooting 36
Notes on Environmental Protection 37
Disposal Considerations 37
Manufacturer & Importer (UK) 37
TECHNICAL DATA
| Item number | 10046292, 10046293, 10046598, 10046599 |
| Power supply | 220-240 V ~ 50 Hz |
SAFETY INSTRUCTIONS
- Thank you for purchasing this cooker hood. Please read the instruction manual carefully before you use the cooker hood, and keep it in a safe place.
- The installation work must be carried out by a qualified electrician or competent person. Before you use the cooker hood, make sure that the voltage (V) and the frequency (Hz) indicated on the cooker hood are exactly the same as the voltage and the frequency in your home.
- The manufacturer and the agent will not bear any responsibility for the damage caused by inappropriate installation and usage.
• Children under the age of 8 must not use the cooker hood. - The appliance is not intended for commercial use, but only for household and similar environments.
- The cooker hood and its filter mesh should be cleaned regularly in order to keep it in good working order.
- Before cleaning, switch the power off at the main supply.
- Clean the cooker hood according to the instruction manual and keep the cooker hood from the danger of burning.
• Prohibit putting the cooker hood by fire. - If the appliance does not function normally, contact the manufacturer or a specialist company.
- This device may be only used by children 8 years old or older and persons with limited physical, sensory and mental capabilities and / or lack of experience and knowledge, provided that they have been instructed in use of the device by a responsible person who understands the associated risks.
- If the supply cord is damaged, it must be replaced by the manufacturer, its service agent or similarly qualified persons in order to avoid a hazard.
- If the range hood is used at the same time as appliances burning gas or other fuels, the room must be adequately ventilated.
- Do not flambé under the range hood. Accessible parts may become hot when used with cooking appliances.
Important hints on installation
- The air must not be discharged into a flue that is used for exhausting fumes from appliances burning gas or other fuels (not applicable to appliances that only discharge the air back into the room).
- Regulations concerning the discharge of air have to be fulfilled.

WARNING
Risk of poisoning from exhaust gases sucked back. Never operate the device in extraction mode simultaneously with an open flue appliance when there is not adequate airflow guaranteed.
Open flue combustion equipment (for example, gas, oil, wood or coal-fired heaters, tankless water heaters, water heaters) pulls combustion air from the room and runs it through an exhaust pipe or chimney to the outside. In the extraction mode, indoor air is removed from the kitchen and the adjacent rooms
- without sufficient air intake this creates a vacuum. Toxic gases from the chimney or extraction flue can thereby be sucked back into the living spaces.
• Always ensure that a sufficient supply of fresh air is guaranteed and that the air can circulate.
- An air supply / extractor box alone does not ensure compliance with the limit value.
Safe operation is only possible when the negative pressure in the room where the appliance is located does not exceed 4 Pa (0.04 mbar). This can be achieved when the air required for combustion can flow through openings that are not closable, for example in doors, windows, in conjunction with an air supply / extractor box or through other technical measures. In any case, consult a qualified chimney sweep who can assess the entire ventilation of your house and propose appropriate measures for adequate ventilation.
If the hood is used exclusively in the recirculation mode, unrestricted operation is possible.
Important note on disassembly of the device
- Disassembly is similar to installation/assembly in reverse order.
• Take a second person to help you during disassembly to avoid injuries.
INSTALLATION
On installation, the minimum distance between the hob and the hood must be exactly complied with and follow the numbering of the steps and the additional instructions.
Execution with air exhausted outdoors (A- see also the installation data). The vapours are extracted via an air exhaust hose fixed to the connector ring.
The diameter of the exhaust air hose must conform to that of the connector ring. If a smoke non-return valve is used or is planned, check whether it can open and close freely after the installation of the exhaust air hose. The extractor hood can be equipped with one (top) or two (top and back) extractor openings.
The hood is normally initially fitted out for use of the top extractor opening, as an extractor hood. Openings not required are fitted with a plastic cover. This plastic cover can be easily removed by turning counterclockwise and optionally fitted to another opening which is not required.
10046292, 10046293 10046598, 10046599
Using the extractor hood as an exhaust air hood (with air extracted to outdoors)
If the extractor hood has been fitted at the factory with a carbon filter, this must be removed. It is only practicable to use this when operating your hood in circulation mode.
Converting the extractor hood to a circulation hood
If you wish to use an appropriately fitted hood as a circulation hood, you must mount the active carbon filter(s) to the fan motor before using the hood. The active carbon filter(s) is/are included in the scope of supply with some models. Otherwise you must obtain the active carbon filter(s) from the supplier of your extractor hood.
Electrical connection
Before connecting the extractor hood, check that the voltage stated on the rating plate (V) agrees with the supply voltage in your home. Never install the appliance if the data on the rating plate does not agree with your supply voltage. You will find the rating plate inside the appliance, behind the grease filter.
If the appliance is not fitted with a connector plug, a two-pole switch, conforming to standards with a minimum open contact gap of 3 mm is to be installed by an authorized tradesman in an easily accessible location. If the extractor hood is fitted with a standard connector plug, connect this to an easily accessible standard socket.
Mounting the carbon filter
You will find the mounting instructions for the carbon filter in its packaging. To mount the carbon filter, remove the grease filter(s), fit the carbon filter according to its mounting instructions and refit the grease filter(s).
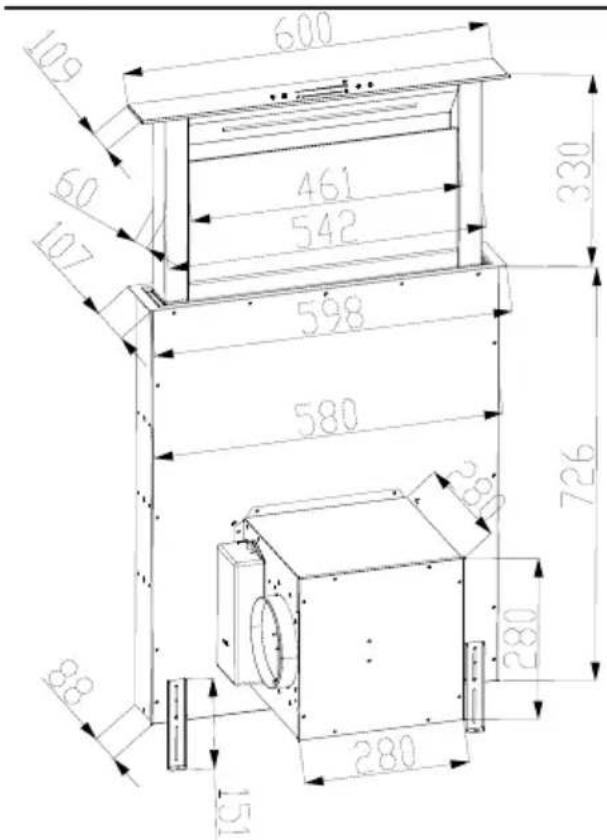
Installation dimensions
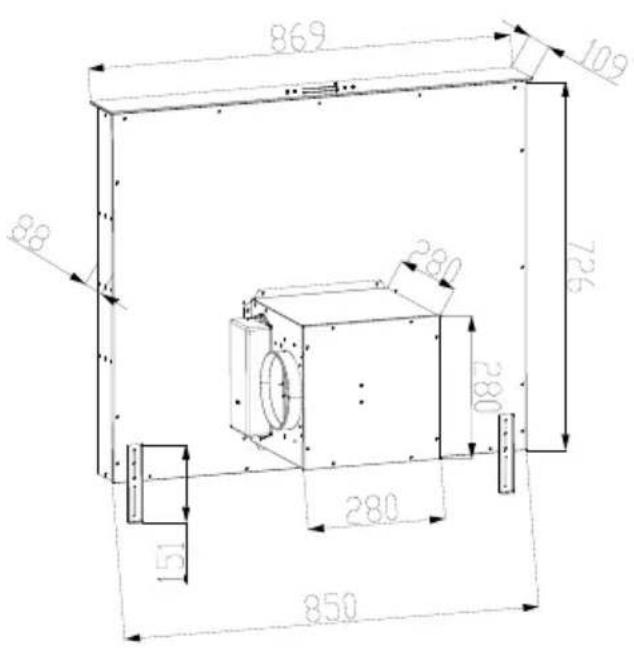
Installation: 10046292, 10046293
Cut hole size: 586 x 94 mm
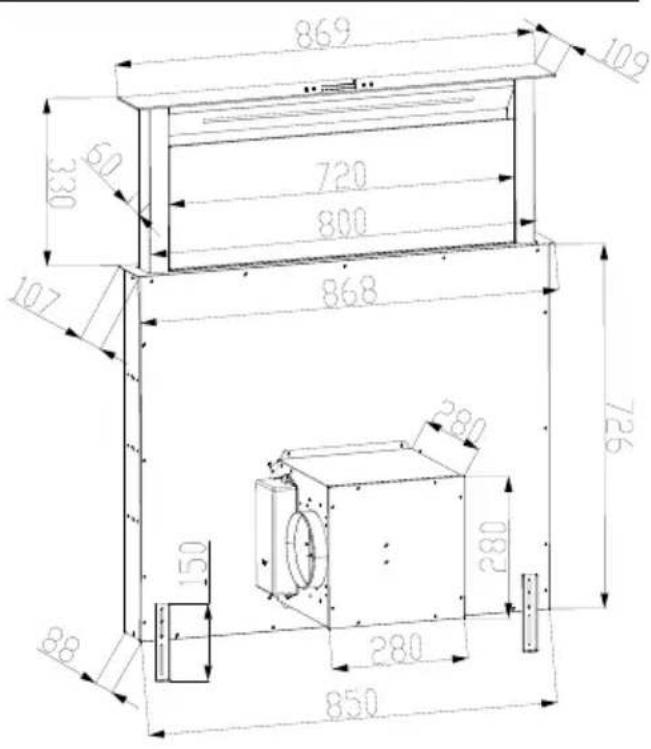
Installation: 10046598, 10046599
Cut hole size: 857 x 95 mm
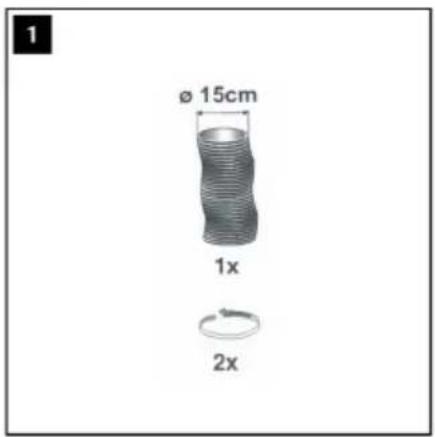
Please get an exhaust duct 150 mm with two hose clamps (not included!).
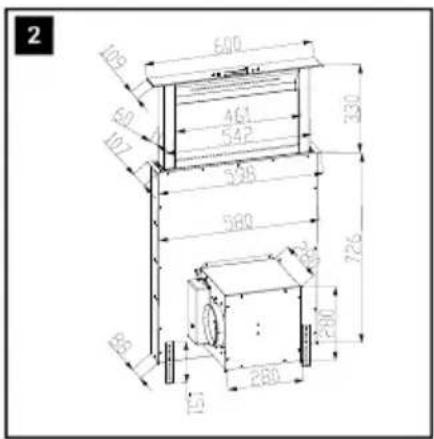
Provide the worktop with the matching cutouts for the ventilation system.
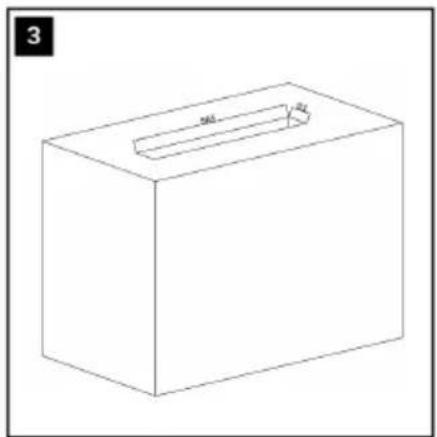
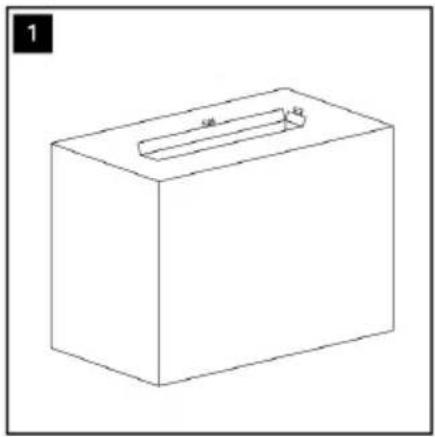
natural_image
Simple line drawing of a rectangular box with a slot, labeled '3' in top-left corner (no text or symbols on the box itself)Provide the countertop with a cutout for the cooktop.
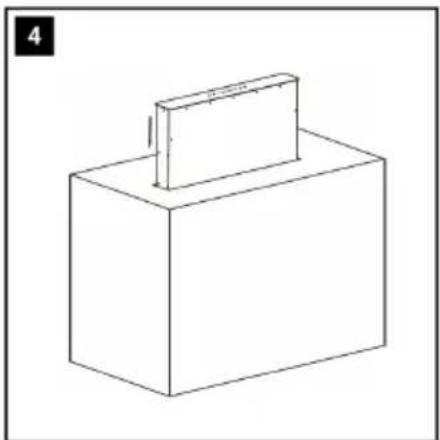
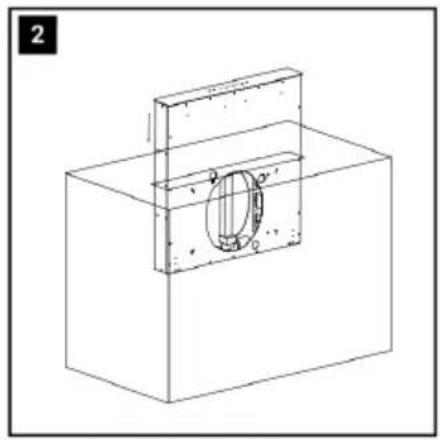
natural_image
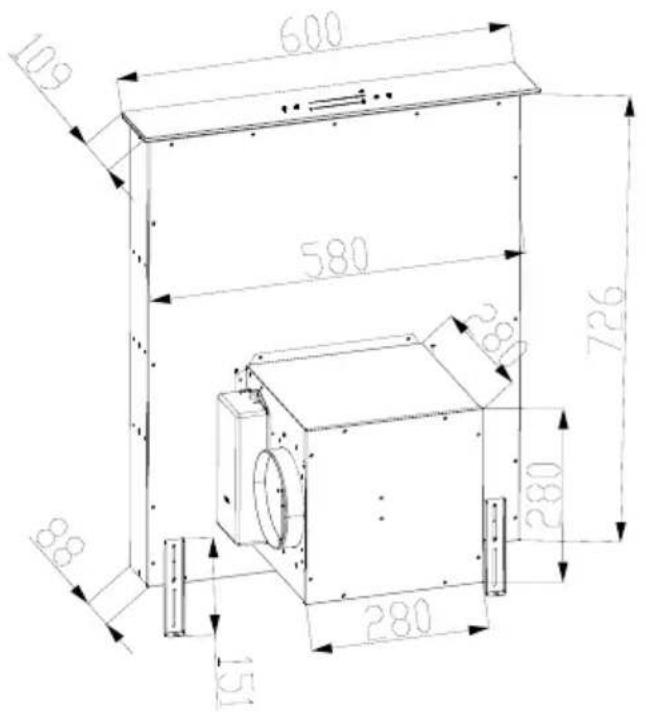
Isometric line drawing of a rectangular block with a smaller rectangular block on top, no text or symbols presentInsert the ventilation system in the cutout and connect them mitteles holding rails with under the countertop and on the body.
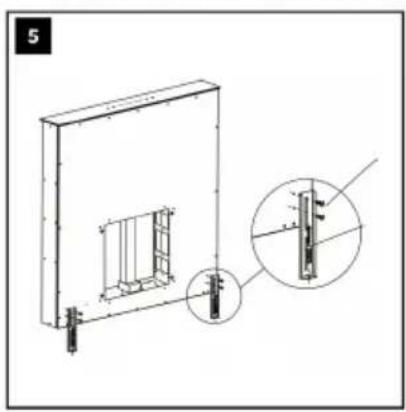
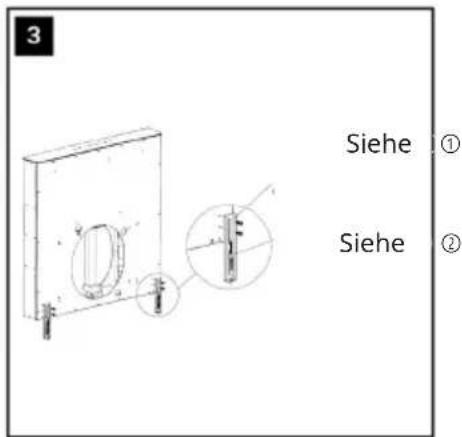
natural_image
Technical line drawing of a structural frame with an inset close-up showing detail (no text or symbols)
natural_image
Technical line drawing of a mechanical device with rotating components and a rectangular housing (no text or symbols)
natural_image
Technical line drawing of a mechanical assembly with a rectangular frame and a smaller housing (no text or symbols)

natural_image
Isometric line drawing of a rectangular box with a central internal component and a vertical rod, no text or symbols present.- Mounting the motor unit:
- You have the option to connect the motor unit to the right or left on the vent housing
- Then connect the different blades and check the unit for function.
Note: The ventilation system has sharp edges. Use safety gloves:
natural_image
Simple line drawing of a rectangular box with a slot, no text or symbols presentInstallation:
Drill 585*93 holes above the installation cabinet according to the outline size of the flue. Note: The holes for the cabinet installation should be drilled according to the size of the drawing.
natural_image
Technical line drawing of a mechanical component with a circular housing and rectangular base (no text or symbols)Provide the worktop with a cut-out for the cooktop.
-
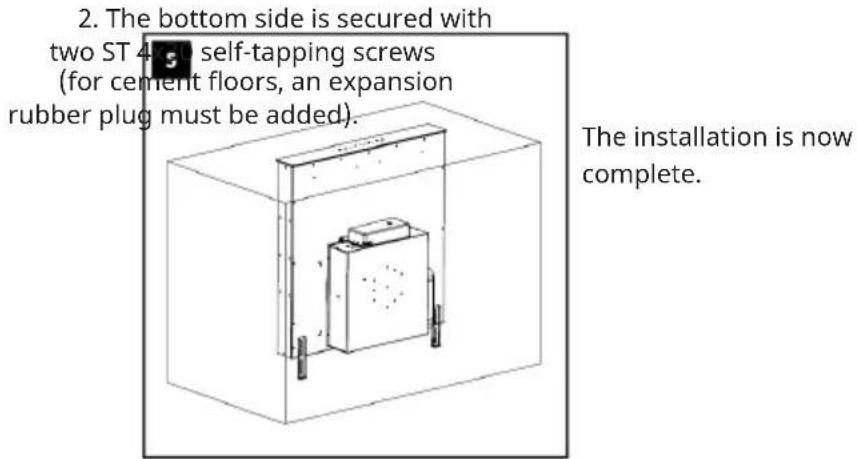
Attach the bellows to the housing using D1.0030 ST 4.0x8 screws.
-
4 holes must be drilled for the
-
Once the housing is in the correct position, use 4 ST 4.0x8 self-tapping screws to secure the
housing.
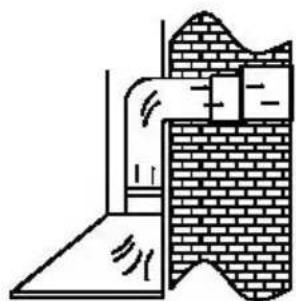
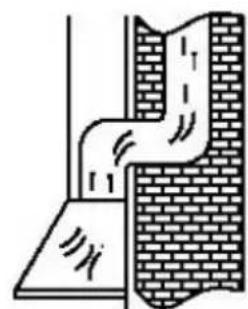
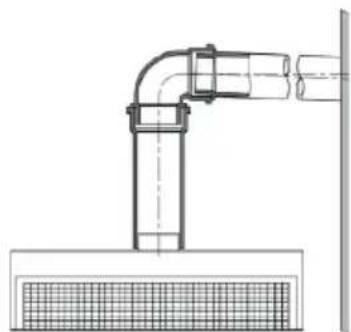
Exhaust air pipe
natural_image
Diagram of a brick wall section with an arched opening and a sloped slope, showing structural details without any text or symbols.1 Air outlet to outdoors
natural_image
Diagram showing a pipe flowing through a brick wall with visible cracks and a wavy line indicating flow (no text or symbols)2 Air outlet via an air shaft
• The exhaust air line should be as short and straight as possible.
- To avoid excessive noise or a reduced extraction capacity the diameter of the exhaust air pipeline should not be less than 150 mm.
- Use or form only large radius bends. Small radius bends reduce the extraction capacity of the hood.
- Use only smooth pipelines or fl exible hoses of non-fl ammable materials for the exhaust air pipeline
- If the exhaust air pipeline is horizontally routed, there must be a minimum gradient of 1 cm per metre or an inclination angle of 2^ . (Fig. C) Otherwise condensation water could run into the extractor hood motor.
- If the exhaust air is directed into an exhaust air duct, the end of the entry fitting must be directed in the direction of flow.
- If the exhaust air pipeline is routed though cool rooms, loft s etc. there can be a large temperature drop within the individual parts of the pipeline, resulting in sweating or condensation water production. This renders outlet pipeline insulation necessary.
- In some cases a condensation water barrier must be installed in addition to adequate insulation.
natural_image
Technical line drawing of a pipe elbow joint with a grid-patterned base (no text or symbols)OPERATION
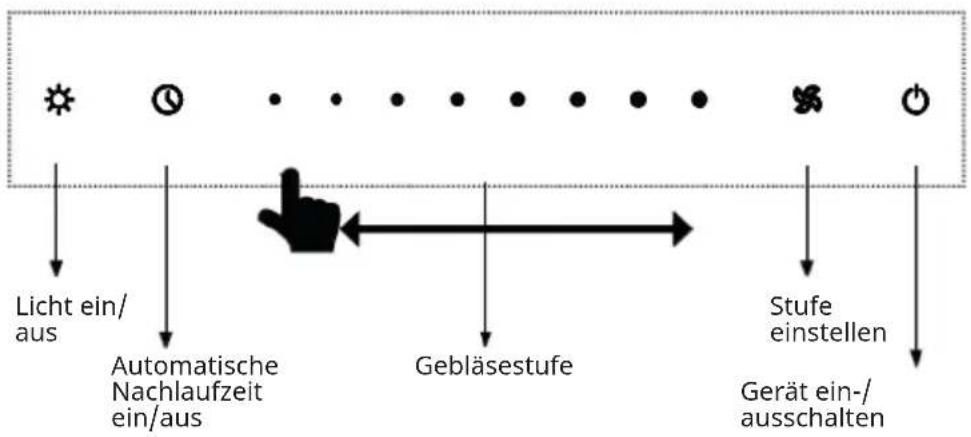
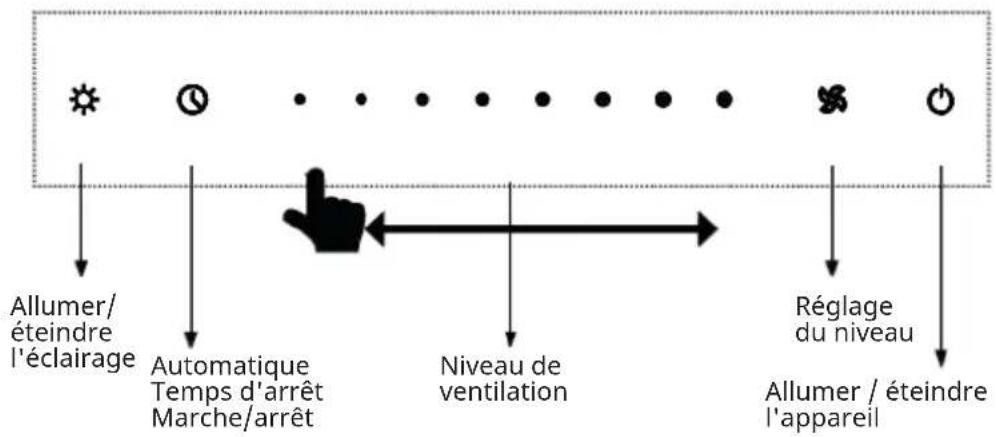
Control panel
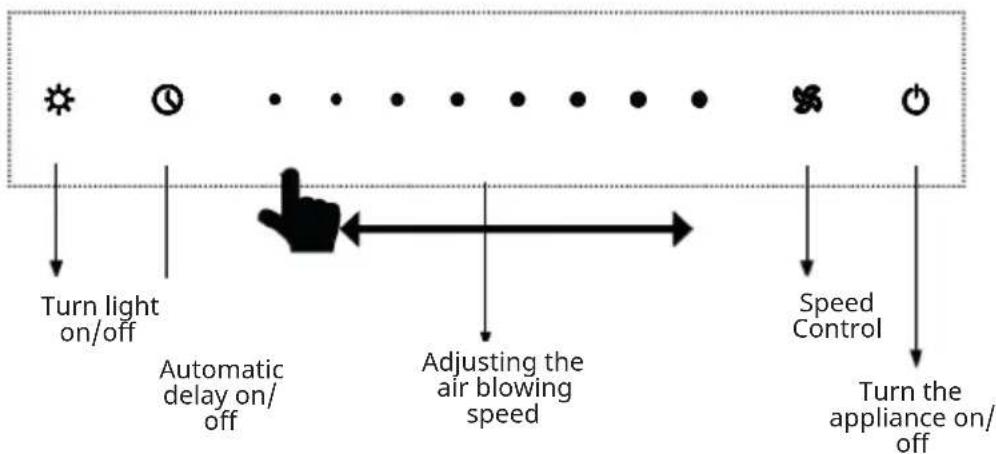
flowchart
graph TD
    A["Turn light on/off"] --> B["Automatic delay on/off"]
    B --> C["Adjusting the air blowing speed"]
    C --> D["Speed Control"]
    D --> E["Turn the appliance on/off"]
Lift hood up/down
If you press the extract button for 2 seconds, the hood begins to lift up and remain in the highest position available. By again pressing the key, the hood retracts.
Important: Check that the core when moving in and out is not blocked or obstructed. There is a risk that a container is lifted (handle, etc.) and possibly hot contents may spill.
Adjust the power intensity
In work mode, briefly press the speed control button to increase the speed by one level (from level 1 to 8). Press and hold the speed control button to activate the function. After 5 minutes, the speed automatically changes to level 8.
With the Silder, you can reduce or increase the power level. To do this, either directly touch the desired intensity level or move back and forth on the control panel (under the illuminated stepped bar) until you have reached the desired intensity. The power level is displayed in the display above.
Turn of the automatic delay
Press the automatic delay button during operation. When it starts flashing, 3 minutes automatic delay is activated.
CLEANING AND CARE
Prior to any maintenance or cleaning work, isolate the hood from the electrical supply by: pulling out the appliance connector plug or tripping the house installation circuit breaker or fully unscrew the screw type fuse from the house installation.
- The extractor hood is not to be cleaned with a steam cleaner.
- Do not use cleaning agents containing alcohol to clean appliances
• with a matt black finish. These can lead to discolouring. - Non-compliance with the maintenance and cleaning instructions can result in a fire hazard due to grease deposits.
- The grease filters on your appliance are to be cleaned or replaced at regular intervals.
- Filters saturated with grease can quickly catch fire and also distribute unpleasant odours.
- Grease filters obstructed by dirt particles seriously impair the appliance function.
- When cleaning the area of the control elements, take great care to prevent water entering the electronics.
Special information for appliances with a stainless steel casing
- A commercially available non-abrasive stainless steel cleaning agent should be used for cleaning stainless steel surfaces.
- Treatment with a stainless steel preservative is recommended to prevent surfaces becoming quickly re-soiled.
- Apply the agent all over and economically using a soft cloth.
- Never use stainless steel cleaning agents in the vicinity of the control elements.
- When cleaning metal grease filters take care not to damage the mesh.
- Frequent cleaning or the use of aggressive cleaning agents can cause colour changes to the metal surface.
• These do not affect the filter function and are not grounds for complaint.
Changing the grease filter
- Change paper grease filters monthly.
- Change paper grease filters with alarm every two months or when the colour of the surface becomes visible through the mesh openings. This filter is coloured on one side; after fitting, this colouring must not be visible through the mesh openings.
- Foam grease filters must be soaked once a month in warm soapy water for 1 to 2 hours. Do not wring out; repeat where required and replace the filter by a
new item after a maximum of 5-6 washes.
- Metal grease filters do not have to be replaced when they are over-saturated but washed once a month by hand or in a dishwasher (60 °C). Allow the filter to dry thoroughly and carefully replace it in the extractor hood.
Do not use alkaline dishwashing detergents (pH value above 7).
Carbon filters
a) Traditional carbon filters (normally round in shape) can be neither washer nor regenerated. In normal use and depending on their size, replace every 4 to 6 months. Comply with the relevant instructions on the package.
b) Washable and regeneratable carbon filters (normally square in shape) are to be washed once a month in a dishwasher, using a standard rinsing agent and with the intensive rinsing program (at the highest temperature). Washable and regeneratable carbon filters absorb kitchen odours for a maximum of 3 years when cleaned monthly. The filter should then be replaced by a new item.
Washable and regeneratable carbon filters should be washed separately to avoid food residue deposits which can later cause unpleasant odours. After washing, the washable and regeneratable carbon filter must be reactivated. This is carried out by drying the cleaned filter in an oven for 10 minutes at 100 °C. Read the package to see whether your carbon filter is washable and regeneratable. If the package carries no information, then it contains a traditional, non-washable carbon filter. Each time you change or wash a grease filter or carbon filter, after removal clean all exposed lower parts of the hood with a mild grease solvent. For the daily cleaning of the outer pats of the hood use a soft cloth moistened with alcohol or a mild liquid cleaner. Never use an abrasive cleaner. There is a risk of fire if the instructions for cleaning the hood and the changing or cleaning of the filters are not complied with.

WARNING
Danger of fire! Comply with the the instructions for cleaning the hood and the filters.
Lighting
This appliance has a built-in LED-stripe. This stripe does not have to be replaced.
TROUBLESHOOTING
| Fault Cause Solution | ||
| Light on, but fan does not work | The fan blade is jammed. | Switch of the unit and repair by qualified service personnel only. |
| The motor is damaged. | ||
| Both light and fan do not work | light bulb burn. Replace the | bulb with correct rating. |
| Power cord looses. Plug in | to the power supply again. | |
| Serious vibration of the unit | The fan blade is damaged. | Switch of the unit and repair by qualified service personnel only. |
| The fan motor is not fixed tightly. | ||
| The unit is not hung properly on the bracket. | Take down the unit and check whether the bracket is in proper location. | |
| Suction performance not good | Too long distance between the unit and the cooking plane | Readjust the distance to 65-75cm |
NOTES ON ENVIRONMENTAL PROTECTION
- During cooking, make sure that there is sufficient air supply so that the cooker hood can operate efficiently and with low operating noise.
- Adjust the fan speed to the amount of steam produced during cooking. The lower the fan speed, the less energy is consumed.
- If large amounts of steam are produced during cooking, select a higher fan speed in good time. If the cooking steam has already dispersed in the kitchen, the cooker hood must be operated longer.
- Switch off the cooker hood when you no longer need it.
- Switch off the lighting when you no longer need it.
- Clean the filter at regular intervals and replace it if necessary to increase the effectiveness of the ventilation system and prevent fire hazards.
- Always put the lid on when cooking to reduce cooking steam and condensation.
DISPOSAL CONSIDERATIONS
natural_image
Symbol of a trash bin crossed with a diagonal line, no text or numbers presentIf there is a legal regulation for the disposal of electrical and electronic devices in your country, this symbol on the product or on the packaging indicates that this product must not be disposed of with household waste. Instead, it must be taken to a collection point for the recycling of electrical and electronic equipment. By disposing of it in accordance with the rules, you are protecting the environment and the health of your fellow human beings from negative consequences. For information about the recycling and disposal of this product, please contact your local authority or your household waste disposal service.
MANUFACTURER & IMPORTER (UK)
Manufacturer:
Chal-Tec GmbH, Wallstrasse 16, 10179 Berlin, Germany.
info@electronic-star.de
Importer for Great Britain:
Berlin Brands Group UK Limited
PO Box 42
272 Kensington High Street
London, W8 6ND
United Kingdom
Product fiche
| Delegated Regulation (EU) 65/2014 | |
| Supplier name or trademark Klarstein | |
| Model identifier 10046292, 10046293 | |
| Annual Energy Consumption 19,6 kWh/annum | |
| Energy Efficiency Class A | |
| Fluid Dynamic Efficiency 40,0 | |
| Fluid Dynamic Efficiency class A | |
| Lighting Efficiency 69,3 Lux/W | |
| Lighting Efficiency class A | |
| Grease Filtering Efficiency 63,9 % | |
| Grease Filtering Efficiency class E | |
| Air flow (min speed normal use) 263 m^3/h | |
| Air flow (max speed normal use) 640 m^3/h | |
| Air flow (intensive or boost use) 714 m^3/h | |
| Airborne acoustical A-weighted sound power emissions (min speed normal use) | 52 dB |
| Airborne acoustical A-weighted sound power emissions (max speed normal use) | 68 dB |
| Airborne acoustical A-weighted sound power emissions (intensive or boost use) | 72 dB |
| Power consumption in off mode (W) 0,49 W | |
| Power consumption in standby mode (W) 0,93 W | |
Model placed on the Union market from 01/06/2024.

EPREL registration number: 2032343
https://eprel.ec.europa.eu/qr/2032343
Supplier: Chal -Tec GmbH (Authorised representative)
Website:
Customer care service:
Name: Customer service
Website: https://www.elektronik-star.de/lnfo/Impressum/
Email: info@electronic-star.de
Phone: +49303001385500
Address:
Wallstraße 16
10179 berlin
Germany
Product fiche
Delegated Regulation (EU) 65/2014
| Supplier name or trademark Klarstein | |
| Model identifier 10046598, 10046599 | |
| Annual Energy Consumption 20,3 kWh/annum | |
| Energy Efficiency Class A++ | |
| Fluid Dynamic Efficiency 40,0 | |
| Fluid Dynamic Efficiency class A | |
| Lighting Efficiency 47,3 Lux/W | |
| Lighting Efficiency class A | |
| Grease Filtering Efficiency 63,9 % | |
| Grease Filtering Efficiency class E | |
| Air flow (min speed normal use) 323 m^3/h | |
| Air flow (max speed normal use) 604 m^3/h | |
| Air flow (intensive or boost use) 714 m^3/h | |
| Airborne acoustical A-weighted sound power emissions (min speed normal use) | 52 dB |
| Airborne acoustical A-weighted sound power emissions (max speed normal use) | 68 dB |
| Airborne acoustical A-weighted sound power emissions (intensive or boost use) | 72 dB |
| Power consumption in off mode (W) 0,43 W |
Model placed on the Union market from 01/11/2024.

EPREL registration number: 2178871
https://eprel.ec.europa.eu/qr/2178871
Supplier: Chal -Tec GmbH (Authorised representative)
Website:
Customer care service:
Name: Customer service
Website: https://www.elektronik-star.de/lnfo/Impressum/
Email: info@electronic-star.de
Phone: +49303001385500
Address:
Wallstraße 16
10179 berlin
Germany
Chère cliente, cher client,
SOMMAIRE
Fiche technique 41
natural_image
Simple line drawing of a rectangular box with a slot, labeled with dimensions (no text or symbols beyond basic geometry)natural_image
Isometric line drawing of a rectangular block with a smaller rectangular block on top, no text or symbols presentnatural_image
Technical line drawing of a structural frame with an inset close-up showing detail (no text or symbols)
natural_image
Technical line drawing of a mechanical device with rotating components and a rectangular housing (no text or symbols)
natural_image
Technical line drawing of a mechanical assembly with a rectangular frame and a smaller housing (no text or symbols)

natural_image
Isometric line drawing of a rectangular box with a central internal component and a vertical rod, no text or symbols present.natural_image
Simple line drawing of a rectangular box with a slot, no text or symbols presentInstallation :
natural_image
Technical line drawing of a mechanical component with a circular housing and rectangular base (no text or symbols)natural_image
Technical line drawing of a pipe elbow joint with a grid-patterned base (no text or symbols)UTILISATION
Panneau de commande
natural_image
Symbol of a trash bin crossed with a diagonal line, no text or numbers presentBerlin Brands Group UK Limited
PO Box 42
272 Kensington High Street
London, W8 6ND
United Kingdom
Fiche de produit
Nom: Customer service
Site web: https://www.elektronik-star.de/lnfo/Impressum/
Courriel: info@electronic-star.de
Téléphone: +49303001385500
Adresse:
Wallstraße 16
10179 berlin
Allemagne
Fiche de produit
Nom: Customer service
Site web: https://www.elektronik-star.de/lnfo/Impressum/
Courriel: info@electronic-star.de
Téléphone: +49303001385500
Adresse:
Wallstraße 16
10179 berlin
Allemagne
Gentile cliente,
INDICE
Dati tecnici 59
natural_image
Simple line drawing of a rectangular box with a slot, no text or symbols presentnatural_image
Isometric line drawing of a rectangular block with a smaller rectangular block on top, no text or symbols presentnatural_image
Technical line drawing of a structural frame with an inset close-up showing detail (no text or symbols)
natural_image
Technical line drawing of a mechanical device with rotating components and a rectangular housing (no text or symbols)
natural_image
Technical line drawing of a mechanical assembly with a rectangular frame and a smaller housing (no text or symbols)

natural_image
Isometric line drawing of a rectangular box with a central internal component and a vertical rod, no text or symbols present.natural_image
Simple line drawing of a rectangular box with a slot, no text or symbols presentInstallazione:
natural_image
Technical line drawing of a mechanical component with a circular housing and rectangular base (no text or symbols)natural_image
Diagram of a brick wall section with an arched opening and a sloped slope, showing structural details without any text or symbols.natural_image
Diagram showing a pipe or channel interacting with a brick wall, no text or symbols presentnatural_image
Technical line drawing of a pipe elbow joint with a grid-patterned base (no text or symbols)UTILIZZO
natural_image
Symbol of a trash bin crossed out by a diagonal line, with no text or labels present.PRODUTTORE E IMPORTATORE (UK)
Produttore:
Chal-Tec GmbH, Wallstraße 16, 10179 Berlino, Germania.
info@electronic-star.de
Berlin Brands Group UK Limited
PO Box 42
272 Kensington High Street
London, W8 6ND
United Kingdom
Nome: Customer service
Sito web: https://www.elektronik-star.de/lnfo/Impressum/
E-mail: info@electronic-star.de
Nome: Customer service
E-mail: info@electronic-star.de
Indirizzo:
Wallstraße 16
10179 berlin
Germania
https://eprel.ec.europa.eu/qr/2178871
Sito web:
Sito web: https://www.elektronik-star.de/l nfo/Impressum/
ÍNDICE
Datos técnicos 77
natural_image
Simple line drawing of a rectangular box with a slot, no text or symbols presentnatural_image
Isometric line drawing of a rectangular block with a smaller rectangular block on top, no text or symbols presentnatural_image
Technical line drawing of a structural frame with an inset close-up showing detail (no text or symbols)
natural_image
Technical line drawing of a mechanical device with rotating components and a rectangular housing (no text or symbols)
natural_image
Technical line drawing of a mechanical assembly with a rectangular frame and a smaller housing (no text or symbols)

natural_image
Isometric line drawing of a rectangular box with a central internal component and a vertical rod, no text or symbols present.natural_image
Simple line drawing of a rectangular box with a slot, no text or symbols presentInstalación:
natural_image
Technical line drawing of a mechanical component with a circular housing and rectangular base (no text or symbols)natural_image
Technical line drawing of a pipe elbow joint with a grid-patterned base (no text or symbols)FUNCIONAMIENTO
Panel de control

flowchart
graph TD
    A["Luz On/off"] --> B["Automático Tiempo de seguimiento Encender/apagar"]
    B --> C["Nivel del ventilador"]
    C --> D["Nivel de ajuste Encender/apagar el aparato"]
    D --> E["Arrow pointing inward"]
    style A fill:#f9f,stroke:#333
    style B fill:#ccf,stroke:#333
    style C fill:#cfc,stroke:#333
    style D fill:#fcc,stroke:#333
    style E fill:#ffc,stroke:#333
natural_image
Symbol of a trash bin crossed out by a diagonal line, with no text or labels present.Berlin Brands Group UK Limited PO Box 42 272 Kensington High Street London, W8 6ND United Kingdom
Ficha del producto
INHOUDSOPGAVE
natural_image
Simple line drawing of a rectangular box with a slot, no text or symbols presentnatural_image
Isometric line drawing of a rectangular block with a smaller rectangular block on top, no text or symbols presentnatural_image
Technical line drawing of a structural frame with an inset close-up showing detail (no text or symbols)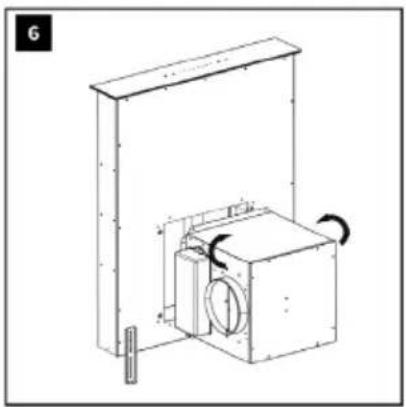
natural_image
Technical line drawing of a mechanical device with rotating components and a rectangular housing (no text or symbols)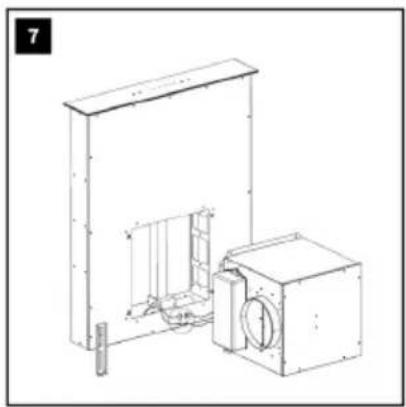
natural_image
Technical line drawing of a mechanical assembly with a rectangular frame and a smaller housing (no text or symbols)

natural_image
Isometric line drawing of a rectangular box with a central internal component and a vertical rod, no text or symbols present.natural_image
Simple line drawing of a rectangular box with a slot, no text or symbols presentInstallatie:
natural_image
Technical line drawing of a mechanical component with a circular housing and rectangular base (no text or symbols)natural_image
Technical line drawing of a pipe elbow joint with a grid-patterned base (no text or symbols)BEDIENING
Controlepaneel

INSTRUCTIES VOOR AFVOER
natural_image
Symbol of a trash bin crossed with a diagonal line, no text or labels presentBerlin Brands Group UK Limited
PO Box 42
272 Kensington High Street
London, W8 6ND
United Kingdom
Productkaart
area
| Category | Value | | -------- | ----- | | 1 | 100 | | 2 | 100 | | 3 | 100 | | 4 | 100 | | 5 | 100 | | 6 | 100 | | 7 | 100 | | 8 | 100 | | 9 | 100 | | 10 | 100 | | 11 | 100 | | 12 | 100 | | 13 | 100 | | 14 | 100 | | 15 | 100 | | 16 | 100 | | 17 | 100 | | 18 | 100 | | 19 | 100 | | 20 | 100 | | 21 | 100 | | 22 | 100 | | 23 | 100 | | 24 | 100 | | 25 | 100 | | 26 | 100 | | 27 | 100 | | 28 | 100 | | 29 | 100 | | 30 | 100 | | 31 | 100 | | 32 | 100 | | 33 | 100 | | 34 | 100 | | 35 | 100 | | 36 | 100 | | 37 | 100 | | 38 | 100 | | 39 | 100 | | 40 | 100 | | 41 | 100 | | 42 | 100 | | 43 | 100 | | 44 | 100 | | 45 | 100 | | 46 | 100 | | 47 | 100 | | 48 | 100 | | 49 | 100 | | 50 | 100 | | 51 | 100 | | 52 | 100 | | 53 | 100 | | 54 | 100 | | 55 | 100 | | 56 | 100 | | 57 | 100 | | 58 | 100 | | 59 | 100 | | 60 | 100 | | 61 | 100 | | 62 | 100 | | 63 | 100 | | 64 | 100 | | 65 | 100 | | 66 | 100 | | 67 | 100 | | 68 | 100 | | 69 | 100 | | 70 | 100 | | 71 | 100 | | 72 | 100 | | 73 | 100 | | 74 | 100 | | 75 | 100 | | 76 | 100 | | 77 | 100 | | 78 | 100 | | 79 | 100 | | 80 | 100 | | Note: The actual values are not provided in the code. I have used the label 'Value' as a placeholder for the value detection. You would need to run the code to get the actual values from the code list. Please note that the actual values would be the result of this example. You would need to run the code to get the actual values from the code list. You would need to run the code to get the actual values from the code list. You would need to run the code to get the actual values from the code list. You would need to run the code to get the actual values from the code list. You would need to run the code to get the actual values from the code list. You would need to run the code to get the actual values from the code list. You would need to run the code to get the actual values from you would need to run the code. You would need to run the code to get the actual values from you would need to run the code.
KLARSTEIN

- INHALTSVERZEICHNIS
- BEDIENUNG
- Dear Customer,
- CONTENTS
- TECHNICAL DATA
- SAFETY INSTRUCTIONS
- Important hints on installation
- WARNING
- Important note on disassembly of the device
- INSTALLATION
- Using the extractor hood as an exhaust air hood (with air extracted to outdoors)
- Converting the extractor hood to a circulation hood
- Electrical connection
- Mounting the carbon filter
- Installation dimensions
- Exhaust air pipe
- OPERATION
- Lift hood up/down
- Adjust the power intensity
- Turn of the automatic delay
- CLEANING AND CARE
- Special information for appliances with a stainless steel casing
- Changing the grease filter
- Carbon filters
- Lighting
- TROUBLESHOOTING
- NOTES ON ENVIRONMENTAL PROTECTION
- DISPOSAL CONSIDERATIONS
- MANUFACTURER & IMPORTER (UK)
- Manufacturer:
- Importer for Great Britain:
- SOMMAIRE
- UTILISATION
- Fiche de produit
- Gentile cliente,
- INDICE
- UTILIZZO
- PRODUTTORE E IMPORTATORE (UK)
- ÍNDICE
- FUNCIONAMIENTO
- INHOUDSOPGAVE
- BEDIENING
- INSTRUCTIES VOOR AFVOER
- KLARSTEIN
Brand : Klarstein
Model : Victoria Downdraft
Category : Basket