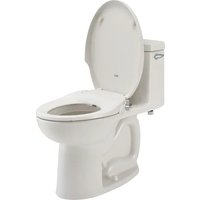
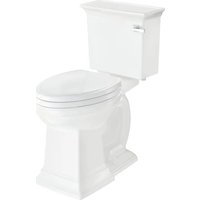
Aquawash 5900A05G.020 - Toilet American Standard - Free user manual and instructions
Find the device manual for free Aquawash 5900A05G.020 American Standard in PDF.


| Product Type | Toilet with bidet seat (SpaLet) |
| Brand | American Standard |
| Model | Aquawash 5900A05G.020 |
| Category | Toilet |
| Bowl Shape | Elongated |
| Height | Chair height |
| Water Supply | Cold water only (maximum 40 °C) |
| Required Water Pressure | 0.07 to 0.8 MPa (10 to 115 psi) |
| Main Functions | Wash/Bidet with control handle, self-cleaning nozzles |
| Seat | SpaLet seat with sliding plate fixing |
| Installation | On floor flange, with wax ring and bolts |
| Maintenance | Clean with soapy water, avoid abrasive products; clean filter and nozzles |
| Safety | Do not overtighten fittings; do not use sealant on water supply |
| Spare Parts | Connection hose filter, nozzles, pressure regulator |
| Repairability | Nozzles and regulator replaceable, filter cleanable |
| Warranty | Registration required, contact customer service |
| Box Contents | Wax ring, tank gasket, bolts, SpaLet seat, connection hose with filter, T-adapter, etc. |
Frequently Asked Questions - Aquawash 5900A05G.020 American Standard
User questions about Aquawash 5900A05G.020 American Standard
0 question about this device. Answer the ones you know or ask your own.
Ask a new question about this device
Download the instructions for your Toilet in PDF format for free! Find your manual Aquawash 5900A05G.020 - American Standard and take your electronic device back in hand. On this page are published all the documents necessary for the use of your device. Aquawash 5900A05G.020 by American Standard.
USER MANUAL Aquawash 5900A05G.020 American Standard
American Standard is devoted to making life, in the heart of your home, better every day...
...so, thank you for inviting us in! With the very best in kitchen and bathroom products, we are here to help make your life happier, healthier and simpler. Our commitment to quality, innovation and performance has made us part of your everyday routine for nearly 150 years, and we look forward to being a part of your life for many years to come.
Learn more at www.AmericanStandard.com
REGISTER WARRANTY
Try the easy-scan QR code to quickly enter your information or find your product's detailed warranty here:

AmericanStandard-us.com/support/warranty
Registering allows you to keep your product information safe, and us the ability to contact you in the event of a product recall or any news about your purchase.
And if ever you have a question or need help...?
Call us at 1-855-815-0004
7302240-100 Rev. 4 (1/24)
765AA701/5900A05G/5900A05GT

OWNERS MANUAL
AquaWash® Ambient SpaLet®
Bidet Seat and Edgemere®
Chair Height Elongated Toilet Combo
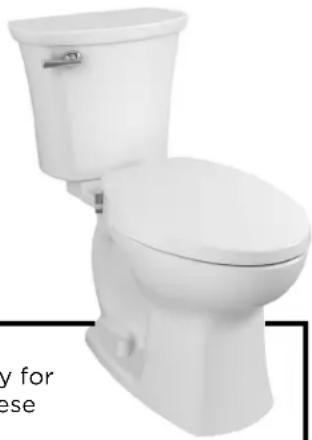
INSTALLATION INSTRUCTIONS
Thank you for selecting American Standard – the benchmark of fine quality for over 150 years. To ensure this product is installed properly, please read these instructions carefully before you begin. Certain installations may require professional help.
INSTALLATION PREPARATION
- Please unpack carefully and identify all parts needed for installation by using the Box Contents page as a reference. Inspect the product and report any damages or missing parts immediately to customer care by calling 855-815-0004. Follow the prompts for consumer/bathing. Local building codes vary by location. Observe all local plumbing and building codes.
NOTE: Take extra care in handling the front surfaces. Use only non-abrasive cloths avoid scratching.
- Wear protective equipment during installation to avoid injury.
- Please keep these instructions for after care and customer service details.
Image shown may vary from product purchased.
INSIDE THE BOX
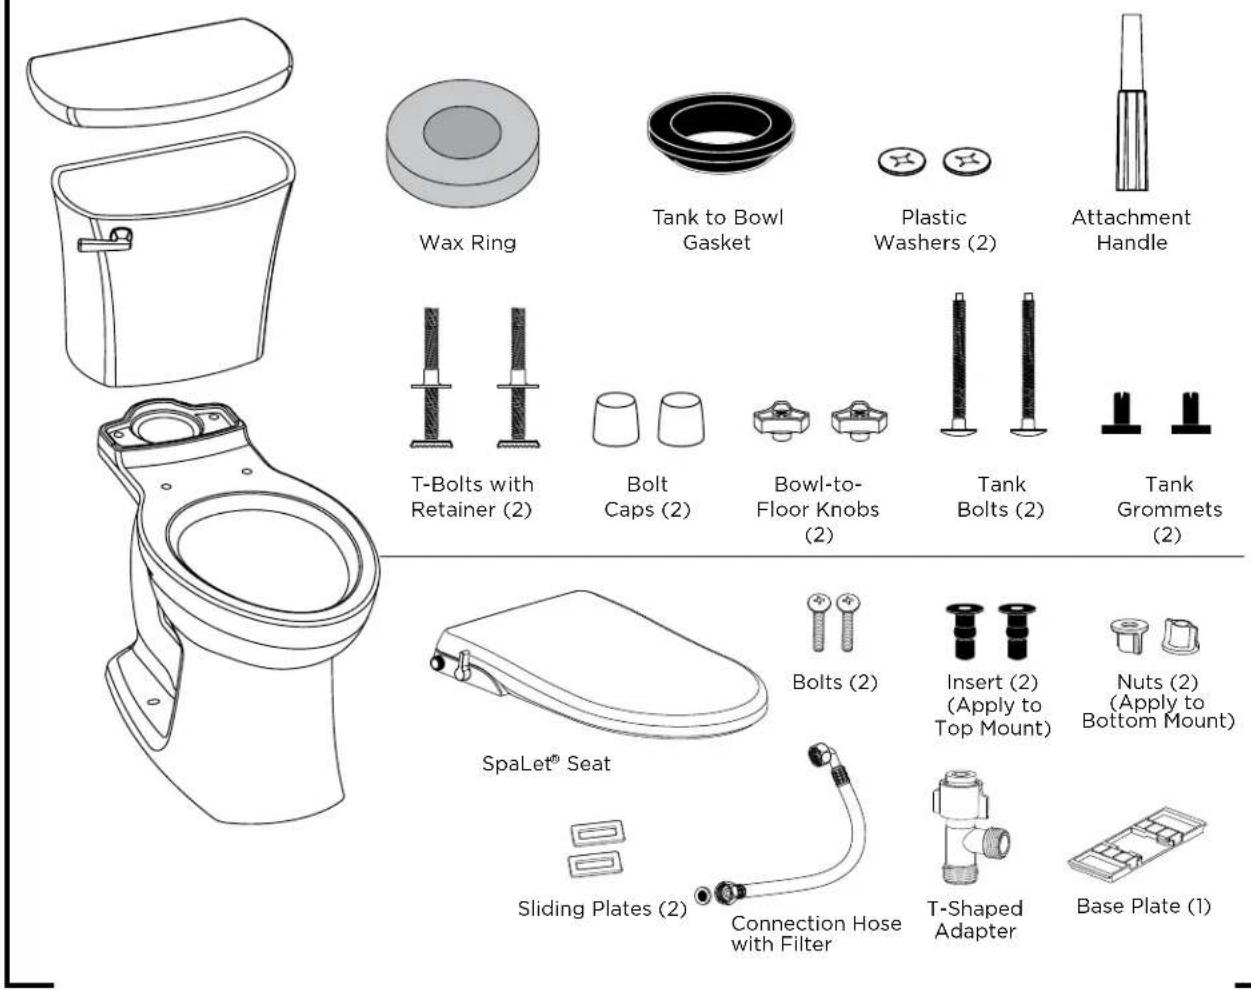
SOLD SEPARATELY

Water Supply Line

BEFORE INSTALLING YOUR TOILET
please see your product spec page to verify the dimensions and water supply connections. Visit our website where you can search by Model number for the product spec page at: http://www.americanstandard-us.com
Image shown may vary from product purchased.
7302240-100 Rev. 4 (1/24)
IF REMOVING AN EXISTING TOILET
1 23 off water supply
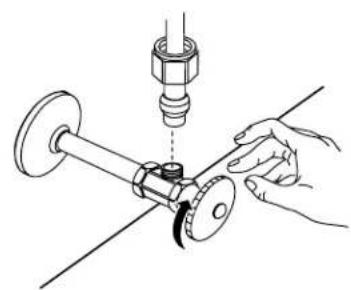
tank; sponge remaining water from bowl before removing toilet
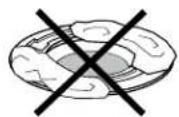
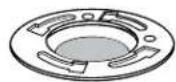
Clean flangeFlush to remove
CAUTION
If leaving floor flange open for more than 1-2 hours, cover flange to prevent escaping sewer gasses.
INSTALLATION INSTRUCTIONS
BACK-TO-BACK INSTALLATION
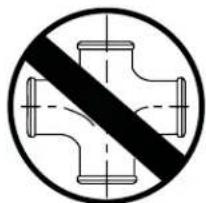
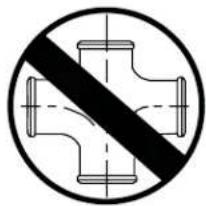
Depending upon your plumbing and venting conditions, the flow from this toilet in a back-to-back installation may create a vacuum on the system and draw water from the opposing bowl. The National Standards Plumbing Code prohibits the use of a cross fitting for drainage as throw over is possible. The code does approve a directional "Y" style fitting with proper venting to direct the water downward and away from the other toilet.
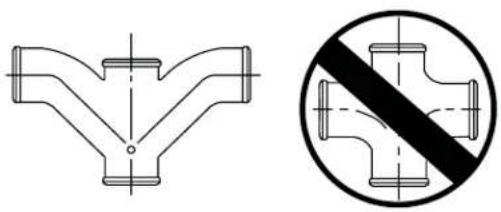
Recommended fitting type for back-to-back installations.
1
SECURE FLANGE
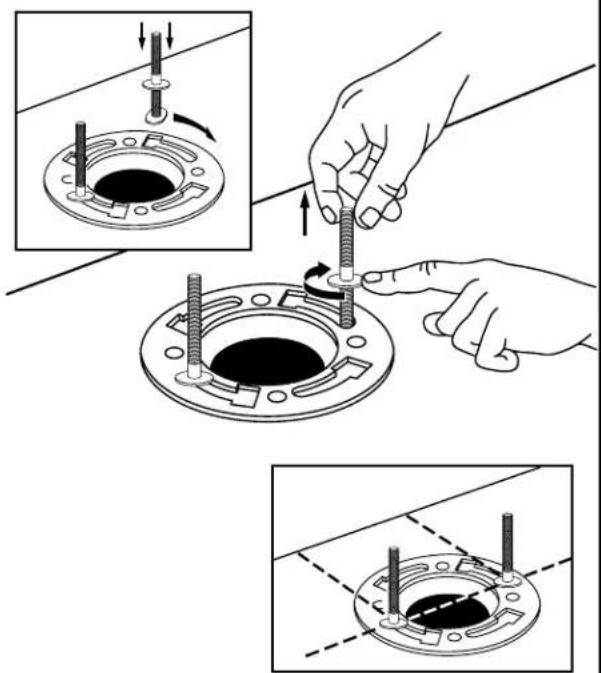
2
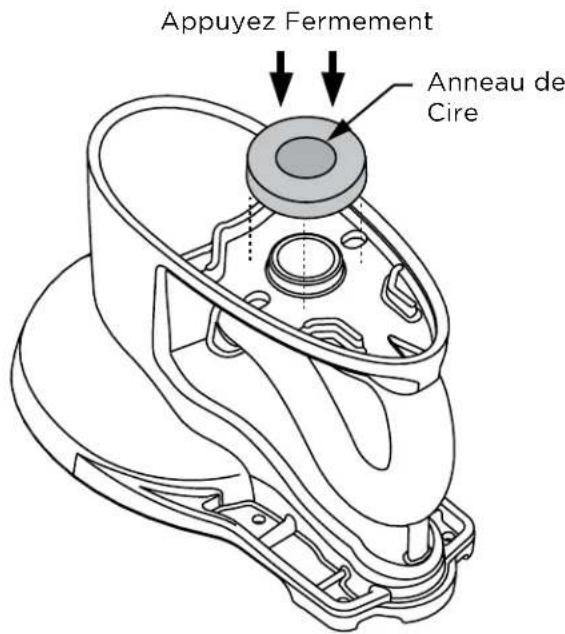
ATTACH WAX RING
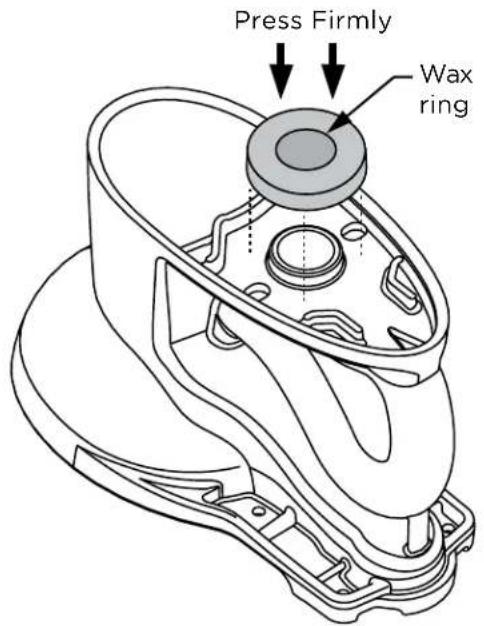
3
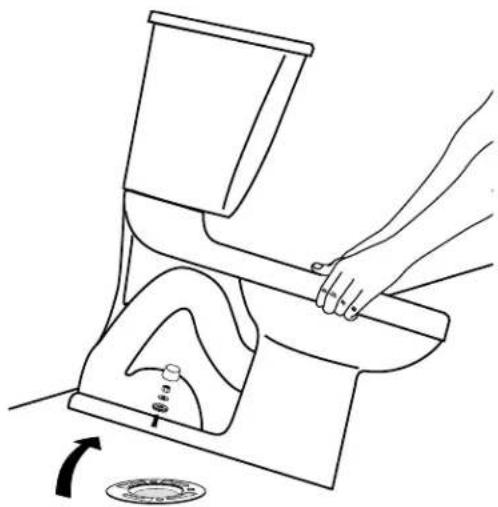
PLACE TOILET ON FLANGE
Apply weight evenly. Do not move after placement. Water tight seal may break.
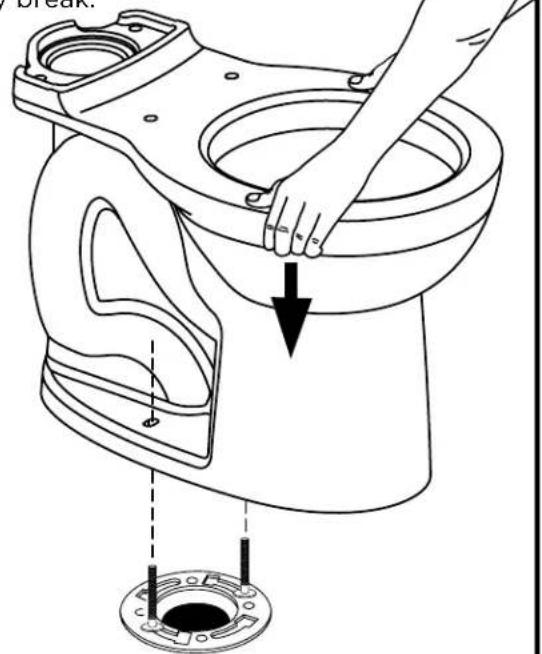
4
ATTACH BOWL TO FLOOR KNOBS
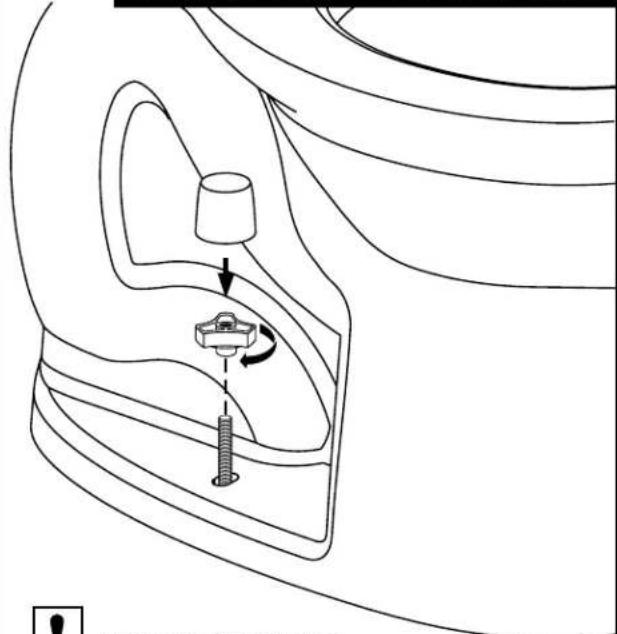

Hand tighten only. Do not over-tighten.
7302240-100 Rev. 4 (1/24)
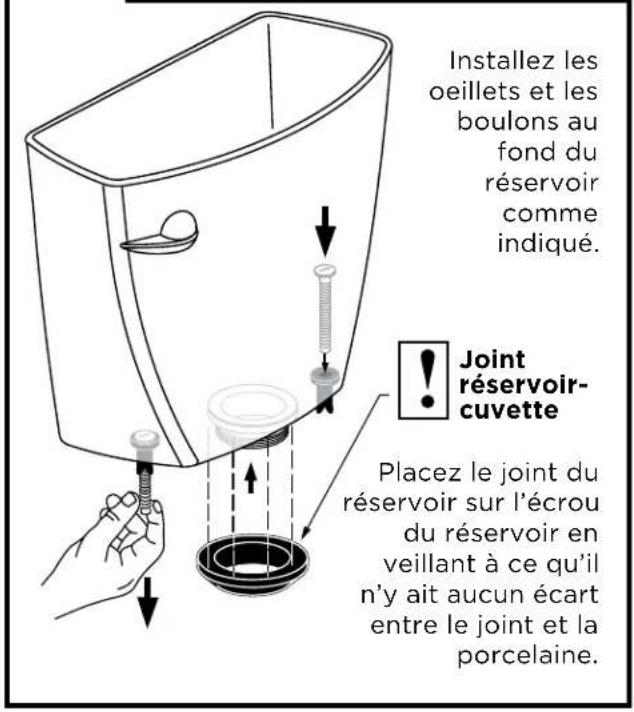
Install tank grommets and tank bolts in bottom of tank as shown.

Tank
to Bowl
Gasket
Place the tank gasket over the tank nut ensuring there are no gaps between the gasket and the chinaware.
6
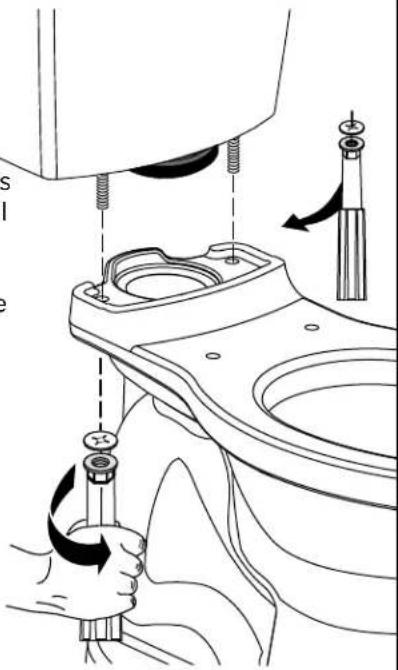
CONNECT TANK AND BOWL
Tighten handles alternately until the tank contacts the front and back of the bowl achieving china-to-china contact.
NOTE: To ease installation, push down on the top of the tank while tightening handles.
7
CONNECT WATER SUPPLY
AConnect water supply line. (Sold separately) Hand tighten nut.
B Turn on water supply.


WARNING: Over-tightening of water supply line nuts could result in breakage and potential flooding.
If the connection leaks after hand tightening, replace the supply line. If the connection continues to leak with the new supply line, replace the fill valve. Do not use plumber's putty, pipe dope or any other sealant on the water supply connection. Use of plumber's putty, pipe dope, or any other type of sealant will void the warranty.
WARNING: Do not use plumber's putty, pipe dope, or any other sealant on the water supply connection to this tank. If the connection leaks after hand tightening, replace the supply line. If the connection continues to leak with the new supply line, replace the fill valve.
Warranty is void if any type of sealant is used on the water supply connection.
ADJUST
ADJUSTMENTS
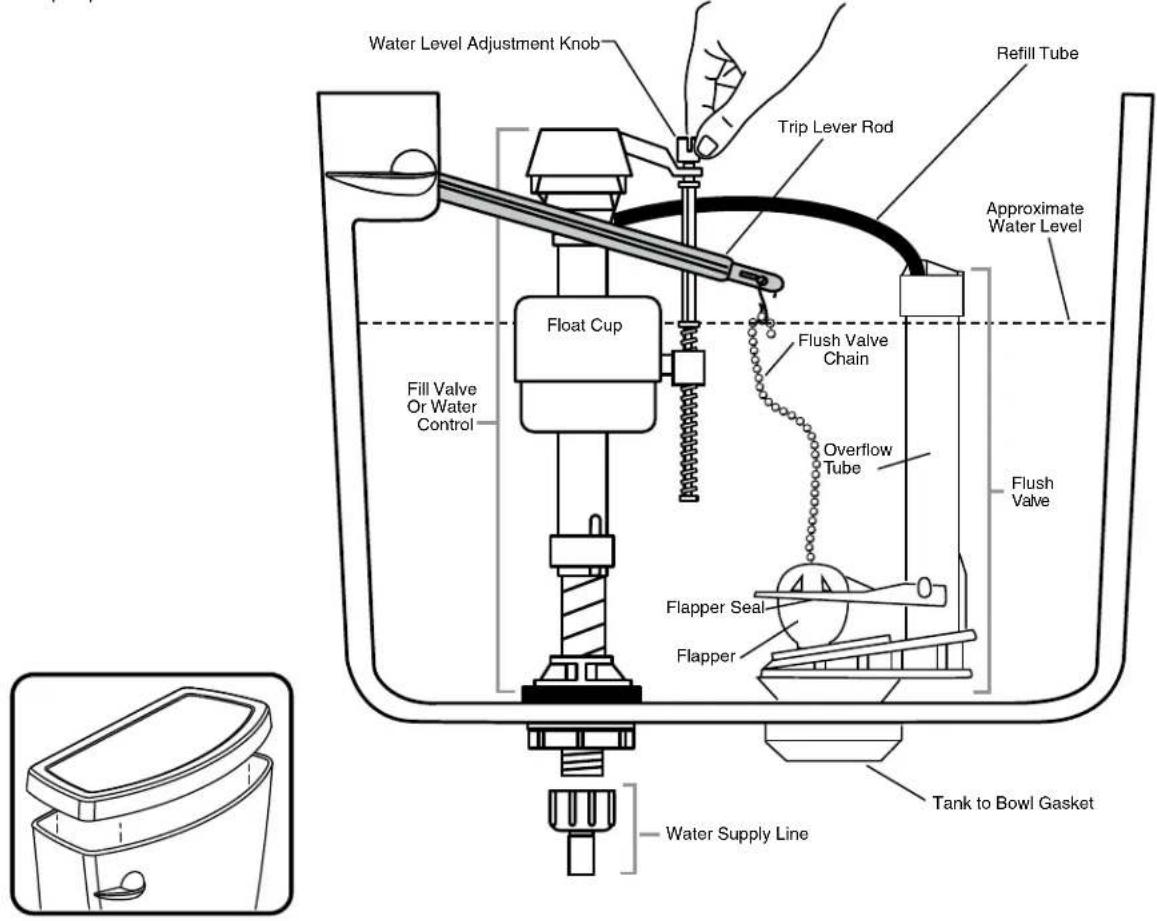
Adjust water level to level indicated on tank by turning water level adjustment knob to move float cup up or down.
CARE AND CLEANING
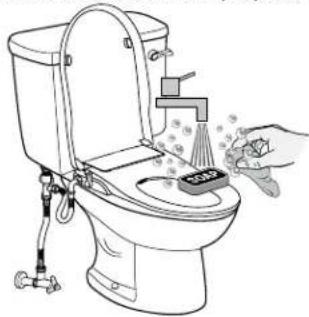
When cleaning your toilet, wash it with mild, soapy water, rinse thoroughly with clear water and dry with a soft cloth. WARNING: Do not use in-tank cleaners. These products can seriously corrode fittings in the tank. This damage can cause leakage and property damage. American Standard shall not be responsible or liable for any damage caused by the use of in-tank cleaners.
7302240-100 Rev. 4 (1/24)
TROUBLESHOOTING GUIDE
See Step 9 For Diagram
PROBLEM POSSIBLE CAUSE CORRECTIVE ACTION
| Does not flush | a. Water supply valve closedb. Supply line blockedc. Flush valve chain too loose or disconnectedd. Sand or debris lodged in water control | a. Open valve and allow water to fill tankb. Shut off water supply, disconnect supply line and inspect all gaskets and washers.Reassemblec. Readjust chain length as requiredd. Shut off water supply. Remove cap and clean as per Fluidmaster maintenance instructions at:www.americanstandard-us.com/enews/fluidmasterguide.pdf |
| Poor or sluggish flush | a. Bowl water level too lowb. Supply valve partly closedc. Partially clogged trap-way and/or drain pipe and/ or ventd. Supply pressure too low | a. Check that refill tube is connected to water control and inserted into overflow tube without being kinked or damagedb. Open supply valve fully. Be sure that proper supply tube size is usedc. Remove obstruction. Consult a plumber if necessaryd. Normal supply pressure must be at least 20 psi |
| Toilet leaks | a. Poor supply line connectionb. Poor bowl to tank/floor connection | a. Review Step 8 of installation procedureb.ReviewStep 1 through 6 of installation procedure |
| Toilet does not shut off | a. Flapper seal leaking or deformedb. Sand or debris lodged in water controlc. Flush valve chain too tight, holding flapper open | a. Clean debris from seal surface. Replace flapper seal as neededb. Shut off water supply. Remove cap and cleanas per Fluidmaster maintenance instructions at: www.americanstandard-us.com/enews/fluidmasterguide.pdfc. Readjust chain length as needed |
| Toilet bowl rocks after installation | a. Wax ring not fully compressedb. Floor not level | a. Retighten bowl-to-floor knobsb. Use toilet shims and /or place a bead of caulk around the base of the toilet |
7302240-100 Rev. 4 (1/24)
PARTS

WARNING
Please read the instructions carefully before installing and using.
The product requires a flexible supply hose.
The watter shutoff valve should be near the installed product for ease of installation.
Do not use in hot water line. Temperature above 104° F / 40° C will damage the product and void your warranty.
7302240-100 Rev. 4 (1/24)
1
Wipe the bowl surface clean. Lay the template over the top of the toilet bowl. Position the template to how you want the bidet seat to pair up with the bowl once installed.
2a
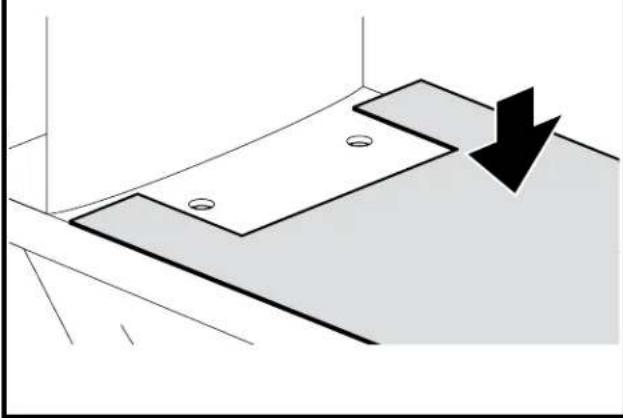
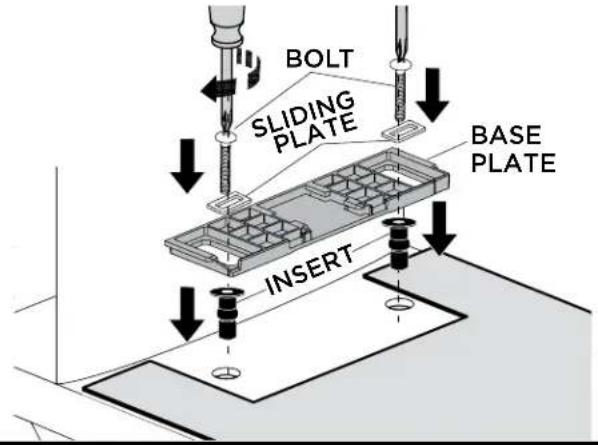
Press the inserts into the toilet bowl holes. Align the base plate to the slotted area of the template and then place the hardware onto the base plate as shown. Using a medium size Phillips screwdriver, start screwing down the bolts into the inserts until the base plate is fixed.
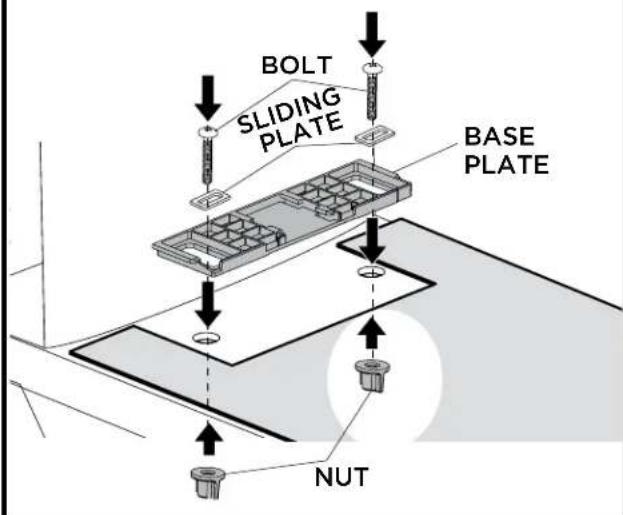
If the insert does not fit the bowl, proceed to Step 2B, otherwise, skip Step 2B and continue with Step 3.
2b
Place the base plate in the slotted area of the template and then place the hardware onto the base plate as shown. Screw in the nuts from the underside of the ceramic until the base plate is fixed.
3
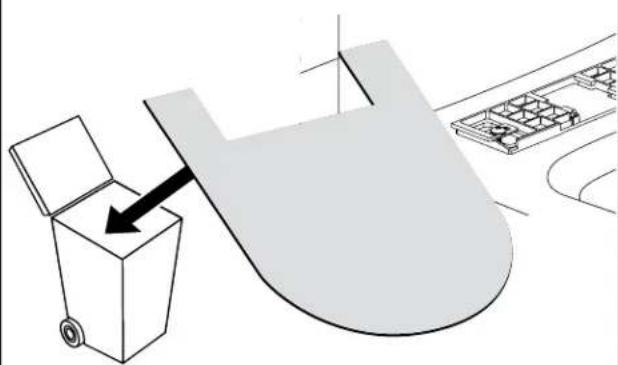
Remove the template from the bowl.
7302240-100 Rev. 4 (1/24)
4
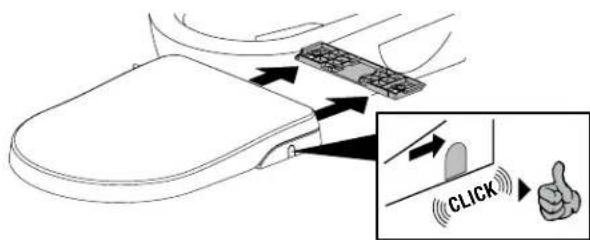
Slide the SpaLet® seat across the base plate until you hear a click. The SpaLet seat is now assembled to the bowl.
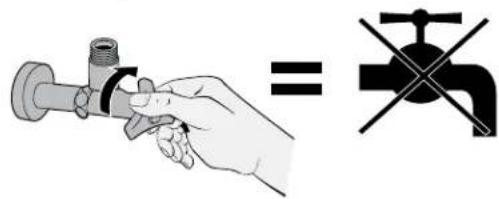
Turn off the water supply by turning off the water shutoff valve, then disconnect the supply hose.
If you are using a rigid supply line you will need to purchase a flexible supply hose to install the SpaLet seat.
5
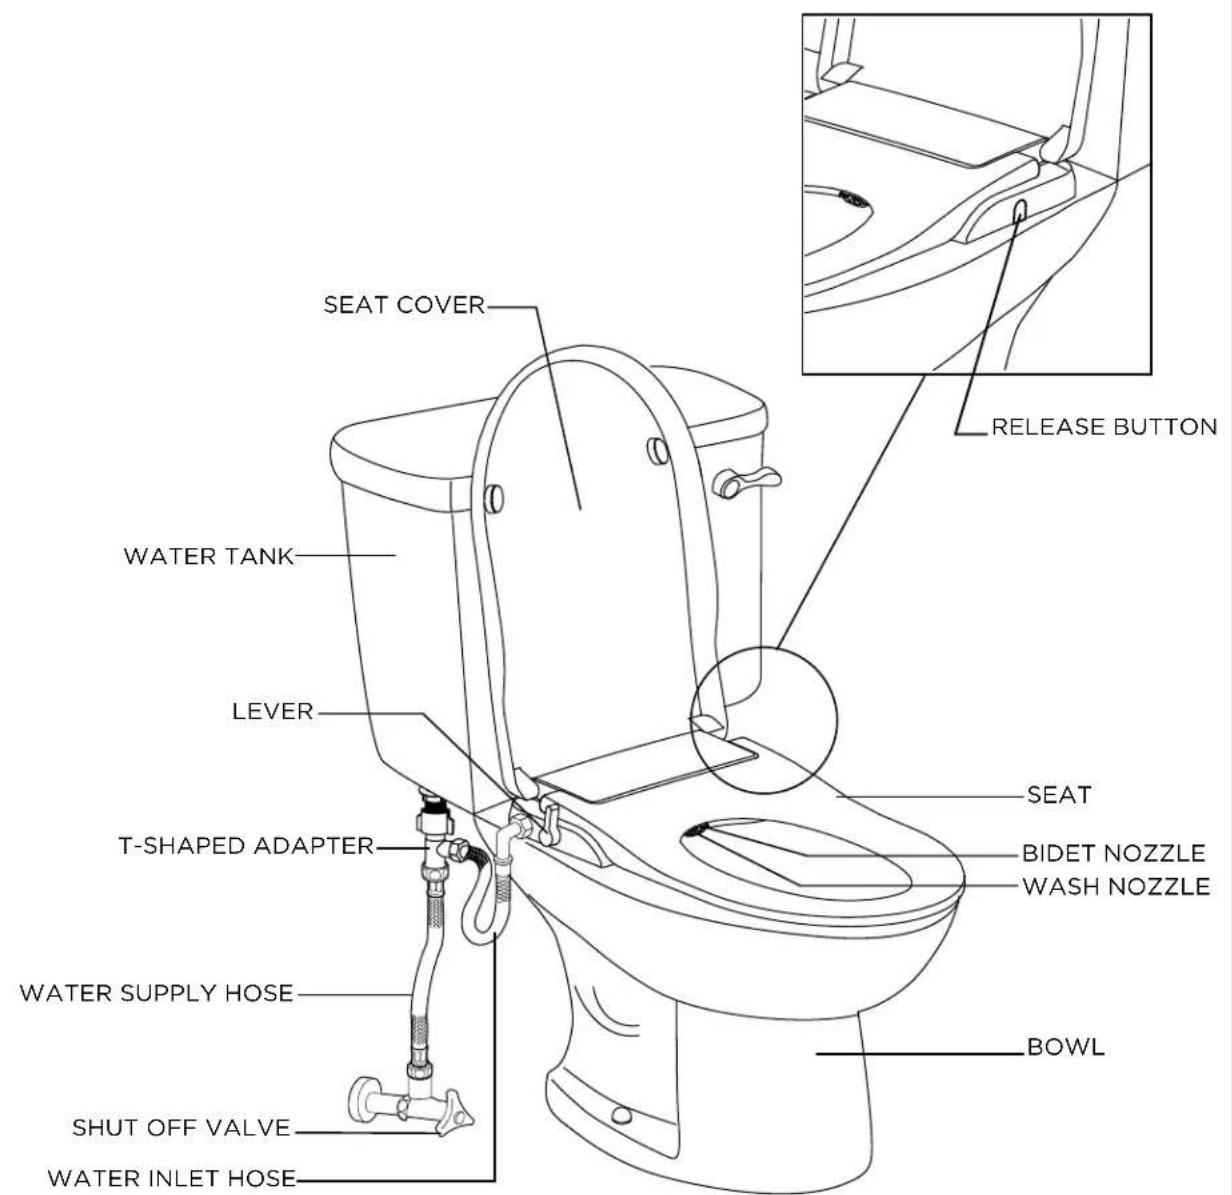
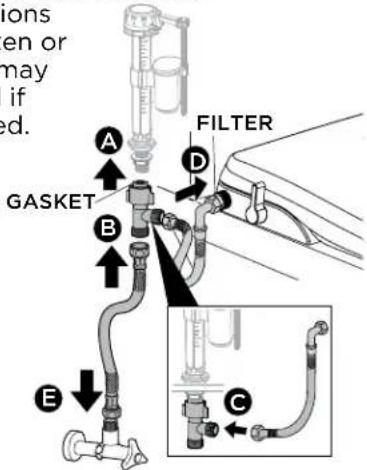
Install T-shaped adapter to the fill valve and supply hose as shown. Connect the included connection hose with filter on to the T-shaped adapter and the SpaLet® seat inlet.

WARNING: Make sure the filter and seal on the connection hose are installed along with the hose.
DO NOT OVERTIGHTEN THE THREADED CONNECTIONS.
The connections may be broken or the threads may be damaged if vover torqued.
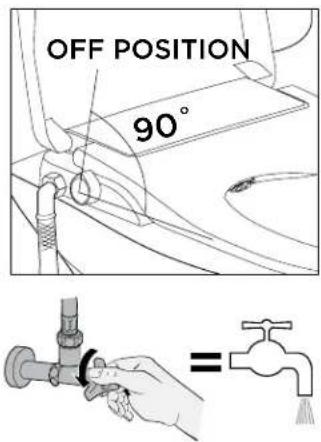
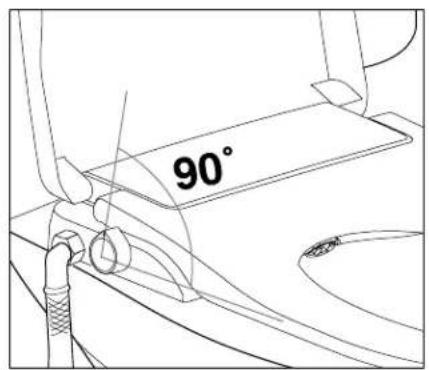
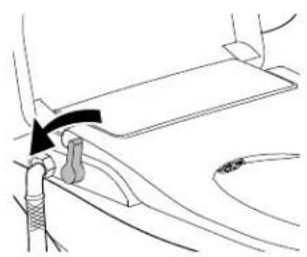
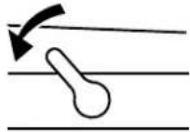
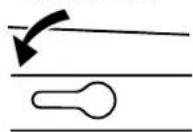
Make sure the control knob on the SpaLet seat is at the 90° off position. Turn the water shutoff valve back on.
7
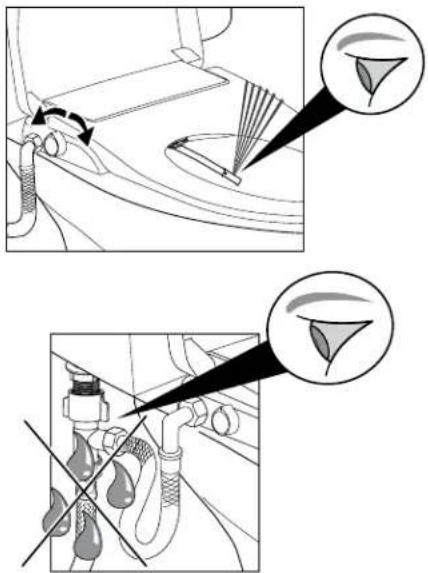
While sitting on the seat, rotate the control knob forward or backward for functional testing. Also, check the connections to make sure there are no leaks. If you find leaks retighten the connections.
7302240-100 Rev. 4 (1/24)
OPERATION
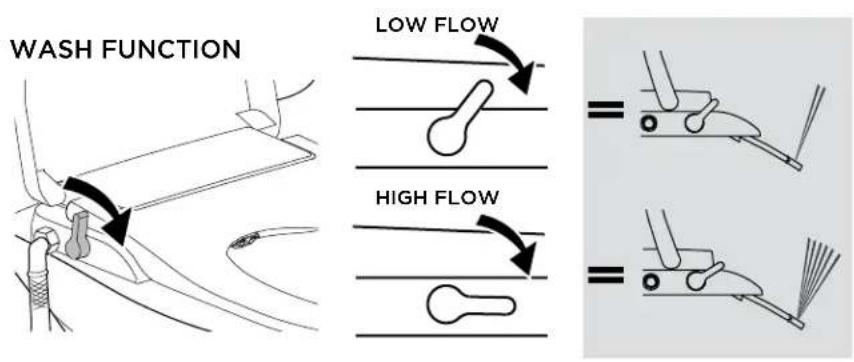
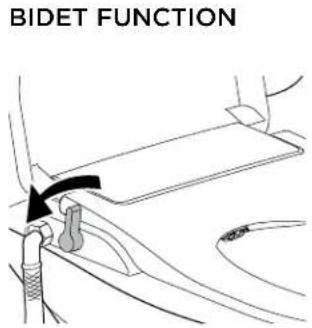
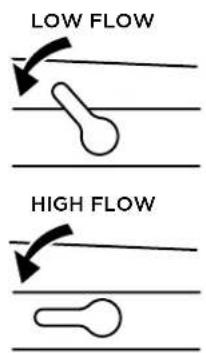
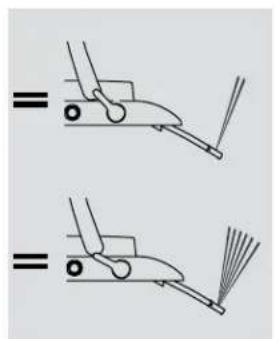
OFF AND SELF-CLEANING
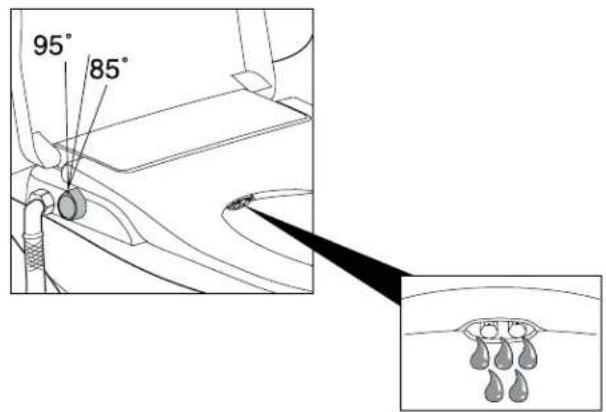
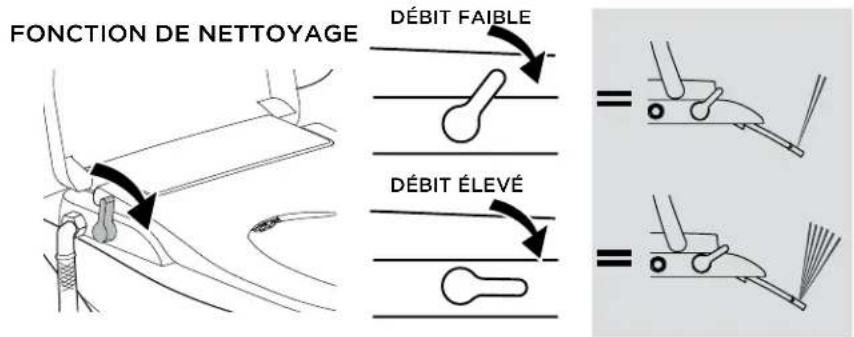
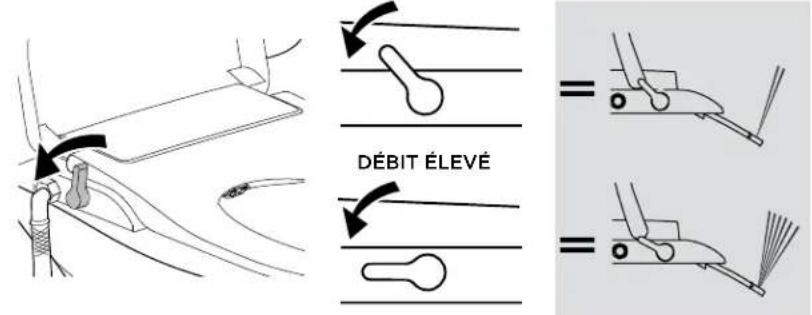
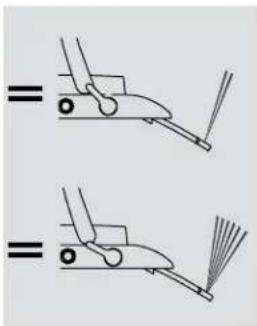
Keep the knob at the 90° position when not in use. The wand cleans itself after each use. For additional cleaning of the wand, position the knob at 85° or 95° for a few seconds and then reposition back to 90° .
CLEANING AND MAINTENANCE
1 DO NOT USE AGGRESSIVE CHEMICALS:
For example: hydrogen chloride, paint thinner, benzene, abrasive cloth or paper,
polishing agent, fragrance, insecticide, etc.

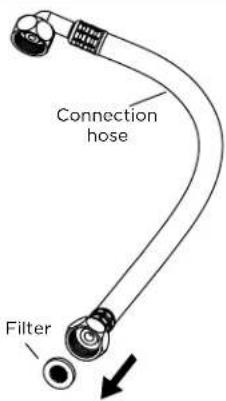
3 If you start to notice that the flow of water is low when using the SpaLet® seat it may be time for the filter to be cleaned out. Especially with new home construction or newly renovated plumbing there are a lot of sediments in the water. You will need to remove the connection hose and clean out the filter as needed.
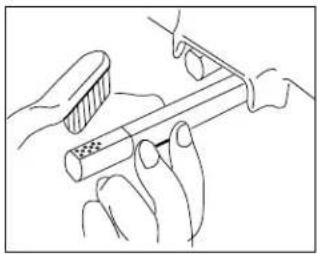
2 You will need to clean the wands when they get build up of residue and calcium. You can pull the wands out with your finger and then with a soft bristle toothbrush, brush the nozzle head.
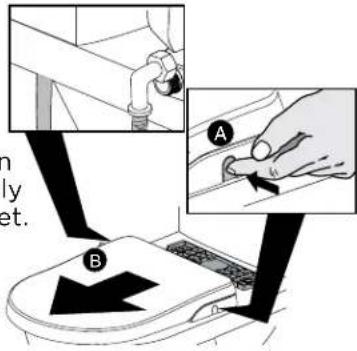
4 You can remove the SpaLet seat by pressing the release button on the right side of the
SpaLet seat and sliding the seat forward as shown. This enables you to be able to clean more thoroughly around the toilet. Make sure to disconnect the connection hose before you do this.
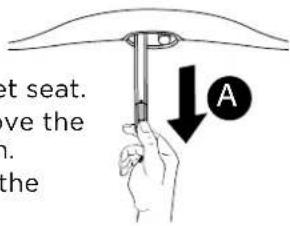
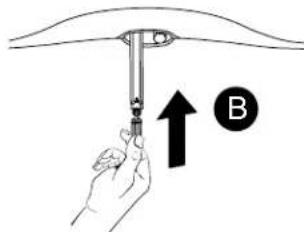
5 The nozzles can be removed if needed for cleaning.
First turn off the water supply to the SpaLet seat. As per figure A, pull out the tube and remove the old nozzle by pulling out straight, as shown. As per figure B, insert the new nozzle into the tube along the corresponding slot.
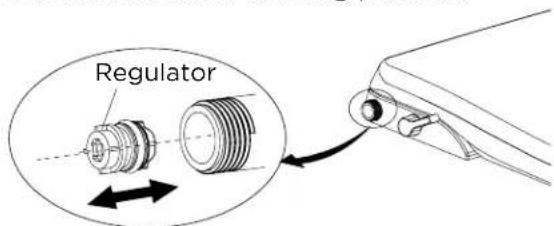
6 The incoming water pressure is regulated by a regulator insert. This can be removed and replaced. First turn off the water supply and disconnect the connection hose. Rotate the lever to the on position, pull out the regulator from the inlet tube with needle-nose pliers. Press the new regulator into the inlet tube. Then rotate the lever back to non-working position.
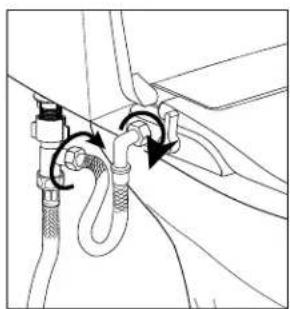
7 If anything shall leak, retighten the connection and use teflon tape if needed. If water leaks from the two ends of the water hose, retighten the nuts to avoid water leaking

WARNING:
DO NOT OVERTIGHTEN AS IT WILL DAMAGE THE CONNECTION. HAND TIGHTENING IS RECOMMENDED.
TROUBLESHOOTING GUIDE
| PROBLEM POSSIBLE | CAUSE CORRECTIVE ACTION | |
| Water is too low during WASH/BIDET | a. Low water pressure of the unitb. Low water pressure of water supply | a. During WASH/BIDET, turn the knob to a higher settingb. When water supply pressure is lower than 0.07 MPa (10 psi) |
| No water comes out during WASH/BIDET | a. Water shut-off valve is turned offb. Filter of T-shaped connector is stuckc. Filter of water inlet hose is stuckd. Nozzle head is stucke. External water pressure is low | a. Turn on the water shut-off valveb. Clean the filter of T-shaped connectorc. Clean the filter of water inlet hosed. Take off and clean the nozzle heade. Increase external water pressure |
| Water dropping from bowl when using the unit | External water pressure is too high | The maximum water pressure of the unit is 0.8 MPa (115 psi). If water supply pressure is higher than that, please contact local department for water pressure question. |
TELL US WHAT YOU THINK!

Please leave us a product review or story at americanstandard.com/reviews
Find installation videos at
youtube.com/americanstandard
Register your warranty and sign up for an idea-filled newsletter at AmericanStandard-us.com/support/warranty
PLEASE COMPLETE AMERICAN STANDARD WARRANTY REGISTRATION PROCESS AND SAVE THIS WARRANTY INFORMATIONIMPORTANT:
Registration of the toilet must be completed for this warranty to become effective. Your registration will make it easier to contact you in the event of a product recall.*
INSTRUCTIONS: Register your toilet at www.americanstandard.com. Please save your proof of purchase (sale receipt). If you need assistance or do not have access to our website, please contact American Standard Customer Care at: (800) 442-1902. An American Standard representative will assist in completing the warranty registration.
*In California, your warranty rights remain intact even if you do not complete the registration process.

SHARE YOUR NEW PRODUCT!
Tag us @american_standard on Instagram and show us how your new product looks.
WANT MORE INFO?
For questions or help call us at 855-815-0004, or visit AmericanStandard.com
UNITED STATES
American Standard Brands 865 Centennial Ave. Piscataway, New Jersey 08854 Attention: Director of Customer Care For residents of the United States, warrantyinformation may also be obtained by calling the following toll free number: (855) 815-0004 www.AmericanStandard.com
CANADA
LIXIL Canada, Inc. 5900 Avebury Rd. Mississauga, Ontario Canada L5R 3M3 Toll Free: (800) 387-0369 www.AmericanStandard.ca
MEXICO
American Standard B&K Mexico
S. de R.L. de C.V.
Via Morelos #330
Col. Santa Clara
Ecatepec 55540 Edo. Mexico
Toll Free: 800-839-1200
www.AmericanStandard.com.mx
7302240-100 Rev. 4 (1/24)
PART OF

American Standard


www.AmericanStandard.ca/support/warranty

7302240-100 FR Rev. 4 (1/24)
765AA701/5900A05G/5900A05GT

MANUEL DU PROPRIÉTAIRE
CONSIGNES D'INSTALLATION
7302240-100 FR Rev. 4 (1/24)
CONTENU DE LA BOÎTE
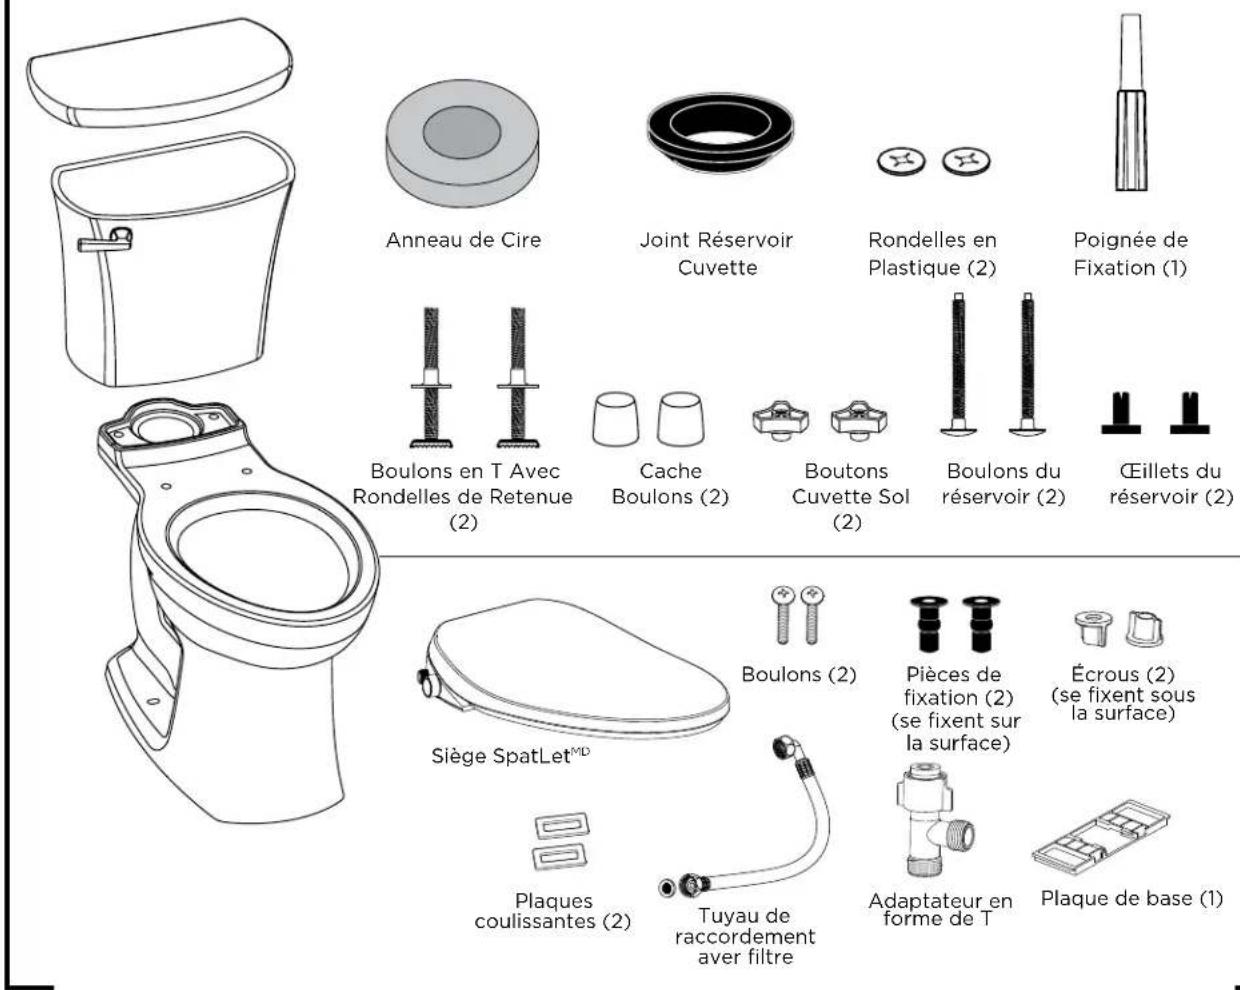
Image shown may vary from product purchased.
7302240-100 FR Rev. 4 (1/24)
SI VOUS ENLEVEZ UNE CUVETTE DE TOILETTE DÉJÀ EN PLACE
2
FIXER L'ANNEAU DE CIRE

7302240-100 FR Rev. 4 (1/24)
5
FIXER LE RÉSERVOIR AU JOINT DE LA CUVETTE

7302240-100 FR Rev. 4 (1/24)
GUIDE DE DÉPANNAGE
PROBLÈME CAUSE POSSIBLE MESURE CORRECTIVE
7302240-100 FR Rev. 4 (1/24)
PIÈCES


AVERTISSEMENT
7302240-100 FR Rev. 4 (1/24)
1
2a
7302240-100 FR Rev. 4 (1/24)
4
7
7302240-100 FR Rev. 4 (1/24)
FONCTIONNEMENT
FONCTION DE BIDET
NETTOYAGE ET ENTRETIEN
1 NE PAS UTILISER DE PRODUITS CHIMIQUES AGRESSIFS :
GUIDE DE DÉPANNAGE
7302240-100 FR Rev. 4 (1/24)
FAITES-NOUS PART DE VOS COMMENTAIRES!

www.americanstandard.ca/support/warranty
VEUILLEZ REMPLIR L'ENREGISTREMENT DE GARANTIE AMERICAN STANDARD ET SAUVEGARDER CETTE INFORMATION SUR LA GARANTIE.
American Standard Brands
865 Centennial Ave.
Piscataway, New Jersey 08854
7302240-100 FR Rev. 4 (1/24)
AU CANADA
LIXIL Canada, Inc.
5900 Avebury Rd.
Mississauga, Ontario
Canada L5R 3M3
American Standard B&K Mexico
S. de R.L. de C.V.
Via Morelos #330
Col. Santa Clara
Ecatepec 55540 Edo. Mexico
Sans frais: 800-839-1200
www.americanstandard.com.mx
PART OF

American Standard


www.AmericanStandard.com.mx/garantia
7302240-100 SP Rev. 4 (1/24)
765AA701/5900A05G/5900A05GT

7302240-100 SP Rev. 4 (1/24)
CONTENIDO DE LA CAJA
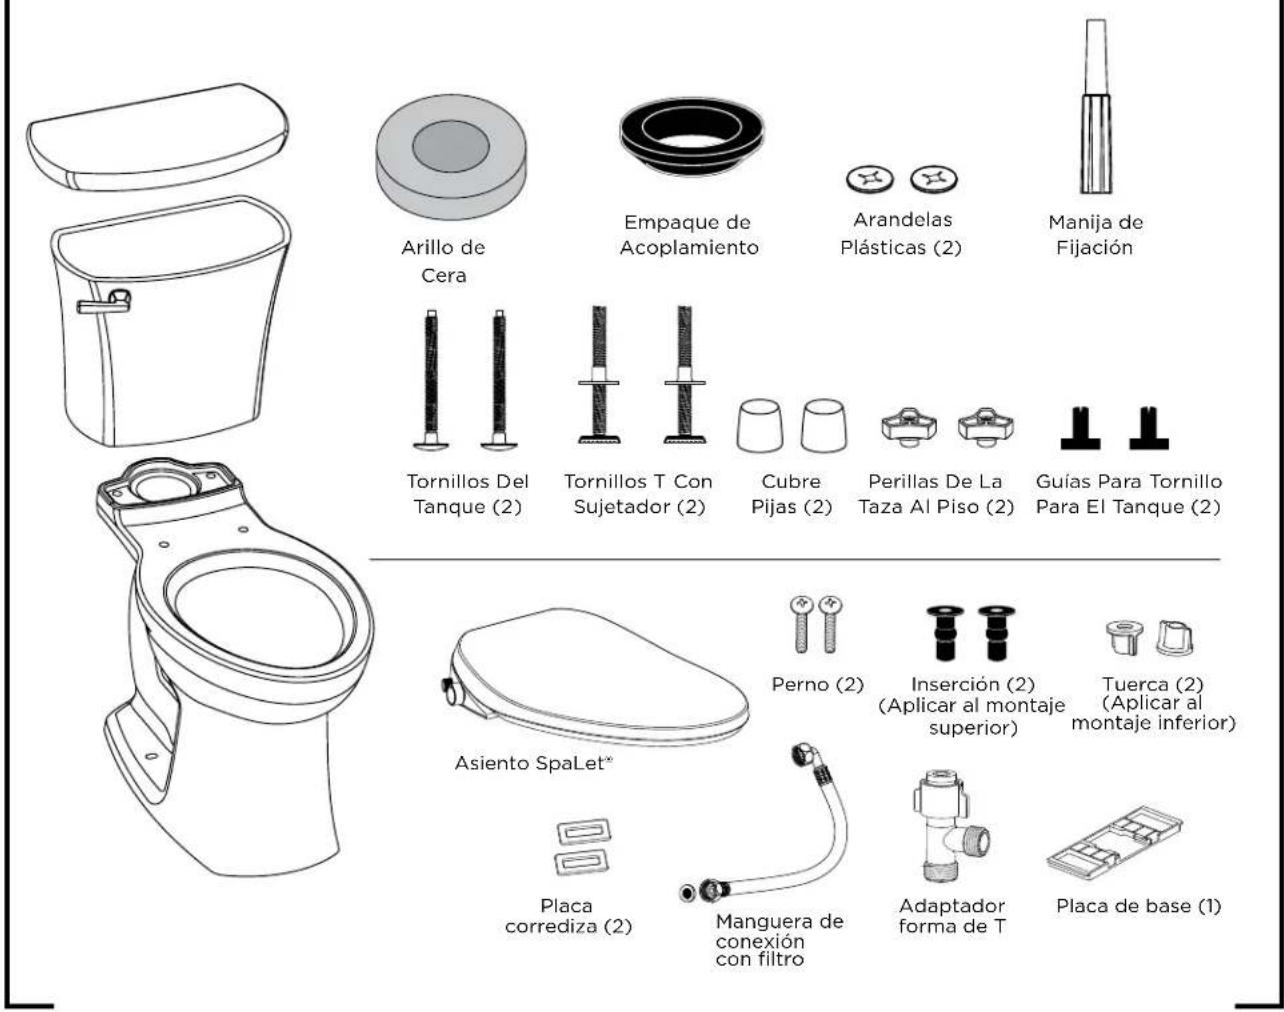
Image shown may vary from product purchased.
7302240-100 SP Rev. 4 (1/24)
PARA RETIRAR UN INODORO VIEJO EXISTENTE
2
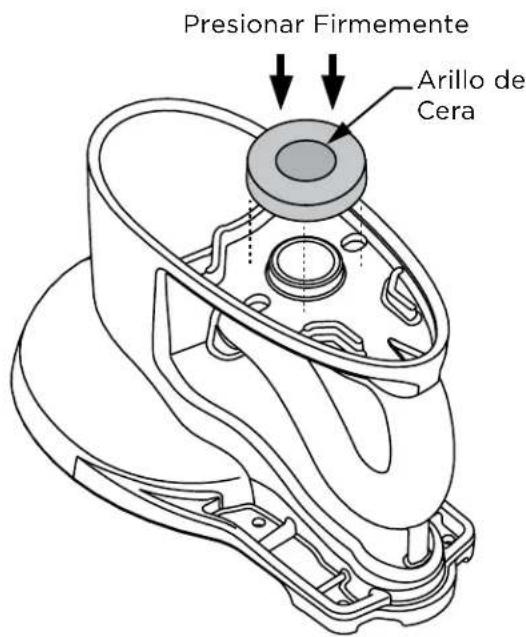
FIJAR EL ANILLO DE CERA
4
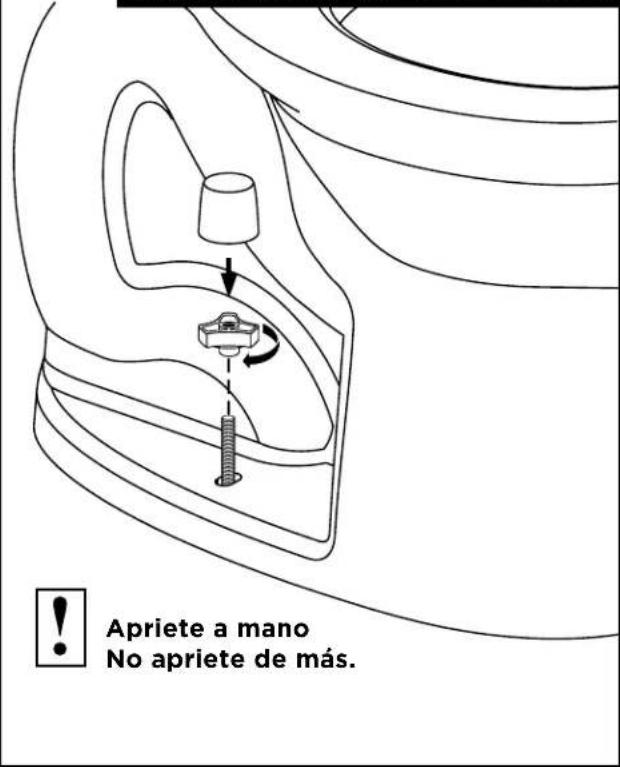
FIJAR LA TAZA A LOS POMOS DEL SUELO
7302240-100 SP Rev. 4 (1/24)
5
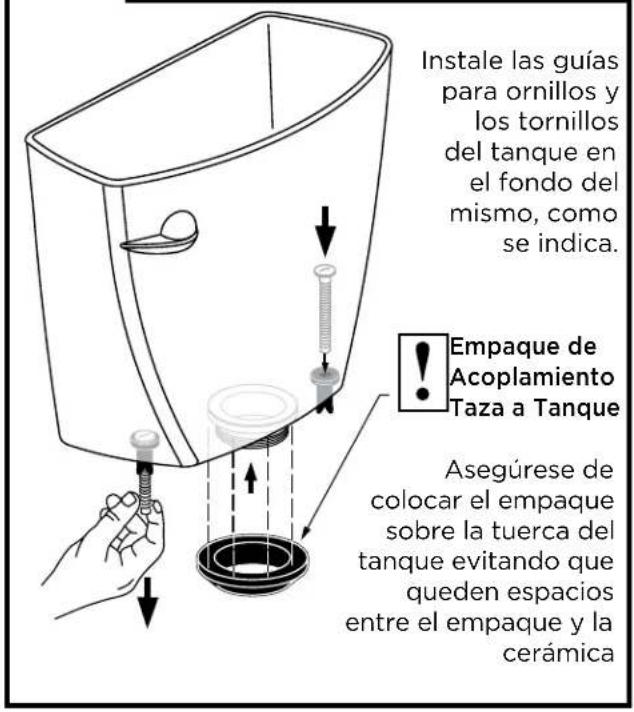
FIJAR LA CISTERNA A LA JUNTA DE LA TAZA
PROBLEMA CAUSA POSIBLE MEDIDA CORRECTIVA
7302240-100 SP Rev. 4 (1/24)
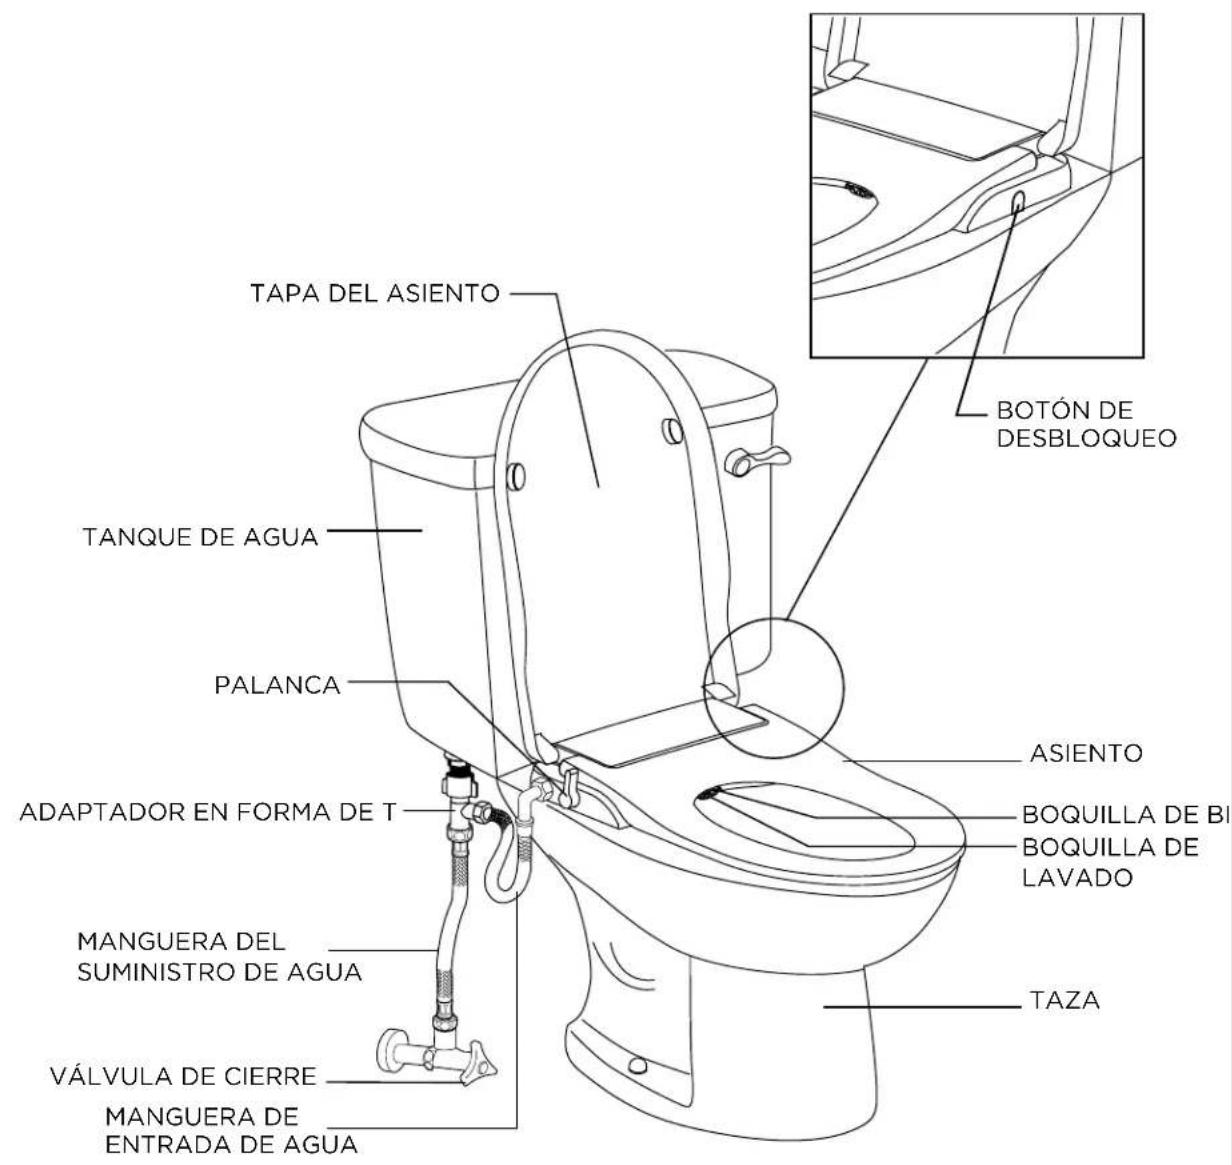
PIEZAS
7302240-100 SP Rev. 4 (1/24)
1
2a
7302240-100 SP Rev. 4 (1/24)
4
5
7302240-100 SP Rev. 4 (1/24)
FUNCIONAMIENTO
FUNCIÓN DE LAVADO
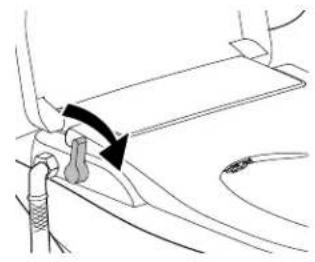
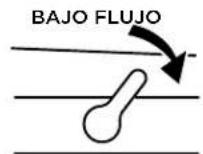
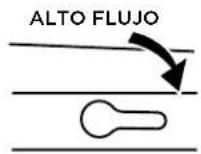
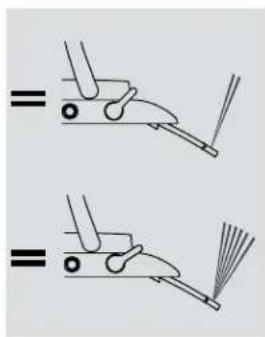
FUNCIÓN DE BIDÉ
BAJO FLUJO
ALTO FLUJO
APAGADO Y AUTOLIMPIEZA
American Standard Brands 865 Centennial Ave.
Piscataway, New Jersey 08854
www.AmericanStandard.ca
EN MÉXICO
American Standard B&K Mexico
S. de R.L. de C.V.
Via Morelos #330
Col. Santa Clara
Ecatepec 55540 Edo. Mexico
TNúmero gratuito: 800-839-1200
www.AmericanStandard.com.mx
7302240-100 SP Rev. 4 (1/24)
PART OF



- AMERICAN STANDARD IS DEVOTED TO MAKING LIFE, IN THE HEART OF YOUR HOME, BETTER EVERY DAY
- REGISTER WARRANTY
- AMERICANSTANDARD-US.COM/SUPPORT/WARRANTY
- AND IF EVER YOU HAVE A QUESTION OR NEED HELP
- OWNERS MANUAL
- AQUAWASH® AMBIENT SPALET®
- BIDET SEAT AND EDGEMERE®
- CHAIR HEIGHT ELONGATED TOILET COMBO
- INSTALLATION INSTRUCTIONS
- INSTALLATION PREPARATION
- BEFORE INSTALLING YOUR TOILET
- IF REMOVING AN EXISTING TOILET
- CAUTION
- BACK-TO-BACK INSTALLATION
- ADJUST
- ADJUSTMENTS
- CARE AND CLEANING
- TROUBLESHOOTING GUIDE
- WARNING
- 1
- 2A
- 2B
- 3
- 4
- 5
- 7
- OFF AND SELF-CLEANING
- CLEANING AND MAINTENANCE
- 1 DO NOT USE AGGRESSIVE CHEMICALS
- TELL US WHAT YOU THINK
- UNITED STATES
- CANADA
- MEXICO
- AMERICAN STANDARD
- MANUEL DU PROPRIÉTAIRE
- CONSIGNES D'INSTALLATION
- SI VOUS ENLEVEZ UNE CUVETTE DE TOILETTE DÉJÀ EN PLACE
- GUIDE DE DÉPANNAGE
- PIÈCES
- AVERTISSEMENT
- FONCTIONNEMENT
- NETTOYAGE ET ENTRETIEN
- 1 NE PAS UTILISER DE PRODUITS CHIMIQUES AGRESSIFS
- FAITES-NOUS PART DE VOS COMMENTAIRES
- AU CANADA
- PARA RETIRAR UN INODORO VIEJO EXISTENTE
- FUNCIONAMIENTO
- APAGADO Y AUTOLIMPIEZA
- EN MÉXICO
Brand : American Standard
Model : Aquawash 5900A05G.020
Category : Toilet