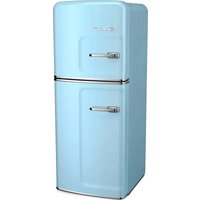
BC11TFR - Freezer Big Chill - Free user manual and instructions
Find the device manual for free BC11TFR Big Chill in PDF.


| Product Type | Top-freezer refrigerator-freezer |
| Brand | Big Chill |
| Model | BC11TFR |
| Power Supply | 115 V AC, 60 Hz, 15-20 A dedicated circuit |
| Climate Class | 13 °C to 43 °C |
| Defrost | Automatic |
| Ice Maker | Optional (kit ref. W11337839) |
| Leveling Legs | 2 adjustable legs at front |
| Door Reversibility | Possible (kit not supplied) |
| Interior Cleaning | Warm water and mild detergent |
| Exterior Cleaning | Warm water and mild detergent, soft cloth |
| Refrigerant | Flammable (type not specified) |
| Lighting | Bulb (replaceable) |
| Optional Accessories | affresh® cleaner (W10355010) |
| Safety | 3-prong grounded outlet, do not use extension cord |
| Intended Use | Household and similar (offices, hotels, etc.) |
Frequently Asked Questions - BC11TFR Big Chill
User questions about BC11TFR Big Chill
0 question about this device. Answer the ones you know or ask your own.
Ask a new question about this device
Download the instructions for your Freezer in PDF format for free! Find your manual BC11TFR - Big Chill and take your electronic device back in hand. On this page are published all the documents necessary for the use of your device. BC11TFR by Big Chill.
USER MANUAL BC11TFR Big Chill
Top-Mount Refrigerator Owner's Manual
INSTALLATION INSTRUCTIONS....3
Unpack the Refrigerator....3
Location Requirements 4
Electrical Requirements....4
Water Supply Requirements....4
Connect the Water Supply (on some models)....5
Refrigerator Doors....6
Leveling and Door Adjustment 9
Normal Sounds....9
REFRIGERATOR USE....9
Your safety and the safety of others are very important.
We have provided many important safety messages in this manual and on your appliance. Always read and obey all safety messages.
This is the safety alert symbol.
This symbol alerts you to potential hazards that can kill or hurt you and others.
All safety messages will follow the safety alert symbol and either the word "DANGER" or "WARNING."
These words mean:
! DANGER
You can be killed or seriously injured if you don't immediately follow instructions.
WARNING
You can be killed or seriously injured if you don't follow instructions.
All safety messages will tell you what the potential hazard is, tell you how to reduce the chance of injury, and tell you what can happen if the instructions are not followed.
IMPORTANT SAFETY INSTRUCTIONS
WARNING: To reduce the risk of fire, electric shock, or injury to persons when using your appliance, follow basic precautions, including the following:
■ Childrenshouldbesupervisedtoensurethattheydonot playwiththeappliance.
This appliance is not intended for use by persons (including children) with reduced physical, sensory, or mental capabilities, or lack of experience and knowledge, unless they have been given supervision or instruction concerning use of the appliance by a person responsible for their safety.
■ Donotuseanextensioncord.
■ Ifpowersupplycordisdamaged, itmustbereplaced by the manufacturer, itsserviceagent, orasimilarlyqualified personinordertoavoidahazard.
■ Connecttopotablewatersupplyonly.
This appliance is intended to be used in household and similar application such as: staff kitchen areas in shops, offices, and other working environments; farmhouses and by clients in hotels, motels, and other residential-type environments; bed and breakfast-type environments; and catering and similar non-retail applications.
■ Donotstoreexplosivesubstancesuchasaerosolcans withaflammablepropellantinthisappliance.
■ Donotusereplacementpartsthathavenotbeen recommendedbythemanufacturer(e.g.,partsmadeat homeusinga3Dprinter).
- Keepventilationopenings, intheapplianceenclosureorin thebuilt-instructure, clearofobstruction.
■ Donotusemechanicaldevicesorothermeansto acceleratethedefrostingprocess,otherthanthose recommendedbythemanufacturer.
■ Donotdamagetherefrigerantcircuit.
■ Donotuseeelectricalappliancesinsidethefoodstorage compartmentsoftheappliance,unlesstheyareofthetype recommendedbythemanufacturer.
SAVETHESEINSTRUCTIONS
Proper Disposal of Your Old Refrigerator
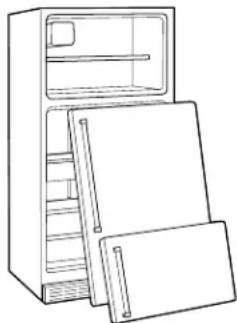
WARNING: Risk of child entrapment. Before you throw away your old refrigerator or freezer:
■Take off the doors.
■Leave the shelves in place so that children may not easily climb inside.
WARNING
SuffocationHazard
Removedoorsorlidfromyouroldappliance.
Failuretodosocanresultindeathorbraindamage.
IMPORTANT: Child entrapment and suffocation are not problems of the past. Junked or abandoned refrigerators are still dangerous – even if they will sit for “just a few days.” If you are getting rid of your old refrigerator, please follow these instructions to help prevent accidents.
Important information to know about disposal of refrigerants:
Dispose of refrigerator in accordance with federal and local regulations.
Refrigerants must be evacuated by a licensed, EPA-certified refrigerant technician in accordance with established procedures.
natural_image
Line drawing of a refrigerator with open doors and shelves (no text or symbols)INSTALLATION INSTRUCTIONS
Unpack the Refrigerator
WARNING
Excessive Weight Hazard
Use two or more people to move and install refrigerator.
Failure to do so can result in back or other injury.
Remove the Packaging
IMPORTANT: Do not remove the white foam air return insert from behind the control panel on the ceiling of the refrigerator. If the insert is removed, ice may migrate down from the freezer and cause icicles to form.
- Remove tape and glue residue from surfaces before turning on the refrigerator. Rub a small amount of liquid dish soap over the adhesive with your fingers. Rinse with warm water and dry with a soft cloth.
NOTE: Do not use sharp instruments, rubbing alcohol, flammable fluids, or abrasive cleaners to remove tape or glue. These products can damage the surface of your refrigerator. For more information see “Refrigerator Safety”.
When Moving Your Refrigerator:
Your refrigerator is heavy. When moving the refrigerator for cleaning or service, be sure to cover the oor with cardboard or hardboard to avoid oor damage. Always pull the refrigerator straight out when moving it. Do not wiggle or "walk" the refrigerator when trying to move it, as oor damage could occur.
Install Levelers
IMPORTANT: Lay down the refrigerator ONLY to your left-hand side (as you are looking at the front of the refrigerator) to avoid damaging the refrigerator.
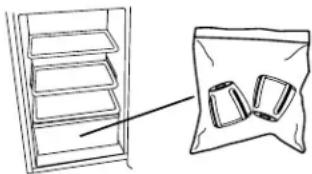
- Locate the levelers. They are enclosed in a plastic bag inside the crisper drawer.
natural_image
Simple line drawing of a rack with shelves and a bag (no text or symbols)- Using two or more people, access the bottom of the refrigerator either by tilting it first to one side and then the other or by laying it down on the floor to your left-hand side as shown.
■Tilt the refrigerator to the side enough to access the bottom. Using a 3/8" hex driver, remove the two screws attaching the wooden runner to the bottom of the refrigerator. Then install a leveler to the front corner. Repeat for the opposite side.
NOTE: The refrigerator cabinet should not touch the floor without a leveler installed.
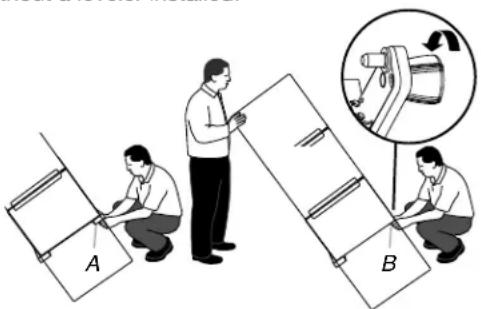
A. Remove runner.
B. Install leveler.
OR
■Using the packaging corner posts (left-hand side, front and back) as a cushion, lay the refrigerator down on the floor (to your left-hand side only) as shown in the following graphic. NOTE: Using the packaging as a cushion will help to avoid possible damage to the refrigerator.
■Using a 3/8" hex driver, remove the two screws attaching each wooden runner to the bottom of the refrigerator. Install a leveler to each of the front corners.

A. Remove runner.
B. Install leveler.
C. Packaging corner post.
Clean Before Using
After you remove all of the package materials, clean the inside of your refrigerator before using it. See the cleaning instructions in "Refrigerator Care."
Important information to know about glass shelves and covers:
Do not clean glass shelves or covers with warm water when they are cold. Shelves and covers may break if exposed to sudden temperature changes or impact, such as bumping. Tempered glass is designed to shatter into many small, pebble-size pieces.
This is normal. Glass shelves and covers are heavy. Use both hands when removing them to avoid dropping.
Location Requirements
WARNING
Explosion Hazard
Keep flammable materials and vapors, such as gasoline, away from refrigerator.
Failure to do so can result in death, explosion, or fire.
IMPORTANT: This refrigerator is designed for indoor, household use only.
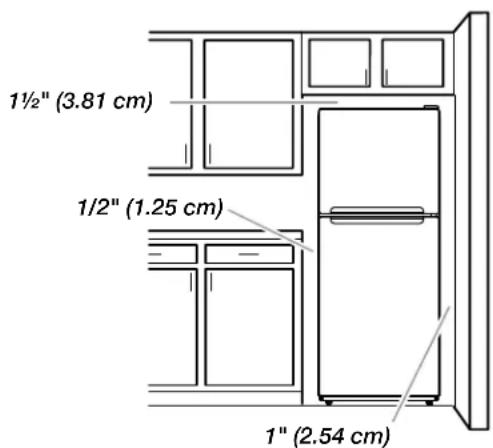
To ensure proper ventilation for your refrigerator, it is recommended to allow a 1/2" (1.25 cm) space on each side. Allow 1½" (3.81 cm) of space between overhead cabinets and refrigerator top. Allow at least 1" (2.54 cm) between back of cabinet and the wall (consider the condenser as back in case is present). If your refrigerator has an ice maker, make sure you leave extra space at the back for the water line connections. If you are installing your refrigerator next to a fixed wall, leave enough space on the hinge side to allow the door to swing open.
NOTE: This refrigerator is intended for use in a location where the temperature ranges from a minimum of 55^ F ( 13^ C) to a maximum of 110^ F ( 43^ C). The preferred room temperature range for optimum performance, which reduces electricity usage and provides superior cooling, is between 60^ F ( 15^ C) and 90^ F ( 32^ C). It is recommended that you do not install the refrigerator near a heat source, such as an oven or radiator.
Electrical Requirements
WARNING
Electrical Shock Hazard
Plug into a grounded 3 prong outlet.
Do not remove ground prong.
Do not use an adapter.
Do not use an extension cord.
Failure to follow these instructions can result in death, fire, or electrical shock.
Before you move your refrigerator into its final location, it is important to make sure you have the proper electrical connection.
Recommended Grounding Method
A 115 V, 60 Hz, AC only, 15A or 20A fused, grounded electrical supply is required. It is recommended that a separate circuit serving only your refrigerator be provided. Use an outlet that cannot be turned off by a switch. Do not use an extension cord.
NOTE: Before performing any type of installation or cleaning, or removing a light bulb, turn cooling off or turn the control (Thermostat, Refrigerator or Freezer Control depending on the model) to OFF, and then disconnect the refrigerator from the electrical source. When you are finished, reconnect the refrigerator to the electrical source, and turn cooling on or reset the control (Thermostat, Refrigerator or Freezer Control, depending on the model) to the desired setting. See “Using the Controls” in the User Instructions, User Guide, or Use & Care Guide.
Water Supply Requirements
Read all directions before you begin.
IMPORTANT:
■Connect to potable water supply only.
Do not use with water that is microbiologically unsafe or of unknown quality without adequate disinfection before or after the system. Systems certified for cyst reduction may be used on disinfected waters that may contain filterable cysts.
■If you turn the refrigerator on before the water line is connected, turn the ice maker off.
■All installations must meet local plumbing code requirements.
■Use copper tubing and check for leaks. Install copper tubing only in areas where the household temperatures will remain above freezing.
TOOLS NEEDED: Flat-blade screwdriver, 7/16" and 1/2" open-end wrenches or 2 adjustable wrenches, 1/4" nut driver and drill bit, cordless drill. Gather the required tools and parts before starting installation. Read and follow the instructions provided with any tools listed.
NOTE: Your refrigerator dealer has a kit available with a 12 " (6.35 mm) saddle-type shutoff valve, a union, and copper tubing. Before purchasing, make sure a saddle-type valve complies with your local plumbing codes. Do not use a piercing-type or 3/16" (4.76 mm) saddle valve which reduces water flow and clogs more easily.
Water Pressure
A cold water supply with water pressure between 30 psi and 120 psi (207 kPa and 827 kPa) is required to operate the ice maker. If you have questions about your water pressure, call a licensed, qualified plumber.
Reverse Osmosis Water Supply
If a reverse osmosis water filtration system is connected to your cold water supply, the water pressure to the reverse osmosis system needs to be a minimum of 40 psi to 60 psi (276 kPa to 414 kPa).
If the water pressure to the reverse osmosis system is less than 40 psi to 60 psi (276 kPa to 414 kPa), a booster pump can be inserted into the small tubing that goes from the cold water line to the reverse osmosis system.
If the ice maker is still not operating properly:
■Check to see whether the sediment filter in the reverse osmosis system is blocked. Replace the filter if necessary.
- Allow the storage tank on the reverse osmosis system to refill after heavy usage.
If you have questions about your water pressure, call a licensed, qualified plumber.
Connect the Water Supply (on some models)
Read all directions before you begin.
IMPORTANT: If you turn the refrigerator on before the water line is connected, turn the ice maker off to avoid excessive noise or damage to the water valve.
Connect the Water Line
- Unplug refrigerator or disconnect power.
- Turn off main water supply. Turn on nearest faucet long enough to clear line of water.
- Locate a 1/2" to 1¼" (1.27 cm to 3.18 cm) vertical cold water pipe near the refrigerator.
IMPORTANT:
■Make sure it is a cold water pipe.
■Horizontal pipe will work. Drill on the top side of the pipe, not the bottom. This will help keep water away from the drill and normal sediment from collecting in the valve.
-
Determine the length of copper tubing you will need. Measure from the connection on lower left rear of refrigerator to the water pipe. Add 7 ft (2.1 m) to allow for cleaning. Use 1/4" (6.35 mm) O.D. (outside diameter) copper tubing. Be sure both ends of copper tubing are cut square.
-
Using a cordless drill, drill a 1/4" (6.35 mm) hole in the cold water pipe you have selected.
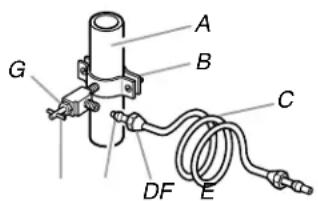
A. Cold water pipe
B. Pipe clamp
C. Copper tubing
D. Compression nut
E. Compression sleeve
F. Shutoff valve
G. Packing nut
- Fasten the shutoff valve to the cold water pipe with the pipe clamp. Be sure the outlet end is solidly in the 1/4" (6.35 mm) drilled hole in the water pipe and that the washer is under the pipe clamp. Tighten the packing nut. Tighten the pipe clamp screws slowly and evenly so washer makes a watertight seal. Do not overtighten.
-
Slip the compression sleeve and compression nut on the copper tubing as shown. Insert the end of the tubing into the outlet end squarely as far as it will go. Screw compression nut onto outlet end with adjustable wrench. Do not overtighten.
-
Place the free end of the copper tubing in a container or sink and turn on the main water supply. Flush the tubing until water is clear. Turn off the shutoff valve on the water pipe. Coil the copper tubing.
Connect to Refrigerator
NOTE: On kit models, attach water valve to refrigerator according to kit instructions.
Style 1
- Unplug refrigerator or disconnect power.
- Attach the copper tube to the valve inlet using a compression nut and sleeve as shown. Tighten the compression nut. Do not overtighten.
- Use the tube clamp on the back of the refrigerator to secure the tubing to the refrigerator as shown. This will help avoid damage to the tubing when the refrigerator is pushed back against the wall.
- Turn shutoff valve ON.
- Check for leaks. Tighten any connections (including connections at the valve) or nuts that leak.
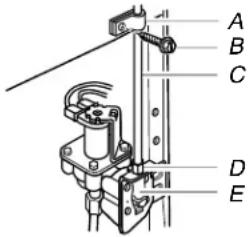
A. Tube clamp
B. Tube clamp screw
C. Copper tubing
D. Compression nut
E. Valve inlet
- The ice maker is equipped with a built-in water strainer. If your water conditions require a second water strainer, install it in the 1/4" (6.35 mm) water line at either tube connection. Obtain a water strainer from your nearest appliance dealer.
Style 2
- Unplug refrigerator or disconnect power.
- Disconnect the tube clamp on the back of the product and insert the copper tubing through the clamp as shown.
- Attach the copper tube to the valve inlet using a compression nut and sleeve as shown.
- Tighten the compression nut. Do not overtighten. Reattach the tube clamp and tube to the back of the cabinet.
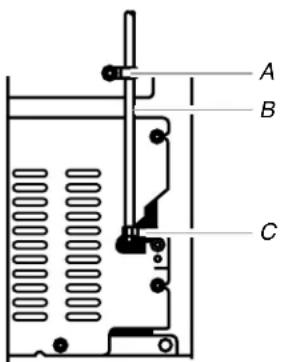
A. Tube clamp
B. Copper tubing
C. Compression nut
- Turn shutoff valve ON. Check for leaks. Tighten any connections (including connections at the valve) or nuts that leak.
- The ice maker is equipped with a built-in water strainer. If your water conditions require a second water strainer, install it in the 1/4" (6.35 mm) water line at either tube connection. Obtain a water strainer from your nearest appliance dealer.
Complete the Installation
WARNING

Electrical Shock Hazard
Plug into a grounded 3 prong outlet.
Do not remove ground prong.
Do not use an adapter.
Do not use an extension cord.
Failure to follow these instructions can result in death, fire, or electrical shock.
- Plug into a grounded 3 prong outlet.
NOTE: Allow 24 hours to produce the first batch of ice. Discard the first three batches of ice produced. Allow 3 days to completely fill ice container.
Refrigerator Doors
TOOLS NEEDED: 5/16" hex-head socket wrench, #2 Phillips screwdriver, flat-blade screwdriver, 5/16" open-end wrench, flat 2" putty knife.
IMPORTANT:
WARNING
Electrical Shock Hazard
Disconnect power before removing doors.
Failure to do so can result in death or electrical shock.
■Before you begin, turn off the refrigerator control. Unplug refrigerator or disconnect power.
■Remove food and adjustable door or utility bins from doors.
■If you are only removing and replacing the doors, see the "Remove Doors and Hinges" and "Replace Doors and Hinges" sections.
Remove Doors and Hinges
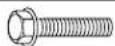
A. 5/16" Hex-Head Hinge Screw
- Unplug refrigerator or disconnect power.
-
Close the refrigerator door and keep both doors closed until you are ready to lift them free from the cabinet.
NOTE: Provide support between the freezer and refrigerator doors while the hinges are being moved. Do not depend on the door magnets to hold the doors in place while you are working. -
Remove the parts for the top hinge as shown in Top Hinge graphic. Lift the freezer door free from the cabinet.
WARNING
Excessive Weight Hazard
Use two or more people to lift the refrigerator door.
Failure to do so can result in back or other injury.
- Remove the parts for the center hinge as shown in the Center Hinge graphic.
NOTE: Provide support between the refrigerator door and the floor while the hinges are being moved. Do not depend on the door magnets to hold the door in place while you are working. - Lift the refrigerator door free from the cabinet.
- Remove the four screws, (two on the bottom and two on the front) attaching the bottom hinge to the cabinet. See Bottom Hinge graphic.
Reverse Doors (optional)
IMPORTANT: If you want to reverse your doors so that they open in the opposite direction, follow these steps. If you are not reversing the doors, see "Replace Doors and Hinges."
Online video instructions for reversing doors can be found on producthelp.whirlpool.com.
Graphics follow these instructions.

Door Hinge
Hole Plug

Cabinet Hinge
Hole Plug
Cabinet
- From the top of the cabinet, remove the hinge hole plugs, move them to the opposite side, and insert the hole plugs into the holes from where you removed the hinge screws. See Graphic 1-2.
- Remove the screws filling the holes to be used for the center hinge and install them on the opposite side.
- Move the leveler from the bottom of the refrigerator and install it on the opposite side.
- Move the parts of the top hinge, center hinge and bottom hinge to the opposite side.
Doors
- Remove door hinge hole plug from top of freezer door. Move to opposite side as shown. See Graphic 2.
- Remove the door stop from the bottoms of both the freezer and refrigerator doors and install them on the opposite side. See Graphics 3 and 4.
Replace Doors and Hinges
NOTES:
■Door Removal & Replacement and Door Swing Reversal graphics may be reversed if door swing is reversed.
■Provide additional support for the doors while the hinges are being reinstalled. Do not depend on the door magnets to hold the doors in place while you are working.
- Replace the parts for the bottom hinge as shown. Tighten screws. Replace the refrigerator door.
- Assemble the parts for the center hinge as shown and tighten all screws. See Center Hinge graphic. Replace the freezer door.
- Assemble the parts for the top hinge as shown. See Top Hinge graphic. Do not tighten screws completely.
- Align the doors so that the bottom of the freezer door is even with the top of the refrigerator door. Tighten all screws.
Final Steps
- Check all holes to make sure that hole plugs and screws are in place.
WARNING
Electrical Shock Hazard
Plug into a grounded 3 prong outlet.
Do not remove ground prong.
Do not use an adapter.
Do not use an extension cord.
Failure to follow these instructions can result in death, fire, or electrical shock.
- Plug into a grounded 3 prong outlet.
- Reset the controls. See "Using the Control(s)" in the User Instructions, User Guide, or Use & Care Guide.
- Return all removable door parts to doors and food to refrigerator.
E ACEMENT
WARNING
Electrical Shock Hazard
Disconnect power before removing doors.
Failure to do so can result in death or electrical shock.
DOOR REMOVAL & REPLACEMENT
Top Hinge
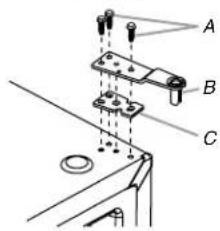
A. 5/16" Hex-Head Hinge Screws
B. Top Hinge
C. Spacer
Center Hinge
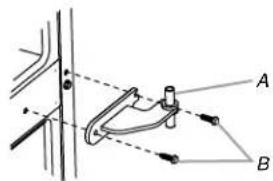
A. Center Hinge
B. 5/16" Hex-Head Hinge Screws
Bottom Hinge
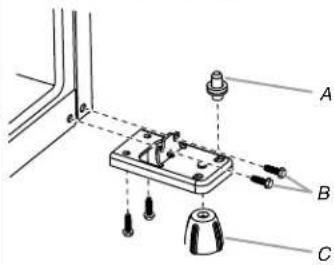
A. Bottom Hinge
B. 5/16" Hex-Head Hinge Screws
C. Leveler
DOOR SWING REVERSAL (OPTIONAL)
1-1
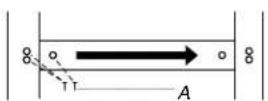
A. 5/16" Hex-Head Hinge Screws and Washers
1-2
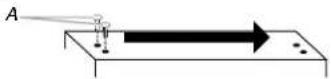
A. Cabinet Hinge Hole Plugs
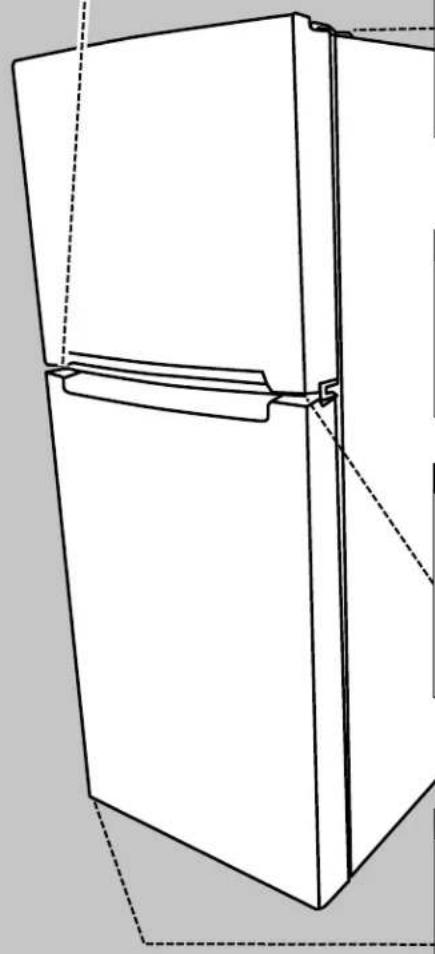
natural_image
Line drawing of a refrigerator with door and front panel, showing structural details (no text or symbols)2
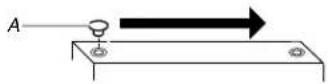
A. Door Hinge Hole Plug
3
Removal of Door Stops
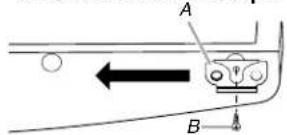
A. Door Stop
B. Door Stop Screw
4
Reinstallation of Door Stops
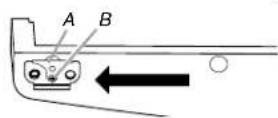
A. Door Stop
B. Door Stop Screw
Leveling and Door Adjustment
WARNING
Excessive Weight Hazard
Use two or more people to move and install refrigerator.
Failure to do so can result in back or other injury.
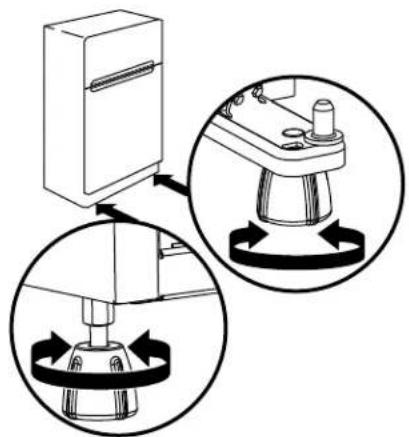
Your refrigerator has two adjustable levelers, one on each side, at the base of the refrigerator. If your refrigerator seems unsteady or if you want the doors to close more easily, adjust the level and tilt of the refrigerator.
- Turn the leveler to the left to raise that side of the refrigerator or to the right to lower that side. It may take several turns to level the refrigerator.
NOTE: Having someone push against the top of the refrigerator takes some weight off the levelers. This makes it easier to turn the levelers.
-
Once the refrigerator is level from side to side, raise the front levelers so that the refrigerator is tilted slightly (approximately 12 ) downward to the rear. The doors will close more easily and the freezer door will remain closed whenever you close the refrigerator door.
-
Open both doors again to make sure that they close as easily as you like. If not, tilt the refrigerator slightly more to the rear by turning both levelers to the right. It may take several more turns.
NOTE: To keep the refrigerator level, make the same adjustment to each side.
- Using a level, make sure the refrigerator is still level from side to side. Readjust if necessary.
natural_image
Diagram showing mechanical assembly with circular insets illustrating rotational motion (no text or symbols)Normal Sounds
Your new refrigerator may make sounds that your old one didn't make. Because the sounds are new to you, you might be concerned about them. Most of the new sounds are normal. Hard surfaces, such as the floor, walls, and cabinets, can make the sounds seem louder. The following describes the kinds of sounds and what may be making them.
■If your refrigerator is equipped with an ice maker, you will hear a buzzing sound when the water valve opens to fill the ice maker for each cycle.
■Your refrigerator is designed to run more efficiently to keep your food items at the desired temperatures and to minimize energy usage. The high efficiency compressor and fans may cause your refrigerator to run longer than your old one. You may also hear a pulsating or high-pitched sound from the compressor or fans adjusting to optimize performance.
■You may hear the evaporator fan motor circulating air through the refrigerator and freezer compartments. The fan speed may increase as you open the doors or add warm food.
■Rattling noises may come from the flow of refrigerant, the water line, or items stored on top of the refrigerator.
■Water dripping on the defrost heater during a defrost cycle may cause a sizzling sound.
■As each cycle ends, you may hear a gurgling sound due to the refrigerant flowing in your refrigerator.
■Contraction and expansion of the inside walls may cause a popping noise.
■You may hear air being forced over the condenser by the condenser fan.
■You may hear water running into the drain pan during the defrost cycle.
REFRIGERATOR USE
Ensuring Proper Air Circulation
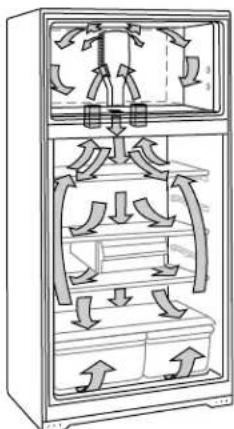
In order to ensure proper temperatures, you need to permit airflow between the refrigerator and freezer sections. As shown in the illustration, cool air enters through the bottom of the freezer section and moves up. Most of the air then flows through the freezer section vents and recirculates under the freezer floor. The rest of the air enters the refrigerator section through the top vent.
NOTE: Depending on your model, the refrigerator may have either a Normal flow or Multiflow air system.
natural_image
Technical line drawing of a refrigerator interior showing internal airflow and structural components (no text or labels)Do not block any of these vents with food packages. If the vents are blocked, airflow will be restricted and temperature and moisture problems may occur.
IMPORTANT: Because air circulates between both sections, any odors formed in one section will transfer to the other. You must thoroughly clean both sections to eliminate odors. To avoid odor transfer and drying out of food, wrap or cover foods tightly.
Using the Controls panel
Temperature Control
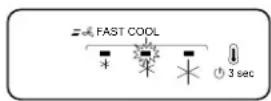
Temperature Control For your convenience, the temperature control is preset at the factory.
When you first install your
refrigerator, make sure the control is still preset as shown
Recommended Setting

NOTE: Neither compartment will cool when the control is set to OFF.
Adjusting the Temperature Control
If you need to adjust the temperature on either the refrigerator or freezer compartment, use the settings listed in the chart below as a guide.
NOTE: Except when starting the refrigerator, do not adjust the control more than one setting at a time. Wait 24 hours between adjustments for the temperature to stabilize.
■Press the Temp button to toggle among the third LED lights which indicate the temperature setting. Reading from left to right, the LED in the first position is the least cold. The LEDs indicate increasingly colder settings as you continue to the right until all third LEDs are illuminated.
| CONDITION/REASON: ADJUSTMENT: | |
| REFRIGERATOR too warm Temperature Control one setting higher | |
| REFRIGERATOR too warm/too little ice | Temperature Control one setting higher |
| REFRIGERATOR too cold Temperature Control one setting lower | |
| FREEZER too cold Temperature Control one setting lower | |
Airflow Control
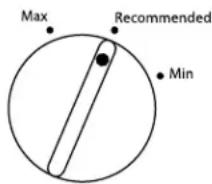
The Airflow control is located on the back wall of the freezer. It regulates the amount of air flowing between the freezer and the refrigerator compartments.
When you plug in the refrigerator for the first time, turn the Airflow control to the Recommended setting.
Adjust the Airflow Control
If you want to temporarily increase the cold airflow to a specific compartment, adjust the control.
IMPORTANT: Once the performance is achieved, return the Airflow control to the Recommended setting to keep the refrigerator operating at optimum efficiency.
| CONDITION/REASON: ADJUSTMENT: | |
| Heavy ice use Max | |
| Hot room temperature Max - To | maintain icemaking production rate |
| Large quantity of groceries Min | - To quickly chill foodand beverages |
Crisper Humidity Control (on some models)
You control the amount of humidity in the moisture-sealed crisper. Depending on the produce you are storing, select the desired Humidity Level.
Humidity Level - Min Setting
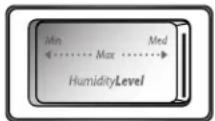
MIN (open) lets moist air out of the crisper for best storage of fruits and vegetables with skins.
■Fruit: Wash, let dry and store in refrigerator in plastic bag or crisper. Do not wash or cut berries until they are ready to use. Sort and keep berries in original container in crisper, or store in a loosely closed paper bag on a refrigerator shelf.
■Vegetables with skins: Place in plastic bag or plastic container and store in crisper.
Humidity Level - Max Setting
MAX (closed) keeps moist air in the crisper for best storage of fresh, leafy vegetables.
■Leafy vegetables: Wash in cold water, drain and trim or tear off bruised and discolored areas. Place in plastic bag or plastic container and store in crisper.
REFRIGERATOR CARE
Cleaning
WARNING
ExplosionHazard
RiskofFireorExplosion.
FlammableRefrigerantUsed.
DoNotUseMechanicalDevicestoDefrostRefrigerator.
DoNotPunctureRefrigerantTubing.
Both the refrigerator and freezer sections defrost automatically. However, clean both sections about once a month to avoid buildup of odors. Wipe up spills immediately.
IMPORTANT: Because air circulates between both sections, any odors formed in one section will transfer to the other. You must thoroughly clean both sections to eliminate odors. To avoid odor transfer and drying out of food, wrap or cover foods tightly.
To Clean Your Refrigerator:
NOTE: Do not use abrasive or harsh cleaners such as window sprays, scouring cleansers, flammable fluids, cleaning waxes, concentrated detergents, bleaches or cleansers containing petroleum products on plastic parts, interior and door liners or gaskets. Do not use paper towels, scouring pads, or other harsh cleaning tools.
- Unplug refrigerator or disconnect power.
- Hand wash, rinse, and dry removable parts and interior surfaces thoroughly. Use a clean sponge or soft cloth and a mild detergent in warm water.
- Wash painted metal exteriors with a clean sponge or soft cloth and a mild detergent in warm water. Dry thoroughly with a soft cloth.
- Plug in refrigerator or reconnect power.
Vacation and Moving Care
Vacation
If You Choose to Leave the Refrigerator On While You're Away:
- Use up any perishables and freeze other items.
- If your refrigerator has an automatic ice maker, and is connected to the household water supply, turn off the water supply to the refrigerator. Property damage can occur if the water supply is not turned off.
-
If you have an automatic ice maker, turn off the ice maker.
NOTE: Depending on your model, raise the wire shutoff arm to Off (up) position or press the switch to Off. -
Empty the ice bin.
Models with Vacation Mode Feature.
■Turn on Vacation mode. See the "Quick Start Guide" for details.
NOTE: Activating Vacation mode does not turn off the icemaker.
If You Choose to Turn Off the Refrigerator Before You Leave:
- Remove all food from the refrigerator.
- If your refrigerator has an automatic ice maker:
■Turn off the water supply to the ice maker at least one day ahead of time.
■When the last load of ice drops, raise the wire shutoff arm to the Off (up) position or press the switch to Off, depending on your model.
-
Empty the ice bin.
-
Turn off the Temperature control(s). See the "Quick Start Guide."
-
Clean refrigerator, wipe it, and dry well.
-
Tape rubber or wood blocks to the tops of both doors to prop them open far enough for air to get in. This stops odor and mold from building up.
Moving
When you are moving your refrigerator to a new home, follow these steps to prepare it for the move.
- If your refrigerator has an automatic ice maker:
■Turn off the water supply to the ice maker at least one day ahead of time.
■Disconnect the water line from the back of the refrigerator.
■When the last load of ice drops, raise the wire shutoff arm to the Off (up) position or press the switch to Off, depending on your model.
-
Remove all food from the refrigerator and pack all frozen food in dry ice.
-
Empty the ice bin.
-
Turn off the Temperature control(s). See the "Quick Start Guide."
-
Unplug refrigerator.
-
Clean, wipe, and dry thoroughly.
-
Take out all removable parts, wrap them well, and tape them together so they don't shift and rattle during the move.
-
Depending on the model, raise the front of the refrigerator so it rolls more easily or raise the leveling screws so they don't scrape the floor. See "Adjust the Door(s)" or "Door Closing and Door Alignment."
-
Tape the doors closed and tape the power cord to the back of the refrigerator.
When you get to your new home, put everything back and refer to the "Installation Instructions" section for preparation instructions. Also, if your refrigerator has an automatic ice maker, remember to reconnect the water supply to the refrigerator.
ACCESSORIES
The following accessories are available for your refrigerator. To order, contact us and ask for the Part Number.
In the U.S.A., visit our webpage
www.whirlpool.com/accessories or call 1-800-901-2042.
In Canada, call 1-800-807-6777.
Automatic Ice Maker (optional on some models):
Order Part W11337839
Affresh® Kitchen & Appliance Cleaner:
Order Part #W10355010
PROBLEM SOLVER
First try the solutions suggested here. If you need further assistance, warranty information, or more recommendations that may help you avoid a service call, visit www.whirlpool.com/product_help. In Canada, visit http://www.whirlpool.ca.
Contact us by mail with any questions or concerns at the address below:
In the U.S.A.:
In Canada:
Whirlpool Brand Home Appliances
Whirlpool Brand Home Appliances
Customer eXperience Center
Customer eXperience Centre
553 Benson Road 200 - 6750 Century Ave.
Benton Harbor, MI 49022-2692
Mississauga ON L5N 0B7
Please include a daytime phone number in your correspondence.
WARNING
Explosion Hazard
Risk of fire or explosion. Flammable refrigerant used.
Do not use mechanical devices to defrost refrigerator.
Do not puncture refrigerant tubing.
WARNING
Explosion Hazard
Risk of fire or explosion due to puncture of refrigerant tubing.
Follow handling instructions carefully. Flammable refrigerant used.
WARNING
Electrical Shock Hazard
Plug into a grounded 3 prong outlet.
Do not remove ground prong.
Do not use an adapter.
Do not use an extension cord.
Failure to follow these instructions can result in death, fire, or electrical shock.
WARNING
Explosion Hazard
Use nonflammable cleaner.
Failure to do so can result in death, explosion, or fire.
| If you experience | Possible Causes and/or Recommended Solutions |
| The refrigerator will not operate | Not connected to an electrical supply - Plug the power cord into a grounded 3-prong outlet. Do not use an extension cord.No power to the electrical outlet - Plug in a lamp to see if the outlet is working.Household fuse blown or circuit breaker tripped - Replace the fuse or reset the circuit breaker. If the problem continues, contact an electrician.Control is not turned on - Turn on the refrigerator control. See “Using the Controls.”New Installation - Allow 24 hours following installation for the refrigerator to cool completely.NOTE: Adjusting the temperature controls to coldest setting will not cool the refrigerator more quickly. |
| The motor seems to run too much | Your new refrigerator may run longer than your old one. Energy efficient refrigerators run longer at lower, more energy efficient speeds. Your refrigerator may run even longer if the room is warm, a large food load is added, the door is opened often, or if the door has been left open. |
| The refrigerator is noisy | Refrigerator noise has been reduced over the years. Due to this reduction in operating noise, you may notice unfamiliar noises that are normal. Following are some normal sounds with an explanation:Buzzing - heard when the water valve opens to fill the ice makerClicking/Snapping - valves opening or closingPulsating - fans/compressor adjusting to optimize performanceRattling - fl w of refrigerant, water line, or from items placed on top of the refrigeratorSizzling/Gurgling - water dripping on the heater during defrost cyclePopping - contraction/expansion of inside walls, especially during initial cool-downWater running - may be heard when ice melts during the defrost cycle and water runs into the drain panCreaking/Cracking - occurs as ice is being ejected from the ice maker mold. |
| The door will not close completely | The door is blocked open - Move food packages away from door. Push bin or shelf back in the correct position. Make sure the crisper cover is fully pushed in, so that the back rests on the supports. |
| The door is difficult to open | Gaskets are dirty or sticky - Clean gaskets and contact surfaces with mild soap and warm water. Rinse and dry with soft cloth. |
| Temperature is too warm | New Installation - Allow 24 hours following installation for the refrigerator to cool completely.Door(s) opened often or not closed completely - Allows warm air to enter refrigerator. Minimize door openings and keep doors fully closed.A large amount of warm food has been recently added - Allow several hours for refrigerator to return to normal temperature.Check that the Temperature Control(s) are set correctly for the surrounding conditions - Adjust the controls to one setting colder. Check temperature in 24 hours. See “Using the Controls.” |
| There is interior moisture buildupNOTE: Some moisture build-up is normal. | Humid room - Contributes to moisture buildup in the refrigerator.Door(s) opened often or not closed completely - Allows humid air to enter the refrigerator. Minimize door openings and keep door fully closed. |
| The ice maker is not producing ice or not enough ice | The ice maker is not connected to a water supply - Connect refrigerator to water supply and turn water shutoff valve fully open.A kink in the line can reduce water fl w - Straighten the water source line.Ice maker is not turned on - Make sure the ice maker wire shutoff arm or switch (depending on model) is in the ON position.New installation - Wait 24 hours after ice maker installation for ice production to begin. Wait 3 days for full ice production.Large amount of ice recently removed - Allow sufficient time or ice maker to produce more ice.Ice cube jammed in the ice maker ejector arm - Remove ice from the ejector arm with a plastic utensil.A reverse osmosis water filtration system connected to our cold water supply can decrease water pressure - See “Water Supply Requirements. |
| The ice cubes are hollow or smallNOTE: This is an indication of low water pressure. | The water valve is not completely open - Completely open the water shutoff valve.A kink in the line can reduce water flow - Straighten the water source line.A reverse osmosis water filtration system connected to our cold water supply can decrease water pressure - See “Water Supply Requirements.”If questions regarding water pressure remain, call a licensed, qualified plumber. |
| Off-taste, odor or gray color in the ice | New plumbing connections can cause discolored or off-flavored ice - Discard the ice and wash the ice storage bin. Allow 24 hours for the ice maker to make new ice, and discard the first 3 batches of ice producedIce stored too long can develop an off-taste - Discard ice. Wash ice bin. Allow 24 hours for ice maker to make new ice.Food odor transferring to ice - Use airtight, moisture proof packaging to store food.There are minerals (such as sulfur) in the water - A water filter my need to be installed to remove the minerals. |
SÉCURITÉ DU RÉFRIGÉRATEUR
natural_image
Line drawing of a refrigerator with open doors and shelves (no text or symbols)INSTRUCTIONS D'INSTALLATION
natural_image
Simple line drawing of a rack with a bag containing two fragments (no text or symbols)A. Ôter le profilé.
A. Ôter le profilé.
natural_image
Line drawing of a refrigerator with open lid and side door, showing structural details (no text or symbols)1-2
natural_image
Diagram showing mechanical assembly with two views of a device and a rotating base (no text or symbols)Sons normaux
natural_image
Technical line drawing of a refrigerator interior showing internal airflow and structural components (no text or labels)Customer eXperience Center Customer eXperience Centre
553 Benson Road 200 - 6750 Century Ave.
Benton Harbor, MI 49022-2692 Mississauga ON L5N 0B7
Prizer-Painter Stove Works, Inc. ("Prizer-Painter") warrants your BlueStar appliance ("product") purchased in the U.S. and Canada and installed in residential properties for normal residential use.
What Is Covered
Subject to the specific conditions and limitations below, this warranty covers parts and/or labor necessary to repair or replace any part of the product that contains defects in materials and workmanship.
Two Year Warranty. For two (2) years from the date of installation, this warranty covers all parts and labor necessary to repair or replace any part on the product except for the Cosmetic Component Warranty below.
Cosmetic Component Warranty. For thirty (30) days from the date of installation, this warranty covers scratches and dents, paint and porcelain blemishes, visible chips, etc.
Limitations of Coverage
- Floor Models. For one (1) year from the date of installation, this warranty covers all parts and labor necessary to repair or replace any part on the product except for cosmetic parts for which there is no warranty.
- The replacement of a part under this warranty does not extend the warranty period.
- Warranty service outside normal business hours and in areas beyond 50 miles one way from an authorized BlueStar retailer or service provider. The owner will be responsible for any and all costs associated with additional mileage, non-standard service or overtime, and special equipment required to remove the product so service may be performed.
This warranty is null and void:
- If the product is removed from where it was originally installed.
- If the original factory installed serial number is altered or removed from the product.
What Is Not Covered
This warranty does not cover, and specifically excludes:
- Product installed or used in any commercial or other non-residential property such as, but not limited to, day care facilities, fire stations, hotels, nursing homes, etc.
- Installation related issues including improper badge placement or installation inconsistent with the product specifications/installation instructions.
- Damage or repairs caused by alterations or modifications, abuse, misuse, neglect, or improper installation, mounting, handling, operation, maintenance, or storage.
• Normal adjustments after installation and setup. - Normal wear, care, and maintenance of the product as described in the use and care manual.
- Service calls to educate the customer on the proper use and care of the product.
- Consumable parts such as water filters.
- Damage or repairs caused by unauthorized service or repairs, including unauthorized adjustments or calibrations performed on the product.
- Accidental or intentional damage.
- Damage or repairs as a result of natural disasters, fires, floods, earthquakes, winds, lightning, corrosive atmosphere, loss of electrical power to the product for any reason, or other conditions beyond Prizer-Painter's control.
• Damage or repairs caused by alteration for outdoor use. - Damage or repairs caused by the use of harsh chemicals or cleaning products improperly applied.
- Liability or responsibility for damage to surrounding property including cabinetry, floors, ceilings, etc.
- Consequential or incidental damage, including but not limited to food or medicine loss, time away from work, restaurant meals, etc.
The terms of this warranty provide for repair of the product only. If the product cannot be repaired, Prizer-Painter, at its sole discretion, will determine whether to exchange the product.
Please see the Arbitration Clause and Related Provisions, which affect your legal rights. The Arbitration Clause is available at www.bluestarcooking.com.
- Top-Mount Refrigerator Owner's Manual
- Your safety and the safety of others are very important.
- ! DANGER
- WARNING
- IMPORTANT SAFETY INSTRUCTIONS
- SAVETHESEINSTRUCTIONS
- Proper Disposal of Your Old Refrigerator
- INSTALLATION INSTRUCTIONS
- Remove the Packaging
- When Moving Your Refrigerator:
- Install Levelers
- OR
- Clean Before Using
- Important information to know about glass shelves and covers:
- Location Requirements
- Explosion Hazard
- Electrical Requirements
- Electrical Shock Hazard
- Recommended Grounding Method
- Water Supply Requirements
- IMPORTANT:
- Water Pressure
- Reverse Osmosis Water Supply
- Connect the Water Supply (on some models)
- Connect the Water Line
- Connect to Refrigerator
- Style 1
- Style 2
- Complete the Installation
- Refrigerator Doors
- Remove Doors and Hinges
- Reverse Doors (optional)
- Cabinet
- Doors
- Replace Doors and Hinges
- NOTES:
- Final Steps
- E ACEMENT
- DOOR REMOVAL & REPLACEMENT
- DOOR SWING REVERSAL (OPTIONAL)
- Leveling and Door Adjustment
- Excessive Weight Hazard
- Normal Sounds
- REFRIGERATOR USE
- Ensuring Proper Air Circulation
- Using the Controls panel
- Temperature Control
- Adjusting the Temperature Control
- Airflow Control
- Adjust the Airflow Control
- Crisper Humidity Control (on some models)
- Humidity Level - Min Setting
- Humidity Level - Max Setting
- REFRIGERATOR CARE
- To Clean Your Refrigerator:
- Vacation and Moving Care
- Vacation
- If You Choose to Leave the Refrigerator On While You're Away:
- If You Choose to Turn Off the Refrigerator Before You Leave:
- Moving
- ACCESSORIES
- PROBLEM SOLVER
- SÉCURITÉ DU RÉFRIGÉRATEUR
- INSTRUCTIONS D'INSTALLATION
- Sons normaux
- What Is Covered
- Limitations of Coverage
- What Is Not Covered
Brand : Big Chill
Model : BC11TFR
Category : Freezer