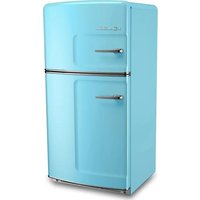
BC21TFR - Freezer Big Chill - Free user manual and instructions
Find the device manual for free BC21TFR Big Chill in PDF.


| Brand | Big Chill |
| Model | BC21TFR |
| Product Type | Upright Freezer |
| Power Supply Voltage | 115 V ~ 60 Hz |
| Rated Current | 15 A to 20 A |
| Required Outlet | 3-prong grounded outlet |
| Freezer Capacity | Not specified (estimated ~ 10 cu ft) |
| Metal Shelf | Yes, removable |
| Glass Shelf | Yes, removable |
| Ice Maker | Yes (on some models, requires water connection) |
| Water Filter | Integrated for ice maker |
| Adjustable Rollers | Yes, at front |
| Door Reversal | Possible (kit provided) |
| Door Stop | Removable and transferable |
| Handles | Removable, standard or contoured style |
| Door Bins | Removable |
| Utility Compartment | Removable |
| Interior Cleaning | Warm water and mild soap |
| Recommended Ambient Temperature | 60°F to 90°F (15°C to 32°C) |
| Minimum Ambient Temperature | 55°F (13°C) |
| Maximum Ambient Temperature | 110°F (43°C) |
| Required Clearance | 1/2 in on sides and top, 1 in behind |
| Water Pressure for Ice Maker | 30 to 120 psi (207 to 827 kPa) |
| Safety | Grounded outlet, avoid flammable materials |
Frequently Asked Questions - BC21TFR Big Chill
User questions about BC21TFR Big Chill
0 question about this device. Answer the ones you know or ask your own.
Ask a new question about this device
Download the instructions for your Freezer in PDF format for free! Find your manual BC21TFR - Big Chill and take your electronic device back in hand. On this page are published all the documents necessary for the use of your device. BC21TFR by Big Chill.
USER MANUAL BC21TFR Big Chill
INSTALLATION INSTRUCTIONS AND OWNER'S MANUAL
Top Mount Refrigerator
Proper Disposal of Your Old Refrigerator....3
INSTALLATION INSTRUCTIONS ....3
Unpack the Refrigerator....3
Location Requirements....4
Electrical Requirements....4
Water Supply Requirements....4
Connect the Water Supply....5
Refrigerator Doors....6
Reversibility Kit Instructions....11
Adjust the Doors ....11
REFRIGERATOR FEATURES ....12
Refrigerator Shelves....12
Deli Drawer....12
Crisper....12
FREEZER FEATURES ....13
Wire Freezer Shelf....13
Glass Freezer Shelf 13
DOOR FEATURES ....14
Door Rails....14
Door Bins....14
Utility Compartment....14
BRAND BADGE PLACEMENT TEMPLATE....BACK COVER
SÉCURITÉ DU RÉFRIGÉRATEUR ....16
INSTRUCTIONS D'INSTALLATION ....17
Your safety and the safety of others are very important.
We have provided many important safety messages in this manual and on your appliance. Always read and obey all safety messages.

This is the safety alert symbol.
This symbol alerts you to potential hazards that can kill or hurt you and others.
All safety messages will follow the safety alert symbol and either the word "DANGER" or "WARNING."
These words mean:
DANGER
You can be killed or seriously injured if you don't immediately follow instructions.
WARNING
You can be killed or seriously injured if you don't follow instructions.
All safety messages will tell you what the potential hazard is, tell you how to reduce the chance of injury, and tell you what can happen if the instructions are not followed.
IMPORTANT SAFETY INSTRUCTIONS
WARNING: To reduce the risk of fire, electric shock, or injury to persons when using the refrigerator, follow basic precautions, including the following:
■ Plug into a grounded 3 prong outlet.
■ Do not remove ground prong.
■ Do not use an adapter.
■ Do not use an extension cord.
■ Disconnect power before servicing.
■ Replace all parts and panels before operating.
■ Remove doors from your old refrigerator.
■ Use nonflammable cleaner.
- Keep flammable materials and vapors, such as gasoline, away from refrigerator.
■ Use two or more people to move and install refrigerator.
■ Disconnect power before installing ice maker (on ice maker kit ready models only).
SAVE THESE INSTRUCTIONS
State of California Proposition 65 Warnings:
WARNING: This product contains one or more chemicals known to the State of California to cause cancer.
WARNING: This product contains one or more chemicals known to the State of California to cause birth defects or other reproductive harm.
Proper Disposal of Your Old Refrigerator
WARNING
Suffocation Hazard
Remove doors from your old refrigerator.
Failure to do so can result in death or brain damage.
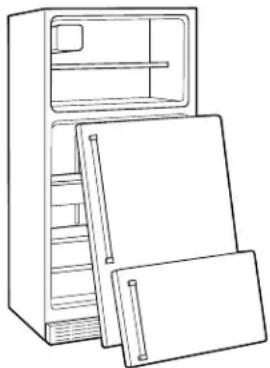
IMPORTANT: Child entrapment and suffocation are not problems of the past. Junked or abandoned refrigerators are still dangerous – even if they will sit for “just a few days.” If you are getting rid of your old refrigerator, please follow these instructions to help prevent accidents.
Before You Throw Away Your Old Refrigerator or Freezer:
■ Take off the doors.
■ Leave the shelves in place so that children may not easily climb inside.
natural_image
Line drawing of a refrigerator with open doors and shelves (no text or symbols)Important information to know about disposal of refrigerants:
Dispose of refrigerator in accordance with Federal and Local regulations. Refrigerants must be evacuated by a licensed, EPA certified refrigerant technician in accordance with established procedures.
INSTALLATION INSTRUCTIONS
Unpack the Refrigerator
WARNING
Excessive Weight Hazard
Use two or more people to move and install refrigerator.
Failure to do so can result in back or other injury.
Remove the Packaging
■ Remove tape and glue residue from surfaces before turning on the refrigerator. Rub a small amount of liquid dish soap over the adhesive with your fingers. Wipe with warm water and dry.
NOTE: Do not use sharp instruments, rubbing alcohol, flammable fluids, or abrasive cleaners to remove tape or glue. These products can damage the surface of your refrigerator. For more information, see “Refrigerator Safety.”
■ Dispose of/recycle all packaging materials.
IMPORTANT: Do not remove the white foam air return insert that is located behind the control panel on the ceiling of the refrigerator (on some models). The insert is part of the refrigerator and not part of the packing material. If the insert is removed, ice may migrate down from the freezer and cause icicles to form.
When Moving Your Refrigerator:
Your refrigerator is heavy. When moving the refrigerator for cleaning or service, be sure to cover the floor with cardboard or hardboard to avoid floor damage. Always pull the refrigerator straight out when moving it. Do not wiggle or "walk" the refrigerator when trying to move it, as floor damage could occur.
Clean Before Using
After you remove all of the package materials, clean the inside of your refrigerator before using it. See the cleaning instructions in "Refrigerator Care."
Important information to know about glass shelves and covers:
Do not clean glass shelves or covers with warm water when they are cold. Shelves and covers may break if exposed to sudden temperature changes or impact, such as bumping. Tempered glass is designed to shatter into many small, pebble-size pieces. This is normal. Glass shelves and covers are heavy. Use both hands when removing them to avoid dropping.
Location Requirements
WARNING
Explosion Hazard
Keep flammable materials and vapors, such as gasoline, away from refrigerator.
Failure to do so can result in death, explosion, or fire.
IMPORTANT: This refrigerator is designed for indoor household use only.
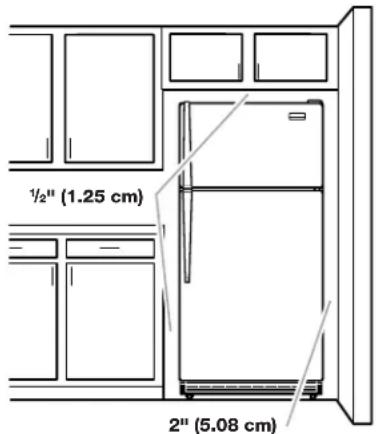
To ensure proper ventilation for your refrigerator, allow for 12 " (1.25 cm) of space on each side and at the top. Allow for 1" (2.54 cm) of space behind the refrigerator. If your refrigerator has an ice maker, allow extra space at the back for the water line connections. When installing your refrigerator next to a fixed wall, leave a 2" (5.08 cm) minimum space on the hinge side (some models require more) to allow the door to swing open.
NOTE: This refrigerator is intended for use in a location where the temperature ranges from a minimum of 55^ F ( 13^ C) to a maximum of 110^ F ( 43^ C). The preferred room temperature range for optimum performance, which reduces electricity usage and provides superior cooling, is between 60^ F ( 15^ C) and 90^ F ( 32^ C). It is recommended that you do not install the refrigerator near a heat source, such as an oven or radiator.
Electrical Requirements
WARNING
Electrical Shock Hazard
Plug into a grounded 3 prong outlet.
Do not remove ground prong.
Do not use an adapter.
Do not use an extension cord.
Failure to follow these instructions can result in death, fire, or electrical shock.
Before you move your refrigerator into its final location, it is important to make sure you have the proper electrical connection.
Recommended Grounding Method
A 115 volt, 60 Hz, AC only, 15- or 20-amp fused, grounded electrical supply is required. It is recommended that a separate circuit serving only your refrigerator be provided. Use an outlet that cannot be turned off by a switch. Do not use an extension cord.
NOTE: Before performing any type of installation or cleaning, or removing a light bulb, turn cooling off or turn the control (Thermostat, Refrigerator or Freezer Control depending on the model) to OFF, and then disconnect the refrigerator from the electrical source. When you are finished, reconnect the refrigerator to the electrical source and turn cooling on or reset the control (Thermostat, Refrigerator or Freezer Control depending on the model) to the desired setting. See "Using the Controls" in the User Instructions, User Guide, or Use & Care Guide.
Water Supply Requirements
Read all directions before you begin.
Gather the required tools and parts before starting installation. Read and follow the instructions provided with any tools listed here.
Tools Needed: Flat-blade screwdriver, 716 " and 12 " Open-end wrenches or 2 Adjustable wrenches, 14 " Nut driver and drill bit, Cordless drill.
IMPORTANT:
■ If you turn on the refrigerator before the water line is connected, turn OFF the ice maker.
■ All installations must meet local plumbing code requirements.
■ Use copper tubing and check for leaks. Install copper tubing only in areas where the household temperatures will remain above freezing.
NOTE: Your refrigerator dealer has a kit available with a 14 " (6.35 mm) saddle-type shutoff valve, a union, and copper tubing. Before purchasing, make sure a saddle-type valve complies with your local plumbing codes. Do not use a piercing-type or 316 " (4.76 mm) saddle valve which reduces water flow and clogs more easily.
Water Pressure
IMPORTANT: A cold water supply with water pressure between 30 and 120 psi (207 and 827 kPa) is required to operate the ice maker.
NOTE: If the water pressure is less than what is required, ice cubes could be hollow or irregular shaped.
If you have questions about your water pressure, call a licensed, qualified plumber.
Reverse Osmosis Water Supply
If a reverse osmosis water filtration system is connected to your cold water supply, the water pressure to the reverse osmosis system needs to be a minimum of 40 to 60 psi (276 to 414 kPa).
If the ice maker is still not operating properly:
■ Check to see whether the sediment filter in the reverse osmosis system is blocked. Replace the filter if necessary.
- Allow the storage tank on the reverse osmosis system to refill after heavy usage.
Connect the Water Supply
Read all directions before you begin.
IMPORTANT: If you turn ON the refrigerator before the water line is connected, turn OFF the ice maker.
Connect to Water Line
- Unplug refrigerator or disconnect power.
- Turn OFF main water supply. Turn ON nearest faucet long enough to clear line of water.
- Locate a 12 " to 114 " (1.25 cm to 3.18 cm) vertical cold water pipe near the refrigerator.
IMPORTANT:
■ Make sure it is a cold water pipe.
■ Horizontal pipe will work, but drill on the top side of the pipe, not the bottom. This will help keep water away from the drill and normal sediment from collecting in the valve.
-
Determine the length of copper tubing you need. Measure from the connection on the lower left rear of refrigerator to the water pipe. Add 7 ft (2.1 m) to allow for cleaning. Use 14 " (6.35 mm) O.D. (outside diameter) copper tubing. Be sure both ends of copper tubing are cut square.
-
Using a cordless drill, drill a 14 " hole in the cold water pipe you have selected.
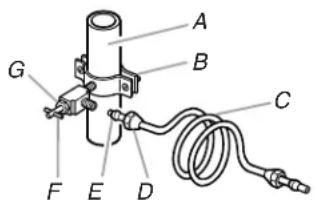
A. Cold water pipe
B. Pipe clamp
C. Copper tubing
D. Compression nut
E. Compression sleeve
F. Shutoff valve
G. Packing nut
-
Fasten the shutoff valve to the cold water pipe with the pipe clamp. Be sure the outlet end is solidly in the 14 " drilled hole in the water pipe and that the washer is under the pipe clamp. Tighten the packing nut. Tighten the pipe clamp screws slowly and evenly so washer makes a watertight seal. Do not overtighten or you may crush the copper tubing.
-
Slip the compression sleeve and compression nut on the copper tubing, as shown. Insert the end of the tubing into the outlet end squarely as far as it will go. Screw compression nut onto outlet end with adjustable wrench. Do not overtighten.
- Place the free end of the tubing in a container or sink, and turn ON the main water supply. Flush the tubing until water is clear. Turn OFF the shutoff valve on the water pipe. Coil the copper tubing.
Connect to Refrigerator
- Unplug refrigerator or disconnect power.
- Attach the copper tubing to the valve inlet using a compression nut and sleeve, as shown. Tighten the compression nut. Do not overtighten.
- Use the tube clamp on the back of the refrigerator to secure the tubing to the refrigerator, as shown. This will help avoid damage to the tubing when the refrigerator is pushed back against the wall.
- Turn shutoff valve ON.
- Check for leaks. Tighten any connections (including connections at the valve) or nuts that leak.
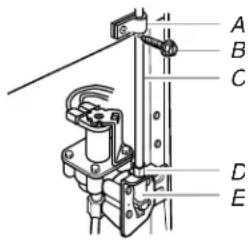
A. Tube clamp
B. Tube clamp screw
C. Copper tubing
D. Compression nut
E. Valve inlet
- The ice maker is equipped with a built-in water strainer. If your water conditions require a second water strainer, install it in the 14 " (6.35 mm) water line at either tube connection. Obtain a water strainer from your nearest appliance dealer.
Complete the Installation
WARNING
Electrical Shock Hazard
Plug into a grounded 3 prong outlet.
Do not remove ground prong.
Do not use an adapter.
Do not use an extension cord.
Failure to follow these instructions can result in death, fire, or electrical shock.
- Plug into a grounded 3 prong outlet.
NOTE: Allow 24 hours to produce the first batch of ice. Discard the first three batches of ice produced. Allow 3 days to completely fill ice container.
Refrigerator Doors
Tools Needed:
■ 5/16" Hex-head socket wrench
■ 5/16" Open-end wrench
■ #2 Phillips screwdriver
■ Flat 2" putty knife
■ Flat-blade screwdriver
IMPORTANT:
■ Before you begin, turn the refrigerator control OFF. Unplug refrigerator or disconnect power.
■ Remove food and adjustable door or utility bins from doors.
■ If you are only removing and replacing the doors, see the "Remove Doors and Hinges" and "Replace Doors and Hinges" sections.
■ Depending on your model, you may have standard (Style 1) or contoured (Style 2) doors. If you are also going to reverse the door swing, follow the instructions for the appropriate door style.
NOTE: A Reversibility Kit, which includes a new Brand Badge and hole covers, is available.
■ All graphics referenced in the following instructions are included later in this section after “Final Steps.”
Remove Doors and Hinges
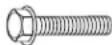
^5/_16 " Hex-head Hinge Screw
- Unplug refrigerator or disconnect power.
- Close the refrigerator door and keep both doors closed until you are ready to lift them free from the cabinet.
NOTE: Provide additional support for the doors while the hinges are being moved. Do not depend on the door magnets to hold the doors in place while you are working.
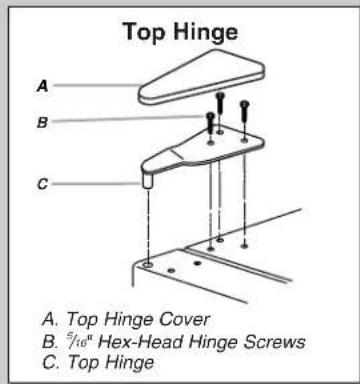
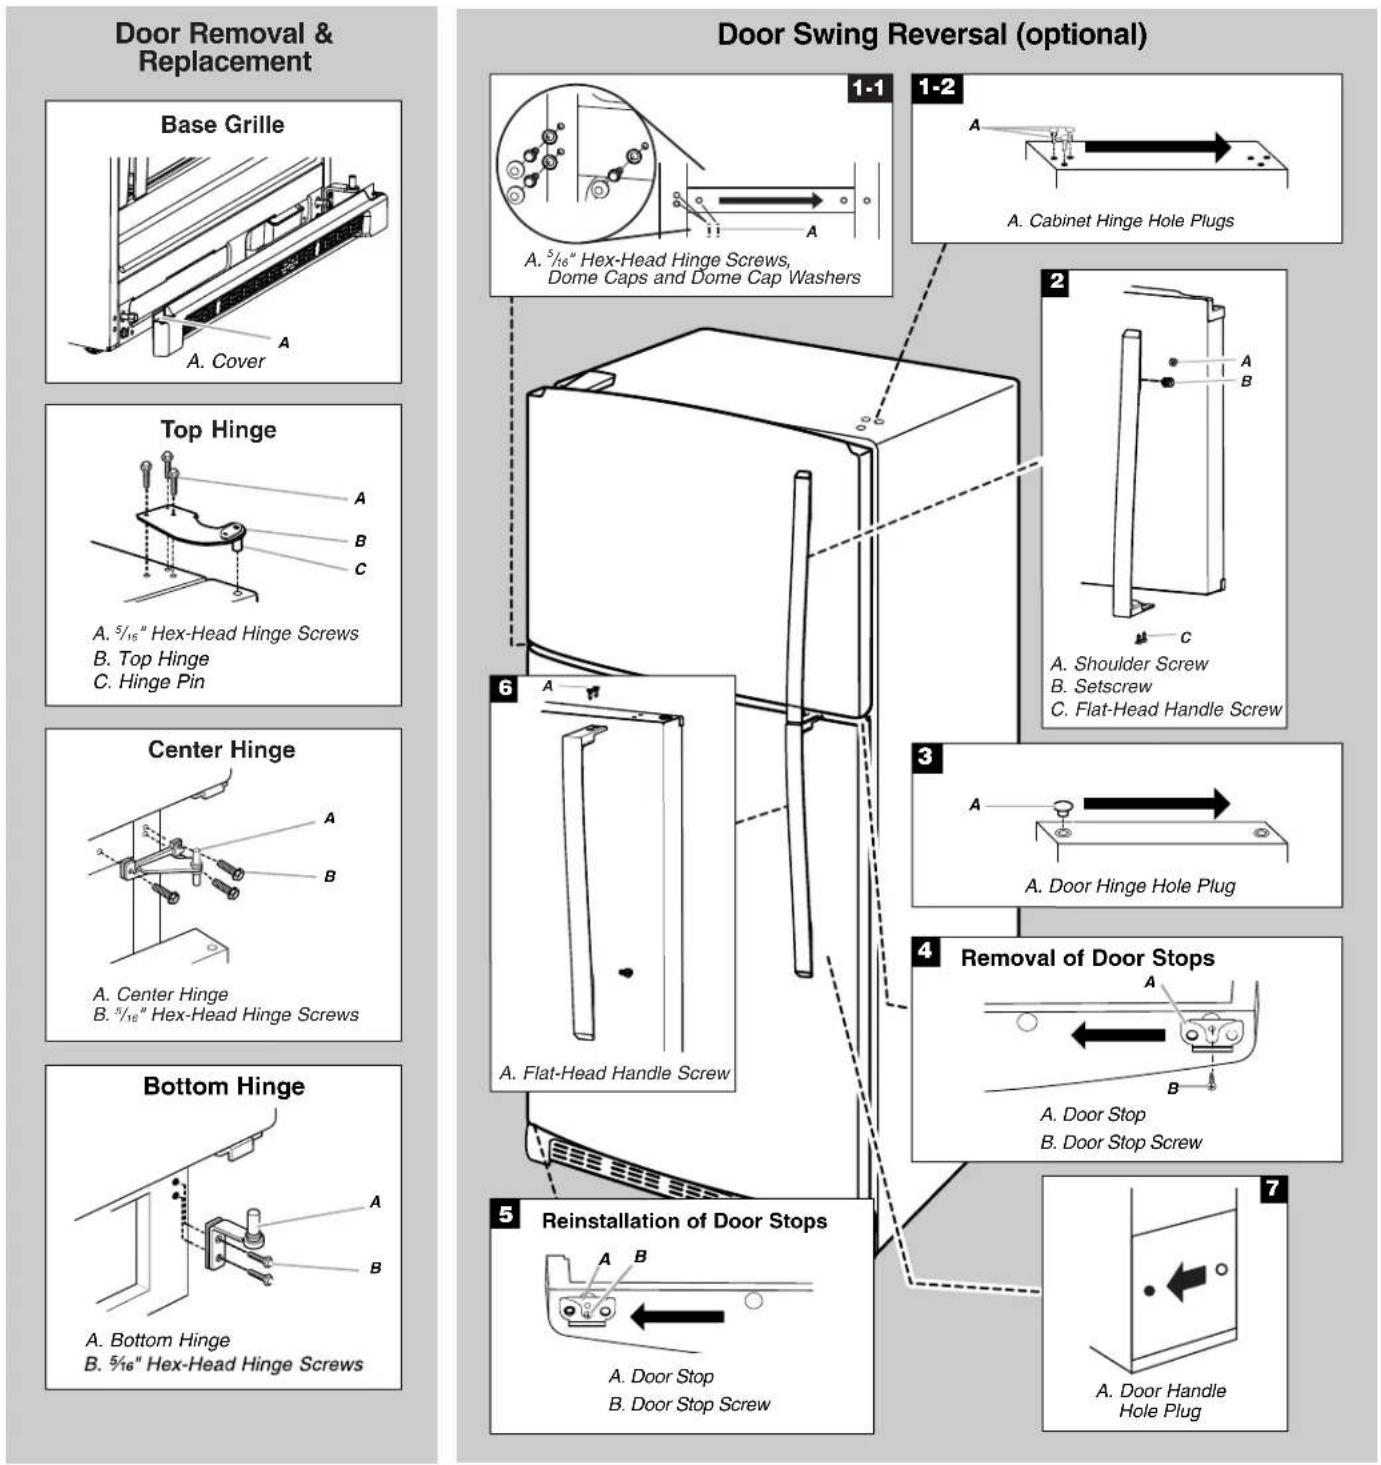
- Remove the parts for the top hinge, as shown in Top Hinge graphic. Lift the freezer door free from the cabinet.
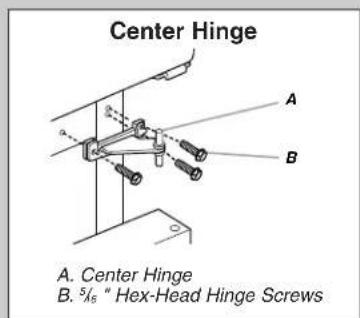
- Remove the parts for the center hinge, as shown in the Center Hinge graphic. Lift the refrigerator door free from the cabinet.
- Remove base grille from the bottom front of the refrigerator.
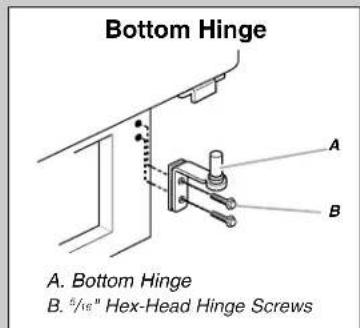
- Remove the parts for the bottom hinge, as shown in the Bottom Hinge graphic.
Reverse Doors (optional)
IMPORTANT: If you want to reverse your doors so that they open in the opposite direction, follow these steps. If you are not reversing the doors, see "Replace Doors and Hinges."
Style 1 - Standard Door Models
Graphics follow these instructions.

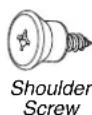
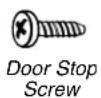
Door Stop Screw

Door Handle Sealing Screw

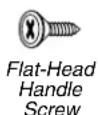
Flat-Head Handle Screw

Dome Cap

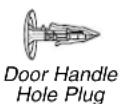
Door Handle Hole Plug

Door Hinge Hole Plug

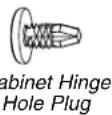
Cabinet Hinge Hole Plug

Dome Cap Washer
Cabinet
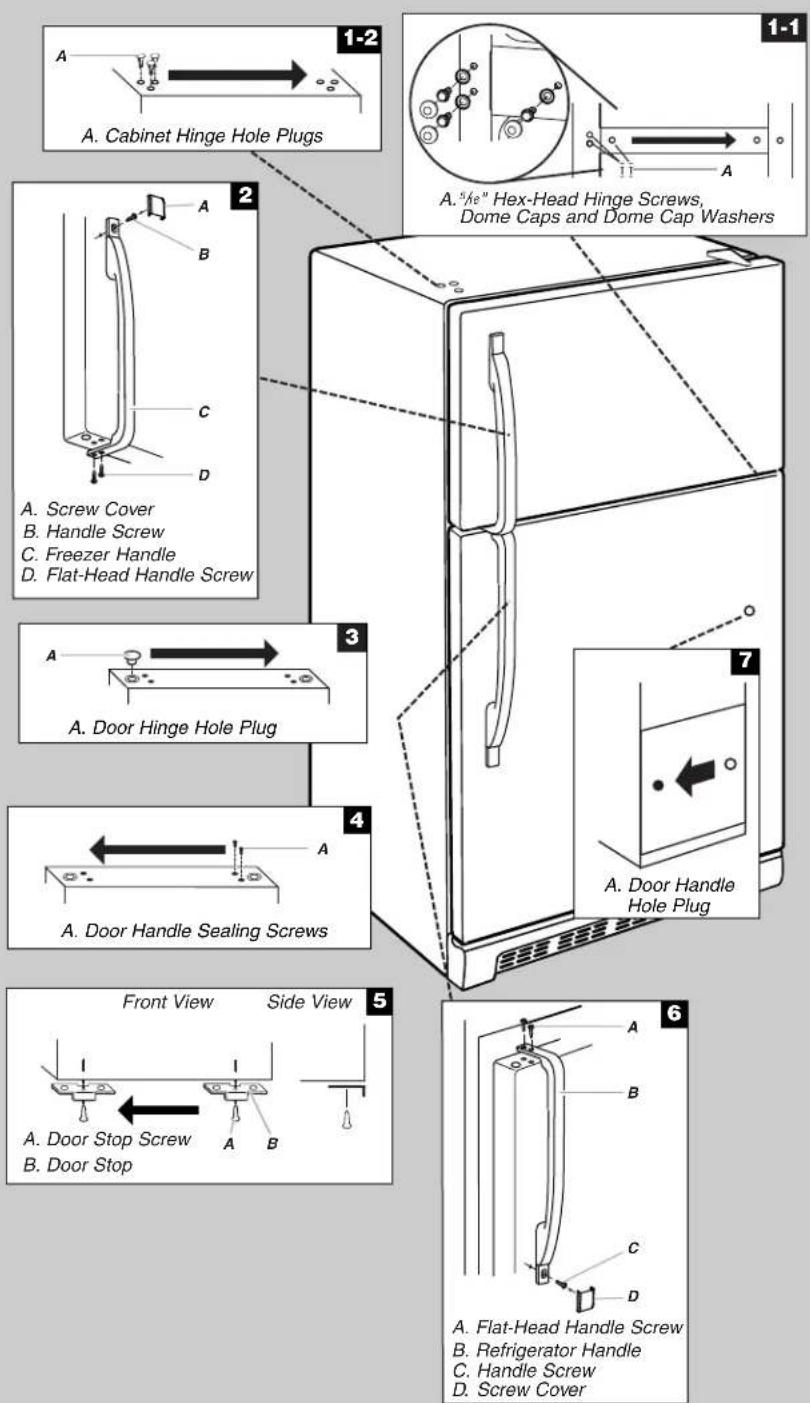
- Remove the three dome caps and the screws from handle side and move them to opposite side. See Graphic 1-1.
- Remove cabinet hinge hole plugs from cabinet top and move them to opposite side hinge holes, as shown. See Graphic 1-2.
Freezer Door
- Remove the screw cover. See Graphic 2.
- Remove the freezer handle assembly, as shown. Keep all parts together. See Graphic 2.
- Remove door hinge hole plug from freezer door. Move to opposite side hinge hole, as shown. See Graphic 3.
- Remove the brand badge using the plastic tool (provided). Replace it with the badge provided in the Reversibility Kit located inside the crisper drawer. For proper placement, see the Brand Badge Placement template (the last page of this manual).
NOTES:
■ To avoid scratching the finish, do not use a sharp or metallic object to pry the brand badge from the door.
■ Rub a small amount of liquid dish soap over any adhesive residue with your fingers. Rinse the door with warm water and dry with a soft cloth.
- Remove door stop. Move to opposite side of refrigerator door, as shown. See Graphic 5.
- Position freezer handle on opposite side of the freezer door, as shown. See Graphic 2. First, drive the bottom two screws into handle. Align upper portion of handle and drive top screw into handle.
- Tighten all screws. Set aside door until hinges and refrigerator compartment door are in place.
- Replace screw cover. See Graphic 2.
Refrigerator Door
- Remove the screw cover. See Graphic 6.
- Remove refrigerator handle assembly, as shown. Keep all parts together. See Graphic 6.
- Remove door hinge hole plug from refrigerator door. Move to opposite side hinge hole, as shown. See Graphic 3.
- Remove door handle sealing screws. Move to opposite side of refrigerator door, as shown. See Graphic 4.
- Remove door handle hole plug and discard. See Graphic 7. Replace on opposite side with the door handle hole plug provided in the Reversibility Kit located in the crisper.
- Remove door stop. Move to opposite side of refrigerator door, as shown. See Graphic 5.
- Position refrigerator handle on opposite side of the refrigerator door, as shown. See Graphic 6. First, drive top two screws in handle first. Align lower portion of handle and drive bottom screw into handle.
- Tighten all screws. Set aside refrigerator door until bottom hinge is installed on refrigerator.
- Replace screw cover. See Graphic 6.
Style 2 - Contour Door Models
Graphics follow these instructions.





Cabinet
- Remove the three dome caps and screws from handle side and move them to opposite side. See Graphic 1-1.
- Using the three 516 " hex-head hinge screws, insert two screws halfway into the holes, leaving space to insert the center hinge.
- Slide the center hinge, from the right, onto the screws. Insert the third screw, and tighten all screws completely.
NOTE: Make sure the washers are in place on both the top and bottom pins of the center hinge.
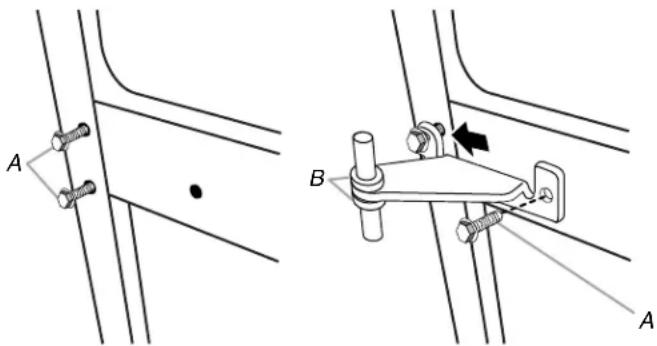
A. 516 " Hex-head hinge screws B. Washers
- Remove cabinet hinge hole plugs from the cabinet top and move them to opposite side hinge holes, as shown. See Graphic 1-2.
Freezer Door
- Remove the freezer door handle. Using a 18 " hex key, loosen the setscrew located on the side of the handle. Pull the handle straight out from the door. Keep all parts together. See Graphic 2.
- Remove the brand badge using the plastic tool (provided). Replace it with the badge provided in the Reversibility Kit located inside the crisper. For proper placement, see the Brand Badge Placement template (the last page of this manual).
NOTES:
■ To avoid scratching the finish, do not use a sharp or metallic object to pry the brand badge from the door.
■ Rub a small amount of liquid dish soap over any adhesive residue with your fingers. Rinse the door with warm water and dry with a soft cloth.
-
Remove door stop. Move to opposite side of freezer door, as shown. See Graphic 4.
-
Reinstall freezer handle on opposite side of the freezer door, as shown. See Graphic 2.
-
Tighten all screws. Set aside door until hinges and refrigerator compartment door are in place.
Refrigerator Door
- Remove the refrigerator door handle. Using a 18 " hex key, loosen the setscrew located on the side of the handle. Pull the handle straight out from the door. Keep all parts together. See Graphic 6.
- Remove door hinge hole plug from refrigerator door. Move to opposite side hinge hole, as shown. See Graphic 3.
- Remove door handle hole plug and discard. See Graphic 7. Replace on opposite side with the door handle hole plug provided in the Reversibility Kit located in the crisper.
- Remove door stop. Move to opposite side of refrigerator door, as shown. See Graphic 4.
- Reinstall refrigerator handle on opposite side of the refrigerator door, as shown. See Graphic 6.
- Tighten all screws. Set aside refrigerator door until bottom hinge is installed on refrigerator.
Replace Doors and Hinges
NOTE: Graphic may be reversed if door swing is reversed.
- Replace the parts for the bottom hinge, as shown. Tighten screws. Replace the refrigerator door.
NOTE: Provide additional support for the doors while the hinges are being moved. Do not depend on the door magnets to hold the doors in place while you are working. - Measure the distance from the bottom of the refrigerator door to the floor. The distance should be approximately 312 " (88 mm).
NOTE: If necessary, loosen the bottom hinge, without removing the screws. Adjust the door to the correct height and fully tighten the screws. - Assemble the parts for the center hinge, as shown, and then tighten all screws. See Center Hinge graphic. Replace the freezer door.
- Assemble the parts for the top hinge, as shown. See Top Hinge graphic. Do not tighten screws completely.
Contour Door Models Only:
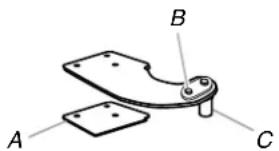
■ Remove the screw attaching the hinge pin to the hinge. Turn the hinge over so that it is pointing in the opposite direction.
■ Place the plastic spacer beneath the hinge so that it will be between the hinge and the cabinet, making sure the holes are aligned.
natural_image
Mechanical component diagram with labeled points A, B, and C (no text or symbols beyond labels)A. Plastic spacer
B. Hinge pin screw
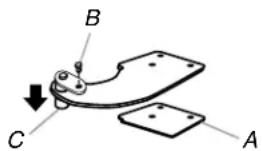
C. Hinge pin
■ Fasten the top hinge to the opposite side of the cabinet, inserting the screws only halfway, so you will be able to replace and align the freezer door later.
- Line up the doors so that the bottom of the freezer door aligns evenly with the top of the refrigerator door. Tighten all screws.
NOTE: The distance between the doors should be approximately 58 " (16 mm).
Final Steps
- Check all holes to make sure that hole plugs and screws are in place. Reinstall top hinge cover. See Top Hinge graphic.
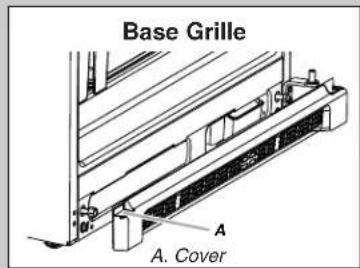
- Remove the cover from the base grille. Move the cover to the opposite side.
- Align the clips on the base grille with the screws on the bottom of the cabinet. Push the base grille toward the cabinet until it is flush.
WARNING
Electrical Shock Hazard
Plug into a grounded 3 prong outlet.
Do not remove ground prong.
Do not use an adapter.
Do not use an extension cord.
Failure to follow these instructions can result in death, fire, or electrical shock.
- Plug into a grounded 3 prong outlet.
- Reset the controls. See "Using the Control(s)."
- Return all removable door parts to doors and food to refrigerator.
Style 1 - Standard
Door Removal & Replacement
Door Swing Reversal (optional)
Style 2 - Contour
Reversibility Kit Instructions
If your model came with a Reversibility kit, please use the Brand Badge Placement template and the following instructions to install the Brand Badge on the opposite side of the freezer door.
Parts Included:
■ Brand badge removal tool
■ Brand badge template (on last page)
■ Door handle hole plug
Tools Needed:
■ Scissors
■ Masking tape
Freezer Door
- Using the removal tool (provided), remove the brand badge from the freezer door by lifting up the right-hand side and peeling the badge away from the door from right to left.
NOTE: To avoid scratching the door, do not use a sharp or metallic object to pry the brand badge from the door. - Rub a small amount of liquid dish soap over any adhesive residue with your fingers. Rinse the door with warm water and dry with a soft cloth.
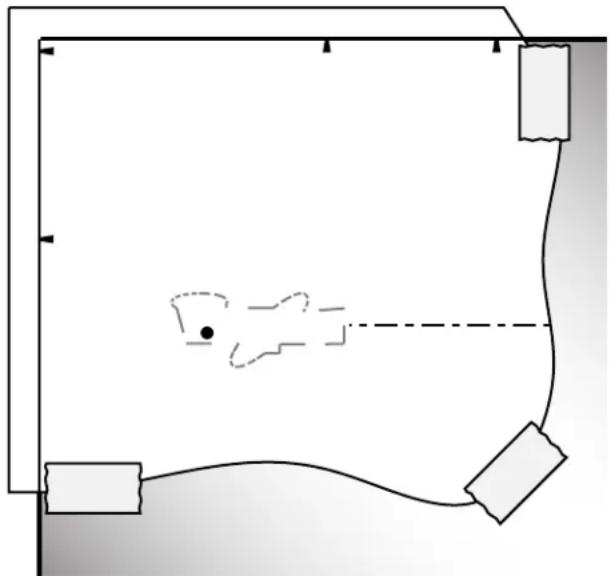
- Cut the template along the dotted lines that match the shape of the brand badge.
- Align the edges of the template with the side and top of the freezer door and tape the template to the door. NOTE: When the template is correctly aligned, the hole in the door, where the handle was, will be within the cutout of the template, as shown.
natural_image
Simple line drawing of a boat on a curved ramp with two rectangular blocks and a dashed line indicating a path (no text or symbols)-
Using the cutout as a guide, press the brand badge onto the freezer door making sure that the hole is completely covered.
-
Slowly remove the template.
Adjust the Doors
IMPORTANT: To comply with American Disabilities Act (ADA) guidelines, fully retract the rollers into the cabinet to lower the refrigerator.
Door Closing
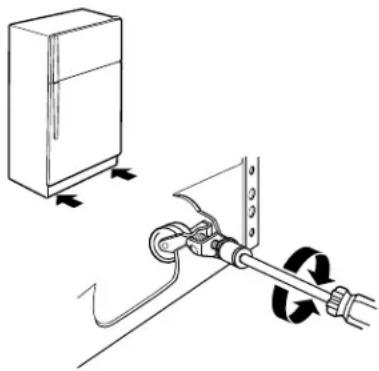
Your refrigerator has two front adjustable rollers – one on the right and one on the left. If your refrigerator seems unsteady or you want the doors to close easier, adjust the refrigerator's tilt using the following instructions:
- Remove the base grille. See the Base Grille graphic in "Refrigerator Doors." The two leveling screws are part of the front roller assemblies, which are at the base of the refrigerator on either side.
- Use a socket driver to adjust the leveling screws. Turn the leveling screw to the right to raise that side of the refrigerator or turn the leveling screw to the left to lower that side. It may take several turns of the leveling screws to adjust the tilt of the refrigerator.
NOTE: Having someone push against the top of the refrigerator takes some weight off the leveling screws and rollers which makes it easier to adjust.
natural_image
Diagram showing a refrigerator connected to a pipe with rotating arrows indicating flow (no text or symbols present)- Open both doors again to make sure they close as easily as you like and that they stay closed. If not, tilt the refrigerator slightly more to the rear by turning both leveling screws to the right. It may take several more turns.
NOTE: To keep the refrigerator level, you should turn both leveling screws the same amount.
- Replace the base grille.
Door Aligning
If the space between your doors looks uneven, you can adjust it using the following instructions:
- Depending on your model, remove the top hinge cover. Loosen the top hinge screws using a 516 " socket or wrench.
- Have someone hold the door in place or put a spacer between the doors while you tighten the top hinge screws.
- Replace the top hinge cover, if removed in Step 1.
REFRIGERATOR FEATURES
Your model may have some or all of these features.
Important information to know about glass shelves and covers:
Do not clean glass shelves or covers with warm water when they are cold. Shelves and covers may break if exposed to sudden temperature changes or impact, such as bumping. Tempered glass is designed to shatter into many small, pebble-size pieces. This is normal. Glass shelves and covers are heavy. Use both hands when removing them to avoid dropping.
Refrigerator Shelves
The shelves in your refrigerator are adjustable to match your individual storage needs.
Storing similar food items together in your refrigerator and adjusting the shelves to fit different heights of items will make finding the exact item you want easier. It will also reduce the amount of time the refrigerator door is open, and save energy.
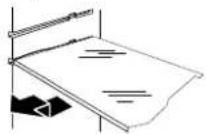
To remove and replace a shelf:
-
Remove items from the shelf.
-
Slide the shelf straight out to the stop.
-
Depending on your model, lift back or front of the shelf past the stop. Slide shelf out the rest of the way.
-
Replace the shelf by sliding the back of the shelf into the track in the wall of the cabinet.
-
Guide the front of the shelf into the shelf track. Be sure to slide the shelf in all the way.
Deli Drawer
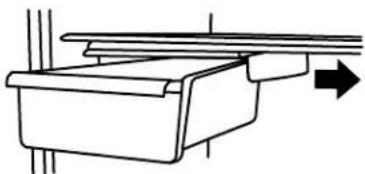
To remove and replace the deli drawer:
-
Slide deli drawer out to the stop.
-
Lift front of deli drawer with one hand while supporting bottom of drawer with other hand. Slide drawer out the rest of the way.
-
Replace the drawer by sliding it back in fully past the drawer stop.
NOTE: The deli drawer moves sideways on the shelf to allow for flexible positioning.
natural_image
Pure technical diagram of a mechanical assembly with no text or symbolsMeat Storage Guide
Store most meat in original wrapping as long as it is airtight and moisture-proof. Rewrap if necessary. See the following chart for storage times. When storing meat longer than the times given, freeze the meat.
Fresh fish or shellfish.....use same day as purchased
Chicken, ground beef, variety meats (liver)....1-2 days
Cold cuts, steaks/roasts ....3-5 days
Cured meats....7-10 days
Leftovers - Cover leftovers with plastic wrap, aluminum foil, or plastic containers with tight lids.
Crisper
Crisper Drawers
To remove and replace the crisper drawer:
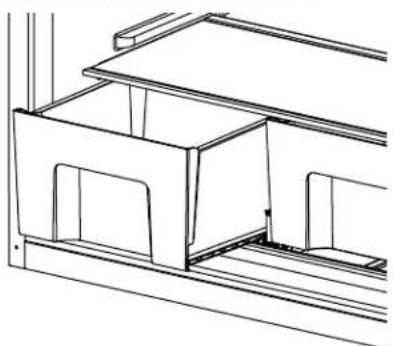
- Slide the crisper drawer straight out to the stop. Lift the front and slide the drawer out the rest of the way.
- Replace the drawer by sliding the drawer in fully past the stop.
Crisper Cover
To remove and replace the crisper cover:
- Remove the crisper(s).
- Pull the glass straight out.
- Replace the glass by pushing it straight in.
natural_image
Technical line drawing of a cabinet or enclosure structure with no visible text or symbolsCrisper Humidity Control
You can control the amount of humidity in the moisture-sealed crisper. Adjust the control to any setting between LOW and HIGH. LOW (open) lets moist air out of the crisper for best storage of fruits and vegetables with skins.
■ Fruit: Wash, let dry and store in refrigerator in plastic bag or crisper. Do not wash or hull berries until they are ready to use. Sort and keep berries in original container in crisper, or store in a loosely closed paper bag on a refrigerator shelf.
■ Vegetables with skins: Place in plastic bag or plastic container and store in crisper.
HIGH (closed) keeps moist air in the crisper for best storage of fresh, leafy vegetables.
■ Leafy vegetables: Wash in cold water, drain and trim or tear off bruised and discolored areas. Place in plastic bag or plastic container and store in crisper.
FREEZER FEATURES
Your model may have some or all of these features.
Important information to know about glass shelves and covers:
Do not clean glass shelves or covers with warm water when they are cold. Shelves and covers may break if exposed to sudden temperature changes or impact, such as bumping. Tempered glass is designed to shatter into many small, pebble-size pieces. This is normal. Glass shelves and covers are heavy. Use both hands when removing them to avoid dropping.
Wire Freezer Shelf (on some models)
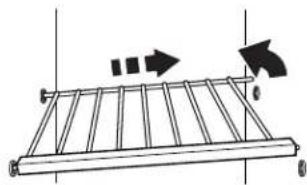
To remove and replace a wire shelf:
- Remove the shelf by lifting the entire shelf slightly and moving it all the way to the left-hand side. Tilt the right-hand side up and out of the shelf supports.
- Replace the shelf by inserting the left-hand end all the way into the shelf supports. Then, lower the right-hand end of the shelf and insert it into the shelf supports.
NOTE: The shelf should lower slightly and lock into place. If the shelf does not appear stable, make sure both ends of the shelf are inserted into the shelf supports.
natural_image
Simple line drawing of a metal rack with two arrows indicating direction (no text or symbols)Glass Freezer Shelf (on some models)
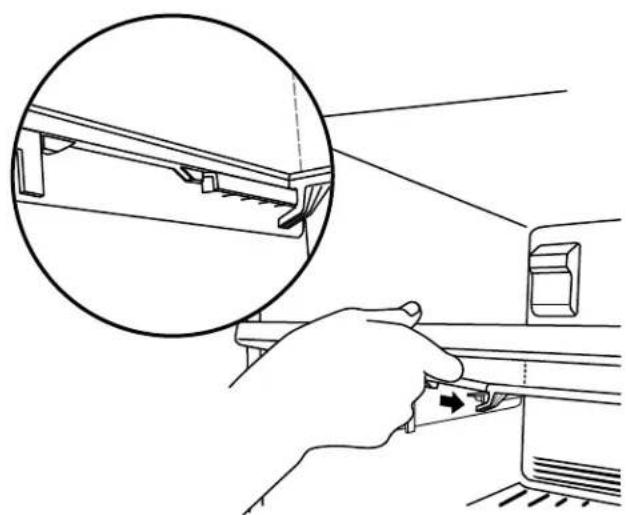
To remove and replace a glass shelf:
- Lift the front of the shelf to raise the shelf tabs up and out of the opening in each shelf track. Slide the shelf out the rest of the way.
- Replace the shelf by tilting the back end downward to align the back shelf tab under the track on each side of the freezer. Gently push the shelf into the freezer until the two center shelf tabs are positioned within the opening in each track. Lower the shelf to rest on the shelf tracks.
natural_image
Line drawing of a hand adjusting a mechanical component with an inset magnified view (no text or symbols)Frozen Food Storage Guide
Storage times will vary according to the quality and type of food, the type of packaging or wrap used (should be airtight and moisture-proof), and the storage temperature. Seal the package or container securely to avoid taste and odor transfer throughout the product. Ice crystals inside a sealed package are normal. This simply means that moisture in the food and air inside the package have condensed, creating ice crystals.
Put no more unfrozen food into the freezer than will freeze within 24 hours (no more than 2 to 3 lbs of food per cubic foot [907 to 1,350 g per L] of freezer space). Leave enough space in the freezer for air to circulate around packages. The freezer door must close tightly.
NOTE: For more information on preparing food for freezing, check a freezer guide or reliable cookbook.
DOOR FEATURES
Your model may have some or all of these features.
Door Rails
The door rails may be removed for easier cleaning.
Snap-on Door Rails (on some models)
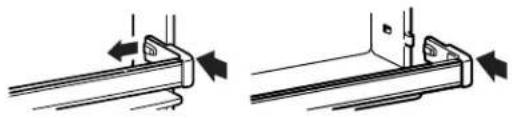
To remove and replace the rails:
- Depending on your model, remove the rails by pushing in slightly on the front of the bracket while pulling out on the inside tab. Repeat these steps for the other end.
- Replace the rails by aligning the ends of the brackets with the buttons on the sides of the door liner. Firmly snap bracket and assembly onto the tabs above the shelf, as shown.
natural_image
Two mechanical assembly diagrams showing a bracket with arrows indicating force direction (no text or symbols)Drop-in Door Rails (on some models)
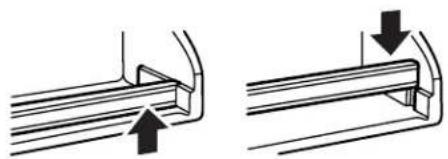
To remove and replace the rails:
- Remove the rails by pulling straight up on each end of the rail.
- Replace the rails by sliding the shelf rail into the slots on the door and pushing the rail straight down until it stops.
natural_image
Two mechanical pipe fittings with arrows indicating direction of movement (no text or symbols)Door Bins
(on some models)
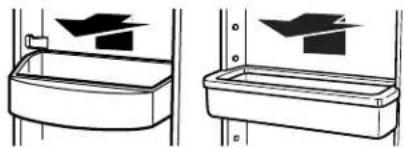
To remove and replace the bins:
- Remove the bin by lifting it and pulling it straight out.
- Replace the bin by sliding it in above the desired support and pushing it down until it stops.
natural_image
Two technical line drawings of a container with a lid and side supports, showing internal structure (no text or symbols)Utility Compartment
The utility compartment may be removed for easier cleaning.
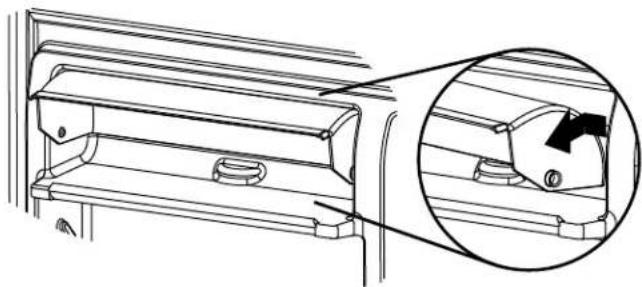
To remove and replace the utility compartment:
- Remove the utility compartment by squeezing against one side while raising the utility compartment up and pulling it straight out.
- Replace the utility compartment by positioning one side in the lock and sliding in the opposite side until it stops.
natural_image
Technical line drawing of a mechanical component with an inset close-up showing a cylindrical feature (no text or symbols)Notes
INSTRUCTIONS D'INSTALLATION ET MANUEL D'UTILISATION
natural_image
Line drawing of an open refrigerator with doors placed on the side (no text or symbols)E. Bague de compression
F. Robinet d'arrêt
G. Écrou de serrage
natural_image
Mechanical component diagram with labeled points A, B, and C (no text or symbols beyond labels)natural_image
Simple line drawing of a boat navigating a curved ramp with two rectangular blocks and a dashed line indicating a path (no text or symbols)natural_image
Diagram showing a refrigerator connected to a pipe with rotating arrows indicating flow (no text or symbols)natural_image
Pure technical line drawing of a mechanical component with no text or symbolsnatural_image
Technical line drawing of a cabinet or storage unit with internal compartments and mounting brackets (no text or symbols)Commande d'humidité
natural_image
Simple line drawing of a rack with vertical bars and directional arrows indicating movement (no text or symbols)natural_image
Line drawing of a hand adjusting a mechanical component with an inset magnified view (no text or symbols)natural_image
Technical line drawing showing two mechanical assembly steps with arrows indicating motion direction (no text or symbols)natural_image
Two technical diagrams showing a container with a handle and a side view of a container with a handle (no text or symbols present)natural_image
Technical line drawing of a mechanical component with an inset close-up showing a detail (no text or symbols)
- INSTALLATION INSTRUCTIONS AND OWNER'S MANUAL
- Your safety and the safety of others are very important.
- DANGER
- WARNING
- IMPORTANT SAFETY INSTRUCTIONS
- SAVE THESE INSTRUCTIONS
- Proper Disposal of Your Old Refrigerator
- Before You Throw Away Your Old Refrigerator or Freezer:
- INSTALLATION INSTRUCTIONS
- Unpack the Refrigerator
- Remove the Packaging
- When Moving Your Refrigerator:
- Clean Before Using
- Important information to know about glass shelves and covers:
- Location Requirements
- Electrical Requirements
- Recommended Grounding Method
- Water Supply Requirements
- IMPORTANT:
- Water Pressure
- Reverse Osmosis Water Supply
- Connect the Water Supply
- Connect to Water Line
- Connect to Refrigerator
- Complete the Installation
- Electrical Shock Hazard
- Refrigerator Doors
- Tools Needed:
- Remove Doors and Hinges
- Reverse Doors (optional)
- Style 1 - Standard Door Models
- Cabinet
- Freezer Door
- NOTES:
- Refrigerator Door
- Style 2 - Contour Door Models
- Replace Doors and Hinges
- Contour Door Models Only:
- Final Steps
- Reversibility Kit Instructions
- Parts Included:
- Adjust the Doors
- Door Closing
- Door Aligning
- REFRIGERATOR FEATURES
- Refrigerator Shelves
- To remove and replace a shelf:
- Deli Drawer
- To remove and replace the deli drawer:
- Meat Storage Guide
- Crisper
- Crisper Drawers
- To remove and replace the crisper drawer:
- Crisper Cover
- To remove and replace the crisper cover:
- Crisper Humidity Control
- FREEZER FEATURES
- Wire Freezer Shelf (on some models)
- To remove and replace a wire shelf:
- Glass Freezer Shelf (on some models)
- To remove and replace a glass shelf:
- Frozen Food Storage Guide
- DOOR FEATURES
- Door Rails
- Snap-on Door Rails (on some models)
- To remove and replace the rails:
- Drop-in Door Rails (on some models)
- Door Bins
- (on some models)
- To remove and replace the bins:
- Utility Compartment
- To remove and replace the utility compartment:
- INSTRUCTIONS D'INSTALLATION ET MANUEL D'UTILISATION
- Commande d'humidité
Brand : Big Chill
Model : BC21TFR
Category : Freezer