
DW7214MC - Drill Atag - Free user manual and instructions
Find the device manual for free DW7214MC Atag in PDF.

| Product type | Built-in dishwasher |
| Brand | Atag |
| Model | DW7214MC |
| Height | 819-872 mm (adjustable) |
| Width | 596 mm |
| Depth | 554 mm |
| Weight | 50 kg |
| Number of standard place settings | 14 |
| Water pressure | 0.03-1.0 MPa |
| Electrical connection | See rating plate |
| Rated power | See rating plate |
| Integrated water softener | Yes, adjustable (0-9) according to water hardness |
| Wash programs | Eco, Universal, Intensive, Quick, Scheduled duration, Hygiene, Pre-rinse, Self-clean, Anti-odor |
| Options | Delay start (1-24 h), Door open, Speed, Night mode, Extra rinse |
| Upper basket capacity | Height adjustable, foldable tines |
| Cutlery basket | Cutlery tray + lower basket |
| Adjustable power zones | Yes, 2 positions (vases/fine items, pots/pans) or disabled |
| Child safety lock | Yes (auto or manual, button lock) |
| Overfill protection | Yes, with water shut-off and error message |
| Filter cleaning | Coarse and fine filter, regular cleaning recommended |
| Spray arm cleaning | Removable, clean nozzles with a pin |
| Drain pump blockage removal | Accessible from the bottom, after removing filters |
| Water consumption (Eco program) | 9.2 L |
| Eco program duration | Approx. 4 h 00 min (cold water) |
Frequently Asked Questions - DW7214MC Atag
User questions about DW7214MC Atag
0 question about this device. Answer the ones you know or ask your own.
Ask a new question about this device
Download the instructions for your Drill in PDF format for free! Find your manual DW7214MC - Atag and take your electronic device back in hand. On this page are published all the documents necessary for the use of your device. DW7214MC by Atag.
USER MANUAL DW7214MC Atag
natural_image
Blank gray rectangular image with no visible text, symbols, or markingsGEBRUIKSAANWIJZING
Vaatwasser
NL
DW7214MC
3Uwvaatwasser......
natural_image
Technical illustration of a food processing machine with cutlery and kitchen utensils (no text or symbols)natural_image
Mechanical assembly diagram showing a yellow component being inserted into a multi-stage gun barrel (no text or symbols visible)Bovenkorf
natural_image
Two technical illustrations of a multi-tiered kitchen drawer with cutlery and utensils, no text or symbols present.Messenhouder
Inruimenvandevaatwasser
natural_image
3D wireframe model of a mechanical assembly with no visible text or symbolsOnderkorf
natural_image
Illustration of a multi-tiered kitchen appliance with cutlery and utensils inside a basket (no text or symbols)Verstelbarebordensteunen
natural_image
Technical diagram of a steel rebar structure with directional arrows indicating movement or force (no text or symbols present)natural_image
Illustration showing a hand using a tool to cut a 3D architectural structure, with two circular insets illustrating the same architectural details (no text or symbols present)Voegvaatwasmiddeltoe
Druk om te openen
natural_image
Simple line drawing of a mechanical joint or bracket with a central mark and radiating lines (no text or symbols)natural_image
Mechanical assembly diagram showing a lever with four arrows pointing to specific components (no text or symbols present)natural_image
Diagram of a mechanical component with directional arrows indicating rotation or movement (no text or symbols)Bovenstesproeiarm
natural_image
Mechanical assembly diagram showing a rotating component with rotational arrow (no text or symbols)Onderstesproeiarm
natural_image
Mechanical assembly diagram showing a rotating shaft with an upward arrow indicating motion (no text or symbols)Schoonmakenvandebuitenkantvandevaatwasser
Deurendeurafdichting
natural_image
Blank gray rectangular image with no visible text, symbols, or markingsNOTICED'UTILISATION
Lave-vaisselle
FR
DW7214MC
Avantlepremierlavage

ATTENTION!
natural_image
Cross-sectional diagram of a food storage tray with various kitchen utensils and dishes (no text or labels)natural_image
3D mechanical assembly diagram showing internal components and a yellow component with directional arrow (no text or symbols)Paniersupérieur
natural_image
Two technical illustrations of a kitchen drawer with various kitchen utensils and dishes, no text or symbols present.Porte-couteaux
natural_image
3D wireframe model of a mechanical assembly with no visible text or symbolsPanierinférieur
Placezdanslepanierinférieur:lesassiettes,lesplatsàfouretplatsdeservice,lescasseroleset lescouvertsrangésdanslepanieràcouverts.
natural_image
Illustration of a multi-tiered kitchen appliance with cutlery and utensils (no text or symbols)natural_image
Technical diagram of a steel structure with directional arrows indicating movement or force (no text or symbols present)natural_image
Illustration showing a hand placing a component into a building interior, with two circular insets illustrating the same components (no text or symbols present)Appuyez pour ouvrir
natural_image
Simple circular diagram showing a diagonal line intersecting a rectangular block with a small circular mark at the center (no text or symbols)natural_image
Diagram of a mechanical component with four arrows pointing to circular features on a base (no text or symbols)natural_image
Diagram of a mechanical component with directional arrows indicating rotation or movement (no text or symbols)natural_image
Mechanical assembly diagram showing a rotating component with a curved arrow indicating rotational motion (no text or symbols present)natural_image
Mechanical assembly diagram showing a rotating shaft with an upward arrow indicating motion (no text or symbols)natural_image
Blank gray rectangular image with no visible text, symbols, or markingsGEBRAUCHSANWEISUNG
Geschirrspüler
DE
DW7214MC
natural_image
Cross-sectional diagram of a food storage tray with various kitchen utensils and dishes (no text or labels)natural_image
3D mechanical assembly diagram showing internal components and a yellow component with directional arrow (no text or symbols)ObererKorb
natural_image
Illustration of a food storage rack with various kitchen utensils and cutlery, labeled 'Messerköcher' (no other text or symbols)natural_image
3D wireframe model of a structural framework with internal beams and supports, showing no text or symbols.UntererKorb
natural_image
Illustration of a multi-tiered kitchen appliance with cutlery and utensils inside a basket (no text or symbols)natural_image
Technical diagram of a steel structure with rebar and pipe connections, showing directional arrows (no text or symbols)natural_image
Illustration showing a hand placing a component into a container, with two circular insets illustrating the same process (no text or symbols present)Zum Öffnen drücken
Hauptspülmittel
natural_image
Simple circular diagram showing a diagonal line intersecting a rectangular block with a central mark (no text or symbols)natural_image
Technical illustration of a mechanical component with highlighted yellow area, showing internal structure and assembly (no text or symbols)natural_image
Diagram of a mechanical component with four arrows pointing to circular features on a base (no text or symbols)natural_image
Diagram of a mechanical component with directional arrows indicating rotation or movement (no text or symbols)ObererSprüharm
natural_image
Mechanical assembly diagram showing a rotating component with a circular arrow indicating rotational motion (no text or symbols present)UntererSprüharm
natural_image
Mechanical assembly diagram showing a rotating shaft with an upward arrow indicating motion (no text or symbols)natural_image
Blank gray rectangular image with no visible text, symbols, or markingsUSERMANUAL
Dishwasher
EN
DW7214MC
3Yourdishwasher......
4Safetyinstructions......
5Childlock......
5Installation....
5Overflowguard......
5Packaging......
5Disposal....
5Symbolsontheappliance......
6Beforewashingforthefirsttime......
6Waterhardness......
7Basicsettings......
8Topuprinseaid......
8Topupsalt......
9Greenerdishwashing......
9Saveenergyandwater......
10Loadingthedishwasher......
10Fragiledishes......
10Loadingaffectstheresults......
10Thedishwasher'sbaskets......
11Topcutlerytray......
12Upperbasket......
13Lowerbasket......
14Cutlerybasket......
15Usingthedishwasher......
15Adddetergent......
16On/Off......
16Selectprogram......
17Selectprogrammode......
18Selection....
18Start/Stop....
19Statuslight......
19Ifyouwant
19Powerfail
19Oncether
20Thebestd
20Unloading
21Program
22Settings.
25Careando
25Topuprins
25Topupsal
25Cleanthef
27Cleaningt
28Cleanthed
28RunSelf-c
28Removeb
29Wintersto
30Troubles
37Installatio
37Safetyinst
38Setup......
38Drainage
38Connectic
39Electrical
40Service...
40Numbero
41Technica
41Technical
41Informatic
41Informatic
41Declaratic
Installthedishwasher,seethechapterInstallation.Thenopenthedoorandpress.

"First time setup." is shown on the display the first time the dishwasher is switched on. It is important that you choose her right setting to ensure good dish washing results. Seepage6.
Safetyinstructions
- Readtheusermanualandkeepitinasafeplace!
•Numberofstandardplacesettings:14 - Neverusethedishwasherforanypurposeotherthanthat specifiedintheseoperatinginstructions.
- Donotloadthedishwasherdoorordishwasherbasketswith anythingotherthandishes.
- Neverleavethedishwasherdooropenassomeonemaytripon it. Pushthebasketsintoavoidriskingthedishwashertipping over.
- Useonlydishwasherdetergent!
- Thismachine can be used by children aged 8 and upwards, and by people with reduced physical capacity, mental ability, memory loss or lacking experience and knowledge. These individuals must be supervised when using the machine or have instructions on how to set the machine and understand their risk that can occur. Cleaning of the machine must not be carried out by children without supervision.
- Damagedsupplycordmustonlybereplacedbythe manufacturer'sservicecentreorsomeonesimilarlyprofessionally qualified.
- Onlyusethedishwasherinhousehold-typeenvironmentsfor dishwashinghouseholddishes. Allotheruseisprohibited.
- Neverplacedisheswithsolventresiduesinthedishwasherdue totheriskofexplosion.Normaydishesthatcontainash,waxor lubricantsbewashedinthedishwasher.
- Childrenmustbewatched.Donotallowchildrentouseorplay withthedishwasher.Beespeciallyvigilantwhenthedoorisopen. Somedetergentmayremaininside!Afteraddingdetergent,always startthedishwasherimmediately.
WARNING!
Knivesandotherpointeditemsmustbeplacedwiththepoints downinthecutlerybasketorhorizontallyinotherbaskets.
WARNING!
Childrenmustbesupervised-dishwasherdetergentiscorrosive!
Childlock
You can activate the automatic child lock setting to prevent children from starting the dishwasher. See the chapter Settings. You can also temporarily activate and deactivate the Child lock function. Press and hold and forth three seconds.
Installation
SeethechapterInstallation.
Overflowguard
Theoverflowguardstartspumpingoutthewaterandturnsoffthewatersupplyifthewaterlevelin thedishwasherexceedsthenormallevel.Iftheoverflowguardstriggered,F54(Overfillingwater) appearsonthedisplay.Turnoffthewatertapandcontactyournearestservicecentre.(Toavoid waterleakageoutsidethedishwasher,donotremovetheplugfromthewallsocketuntilthewater taponthesupplylinehasbeenturnedoff!)
Packaging
Theouterpackagingprotectstheproductduringtransport. Thepackagingmaterialisrecyclable. Separatethedifferentpackagingmaterialstohelpreducerawmaterialuseandwaste. Yourdealer cantakethepackagingforrecyclingordirectyoutothenearestrecyclingcentre. Thepackaging iscomprisedof:
- Corrugatedcardboardmadefromupto 100% recycledmaterial.
- Expandedpolystyrene(EPS)withnoaddedchlorineorfluorine.
•Supportsmadefromuntreatedwood. - Protectiveplasticmadefrompolyethylene(PE).
Disposal
Thedishwashermanufacturedandlabelledforrecycling.Whenthedishwasherhasreachedthe endofitsservicelifeandistobedisposedof,itshouldimmediatelybemadeunusable.Pulloutthe powercableandcutitasshortaspossible.Removethelightsource/lightsources.
Contact your local authority for information about where and how your dish washers should be correctly recycled.
Symbolsontheappliance
Readtheusermanual.
Recycleaselectricalwaste.
CE ApprovedinaccordancewiththerelevantEUdirectives.
UK CA ApprovedinaccordancewiththerelevantUKlegalrequirements.
Beforewashingforthefirsttime
Waterhardness
Inordertoachievegooddishwashingresults,thedishwasherneedssoftwater(waterwithlowmineral content).Hardwaterleavesawhitecoatingondishesandthedishwasher.
Checkingwaterhardness
WaterhardnessisspecifiedusingGermandegreesofwaterhardness(°dH),Frenchdegreesofwaterhardness(°fH),Englishdegreesofwaterhardness(°eH)ormillimolesperlitre(mmol/l).
Awatersupplywithawaterhardnessinexcessof5°dH(9°fH/6°eH/0.9mmol/l)mustbesoftened. Thisisdoneautomaticallywiththeaidofthebuilt-inwatersoftener.Inorderforthewatersoftener tofunctionproperly,itssettingsmustbeadjustedtothehardnessofthewatersupply.Onceyou haveadjustedthewatersoftenersettings,adddetergentandrinseaidindosessuitableforsoft water.
Contact the local water work to check the water hardness in your area.
Makeanoteofthewaterhardness: ____
| Recommendedsettingmmol/l°eH°fH°dH | ||||
| 00.0-0.90-60-90-5 | ||||
| 11.0-1.47-1010-146-8 | ||||
| 21.5-2.011-1415-209-11 | ||||
| 32.1-2.515-1821-2512-14 | ||||
| 42.6-3.419-2426-3415-19 | ||||
| 53.5-4.325-3035-4320-24 | ||||
| 64.4-5.231-3644-5225-29 | ||||
| 75.3-7.037-4953-7030-39 | ||||
| 87.1-8.850-6171-8840-49 | ||||
| 98.9628950 |
If the water hardness exceeds 50^ dH ( 89^ fH/62°eH/8.9 mmol/l), were recommend connecting an external watersoftener.
Increasedconsumptionduringregeneration
Thedishwasher's built-in watersofteneris regularly regenerated to maintain its function. Regeneration extend the dish washing program and increases energy and water consumption. Just how often the dish washer's watersofteneris regenerated depends on these selected setting.
Example: If the Ecoprogram is run with a water hardness of 14^ dH ( 25^ fH/ 18^ eH/2.5mmol/l), the watersofteneris regenerated at regular intervals (after 7 dishwashing cycles), energy consumption increases by 0.015 kWh, and water consumption increases by 2.3 litres, while the program time is extended by 3 minutes. Regeneration takes placed during the program's mainwash.
WARNING!
Hardwaterleavesawhitecoatingondishesandinsidethedishwasher.Itisthereforeimportant thatyouselecttherightsettingforthewatersoftener!SeeWaterhardness.
Neverrunthedishwasherwithanemptysaltcompartmentifthewatersupplyhasawaterhardness inexcessof5°dH(9°fH/6°eH/0.9mmol/l).
Basicsettings
Openthedoor.Press.
"First time setup." is shown on the display. It is important that you choose the right settings to ensure gooddishwashing results.
Selectsettingwith. Or firmsselectedsettingwith.
| Settings | ||
| Selectthelanguagetobeshownonthedisplay.Language1. | ||
| 2. | Setlevelofrinseaid0/1/2/3/4/5Pre-selectedatfactory:4 | Dryingisfasterandabetterresultisachievedifyouuserinseaid.Youwillalsoachieveabetterdishwashingresultwithclearandspotlessdishes.Therinseaiddispensercanbeadjustedbetween0(Off)and5(Highdosage). |
| 3. | Setwaterhardness0/1/2/3/4/5/6/7/8/9Pre-selectedatfactory:4 | Adjustingthewatersoftener.Selectasettingdependingonthehardnessofthewatersupply.Itisimportantthatthissettingiscorrect!Forawatersupplywithahardnessabove 5^ dH( 9^ fH/ 6^ eH/0.9mmol/l),fillwithsalt.Forawatersupplywithahardnessbelow 6^ dH( 10^ fH/ 7^ eH/1.0mmol/l),select0. Thewatersoftenerisdeactivatedandnosaltneedstobeadded. |
| 4. | TABOn/Off(All-in-onedetergent)Pre-selectedatfactory:Off | Activatethissettingwhenusinganall-in-onedetergentthatcontainsrinseaid.Thissettingreducesterinseaiddosageandaffectshow oftenthedishwasher'sbuilt-insoftenerisregenerated. |
Tochangetheselectedsetting,seethechapterSettings.
Beforewashingforthefirsttime
\* Topuprinseaid
TopuptherinseaidcompartmentwithrinseaidifyouhaveselectedRinseaid1-5.
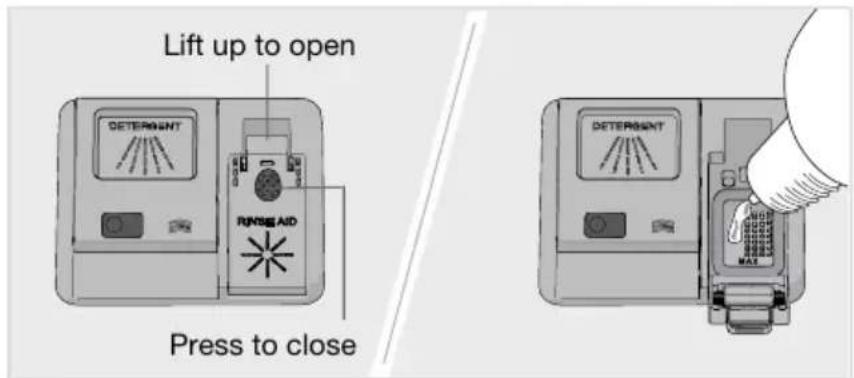
- Opentherinseaaidcompartmentlid.
- CarefullytopupwithrinseaidtothelevelmarkedMAX.
3.Wipeupanysplashesofrinseaidaroundthecompartment. - Closethelidfirmly.
S Topupsalt
Forawatersupplywithahardnessabove5°dH(9°fH/6°eH/0.9mmol/l),fillwithsalt.
AddsalttothesaltcompartmentifyouhaveselectedWaterhardness1-9.
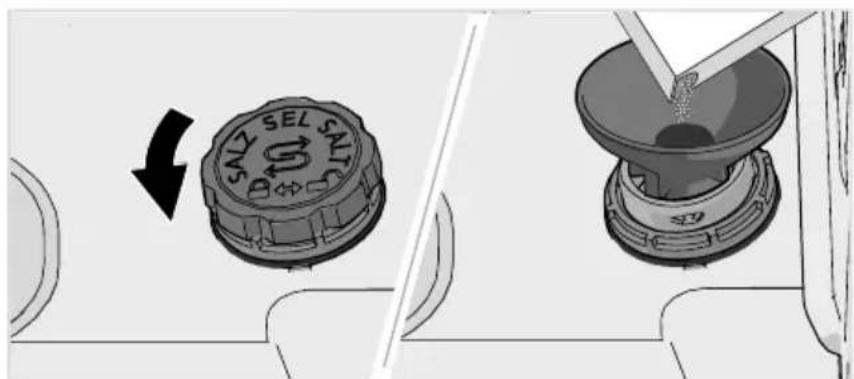
- Removethesaltcompartmentlidbyturningitanticlockwise.
- Placethefunnelsuppliedwiththedishwasherinthesaltcompartmenttop-uphole.Before washingforthefirsttime,pourinabout1lofwater.(Waterisonlyneededthefirsttime.)
- Addenoughsalttofillthesaltcompartment(max.750gram). Usespecialdishwashersalt.
- Wipeawayexcesssaltandturnthelidclockwiseuntilintheclosedposition.
WARNING!
Inordertoavoidruststainsadishwashingprogrammustbestartedinmediatelyafteradding salt.
Neverpourdishwasherdetergentintothesaltcompartment. Thisdestroysthewatersoftener!
Saveenergyandwater
When using a dishwasher a residential setting, less energy and water are generally used compared to washing the dishes by hand.
Donotrinseunderrunningwater
Donotrinsethedishesunderrunningwaterasthiswillleadtoincreasedenergyandwater consumption.Simplyscrapeofflargefoodparticlesbeforeloadingthedishwasher.
Chooseagreendetergent
Readtheenvironmentaldeclarationonthepackaging!
Toomuchdetergent, rinseaidandsaltcanresultinlesseffectivedishwashingandalsoentailgreater environmentalimpact.
Runafullyloadeddishwasher
Saveenergyandwaterbywaitinguntilthedishwasherisfullbeforerunningaprogram(seenumber ofstandardplacesettings).UsetheRinseandholdprogramtorinsethedishesifthereareany unpleasantodours.
YoucanalsousetheAnti-odourprogramtopreventbadodoursfromdirtydishesleftinthe dishwasher.
Runprogramsatalowertemperature
Ifthedishesareonlyslightlydirty,youcanselectaprogramwithalowtemperature.
Selectdishwashingprogram—Eco
Thisprogramissuitableforwashingnormallysoileddishesandisthemosteeffectiveprogramin termsofcombinedenergyandwaterconsumption. Thisprogramisusedtoassesscompliancewith EUlegislationonecodesign.
Thedishwashingprogramisdesignedforaneffectivewashasusingaslittleenergyandwateras possible. Theprogramwashesatalowtemperatureforalongtime.
Selection-Autodooropen
BetterdryingresultsareachievedifyousetheAutodooropenoption,whichautomaticallyopens thedishwasherdoor.Waituntilthedishwasherindicatesthattheprogrammehasendedandthe disheshavecooledbeforeunloadingthedishwasher.
Connecttocoldwater
Connectthedishwashertothecoldwatersupplyifthebuildingisheatedusingoil,electricityorgas.
Connecttohotwater
Connectthedishwashertothehotwatersupply(max.70°C)ifthebuildingisheatedusingan energy-efficientmeanssuchasdistrictheating,solarpowerorgeothermalpower.Choosingahot waterconnectionreducethedishwasher'senergyconsumption.
NOTE!
Donotexceedthepermittedwatersupplytemperature.Certainmaterialsusedinsomecookware cannot withstand high heat. See Fragile dishes in the chapter Loading the dishwasher.
Loadingthedishwasher
Fragiledishes
Somecookwareisnotdishwashersafe. This can be for several reasons. Somematerials cannot withstand high heat, others can be damaged by dishwasher detergent.
Exercisecautionwith,forexample,handmadeitems,fragiledecoration,crystal/glassware,silver,copper,tin,aluminium,woodandplastic.Lookforthe"Dishwashersafe"marking.
Fragiledecoration
Porcelainwithdecorationontopoftheglazing(theitemsfeelrough)shouldnotbewashedina dishwasher.
Crystal/Glass
Dryingisfasterandabetterresultisachievedifyouuserinseaid.Youwillalsoachieveabetterdishwashingresultwithclearandspotlessdishes.
Hand-paintedglassware, as well as antique and very fragile items, should not bewashed in dishwasher.
Silver
Silverandstainlesssteelitemsshouldnotcomeintocontact, asthesilvercanbecomediscoloured.
Inordertoavoidmarksandtarnishing, separatedishesmadefromdifferentmetals,suchassilver, stainlesssteelandaluminium.
Aluminium
Aluminiumcanloseitsshineifwashedinadishwasher. However, goodqualityaluminiumpanscan bewashedinadishwasher, even if some of the shinewillbelost.
Cutlerywithgluedhandles
Sometypesofgluearenotdishwashersafe.Insuchcases,thehandlesmayloosen.
Loadingaffectstheresults
Loadthedishescarefullytoensurethebestwashinganddryingresultswiththelowestpossible energyandwaterconsumption.Giveyourdishwasherthebestchancetoreachandcleanallsurfaces, aswellastodrythedishesasthoroughlyaspossible.
- Allidirtysurfacesshouldfaceinwardsanddownwards!
- Dishesshouldnotbeplacedinoroneachother.
- Angle dishes with hollows, such as cups, so that the rinse water will run off. This is also important for plastic items.
- Make sure small items cannot fall through the dishwasher basket; place them in the top cutlery tray.
NOTE!
Checkthatthesprayarmscanrotatefreely.
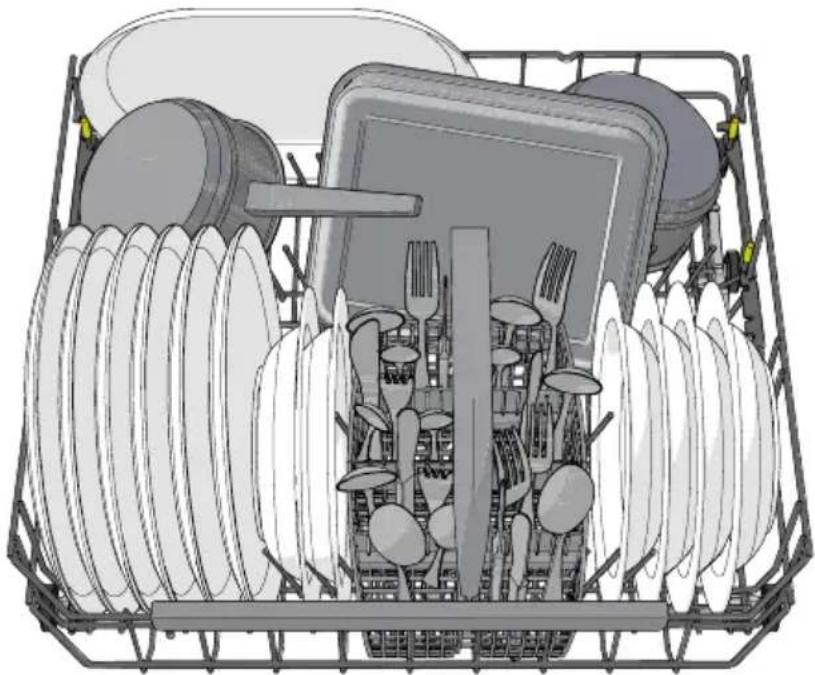
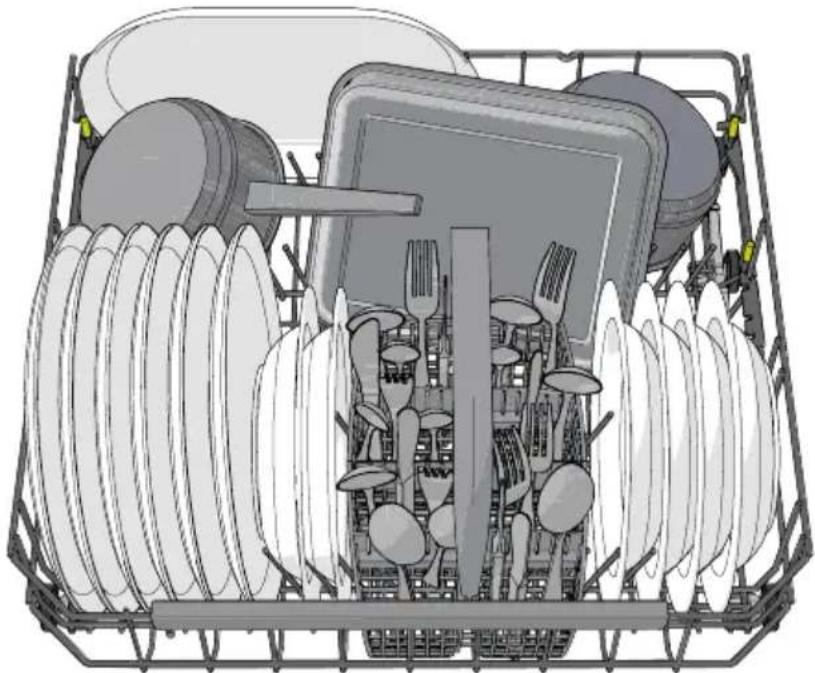
Thedishwasher'sbaskets
Thedishwasherisequippedwithatopcutlerytray,anupperbasketandalowerbasketwithacutlery basket.
Theappearanceofthebasketsmaydifferdependingonthedishwashersetup.
Topcutlerytray
Thetopcutlerytrayhasspaceforcutlery,ladles,whisks,servingcutleryandsimilaritems.
Avoidplacingtallobjectsinthetopcutlerytray.Theycanblockthetopsprayarm.

natural_image
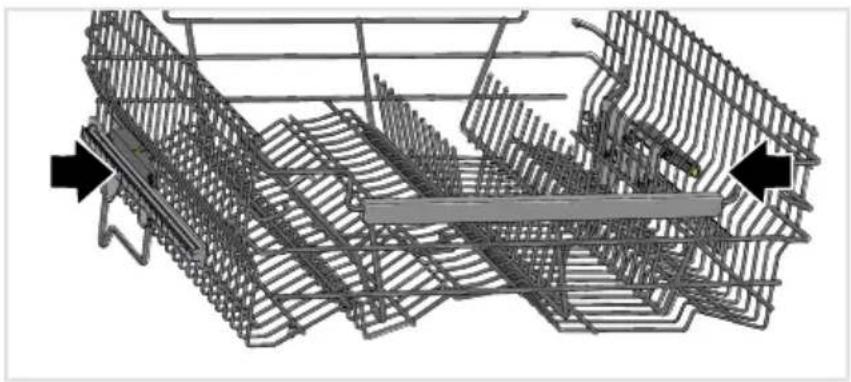
Top-down technical illustration of a mechanical assembly with gears, rods, and spoons inside a grid-like frame (no text or symbols)Raisingthetopcutlerytray
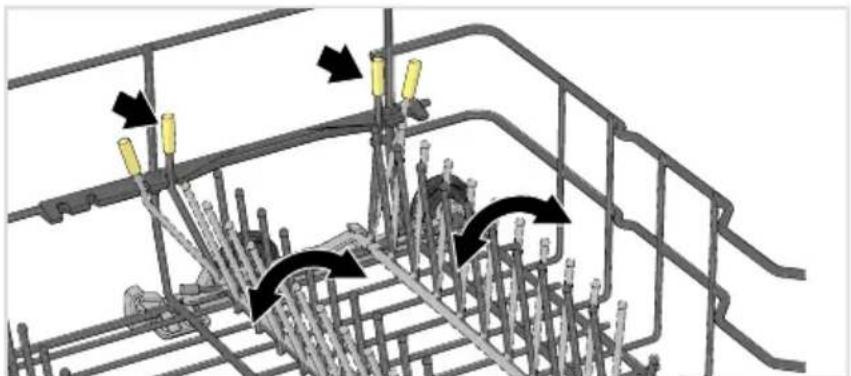
- Pulloutthetopcutlerytray.
- Pullforwardthetwolockinghandlesoneithersidetoraisethetopcutlerytray.
Loweringthetopcutlerytray
- Makesuretheupperbasketisinthelowestposition.
- Pulloutthetopcutlerytray.
3.Slidethetwolockinghandlesoneithersidedownwardsandbackwardstolowerthetopcutlery tray.
natural_image
Mechanical assembly diagram showing a yellow tool interacting with a multi-stage gun barrel (no text or symbols visible)Loadingthedishwasher
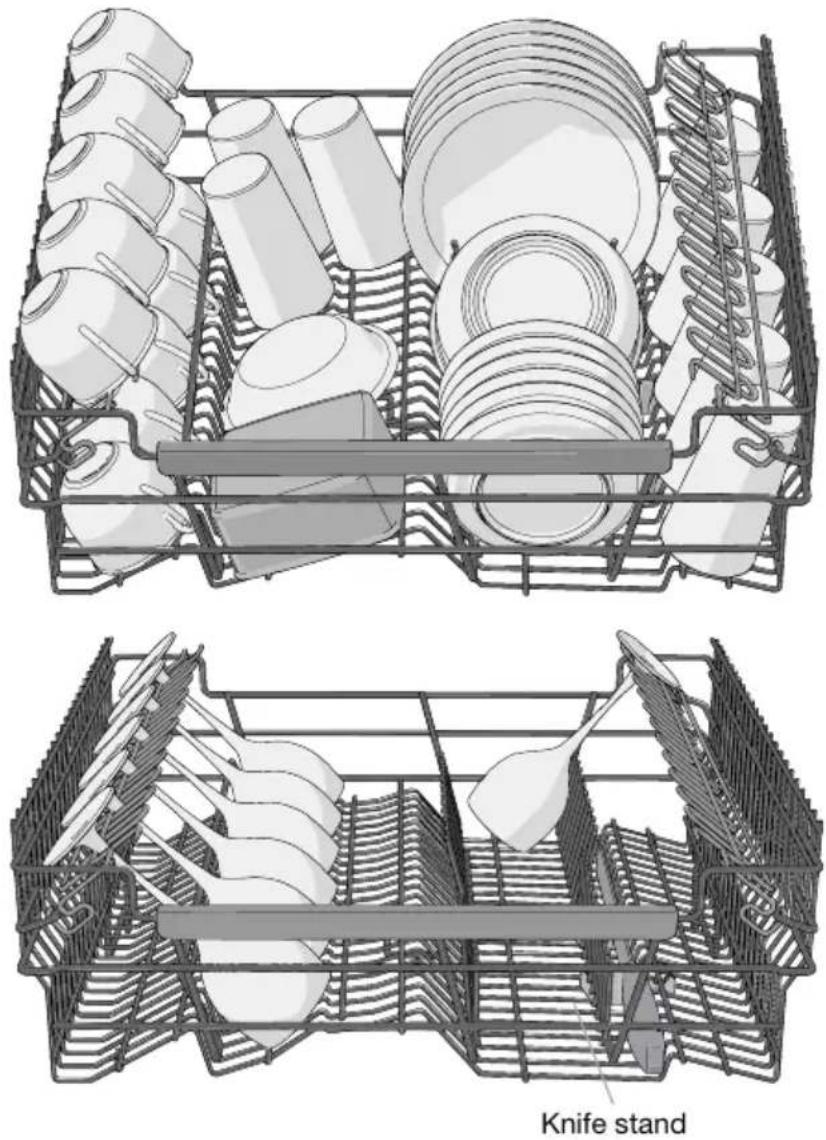
Upperbasket
Placeglasses,cups,bowls,sideplatesandsaucersintheupperbasket.Alldirtysurfaceshould faceinwardsanddownwards!Wineglassesareplacedonthewineglassshelfandknivesare placedintheknifestandontheright.
Raisingtheupperbasket
- Pullouttheupperbasket.
- Grabthesides of the upper basket with both hands and lift it up.
Loweringtheupperbasket
- Pullouttheupperbasket.
- Grabthesides of the upper basket with both hands and push in the two locking handle to lower the upper basket.
natural_image
3D wireframe model of a mechanical assembly with no visible text or symbolsLowerbasket
Placeplates, sideplates, serving dishes, pots and cutlery (inthecutlery basket) in the lower basket.
natural_image
Illustration of a multi-tiered kitchen appliance with cutlery and utensils inside a metal rack (no text or symbols)Adjustableplatesupports
Theadjustableplatesupportscanbeadjustedtosuitthedishes.Releasetheplatesupportsby pushingtheminwardsbeforerepositioningthem.Theplatesupportscanalsobefoldeddownto makeiteasiertoloadpotsandbowls.
natural_image
Technical diagram of a steel rebar structure with directional arrows indicating movement or force (no text or symbols present)Loadingthedishwasher
Adaptablepowerzones
Thedishwasher'stwo adaptable power zones can be opened into different positions or turned off.
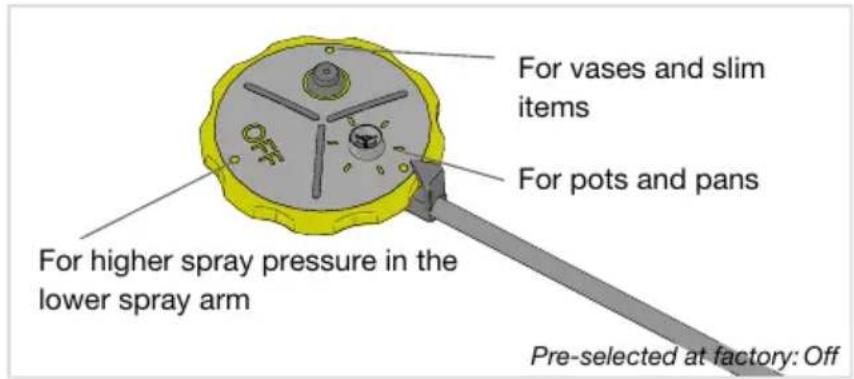
Leavethepowerzonesopenifyouwantanincreasedwaterflowwhere,forexample,youhave placedpotsandpansorvasesandslimitems.Turnthedishwasher'spowerzonesoffifyouwant greaterspraypressureinthelowersprayarm.
Washinglargeplates
You can adjust the lower basket for plates with diameter of 25-31 cm by moving the adjustable plates supports and their fixture to increase the distance between the inner rows.
Cutlerybasket
Placecutlerywiththehandlesfacingdown,exceptforknives,andspreadthemoutasmuchas possible.Ensurethatspoonsdonotstackinsideeachother.
Thecutlerybasketisbestplacedinthemiddleatthefrontofthelowerbaskettobestutilise dishwashingperformancefromtheuniquesprayzoneintendedforthecutlerybasket.

WARNING!
Knivesandotherpointeditemsmustbeplacedhorizontallyinthedishwasher'sspecialcutlery baskets.
Fold-downsectionforsmallitems
Thecutlerybaskethasafold-downsectioninthemiddleforsmallitemsorsmallshafts(suchas electricwhiskattachments).
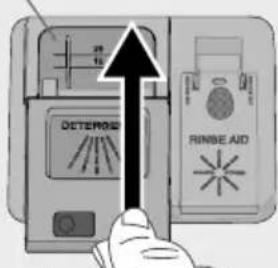
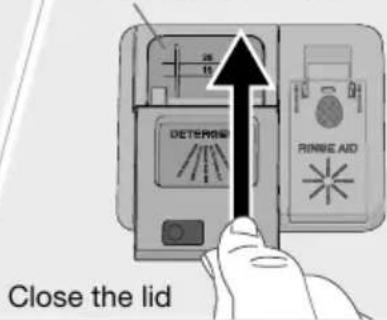
Adddetergent
Followtheinstructionsonthedetergentpackaging. Thisdishwasherisfittedwithawatersoftener, sousedetergentandrinseaiddosessuitableforsoftwater.
Toomuchdetergentcanresultinlesseffectivedishwashingandalsoentailsgreaterenvironmental impact.
Detergentcompartment
The detergent compartment must bedry when adding detergent.
Ifpowderorliquiddishwasherdetergentisused,addasmallamountofthedetergenttothe compartmentforprewashdetergent.
Prewash detergent
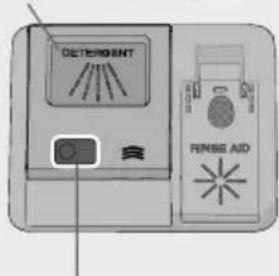
Press to open
Main wash detergent
NOTE!
Useonlydishwasherdetergent!Washingupliquidmustnotbeusedasthefoamthatforms preventshedishwasherfromoperatingeffectively.
All-in-onedetergent
Therearemanytypesofall-in-onedetergentsonthemarket.Readthroughthedirectionsforthese productscarefully.
Activate the TAB setting when using an all-in-oned detergent that contains rinse aid.
Dishwashertabletsarenotrecommendedforshortprograms(lessthan75minutes).Usepowder orliquiddishwasherdetergentinstead.
NOTE!
Optimal washing and drying results are achieved by using normal detergent together with separately dispensedrinseaidandsalt.
Contactthedetergentmanufacturerifyouhavequestionsaboutthedetergent.
Usingthedishwasher


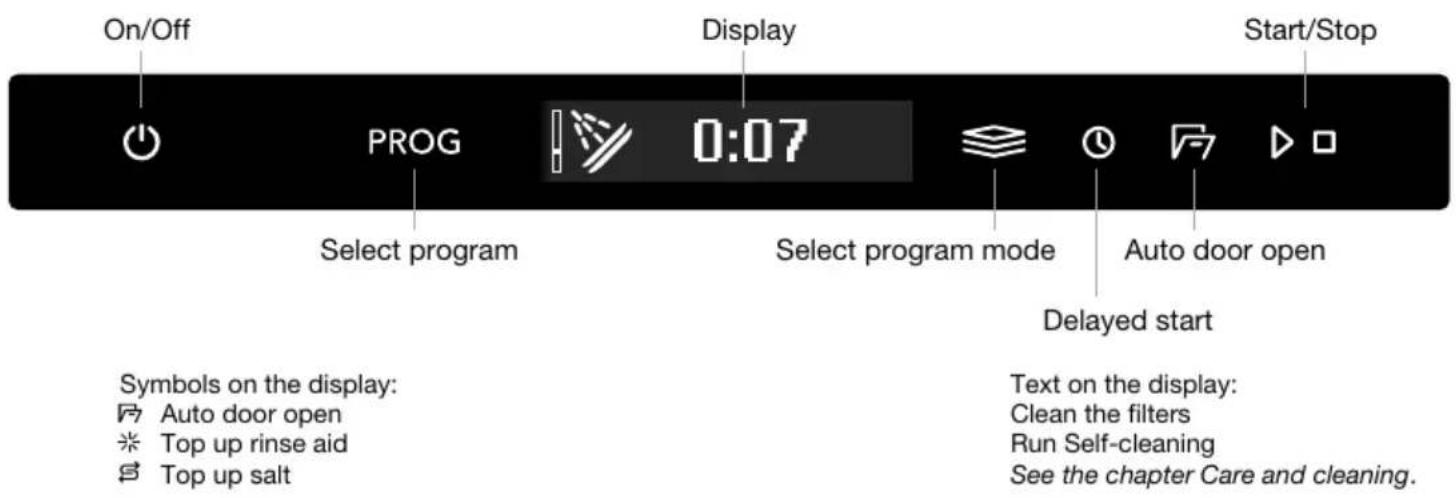
On/Off
Openthedoorandpress.Alsbturnonthewatertapifitisturnedoff.
PROG Selectprogram
Ecoisalwayspre-selected. Toselectanotherprogram, pressuntilthe desiredprogram is shownonthedisplay.
Selectaprogramtosuitthetypeofdishesandhowdirtytheyare.

Eco
Thisprogramissuitableforwashingnormallysoileddishesandisthemosteeffectiveprogramin termsofcombinedenergyandwaterconsumption. Thisprogramisusedtoassesscompliancewith EUlegislationonecodesign.
YoucanreadmoreaboutgreenerdishwashinginthechapterGreenerdishwashing.
Forheavilysoileddisheswithalotofgrease,aprogramwithhighertemperatureshouldbeused.

Universal
Aneffectiveprogramfordailyuseforslightlydriedleftovers.(Thisprogramisnotintendedforburnt food,suchasonovendishes.)

Intensive
Aprogramwithahightemperaturefordissolvinggreaseonverydirtydishes,suchaspans,casserole dishesandovendishes.Ifthesedishesdonotcompletelyfillthedishwasher,youcanaddplates andotherdishes.

Quick ^1)
Afastandeffectiveprogramforslightlydriedleftovers.(Thisprogramisnotintendedforburntfood, suchasonovendishes.)
The Autodooropenoption is important for ensuring the best drying results.
1) When combined with Speed, the program is shortened (60 minutes).

Timeprogram
The program adapt to the specified running time or finish time. With this program it is important to choose times suited to how dirty the dishes are.
Presstøsetthedesiredprogramtime.
Slightlydirtydishes0:15-0:45
Normallydirtydishes1:00-1:30
Verydirtydishes2:00-2:30

Hygiene
This program is ideal to use hered demand on hygiene are e-trahigh, e.g. for baby bottles and cutting boards. The temperature is high both them main wash and in the final rinse.

Rinseandhold
Usedtorinsedisheswhileyouwaitforthedishwashertobecomefullyloaded.

Self-cleaning
Self-cleaningprogramforhygieniccleaningofthedishwashertub,sprayarmsandspraypipes.
Thisprogramshouldberun(withnodishesinthemachine)usingnormaldishwasherdetergentor citricacid.Specialdishwashercleanersarealsoavailableonthemarket.Fortheremovaloflimescale deposits,seeDishwashertubinthechapterCareandcleaning.
72h

Anti-odour ^2)
This program prevents bad odours from dirty dishes left in the dishwasher. Only the dishwasher's fanisactivated(atregularintervalsduringaperiodof72hours).

Selectprogrammode
Presstscrollthroughtheavailableprogrammodes. Thesymbolisdimlylitinavailableprogram modes, and glowsbrighterwhenaprogrammodehasbeenactivated. (Theprogrammodesyou canselectvarybetweenprograms.)

Speed
The program time is shortened, but the dish washer uses more energy.

Night
Lowernoiselevelduringthedishwashingprogram. The program time is extended.
2) ActivateOdourcontrolinthedishwasher'sSettingsmenu.SeetheSettingschapter.
Usingthedishwasher
Selection
Availableoptionsaredimlylit.Selecttheoptions(,)toactivstethem.Theoptionsglowbrighter whenactivated.(Theoptionsyoucanselectvarybetweenprograms.)
Delayedstart
WhenyouselectDelayedstart, the dishwasher will start 1-24 hours after you have pressed and closed the door.

- PressofcetoactivateDelayedstart.Pressseveraltimes,orholditin,tosetthedesired numberofhours.
- Press and closetedoor. Thetimercountsdownandthedishwasherstartsaftertheselected delay.
If you want to cancel the Delayed start option, open the door then press and hold for three seconds.
Autodooropen
Thedishwasherdooropensautomatically, which shorten the program time and improves the drying results. Wait until the dishwasher indicates that the program has ended and the dishes have cooled before unloading the dishwasher.
The drying time of the Autodoor open option varies (from 5 to 90 minutes) depending on the model, program and temperature of the final rinse.
The Autodooropenoption is pre-selected for some programs.
NOTE!
Forthebestdryingresults, donotclosethedoorbeforethedryingphasehasfinishedandthe machinehasautomaticallyswitchedoff.
WARNING!
Thedishwasherdoormustnotbeblockedorclosedwhenopenedautomatically.Doingsomay damagethedorlockmechanism.Waitatleast5minutesbeforeclosingthedoor.
▷ □ Start/Stop
Press the display shows "Program started". This indicates that the dishwasher is ready to start. Closetedoor properly, other-wise dishwasher will not start.
If the dishwasher is not started, the door is not closed within 2 minutes of the last time the control panel was pressed, them machines switches off.
Stoppingorchangingaprogram
If you want to change program after starting the dishwasher, opened door then press and hold for three seconds. Add more detergentifth elid of the detergent dispenser has opened. Then select anew program, press and closed the door.

Remainingtime
Once you have selected a program, program mode and options, the time the program took when last used is displayed.
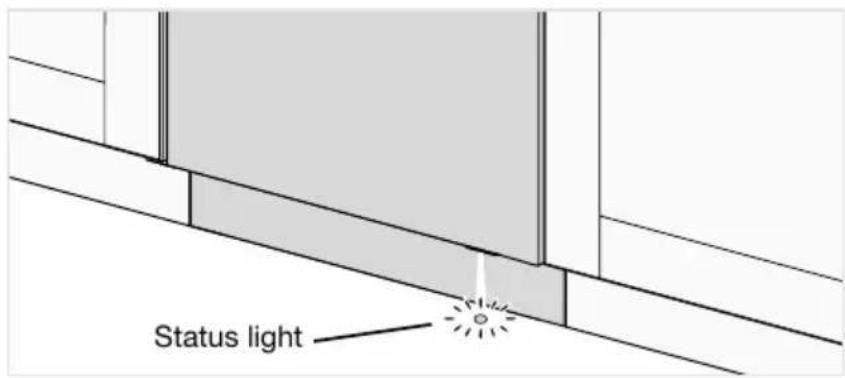
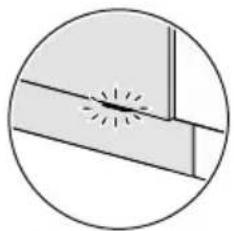
Statuslight
Thestatuslightatthebottomonthedishwasherprovidesinformationbymeansof3differentcolours.
natural_image
Simple circular diagram showing a diagonal line intersecting a rectangular structure with a small circular mark at the center (no text or symbols)A lens for a forward-facing status light can be fitted. See the chapter Installation.
Blue-Loadmore
Theprogramhasstarted, butyoucanstillloadmoredishes.
Red-Donotload
Youshouldnotloadmoredishes(riskofpoorerdishwashingresult).
Green-Unload
Thedishwashingprogramisfinished. Thestatuslightstaysonfor15minutes.
Flashingred
Aflashinglightindicatesthatthedoorhasbeenopenedwhileaprogramisinprogress.Ifitflashes whenthedoorisclosed,anerrorhasoccurred.SeethechapterTroubleshooting.
Ifyouwanttoloadmoredishes 3)
Openthedoor. Thedishwasherstopsautomatically. Addthedishesandclosethedoor. Aftera while, thedishwashercontinuestheprogram.
Powerfailure
If the dishwasher is turned off due to a power failure when adish washing program is running, the program continues when power is restored. If the power is cut during drying, the program is interrupted.
If you opened the door form more than 2 minutes during drying, the program will be interrupted.
Oncetheprogramhasfinished
Theendoftheprogramisindicatedbyoneshortsignalfromthebuzzer. Thechapter Settings describeshowtochangethisfunction.
Moreover, the end of the program is indicated by the status light turning green.
Oncethedishwasherdoorisopenedandtheprogramhasfinished"Programdone"appearsonthe display.
Thedishwasherswitchesoffautomaticallyaftertheprogramends.Shutoffthewatertapaftereach use(ifrequiredbyyourinsurancecompany).
Usingthedishwasher
Thebestdryingresults
- Fullyloadthedishwasher.
- Angle dishes with hollows, such as cups, so that the rinse water will run off. This is also important for plastic items.
- Topupwithrinseaidorincreasinginseaiddosagesetting.
- Activate the Autodooropenoption.
- Allowthedishestocoolbeforeunloadingthedishwasher.
Unloadingthedishwasher
Hotporcelainismorefragile.Leavethedishestocoolinthedishwasherbeforeunloadingthem.
Unloadthelowerbasketfirsttoavoidanywaterdropsfromtheupperbasketfallingontothedishesinthelowerbasket.
| Program | Programmode /Option | ofprewashes | MainwashNumber ofrinses | Final rinse | Consumptionvalues 1) | ||||
| Coldwater 2) | Hotwater 3) | Watercons. (liter) | |||||||
| Dishwashing time (approx. hrs:min) | Energy (approx.kWh) | Dishwashing time (approx. hrs:min) | Energy (approx.kWh) | ||||||
| Eco 4) | 5) | 9.20.34:000.544:1040°C247°C | |||||||
| Universal | 5) | 12.50.72:201.12:4060°C260°C1 | |||||||
| 16.01.22:301.62:5070°C270°C2Intensiv. | |||||||||
| Quick | 5) | 14.50.91:301.31:3065°C365°C | |||||||
| 10.0-16.50.2-1.00:15-2:300.3-1.40:15-2 | |||||||||
| 10.50.90:451.31:0570°C270°CHygiene | |||||||||
| 3.50.010:070.010:071Rinseandhold | |||||||||
| 10.00.60:451.01:0570°C270°CSelf-clea | |||||||||
| 72h | 0.272:000.272:00Anti-odour | ||||||||
1) Consumption values vary depending on the temperature of the incoming water, room temperature, load size, selected additional functions and more. The values for the Eco program are accurate, others are indicative only.
2) Connectiontocoldwater, approx. 15°C.
3) Connectiontohotwater.approx.60°C.
4) This program is suitable for washing normally soiled dishes and is the most effective program in terms of combined energy and water consumption. This program is used to assess compliance with EUlegislationonecodesign.
5) Autodooropen
Settings
Openthedoorandpress.
Toopenthedishwasher'sSettingsmenu, press until Settingsmenu is shown on the display and confirm your selection with.
Toexitthedishwasher'sSettingsmenu,selectExitandconfirmyourselectionwith.

| AlternativesSettings | |||
| Language1. | Youcanchoosethelanguageusedforthe display. | ||
| On/OffAutomaticchildlock | YoucanactivatetheAutomaticchildlock settingtopreventchildrenfromstartingthe dishwasher.Totemporarilydeactivateoractivatethe Automaticchildlocksetting,pressandhold ≈ andf0threeseconds. | ||
| Foradjustingthecontrastofthedisplay.Contrast 1/2/3/4Di: | |||
| ProgramInfoscreen T/S | Youcanselectwhichinformationisshown onthedisplay. | T-Text | T-Text | S-Symbol | S-Symbol | ||
| 4. | Sound | Feedback 0/1/2/3 | Abeepconfirmsthatthecontrolpanelhas beenpressed. |
| Notification0/1/2/3 | Thebuzzerindicateswhenadishwashing programhasended.Errormessagesarealwaysindicatedbya loudbuzzer. | ||
| 5. | Rinseaid | 0/1/2/3/4/5 | Settingforrinseaiddosage.Therinseaid dispensercanbeadjustedbetween0(Off) and5(Highdosage).Increasetherinseaiddosage:Ifthedisheshavewatermarks.Decreasetherinseaiddosage:Ifthedisheshaveastickywhite/bluefilm.Ifthedishesarestreaked. |
| AlternativesSettings | |||
| •Build-upoffoam.Ifyouhaveverysoft water,therinseaidcanbediluted50:50 withwater. | |||
| 0/1/2/3/4/5/6/7/8/9 | Adnessingthewatersoftener.Selectasetting dependingonthehardnessofthewater supply.Itisimportantthatthissettingis correct!SeeWaterhardnessinthechapterBefore washingforthefirsttime.Forawatersupplywithahardnessabove 5°dH(9°fH/6°eH/0.9mmol/l),fillwithsalt.Forawatersupplywithahardnessbelow 6°dH(10°fH/7°eH/1.0mmol/l),select0.Thewatersoftenerisdeactivatedandnosalt needstobeaded. | ||
| 7. | (All-in-onedetergent) | On/OffTAB | Activatethissettngwhenusinganall-in-one detergentthatcontainsrinseaid.Thissettingreducesterinseaiddosage andaffectshowoftenthedishwasher's built-insoftenerisregenerated. |
| On/OffSuperrinse8. | TheSuperrinsefunctionrinsethedishesan extratwotimes.Theprogramtimeisextendedandthe dishwasherusesmoreenergyandwater.Activatedinthefollowingprograms:UniversalIntensiveQuickHygiene | ||
| 9. | poweroff | On/OffInteriorlightat | Selectwhethertheinteriorlightistobe switchedonwhenthedishwasheristurned offandthedoorisopened.(Ifistured on,theinteriorlightisalwaysswitchedon whenthedorisopened.) |
| On/OffOdourcontrol10. | WhenOdourcontrolisactivated, Anti-odourcanbeselectedfromtheprogram table. | ||
| Anyerrormessages.Failureereadout11.Whencontactingyourservicecentre,you maybeaskedtoprovidethemostrecent errormessages. | |||
| Restoresallsettingstothefactorydefaults.Facto SelectFactoryresetandpress. ▷ □ | |||
Settings
| AlternativesSettings | |||
| Exit13. | Toexitthedishwasher'sSettingsmenu, selectExitandpress. ≈ | ||
\* Topuprinseaid
Whetherinseaidneedstoppingup,thesymbollightsonthedisplay.
SeethechapterBeforewashingforthefirsttime.
S Topupsalt
Whenthesaltneedstoppingup,thesymbollightsonthedisplay.
Seethechapter Beforewashingforthefirsttime.
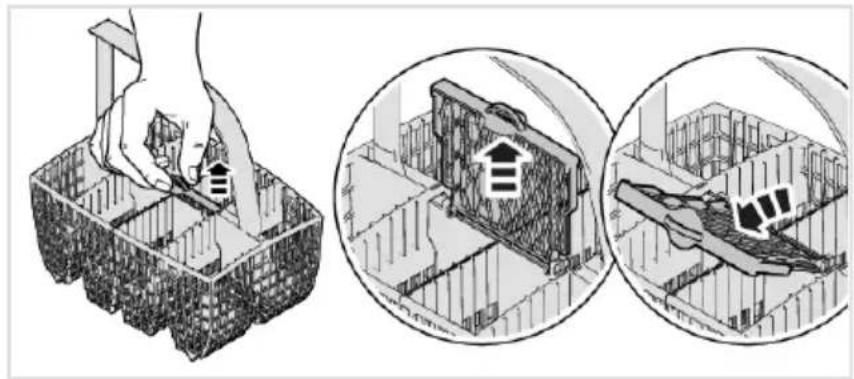
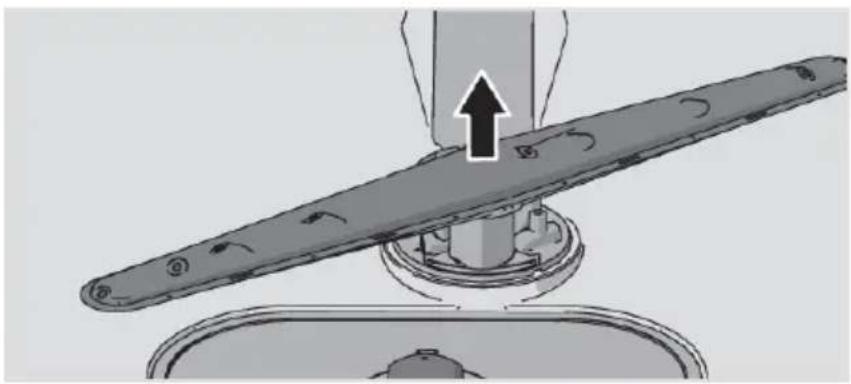
Cleanthefilters
Coarsefilter
The coarsefiltertrapslargerfoodparticles, which cannot get past the drainage pump. Empty the coarsefilter when necessary. It should be cleaned at regular intervals depending on how often the dishwasher is used.
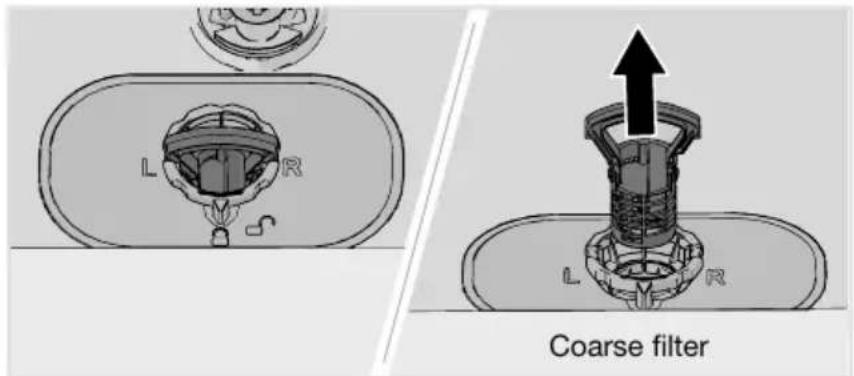
- Liftthecoarsefilterbythehandle.
- Emptythecoarsefilter.
- Refitthecoarsefilter. Pressitdownuntilclicksintoplace.
Careandcleaning
Finefilter
Debristhatcollectsonthefinefilterisautomaticallyrinsedawayduringeachwash.Cleanthefine filterwhennecessary.Itshouldbecleanedatregularintervalsdependingonhowoftenthedishwasher isused.
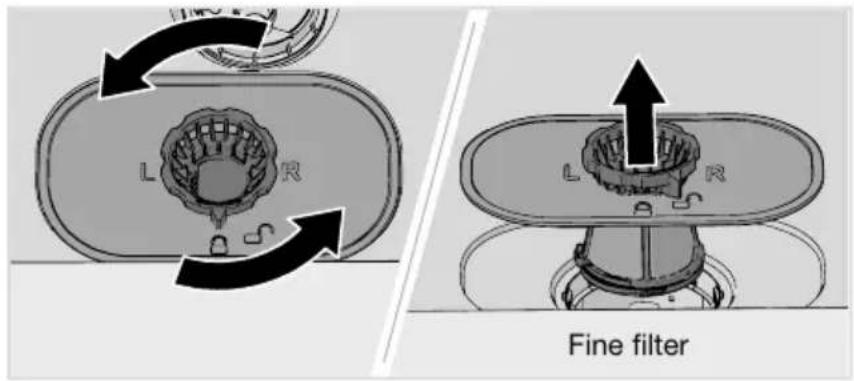
- Turnthelockingringanticlockwiseandliftthefinefilterstraightup.
2.Cleanthefinefilter. - Refitthefinefilterandturnthelockingringclockwisetoitsstopposition. Check that the edges seal properly.
Remembertorefitthecoarsefilter!
NOTE!
Dishwashing results may be affected if the coarse and fine filters are incorrectly fitted. The dishwasher must not be used without the filters in place!
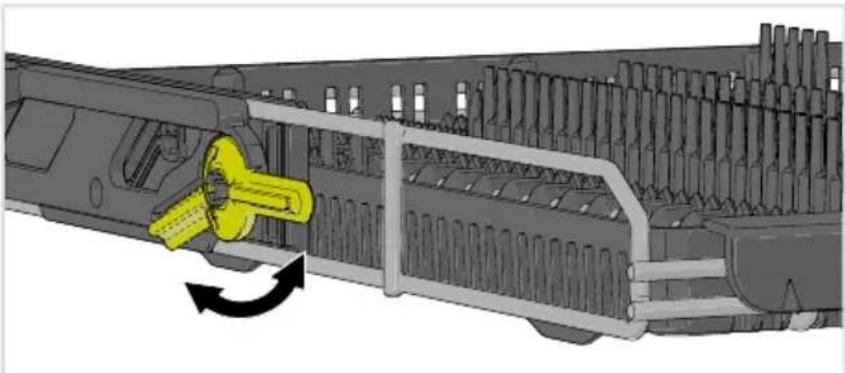
Cleaningthesprayarms
Holesandbearingscansometimesbecomeblocked.Removeanydebrisusingapinorthelike. Thesprayarmsalsohaveholesunderneath.
natural_image
Diagram of a mechanical component with four arrows pointing to circular features on a curved surface (no text or symbols)Tofacilitatecleaningyoucanremovethesprayarms.Remembertofitthemfirmlybackintoplace afterwards.
Topsprayarm
- Pull out the top cutlery tray. Push up on the top spray arm while turning it anticlockwise to release it.

natural_image
Diagram of a mechanical component with directional arrows indicating rotation or movement (no text or symbols)Uppersprayarm
•Pullouttheupperbasket.
- Unscrewthesprayarmbearingsanticlockwisetoremovethesprayarmfromtheupperbasket.
natural_image
Mechanical assembly diagram showing a rotating component with rotational arrow (no text or symbols)Lowersprayarm
•Pullthelowersprayarmstraightuptoreleaseit.
Careandcleaning
natural_image
Mechanical assembly diagram showing a rotating shaft with an upward arrow indicating motion (no text or symbols)Cleantheoutsideofthedishwasher
Dooranddoorseal
Openthedoor.Cleanthesidesofthedoorandthedoorsealregularlywithaslightlydampcloth. Cleanthedoorsealatthelowerfrontedgeofthedishwasherwithawashing-upbrush.
Controlpanel
Keepthecontrolpanelclean.Ifnecessary,wipeitwithadryorslightlydampcloth.Neveruse cleaningproducts-theymayscratchthesurface.
RunSelf-cleaning
Dishwashertub
Thedishwashertubismadeofstainlesssteelandiskeptcleanthroughnormaluse(whenused regularly).
If you have hardwater, limescale deposits may build up in the dishwasher. If this happens, run the Self-cleaning program with twotablespoon of citric acid in the detergent compartment (with no dishes in the machine). Special dishwashercleaners are also available on the market.
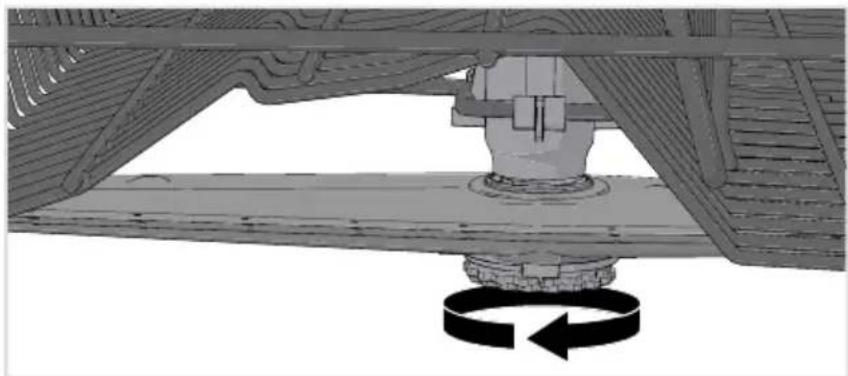
Removeblockages
Unblockingthedrainagepump
If the dishwasher still contains water after the program has finished, something may be blocking the drainage pump, which results in the error message Water outlet fault or BLDC drain pump fault.
-
Turnoffthemachineusingandremovetheplugfromthewallsocket.
-
Removethecoarsefilterandthefinefilter.
-
Scoopoutthewaterfromthedishwashertub.
-
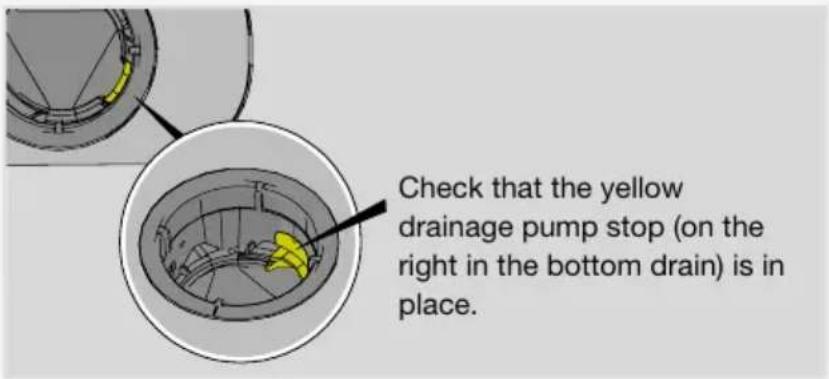
Inordertoinspectthedrainagepump, removetheyellowdrainagepumpstopontherightin thebottomdrain.(Useapairofpliersifnecessary.)
-
Turnthepumpwheellocatedbehindthedrainagepumpstopbyhand.Carefullyremoveany sharpitems,suchasglass.
-
Refitthedrainagepumpstopalongwiththefineandcoarsefilters.
7.Plugthemachineinagain.
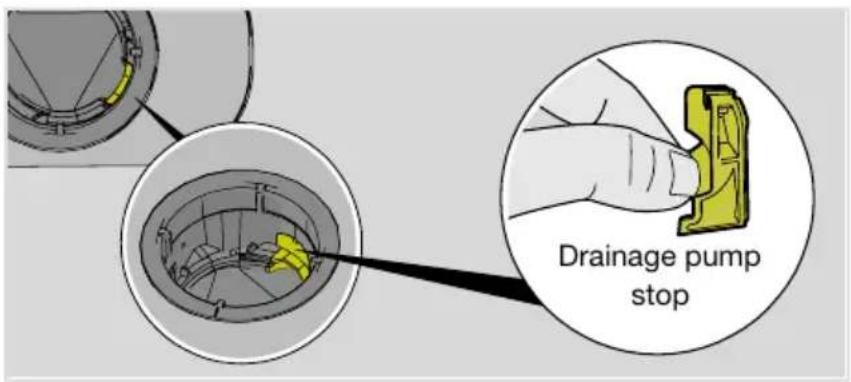
NOTE!
Donotforgettorefitthedrainagepumpstop.
Unblockingtheinlethosefilter
If the watersupply contains small particles, the outer filter on the inlethose may become blocked, which results in the Water inlet fault error message.
- Turnoffthemachineusingandremovetheplugfromthewallsocket.
- Turnoffthewatertap.
- Unscrewtheinlethose.
- Carefully remove the outer filter from the inlethose and clean it.
- Refitthefilterandcheckthatthegasketiscorrectlypositioned.
- Screw the inle those firmly into place.
- Plugthemachineintothewallsocketandturnonthewatertap.Allowthepressuretosettlefor awhileandcheckthattheconnectioniswatertight.

Winterstorage/Transport
Storethedishwasherabovefreezingtemperatureandavoidlongtransportdistancesinverycold weather. Transportthedishwasheruprightorlayingonitsback.
Before transporting a used dish washer, or before prolonged storage, water must first be removed from the machine. Run the Self-cleaning program.
Troubleshooting
| ActionErrormessages | ||
| Overfillingwater1F10 | Unblockingthedrainagepump.SeethechapterCareand cleaning.Iftheproblempersists,contactyournearestservice centre. | |
| WateroutletfaultF11 | See"Waterremainsinthedishwasher"under"Problem"inthe tablebelow.Iftheproblempersists,contactyournearestservice centre. | |
| Waterinletfault1F12 | Checkthatthewatertapison.Checkthattheouterfilteronthe inlethoseisnotblocked.SeeUnblockingtheinlethosefilterin thechapterCareandcleaning.Iftheproblempersists,contact yournearestservicecentre. | |
| Turnoffthewatertapandcontactyournearestservicecentre.InletvalveleakageF | ||
| Heaterfault1F41 | Turnoffthewatertap.Removetheplugfromthewallsocketand contactyournearestservicecentre. | |
| Contactyournearestservicecentre.DiverterfaultF45 | ||
| WaterlevelfaultF52 | Cleanthecoarseandfinefilters.Checkthattheouterfilteronthe inlethoseisnotblocked.Iftheproblempersists,contactyour nearestservicecentre. | |
| Turnoffthewatertapandcontactyournearestservicecentre.Overfillingwater2FToavoidwaterleakageoutsidethedishwasher,donotremove theplugfromthewallsocketuntilthewatertaponthesupplyline hasbeenturnedoff! | ||
| Contactyournearestservicecentre.CirculationpumpfaultF56 | ||
| Waterinletfault2F67 | Checkthatthewatertapison.Checkthattheouterfilteronthe inlethoseisnotblocked.SeeUnblockingtheinlethosefilterin thechapterCareandcleaning.Iftheproblempersists,contact yournearestservicecentre. | |
| BLDCdrainpumpfaultF68 | See"Waterremainsinthedishwasher"under"Problem"inthe tablebelow.Iftheproblempersists,contactyournearestservice centre. | |
Pressanybuttontocleartheerrormessage.
| ActionPossiblecausesProblem | ||
| Thecontrolpaneldoesnotreact whenpressed. | paneltoosoonafteropeningthe door. | Waitamomentthentryagain.Youhavepresse |
| ChildlockorAutomaticchild lockisactivated. | SeethechapterSafety instructions. | |
| Thedoorisclosed. | Openthedor.Thecontrol panelonlyreactstousewhen thedoorisopen. | |
| Dirtonthecontrolpanel. | Cleanwithadryorslightlydamp cloth. | |
| Thecontrolpanelrequires calibration. | Turnoffthewatertap.Remove theplugfromthewallsocket andwaitfor60seconds.Then plugtheappliancebackinto the wallsocketandturnonthe watertap. | |
| Cannotclosedoor. | Thebasketsarenotcorrectly positioned. | Checkthatthebasketsare correctlypositionedhorizontally. |
| Checkthatthedishesarenot blockingthebasketsfrom slidingproperlyintoplace. | ||
| Thedoorlockdoesnotclickinto placeandlock. | Checkthedoorlock.Ifitdoes notclickintoplaceandlock, openthedor.PressandholdamPROG untilhedisplaystartsflashing.Waituntilstopsflashing(60 seconds).Closethedoor.Checkkathedoorlockclicks intoplaceandlocks. |
Troubleshooting
| ActionPossiblecausesProblem | ||
| Thedishwasherdoesnotstart. | hasnotbeenpressed. | Pressinflthedisplay shows"Programstarted". |
| Check.Thedoorisnotproperlyclosed. | ||
| Youhaveopenedthe dishwashertoaddmoredishes whileaprogramisinprogress. | Closethedoorandwait.Aftera while,thedishwashercontinues theprogram. | |
| Thedoorlockhasnotclicked intoplaceandlocked. | Checkthedoorlock.Ifithasnot clickedintoplaceandlocked, openthedor.PressandholdandPROG untilthedisplaystartsflashing.Waituntilstopsflashing(60 seconds).Closethedoor.Checkthatthedoorlockclicks intoplaceandlocksandthe dishwasherstarts. | |
| CheckwhethertheDelayedstart optionhasbeenselected. | Pressandholdforthree secondsifyouwanttocancel theDelayedstartoption. | |
| wallsocket. | Check.Theplugisnotpluggedintothe | |
| tripped. | Check.Afuse/circuitbreakerhasbeen | |
| Thesprayarmsdonotrotate. Thedis | Check that dishes are not blocking the spray arms. | |
| Sprayarmholesorbearings blocked. | Cleanthespray arms. Seethe chapter Care and cleaning. | |
| Unsuitabledishwashing program. | Select a program with a high temperature to dissolve grease on very dirty dishes, such as Intensive. | |
| Incorrect detergent dosage. | Dose according to water hardness. Fartoomuchorfar to little detergent results in poorer dish washing results. | |
| perishable product. | Avoid large packages. Old detergent. Detergent. | |
| Dishes loaded incorrectly. | Donot cover porcelain with large bowlsorthelike. Avoid placing very tall glasses in the corners of the baskets. Seethe chapter Loading the dishwasher. | |
| overduring the program. | Placed ishest sit steady. Glasses and cup sh | |
| Clean the coarse and fine filters. The filters are | ||
| The filters are not fitted correctly. | Check that the filters are fitted correctly. Seethe chapter Care and cleaning. | |
| Drainage pump stop missing. | Check that they yellow drainage pump stop (on their height in the bottom drain) is in place. See the chapter Care and cleaning. | |
| Spotson stainless steel silver. | Some food stuffs, such as mustard, mayonnaise, lemon, vinegar, salt and dressings, can causes potson stainless steel left for to long. | Rinse off these types of food stuffs if not starting the dishwasher immediately. Use the Rinse and hold program. |
| All stainless steel can cause spot on silver if they come into contact during dish washing. Aluminium can also cause spots on dishes. | Inorderto avoid marks and tarnishing, separated dishes made from different metals, such as silver, stainless steel and aluminium. | |
| Spotsorfilmsonthedishes. | setting. | SeethechapterSettings.Incorrectrinseaidd |
| ThesettingTABisactivatedand all-in-onedetergentwith insufficientdryingeffectisbeing used. | Switchall-in-onedetergentsor deactivatethesettingTABand topupwithsaltandseparate rinseaid.SeeRinseaidinthe chapterSettings. | |
| Saltcompartmentempty. | Topupwithsalt.Seethe chapterCareandcleaning. | |
| Incorrectwatersoftenersetting. | SeeWaterhardnessinthe chapterSettings. | |
| Thewatersoftenerisleaking salt. | Checkthatthesaltcompartment lidisproperlytightened. Otherwisecontactyournearest servicecentre. | |
| Toohighttemperatureand/ortoo muchdetergentcancause etchingoncrystal. Unfortunately,thiscannot be repaired,onlyprevented. | Washcrystalatalow temperatureandwitha conservativeamountof detergent.Contactthedetergent manufacturer. | |
| Thedisheshaveasticky white/bluefilm. | Rinseaiddosagesettingtoo high. | Reducethedosage.Seethe chapterSettings.Ifyouhave verysoftwater,youmaywantto dilutetherinseaid50:50with water. |
| Spotsleftafterwashing. | Lipstickandtea/coffeestains canbedifficulttoremove. | Useadetergentwitha bleachingagent. |
| Detergentresidueinthe detergentcompartmentafter dishwashing. | Thedetergentcompartmentwas dampwhenaddingdetergent. | Thedetergentcompartment mustbedrywhenadding detergent. |
| Thedetergentcompartmenthas beenblocked. | Checkthatthedishesarenot preventingthedetergent compartmentfromopening. | |
| Rattlingsoundwhen dishwashing. | Thedishesarenotcorrectly placedorthesprayarmsarenot rotating. | Checkthatthedishesare placedsecurely.Spinthespray armstomakesuretheycan rotate. |
| dishwasher. | Cleanthecoarseandfinefilters.Thefiltersare | |
| Thefiltersarenotfittedcorrectly. | Checkthatthefiltersarefitted correctly.SeethechapterCare andcleaning. | |
| Debrisinthedrainagepump. | Cleanthedrainagepump.See thechapterCareandcleaning. | |
| Drainagepumpstopmissing. | Checkthattheyellowdrainage pumpstop(ontherightinthe bottomdrain)isinplace.See thechapterCareandcleaning. | |
| Kinkindrainagehose. | Checkthatthehoseisfreefrom kinksandsharpbends. | |
| Blockeddrainagehose. | Disconnectthedrainagehose whereitconnectstothesink unit'swatertrap.Checkthatno debrishasfastenedandthatthe connectionhasaninner diameterofatleast14mm. | |
| Badodourindishwasher. | Dirtaroundthesealsandin corners. | Cleanwithwashing-upbrush andlowfoamingcleaner. |
| Lowtemperatureprogramshave beenselectedforaprolonged period. | Runaprogramwithahigh temperatureonceortwicea month.Orrunaself-cleaning program.SeeSelf-cleaning in thechapterUsingthe dishwasher. | |
| Greasedepositsinthe dishwasher. | Lowtemperatureprogramshave beenselectedforaprolonged period. | Selectaprogramwithahigh temperaturetodissolvegrease onverydirtydishes,suchas Intensive.Orrunaself-cleaning programonceortwiceamonth.SeeSelf-cleaninginthechapterUsingthedishwasher. |
Troubleshooting
| ActionPossiblecausesProblem | ||
| Thedishesarenotdryenough. | TheAutodooropenoptionisnot activated. | ActivatetheAutodooropen option. |
| loaded. | Fullyloadthedishwasher.Thedishwasherisr | |
| Rinseaidneedstoppingupor dosageissettoolow. | Topupwithrinseaidorincrease therinseaiddosagesetting. | |
| ThesettingTABisactivatedand all-in-onedetergentwith insufficientdryingeffectisbeing used. | Switchall-in-onedetergentsor deactivatethesettingTABand topupwithsaltandseparate rinseaid.SeeRinseaidinthe chapterSettings. |
It is important that you read through hand follow the instructions and directions below. Conduct installation and connection in accordance with these separate installation instructions.
[mm]
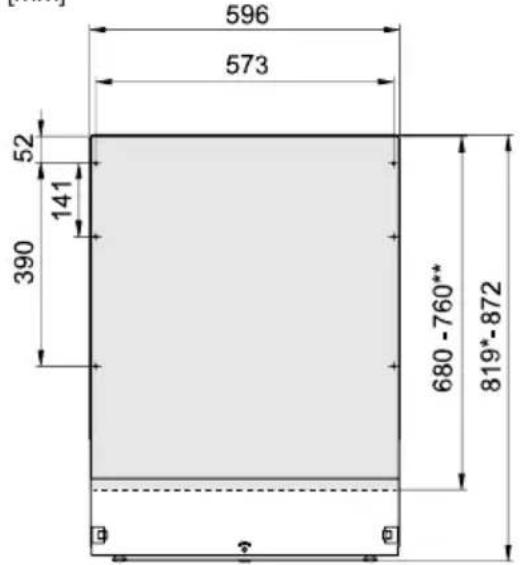
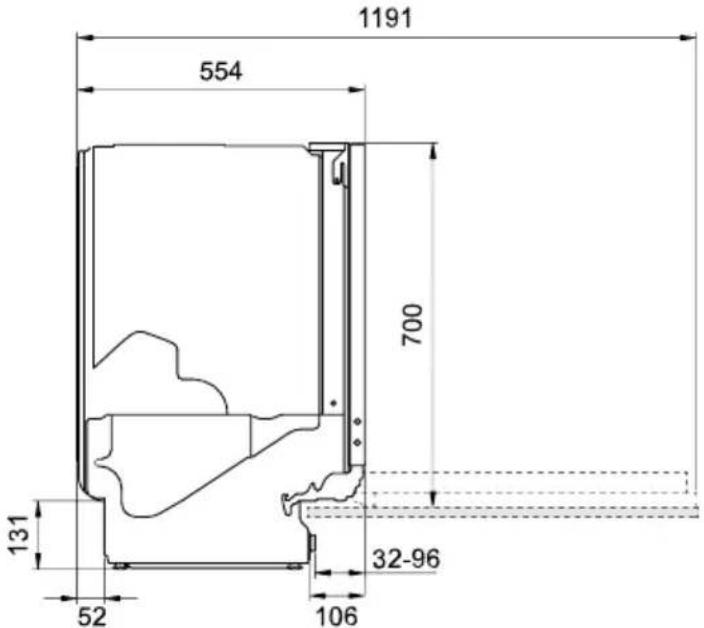
*Remove the locking nuts when installing in a recess measuring 820-821 mm.
**Cover door length.
Nominal dimensions. Actual measurements may vary.
Safetyinstructions
- Connectionstoelectricity, wateranddrainagemustbeperformedbyaqualifiedprofessional.
- Always follow applicable regulations for water, drainage and electricity.
•Takecareduringinstallation!Wearprotectivegloves!Theremustalwaysbetwopeople! - Placeadriptrayonthefloorbeneaththedishwashertopreventdamagefromanywaterleaks.
- Before-screwingthedishwasherintoplace,testthedishwasherbyrunningtheRinseandhold program.Checkthatthedishwasherfillswithwaterandrains.Checkalsothatnoneofthe connectionsleak.

WARNING!
Theventilationopeninginthelowerpartofthedoormustnotbeblockedbyarug,carpetor similarfurnishing.

WARNING!
Turnoffthewatersupplywheninstallingthedishwasher!
Theplugmustbedisconnectedorpowertothesocketturnedoffwhiletheworkiscarriedout!
Setup
- Therecessandconnectiondimensionsareincludedintheseparateinstallationinstructions.
Check that all dimensions are correct before starting the installation. Not that the height of the cover door can be adjusted to match other fittings. - Make sure the area on which the dishwasher is to be installed is firm. Adjust the adjustable feet so that the dishwasher is level. Tightenthelocknuts.
- If the dishwasher is built-in the surrounding furnishings must be resistant to any condensation fromthedishwasher.
- Mounttheprotectivefilmbeneaththeworktopanduparoundtheedge. The function of the protective filmistoprotecttheworktopfrommoisture. (Theprotectivefilmisintheenclosed plasticbag.)
- Check that the machine is installed such that the door opens freely, otherwise door lock functionality may be disrupted.
- Note that the door springs may need adjusting after a cover door has been fitted. Adjust the left and rightdoorspringsequallyuntilthedoorisevenlybalanced.
Drainageconnection
Thisdishwasherissuitableforinstallinginaraisedrecess(toattainanergonomicworkingheight).
Thismeansthatthedishwashercanbeplacedsothatthedrainagehoserunstoalowerlevelthan thebottomofthedishwasher,suchasbyroutingitdirectlytoafloordrain.
Thedrainagehosecanalsobeconnectedtoaconnectionnippleonthesinkunit'swatertrap. The connectionnipplemusthaveaninternaldiameterofatleast14mm.
Thedrainagehose may be extended by a maximum of 2.5m (thetotallength of the drainage hose must not exceed 4.5m). Any joints and connecting pipes must have an internal diameter of least 14mm.
Nopartofthedrainagehosemaybemorethan950mmabovethebottomofthedishwasher.
Attachthedrainagehosewithahoseclamp.Ensurethatthedrainagehosehasnokinks.
Connectiontowatersupply
Useonlytheinlethosesuppliedwiththedishwasher.Donotre-useoldorothersparehoses.
Thesupplypipemustbefittedwithawatertap(stopcock).Thewatertapmustbeeasilyaccessible, sothatthewatercanbeshutofffifthedishwasherhastobemoved.
Oncetheinstallationiscomplete,turnonthewatertapandallowthepressuretosettleforawhile.
Check that all connections are watertight.
Connecttocoldwater
Connectthedishwashertothecoldwatersupplyifthebuildingisheatedusingoil,electricityorgas.
Connecttohotwater
Connectthedishwashertothehotwatersupply(max.70°C)ifthebuildingisheatedusingan energy-efficientmeanssuchasdistrictheating,solarpowerorgeothermalpower.Choosingahot waterconnectionreducethedishwasher'senergyconsumption.
NOTE!
Donotexceedthepermittedwatersupplytemperature.Certainmaterialsusedinsomecookware cannot withstand high heat. See Fragile dishes in the chapter Loading the dishwasher.
Electrical connection
Informationabouttheelectricalconnectioncanbefoundontheserialnumberplate. This specification must match the electricity supply.
Thedishwashermustbeconnectedtoanearthedsocket.
Theelectricwallsocketmustbeplacedoutsideoftheinstallationareatobeeasilyaccessibleafter installingthedishwasher.Donotuseanextensioncord!
Service
Read the chapter Troubleshooting before contacting the service centre. If you have encountered a problem that you cannot resolve, please contact your nearest service centre for professional help, see www.atag.nl/www.atag.be. Our website also has information about spare part availability and what you can repair yourself.
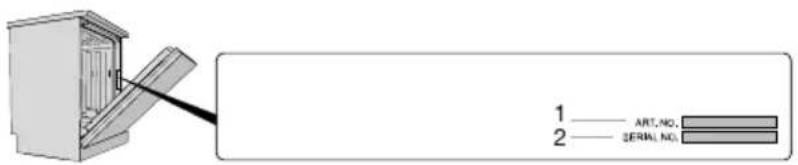
Whenmakingcontact, providethedetailsontheserialnumberplate. Include thearticlenumber(1) and theserialnumber(2).
Pleasenotethatnon-professionalrepairsmayriskusersafetyandaffectthewarranty.
Numberofcycles
Pressandholdandfor3secondstoshowNumberofcyclesonthedisplay.
Technicaldataandenergylabelling
Technicaldata
Weight:
Numberofstandardplacesettings:
819-872mmHeight:
596mmWidth:
554mmDepth:
50kg 1)
142)
0.03-1.0MPaWaterpressure:
SeetheserialnumberplateElectricalconnection:
SeetheserialnumberplateRatedpower:
1) Weightcanvaryduetodifferentspecifications.
2) InaccordancewiththeEN60436standard.
Informationforconsumers
Informationaboutyourapplianccanbefoundatwww.atag.nl/www.atag.be.Youcanalsofind informationintheEUProductRegistrationdatabaseforEnergyLabelling,EPREL.ScantheQRcode ontheenergylabelsuppliedwiththedishwasher(orgotohttps://eprel.ec.europa.euandsearch forthemodelname).
This appliance contains alight source/light sources of energy efficiency class D. Light sources are available as spare parts and can be replaced, without damage to the dish washer, by your nearest service centre or as similarly qualified professional.
Informationfortestinstitute
InformationaboutthisproductcanbefoundintheEuropeanProductDatabaseforEnergyLabelling, EPREL,andcanalsobeorderedbye-maildishwashers@appliance-development.com.
Therequest should include the detail on the serial number plate. Include the article number(1), the serial number(2) and the model name(3).

Declarationofconformity
WeherebydeclarethatthisapplianceisinconformitywiththerelevantEuropeandirectivesandtherequirementsoftherelevantstandards.
ATAG
www.atag.nl•www.atag.be

917891-a5

- GEBRUIKSAANWIJZING
- Bovenkorf
- Inruimenvandevaatwasser
- Onderkorf
- Verstelbarebordensteunen
- Voegvaatwasmiddeltoe
- Bovenstesproeiarm
- Onderstesproeiarm
- Schoonmakenvandebuitenkantvandevaatwasser
- Deurendeurafdichting
- NOTICED'UTILISATION
- Avantlepremierlavage
- ATTENTION!
- Paniersupérieur
- Panierinférieur
- GEBRAUCHSANWEISUNG
- ObererKorb
- UntererKorb
- ObererSprüharm
- UntererSprüharm
- Safetyinstructions
- WARNING!
- Childrenmustbesupervised-dishwasherdetergentiscorrosive!
- Childlock
- Installation
- Overflowguard
- Packaging
- Disposal
- Symbolsontheappliance
- Beforewashingforthefirsttime
- Waterhardness
- Checkingwaterhardness
- Increasedconsumptionduringregeneration
- Basicsettings
- \* Topuprinseaid
- S Topupsalt
- Saveenergyandwater
- Donotrinseunderrunningwater
- Chooseagreendetergent
- Runafullyloadeddishwasher
- Runprogramsatalowertemperature
- Selectdishwashingprogram—Eco
- Selection-Autodooropen
- Connecttocoldwater
- Connecttohotwater
- NOTE!
- Loadingthedishwasher
- Fragiledishes
- Fragiledecoration
- Crystal/Glass
- Silver
- Aluminium
- Cutlerywithgluedhandles
- Loadingaffectstheresults
- Thedishwasher'sbaskets
- Topcutlerytray
- Raisingthetopcutlerytray
- Loweringthetopcutlerytray
- Upperbasket
- Raisingtheupperbasket
- Loweringtheupperbasket
- Lowerbasket
- Adjustableplatesupports
- Adaptablepowerzones
- Washinglargeplates
- Cutlerybasket
- Fold-downsectionforsmallitems
- Adddetergent
- Detergentcompartment
- All-in-onedetergent
- Usingthedishwasher
- On/Off
- PROG Selectprogram
- Eco
- Universal
- Intensive
- Quick 1)
- Timeprogram
- Hygiene
- Rinseandhold
- Self-cleaning
- Anti-odour 2)
- Selectprogrammode
- Speed
- Night
- Selection
- Delayedstart
- Autodooropen
- ▷ □ Start/Stop
- Stoppingorchangingaprogram
- Remainingtime
- Statuslight
- Blue-Loadmore
- Red-Donotload
- Green-Unload
- Flashingred
- Ifyouwanttoloadmoredishes 3)
- Powerfailure
- Oncetheprogramhasfinished
- Thebestdryingresults
- Unloadingthedishwasher
- Settings
- Cleanthefilters
- Coarsefilter
- Careandcleaning
- Finefilter
- Cleaningthesprayarms
- Topsprayarm
- Uppersprayarm
- Lowersprayarm
- Cleantheoutsideofthedishwasher
- Dooranddoorseal
- Controlpanel
- RunSelf-cleaning
- Dishwashertub
- Removeblockages
- Unblockingthedrainagepump
- Unblockingtheinlethosefilter
- Winterstorage/Transport
- Troubleshooting
- Setup
- Drainageconnection
- Connectiontowatersupply
- Electrical connection
- Service
- Numberofcycles
- Technicaldataandenergylabelling
- Technicaldata
- Informationforconsumers
- Informationfortestinstitute
- Declarationofconformity
- ATAG
Brand : Atag
Model : DW7214MC
Category : Drill