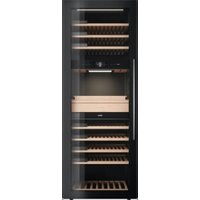
KA8074K3C - Fridge Atag - Free user manual and instructions
Find the device manual for free KA8074K3C Atag in PDF.


| Product type | Wine refrigerator (wine cellar) |
| Brand | Atag |
| Model | KA8074K3C |
| Dimensions (H x W x D) | 1435 x 683 x 700 mm |
| Empty weight | Approximately 168 kg |
| Maximum load weight | Approximately 350 kg |
| Electrical supply | 220-240 V, 50 Hz |
| Climate class | SN (extended temperate) to T (tropical) |
| Number of temperature zones | 3 zones (A, B, C) |
| Adjustable temperature range | 5°C to 20°C (depending on zone) |
| Bottle capacity (standard) | Up to 139 Bordeaux bottles (0.75 L) |
| Maximum capacity (with accessories) | Up to 190 bottles |
| Interior lighting | LED on shelves, RGB lighting in service zone |
| Connected functions | Wi-Fi, ConnectLife mobile app, remote control |
| Inventory management system | Label scanner (camera) and manual management |
| Charcoal filters | 3 filters (one per zone), replacement every 12 months |
| Humidity control | Clay humidity box (included), electronic monitoring |
| Door | 3-layer glass with UV filter, automatic and damped closing |
| Door opening direction reversal | Possible (requires at least 3 people, tools included) |
| Maintenance | Interior cleaning with soft cloth and mild detergent; automatic defrost |
Frequently Asked Questions - KA8074K3C Atag
User questions about KA8074K3C Atag
0 question about this device. Answer the ones you know or ask your own.
Ask a new question about this device
Download the instructions for your Fridge in PDF format for free! Find your manual KA8074K3C - Atag and take your electronic device back in hand. On this page are published all the documents necessary for the use of your device. KA8074K3C by Atag.
USER MANUAL KA8074K3C Atag
natural_image
Line drawing of a multi-level refrigerator cabinet with shelves and doors open (no text or symbols)GEBRUIKSAANWIJZING
WIJNKLIMAATKAST
NL
KA8074K3C
Inhoudsopgave
text_image
Diagram illustrating hand movement and load failure on a device, with arrows indicating left and right motion directions.natural_image
Diagram showing a TV mounted on a wall with a 90-degree angle indicator and a close-up of the front panel (no text or symbols present)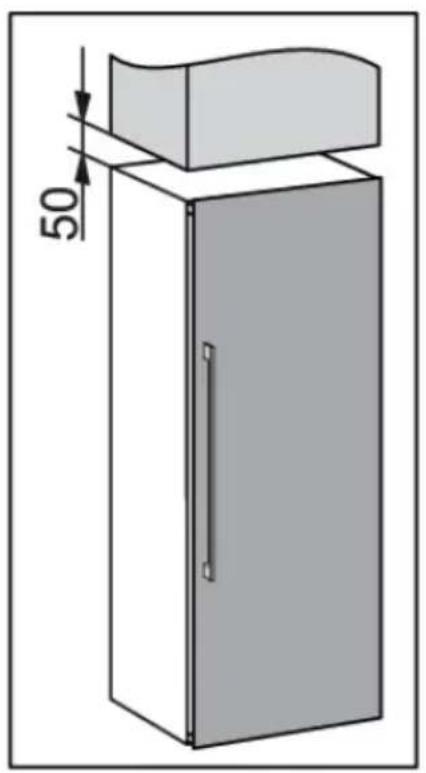
natural_image
Diagram of a cabinet with a curved top and a vertical dimension line labeled '50' (no text or symbols beyond the label)natural_image
Diagram of a rack-mounted electronic device with multiple drive bays and a switch, showing no text or symbols.text_image
Diagram illustrating two steps of installing a grid panel, labeled with arrows and numbered positions.text_image
Technical diagram illustrating a mechanical assembly with labeled parts and directional arrows indicating assembly steps.natural_image
Illustration of seven identical empty wine bottles arranged in a row (no text or symbols)INFORMATIE!
natural_image
Technical illustration of a mechanical assembly with two views: top shows a rack with a handle, bottom shows a clamped component labeled 'a' (no text or symbols present)natural_image
Illustration of two wine bottles placed on a wooden shelf (no text or symbols)natural_image
Diagram of six identical mechanical components arranged in a grid pattern (no text or symbols)natural_image
Diagram of a two-tier storage tray with upward arrows indicating flow or movement (no text or symbols)text_image
Technical diagram showing mechanical assembly with labeled components and directional arrows indicating motion or movement.natural_image
Technical line drawing of a rectangular container with an upward arrow indicating motion or force (no text or symbols)natural_image
Line drawing of a tray with three glasses and a conical object, labeled 'ServingTay' (no other text or symbols)text_image
12 11 13 Serving tray Accessory drawer 14natural_image
Diagram of a multi-compartment drawer with an upward arrow indicating flow or movement (no text or symbols)text_image
Technical diagram showing mechanical assembly with labeled components and directional arrowsnatural_image
Cross-sectional diagrams of a mechanical component showing internal structure and assembly (no text or symbols)natural_image
Illustration of a container pouring liquid into a rectangular block (no text or symbols)natural_image
Diagram of a container with circular components inside, no text or symbols presentnatural_image
Diagram showing a device interior with a back panel and a side panel, both before and after transformation (no text or symbols)natural_image
Interior view of a dual-chamber server rack cabinet with open doors open, showing internal compartments and ventilation grilles (no text or labels visible)text_image
INVENTORY / NOTES Added to inventory; 23-09-2021 Notes Best to drinktext_image
ADD NOTES Notes Type special information about this wine... Best to drink time depends on the type of wine Best to drink 05/2021 SET REMINDERtext_image
APPLICATION DOWNLOAD Use QR code for application downloadtext_image
PAIRING While this screen is open, pairing is enabled WINE CABINET QR CODE Use QR code for user pairingtext_image
NETWORK CONNECTION REMOTE CONTROL Switch on the appliance Remote Control to be able to change settings on the appliance with your smart device. This can also be done later. SKIPtext_image
CAMERA CAMERA When the camera is disabled, wine data can only be added manually. When the camera is unlocked, it will only be activated when a "scan" action is taking place.text_image
SETTINGS | ... | DATE AND TIME | TIME ZONE UCT+0 (W. Europe Standard Time) UCT+3 (Russian standard Time) UCT+3 (Russian standard Time) UCT+3 (Russian standard Time)Tijdendatum
text_image
TIME 12 : 00 HOURS MINUTES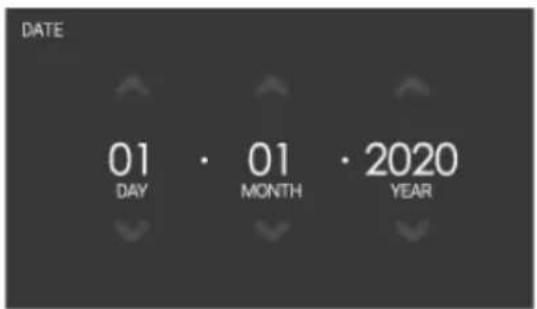
text_image
DATE 01 · 01 · 2020 DAY MONTH YEARtext_image
SETTINGS Go to the appliance settings SCAN WINE LABEL To be able to add or remove it from the inventory INVENTORY Add wine data and position to easily find it latertext_image
SETTINGS Go to the appliance settings SCAN WINE LABEL To be able to add or remove it from the inventory INVENTORY Add wine data and position to easily find it latertext_image
SETTINGS Go to the appliance settings SCAN WINE LABEL To be able to add or remove it from the inventory INVENTORY Add wine data and position to easily find it latertext_image
INVENTORY MANAGEMENT Generic Exact Save your bottles' position on a shelf. You can later check which bottles are on each shelf.
text_image
INVENTORY MANAGEMENT GENERIC EXACT Save your bottles' position in a specific place inside a shelf. You can later check the exact arrangement of bottles on each shelf.text_image
SETTINGS Go to the appliance settings SCAN WINE LABEL To be able to add or remove it from the inventory INVENTORY Add wine data and position to easily find it latertext_image
SCAN WINE Position the wine label and 'press 'Take a picture'. 01 Take a picture Manually input wine data Take a picture 5° countdown 02 03bubble
| Point | Value | |---|---| | 1 | 02.1 | | 2 | 02.2 | | 3 | 02.4 | | 4 | 02.4 | | 5 | 02.4 | | 6 | 02.4 | | 7 | 02.3 | | 8 | 02.3 | | 9 | 02.3 | | 10 | 02.3 | | 11 | 02.3 | | 12 | 02.3 | | 13 | 02.3 |text_image
01 02 INVENTORY | NOTES Added to inventory: 23-01-2020 Notes - Best to servetext_image
ADD NOTES Notes Type special information about this wine... Best to drink time depends on the type of wine Best to drink 05/2021 SET REMINDERtext_image
INVENTORY | NOTES Unplaced 2x Shelf A2 3x Position 2 Position 4 Added to inventory: 23-01-2020 Notes - Best to serve - Show position Position 6 01 02 03text_image
ADD NOTES Notes Type special information about this wine... Best to drink time depends on the type of wine Best to drink 05/2021 SET REMINDERnatural_image
Illustration of three different screwdriver tools: a standard screwdriver, a standard drill bit, and a standard electric drill (no text or symbols present)text_image
Diagram of an open refrigerator with numbered parts and a rotation arrow indicating clockwise motion.natural_image
Mechanical assembly diagram showing a clamping mechanism with directional arrows and a small table (no text or symbols)natural_image
Diagram showing three views of a refrigerator with internal compartments and door frame, illustrating structural changes (no text or symbols)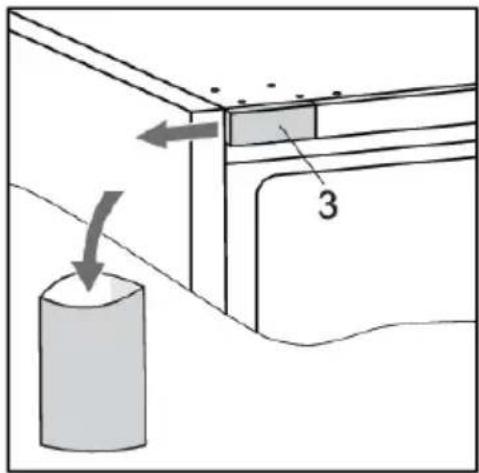
text_image
Diagram showing a cylindrical object with an arrow indicating direction and labeled component '3'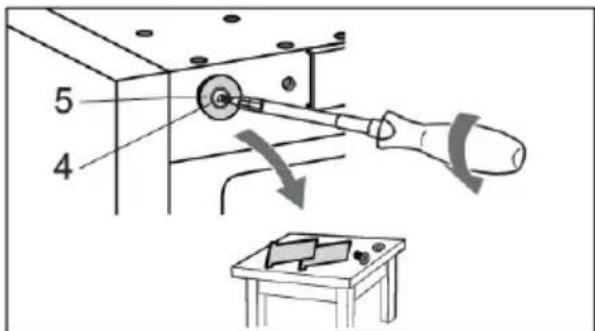
text_image
5 4text_image
Technical diagram of a refrigerator with labeled parts and an inset showing a mechanical clamp mechanism labeled 'a'.text_image
Technical diagram showing a tool interacting with a mechanical component, with an inset close-up highlighting the component's internal structure.natural_image
Technical diagram of a mechanical assembly with directional arrows indicating motion or force (no text or symbols present)text_image
Technical diagram showing a mechanical assembly with labeled parts 4 and 5, including an arrow indicating direction of motion.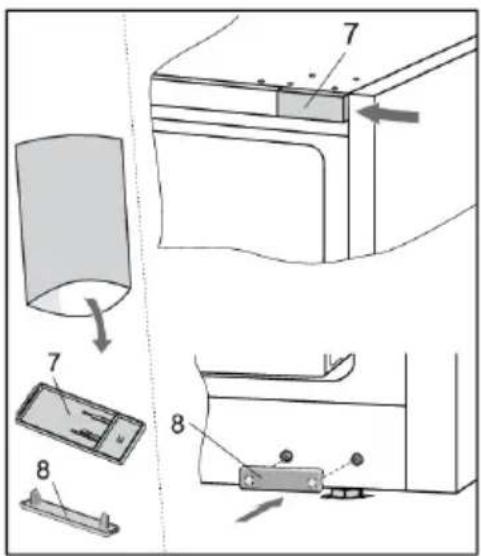
text_image
Technical diagram showing exploded view of a refrigerator with labeled parts and directional arrows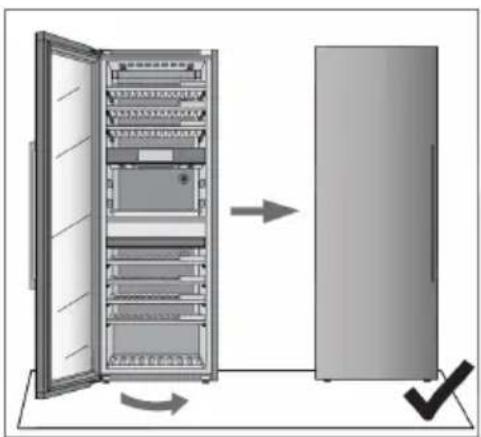
flowchart
graph TD
    A["Open Server Rack"] --> B["Closed Unit"]
    style A fill:#f9f,stroke:#333
    style B fill:#bbf,stroke:#333
text_image
Technical diagram showing a mechanical assembly with labeled component '1' and directional arrow indicating motion or movement.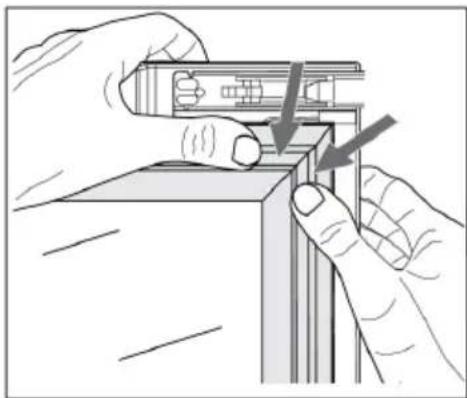
natural_image
Illustration of hands installing or adjusting a mechanical component with arrows indicating assembly (no text or symbols present)natural_image
Architectural line drawing of a multi-level cabinet or rack unit with no visible text or symbolsNOTICED'UTILISATION
ARMOIRE À VIN
FR
KA8074K3C
Tables des matières
Installation et raccordement
text_image
Diagram illustrating hand movement and load failure on a device, with arrows indicating left and right motion directions.Installation et raccordement
natural_image
Diagram showing a TV mounted on a wall with a 90-degree angle indicator and a close-up of the front panel (no text or symbols present)natural_image
Diagram of a cabinet with a curved top and a vertical dimension line labeled '50' (no text or symbols beyond the label)Installation et raccordement
natural_image
Diagram of a device with coiled components and directional arrows indicating movement (no text or symbols)Installation et raccordement
text_image
797 1920 745 700 L= 2000Installation et raccordement
text_image
Diagram illustrating two steps of heating a heat exchanger with labeled arrows and componentstext_image
Technical diagram illustrating a mechanical assembly with labeled parts and directional arrows indicating assembly steps.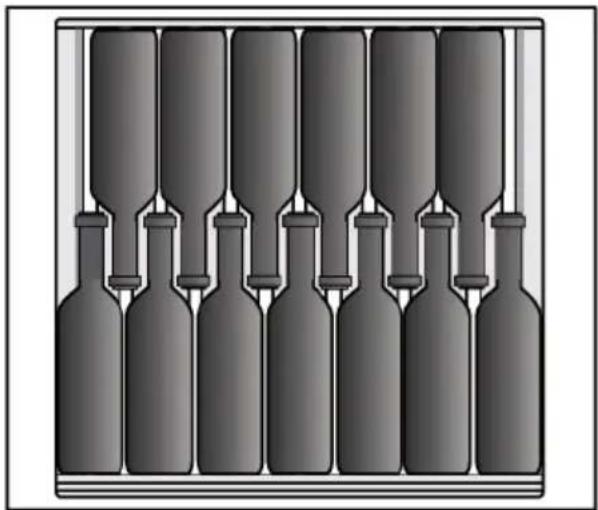
natural_image
Illustration of seven identical empty wine bottles arranged in a row (no text or symbols)natural_image
Technical illustration of a mechanical assembly with two views: top shows a rack with ribbed metal components, bottom shows a 3D model with labeled component 'a' (no text or symbols beyond labels)natural_image
Illustration of two wine bottles placed on a textured surface (no text or symbols)natural_image
Pure diagram of six identical mechanical components arranged in a wavy pattern, no text or symbols present.natural_image
Diagram of two stacked plastic crates with upward arrows indicating movement or assembly (no text or symbols)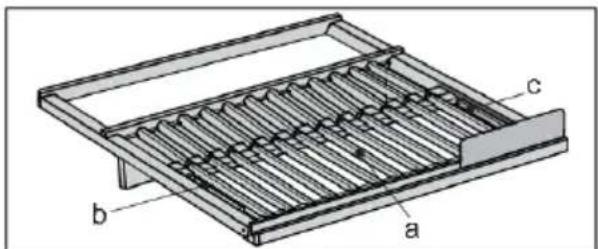
natural_image
Technical line drawing of a rack with labeled components (a, b, c), no text or symbols present.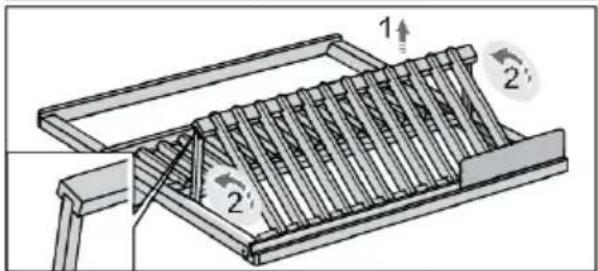
text_image
Technical diagram of a mechanical assembly with labeled components 1 and 2, showing structural details and motion indicators.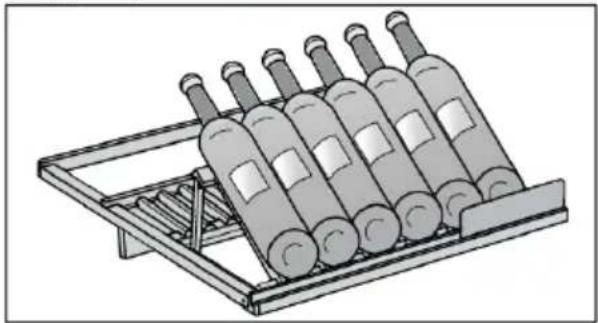
natural_image
Illustration of a multi-wine bottle rack with six bottles, no text or symbols presenttext_image
Technical diagram showing mechanical assembly with labeled components and directional arrows indicating motion or movement.natural_image
Technical line drawing of a rectangular container with internal compartments and an upward arrow indicating motion (no text or symbols)natural_image
Line drawing of a tray with three glasses and a conical object, labeled 'Serving Day' (no other text or symbols)text_image
12 11 13 Serving/Key Accessory Drimer 14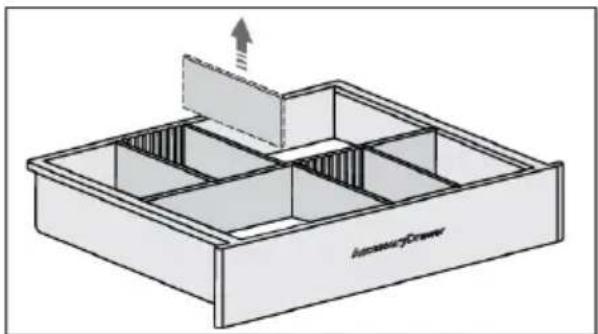
text_image
InventoryDrawer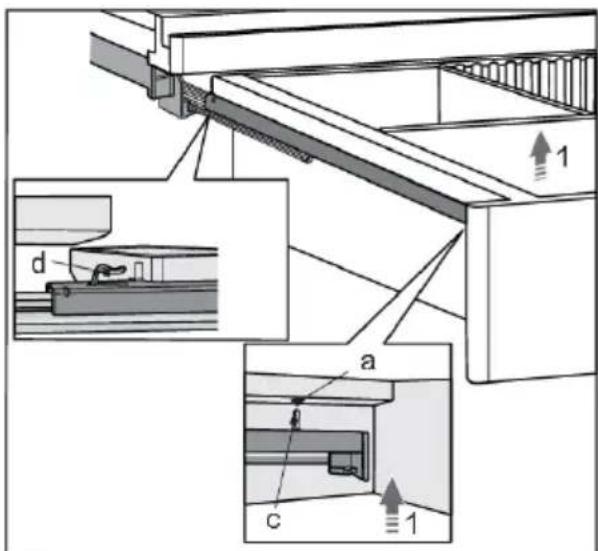
text_image
Technical diagram showing mechanical assembly with labeled components and directional arrowsnatural_image
Cross-sectional diagrams of a mechanical component showing internal structure and assembly (no text or symbols)natural_image
Illustration of a container pouring liquid into a rectangular block (no text or symbols)natural_image
Diagram of a container with circular and rectangular elements inside, no text or symbols presentnatural_image
Diagram showing a device interior with a back panel and a side panel, both before and after transformation (no text or symbols present)natural_image
Interior view of a dual-chamber electric cabinet with open doors showing internal compartments and ventilation grilles (no text or labels visible)text_image
INVENTORY | NOTES Added to inventory: 23-09-2021 Notes Best to drinktext_image
ADD NOTES Notes Type special information about this wine... Best to drink time depends on the type of wine Best to drink 05/2021 SET REMINDERtext_image
APPLICATION DOWNLOAD Use QR code for application downloadtext_image
PAIRING While this screen is open, pairing is enabled WINE CABINET QR CODE Use QR code for user pairingtext_image
NETWORK CONNECTION REMOTE CONTROL Switch on the appliance Remote Control to be able to change settings on the appliance with your smart device. This can also be done later. SKIPtext_image
CAMERA CAMERA When the camera is disabled, wine data can only be added manually. When the camera is unlocked, it will only be activated when a "scan" action is taking place.text_image
SETTINGS | ... | DATE AND TIME | TIME ZONE UCT+0 (W. Europe Standard Time) UCT+3 (Russian standard Time) UCT+3 (Russian standard Time) UCT+3 (Russian standard Time)Heureetdate
text_image
TIME 12 : 00 HOURS MINUTES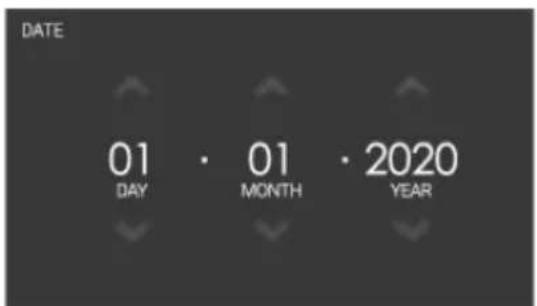
text_image
DATE 01 · 01 · 2020 DAY MONTH YEARtext_image
TEMPERATURE GUIDE 03 04 Serving Preserving 7° 9° 11° LIGHT WHITE MEDIUM WHITE FULL WHITE DESIGN 05text_image
SETTINGS Go to the appliance settings SCAN WINE LABEL To be able to add or remove it from the inventory INVENTORY Add wine data and position to easily find it latertext_image
SETTINGS Go to the appliance settings SCAN WINE LABEL To be able to add or remove it from the inventory INVENTORY Add wine data and position to easily find it latertext_image
SETTINGS Go to the appliance settings SCAN WINE LABEL To be able to add or remove it from the inventory INVENTORY Add wine data and position to easily find it latertext_image
INVENTORY MANAGEMENT Generic Exact Save your bottles' position on a shelf. You can later check which bottles are on each shelf.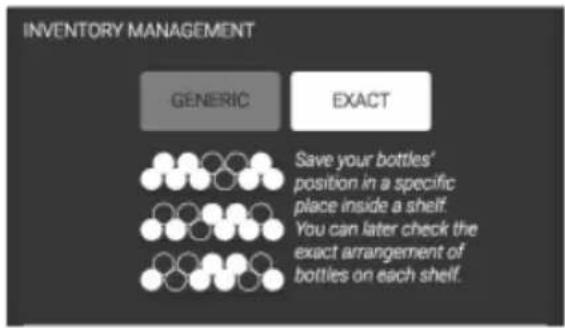
text_image
INVENTORY MANAGEMENT GENERIC EXACT Save your bottles' position in a specific place inside a shelf. You can later check the exact arrangement of bottles on each shelf.text_image
SETTINGS Go to the appliance settings SCAN WINE LABEL To be able to add or remove it from the inventory INVENTORY Add wine data and position to easily find it latertext_image
SCAN WINE Position the wine label and 'press 'Take a picture'. 01 Take a picture Manually input wine data 02 Take a picture 5° countdown 03bubble
| Point | Value | |---|---| | 1 | 02.2 | | 2 | 02.1 | | 3 | 02.4 | | 4 | 02.4 | | 5 | 02.4 | | 6 | 02.4 | | 7 | 02.3 | | 8 | 02.3 | | 9 | 02.3 | | 10 | 02.3 | | 11 | 02.3 | | 12 | 02.3 |Emplacement vide.021
text_image
01 02 INVENTORY | NOTES Added to inventory: 23-01-2020 Notes - Best to servetext_image
ADD NOTES Notes Type special information about this wine... Best to drink time depends on the type of wine Best to drink 05/2021 SET REMINDERtext_image
INVENTORY | NOTES Unplaced 2x Shelf A2 3x Position 2 Position 4 Added to inventory: 23-01-2020 Notes - Best to serve - Show position Position 6 01 02 03text_image
ADD NOTES Notes Type special information about this wine... Best to drink time depends on the type of wine Best to drink 05/2021 SET REMINDERnatural_image
Illustration of three different screwdriver tools: a flat screwdriver, a standard screwdriver with a star-shaped head, and a standard electric drill (no text or symbols present)text_image
Diagram of an open refrigerator with numbered parts and a rotation arrow indicating clockwise motion.natural_image
Mechanical assembly diagram showing a robotic arm interacting with a small table, no text or symbols presentnatural_image
Diagram showing three views of a refrigerator with internal compartments and door frame, illustrating structural changes (no text or symbols)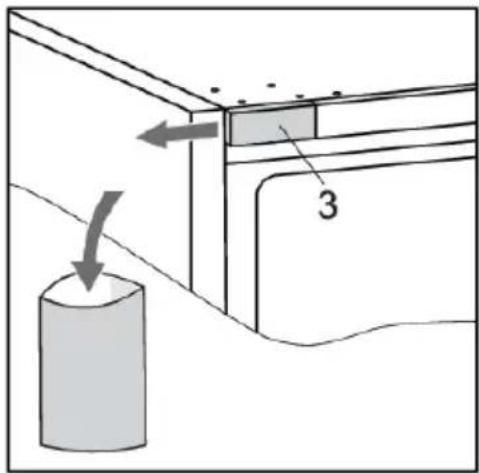
text_image
Diagram showing a cylindrical object with an arrow indicating direction and labeled part '3', likely illustrating a mechanical or structural assembly.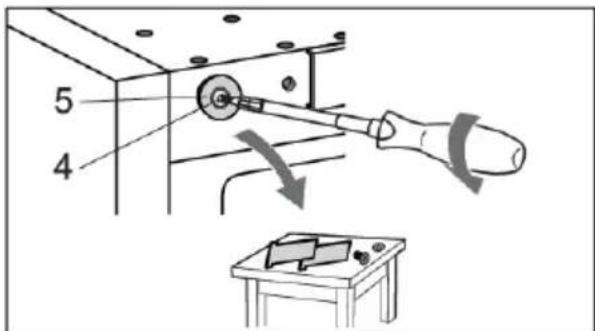
text_image
5 4text_image
Technical diagram of a refrigerator with labeled parts and an inset showing a mechanical clamp mechanism labeled 'a'.text_image
Technical diagram showing a tool interacting with a mechanical component, with an inset close-up highlighting the component's internal structure.natural_image
Technical diagram of a mechanical assembly with directional arrows indicating motion or force (no text or symbols present)text_image
Technical diagram showing a mechanical assembly with labeled parts 4 and 5, including an arrow indicating direction of motion.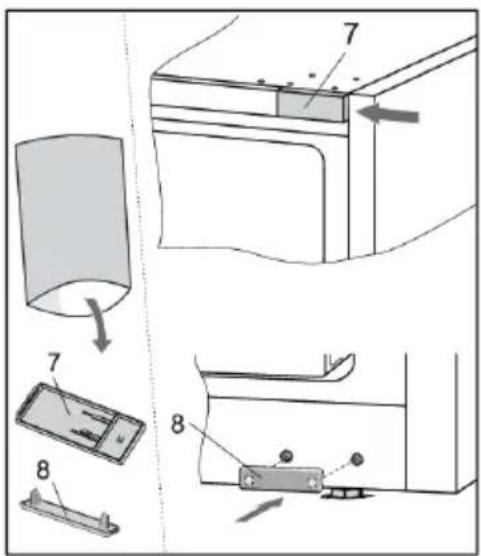
text_image
Technical diagram showing exploded view of a refrigerator with labeled parts and directional arrows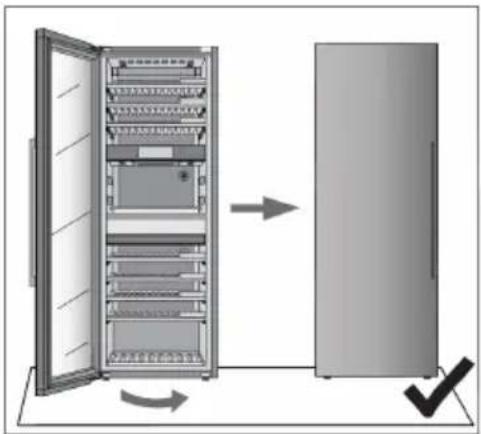
flowchart
graph LR
    A["Open Panel Rack"] --> B["Right-Left Rack"]
    style A fill:#f9f,stroke:#333
    style B fill:#bbf,stroke:#333
text_image
Technical diagram showing a mechanical assembly with labeled component '1' and a tool interacting with a bracket.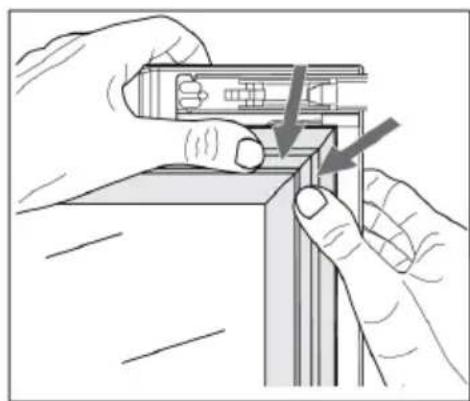
natural_image
Illustration of hands installing or adjusting a mechanical component with arrows indicating assembly (no text or symbols present)natural_image
Line drawing of a multi-level refrigerator cabinet with shelves and doors open (no text or symbols)BEDIENUNGSANLEITUNG
WEINKÜHLSCHRANK
DE
KA8074K3C
text_image
Diagram illustrating hand movement and load failure on a device, with arrows indicating left and right motion directions.natural_image
Diagram showing a TV mounted on a wall with a 90-degree angle indicator, and an inset view of a washing machine (no text or symbols present)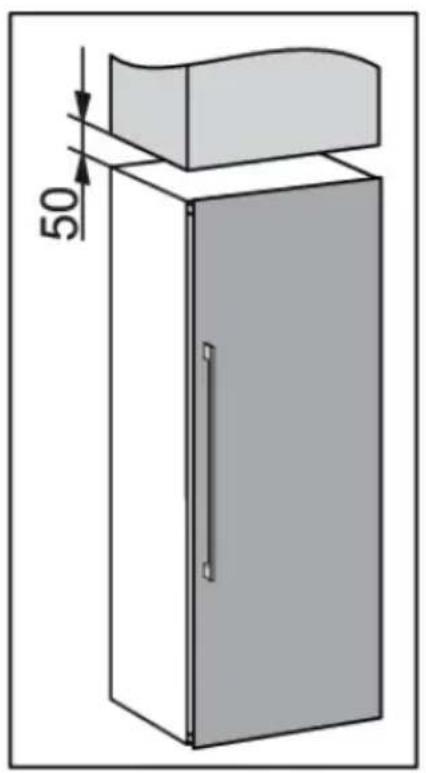
natural_image
Diagram of a cabinet with a curved top and a vertical dimension line labeled '50' (no text or symbols beyond the label)natural_image
Diagram of a device with coiled components and directional arrows indicating movement (no text or symbols)text_image
Diagram illustrating two steps of installing a grid panel, labeled with arrows and numbered positions.text_image
Technical diagram illustrating a mechanical assembly with labeled parts and directional arrows indicating assembly steps.natural_image
Illustration of seven identical black bottles arranged in a row, no text or symbols present
INFORMATION!
natural_image
Technical illustration of a mechanical assembly with two views: top shows a rack with ribbed metal components, bottom shows a clamped component labeled 'a' (no text or symbols beyond label)natural_image
Illustration of two wine bottles placed on a wooden shelf (no text or symbols)natural_image
Diagram of six identical mechanical components arranged in a grid pattern (no text or symbols)text_image
12 11 13 Serving tray Accessory Order 14natural_image
Diagram of two stacked plastic crates with upward arrows indicating movement or assembly (no text or symbols)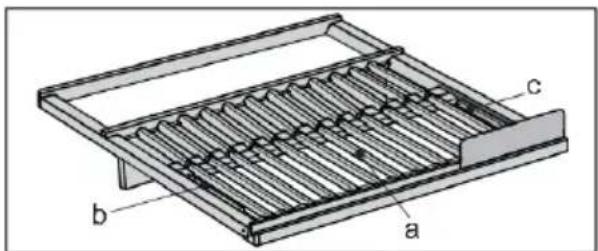
natural_image
Technical line drawing of a mechanical device with labeled components (a, b, c), showing internal structure without any text or symbols.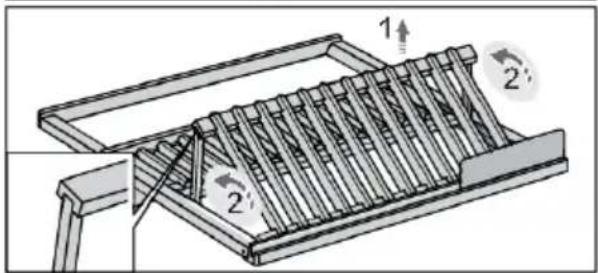
text_image
Technical diagram of a mechanical device with labeled components and directional arrows indicating motion or assembly.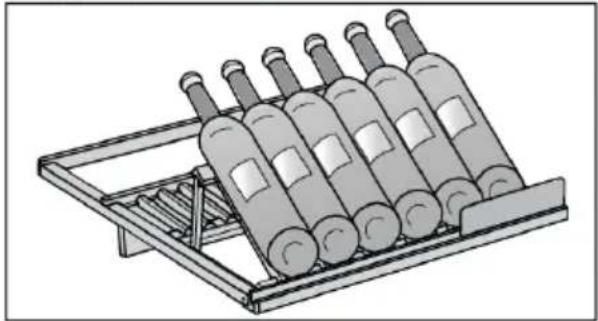
natural_image
Illustration of a multi-wheeled storage rack with multiple bottles on top (no text or symbols visible)text_image
Technical diagram showing mechanical assembly with labeled components and directional arrows indicating motion or movement.natural_image
Technical line drawing of a rectangular container with an upward arrow indicating motion or force (no text or symbols)natural_image
Line drawing of a tray with three glasses and a conical object, labeled 'ServingTray' (no other text or symbols)text_image
12 11 13 Serving They Accessory Drifter 14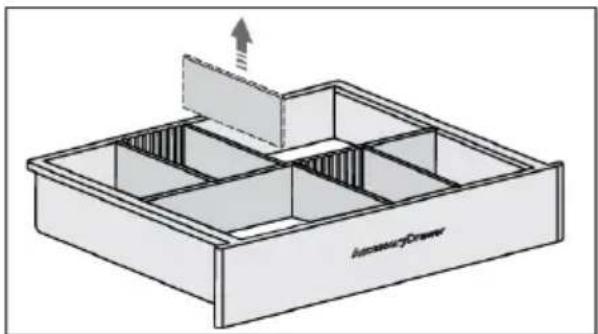
text_image
InventoryDrawer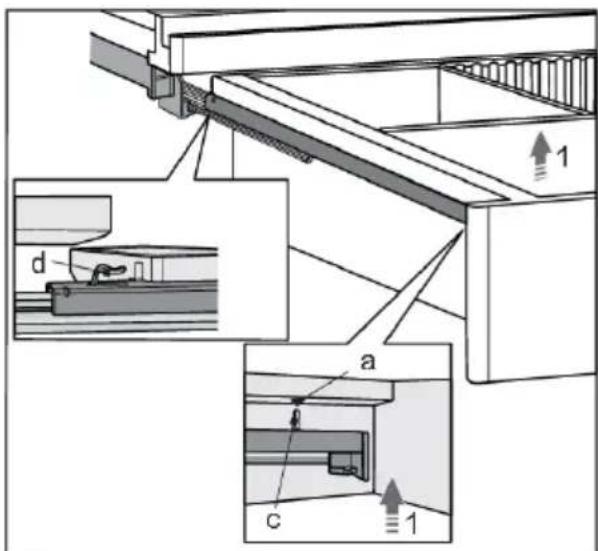
text_image
Technical diagram showing mechanical assembly with labeled components and directional arrowsnatural_image
Illustration of a container pouring liquid into a rectangular block (no text or symbols)natural_image
Diagram of a container with circular elements inside, no text or symbols presentnatural_image
Diagram showing a device interior with labeled components before and after transformation (no text or symbols present)natural_image
Interior view of a dual-chamber server rack cabinet with open doors open, showing internal compartments and ventilation grilles (no text or labels visible)text_image
INVENTORY / NOTES Added to inventory: 23-09-2021 Notes Best to drinktext_image
ADD NOTES Notes Type special information about this wine... Best to drink time depends on the type of wine Best to drink 05/2021 SET REMINDERtext_image
APPLICATION DOWNLOAD Use QR code for application downloadtext_image
PAIRING While this screen is open, pairing is enabled WINE CABINET QR CODE Use QR code for user pairingtext_image
NETWORK CONNECTION REMOTE CONTROL Switch on the appliance Remote Control to be able to change settings on the appliance with your smart device. This can also be done later. SKIPtext_image
CAMERA CAMERA When the camera is disabled, wine data can only be added manually. When the camera is unlocked, it will only be activated when a "scan" action is taking place.text_image
SETTINGS | ... | DATE AND TIME | TIME ZONE UCT+0 (W. Europe Standard Time) UCT+3 (Russian standard Time) UCT+3 (Russian standard Time) UCT+3 (Russian standard Time)ZeitundDatum
text_image
TIME 12 : 00 HOURS MINUTES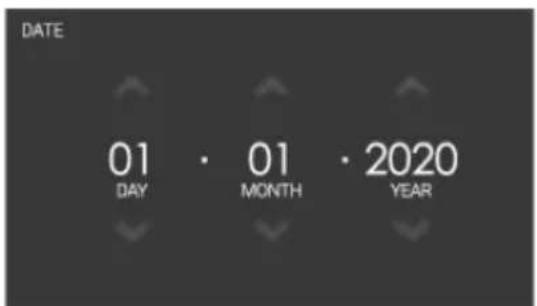
text_image
DATE 01 · 01 · 2020 DAY MONTH YEARtext_image
TEMPERATURE GUIDE 03 Serving 04 Serving Preserving 7° LIGHT MEDIUM 9° WHICE FLOW 11° WHICE FLOW 12° DISCUING 05text_image
SETTINGS Go to the appliance settings SCAN WINE LABEL To be able to add or remove it from the inventory INVENTORY Add wine data and position to easily find it latertext_image
SETTINGS Go to the appliance settings SCAN WINE LABEL To be able to add or remove it from the inventory INVENTORY Add wine data and position to easily find it latertext_image
SETTINGS Go to the appliance settings SCAN WINE LABEL To be able to add or remove it from the inventory INVENTORY Add wine data and position to easily find it latertext_image
INVENTORY MANAGEMENT Generic Exact Save your bottles' position on a shelf. You can later check which bottles are on each shelf.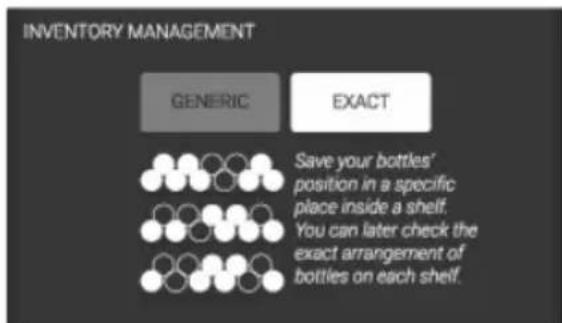
text_image
INVENTORY MANAGEMENT GENERIC EXACT Save your bottles' position in a specific place inside a shelf. You can later check the exact arrangement of bottles on each shelf.text_image
SETTINGS Go to the appliance settings SCAN WINE LABEL To be able to add or remove it from the inventory INVENTORY Add wine data and position to easily find it latertext_image
SCAN WINE Position the wine label and 'press 'Take a picture'. 01 Take a picture Manually input wine data Take a picture 5° countdown 02 03Genau Managementsystem
Genau Managementsystem
text_image
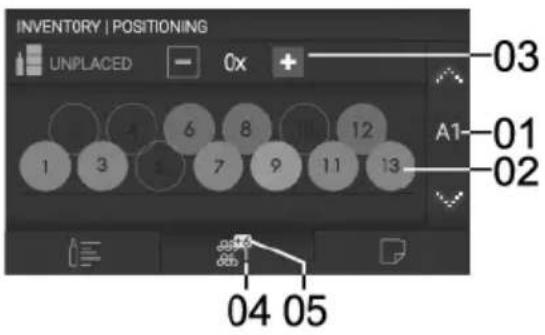
INVENTORY | POSITIONING UNPLACED 0x + 03 A1-01 02 1 3 6 8 12 7 9 11 13 04 05text_image
01 02 INVENTORY | NOTES Added to inventory: 23-01-2020 Notes - Best to servetext_image
ADD NOTES Notes Type special information about this wine... Best to drink time depends on the type of wine Best to drink 05/2021 SET REMINDERGenau Managementsystem
text_image
INVENTORY | NOTES Unplaced 2x Shelf A2 3x Position 2 Position 4 Added to inventory. 23-01-2020 Notes - Best to serve - Show position Position 6 01 02 03text_image
ADD NOTES Notes Type special information about this wine... Best to drink time depends on the type of wine Best to drink 05/2021 SET REMINDERnatural_image
Illustration of three different screwdriver tools: a flat screwdriver, a standard screwdriver with a circular head, and a standard electric drill (no text or symbols present)text_image
Diagram of an open refrigerator with numbered parts and a rotation arrow indicating clockwise motion.natural_image
Mechanical assembly diagram showing a clamping mechanism with directional arrows and a small table (no text or symbols)natural_image
Diagram showing three views of a refrigerator with internal compartments and door frame, illustrating structural changes (no text or symbols)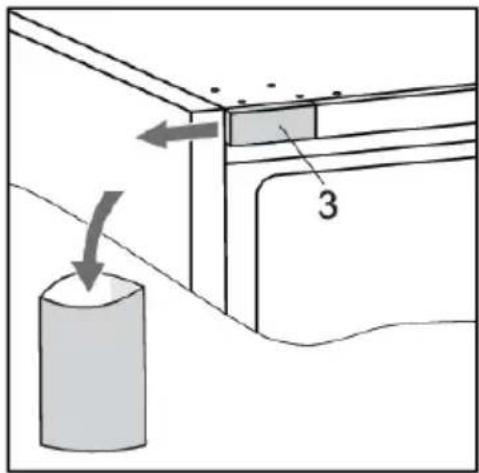
text_image
Diagram showing a cylindrical object with an arrow indicating direction and labeled component '3'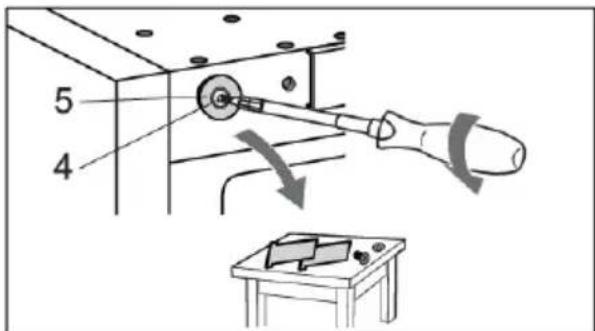
text_image
5 4text_image
Technical diagram of a refrigerator with labeled parts and an inset showing a mechanical clamp mechanism labeled 'a'.text_image
Technical diagram showing a tool interacting with a mechanical component, with an inset close-up highlighting the component's internal structure.natural_image
Technical diagram of a mechanical assembly with directional arrows indicating motion or force (no text or symbols present)text_image
Technical diagram showing a mechanical assembly with labeled parts 4 and 5, including an arrow indicating direction of motion.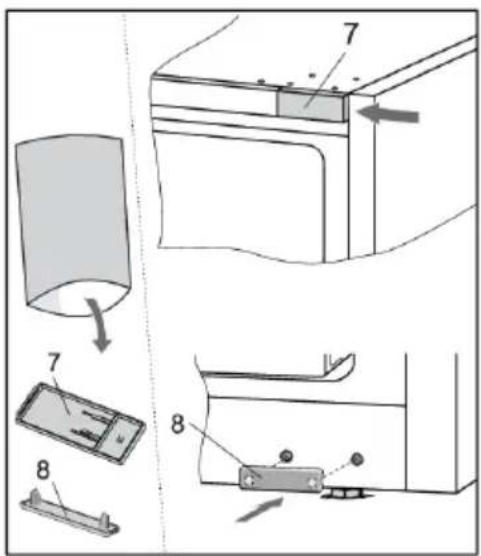
text_image
Technical diagram showing exploded view of a refrigerator with labeled parts and directional arrows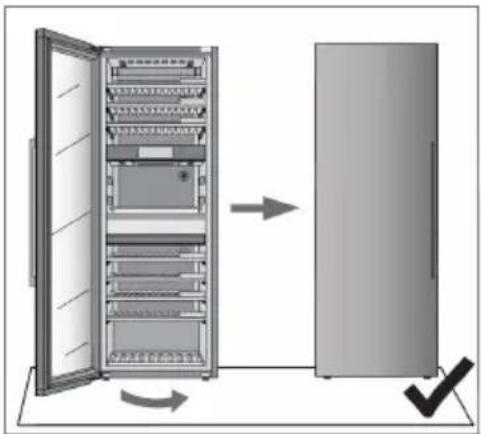
flowchart
graph LR
    A["Open Panel Rack"] --> B["Right-Left Rack"]
    style A fill:#f9f,stroke:#333
    style B fill:#bbf,stroke:#333
text_image
Technical diagram showing a mechanical assembly with labeled component '1' and directional arrow indicating rotation or movement.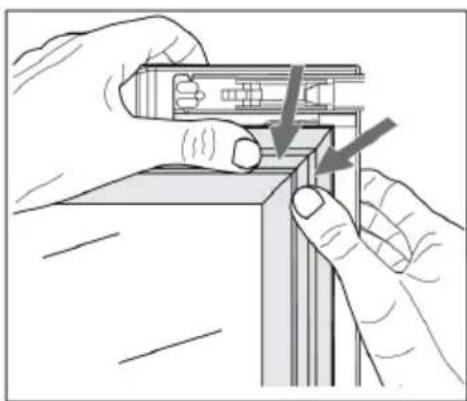
natural_image
Illustration of hands installing or adjusting a mechanical component with arrows indicating assembly (no text or symbols present)natural_image
Line drawing of a multi-level refrigerator cabinet with shelves and doors open (no text or symbols)INSTRUCTIONSFORUSE
WINE CLIMATE CABINET
EN
KA8074K3C
Contents
Welcome to our growing Atag family! ......
Safety of children and vulnerable people .....
Beforeusingtheapplianceforthefirst time....
Before you use the appliance for the first time ....
3 Introduction Serving area.... 23
3 29Zone C ...
4Safetyinstructions......
4 31Accessor
5General safety ....
5Installation 33Operation
6Electrical connection ....
7Use 35Initial use
8Care and cleaning 40Main disp
9Displorad the. 'Plus'.menu 43
10Installationandconnection......
10Selecting the location ....
11Appliance placement 48Inventory
15Connecting the appliance ....
16
16
16Energy-saving advice ....
17Storingwine....
17 Wine storage tips ....
17 Serving temperature 73 General p
18Storing bottles 74Environn
19 Description of the appliance and appliance .... 74
19Zone A 75Compliant
Welcome to our growing Atag family!
We are proud of our appliances. We hope that this appliance will be an appreciated and dependable aid for many years to come.
Please read the operating instructions before use. They include general tips, information about the settings and adjustments you can make, and the best way to take care of your appliance.
LinktotheEUEPRELdatabase
For European marketsonly
The QR code on the energy label supplied with the appliance provides a web link to the registration of this appliance in the EU EPREL database. Keep the energy label for reference together with the user manual and all other documents provided with this appliance. It is possible to find information related to the performance of the product in the EU EPREL database using the link https://eprel.ec.europa.eu and the model name and product number that you can find on the rating plate of the appliance. For more detailed information about the energy label, visit www.theenergylabel.eu.
The following symbols are used throughout the manual and they have the following meanings:

INFORMATION!
Information, advice, tip, or recommendation

WARNING!
Warning –general danger

ELECTRIC SHOCK!
Warning – danger of electric shock

DANGER OF FIRE!
Warning –danger of fire
Before the installation and use of the appliance, carefully read the supplied instructions. The manufacturer is not responsible if an incorrect installation and use causes injuries and damages. Always keep the instructions with the appliance for future reference.
WARNING!
If the appliance is installed at an altitude of over 1000 m above sea level, there is a danger of glass cracking due to air pressure. In such case, glass fragments could cause injury.
Safetyofchildrenandvulnerablepeople
- The appliance is not intended for use by persons (including children) with reduced physical, sensory or mental capabilities, or lack of experience and knowledge, unless they have been given supervision or instruction concerning use of the appliance by a person responsible for their safety.
- Children should be supervised to ensure that they do not play with the appliance.
- Cleaning and user maintenance shall not be made by children without supervision.
- Keep all packaging away from children.
For European marketsonly
- This appliance can be used by children aged from 8 years and above and persons with reduced physical, sensory or mental capabilities or lack of experience and knowledge if they have been given supervision or instruction concerning use of the appliance in a safe way and understand the hazards involved.
• Children shall not play with the appliance.
- Cleaning and user maintenance shall not be made by children without supervision.
- Children aged from 3 to 8 years are not allowed to load and unload the appliance.
Generalsafety
- Illumination in the appliance is only suitable for illumination of this appliance and not for household room illumination.
-
WARNING! This appliance is intended to be used in household and similar applications such as:
-
staff kitchen areas in shops, offices and other working environments;
- farm houses and by clients in hotels, motels and other residential type environments;
- catering and similar non-retail applications.
WARNING!
Keep ventilation openings, in the appliance enclosure or in the built-in structure, clear of obstruction.
Do not use mechanical devices or other means to accelerate the defrosting process, other than those recommended by the manufacturer.
Do not damage the refrigerant circuit.
Do not use water spray and steam to clean the appliance.
Clean the appliance with a moist soft cloth. Only use neutral detergents. Do not use abrasive products, abrasive cleaning pads, solvents or metal objects.
Do not store explosive substances such as aerosol cans with a flammable propellant in this appliance.
If the supply cord is damaged, it must be replaced by the manufacturer, its service agent or similarly qualified persons in order to avoid a hazard.
Installation
- Remove all the packaging.
- Do not install or use a damaged appliance.
Safety instructions
- Obey the installation instruction supplied with the appliance.
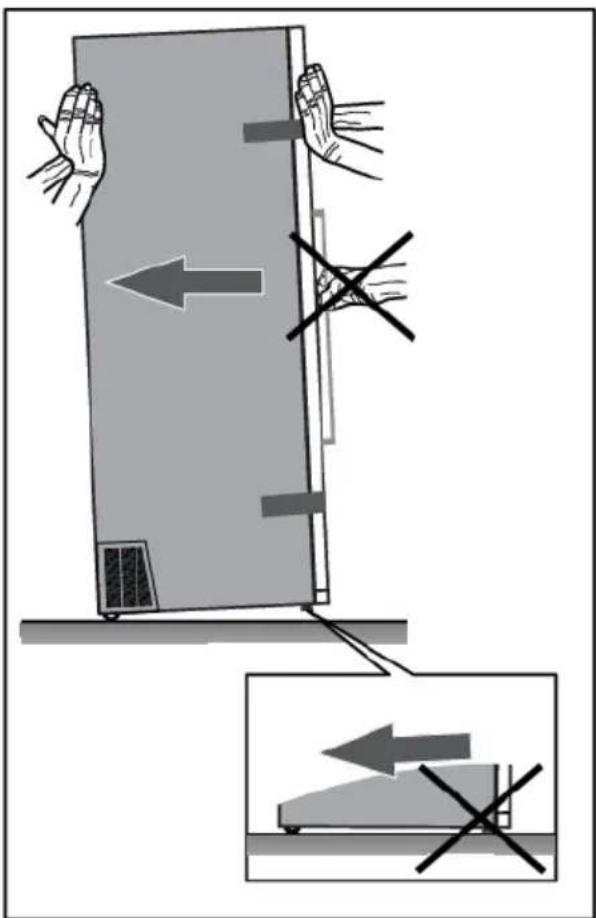
- Always be careful when you move the appliance because it is heavy. Always wear safety gloves.
- When tilting the appliance, make sure the door does not touch the floor. The door glass pane is sensitive, especially to any lateral impact (i.e. impact from the side, on the edge of the door).
- Make sure the air can circulate around the appliance.
- After you place the appliance, wait at least 4 hours before connecting the appliance to the power supply. This is to allow the oil to flow back in the compressor.
- Do not install the appliance close to radiators or cookers, oven or hobs.
- Do not install the appliance where there is direct sunlight.
- Do not install this appliance in areas that are too humid or too cold, such as the construction appendices, garages or cellars.
- When you move the appliance, lift it by the front edge to avoid scratching the floor.
- Never move or lift the appliance by applying force on the door handle.

ELECTRIC SHOCK!
WARNING! When positioning the appliance, ensure the supply cord is not trapped or damaged.
Electricalconnection

ELECTRIC SHOCK!
WARNING! Risk of fire and electrical shock.
- The appliance must be earthed.
-
All electrical connections should be made by a qualified electrician.
-
Make sure that the electrical information on the rating plate agrees with the power supply. If not, contact an electrician.
• Always use a correctly installed shockproof socket. - Do not use multi-plug adapters and extension cables.
- Make sure not to cause damage to the electrical components (e.g. mains plug, mains cable, compressor). Contact the Service or an electrician to change the electrical components.
- The mains cable must stay below the level of the mains plug.
- Connect the mains plug to the mains socket only at the end of the installation. Make sure that there is access to the mains plug after the installation.
- Do not pull the mains cable to disconnect the appliance. Always pull the mains plug.
WARNING!
Do not locate multiple portable socket-outlets or portable power supplies at the rear of the appliance
Use
WARNING!
Risk of injury, burns, electrical shock or fire.
- Do not change the specification of this appliance.
- Do not put electrical appliances (e.g. ice cream makers) in the appliance unless they are stated applicable by the manufacturer.
- Be careful not to cause damage to the refrigerant circuit. It contains isobutene (R600a), a natural gas with a high level of environmental compatibility. This gas is flammable.
- If damage occurs to the refrigerant circuit, make sure that there are no flames and sources of ignition in the room. Ventilate the room.
- Do not let hot items to touch the plastic parts of the appliance.
Safety instructions
- Do not store flammable gas and liquid in the appliance.
- Do not put flammable products or items that are wet with flammable products in, near or on the appliance.
- Do not touch the compressor or the condenser. They are hot.
Careandcleaning

WARNING!
Risk of injury or damage to the appliance.
- Before maintenance, deactivate the appliance and disconnect the mains plug from the mains socket.
- This appliance contains hydrocarbons in the cooling unit. Only a qualified person must do the maintenance and the recharging of the unit.
Disposal
WARNING!
Risk of injury or suffocation.
- Disconnect the appliance from the mains supply.
- Cut off the mains cable and discard it.
- Remove the door to prevent children and pets to be closed inside of the appliance.
- The refrigerant circuit and the insulation materials of this appliance are ozone friendly.
- The insulation foam contains flammable gas. Contact your municipal authority for information on how to discard the appliance correctly.
- Do not cause damage to the part of the cooling unit that is near the heat exchanger.
Installation and connection
Selecting the location
text_image
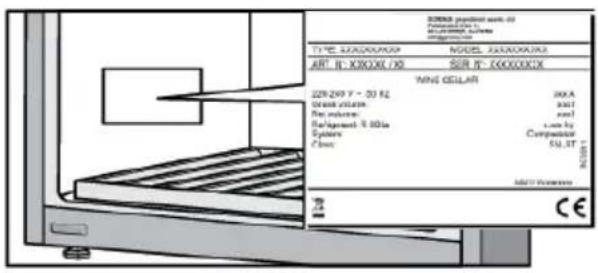
SOMES positioned with 03 Pension line: 1 Line/line: 2 TYPE: XXXXXX/XP MODEL: XXXXXX/XP ART: II: XXXXX/XP SER: II: XXXXXX/XP MINE CELLAR 228-249 Y - 20 Hz Diameter: 500 Size: 500 Extr./inversion: 1.00 Hz System: Compartmental C:/box: SU.ST M/ST Parameters: CEPlace the appliance in a dry and well aired room. The permitted ambient temperature range for the appliance depends on the appliance's climate class, which is shown on the type plate.

WARNING!
Do not place the appliance in a room where the temperature can fall below 5^ C: the appliance may not work properly or become defective!
| RelativehumidityAmbienttemp | |||
| +10 to +32SNExtended temperate | ≤75% | ||
| +16 to +32NTemperate | |||
| +16 to +38STSubtropical | |||
| +16 to +43TTropical |
- In environments with high humidity level, condensate droplets may appear on the appliance's exterior surfaces.
- If the appliance is installed in a dry environment, we recommend to use humidity box included in the appliance.

WARNING!
Install the appliance in a room with an adequate amount of air. There should be at least 1 m^3 of air per every 8 grams of refrigerant. The amount of refrigerant is indicated on the rating plate inside the appliance.

WARNING!
Do not place the appliance in a room where temperature can drop to below 5^ C. In such environment, the appliance may not operate correctly, or it may become defective.

WARNING!
The appliance is not suitable for outdoor use and it may not be exposed to rain.
Appliance placement
Appliance installation should be carried out by at least two persons, in order to avoid damage to the appliance and physical injury of anyone involved.
text_image
Diagram illustrating hand movement and load failure on a device, with arrows indicating left and right motion directions.When moving the appliance, be careful not to push it on the floor because of potential damages. There are two casters on the back of the appliance housing, that make moving the appliance around easier.
In order to safely install the appliance and for the appliance to operate correctly, it is important to place it onto a surface with adequate load-bearing capacity. If necessary, consult an architect/structural engineer. The surface should be smooth and level with the floor in the room.
The weight of an empty appliance is approximately 168 kg.
The weight of a fully loaded appliance is approximately 350 kg.
Installation and connection
natural_image
Diagram showing a TV mounted on a wall with a 90-degree angle indicator, and an inset view of a washing machine (no text or symbols present)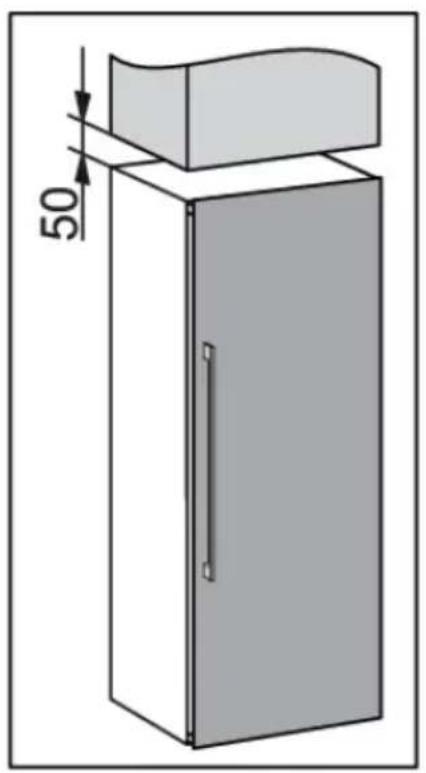
natural_image
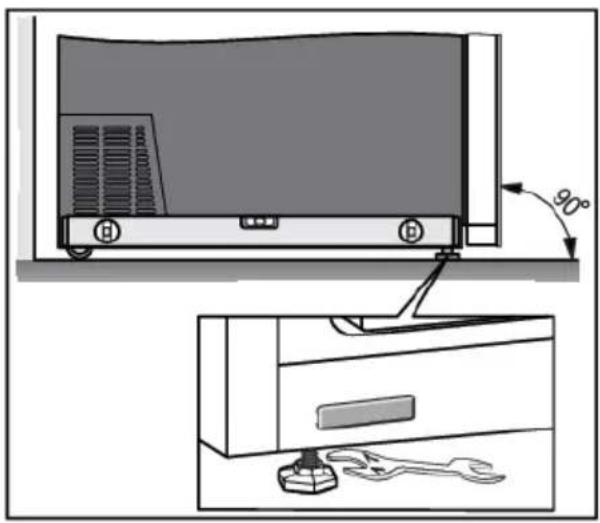
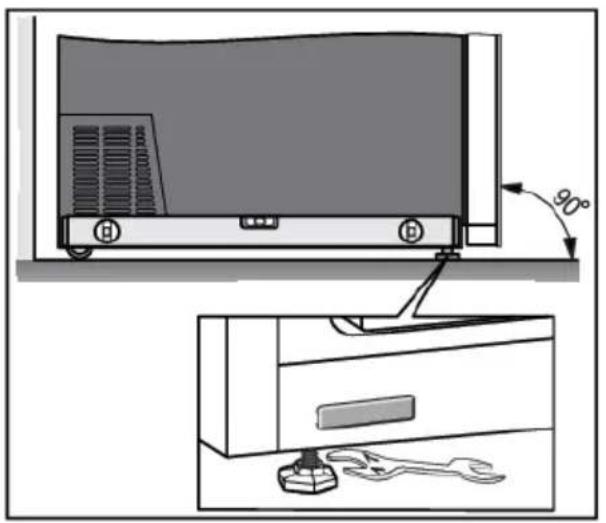
Diagram of a cabinet with a curved top and a vertical dimension line labeled '50' (no text or symbols beyond the label)When the appliance is placed on the intended surface, it should be completely level in order to decrease vibration. To level the appliance, use the adjustable feet at the front of the appliance. An open wrench size 17 is required for adjusting and fastening the feet.
- Place the appliance at least 50 mm away from an electric or gas stove, and at least 300 mm away from a heat source (e.g. a radiator or a heater). If such clearance is not possible, then install an insulation panel.
- The appliance should not be exposed to direct sunlight.
- We recommend free-standing installation of the appliance. When necessary, it can also be placed adjacent to cabinetry, if adequate ventilation and cooling of the installation location (e.g. air-conditioning) are provided. In such a case, the appliance power consumption is likely to increase.
- There has to be a clearance of at least 50 mm between the appliance and any cabinet above it.
- To allow for adequate ventilation and cooling of the appliance, there has to be sufficient clearance behind the appliance and on both sides as well (at least 50 mm). Please, also observe the clearance required to fully open the door in order to allow pulling out the drawers and shelves (see installation diagram).
- In cases of installation where there is less than 50 mm of space around the cabinet, a recess must be made at the ventilation grilles on both sides of the appliance (ventilation grilles must not be blocked) which must be able to supply or exhaust air on each side through an opening of at least 200 cm ^2 .
Furthermore, the 50 mm distance from the rear wall must always be maintained and must be connected to an opening above or behind the cabinet.
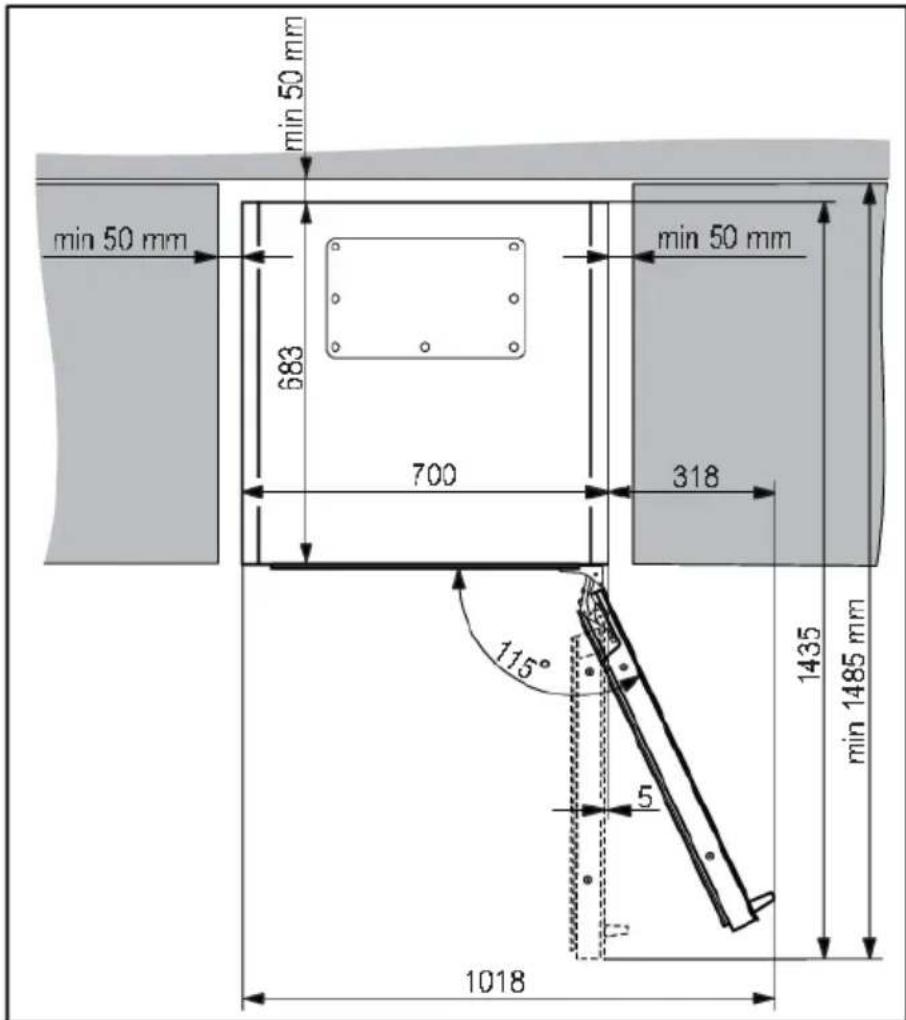
text_image
min 50 mm 683 700 318 1435 min 1485 mm 1018 115° 5
natural_image
Diagram of a rack-mounted electronic device with multiple drive bays and a switch, showing no text or symbols.- The appliance comes supplied with two spacers that should be fitted in the slots on the back of the appliance, one on either side, near the bottom. The spacers ensure adequate air circulation that is required for correct appliance operation. The appliance will operate normally without the spacers in place; however, this could affect its power consumption.
Installation and connection
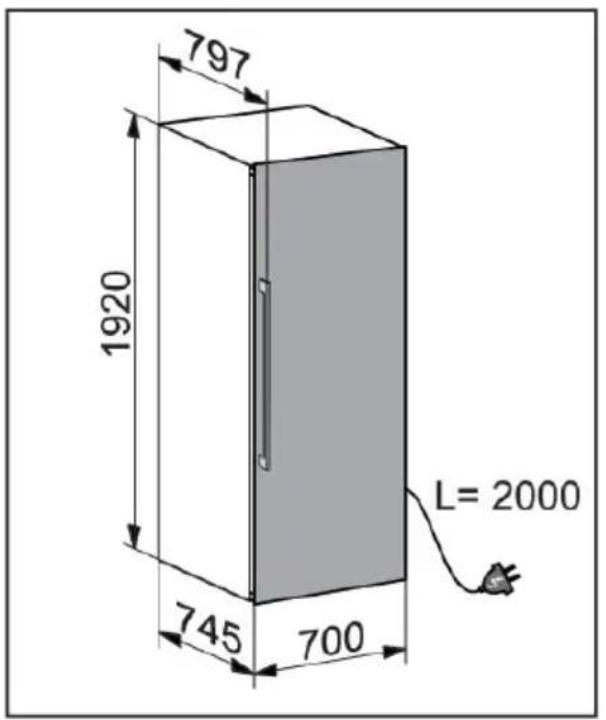
text_image
797 1920 745 700 L= 2000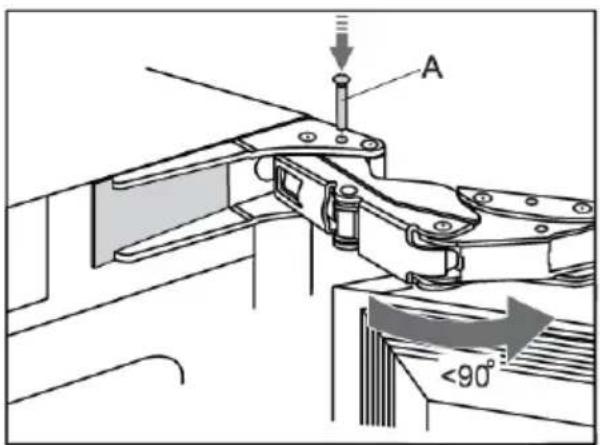
text_image
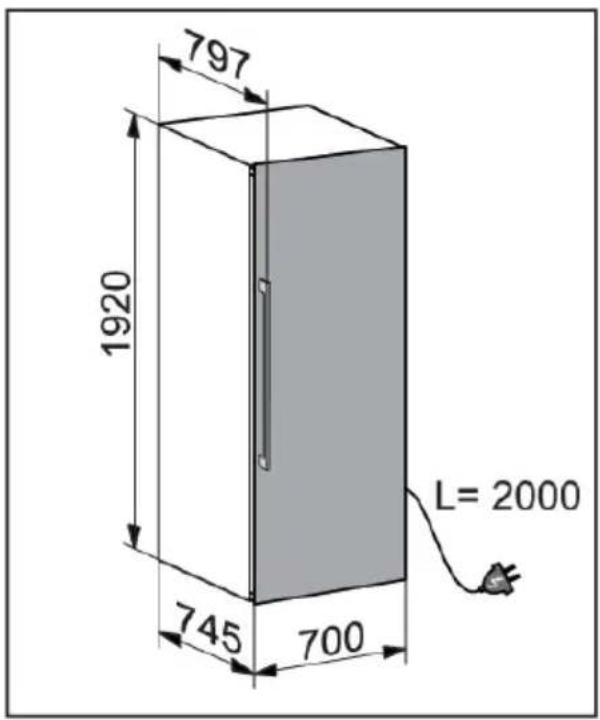
A <90°- Appliance dimensions are shown on the drawing.
- If the appliance is placed in a way that does not allow the door to be opened to the 115° angle, the opening angle can also be restricted to 90°. In this case, use the door restrictors (A) supplied in the bag containing the instruction manual. Carefully open the door to an angle less than 90° and insert the restrictor into the provided opening in the lower hinge. Repeat the same process for the upper hinge. When inserting the restrictor into the hinge, you may also use a small hammer.
- When the appliance is installed, its plug should always be accessible!
- This appliance is not intended to be used as a build-in appliance.
Connecting the appliance
- Connect the appliance to the power supply with a plug. The socket must be earthed. The nominal voltage and frequency required for the appliance are shown on the appliance's type plate/label with basic information.
- The appliance must be connected to the mains and earthed in accordance with the prevailing standards and regulations. The appliance can withstand small variations in the mains voltage to a maximum of plus or minus 6%.

WARNING!
When you are not going to use the appliance for a longer period then switch it off (with function ON/OFF) and disconnect it from the mains. Empty and clean the appliance, than leave the door ajar.
Before using the appliance for the first time
Before you use the appliance for the first time
Do not connect the appliance to the mains until you have carefully read the instructions for the correct and safe use of the appliance. We recommend that you keep these instructions for future use. If you sell the appliance, enclose them with the appliance.
Inspect the appliance for damage and/or irregularities. If the appliance is damaged, contact the store that sold you the appliance.
Allow the appliance to stand upright for at least 4 hours before you connect the appliance to the mains. This reduces the risk of malfunctions resulting from transport effects on the refrigerant unit.
Before using the appliance for the first time, the interior and all internal accessories should be cleaned with lukewarm water and a neutral cleaning agent. Wipe the cleaned parts with a cloth with clean water and then dry them thoroughly.
Clean the wooden parts with a damp cloth. Make sure the wood is not too wet and leave the parts to fully dry before returning them to the appliance.
Energy-saving advice
• Install the appliance as stated in the instructions for use.
- Do not open the door more than necessary.
- Do not cover or block the ventilation slots.
- Replace a damaged door gasket or a gasket that no longer provides a perfect seal as soon as possible.
- When placing bottles on the shelves, make sure the air can freely circulate around them (observe the recommendations from the instruction manual and do not place more bottles on the shelves than recommended or indicated).
- In case of a power supply failure, leave the door closed as long as possible to maintain the temperature inside the appliance. The appliance will store the selected temperature settings and retrieve them once the power supply is restored.
Wine storage tips
Natural wine cellars are the ideal place to store wine, because of the scarce light, the lack of vibrations and having a special climate. A wine's temperature determines its flavour, and influences enjoyment. Wine ageing depends on the environment conditions in which the wine is stored. By maintaining constant optimum temperature, correct air humidity, and an atmosphere free from any odours, the wine climate cabinet provides excellent conditions for storing your wine. It also provides an environment free from harmful vibrations that could also affect the ageing process. Since every type of wine has an optimum ageing time and climate, we suggest checking the recommended time to open the bottle as advised by the winemaker.
Most people who drink wine, know you serve white wine and champagne chilled, and red wine on room temperature. What people may not know that the "room temperature" that wine professionals are referring to, is the temperature of wine caves in the Bordeaux region of France. Those caves are about 13°C. A good wine climate cabinet, ideally with three temperature zones, can keep your wines at a perfect serving temperature, reducing the guesswork and sometimes the headache.
It is very important to maintain a constant temperature within the wine climate cabinet. In case of a power failure, open the door as little as possible to maintain the temperature in the appliance interior. A gradual increase in temperature will not have a negative impact on the wine.
The humidity should be between 50% and 80%. Too low humidity over a longer period will result in a dry cork. Too high humidity over a longer period will cause mold. The Atag Wine Climate Cabinet provides excellent ventilation with clean air which helps preventing damage to labels and corks during storage.
The humidity levels in wine climate cabinet are particularly important for long term wine storage and ageing. Recommended temperature for wine ageing is between 11°C and 13°C. For that purpose, the wine climate cabinet will maintain optimal ageing conditions and notify the user, if the conditions deviate from them. Extremely high and low temperature settings are intended mainly for the wine serving purposes. Wine is exposed to this conditions for shorter time periods and therefore humidity should not have any negative effect on the wine. However, monitoring of relative humidity levels is available regardless of the compartment temperature setting.
Major temperature changes can cause humidity levels to deviate from the desired levels and it may take longer, e.g. about a week, for them to stabilize again. During this time, the notifications for humidity out of zone will not appear.
Extremely diverse settings in neighboring zones, e.g. A=20°C / B=5°C / C=20°C, A=5°C / B=20°C / C=5°C, etc., may result in the humidity levels not reaching the desired levels in the warmer compartments.
Wine should be stored horizontally, especially corked wines. It will keep the cork moist and swollen and prevent wine from unwanted contact with air. Short term storage, within some weeks, storing in tilted position is preferred to keep the cork damp. If the position is too upward, the cork will dry out. Screw and crown caps have less demands regarding the positioning.
Serving temperature
The Three-Zone Atag Wine Climate Cabinet also contains a Serving Area. You will have the possibility to prepare your wine and glasses to the ultimate temperature for the wine you are about to serve. In addition, the temperature can be adjusted according to whether the wine is to be enjoyed in the near future, or whether it is to be stored longer-term. Your Wine Cabinet doesn't have to resemble a science experiment, but some wines are considered to benefit from a bit of breathing space before you drink them. You can do that by using a decanter in the special created area in the serving area.
Storing wine
Storing bottles
- Moving the bottles or excessive vibration can have a negative effect on the ageing process and thus on the wine's flavour. The appliance is fitted with a special sensor that continuously measures vibration. In case of excessive vibration, e.g. when the appliance door is slammed shut, a warning will appear on the appliance display unit.
- Keep the bottles intended for daily use on the front half of the shelves. Keep the wines you intend to store for a long time or age in the bottom part of the cabinet.
- Inventory system will help you to create a register of the wines being stored. So, when searching for a particular wine, it won't be necessary to move the bottles.
- Store the bottles horizontally, so that cork stoppers are also kept moist from within.
- Once open, store the bottle vertically and close them tightly.

INFORMATION!
Mould can appear on bottle labels; this depends on the type of glue used for the label. Clean the bottles and remove any residual glue.

INFORMATION!
White sediment can form on cork stoppers as a result of oxidation due to contact with air. Wipe the sediment with a dry cloth. The sediment does not affect the quality of the wine.
This product contains a light source of energy efficiency class
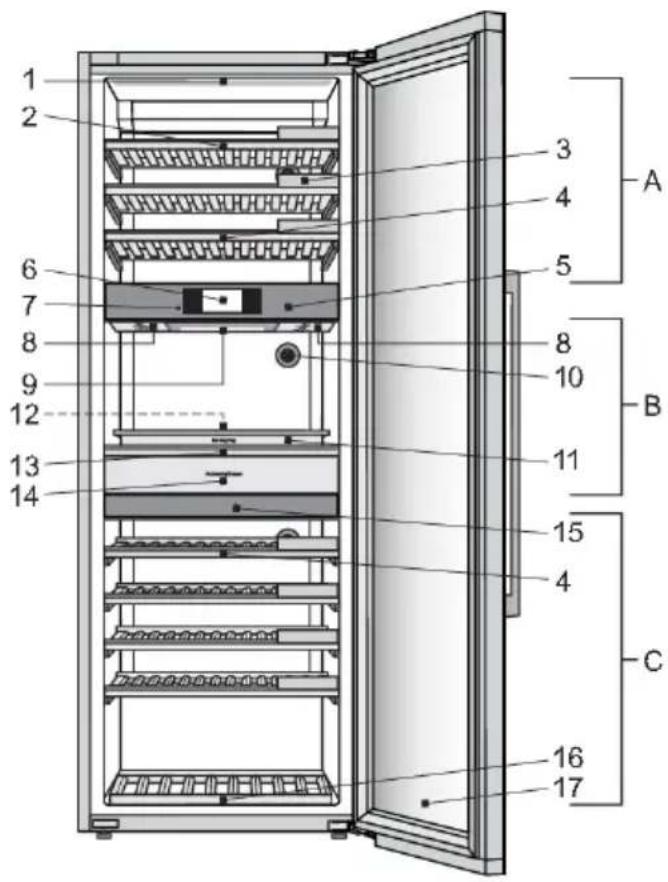
text_image
1 2 3 4 5 A 6 7 8 9 10 B 11 12 13 14 15 4 C 16 17- LED shelf illumination (in all three temperature zones)
- Standard wooden bottle shelf
- Chalkboard name tag
- Wooden bottle shelf with moon shaped recesses
- Top insulation barrier
- Touch screen TFT display
- Scan camera
- Wooden wine glass hanger (right + left)
- RGB illumination
- Charcoal filter (in all three temperature zones)
- Serving tray
- Vertical bottle holder with wooden dividers
- Inclination serving bottle shelf
- Accessory drawer
- Bottom insulation barrier
- Wooden bottom bottle rack
- 3-layered glass door with UV filter
There are two insulation barriers inside the wine climate cabinet: top insulation barrier (5) and bottom insulation barrier (15). Thus, the inside of the wine climate cabinet is divided into three temperature zones: A, B (serving area) and C. This allows storage and immediate serving of different types of wine.
Zone A
LEDshelfillumination(1)
Each temperature zone features functional LED illumination on the appliance ceiling and on the bottom side of both insulation barriers. Owing to the use of LED illumination, the wine will not be exposed to UV rays and heat. The intensity and time interval of LED illumination operation can be adjusted according to the user's preferences and requirements.
Standardwoodenbottleshelf(2)
The shelves are placed on the full-extension telescopic rails with the soft-close feature. Full extension of the shelves allows easier handling of the bottles.

INFORMATION!
Be careful when pulling out the wooden shelves. Carefully pull out and push back the wooden shelves in order not to expose the wine bottles to vibration.
Description of the appliance

INFORMATION!
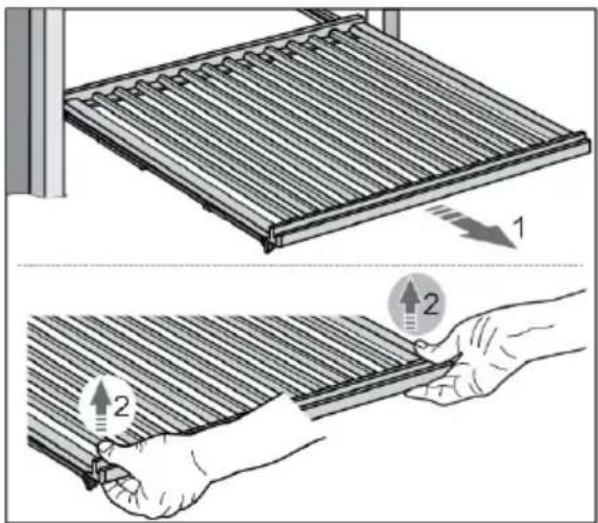
Before removing any shelf from the appliance, the shelf should be completely empty.
Make sure the door is fully open before removing the shelves. This will prevent any damage to the door gasket.
text_image
Diagram illustrating two steps of installing a grid panel, labeled with arrows and numbered positions.To remove a shelf from the appliance, fully extend the telescopic rails (1), and then vertically lift the shelf (2) to remove it from the rails. When removing the shelf, you can experience some resistance because of the fixation with the pin on the front side. Take care not to damage the door gasket.
text_image
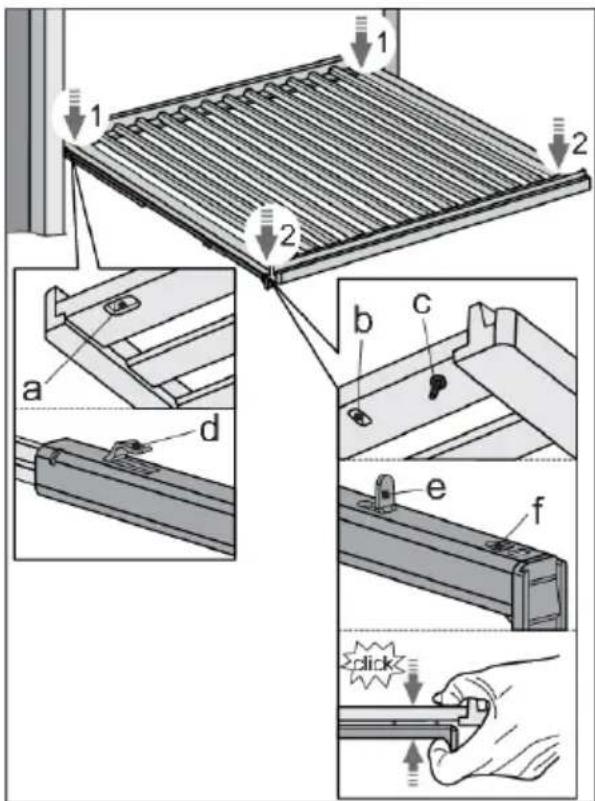
Technical diagram illustrating a mechanical assembly with labeled parts and directional arrows indicating assembly steps.To replace a shelf onto the rails again, use the grooves (a, b) and pin (c) on the back and front side of the shelf.
First, fully extend the telescopic rails. Using the grooves (a) position the shelf onto the hooks (d) on the back side of the rails (1).
Then, use the grooves (b) to position the shelf onto the hooks (e) on the front side of the rails (2).
Pin (c) enables additional fixing of the shelf.
Press the shelf and rails together, so that the pin is fully seated in the hole (f).
This way you will not accidentally push the shelve off.
Description of the appliance
natural_image
Illustration of seven identical black bottles arranged in a row, no text or symbols present
INFORMATION!
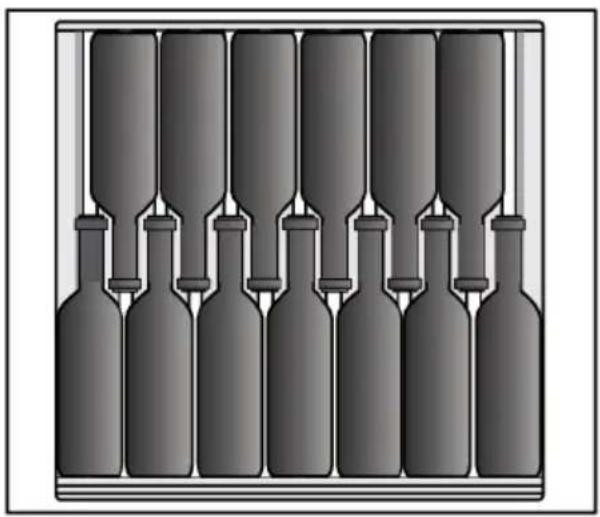
Before you start adding bottles to a shelf, check once more whether the shelf is correctly placed on the telescopic rails. Up to 13 Bordeaux bottles (0.75 l) can be placed on each standard wooden bottle shelf.

INFORMATION!
Higher humidity level inside the appliance may cause the wooden parts to slightly bend; this, however, will not affect their functioning.
Chalkboardnametag(3)
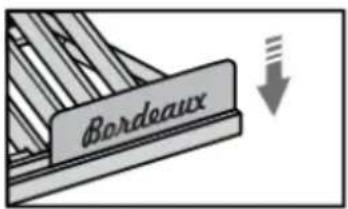
Chalkboard name tags are supplied with the appliance. They can be installed at the front side of each shelf. You can use chalk to indicate the wine stored on a particular shelf. The chalkboard name tags can be wiped with a damp cloth.
text_image
Bordeaux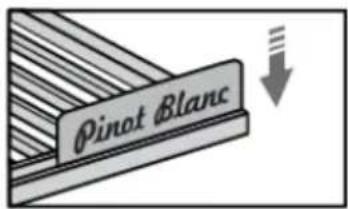
text_image
Pinot BlancWoodenbottleshelfwithmoonshapedrecesses(4)
natural_image
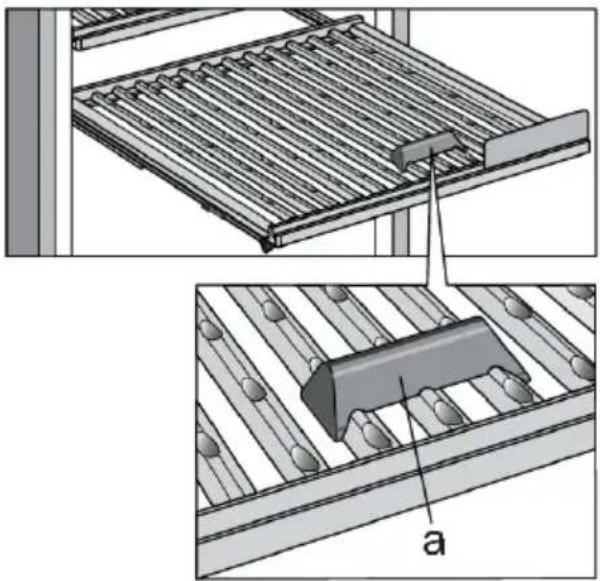
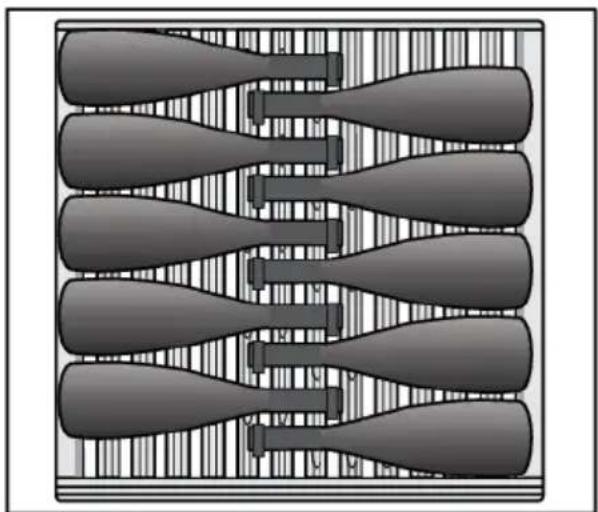
Technical illustration of a mechanical assembly with two views: top shows a rack with ribbed metal components, bottom shows a clamped component labeled 'a' (no text or symbols present)The wooden bottle shelf with moon shaped recesses allows you to load the bottles onto the shelf cross-wise.
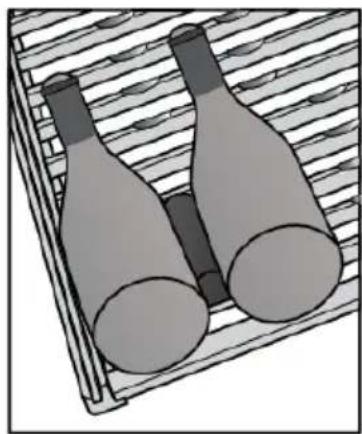
This is particularly convenient for storing larger bottles.
Description of the appliance
natural_image
Illustration of two wine bottles placed on a striped surface (no text or symbols)In some cases, during opening/closing of the shelf, bottles are not properly positioned or stopped and they can move. To prevent movement of the bottles on the shelf, it is recommended to use the accessory 'bottle stopper' (a) included in the appliance equipment.
natural_image
Diagram of six identical mechanical components arranged in a row, with no visible text or symbols.Up to 10 bottles can be stored on a shelf cross-wise.
Normal positioning of the bottles is also possible.
The wooden bottle shelf with moon shaped recesses can be removed from the appliance in the same way as the standard wooden bottle shelf.
Topinsulationbarrier(5)
The top insulation barrier separates zones A and B and allows individual temperature settings for these two zones.
TouchscreenTFTdisplay(6)
Use the touch screen TFT display to control the wine climate cabinet.
Scancamera(7)
The camera is intended for optical reading of wine bottle labels. It gathers and stores the data intended for further management of the wine climate cabinet inventory. This data helps the user find information about a particular wine either via the touch screen TFT display or via the ConnectLife mobile app.

WARNING!
The camera will only be working if the user is activating it on purpose.
Description of the appliance
Zone B - serving area
text_image
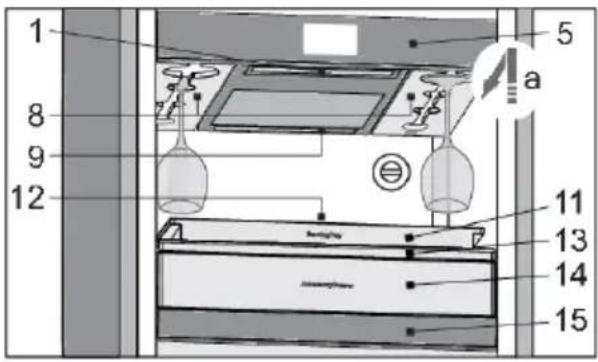
1 8 9 12 5 a 11 13 14 15The serving area (zone B) is a temperature zone between the top (5) and bottom (15) insulation barrier. It allows you to bring the wine on ideal consumption temperature, and to prepare in advance everything you need for quick and top-notch wine serving: chilled wine glasses, space for already open bottles, decanter, and other accessories (bottle openers, wine pourers/spouts, stoppers ...).
WARNING!
Stacking several rows of bottles on top of each other on the telescopic shelves is not accepted!
The following parts are installed on the bottom side of the top insulation barrier (5): wooden wine glass hangers (8), shelf illumination (1) and RGB illumination (9).
Wooden wine glass hangers – left + right (8) allow you to store up to 6 wine glasses. Insert the glasses into the rack by moving them in the direction of the arrow (a). The glasses are then chilled to the set temperature.
RGB illumination (9) provides additional ambiental illumination. It is intended for creating a special ambient in the serving area using the combination of illumination colours. It can be set to your preferences. This illumination is not intended as functional illumination of the appliance or the serving area (zone B).
text_image
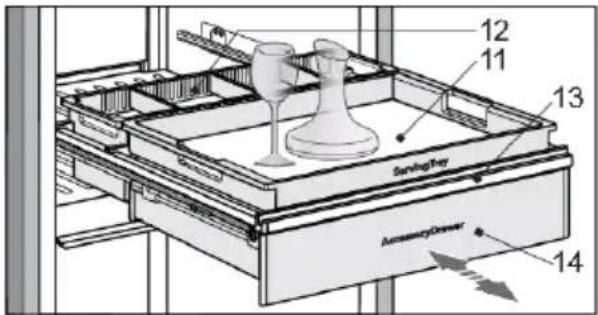
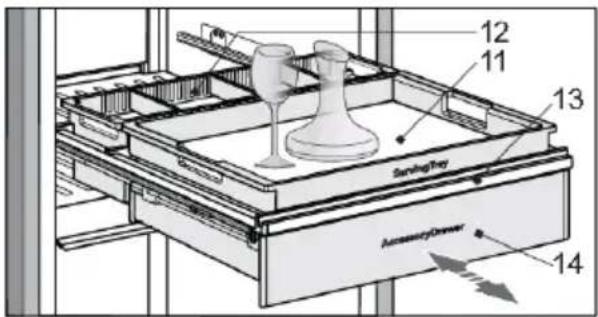
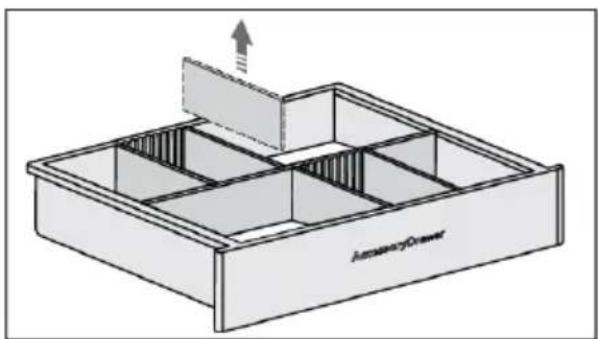
12 11 13 Serving tray Accessory drawer 14The serving set includes the following: inclination serving bottle shelf (13), vertical bottle holder with wooden dividers (12), serving tray (11), accessory drawer (14) on full extension telescopic rails with soft-close and push-to-open mechanism.
natural_image
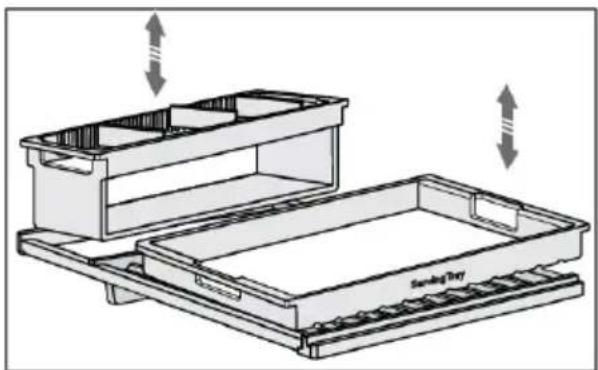
Diagram of two stacked storage compartments with upward arrows indicating movement, no text or symbols presentInclination serving bottle shelf (13) is installed on the full-extension telescopic rails with soft close and it is secured against tipping over. A serving tray is placed on the front part of the serving shelf, and the vertical bottle holder is inserted into the shelf's rear part. The tray and the bottle holder can be lifted and removed from the support shelf (for serving purposes outside the Wine Climate Cabinet, maintenance or cleaning).
Description of the appliance
text_image
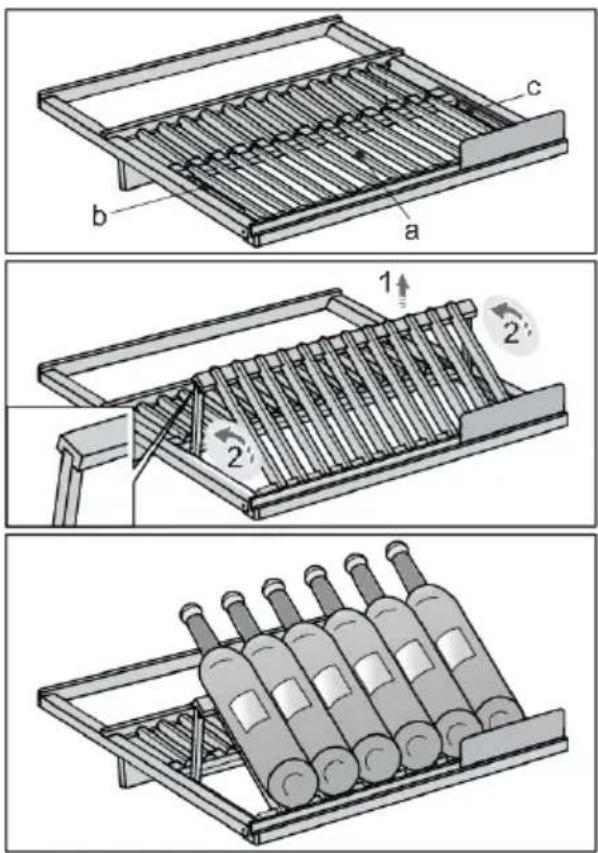
Technical diagram showing mechanical assembly with labeled components and directional arrows indicating motion or movement.Serving bottle shelf also allows storing bottles in two positions: horizontally or tilted/inclined. The front part of the shelf (a) can be lifted (1) and supported by the rotated (2) lateral supports (b, c). Up to 6 Bordeaux bottles can be placed on the front side of the shelf.

INFORMATION!
Only store bottles that you intend to open and serve soon on the inclined front part of the shelf (a). This will allow any sediment to settle on the bottom of the bottle, allowing for decanting.
An accessory drawer with wooden dividers (14) is installed on extendible rails underneath the serving shelf.
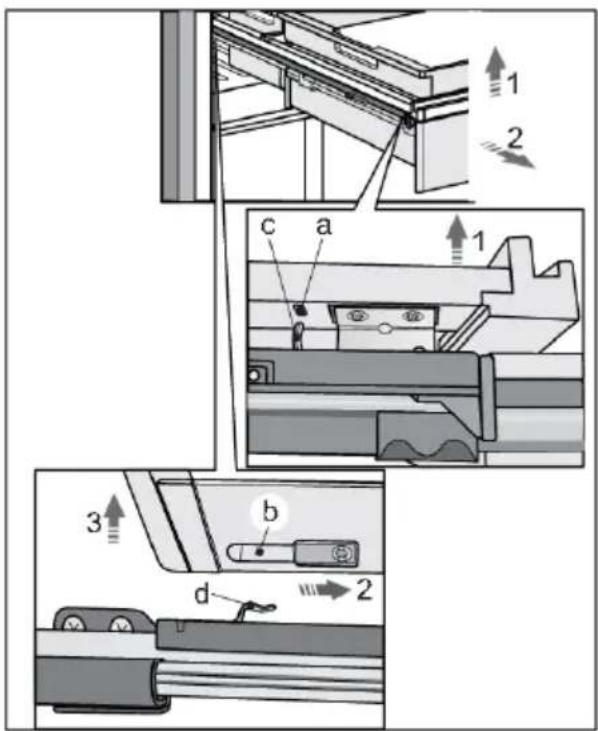
Inclination serving bottle shelf can be removed from the appliance along with the accessory drawer. Take care not to damage the door gasket. Pull out the shelf from the appliance as far as possible. Then, lift it at the front side (1), pull forward (2) and lift at the back (3). To replace the shelf with the accessory drawer onto the rails, follow the same procedure in the reverse order. Fully extend the telescopic rails and align the grooves (b) on the left- and right-hand side at the back onto the two hooks (d). Push the shelf and place it onto the hooks (c) on the front side of the groove (a).
Description of the appliance

INFORMATION!
Before placing the serving tray onto the shelf and inserting the vertical bottle holder, check once more whether the shelf and the accessory drawer are correctly installed on the rails.
natural_image
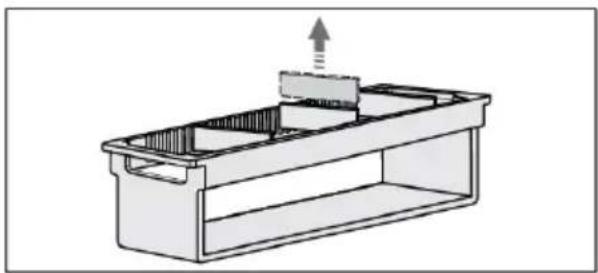
Technical line drawing of a rectangular container with an upward arrow indicating motion or force (no text or symbols)Vertical bottle holder with wooden dividers (12) is intended for storing the bottles in the vertical position. Wooden dividers can be placed into the grooves as desired to create separate bottle compartments.
natural_image
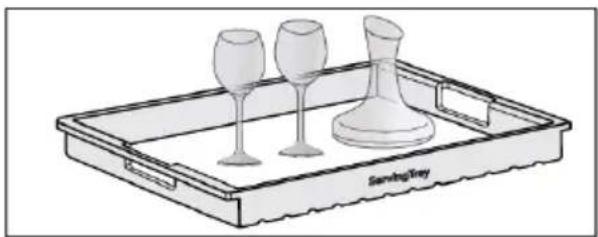
Line drawing of a tray with three glasses and a conical object, labeled 'ServingTay' (no other text or symbols)Serving tray (11) allows you to prepare in advance the glasses and the decanter with wine, and simply take them to the table directly from the wine climate cabinet.
text_image
12 11 13 ServingThey AccessoryDrawer 14
WARNING!
Be careful when removing a loaded tray.
text_image
Amerenoyore AmerenoyoreAccessory drawer (14) is installed on the full-extension telescopic rails. It uses the push-to-open mechanism for opening. Press on the closed drawer to fully open it. To close the drawer, press again on its front side.
Wooden dividers in the drawer can be inserted into the grooves to fit the accessories you are storing (bottle opener, pourer/spout, wine stoppers etc.).
Description of the appliance
text_image
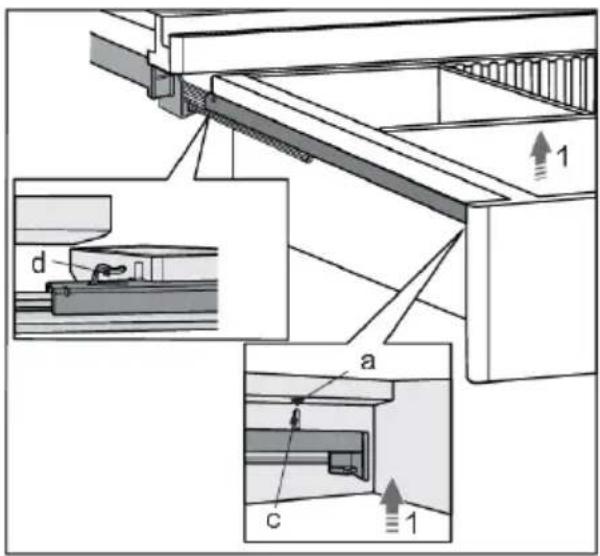
Technical diagram showing mechanical assembly with labeled components and directional arrowsThe drawer can also be removed from the appliance without removing the serving bottle shelf from its rails. To do this, fully open the drawer, lift it at the front (1) and pull it towards you.
To replace the drawer, follow the same procedure in the reverse order: push the drawer along the rails to the hook (d) on the back of the rails. When the drawer is blocked on the rear side, lower it at the front so that the grooves (a) can be placed over the hooks (c).
text_image
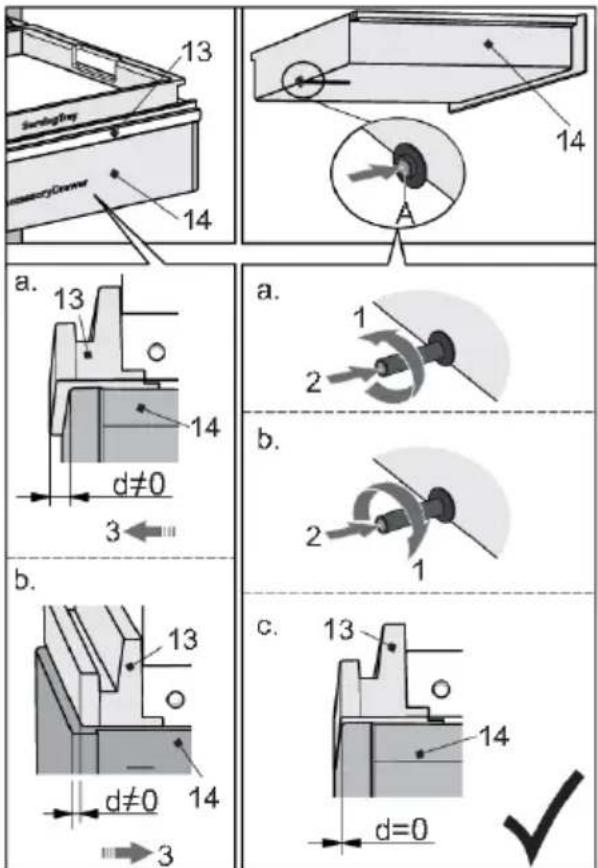
13 14 14 13 14 a. d≠0 3 b. 13 14 d≠0 3 a. 1 2 b. 2 1 c. 13 14 d=0If the shelf (13) and drawer (14) are not aligned at the front (d≠0), first completely pull out the drawer to access the drawer opening mechanism on the back wall. Press on the spacer (A) to release the mechanism. Rotate the spacer to adjust the length.
Situation "a": rotate the spacer in anti-clockwise direction (1). Compared to the initial state, the spacer moves outward relative to the drawer, i.e. it is extended. When you push the drawer back into the appliance (2), the drawer will be positioned slightly more to the front of the appliance (3).
Situation "b": rotate the spacer in clockwise direction (1). Relative to the initial state, the spacer moves toward the drawer, i.e. it is shortened. When you push the drawer back into the appliance (2), the drawer will be positioned slightly more to the back of the appliance (3).
Repeat the process until the shelf and the drawer are flush at the front (d=0) – situation "C".

INFORMATION!
Before you start adding accessories to the drawer, check once more whether the drawer is correctly placed on the telescopic rails.
Description of the appliance
Charcoalfilter(10)
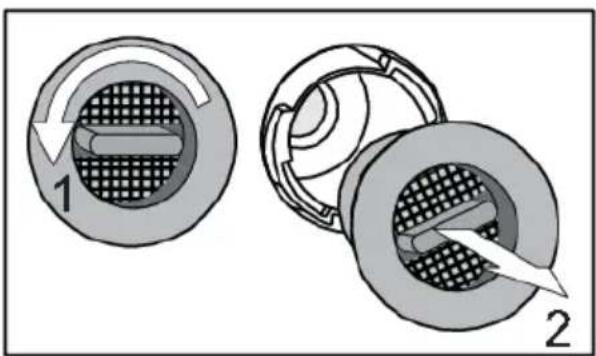
Fresh air is drawn into the appliance interior through active charcoal air filters. This ensures freshness, as well as absence of dust and odours. The fans then distribute the air evenly across the appliance interior.
Replace the air filters approximately every 12 months. A message will appear on the touch screen TFT display and in the ConnectLife mobile app to remind you it is time to replace the filters.
natural_image
Cross-sectional diagrams of a mechanical component showing internal structure and assembly (no text or symbols)To replace the air filter:
- Rotate the filter in the anti-clockwise direction (1) and pull it out from the appliance.
- Insert a new filter into the filter slot and rotate it clockwise until it clicks into place.

INFORMATION!
Charcoal air filter can be ordered as accessory.
For more informations refer to the local Atag dealer or to the Atag website of your country.
Humiditybox
One HumidityBox is supplied with the wine climate cabinet.
The purpose of the HumidityBox is to adjust the humidity in one of the zones of the wine climate cabinet, specifically to prevent humidity from dropping to below 50%, which could appear in certain conditions (e.g., when the wine climate cabinet is placed in an environment with low humidity).
Humidity level in respective zones can be monitored on the appliance display. If humidity in any zone drops to 40% or below, an alarm will be activated. You can then place the humidity box, filled with water, in this zone.
We recommend using the HumidityBox in compartments where the wines are stored for longer periods, since low humidity there could more severely impact the wine (with long-term drying of the corks). When you are storing your bottles for shorter periods or preparing them for serving, lower humidity should not have a significant impact on the wine quality.
Description of the appliance
natural_image
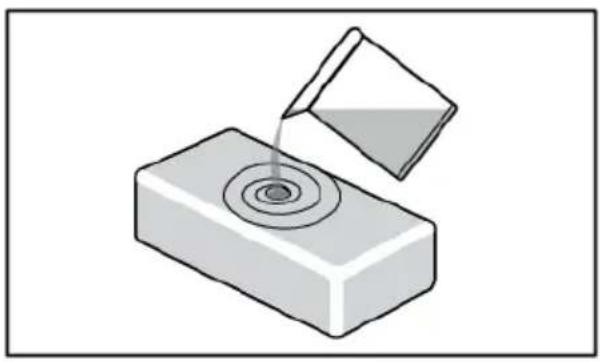
Illustration of a container pouring liquid into a rectangular block (no text or symbols)Fill the box with 0.5 litre of tap water and place it in the relevant zone. There are no preferable positions, as long as it is placed in the correct zone.
HumidityBox is made of clay, a natural material with the right characteristics to first absorb water and then allow it to evaporate to increase humidity.
The walls and bottom of the clay box are glazed to prevent water leakage. Water is absorbed by all walls, but will only evaporate through the unglazed top surface.
The HumidityBox is made in an artisan workshop with fine craftsmanship. As a result, minor irregularities in material or shape may occur. They, however, do not have any effect on functionality.
The colour of the box changes when it is filled with water: as the walls absorb water, they become darker. Depending on the hardness of your tap water, some white limescale stains may appear on the material. To avoid this, you may use descaled or distilled water. The white stains can be washed off.
After placing the HumidityBox in the correct zone, it will take approximately 9 hours to increase the humidity back from 40% to 50%. After 9 hours, humidity will continue to slowly increase.
On average, the HumidityBox should be refilled every 30 days. The appliance will sound an alarm when humidity gets too low (below 40%).
You can also buy additional HumidityBoxes when needed.
Please do not put the HumidityBox in the dishwasher, as this type of material is not dishwasher safe. Because of the relatively thin walls, the box is fragile and should be handled carefully. Occasionally, shower the inside of the box with tap water.

INFORMATION!
For more informations refer to the local Atag dealer or to the Atag website of your country.
Zone C
Bottominsulationbarrier(15)
The bottom insulation barrier separates zones B and C and allows individual temperature settings for these two zones.
Functional LED illumination is installed on the bottom side of the barrier.
Woodenbottombottlerack(16)
natural_image
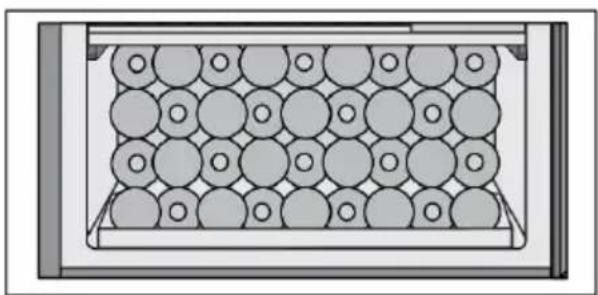
Diagram of a container with circular components inside, no text or symbols presentThe wooden bottom bottle rack is intended for storing the bottles in the compressor area. This area is suitable for storing bottles you wish to keep for a longer period of time, especially for ageing without excessive vibration and unnecessary movement. Up to 36 Bordeaux bottles (0.75 l) can be stored on the wooden bottom bottle rack.
3-layeredglassdoorwithUVfilter(17)
The 3-layered glass door is filled with argon (a noble gas), which makes them more energy efficient. For maximum protection from sunlight that can harm the wine's aging process, an additional UV film is used that stops 99% of sunlight.
The door closes automatically when the opening angle is less than 20^ . The soft-close mechanism gently closes the door.
Appliance capacity
text_image
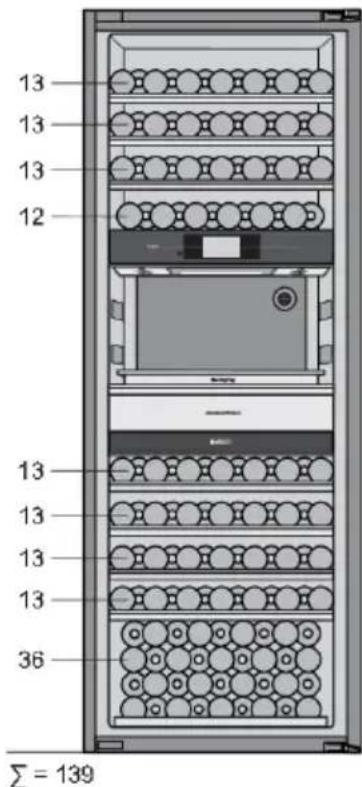
13 13 13 12 13 13 13 36 Σ = 139The basic appliance configuration allows storing up to 139 Bordeaux bottles.
The number of bottles you can load onto each shelf is indicated on the drawing.
Description of the appliance
Changingthebasicapplianceconfiguration
The basic appliance configuration can be adjusted to suit your preferences.
This can be done without using any tools.

WARNING!
Disconnect the appliance from the power mains before changing the appliance configuration! In order to avoid damaging the floor, use a floor mat or other suitable protection on the floor in front of the appliance.
Take care not to damage the door gasket. A damaged gasket will negatively affect appliance operation.
natural_image
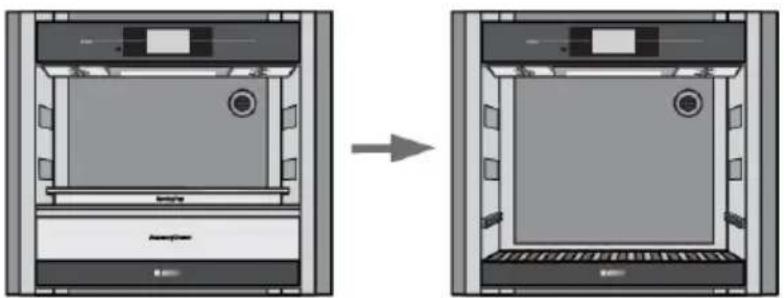
Diagram showing a device interior with a back panel and a side panel, both before and after transformation (no text or symbols)Remove the following serving set elements in the indicated order: vertical bottle holder, serving tray, and inclination serving bottle shelf with accessory drawer. The process of removing each serving set element is described in the chapter Zone B - serving area.
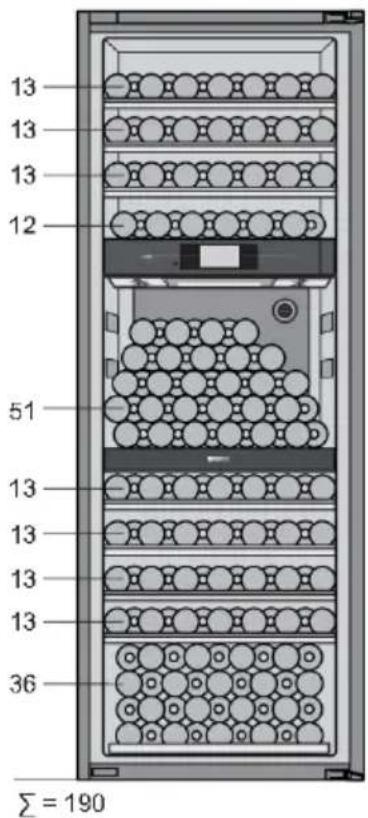
text_image
13 13 13 12 51 13 13 13 36 Σ = 190Up to 51 Bordeaux bottles can be loaded onto the bottom insulation barrier.
With such configuration, a total of 190 Bordeaux bottles can be stored in the appliance.
The number of bottles you can place onto each shelf is indicated on the drawing.
It is however recommended to buy the accessory set with three additional shelves (see next page).
Accessory set
There is a possibility to buy additional equipment, shelves set, that contains the following components:
• 2 standard wooden bottle shelves,
• 1 bottle shelf with moon shaped recesses,
- two pairs of full-extension telescopic rails,
- screws ST4.8 × 13
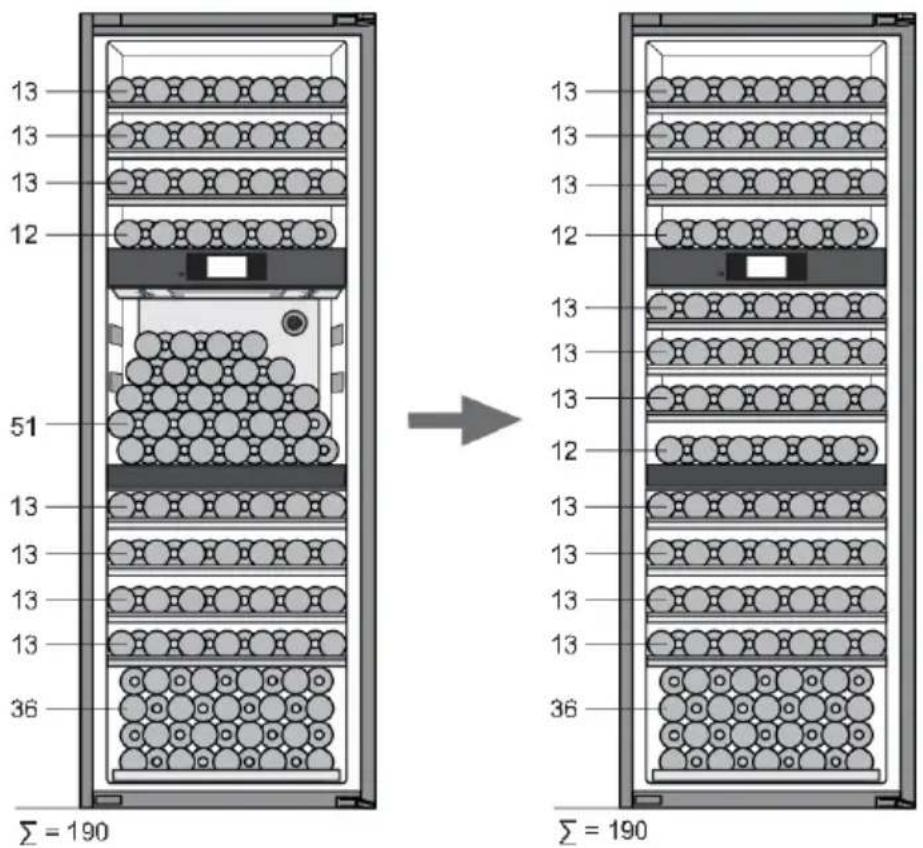
text_image
13 13 13 12 51 13 13 13 13 36 Σ = 190 13 13 13 12 13 13 13 12 13 13 13 36 Σ = 190Shelves set enables you to change the appliance configuration, so a total of 190 Bordeaux bottles can be stored in the appliance.
The number of bottles you can load onto each shelf is indicated on the drawing.
Description of the appliance
Side-by-Side kit
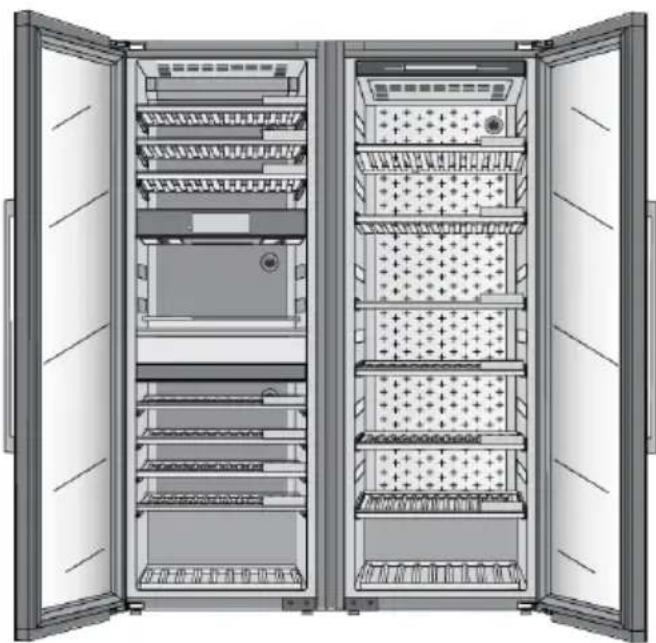
natural_image
Interior view of a dual-chamber electric cabinet with open doors showing internal compartments and ventilation grilles (no text or labels)There is a possibility to place two appliances side-by-side.
To ensure the proper fitting and long-lasting operation of two appliances put in side-by-side installment, the dedicated kit should be used. Using the dedicated side-by-side kit will ensure exact alignment, stabilization, and eliminate the possibility of excessive condensate accumulation between adjacent appliances.
Forsafetyreasons, side-by-sidekit should only be installed by an authorized service technician!

INFORMATION!
For more informations refer to the local Atag dealer or to the Atag website of your country.
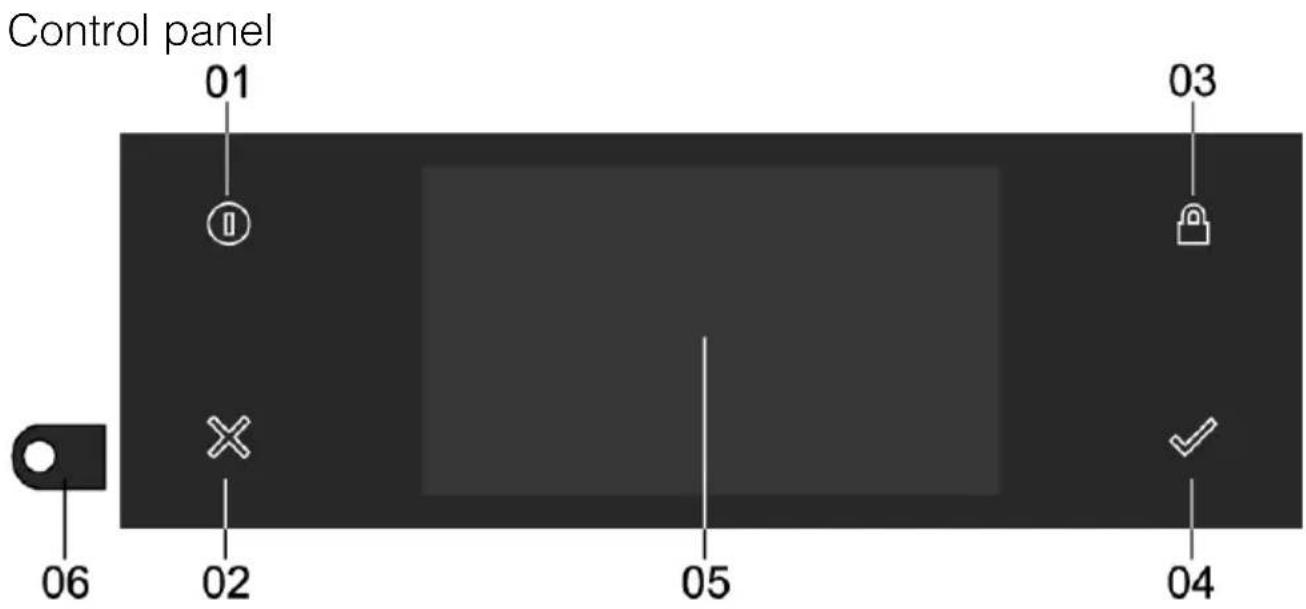
text_image
Control panel 01 03 06 02 05 04On/Off button; use to:01
- turn on the appliance if button is blinking slowly; keep pressing until the appliance switches on.
- turn on the user interface if button is blinking quickly (power failure has occurred); keep pressing until the display switches on.
- switch to or from standby if the button is static lit; short press
• appliance forced shutdown; 8 seconds press.
X key; use to:02
• go a step back in the menu.
- close or answer 'No' to a pop-up menu.
- close or cancel a menu or function.
Lock key; use to:03
- (un)lock the touch screen/display; keep pressing until the screen/display is (un)locked
Confirm key; use to:04
- confirm settings
- start a function
• close or answer 'Yes' to a pop-up
Touch screen/display.05
Camera.06
Operation
Touchscreen
- Operate your Wine Climate Cabinet's touch screen by tapping or swiping it.
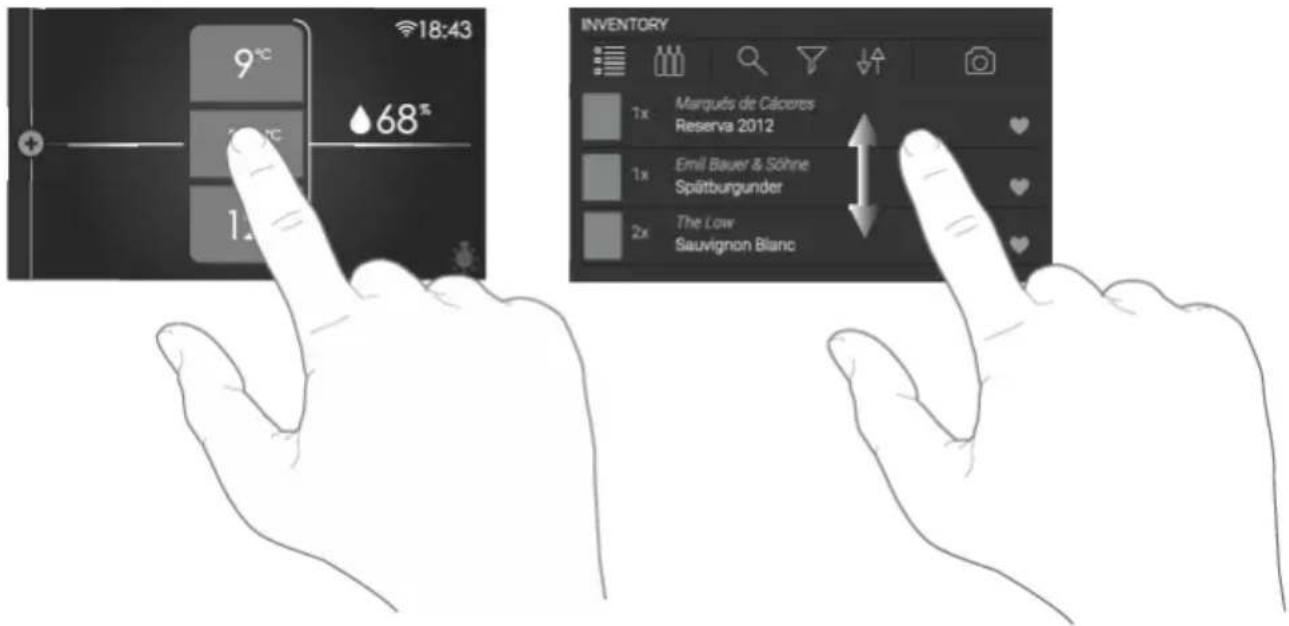
text_image
18:43 9°C 68° 1x INVENTORY 1x Marqués de Caleres Reserva 2012 1x Emil Bauer & Söhne Spätburgunder 2x The Low Sauvignon Blanc
INFORMATION!
For the best response, touch the buttons with the main part of your fingertip. Every time you tap a button during use, a short tone will sound (unless this is adjusted in the settings).
Openingthekeyboard
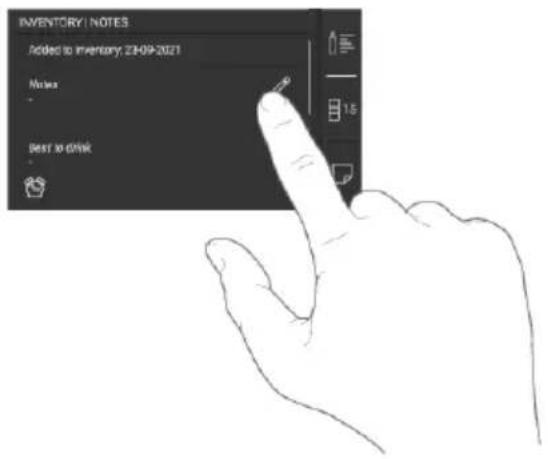
text_image
INVENTORY | NOTES Added to inventory; 23-09-2021 No need Best to drinkA keyboard can be opened for fast entry of notes, wine data fields, passwords and search.
Please refer to chapter "Using the 'Plus' menu" to see how to open menu INVENTORY.
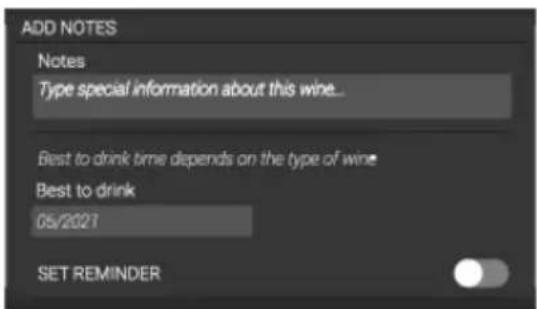
text_image
ADD NOTES Notes Type special information about this wine... Best to drink time depends on the type of wine Best to drink 05/2021 SET REMINDERTap on a text field or on a 'pencil' icon and the keyboard appears.
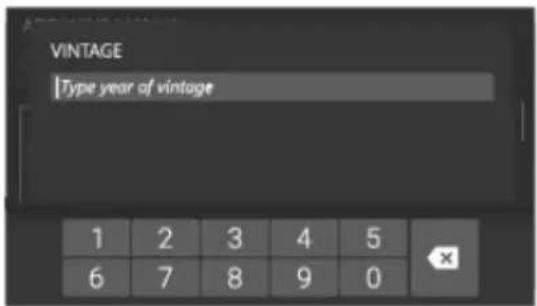
text_image
VINTAGE Type year of vintage 1 2 3 4 5 6 7 8 9 0When the input field requires only numbers a numeric keyboard appears.

After entering the desired content press on the confirm key to confirm the entry.
Initial use

INFORMATION!
When the appliance is moved or transported, it is mandatory to wait for four hours until the appliance can be connected to the mains.
Settingthelanguage
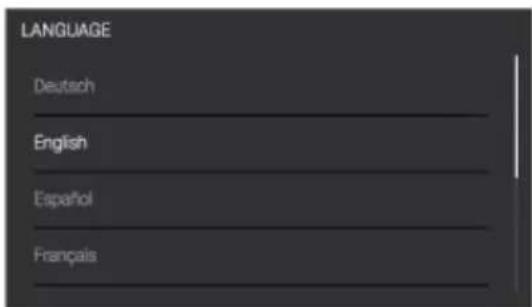
Set the desired language in which the appliance's display texts will appear. The default setting is 'English'.
text_image
LANGUAGE Deutsch English Español Français- Swipe vertically over the display to view all languages.
- Tap on a language to select this.
- Press on the 'Confirm' key to save the set language.
Settingthelocation
Set the appliance location.
Useragreement
- Read End User License Agreement and check the box to agree. When User Agreement is not agreed with, all connected functions, including INVENTORY system, will remain disabled.
- Press on the 'Confirm' button to continue.
Applicationdownload

Connecting your appliance to the application ConnectLife
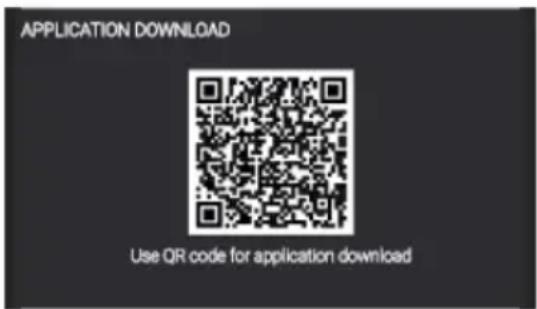
ConnectLife it is a smart home platform that connects people, devices, and services. The ConnectLife application includes advanced digital services and carefree solutions that allow users to monitor and control appliances, receive notifications from a smartphone, and update software (supported features vary depending on your appliance and your region/country).
To connect your smart device, you need a home Wi-Fi network (only 2.4 GHz networks are supported) and a smartphone with the application ConnectLife.
text_image
APPLICATION DOWNLOAD Use QR code for application downloadTo download the ConnectLife application, scan the QR code or search for ConnectLife in your favorite app store.
If you haven't received the email with the verification code within a few minutes, check your spam folder.
- Install the ConnectLife application and create an account.
- In the ConnectLife application, go to the "Add device" menu and select the appropriate type of device. Then scan the QR code (it can be found on the rating plate of the appliance; you can also enter the AUID/SN code manually).
- The application then guides you through the entire process of connecting the appliance to your smartphone.
- After a successful connection, the appliance can be operated remotely via the mobile application.
Do you have more questions? Visit us at www.connectlife.io or contact us at hello@connectlife.io.
Although the application guides you through the process of connecting your device to your smartphone, we have listed some of the most important steps below.
Networkconnection
Connect your appliance to your home router to be able to pair your Wine Climate Cabinet with your mobile app to remote control it and to pair more appliances for monitoring.
- Tap on the switch to turn "On" the appliance wireless network. Or press 'Skip' to not establish the network connection now, you can still do it in Settings.
- After checking for available networks select the network you want to connect to.
- Tap on the text field and enter the password. Press on the 'Confirm key' to continue.
- Tap on 'Join' to proceed. If password is not correct you will see a message "password input error, please try again" on the display. Or tap 'Cancel' to go back to the list of available networks.
Pairing
text_image
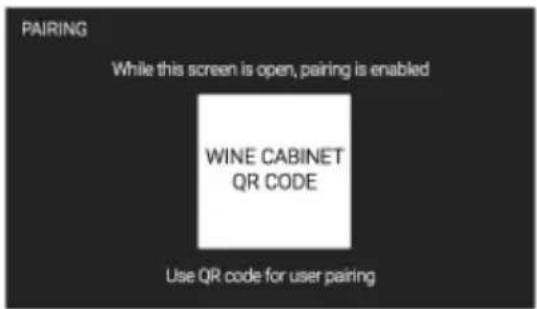
PAIRING While this screen is open, pairing is enabled WINE CABINET QR CODE Use QR code for user pairingRemotecontrol
text_image
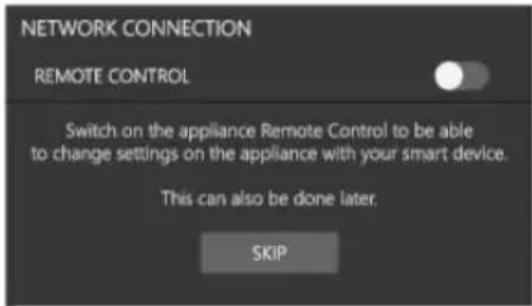
NETWORK CONNECTION REMOTE CONTROL Switch on the appliance Remote Control to be able to change settings on the appliance with your smart device. This can also be done later. SKIPCamera
text_image
CAMERA CAMERA When the camera is disabled, wine data can only be added manually. When the camera is unlocked, it will only be activated when a "scan" action is taking place.TimeZone
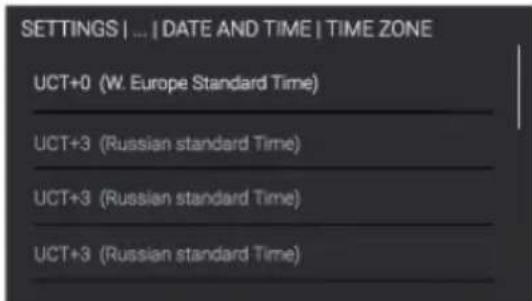
Set the according Time Zone to your location.
text_image
SETTINGS | ... | DATE AND TIME | TIME ZONE UCT+0 (W. Europe Standard Time) UCT+3 (Russian standard Time) UCT+3 (Russian standard Time) UCT+3 (Russian standard Time)- With your smart device scan the QR code to user pair your phone with your appliance.
- Press on the 'Confirm' key to continue.
Switch on the appliance's Remote Control to change the appliance settings from the application.
- Tap on the switch to turn 'On' to enable remote control.
- Press on the 'Confirm' key to save and continue.
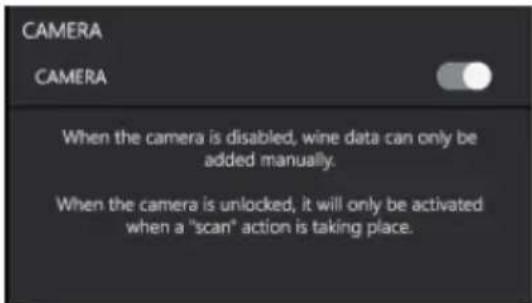
When the camera functionality is enabled, the camera will only be activated when a "scan" action is taking place. When the camera functionality is disabled, wine data can only be added manually.
- Tap on the toggle switch to turn 'On' to enable the camera.
- Press on the 'Confirm' key to save and continue.
TimeandDate
text_image
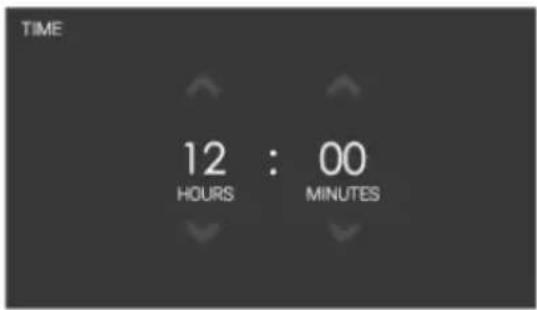
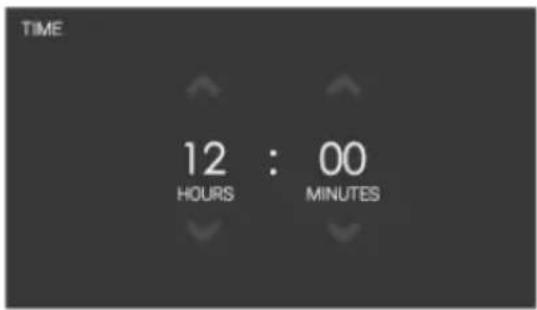
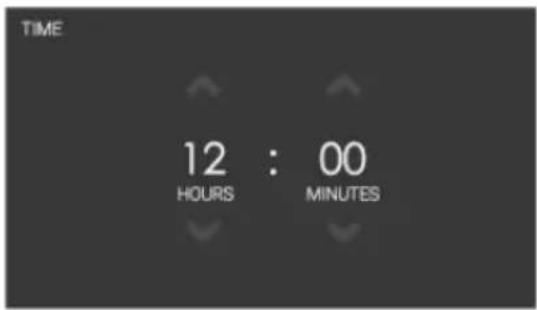
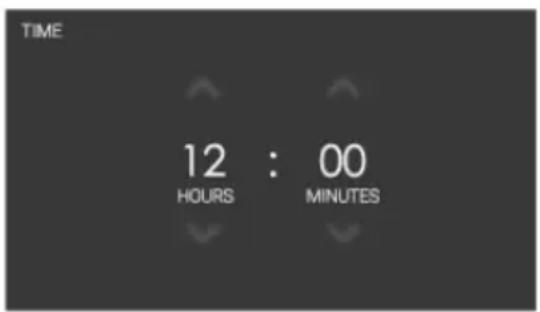
TIME 12 : 00 HOURS MINUTESIf a network connection has not been established you will need to set the current date and time manually.
- Tap on the arrows above and below the hours and minutes to adjust these.
- Press on the 'Confirm' key to save the time and continue.
text_image
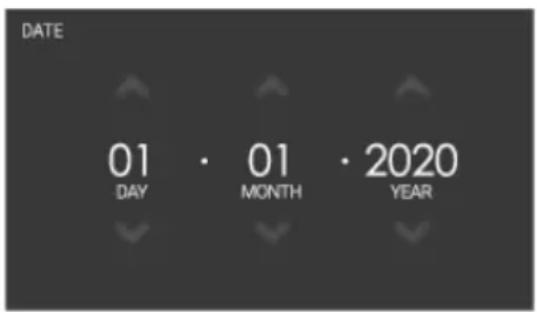
DATE 01 · 01 · 2020 DAY MONTH YEAR- Tap on the arrows above and below the day, month or year to adjust these.
- Press on the 'Confirm' key to save the date and continue.
Temperatureunit
Choose Temperature units (C/F) with which to control and monitor Wine Climate Cabinet.
TemperatureSettings
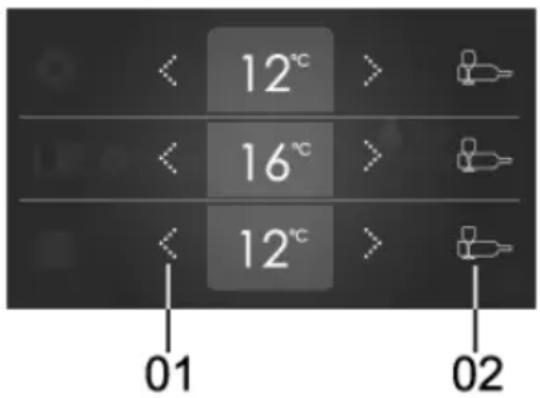
The factory default setting for each of three zones is 12 °C . This temperature can be changed instantly.
Use the temperature settings to set the temperature on each zone individually. Please refer to chapter "Status display" to see how to access this display.
text_image
< 12℃ > 16℃ > 12℃ > 01 02Setting the temperature;01
- Tap on the arrows (left is for decreasing and right is for increasing) to set a temperature.
Temperature guide;02
- Tap on the icon to open the temperature guide screen. A guide on both serving and preserving temperatures will be shown.
The display of the set temperature for each zone flashes until the desired temperature is reached.
Temperatureguidedisplay
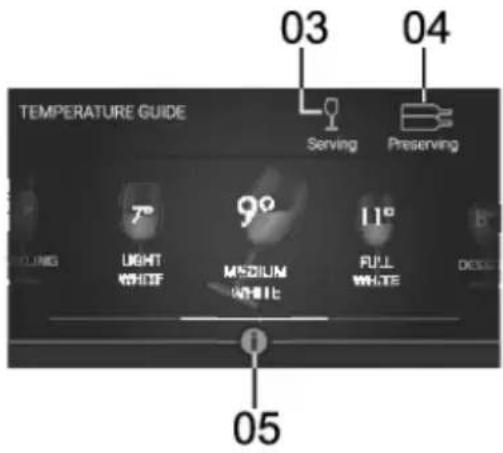
text_image
TEMPERATURE GUIDE Serving Preserving 03 04 7° 9° 11° LIGHT MEDIUM FULL WHITE WHITE 05Serving guide;03
- Swipe left or right to go through the serving temperature guide.
Preserving guide;04
- Swipe left or right to go through the preserving temperature guide.
Info tab;05
- Tap to open the list of grapes applicable for the selected wine type or explanation of the preserving settings.
Main displays
Standbydisplay
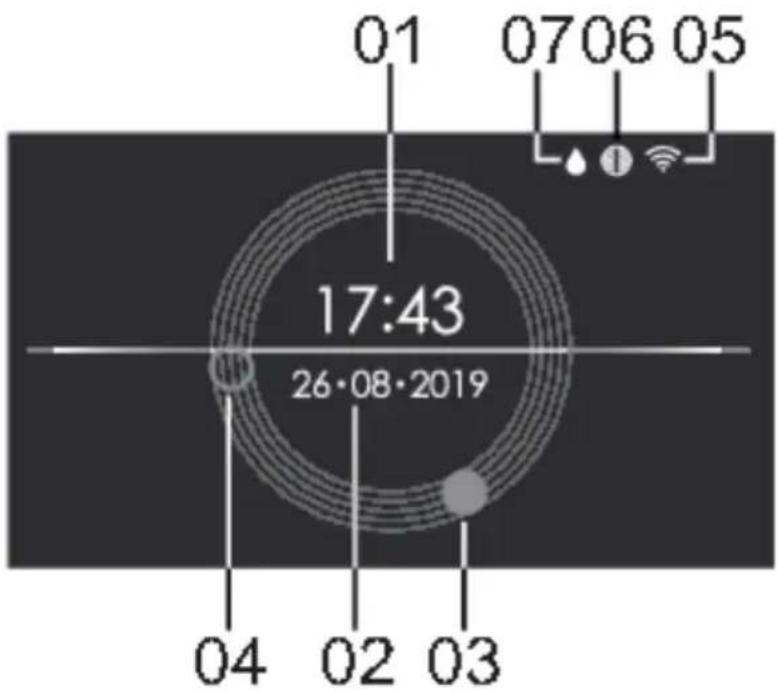
text_image
01 0706 05 17:43 26·08·2019 04 02 03Time, in digital format.01
Date02
03 Time, hour hand of the analog clock.
04 Time, minute hand of the analog clock.
Wi-Fi status.05
06 Charcoal filter icon. Visible only when charcoal filter needs to be replaced.
07 Humidity box refill icon. Visible only when humidity in a zone is low.
Statusdisplay
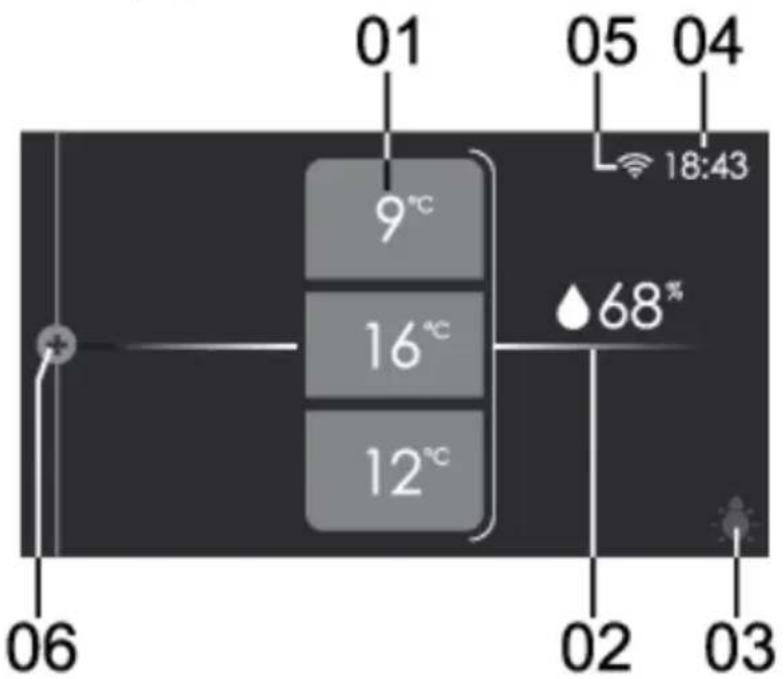
text_image
01 05 04 9°C 18:43 16°C 12°C 68% 06 02 0301
Temperature value of each zone;
• Top value is for zone A, middle for zone B, bottom for zone C.
- Tap any value to open the temperature settings (see chapter "Temperature Settings").
Relative humidity;02
- Tap the value to show the humidity percentage in each zone.
Light switch;03
- Tap on the 'light bulb' symbol to open the switch menu where light can be adjusted for a period of time.
Time:04
• The time is shown here.
Wi-Fi status.05
• The WLAN status is shown here.
'Plus'menu06
- Tap on this left side of the screen, or swipe from left to right, to open the 'plus' menu for further commands.
StatusIcons Wi-Fistatus
| Wi-Fi turned off.No icon | |
 | Wi-Fi connection. |
 | Remote control enabled. |
Charcoalfilter
| No icon | Filter is operating correctly. |
 | Filter countdown close to expiration |
 | (Blinking icon) - filter countdown is expired, charcoal filters must be replaced and countdown reset. |
Using the 'Plus'menu
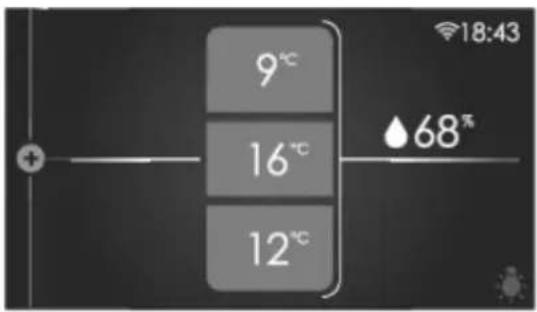
text_image
9°C 16°C 12°C 68% 18:43The 'Plus' menu comprises a number of functions or settings. Please refer to chapter "Status display" to see how to open this menu.
text_image
SETTINGS Go to the appliance settings SCAN WINE LABEL To be able to add or remove it from the inventory INVENTORY Add wine data and position to easily find it laterWhen only the 'Plus' icon is visible you can tap on it or slide it from left to right to open the menu.

INFORMATION!
You can also fix the partly opened plus menu for easy excess to the functions at all times by sliding the vertical colored line just after the icons.
The functions from this menu are:
- SETTINGS; set your preferences (see "Settings" chapter).
• SCAN WINE LABEL; opens camera to identify or add a wine (see "Scan Wine Label" chapter).
• INVENTORY; fill all the information about your inventory in the database.
Settings
text_image
SETTINGS Go to the appliance settings SCAN WINE LABEL To be able to add or remove it from the inventory INVENTORY Add wine data and position to easily find it later- From the status display, access the 'Plus' menu.
Tap on SETTINGS.2.
Operation
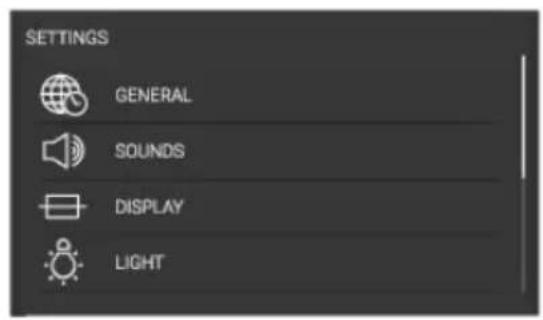
text_image
SETTINGS GENERAL SOUNDS DISPLAY LIGHT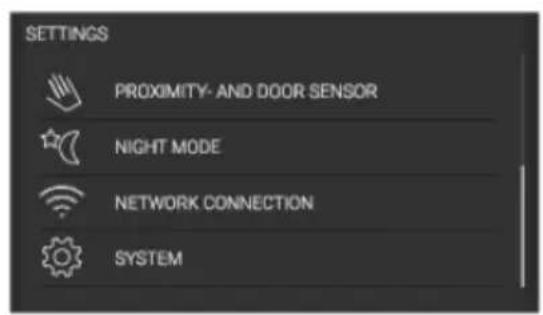
text_image
SETTINGS PROXIMITY- AND DOOR SENSOR NIGHT MODE NETWORK CONNECTION SYSTEM
This menu offers the following choices:
-GENERAL
•SOUNDS
•DISPLAY
•LIGHTS
• PROXIMITY AND DOOR SENSOR
•NIGHT MODE
•NETWORK CONNECTION
•SYSTEM
- Tap on the desired category and the setting to be adjusted.
•tap on the desired choice from a list.
- adjust a value by tapping the arrows above and below the value.
- or switch a setting on or off by tapping on it. A colour background means 'On', a grey background means 'Off'.
- Press the confirm key to confirm.
GENERAL:
You can set the following from this menu:
• Language (language of the touch screen)
- Location (Select appliance location)
• Temperature unit (°C or °F)
• Time and date (Select time zone and enable automatic time and date)
•Time (enter manually)
• Time format (12 or 24-hour clock)
- Date (enter manually)
- Date format (DD-MM-YYYY or MM-DD-YYYY or YYYY-MM-DD)
SOUNDS:
You can set the following from this menu:
• General sounds (volume of sound signals and alarm)
• Alarm sound (volume of alarm sounds)
• Key sound (volume of key sounds)
DISPLAY:
You can set the following from this menu:
• Brightness (adjustable in five brightness levels)
• Color theme (two different colours)
- Clock screen (how long for the display to go to clock screen)
• Standby time (how long for the display to go to standby)
LIGHTmodes:
Two light modes can be set and saved to use in different situations: Ambient mode and Functional mode.
Ambient mode: its purpose is to blend into the living space ambiance. It will be activated when the door is closed (default).
Functional mode: its purpose is to provide a clear view on the shelves and the Serving area. It will be activated when the door is opened (default).
Each light mode consists of a combination of intensity and warmth or color settings of the different light sources. These settings can be changed to your preferences.
The activating and deactivating of the modes in different situations can be done in the PROXIMITY AND DOOR SENSOR settings.
You can set the following from this menu:
- Ambientmode;
- Shelf lights (temperature and intensity sliding percentage from 0 to 100)
- RGB lights (colour and intensity sliding percentage from 0 to 100)
- On for (how long for the cabinet to be lit in this mode)
- Functionalmode;
- Shelf lights (temperature and intensity sliding percentage from 0 to 100)
- RGB lights (colour and intensity sliding percentage from 0 to 100)
- On for (how long for the cabinet to be lit in this mode)
PROXIMITYANDDOORSENSOR:
You can set the following from this menu:
• Proximity sensor (switch 'On' or 'Off')
- On user presence;
- Display change to (none, clock screen or status screen)
- Light change to (none, ambient mode or functional mode)
- During door opening;
- Display change to (none, clock screen or status screen)
- Light change to (none, ambient mode or functional mode)
•After door closing;
- Display change to (none, clock screen or status screen)
- Light change to (none, ambient mode or functional mode)
NIGHTMODE:
You can set the following from this menu:
• Night mode (switch 'On' or 'Off')
• Start time (start time for the lower display brightness)
• Display dimming (display intensity sliding percentage from 0 to 100)
• Light dimming (lights in cabinet intensity sliding percentage from 0 to 100)
NETWORKCONNECTION:
You can set the following from this menu:
• Application download (QR code for application download)
• WLAN (switch 'On' or 'Off')
- Choose a network (select from list of available networks)
- Pairing (While in this menu pairing is enabled, QR code for pairing).
- Unpair all (activate to disconnect all paired user profiles from the appliance connected services).
- Remote control (switch 'On' or 'Off')
SYSTEM:
You can set the following from this menu:
• Inventory management (generic or exact)
• Camera (switch 'On' or 'Off')
• Key lock automatic (how long to automatically activate the key lock)
• Use of Zone B (serving area or shelves)
• Humidity (it is possible to stop monitoring humidity and the humidity box refill notifications)
- Charcoal filters
- Countdown ('Reset' button must be pressed when charcoal filters are replaced)
- Notification (how long will the notification appear on the display before the expired date of the filters).
• Appliance info (appliance name, AUID, MB sw version, UI sw version)
- Software update ('Update' button available if software update is available)
• Factory reset (reset button)
- Modes
- Eco mode (switch 'On' or 'Off')
- Sabbath mode (switch 'On' or 'Off')
- Demo mode (first switch ‘On’ or ‘Off’ to dis- or enable the appliance performance and use for demonstration purposes, switch ‘On’ or ‘Off’ to add 10 virtual wines to the inventory)
Software update
Wine Climate Cabinet can receive updates of the appliance software (for example improved function updates or safety relevant updates). This requires that Wine Climate Cabinet is connected to the cloud.
With ConnectLife mobile application you can also receive notifications when software updates are available in the appliance-but only when a user account is paired to the appliance. If this is not yet established, please proceed with the chapter for Operation, Initial Use (this can be done anytime through SETTINGS menu, not only during initial use).
When new software update is available, both appliance and mobile app will send a notification. In the appliance, a pop up is displayed with a direct access to the update process. In the mobile app, new application screen will appear with notification that new software update is available with direct access to the update process. Please follow the instructions.
To start the update process, press on the "UPDATE" button in the Software Update screen (it is also found inside SETTINGS menu).
During the update process the appliance cannot be used. Make sure the power supply and Wi-Fi connection are not terminated. The update process may take a while. It is normal if there may be no response during the update. The update process can take between 1-5 minutes. In some cases, if there is bad network connection, this time can be longer. User can monitor update progress on appliance's display, download process is displayed in %.

INFORMATION!
With the software update also user interface can change, suser manuals may not reflect the latest changes. For latest version of the user manuals please check your ConnectLife application.
Operation
In case the process failed, Wine Climate Cabinet remains on the previous software version and should operate normal. Please wait for some time before you try again. If the process continues to fail, contact the service department for further support.
If the appliance is not responding after the update process, please wait for some time. The appliance might be still in the update process. If there is still no response after multiple hours, contact the service department for further support.
Inventory
Your Wine Climate Cabinet helps you to manage your wine inventory. It will automatically add the data of the scanned wines to the system. The bottle positions can be managed to be able to find a wine back after years of aging. Two systems are available for managing your inventory, so you can choose the one that suits you best.
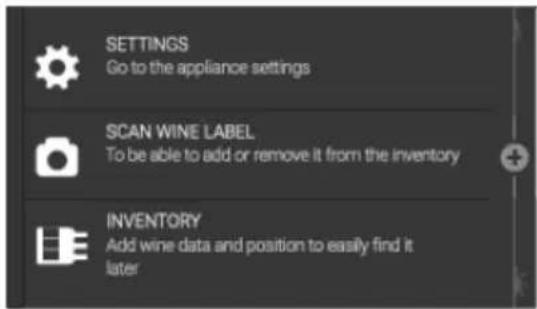
text_image
SETTINGS Go to the appliance settings SCAN WINE LABEL To be able to add or remove it from the inventory INVENTORY Add wine data and position to easily find it laterFrom the opened plus menu, tap on the INVENTORY function to open the Inventory management system.
Firstuse
First time you access the INVENTORY or SCAN WINE LABEL function the preferred system must be decided for and can be changed afterwards in the SETTINGS menu.
Select the preferred system and press on the confirm key to confirm and continue.
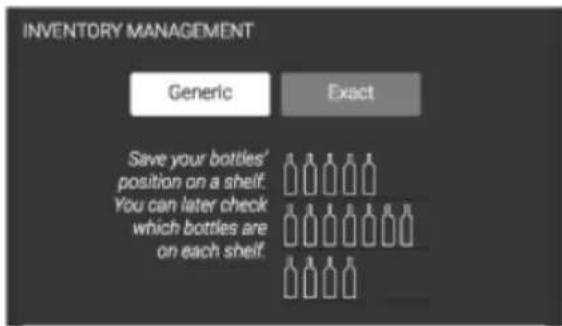
text_image
INVENTORY MANAGEMENT Generic Exact Save your bottles' position on a shelf. You can later check which bottles are on each shelf.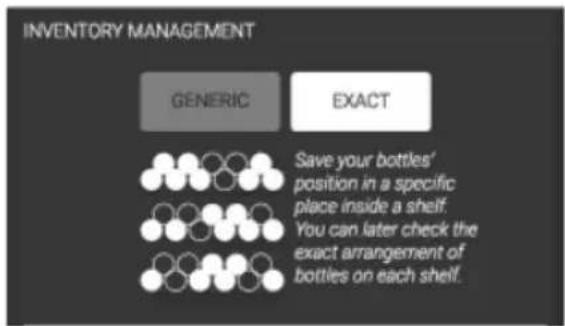
text_image
INVENTORY MANAGEMENT GENERIC EXACT Save your bottles' position in a specific place inside a shelf. You can later check the exact arrangement of bottles on each shelf.- Generic: For each bottle you can enter in the digital inventory the shelf level on which the bottle is positioned. You can change the position of the bottles on the shelf without the need to adjust the positions in the digital inventory. When you would like to find a certain wine, you have to look through all the bottles on the shelf though you can add a logical order to your preference.
- Exact: For each bottle you can enter in the digital inventory the exact position on the shelf. If you would change the order of the bottles on the shelf, the new positions of the bottles have to be entered again. When you would like to find a certain wine, the exact position of that wine will be indicated, if the inventory is well maintained.

INFORMATION!
It is possible to change your INVENTORY MANAGEMENT once it has been used. However it is important to know that:
- When you change to the EXACT management system, all current positioned bottles will get an UNPLACED state. Do you really want to change the INVENTORY MANAGEMENT system to EXACT?
- When you change to the GENERIC management system all NOTES will be deleted and bottles will get a generic position on the current shelf. Do you really want to change the INVENTORY MANAGEMENT system to GENERIC?
ScanWineLabel
Use the camera scanner to automatically recognize a wine label from Vivino database to later on manage your Inventory. If the wine is found all data from the wine will be filled in automatically. If not, it is possible to enter wine data manually.
text_image
SETTINGS Go to the appliance settings SCAN WINE LABEL To be able to add or remove it from the inventory INVENTORY Add wine data and position to easily find it later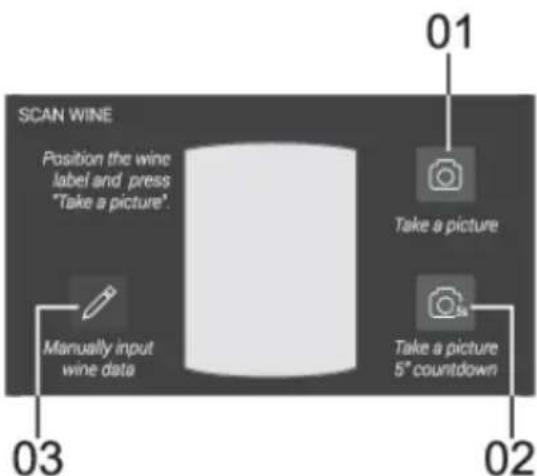
text_image
SCAN WINE Position the wine label and press "Take a picture". Manually input wine data 03 01 Take a picture Take a picture 02 Take a picture 5° countdown-
From opened plus menu, tap on the SCAN WINE LABEL function to start scanning a wine label. To be able to use the camera, it is needed to enable the camera. This can be done during Initial Use or in Settings.
-
Center the wine label in front of the camera. When you are ready tap on the 'Camera' icon to activate the camera.
-
Take a picture. When icon is pressed, a picture is taken automatically.
-
Take a picture with 5 seconds countdown. After the countdown a picture is taken automatically.
-
Manually input wine data. If you prefer to insert yourself the wine data.
The camera feedback is mirrored to make it easier to fit the lable in the frame.
- If the resulting picture is good press the 'Confirm' key. Otherwise, tap on the 'Try again' icon.
Operation
When the wine label has been recognized you will see its Wine Data tab. If not, you may take another picture and scan again the label or you can manually input the wine data if you believe the wine is unlikely to be in the Vivino database (for example, if it is from a domestic wine maker).
Listoverview
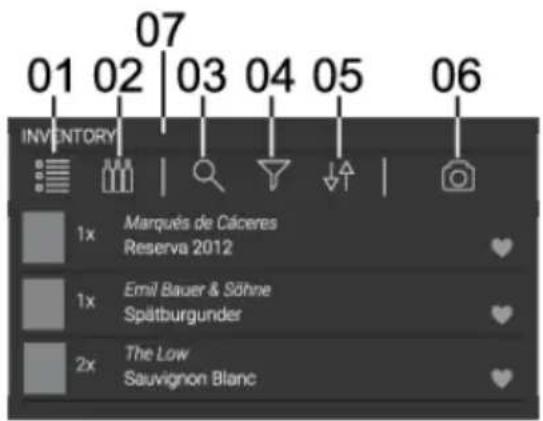
text_image
07 01 02 03 04 05 06 INVENTORY 1x Marqués de Cáceres Reserva 2012 1x Emil Bauer & Söhne Spätburgunder 2x The Low Sauvignon BlancScroll up or down the list to see all the registered wines. For each wine you will see;
- Wine label image
•Quantity of bottles - Winery
- Wine name
• Vintage - Favorite/no favorite
01 List overview. You are currently here.
02 Bottle overview. Depending on the Inventory Management System this is a visual overview of the wines;

Generic management system (bottle icon). Overview wines per shelf.

Exact management system (circles icon). Overview wines in specific spots.
03 Search. Type to search a wine.
04 Filter. Select one or multiple fields to show such relevant wines;
• Only favorite. Displays wines marked as favorite.
- Only unplaced. Displays wines marked on an ‘unplaced’ position.
• Vintage. Tap to open numeric keyboard and type the year vintage range.
• Type (red, dessert, white, fortified, sparkling, rosé, other).
• Region. Tap to choose a region from the expandable list.
• Country. Tap to choose a country from the expandable list.
• Grapes. Tap to choose a type of grape from the expandable list.
- Show removed. Displays wines deleted from the Inventory. This field will make 'only favorite' and 'only unplaced' unavailable.
05 Sort. Select how to organize the List overview from the following list;
• Inventory: Last in – First in
• Inventory: First in – Last in
• Vintage: Old – Young
• Vintage: Young –Old
06 Scan a wine. Direct access to the camera scanner.
07 Total number of bottles stored in the Inventory.
Bottleoverview–Genericmanagementsystem
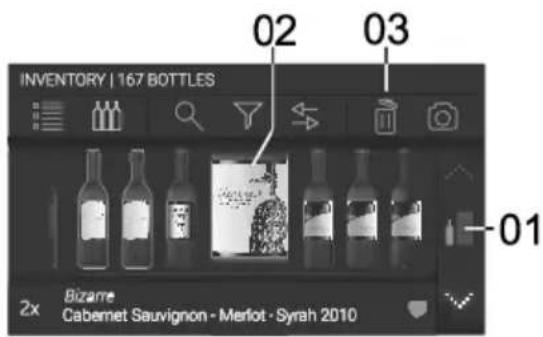
text_image
INVENTORY | 167 BOTTLES 02 03 -01 2x Bizame Cabernet Sauvignon - Merlot - Syrah 2010Current viewed shelf.01
Current viewed bottle.02
- Tap on the arrows (above/below) to navigate through the shelves of the cabinet. Each shelf will display all the bottles positioned inside that shelf.
- Scroll left/right to navigate inside the shelf.
- A below pop-up will appear to reveal information of the current bottle viewed (middle bottle).
03 Remove. Tap here and a small white cross will appear in each label. Tap on each cross to delete bottles—not wines.
Bottleoverview-Exactmanagementsystem
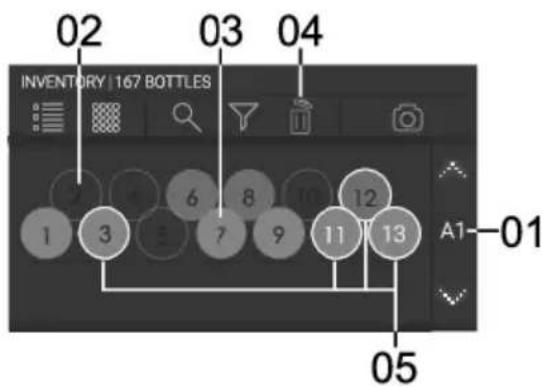
text_image
02 03 04 INVENTORY | 167 BOTTLES 1 3 5 6 7 8 9 10 11 12 13 A1-01 05Current viewed shelf.01
Empty spot.02
Filled spot.03
- Tap on the arrows (above/below) to navigate through the shelves of the cabinet. Each shelf will display 13 spots inside that shelf.
04 Remove. Tap here and a small white cross will appear in each label. Tap on each cross to delete bottles - not wines.
Operation
05
Favorite wine (theme color outline circle).
Selectingawine
To view a wine card, position and notes of a wine first select a wine, because these are all grouped in the same screen and divided by tabs.
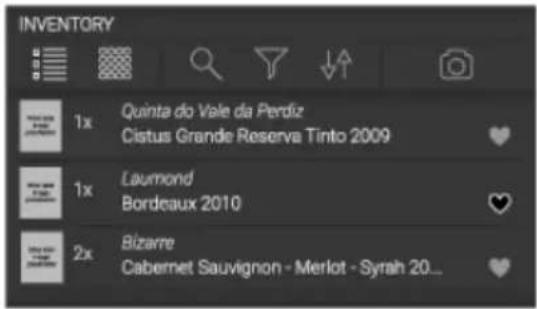
text_image
INVENTORY 1x Quinta do Vale da Perdiz Cistus Grande Reserva Tinto 2009 1x Laumond Bordeaux 2010 2x Bizarre Cabernet Sauvignon - Merlot - Syrah 20...- List view: tap on any space inside the wine row.
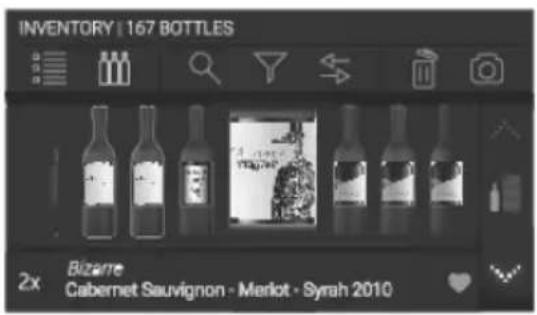
text_image
INVENTORY | 167 BOTTLES 2x Bizame Cabernet Sauvignon - Merlot - Syrah 2010- Generic management system: tap on the wine label image or the wine row below.
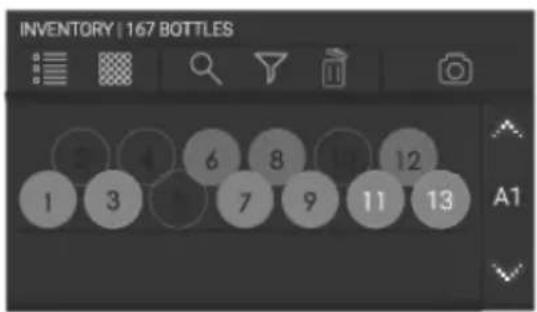
text_image
INVENTORY | 167 BOTTLES 1 3 6 8 12 A1- Exact management system: tap on any circle.
WineCard
Once a wine is selected you can access the data, position and notes of that wine in different tabs.

Wine Card Tab

Positioning Tab – displayed when generic management system is implemented

Positioning Tab – displayed when exact management system is implemented

Notes Tab.

INFORMATION!
From tabs to tabs changes are not saved. Press confirmation key to save the changes and return to the Inventory. Press X button to exit without saving changes.
Unplacedicon

This icon represents the ‘Unplaced’ shelf, therefore, displays all bottles which have not been given a position. This icon appears on both inventory systems on both inventory management systems.
WineCardTab
The Wine Card tab will show the wine data.
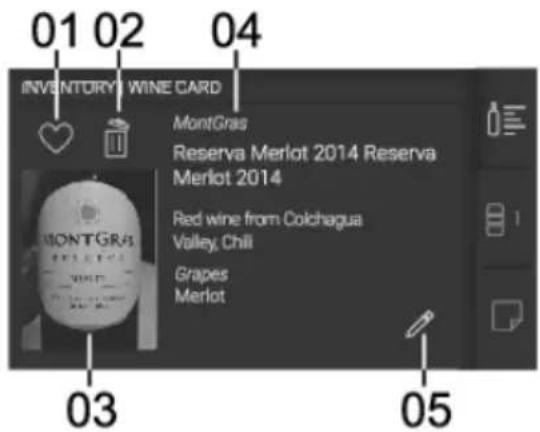
text_image
01 02 04 INVENTORY WINE CARD MontGraS Reserva Merlot 2014 Reserva Merlot 2014 Red wine from Colchagua Valley, Chili Grapes Merlot 03 05Generic Management System
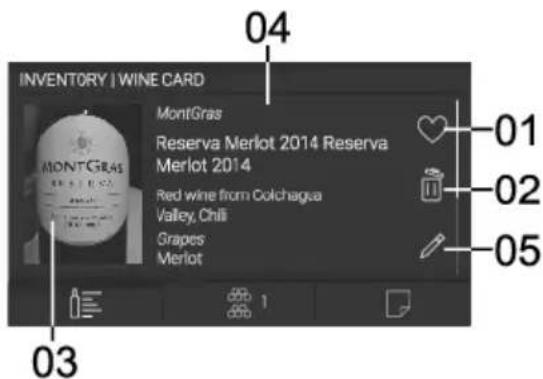
text_image
INVENTORY | WINE CARD 04 MontGras Reserva Merlot 2014 Reserva Merlot 2014 Red wine from Colchagua Valley, Chili Grapes Merlot 01 02 03 1Exact Management System
01 Favorite. To mark wine as a favorite.
02 Delete. To remove wine from the Inventory (positioning and notes will also be removed).
03 Image. Image scanned from camera.
Wine data;04
- Winery
- Wine name
- Type
- Region
- Country
•Grapes
05 Edit. Tap to edit wine data and image. This function is not available if the wine has been automatically identified by the Vivino database. When the wine data is from the Vivino database a logo will be displayed instead.
PositioningTab
The Positioning tab will allow you to save the position of bottles from the selected wine in your cabinet. You can also change here the number of bottles you have.
Generic Management System
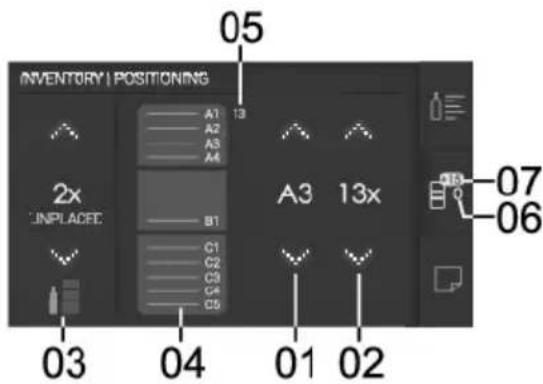
text_image
INVENTORY | POSITIONING 05 A1 13 A2 A3 A4 2x UNPLACED B1 C1 C2 C3 C4 C5 03 04 01 02 A3 13x 06 0701 Shelf. Tap on the arrows (above/below) to move up and down the shelves where you want to store the wine.
02 Quantity. Tap on the arrows (above/below) to add or reduce the number of bottles of the wine. To delete this wine please refer to the Wine Card Tab on how to delete.
03 Unplaced bottles. Tap on the arrows (above/below) to add or reduce the number of bottles of the wine without specific position. This is convenient if you only want to keep track of the number of bottles you have but not the position.
04 Visual zone representations of your Wine Climate Cabinet
05 Total number of bottles per shelf. No action can be done here, this is an overview of the total number of bottles of the wine per shelf.
06 Total original number of bottles stored of this wine.
07 Current number of bottles added/subtracted since last time saved. Therefore this will be reset after saving.
Operation
Exact Management System
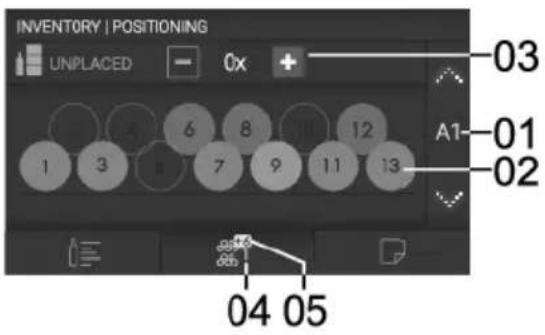
text_image
INVENTORY | POSITIONING UNPLACED - 0x + 03 A1-01 02 1 3 8 7 9 11 13 04 05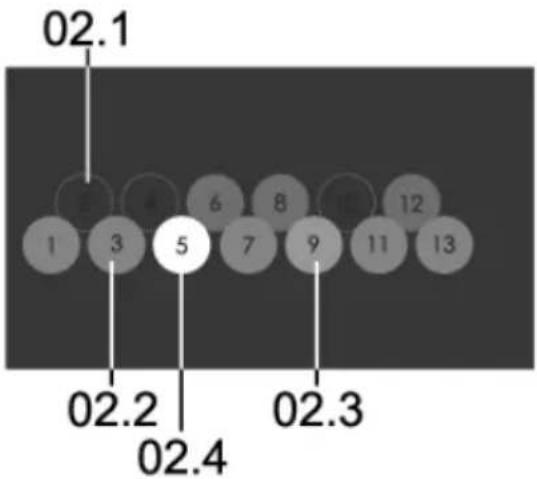
bubble
| Position | Value | |---|---| | 02.1 | 02.1 | | 02.2 | 02.2 | | 02.4 | 02.4 | | 02.3 | 02.3 | | 1 | 1 | | 3 | 3 | | 5 | 5 | | 6 | 6 | | 7 | 7 | | 8 | 8 | | 9 | 9 | | 10 | 10 | | 11 | 11 | | 12 | 12 | | 13 | 13 |01 Shelf. Tap on the arrows (above/below) to move up and down the shelves where you want to store the wine.
02 Exact position. Every circle is a reference to an exact position inside a shelf;
03 Unplaced bottles. Tap on the 'plus' and 'minus' signs to add or reduce the number of bottles of the wine without specifying the shelf you are storing them in. This is convenient if you only want to keep track of the number of bottles you have but not the position.
04 Total original number of bottles stored of this wine.
05 Current number of bottles added/subtracted since last time saved. Therefore this will be reset after saving.
Empty spot.021
022 Taken spot by a different wine.
02.3 Stored spot for one bottle of the wine. If you tap here only a pop-up message will appear to indicate it is not an available spot.
Selected spot. If the spot was previously;024
- Empty (02.1): it will turn from white to orange (02.4). This is how to store a position in this mode.
- Stored spot for one bottle of wine (02.3): it will turn from white to dark grey (02.1). This is how to remove a position in this mode.
NotesTab
The Notes tab allows you to take personal notes and set a best to serve alarm if it is a wine which is going to be preserved.
Generic Management System
In this mode you can save notes for the wine.
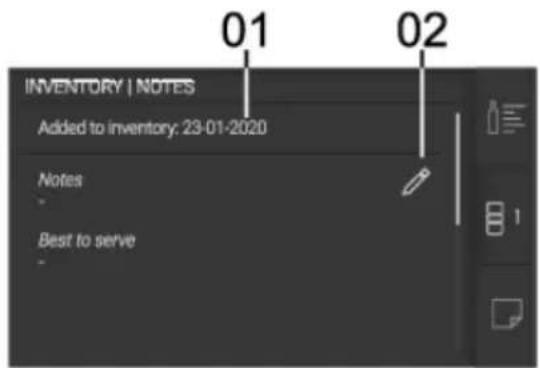
text_image
01 02 INVENTORY | NOTES Added to inventory: 23-01-2020 Notes - Best to serve01 Added to inventory date. No action can be done here.
02 Edit. Tap here to open the edit menu to insert the following;
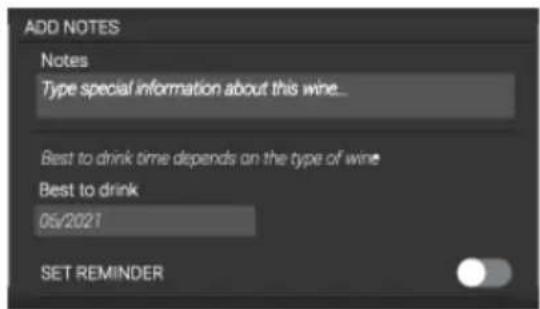
text_image
ADD NOTES Notes Type special information about this wine... Best to drink time depends on the type of wine Best to drink 06/2021 SET REMINDER- Notes. Enter special information about this wine...
- Best to drink date. Input the date which is best to drink the wine.
- Set reminder toggle switch. Turn it on and a date can be set for when you want the "Best to Drink" reminder to pop up.
Exact Management System
In this mode you can save notes for each bottle of the wine.
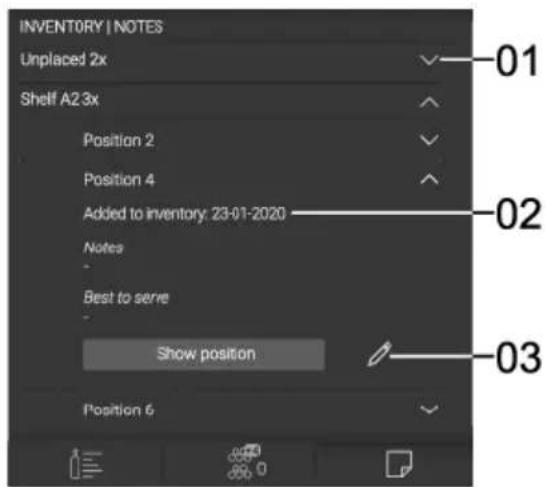
text_image
INVENTORY | NOTES Unplaced 2x Shelf A2.3x Position 2 Position 4 Added to inventory: 23-01-2020 Notes Best to serve Show position Position 6 01 02 0301 Foldable menu. Tap on the arrow to open the menu to add individual notes to each bottle.
02 Added to inventory date. No action can be done here.
03 Edit. Tap here to open the edit menu to insert the following;
Operation
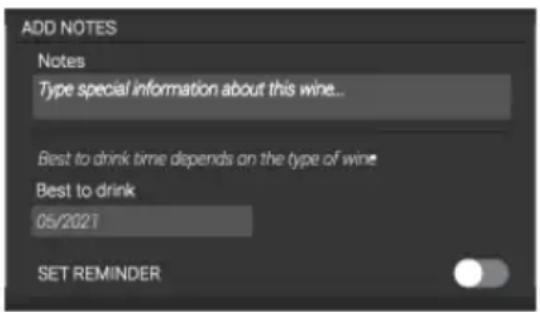
text_image
ADD NOTES Notes Type special information about this wine... Best to drink time depends on the type of wine Best to drink 05/2021 SET REMINDER- Notes. Enter special information about this wine...
- Best to drink date. Input the date which is best to drink the wine.
- Set reminder toggle switch. Turn it on and a date can be set for when you want the "Best to Drink" reminder to pop up.
Defrosting the appliance
- The wine climate cabinet is defrosted automatically. Drops of water will flow through an opening in the rear wall into a tray fitted above the compressor, from where they will evaporate.
Cleaning the appliance

WARNING!
Switch off the appliance and remove the plug from the socket before you start cleaning it.

WARNING!
Do not use abrasive cleaning agents, as they can damage the surface.

WARNING!
Do not remove the rating plate located inside the appliance. The rating plate contains data that you need in case of a repair.
- Before cleaning, remove the bottles from the appliance and store them in a cold place.
- Regularly clean the appliance interior with lukewarm water. If necessary, add a neutral detergent or a special refrigerator detergent to the water. Use a soft cloth to clean all surfaces. Wipe the cleaned parts with a cloth dampened with clean water and dry them thoroughly.
- Do not wash parts of the appliance in a dishwasher as they can be damaged.
- Remove any stains from wooden parts immediately to prevent them from soaking into the wood. Clean the wooden parts with a damp cloth. Make sure the wood is not too wet and leave the parts to dry completely before returning them to the wine cabinet.
Note: Wood is a natural material. Therefore, some stains (especially from red wine) may be hard to remove.
Such stains can be removed by gently rubbing the wood with a very fine sandpaper and then treating the sanded part with wood oil. The substance used to treat the wood should be safe for food contact.
- Clean the glass door with a suitable glass cleaner.
- Clean the gasket with lukewarm water, then wipe it with a soft cloth and dry it thoroughly.
- Regularly clean (using a vacuum cleaner) the ventilation slots on the appliance sides and back. Accumulation of dust on the ventilation slots may result in increased power consumption.

WARNING!
If you do not intend to use the appliance for a long time, switch it off and disconnect it from the power mains. Empty and clean the appliance, than leave the door ajar. This will prevent the appearance of mould inside the appliance.
Reversing the door opening direction
The direction in which the appliance door opens can be reversed.
In order to safely reverse the door opening direction, at least three people should carry out the procedure described below. The door weighs about 40 kg.

WARNING!
In order to avoid damaging the floor, use a floor mat or other suitable protection on the floor in front of the appliance. Also, plan for a suitable spot where you will temporarily place the door during the procedure.
Take care not to damage the door gasket. A damaged gasket will negatively affect appliance operation.

WARNING!
The self-closing hinge could close and damage your fingers. Therefore, please be particularly careful.

WARNING!
Disconnect the appliance from the power mains before reversing the door opening direction.
Toolsrequired:
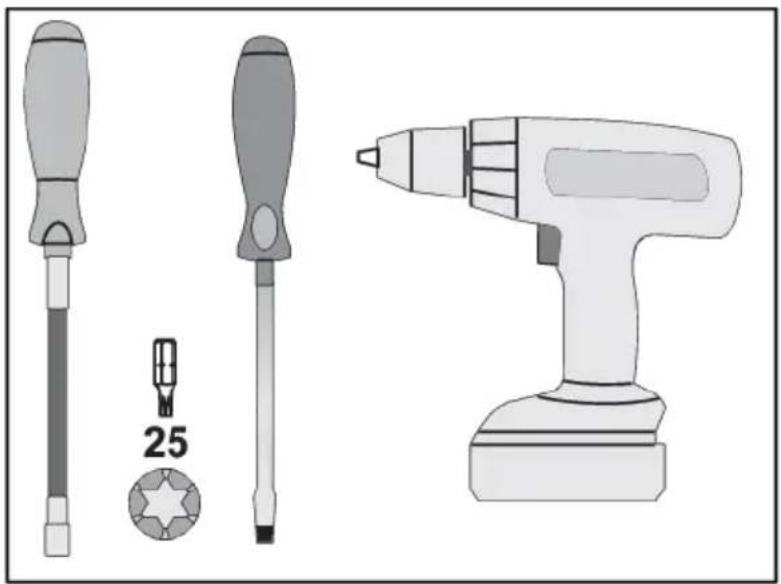
natural_image
Illustration of three different screwdriver tools: a flat screwdriver, a standard screwdriver with a hexagonal head, and a power drill (no text or symbols present)Reversing the door opening direction
To reverse the door opening direction, proceed as follows:
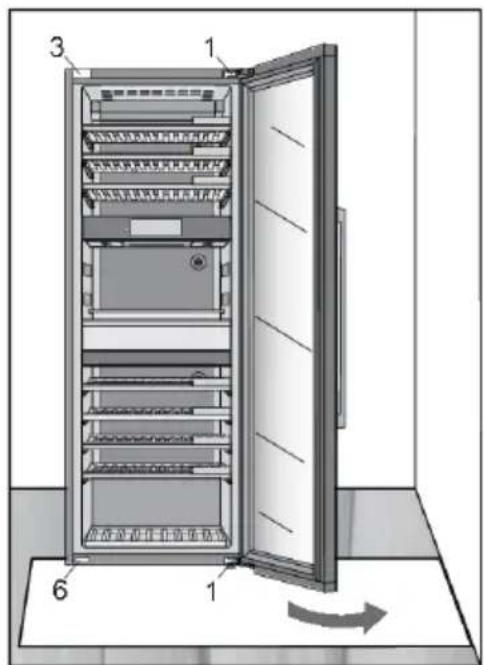
text_image
Diagram of an open refrigerator with numbered parts and a rotation arrow indicating clockwise motion.Open the appliance door.1.
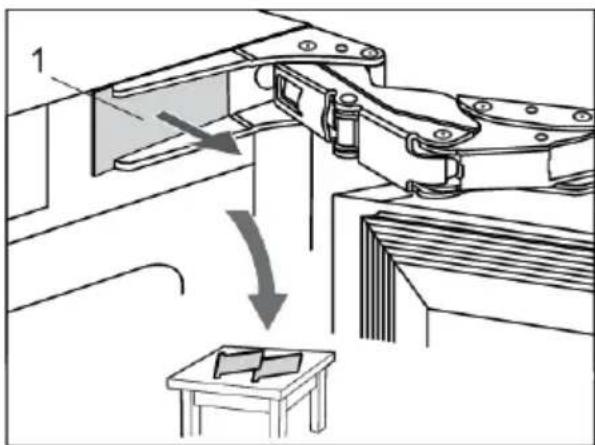
natural_image
Mechanical assembly diagram showing a clamping mechanism with directional arrows and a small table (no text or symbols)- Remove the two hinge caps (1) at the top and bottom. Set them aside, as you will need them later on.
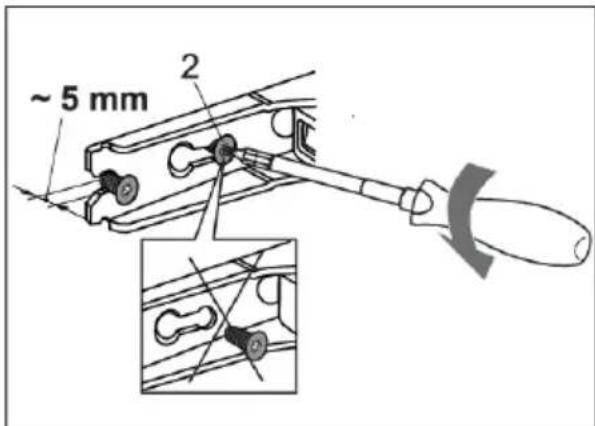
text_image
~ 5 mm 2- Partly (by no more than 5 mm) undo the hinge screws (2) at the top and bottom. Do not completely undo the screws. This way, the door will remain in contact with the housing.
Reversing the door opening direction
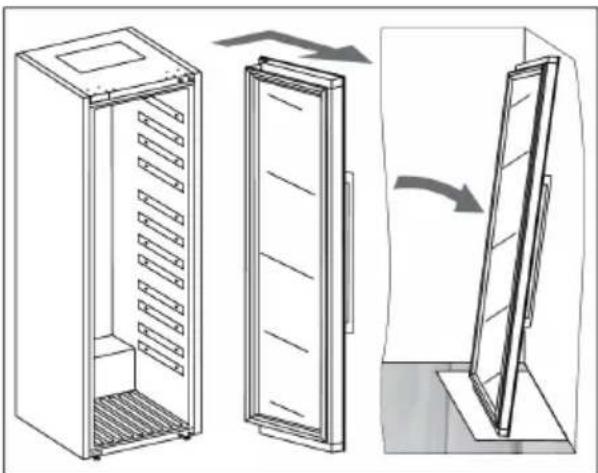
natural_image
Diagram showing three views of a refrigerator with internal compartments and door frame, illustrating structural changes (no text or symbols)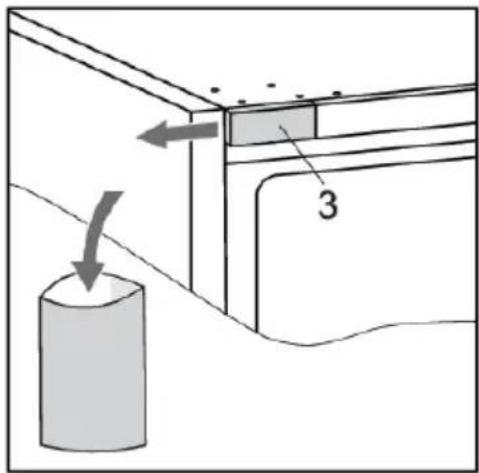
text_image
Diagram showing a cylindrical object with an arrow indicating direction and labeled component '3'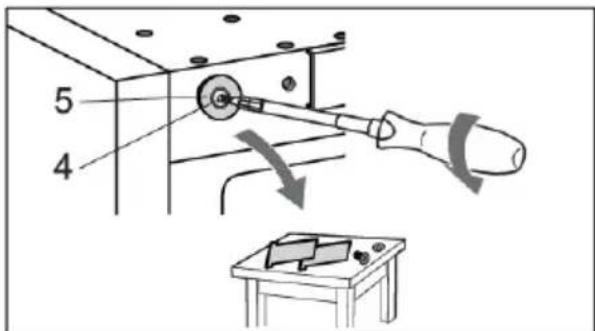
text_image
5 4-
Remove the door, complete with the hinges, by moving it in the direction indicated by the arrow. Carefully place the door on the surface prepared for this purpose.
-
Remove the cap (3). Save it (e.g. in the bag with the instruction manual) if you ever decide to reverse the door opening direction back to the original setting.
6 Undo the screw (4) and remove the cap (5). Set them aside, as you will need them later on.
Reversing the door opening direction
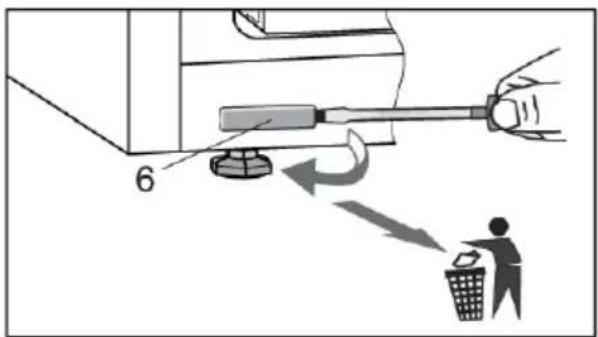
text_image
6- Remove the cap (6) and discard into the bin for plastic waste.
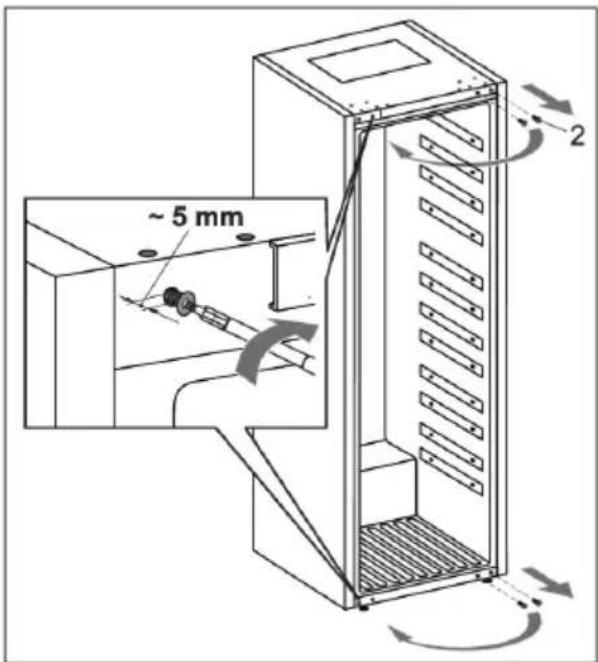
text_image
~ 5 mm 2- Completely undo the screws (2). Then, partly screw them into the holes at the top and bottom on the opposite side of the housing.
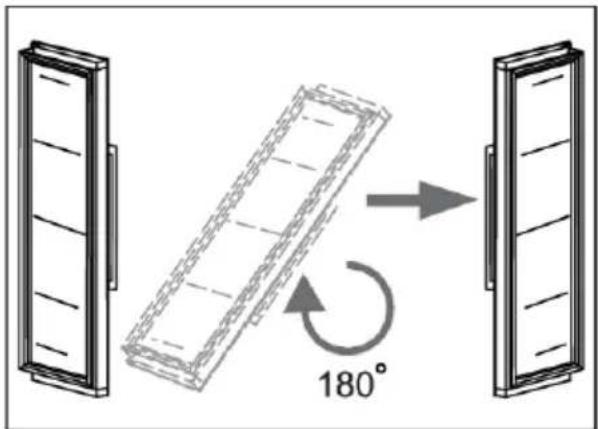
natural_image
Diagram showing a rectangular panel with a 180-degree rotation arrow between two sides (no text or symbols)Carefully rotate the door by 180 degrees.9.
Reversing the door opening direction
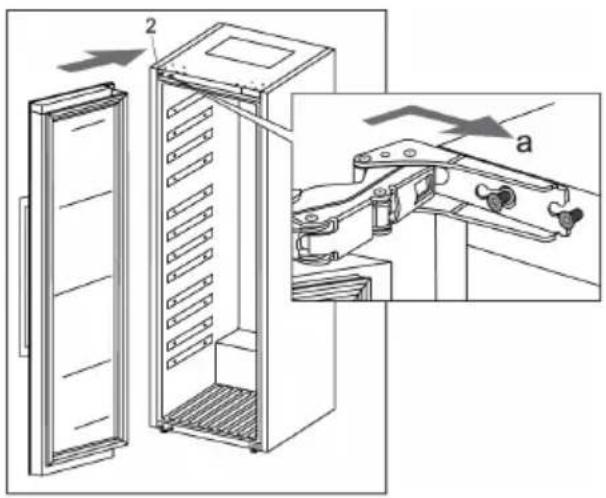
text_image
Technical diagram of a refrigerator with labeled parts and an inset showing a mechanical clamp mechanism labeled 'a'.- Hang the door onto the screws (2) at the top and bottom and slide it in the direction indicated by the arrow (a).

text_image
Technical diagram showing a tool interacting with a mechanical component, with an inset close-up highlighting a component detail.- Tighten the screws. The screws should be tightened to a torque of 6.2 Nm.
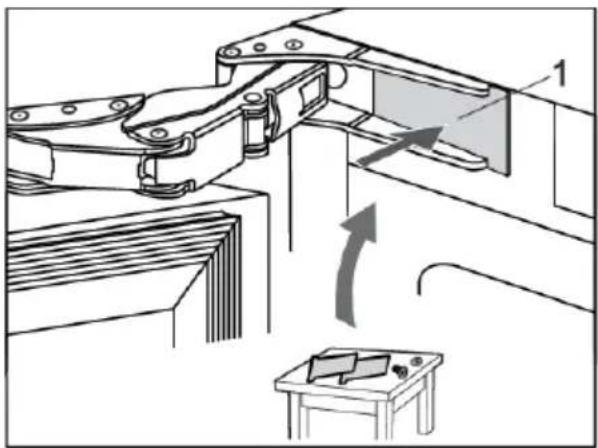
natural_image
Technical diagram of a mechanical assembly with directional arrows indicating motion or force (no text or symbols present)- Replace the hinge caps (1).
Reversing the door opening direction
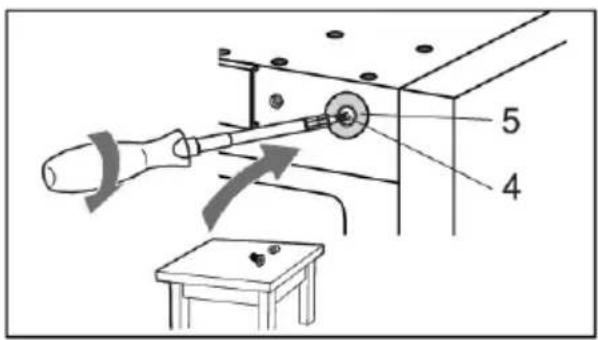
text_image
Technical diagram showing a mechanical assembly with labeled parts 4 and 5, including an arrow indicating direction of motion.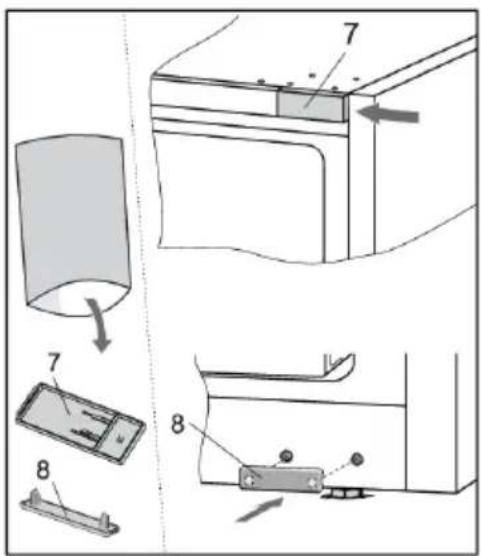
text_image
Technical diagram showing exploded view of a refrigerator with labeled parts and directional arrows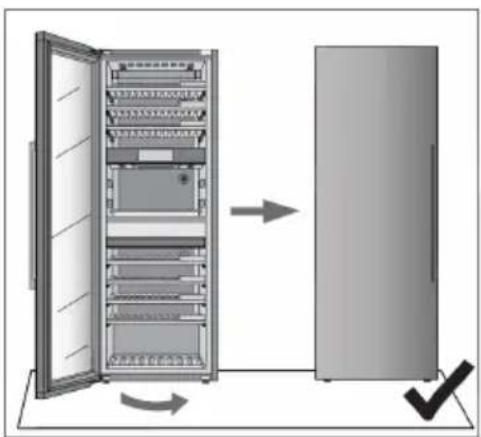
flowchart
graph TD
    A["Open Server Rack"] --> B["Closed Unit"]
    style A fill:#f9f,stroke:#333
    style B fill:#bbf,stroke:#333
-
On the opposite side from the top hinge, attach the cap (5) using the screw (4).
-
Take the caps (7 and 8) from the bag with the instruction manual and install them on the side opposite from the hinges.
-
Close the door and make sure it is aligned with the housing. The housing side and the edge of the door should be parallel.
Reversing the door opening direction
If the door is not aligned with the housing (the angle is not 0^ ),
then proceed as follows:
-
Open the door and detach the gasket from its groove in the corners at the top and bottom hinge.
-
Release the screws (1) at the top and bottom. Do not undo them completely!
-
Close the door, then rotate the screw (2) at the top and bottom to adjust the door position.
Reversing the door opening direction
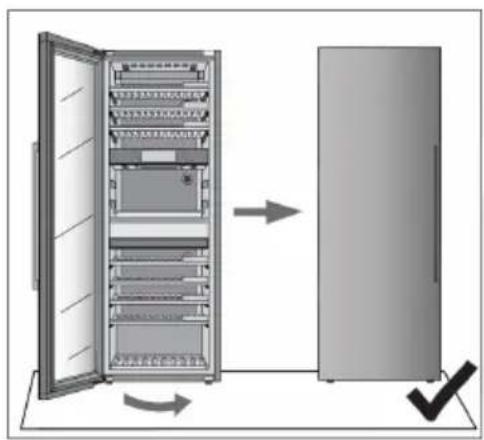
flowchart
graph TD
    A["Open Server Rack"] --> B["Closed Unit"]
    style A fill:#f9f,stroke:#333
    style B fill:#bbf,stroke:#333
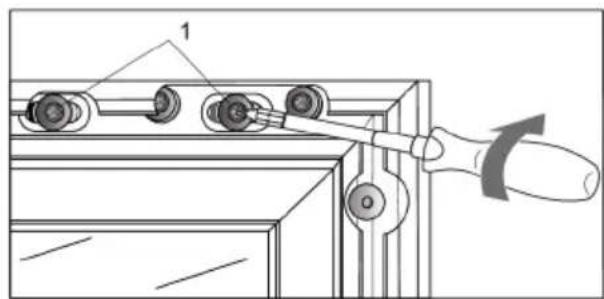
text_image
Technical diagram showing a mechanical assembly with labeled component '1' and directional arrow indicating rotation or movement.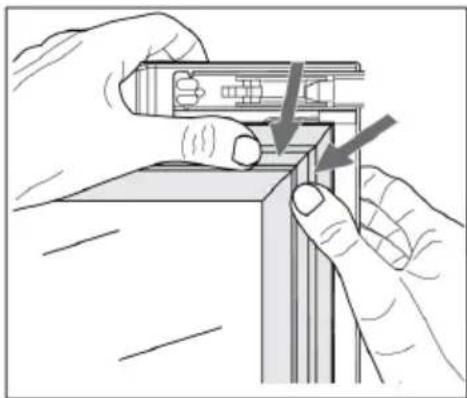
natural_image
Illustration of hands installing or adjusting a mechanical component with arrows indicating assembly (no text or symbols present)-
Adjust the door position until the edge of the door is parallel to the side of the housing.
-
When the door edge is parallel to the housing side, open the door again and tighten the screws (1) you released at the start of the door adjustment process.
-
Carefully press the gasket back into the groove in the door.
If you have any doubts about whether your appliance is working properly, we recommend to first read suggestions below.
Tips & Tricks
When temperature or humidity in the appliance is out of range an alarm will be triggered. This is an alarm sound and notification pop-up.
To remove the sound and pop-up press X key or Confirm key. The temperature and/or humidity of the zone which causes the problem will be blinking on the display until it has been recovered.
If the alarm has not been removed and the temperature and/or humidity has been recovered, the alarm sound will stop but the pop-up needs to be removed (press X key or Confirm key).
Temperatureoutofrange
| CountermeasuresPossiblecause | |
| Frequent and/or long door openings. | Try to minimize opening the door of the wine climate cabinet appliance. Prepare loading plan of large quantities of bottles in advance to minimize the required time for loading.Try to use the ConnectLife mobile application as much as possible to change appliance settings. |
| Recent big changes in temperature settings. | Making larger changes of the temperature settings may take the appliance a few hours to reach new settings. |
| Introduction of new bottles. | Especially introduction of larger quantities of new bottles to the appliance may take longer for the appliance to reach the set temperature range.If possible, we recommend to introduce already cooled bottles to the appliance.We recommend to let the appliance cool down to the set temperature before introducing the first batch of your wine bottles. |
| Recent start-up of the appliance. | It may take a few hours for the appliance to cool to the requested setting after being turned on.We recommend to let the appliance cool down to the set temperature before introducing the first batch of your wine bottles. |
| Extreme ambient temperatures. | Make sure that the appliance is installed in a well ventilated room and is not exposed to extremely high or extremely low temperatures. For detailed appliance installation instructions please refer to the user manual [see chapter “Selecting the location”]. |
In case none of the above countermeasures helped and the "temperature out of range" warning persists, please contact a service center.
Humidityoutofrange
| CountermeasuresPossiblecause | |
| Frequent and/or long door openings. | Try to minimize opening the door of the wine climate cabinet appliance. Prepare loading plan of large quantities of bottles in advance to minimize the required time for loading.Try to use the ConnectLife mobile application as much as possible to change appliance settings. |
| Recent big changes in temperature settings. | Making larger changes of the temperature settings may take the appliance a few hours to reach new settings.Humidity levels in the appliance are strongly dependent on the temperature changes and take longer to stabilize. |
| Recent start-up of the appliance. | It may take a few hours for the appliance to cool to the requested setting after being turned on.Humidity levels in the appliance are strongly dependent on the temperature changes and take longer to stabilize. |
| Extreme ambient temperatures and/or humidity levels. | Make sure that the appliance is installed in a well ventilated room and is not exposed to extremely high or extremely low temperatures. Humidity levels in the appliance are strongly dependent on the temperature changes and take longer to stabilize.For detailed appliance installation instructions please refer to the user manual [see chapter “Selecting the location”].In case of use in ambient with extremely high or extremely low humidity levels you can purchase a humidity stabilizer accessory set. |
In case none of the above countermeasures helped and the "humidity out of range" warning persists, please contact a service center.
Powerfailure
| CountermeasuresPossiblecause | |
| Recent and/or frequent power failure. | If this power cut-outs appear to be frequent, contact professional electrician to check electrical fuses, outlets and appliance's power connecting cable. |
Error notifications
If a component inside the appliance is failing, a notification will pop-up.
The notification will display a code. Codes for these errors can be found in the table below.
| Code | DescriptionError |
| E0 | Communication error from power board to user interface electronics. |
| E2 | Communication error from power board to wireless network card. |
| E3 | Communication error from wireless network card to power board. |
| E8 | Communication error from user interface electronics to power board. |
Solving problems
| Code | DescriptionError |
| Door sensor error.E9 | |
| Zone A fan error.F1 | |
| Condenser fan error.F2 | |
| Zone B fan error.F3 | |
| Zone C fan error.F4 | |
| H1 | Humidity sensor error for zone A. |
| H2 | Humidity sensor error for zone B. |
| H3 | Humidity sensor error for zone C. |
| H4 | Humidity sensor error for outside environment. |
| Proximity sensor error.P1 | |
| T1 | Temperature sensor error for outside environment. |
| T2 | Temperature sensor error for zone A. |
| T3 | Temperature sensor error for zone A evaporator. |
| T4 | Temperature sensor error for zone B. |
| T6 | Temperature sensor error for zone B evaporator. |
| T8 | Temperature sensor error for zone C. |
| T9 | Temperature sensor error for zone C evaporator. |
| Vibration sensor error.U1 |
The message/code is displayed on the screen until the user confirms it by pressing X Key or Confirm key.
If after 3 hours since the user closed the message, the error is still not resolved, the error message is displayed again.
If the problem persists, please contact a service center.
The exception is error P1 (Proximity sensor), where the user can choose not to display this error anymore.
Other display warnings
| Cause/SolutionWarning | |
| Wi-Fi icon is displayed on the screen. | The device is connected to the cloud service. |
| Wi-Fi icon with additional check mark is displayed on the screen. | The device is connected to the cloud service and remote control is enabled.Make sure the device is connected to a local wireless network.Make sure your LAN has access to the Internet. |
| There is no visible Wi-Fi icon on the screen. | The device is not connected to the cloud service.Make sure the device is connected to a local wireless network.Make sure your LAN has access to the Internet. |
| Vibrations have been noticed. Please close the shelves and door gently, making use of the soft close mechanism. Frequent vibrations can influence the quality of the wine on longer term. | Pop-up will show and alarm sound is heard. On press of any key or screen, the pop-up will be removed. The pop-up will also be removed automatically after 10 seconds.Check that the appliance is installed correctly (“Installation and connection”). |
| Considerable vibrations have been noticed. Please look into the placing and calibration of the appliance. If the alarm is triggered more often, please look into circumstances that can be causing vibrations. Frequent vibrations can influence the quality of wine on longer term. | Pop-up will show and alarm sound is heard. On press of any key or screen, the pop-up will be removed.Check that the appliance is installed correctly (“Installation and connection”). |
| The door is open. | The door has been open too long: close the door.If the warning keeps showing, call the service center to arrange repairs. The appliance operates in a safe mode until it is corrected.The appliance automatically maintains the most suitable temperature for each temperature zone. |
| The Charcoal filter of every zone has a lifetime of 12 months. This means that your filters will expire within X days. Please exchange all filters. | Replace the air filters in all three temperature zones. |
| The temperature or humidity of a zone is out of range. | The value of humidity in the room is outside the permitted limits.Ensure that the appliance is located in in a well-ventilated area and not exposed extremely low or extremely high temperatures. |
| The temperature or humidity of a zone is out of range.●Zone »X« Temperature is out of range. | The temperature in an individual room is outside the permitted limits.You can find more information regarding possible causes and potential solutions for this notification in section »Tips & Tricks« In the event that this occurs for a longer period of time since the last intervention in the device (change of setting, loading of bottles, opening of doors,...) it may mean that temperature sensor is out of order. Contact a service center to correct the error. The appliance will operate in safe mode until repaired by a service technician.The appliance will automatically maintain the most suitable temperature for each temperature zone. |
| The average humidity value blinks because the humidity of one or more zones is below 40%. | Pop-up will show. It can be removed by pressing X key, Confirm key or "Go to Humidity" button.By pressing the average humidity value on the status screen, you can see which zone has the blinking humidity value. We advise for convenience to take the chance to refill all boxes, although refilling only according humidity box zone will also stop the notification. |
General problems
| Cause/SolutionProblem | |
| Appliance cools continuously for a long time. | The ambient temperature is too high.The door has been opened for too long or too frequently.The door does not seal properly (the seal is dirty, the door is misaligned or the seal is damaged, etc.).A larger quantity of bottles is newly inserted.Insufficient air circulation around the compressor and condenser.Check that there is sufficient ventilation around the appliance. |
| Appliance makes a noise. | The appliance is cooled by a cooling system with a noise-causing compressor. The noise level depends on the installation of the appliance, its correct use and age.When you connect the appliance to the power supply, the noise made by the compressor or liquid refrigerant may be slightly louder. This does not indicate a fault and has no effect on the service life of the appliance.The appliance will produce more noise for some time.The appliance may temporarily produce more noise after the door has been opened for too long or too frequently or, there is a large amount of newly inserted bottles.The appliance may produce more noise when operating in a high temperature environment. |
| Some or all LED lights are not working. | Check if LED lighting is turned on. For additional information see chapter »Settings/Light«.You may not try to repair LED lighting. Please contact a service center |

INFORMATION!
When calling a service center, you will have to state the type, model and serial number indicated on the type plate on the inside of the appliance [see chapter "Selecting the location"].
When waiting for a service technician, do not open the appliance door to avoid an unnecessary rise in temperature.
When wine bottles need to be removed for service, the consumer is responsible for removing the content from the cabinet.
Disposal of packaging and appliance
This appliance is made from sustainable materials. This appliance must be disposed of in a responsible manner at the end of its service life. Contact the local authorities for information about the method.

INFORMATION!
See also the chapter ‘Disposal’ in the Safety instructions.
The packaging of the appliance is recyclable. The following materials may have been used:
- Cardboard.
•Polyethylene foil (PE).
• CFC-free polystyrene (hard PS foam).
These materials must be disposed of in a responsible manner and in accordance with government regulations.
The appliance is marked with a crossed out wheeled bin symbol to draw your attention to the requirement for the separate disposal of domestic electrical appliances. This means that the appliance may not be disposed of in unsorted household waste at the end of its service life. The appliance must be taken to a special municipal waste processing location for separated waste or to a dealer who provides this service.
Collecting and disposing of domestic appliances separately avoids detrimental consequences for humans and the environment. This ensures that the materials used to make the appliance can be recovered and that substantial savings in the use of energy and raw materials can be achieved.

Declarationofconformity
We hereby declare that our products conform to the applicable European Directives, Regulations and requirements, as well as all requirements in the standards to which reference is made.
| Wi-Fi moduleRadio equipment type: | |
| Operating frequency range: | 2,412 GHz - 2,472 GHz |
| Maximum output power: | 20 dBm EIRP |
| 2,7 dBiMaximum antenna gain: |
or
| Radio equipment type: | HL3215STGHLW3215-TGHLW3215-TG01 |
| Wi-Fi | |
| Operating frequency range: | 2,412 GHz - 2,472 GHz |
| Maximum output power: | ≤10 dBm/MHz (EIRP) (Antenna gain 10 dBi) |
| Maximum antenna gain: | Gain: 0 dBi |
| Bluetooth | |
| Frequency range: | 2,402 GHz - 2,480 GHz |
| Carrier Output: | 6 dBm (≤10 dBm) |
| F1DEmission type: | |
Declarationofconformity
The company declares that the device with the function Connectlife complies with the essential requirements and other relevant provisions of Directive 2014/53/EU. The detailed Declaration of Conformity can be found at the web address https://auid.connectlife.io on the page of your device among the additional documents.
ATAG
The instructions for use can also be found on our website: www.atag.nl, www.atag.be

FSC www.fsc.org
MIX
Paper from onsible sources
FSC® C114278
838541-a9
CE
