
WaterTile K-8014 - Shower head KOHLER - Free user manual and instructions
Find the device manual for free WaterTile K-8014 KOHLER in PDF.

User questions about WaterTile K-8014 KOHLER
0 question about this device. Answer the ones you know or ask your own.
Ask a new question about this device
Download the instructions for your Shower head in PDF format for free! Find your manual WaterTile K-8014 - KOHLER and take your electronic device back in hand. On this page are published all the documents necessary for the use of your device. WaterTile K-8014 by KOHLER.
USER MANUAL WaterTile K-8014 KOHLER
Installation and Care Guide
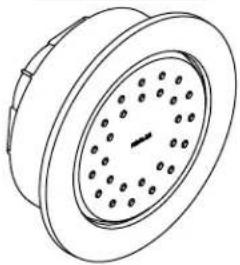
Bodysprays
K-8013, K-77119 K-8014
natural_image
Technical line drawing of a mechanical component with circular housing and central slots (no text or symbols)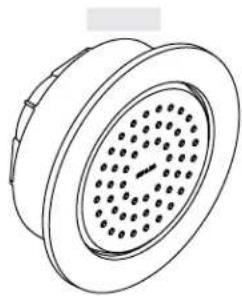
natural_image
Technical line drawing of a circular mechanical component with evenly spaced holes (no text or symbols)Mproduct numbers are for Mexico (i.e. K-12345M)
Socket Wrench with 7/16" Socket and Extension
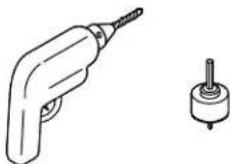
Drill 4-1/8" Hole Saw
Plus:
- Close nipple or
• 1-1/2" NPT pipe nipple
• 1/2" NPT female fittings - 11 mm hex bit (provided)

Sealant Tape
Before You Begin

WARNING: Riskofscalding. High water temperature can cause severe burns. Set the water temperature at or below 120°F (49°C) following the adjustment procedure in the valve Installation and Care Guide.

CAUTION: Riskofpropertydamage. Spraying pressurized water directly at the sprayface may cause water to leak behind the finished wall. Do not spray pressurized water directly into the sprayface.
IMPORTANT! There must be two or more 1.0 gpm bodysprays per valve outlet to ensure proper operation of automatic compensating valves.
□ Observe all local plumbing and building codes.
□ Inspect the supply piping for damage. Replace as necessary.
☐ For service parts information, visit your product page at www.kohler.com/serviceparts.
Single Bodyspray Installation Multiple Bodyspray Installation
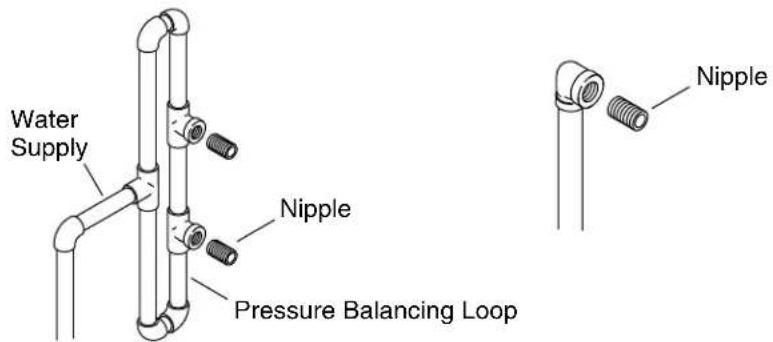
1. Install the Supply Piping
Multiple Bodyspray Installations
☐ Route the water supply lines.
☐ If installing more than one bodyspray off the same supply line, construct a pressure balancing loop. Locate a tee along the loop at each bodyspray installation location.
☐ Do not strap the pipes at this time.
Single Bodyspray Installations
☐ Route the water supply line.
☐ Install an elbow to the end of the supply pipe at the bodyspray installation location.
All Installations
☐ Temporarily install a nipple to each tee/elbow. Do not use any sealant.
☐ Do not strap the pipes at this time.
Install the Plaster Guard
Set Piping Depth
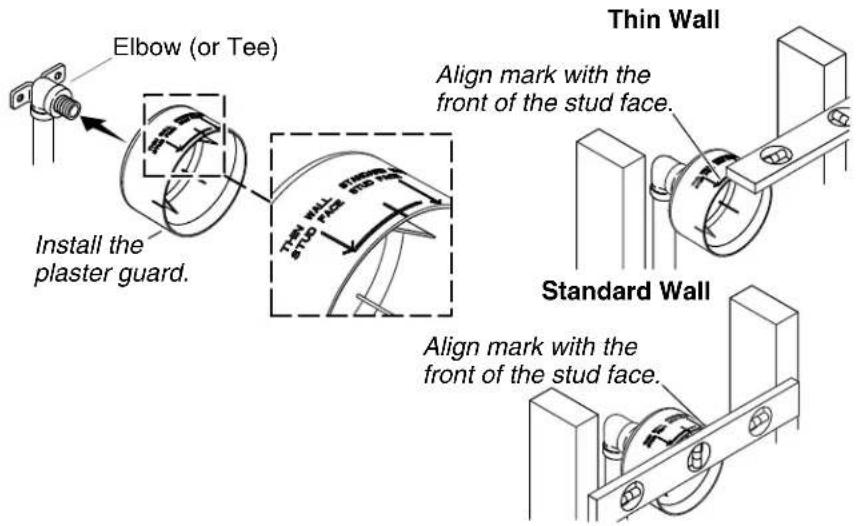
2. Install the Plaster Guard
☐ Install the plaster guard. Push until the plaster guard is snug against the face of the elbow (or tee).
3. Set the Pipe Depth
Thin Wall Installations
NOTE: Thin wall installations have a finished wall thickness of less than 3/8"(10 mm).
☐ To adjust the pipe depth, use a level or other straight edge to line up the "Thin Wall Installation" mark with the front face of the studs.
Standard Wall Installations
☐ To adjust the pipe depth, use a level or other straight edge to line up the edge of the plaster guard with the front face of the studs.
All Installations
□ Install appropriate backing and strap the pipes at the adjusted depth.
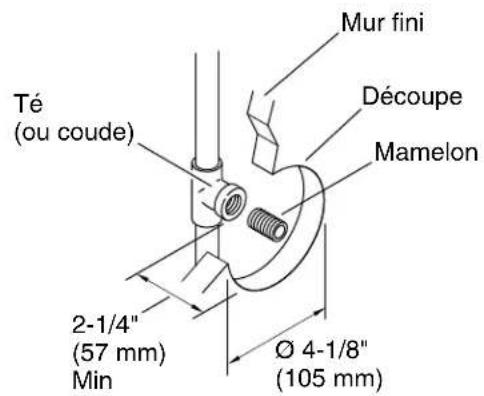
Cutout
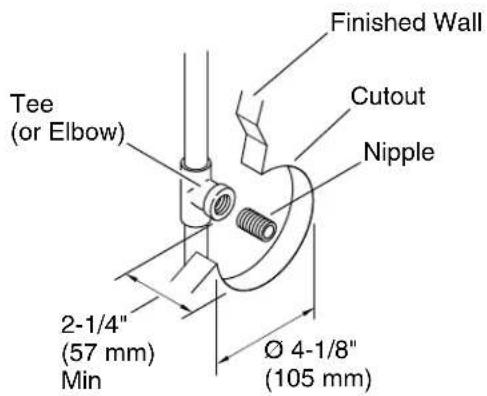
4. Install the Finished Wall
□ Install the water-resistant wall board.
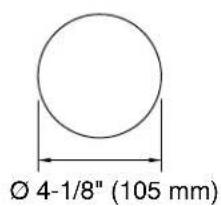
☐ Cut out a 4-1/8"(105 mm) round hole, centered on the pipe nipple at each desired installation location.
□ Install the finished wall material.
5. Install the Pipe Nipple
□ Remove the nipple.
NOTE: The minimum distance between the face of the tee/elbow and the surface of the finished wall should be 2-1/4"(57 mm). The measurement for typical installations is 2-7/8"(73 mm).
☐ Measure the distance from the face of the tee/elbow to the surface of the finished wall. Make any adjustments as needed.
☐ If your measurement is between 2-1/4"(57mm) and 2-3/4"(70mm): Use a close pipe nipple.
☐ If your measurement is between 2-3/4"(70mm) and 3-1/4"(83mm): Use a 1-1/2" pipe nipple.
☐ Thread the nipple into the tee/elbow and hand tighten.
☐ Measure the distance from the end of the nipple to the surface of the finished wall. Verify that the distance is at least 1-1/2"(38 mm) and no more than 2"(51 mm).
□ Remove the nipple.
Install the Pipe Nipple (cont.)
□ Apply thread sealant to the threads of the nipple.
□ Reinstall the nipple to the tee/elbow.
□ Run water through the system to flush out any dirt or debris.
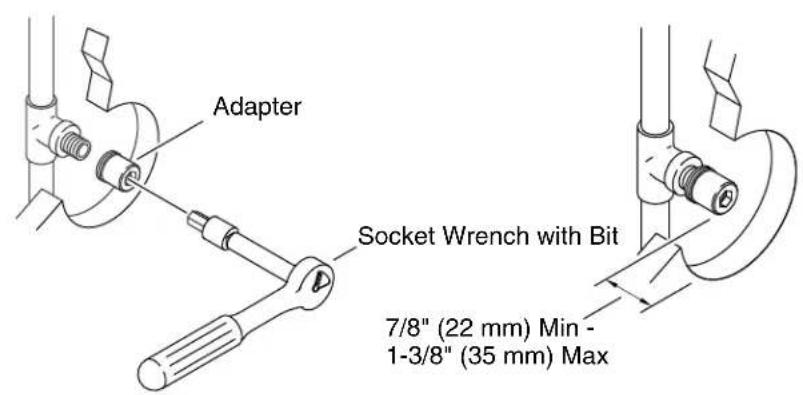
6. Install the Adapter
☐ Install the adapter to the pipe nipple using a socket wrench with extension, 7/16" socket, and the provided 11 mm bit.
☐ Measure the distance from the face of the adapter to the face of the finished wall. Verify the distance is at least 7/8"(22 mm) and no more than 1-3/8"(35 mm). Make any adjustments as needed.
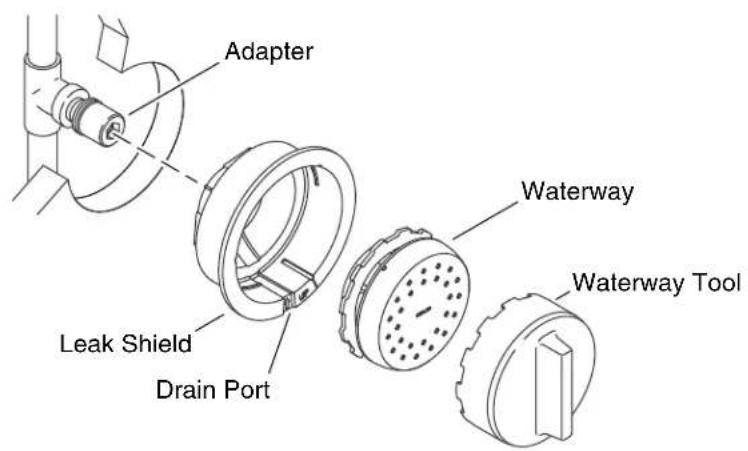
7. Install the Waterway
- Orient the leak shield with the drain port down and the arrow pointing "UP."
☐ Insert the leak shield into the rough opening.
IMPORTANT! If the waterway cannot be threaded onto the adapter, remove the pipe nipple and install a longer one.
□ Using the provided waterway tool, thread the waterway to the adapter.
NOTICE: Keep the waterway installation tool. This tool is needed to remove the waterway for cleaning or servicing.
□ Verify the waterway is centered in the leak shield.
IMPORTANT! If the leak shield is loose after the waterway is installed, remove the pipe nipple and install a shorter one.
☐ Verify the leak shield is still positioned with the drain port down and the arrow pointing "UP." The leak shield should be snug to the wall and not move or shift.
Center the opening with mark.
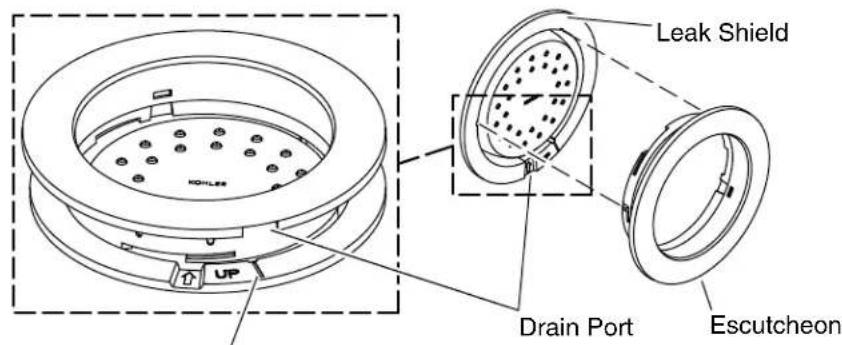
8. Install the Trim
□ Locate the drain port on the escutcheon.
☐ Position the escutcheon on the leak shield with the mark on the leak shield centered in the escutcheon drain port opening.
☐ Press the escutcheon onto the leak shield and turn clockwise to secure.
□ Verify the drain port in the leak shield is aligned with the escutcheon drain port.
Remedy Reduced Water Flow
If you are experiencing reduced water flow from your bodyspray, try one of the following:
Clean the Spray Nozzles

CAUTION: Riskofpropertydamage. Spraying pressurized water directly at the sprayface may cause water to leak behind the finished wall. Do not spray pressurized water directly into the sprayface.
☐ While the water is running, firmly rub your finger across the spray nozzles to dislodge any debris or mineral build-up. If this does not improve water flow, proceed to "Clean the Screen Washer."
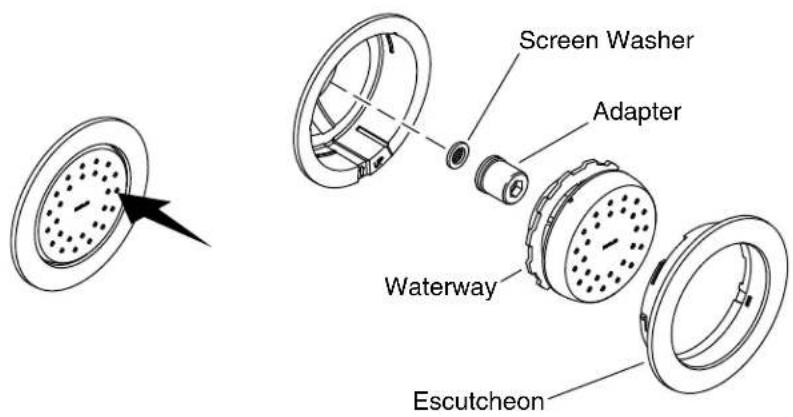
Clean the Screen Washer
□ Turn the escutcheon counterclockwise to remove.
□ Using the waterway tool (provided), remove the waterway.
☐ Using a socket wrench with extension and the provided 11 mm bit (or a 7/16"socket) remove the adapter.
□ Using a thin-blade screwdriver, carefully pry the screen washer from the adapter.
□ Gently rub the washer under running water to remove any debris.
□ Reinstall the washer into the adapter.
Remedy Reduced Water Flow (cont.)
☐ Reinstall the adapter, waterway and escutcheon; refer to the "Install the Adapter," "Install the Waterway," and "Install the Trim" sections.
Warranty
KOHLER® Faucet Lifetime Limited Warranty
Kohler Co. warrants its Faucets* manufactured after January 1, 1997, to be leak and drip free during normal residential use for as long as the original consumer purchaser owns his or her home. If the Faucet should leak or drip during normal use, Kohler Co. will, free of charge, mail to the purchaser the cartridge necessary to put the Faucet in good working condition. This warranty applies only to Kohler Faucets installed in the United States of America, Canada or Mexico ("North America").
Kohler Co. also warrants all other aspects of the faucet or accessories ("Faucet")*, (except gold, non-Vibrant, non-chrome finishes) to be free of defects in material and workmanship during normal residential use for as long as the original consumer purchaser owns his or her home. This warranty applies only to Kohler Faucets installed in North America. If a defect is found in normal residential use, Kohler Co. will, at its election, repair, provide a replacement part or product, or make appropriate adjustment. Damage to a product caused by accident, misuse, or abuse is not covered by this warranty. Improper care and cleaning will void the warranty**. Proof of purchase (original sales receipt) must be provided to Kohler Co. with all warranty claims. Kohler Co. is not responsible for labor charges, installation, or other incidental or consequential costs. In no event shall the liability of Kohler Co. exceed the purchase price of the Faucet.
If the Faucet is used commercially or is installed outside of North America, or if the finish is gold, non-Vibrant or a painted or powder coated color finish, Kohler Co. warrants the Faucet to be free from defects in material and workmanship for one (1) year from the date the product is installed, under Kohler Co.'s standard one-year limited warranty.
If you believe that you have a warranty claim, contact Kohler Co., either through your Dealer, Plumbing Contractor, Home Center or E-tailer, or by writing Kohler Co., Attn.: Customer Care Center, 444 Highland Drive, Kohler, WI 53044, USA. Please be sure to provide all pertinent information regarding your claim, including a complete description of the problem, the product, model number, color, finish, the date the product was purchased and from whom the product was purchased. Also include your original invoice. For other information,
Warranty (cont.)
or to obtain the name and address of the service and repair facility nearest you, call 1-800-4-KOHLER (1-800-456-4537) from within the USA and Canada, and 001-800-456-4537 from within Mexico, or visit www.kohler.com within the USA, www.ca.kohler.com from within Canada, or www.mx.kohler.com in Mexico.
KOHLERCO.AND/ORSELLERAREPROVIDINGTHESE WARRANTIESINLIEUOFALLOTHERWARRANTIES, EXPRESSEDORIMPLIED,INCLUDINGBUTNOTLIMITEDTO THEIMPLIEDWARRANTIESOFMERCHANTABILITYAND FITNESSFORAPARTICULARPURPOSE.KOHLERCO.AND/OR SELLERDISCLAIMALLLIABILITYFORSPECIAL,INCIDENTAL ORCONSEQUENTIALDAMAGES.Somestates/provincesdonot allowlimitationsofhowlonganimpliedwarrantylastsorthe exclusionorlimitationofsuchdamages,sotheselimitationsand exclusionsmaynotapplytoyou.Thiswarrantygivestheconsumer specificlegalrights.Youmayalsohaveotherrightsthatvaryfrom state/provincetostate/province.
ThisisKohlerCo.'sexclusivewrittenwarranty.
*Trend® faucets, MasterShower® tower, BodySpa systems and components; WaterHaven® tower, systems and components; Tripoint® faucets, Polished Gold, non-Vibrant and painted or powder coated finishes, fittings; all items within the "Fixture Related" section of the Kohler Faucets Price Book, drains, Duostrainer® sink strainers, soap/lotion dispensers, Moxie® Wireless Speaker; and faucets used in commercial settings, and outside North America, are covered by Kohler Co.'s one-year limited warranty.
**Never use cleaners containing abrasive cleansers, ammonia, bleach, acids, waxes, alcohol, solvents or other products not recommended for chrome. This will void the warranty.
Découpe
natural_image
Simple line drawing of a circular object with internal dots and an arrow pointing to it (no text or symbols)
Abertura


